
centos7安装elasticsearch
本案例测试es版本等环境下载:链接: https://pan.baidu.com/s/1txx_TxE-bTYwqQEBKxtMKQ 提取码: xrrh
官网下载 https://www.elastic.co/cn/downloads/elasticsearch
一、准备环境
es需要有java环境,安装Java环境
1.先查看本地是否自带java环境: yum list installed |grep java
2.卸载自带的java(输入su,输入root超级管理员的密码,切换到root用户模式)
yum -y remove java-*
yum -y remove tzdata-java*
3,查看java包: yum -y list java*
安装java: yum -y install java-11-openjdk*
4,查找Java安装路径
which java

ls -lrt /usr/bin/java(也就是上一步查询出来的路径),然后回车

输入ls -lrt /etc/alternatives/java(也就是上一步查询出来的路径),然后回车

从路径中可以看到在jvm目录下,输入cd /usr/lib/jvm,跳转到jvm的目录

输入ls 列出当前目录下的文件和文件夹
5,配置Java环境变量
输入vi /etc/profile去编辑环境变量
添加如下:
export JAVA_HOME=/usr/lib/jvm/java-1.8.0
export JRE_HOME=$JAVA_HOME/jre
export PATH=$PATH:$JAVA_HOME/bin:$JRE_HOME/bin
export CLASSPATH=.:$JAVA_HOME/lib/dt.jar:$JAVA_HOME/lib/tools.jar:$JRE_HOME/lib
保存退出
输入source /etc/profile,使配置立即生效
7. 检查Java安装和配置情况 输入java -version,然后回车
二、目录结构

三、启动
elasticsearch不允许使用root启动,因此我们要解决这个问题需要新建一个用户来启动elasticsearch
启动: [hunter@localhost elasticsearch-7.6.2]$ bin/elasticsearch


# ---------------------------------- Cluster -----------------------------------

# Use a descriptive name for your cluster:

# 集群名称,用于定义哪些elasticsearch节点属同一个集群。
cluster.name: bigdata

# ------------------------------------ Node ------------------------------------
# 节点名称,用于唯一标识节点,不可重名
node.name: server3

# 1、以下列出了三种集群拓扑模式,如下:
# 如果想让节点不具备选举主节点的资格,只用来做数据存储节点。
node.master: false
node.data: true

# 2、如果想让节点成为主节点,且不存储任何数据,只作为集群协调者。
node.master: true
node.data: false

# 3、如果想让节点既不成为主节点,又不成为数据节点,那么可将他作为搜索器,从节点中获取数据,生成搜索结果等
node.master: false
node.data: false

# 这个配置限制了单机上可以开启的ES存储实例的个数,当我们需要单机多实例,则需要把这个配置赋值2,或者更高。
#node.max_local_storage_nodes: 1

# ----------------------------------- Index ------------------------------------
# 设置索引的分片数,默认为5  "number_of_shards" 是索引创建后一次生成的,后续不可更改设置
index.number_of_shards: 5

# 设置索引的副本数,默认为1
index.number_of_replicas: 1

# 索引的刷新频率,默认1秒,太小会造成索引频繁刷新,新的数据写入就慢了。(此参数的设置需要在写入性能和实时搜索中取平衡)通常在ELK场景中需要将值调大一些比如60s,在有_template的情况下,需要设置在应用的_template中才生效。
index.refresh_interval: 120s

# ----------------------------------- Paths ------------------------------------
# 数据存储路径,可以设置多个路径用逗号分隔,有助于提高IO。 # path.data: /home/path1,/home/path2
path.data: /home/elk/server3_data

# 日志文件路径
path.logs: /var/log/elasticsearch

# 临时文件的路径
path.work: /path/to/work

# ----------------------------------- Memory -------------------------------------
# 确保 ES_MIN_MEM 和 ES_MAX_MEM 环境变量设置为相同的值,以及机器有足够的内存分配给Elasticsearch
# 注意:内存也不是越大越好,一般64位机器,最大分配内存别才超过32G

# 当JVM开始写入交换空间时(swapping)ElasticSearch性能会低下,你应该保证它不会写入交换空间
# 设置这个属性为true来锁定内存,同时也要允许elasticsearch的进程可以锁住内存,linux下可以通过 `ulimit -l unlimited` 命令

bootstrap.mlockall: true

# 节点用于 fielddata 的最大内存,如果 fielddata
# 达到该阈值,就会把旧数据交换出去。该参数可以设置百分比或者绝对值。默认设置是不限制,所以强烈建议设置该值,比如 10%。
indices.fielddata.cache.size: 50mb

# indices.fielddata.cache.expire  这个参数绝对绝对不要设置!

indices.breaker.fielddata.limit 默认值是JVM堆内存的60%,注意为了让设置正常生效,一定要确保 indices.breaker.fielddata.limit 的值
大于 indices.fielddata.cache.size 的值。否则的话,fielddata 大小一到 limit 阈值就报错,就永远道不了 size 阈值,无法触发对旧数据的交换任务了。

#------------------------------------ Network And HTTP -----------------------------
# 设置绑定的ip地址,可以是ipv4或ipv6的,默认为0.0.0.0
network.bind_host: 192.168.0.1

# 设置其它节点和该节点通信的ip地址,如果不设置它会自动设置,值必须是个真实的ip地址
network.publish_host: 192.168.0.1

# 同时设置bind_host和publish_host上面两个参数
network.host: 192.168.0.1

# 设置集群中节点间通信的tcp端口,默认是9300
transport.tcp.port: 9300

# 设置是否压缩tcp传输时的数据,默认为false,不压缩
transport.tcp.compress: true

# 设置对外服务的http端口,默认为9200
http.port: 9200

# 设置请求内容的最大容量,默认100mb
http.max_content_length: 100mb

# ------------------------------------ Translog -------------------------------------
#当事务日志累积到多少条数据后flush一次。
index.translog.flush_threshold_ops: 50000

# --------------------------------- Discovery --------------------------------------
# 这个参数决定了要选举一个Master至少需要多少个节点,默认值是1,推荐设置为 N/2 + 1,N是集群中节点的数量,这样可以有效避免脑裂
discovery.zen.minimum_master_nodes: 1

# 在java里面GC是很常见的,但在GC时间比较长的时候。在默认配置下,节点会频繁失联。节点的失联又会导致数据频繁重传,甚至会导致整个集群基本不可用。

# discovery参数是用来做集群之间节点通信的,默认超时时间是比较小的。我们把参数适当调大,避免集群GC时间较长导致节点的丢失、失联。
discovery.zen.ping.timeout: 200s
discovery.zen.fd.ping_timeout: 200s
discovery.zen.fd.ping.interval: 30s
discovery.zen.fd.ping.retries: 6

# 设置集群中节点的探测列表,新加入集群的节点需要加入列表中才能被探测到。
discovery.zen.ping.unicast.hosts: ["10.10.1.244:9300",]

# 是否打开广播自动发现节点,默认为true
discovery.zen.ping.multicast.enabled: false

indices.store.throttle.type: merge
indices.store.throttle.max_bytes_per_sec: 100mb

es配置
修改elasticsearch.yml

http.cors.enabled: true
http.cors.allow-origin: "*"
http.cors.allow-headers: Authorization
xpack.security.enabled: true
xpack.security.transport.ssl.enabled: true

启动es服务 ./elasticsearch -d

修改密码
$ ./bin/elasticsearch-setup-passwords interactive

You will be prompted to enter passwords as the process progresses.
Please confirm that you would like to continue [y/N] y
Enter password for [elastic]:
Reenter password for [elastic]:
Enter password for [apm_system]:
Reenter password for [apm_system]:
Enter password for [kibana]:
Reenter password for [kibana]:
Enter password for [logstash_system]:
Reenter password for [logstash_system]:
Enter password for [beats_system]:
Reenter password for [beats_system]:
Enter password for [remote_monitoring_user]:
Reenter password for [remote_monitoring_user]:

修改密码: curl -XPUT -u elastic:changeme 'http://localhost:9200/_xpack/security/user/elastic/_password' -d '{ "password" : "your_passwd" }'
# ======================== Elasticsearch Configuration =========================
#
# NOTE: Elasticsearch comes with reasonable defaults for most settings.
#       Before you set out to tweak and tune the configuration, make sure you
#       understand what are you trying to accomplish and the consequences.
#
# The primary way of configuring a node is via this file. This template lists
# the most important settings you may want to configure for a production cluster.
#
# Please consult the documentation for further information on configuration options:
# https://www.elastic.co/guide/en/elasticsearch/reference/index.html
#
# ---------------------------------- Cluster -----------------------------------
#
# Use a descriptive name for your cluster:
#
cluster.name: demo
cluster.initial_master_nodes: ["node1"]
#
# ------------------------------------ Node ------------------------------------
#
# Use a descriptive name for the node:
#
node.name: node1
#
# Add custom attributes to the node:
#
#node.attr.rack: r1
#
# ----------------------------------- Paths ------------------------------------
#
# Path to directory where to store the data (separate multiple locations by comma):
#
#path.data: /path/to/data
#
# Path to log files:
#
#path.logs: /path/to/logs
#
# ----------------------------------- Memory -----------------------------------
#
# Lock the memory on startup:
#
#bootstrap.memory_lock: true
#
# Make sure that the heap size is set to about half the memory available
# on the system and that the owner of the process is allowed to use this
# limit.
#
# Elasticsearch performs poorly when the system is swapping the memory.
#
# ---------------------------------- Network -----------------------------------
#
# Set the bind address to a specific IP (IPv4 or IPv6):
#
network.host: 192.168.0.150
#
# Set a custom port for HTTP:
#
http.port: 9200
#
# For more information, consult the network module documentation.
#
# --------------------------------- Discovery ----------------------------------
#
# Pass an initial list of hosts to perform discovery when this node is started:
# The default list of hosts is ["127.0.0.1", "[::1]"]
#
#discovery.seed_hosts: ["host1", "host2"]
#
# Bootstrap the cluster using an initial set of master-eligible nodes:
#
#cluster.initial_master_nodes: ["node-1", "node-2"]
#
# For more information, consult the discovery and cluster formation module documentation.
#
# ---------------------------------- Gateway -----------------------------------
#
# Block initial recovery after a full cluster restart until N nodes are started:
#
#gateway.recover_after_nodes: 3
#
# For more information, consult the gateway module documentation.
#
# ---------------------------------- Various -----------------------------------
#
# Require explicit names when deleting indices:
#
#action.destructive_requires_name: true
#
#

http.cors.enabled: true
http.cors.allow-origin: "*"
http.cors.allow-headers: Authorization
xpack.security.enabled: true
xpack.security.transport.ssl.enabled: true
四、安装插件
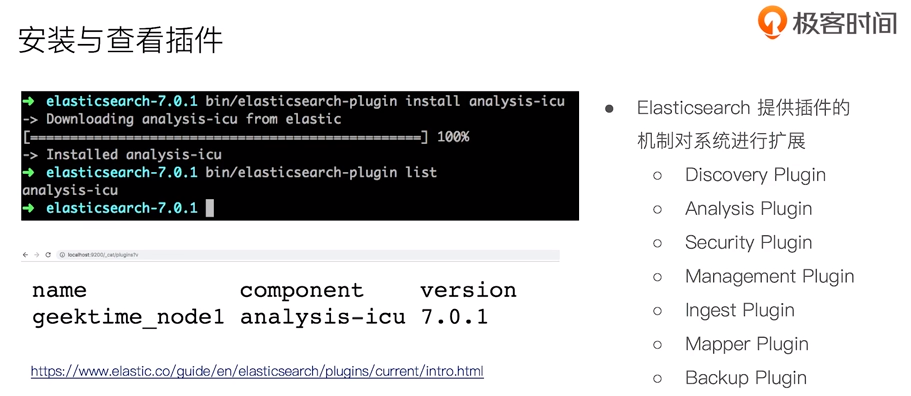
查询安装的插件: [hunter@localhost elasticsearch-7.6.2]$ bin/elasticsearch-plugin list
安装分词插件: bin/elasticsearch-plugin install analysis-icu
url查询安装的插件:http://localhost:9200/_cat/plugins
五、部署多个实例
bin/elasticsearch -E node.name=node0 -E cluster.name=zhang -E path.data=node0_date -d
bin/elasticsearch -E node.name=node1 -E cluster.name=zhang -E path.data=node1_date -d
bin/elasticsearch -E node.name=node2 -E cluster.name=zhang -E path.data=node2_date -d
bin/elasticsearch -E node.name=node3 -E cluster.name=zhang -E path.data=node3_date -d
删除进程:
ps -ef |grep elasticsearch
kill 1234
六、安装失败场景解决
1,Exception in thread "main" java.nio.file.AccessDeniedException
原因:当前用户没有执行权限
解决方法: chown linux用户名 elasticsearch安装目录 -R chown hunter elasticsearch-7.6.2 -R
2,Exception in thread "main" org.elasticsearch.bootstrap.BootstrapException: java.nio.file.FileAlready
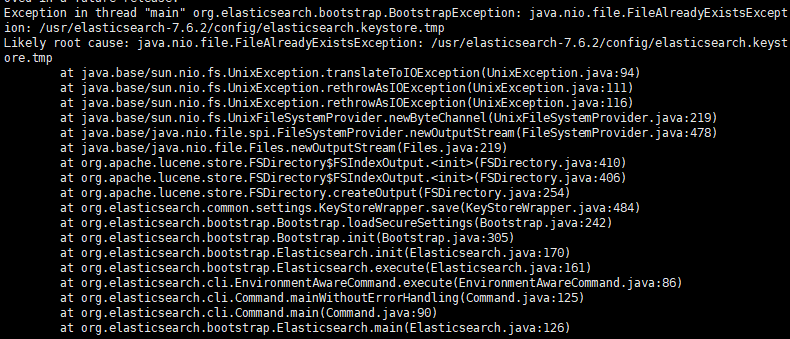
解决方式,删除文件 rm -rf elasticsearch.keystore.tmp
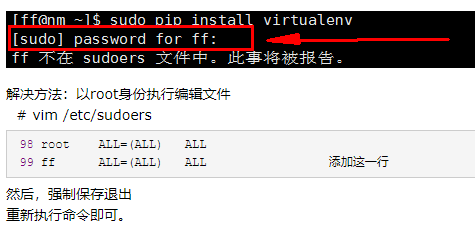
3, hunter 不在 sudoers 文件中。此事将被报告
七、安装Kibana
1,下载地址:https://www.elastic.co/cn/downloads/kibana
2,启动: [hunter@localhost kibana-7.6.2-linux-x86_64]$ bin/kibana
启动之前需要给hunter目录权限
修改host:

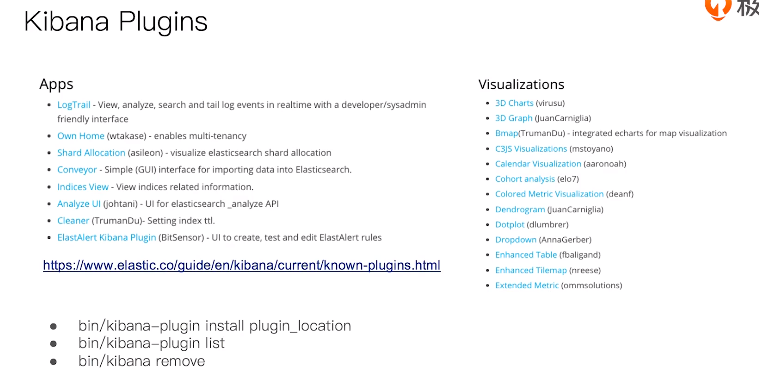
3,插件安装
4,导入测试数据
# Kibana is served by a back end server. This setting specifies the port to use.
server.port: 5601

# Specifies the address to which the Kibana server will bind. IP addresses and host names are both valid values.
# The default is 'localhost', which usually means remote machines will not be able to connect.
# To allow connections from remote users, set this parameter to a non-loopback address.
server.host: "192.168.0.150"

# Enables you to specify a path to mount Kibana at if you are running behind a proxy.
# Use the `server.rewriteBasePath` setting to tell Kibana if it should remove the basePath
# from requests it receives, and to prevent a deprecation warning at startup.
# This setting cannot end in a slash.
#server.basePath: ""

# Specifies whether Kibana should rewrite requests that are prefixed with
# `server.basePath` or require that they are rewritten by your reverse proxy.
# This setting was effectively always `false` before Kibana 6.3 and will
# default to `true` starting in Kibana 7.0.
#server.rewriteBasePath: false

# The maximum payload size in bytes for incoming server requests.
#server.maxPayloadBytes: 1048576

# The Kibana server's name.  This is used for display purposes.
#server.name: "your-hostname"

# The URLs of the Elasticsearch instances to use for all your queries.
elasticsearch.hosts: ["http://192.168.0.150:9200"]

# When this setting's value is true Kibana uses the hostname specified in the server.host
# setting. When the value of this setting is false, Kibana uses the hostname of the host
# that connects to this Kibana instance.
#elasticsearch.preserveHost: true

# Kibana uses an index in Elasticsearch to store saved searches, visualizations and
# dashboards. Kibana creates a new index if the index doesn't already exist.
#kibana.index: ".kibana"

# The default application to load.
#kibana.defaultAppId: "home"

# If your Elasticsearch is protected with basic authentication, these settings provide
# the username and password that the Kibana server uses to perform maintenance on the Kibana
# index at startup. Your Kibana users still need to authenticate with Elasticsearch, which
# is proxied through the Kibana server.
elasticsearch.username: "kibana"
elasticsearch.password: "123456"

# Enables SSL and paths to the PEM-format SSL certificate and SSL key files, respectively.
# These settings enable SSL for outgoing requests from the Kibana server to the browser.
#server.ssl.enabled: false
#server.ssl.certificate: /path/to/your/server.crt
#server.ssl.key: /path/to/your/server.key

# Optional settings that provide the paths to the PEM-format SSL certificate and key files.
# These files are used to verify the identity of Kibana to Elasticsearch and are required when
# xpack.security.http.ssl.client_authentication in Elasticsearch is set to required.
#elasticsearch.ssl.certificate: /path/to/your/client.crt
#elasticsearch.ssl.key: /path/to/your/client.key

# Optional setting that enables you to specify a path to the PEM file for the certificate
# authority for your Elasticsearch instance.
#elasticsearch.ssl.certificateAuthorities: [ "/path/to/your/CA.pem" ]

# To disregard the validity of SSL certificates, change this setting's value to 'none'.
#elasticsearch.ssl.verificationMode: full

# Time in milliseconds to wait for Elasticsearch to respond to pings. Defaults to the value of
# the elasticsearch.requestTimeout setting.
#elasticsearch.pingTimeout: 1500

# Time in milliseconds to wait for responses from the back end or Elasticsearch. This value
# must be a positive integer.
#elasticsearch.requestTimeout: 30000

# List of Kibana client-side headers to send to Elasticsearch. To send *no* client-side
# headers, set this value to [] (an empty list).
#elasticsearch.requestHeadersWhitelist: [ authorization ]

# Header names and values that are sent to Elasticsearch. Any custom headers cannot be overwritten
# by client-side headers, regardless of the elasticsearch.requestHeadersWhitelist configuration.
#elasticsearch.customHeaders: {}

# Time in milliseconds for Elasticsearch to wait for responses from shards. Set to 0 to disable.
#elasticsearch.shardTimeout: 30000

# Time in milliseconds to wait for Elasticsearch at Kibana startup before retrying.
#elasticsearch.startupTimeout: 5000

# Logs queries sent to Elasticsearch. Requires logging.verbose set to true.
#elasticsearch.logQueries: false

# Specifies the path where Kibana creates the process ID file.
#pid.file: /var/run/kibana.pid

# Enables you specify a file where Kibana stores log output.
#logging.dest: stdout

# Set the value of this setting to true to suppress all logging output.
#logging.silent: false

# Set the value of this setting to true to suppress all logging output other than error messages.
#logging.quiet: false

# Set the value of this setting to true to log all events, including system usage information
# and all requests.
#logging.verbose: false

# Set the interval in milliseconds to sample system and process performance
# metrics. Minimum is 100ms. Defaults to 5000.
#ops.interval: 5000

# Specifies locale to be used for all localizable strings, dates and number formats.
# Supported languages are the following: English - en , by default , Chinese - zh-CN .
#i18n.locale: "en"
八、安装logstash
1,下载地址:https://www.elastic.co/cn/downloads/logstash
2,导入数据
3, 执行: [hunter@localhost bin]$ sudo ./logstash -f logstash.conf
4,Filter Plugin-Mutate
Convert 类型转换
Gsub 字符串转换
Split/Join/Merge 字符串切割,数组合并字符串,数组合并数组
Rename 字段重命名
Update/Replace 字段内容更新替换
Remove_field 字段删除
5,定期增量同步mysql表数据
input {
  jdbc {
    jdbc_driver_class => "com.mysql.jdbc.Driver"
    jdbc_connection_string => "jdbc:mysql://localhost:3306/db_example"
    jdbc_user => root
    jdbc_password => ymruan123
    #启用追踪,如果为true,则需要指定tracking_column
    use_column_value => true
    #指定追踪的字段,
    tracking_column => "last_updated"
    #追踪字段的类型,目前只有数字(numeric)和时间类型(timestamp),默认是数字类型
    tracking_column_type => "numeric"
    #记录最后一次运行的结果
    record_last_run => true
    #上面运行结果的保存位置
    last_run_metadata_path => "jdbc-position.txt"
    statement => "SELECT * FROM user where last_updated >:sql_last_value;"
    schedule => " * * * * * *"
  }
}
output {
  elasticsearch {
    document_id => "%{id}"
    document_type => "_doc"
    index => "users"
    hosts => ["http://localhost:9200"]
  }
  stdout{
    codec => rubydebug
  }
}
九、安装cerebro
1,下载地址:https://github.com/lmenezes/cerebro/releases
2,配置es地址: [root@localhost ~]# vim /usr/cerebro-0.8.5/conf/application.conf

3,启动: [root@localhost ~]# vim /usr/cerebro-0.8.5/bin/cerebro

 浙公网安备 33010602011771号