Nginx基础篇
目录
本次以1.21.6版本的nginx作为学习插件。
一、nginx基础篇
1.Nginx开源版本安装
# 下载及编译安装与依赖检查  nginx-1.21.6.tar.gz
tar -zxcf nginx-1.21.6.tar.gz
cd nginx-1.21.6.tar.gz

./configure  # 在编译的时候会需要一些依赖,我们可以先编译,看看报错究竟需要哪些依赖。

报错:.configure:error:C compiler cc is not found
yum install -y gcc

./configure --prefix=/usr/local/nginx # 指定编译到某个路径下。

报错:/configure: grror; the HTTp rowrite module requires the PCRE library.You can either disable the module by using --without-http-rowrite moduleoption, or install the PCRE library into the system, or build the PCRE library statically from the source with nginx by using --with-peremepath> option.

yum install -y pcre pcre-devel

报错:./configure: error: the HTTP gzip module requires the zlib 1ibrary.You can either disable the module by using --without-http-gzip-moduleoption, or insta11 the zib 1ibrary into the system, or build the z1ib library statically from the source with nginx by using --with-zlib=epath> option.

# 安装zlib库
yum insta11 -y zlib zlib-devel

make && make install

# 启动Nginx
cd /usr/local/nginx/sbin
./nginx

# 关闭防火墙
在浏览器访问我们的nginx,访问不了?防火墙没有关闭
systemctl stop firewalld && systemctl disable firewalld # 方式1,内网的话

# 放行端口
firewall-cmd --zone=pubic --add-port=80/tcp --permanent # 方式2,如果对外网暴露了
# Nginx启停

进入安装好的目录/usr/oca1/nginx/sbin
./nginx 启动
./nginx -s stop 快速停止,快速将nginx线程杀死
./nginx -s quit 优雅美闭,在退出前完成已经接受的连接请求;不会再接受新的请求,只把原来没做的一些工作做完,然后再停止服务。
./nginx -s reload 重新加载配置。再修改完配置文件,立即生效,不重启整个nginx服务器。机制比较复杂,会把原来的执行任务的线程停掉,像quit一样,优雅的停掉,reload的时候,会重新开启一个新的线程,重新读取新的配置文件。
# 安装成系统服务

# 创建服务脚本
vi /usr/lib/systemd/system/nginx.service

# 服务脚本内容
[unit]
Description=nginx - web server
After=network.target remote-fs.target nss-lookup.target

[Service]
Type=forking
PIDFile=/usr/loca1/nginx/logs/nginx.pid
ExecstartPre=/usr/local/nginx/sbin/nginx -t -c /usr/loca1/nginx/conf/nginx.conf
Execstart=/usr/local/nginx/sbin/nginx -c /usr/loca/nginx/conf/nginx.conf
ExecReload=/usr/loca1/nginx/sbin/nginx -s reload
Execstop=/usr/local/nginx/sbin/nginx -s stop
ExecQuit=/usr/local/nginx/sbin/nginx -s quit
PrivateTmp=true
[Install]
wantedBy=multi-user.target

# 停掉原先启动的nginx
./nginx -s stop

# 重新加载系统服务
systemctl daemon-reload

# 启动服务
systemctl start nginx.service
2.Nginx的基础配置
# 最小配置文件

# worker_processes
worker_processes 1; 默认为1,表示开启一个业务进程

# worker connections
worker_connections 1024;单个业务进程可接受连接数

# include mime.types;
include		mime.types; 引入http mime类型

#default type application/octet-stream;
default_type application/octet-stream;如果mime类型没匹配上,默认使用二进制流的方式传输,

# sendfile on:
sendfile on; 使用linux的sendfile(socket,file,len)高效网络传输,也就是数据0拷贝。
未开启sendfile
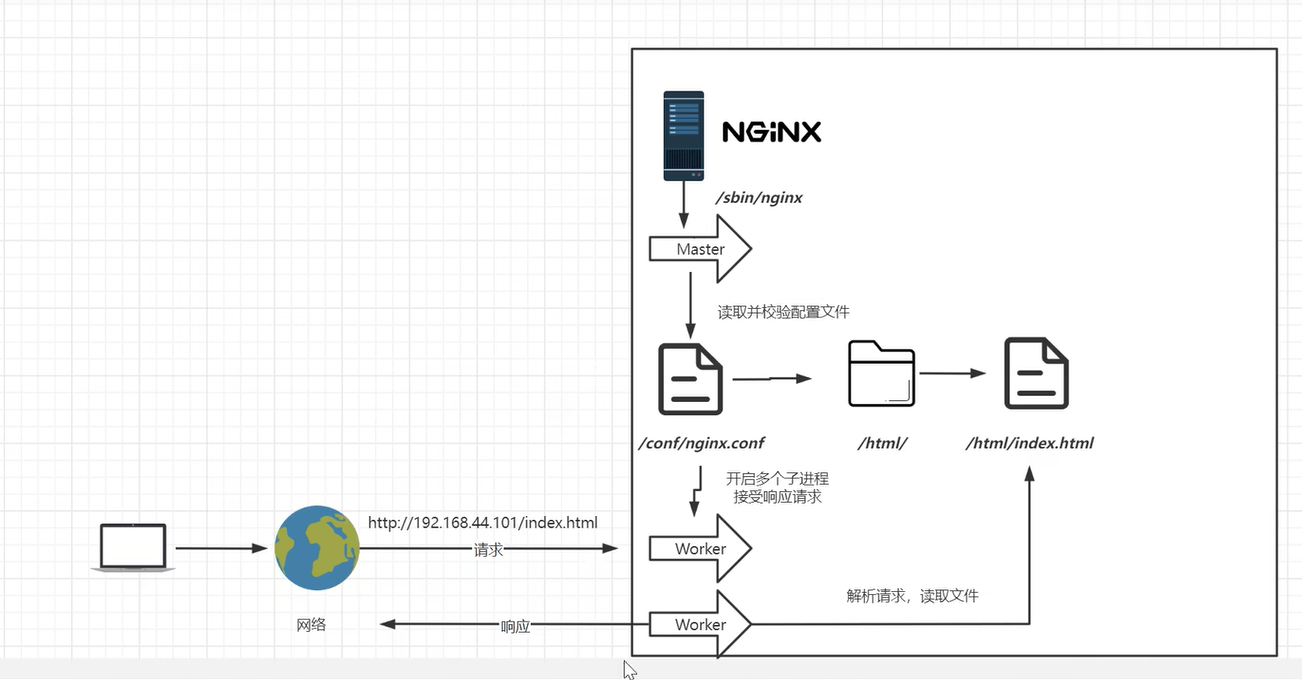
核心配置 # nginx.conf
worker_processes 1;
events {
  worker connections 1024
}

http {
  include    mimetypes;  # 请求头文件类型:文本文档、html文档、可执行程序、
  default type application/octet-stream;
  sendfile    on;
  keepalive timeout 65,

  # 虚拟主机 vhost
  server {
     listen 80; # 当前虚拟主机监听的端口号
     server_name localhost  # 主机名、域名

     location / { # 域名后面跟的子目录,或者专业来讲叫uri
     # 比如:http://baidu.com/xxoo/index.html,url指的是http://baidu.com/xxoo/index.html一个完整的路径,而uri是域名后的资源部分(/xxoo/index.html),叫uri。location是用来匹配这一段的(“/xxoo/index.html”)当匹配到某一段完整的uri路径,或者按照规则模糊匹配到某一段,就会进入到location里面,帮我们找root目录,
       root html; # html是相对路径,相对于/usr/local/nginx/目录下的html。也可以改成其它的目录。
       index index.html index.htm; # 如果html目录下没有设置自己的默认页,就默认展示index.html或者index.htm 默认页
     }

     # 一般是代码错误,某些资源访问不到了,比如:数据库访问不到了,就会返回对应的错误码500、502、503、504,碰到这几个错误码,就会将错误转接到某一个地址上。
     error_page 500 502 503 504 /50x.html; # 跳转到/usr/local/nginx/html/50.html这个页面 。而我们又没有定义50x.html这个页面的位置在哪儿,所以下面这个location就是在访问50.html的时候,帮我们指向html目录下的50x.html。
     location = /50x.html {
       root html;
     }
  }
}


虚拟主机配置
sendfile on/off:
sendfile on;
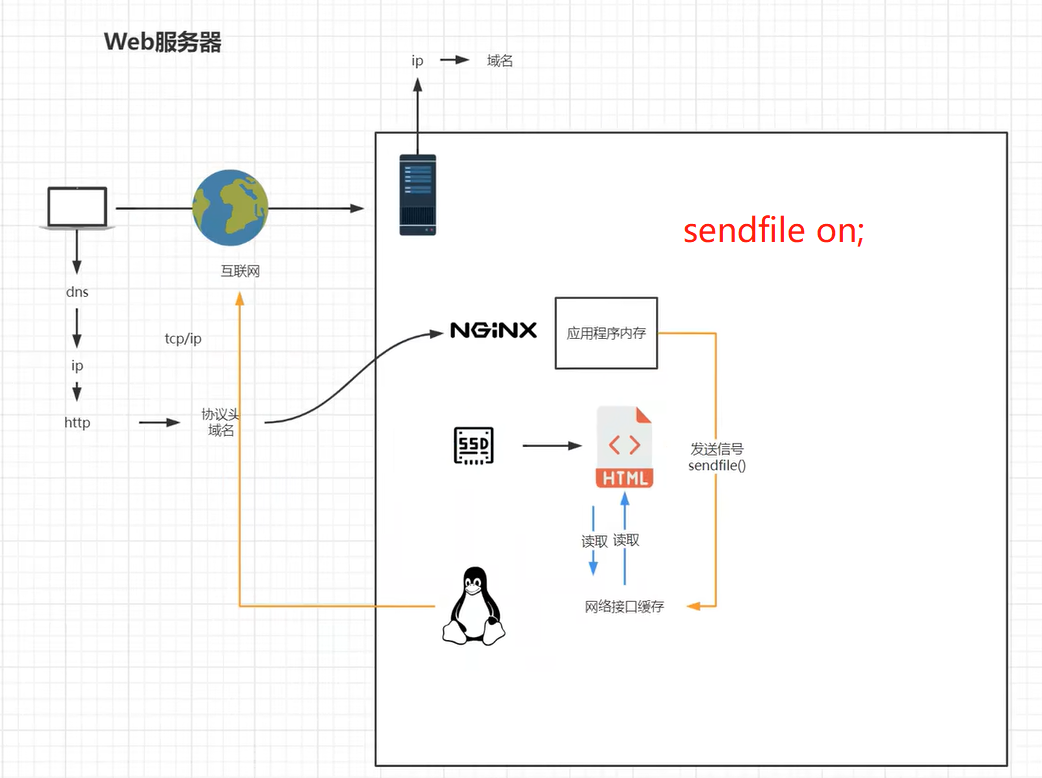
有用户请求打到nginx上,应用程序内存不加载磁盘文件,而是直接推送一个信号sendfile on【包括(socket,fd)】给网络接口,网络接口通过文件描述符(fd)去读取文件,直接通过网络发给用户。这里少了一次数据拷贝
sendfile off;

如果关闭sendfile,在从磁盘找到文件的时候,这就有read/write的两个过程。
read:nginx read磁盘上的文件,将文件加载到应用程序的内存里,通过应用程序的内存读完之后,再把应用程序内存当中的这份文件发给计算机操作系统的网络接口,也就是我们网卡的驱动程序。当然还会经历DMA的调度、网卡驱动程序的缓存以及内核的缓存。层层缓存,都要复制;nginx读取磁盘文件到应用程序内存缓存一份,发到网络接口缓存一份,之后发给用户。
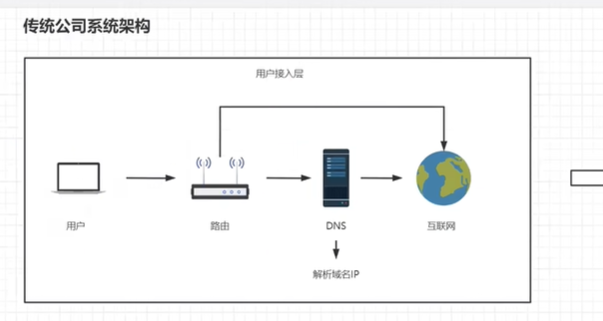
3.虚拟主机与域名解析
虚拟主机:原本一台服务器只能对应一个站点,通过虚拟主机技术可以虚拟化成多个站点同时对外提供服务。
浏览器、Nginx与http协议

域名解析与泛域名解析实战
4.ServerName匹配规则
我们需要注意的是servername匹配分先后顺序,卸载前面的匹配上就不会继续往下匹配了。
1.完整匹配 # 在同一servername种匹配多个域名
  # 域名、主机名
  server_name vod.mmban.com vod1.mmban.com;

  location / {
      root /www/vod;
      index index.html index.htm;
  }
  error_page 500 502 503 504 /50x.html;
  location = /50x.html {
    root html;
  }


2. 通配符匹配
server_name *.mmban.com;

server {
  listen 80;
  # 域名、主机名
  server_name www.mmban.com;
  location /{
      root /www/www;
      index index.html index.html;
  }
  error_page 500 502 503 504 /50x.html;
  location = /50x.html {
    root html;
  }
}

# 虚拟主机 vhost
server {
    listen 80;
    # 域名、主机名
    server_name *.mmban.com;
    location / {
        root /www/vod;
        index index.html index.htm;
    }
  }
通配符匹配首先通过虚拟主机vhost至上而下匹配。浏览器输入www.mmban.com回车,首先匹配到的是上面主机名为www.mmban.com的主机,访问文件路径为/www/www。如果输入xxx.mmban.com,则匹配到xxx.mmban.com。

3. 通配符结束匹配
www.mmban.* # 通配符的后匹配
server_name www.mmban.*; # 浏览器输入www.mmban.org、www.mmban.net回车

4. 正则匹配
  server_name ~^[0-9]+\.mmban\.com$;  # 反斜杠是对.的转义
域名解析相关企业项目实战技术架构
  多用户二级域名
  短网址
  httpdns
Nginx中的虚拟主机配置
多域名(多用户二级域名):
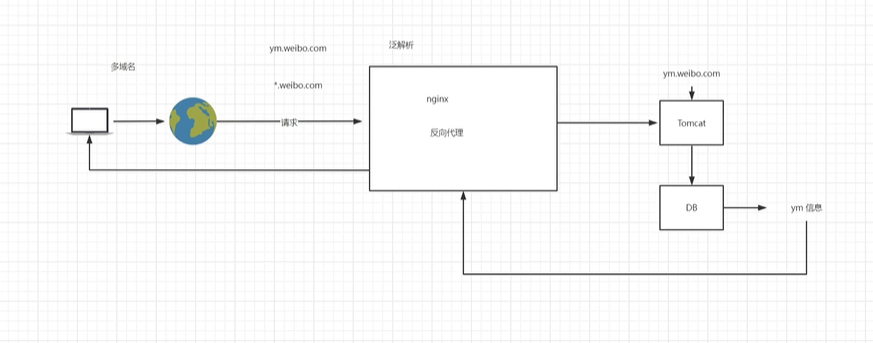
短网址:
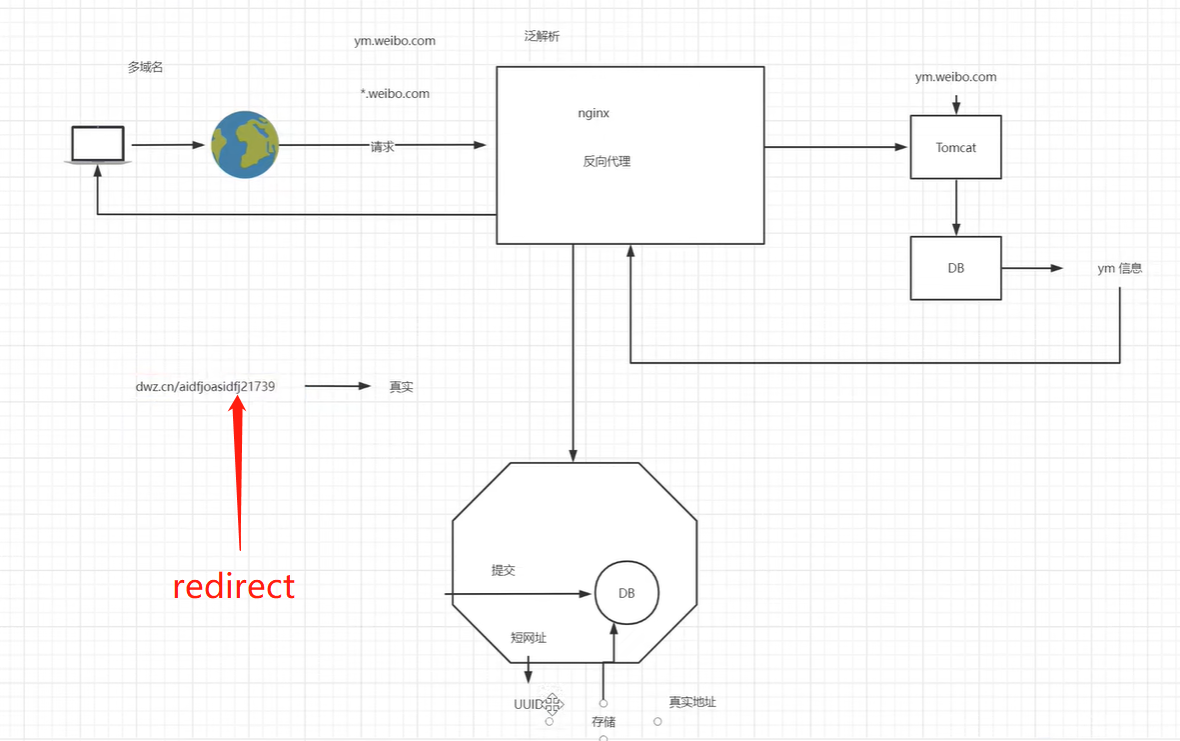
httpdns:

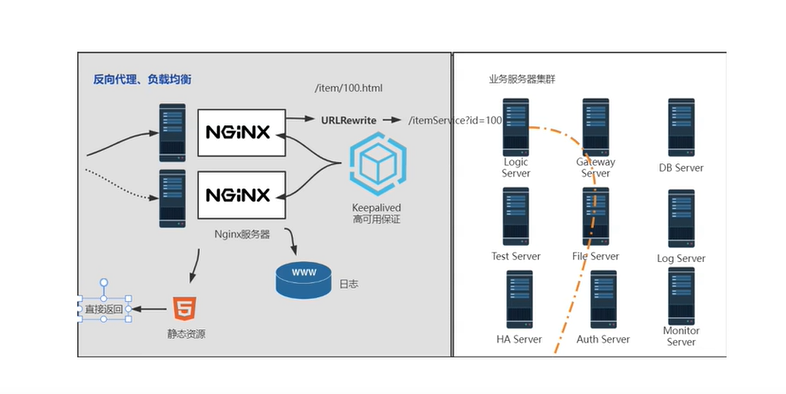
5.反向代理
网关、代理与反代理
反向代理在系统架构种的应用场景
Nginx的反向代理配置
基于反向代理的负载均衡器
负载均衡策略
正、反向代理:

Nginx的反向代理配置:
http {
    include mime.types;
    default_type application/octet-stream;
    sendfile on;
    keepalive_timeout 65;
    server {
        listen 80;
        server_name localhost;
        location /{  # location /  表示访问当前站点的根目录,然后请求会被代理到http://www.mmban.com
            proxy_pass http://www.mmban.com # 反向代理在location内部配置,配置反向代理后,location内部的root内部的root配置失效,可注释掉; 不支持https的反向代理,需要配置域名证书
            #
            # root html;
            # index index.html index.htm;
        }
    }

}
基于反向代理的负载均衡器:
# 定义一组负载均衡服务器
upstream httpds {  # httpds要和server内proxy_pass定义的名称一致
  server 192.168.44.102:80;
  server 192.168.44.103:80;  # 默认代理的端口是80,这里不写端口也行。
}
server {
    listen 80;
    server_name localhost;
    location / {
        proxy_pass http://httpds
    }
}

重启nginx服务(systemctl reload nginx),浏览器访问192.168.44.101。
负载均衡策略:
1.轮询:默认情况下使用轮询方式,逐一转发,这种方适用于无状态请求。
  无法保持会话(session):由于轮流访问多个负载均衡器,比如登录一个负载均衡器,下一次访问轮询到其它负载均衡器上了,同一用户的第二次请求携带的cookie在第二台负载均衡器上没有session做验证而去保持会话。
2.基于权重(weight)的负载均衡
指定轮询几率,weight和访问比率成正比,用于后端服务器性能不均的情况。
upstream httpds {  # httpds要和server内proxy_pass定义的名称一致
  server 192.168.44.102 weight=8;
  server 192.168.44.103 weight=2;  # 默认代理的端口是80,这里不写端口也行。
  server 192.168.44.104 weight=1;
}

# down的使用:将某台服务器下线,不接受请求了;
upstream httpds {  # httpds要和server内proxy_pass定义的名称一致
  server 192.168.44.102 weight=8 down;
  server 192.168.44.103 weight=2;  # 默认代理的端口是80,这里不写端口也行。
  server 192.168.44.104 weight=1;
}

# backup的使用:作为备份的负载均衡器,如下配置也就是当 192.168.44.103不能用的时候,192.168.44.104会接入请求。
upstream httpds {  # httpds要和server内proxy_pass定义的名称一致
  server 192.168.44.102 weight=8 down;
  server 192.168.44.103 weight=2;  # 默认代理的端口是80,这里不写端口也行。
  server 192.168.44.104 weight=1 backup;
}

down:表示当前的server暂时不参与负载
weight:默认为1,weight越大,负载的权重就越大。
backup:其它所有的非backup机器down或者忙的时候,请求backup机器。

ip_hash:根据客户端的ip地址转发同一台服务器,可以保持回话。
   如果是移动客户端用户,在路途中走着走着切换了移动基站,则手机端的ip地址也跟着变,使用ip_hash方法也会导致nginx负载均衡到不同的服务器上,导致无法保持会话。所以也很少使用ip_hash的办法去做负载均衡策略来维持会话。
least_conn:最少连接访问。不常用
url_hash:根据用户访问的url定向转发请求。
fair:根据后端服务器响应时间转发请求。

如何在集群服务器上保持会话?1.session共享,使用一个redis服务,将session保存到redis服务器中,当客户端携带cookie时,服务端查找本服务器有没有对应的校验session,如果没有就去redis服务器查找,之后验证该用户,这是有状态保持会话。但是应对高并发的场景,这种方式不太适用。2.使用token,就是说在服务器端单独设置一台签发token的服务器,客户端第一次访问服务器端,服务端将token下发给客户端,这个token是加密的,客户端下次携带此token,服务端对此token进行解密,获取客户端信息,并通过算法计算一个token与当前token做对比是否一致。一致则表示验证通过。这是无状态保持会话,服务端不保存session值。在Java中有SpringSession,Python中有JWT算法做无状态会话保持,是现在比较主流的方式。。不是使用ip_hash等其它方式做会话保持。
6.动静分离
使用动静分离的场景:一般适用于中小型网站,因为中小型网站并发量不是特别高,而且需要分离出来的静态资源不是特别多,需要把这些静态资源挪到前置的nginx服务器上。如果是大型系统的话,文件比较多,比如淘宝的买家秀,卖家秀,客户的详情页,商品图片等,这些都属于静态资源,就不适合动静分离这种简单的技术架构。动静分离适合初创企业网站的h5的内嵌到app里展示或者网站的展示,这些都没问题的。包括erp系统,传统的项目也可以使用动静分离,动静分离可以起到系统加速的作用。

动静分离原理

Nginx动静分离配置
动静分离:

Nginx动静分离配置:
https://www.bilibili.com/video/BV1yS4y1N76R/?p=28
# 将原本用nginx代理到后端tomcat访问webapp下的静态资源目录js/css/img以及html文件全部拷贝、前置到nginx的html目录下
server {
  listen 80;
  server_name localhost;
  location / { # 动静分离之前,使用nginx反向代理到后端获取静态资源
    proxy_pass http://192.168.44.104:8080;
  }

  location /js {  # /js比/的优先级要高。
    root html;
    index index.html index.htm;
  }

  location /css {
    root html;
    index index.html index.htm;
  }

  location /img {
    root html;
    index index.html index.htm;
  }
  error_page 500 502 503 504 /50x.html;
}
7.location后符号的匹配规则
location ~*  # ~代表将使用正则表达式,*表示不区分大小写

# 正则的location匹配方法
  location ~*/(css|js|img) {
    root html;
    index index.html index.htm;
  }
8.URLRewrite
URLRewrite的使用场景

rewrite是实现URL重写的关键指令,根据regex(正则表达式)部分内容,重定向到replacement,结尾是flag标记。

rewrite    <regex>    <replacement>    [flag];
关键字      正则       替代内容          flag标记

关键字:其中关键字error_log不能改变
正则:perl兼容正则表达式语句进行规则匹配
替代内容:将正则匹配的内容替换成replacement
flag标记:rewrite 支持的flag标记

rewirte参数的标签段位置;
server,location,if

flag 标记说明:
last:本条规则匹配完成后,继续向下匹配新的location URL规则
break: 本条规则匹配完成即终止,不在匹配后面的任何规则
redirect:返回302临时重定向,浏览器地址会显示跳转后的URL地址
permanent:返回301永久重定向,浏览器地址栏会显示跳转后的URL地址


http:192.168.44.101/index.jsp?pageNum=2 改成伪静态:http://192.168.44.101/2.html

配置伪静态:
server {
    listen 80;
    server_name localhost;
    location / {
      # 在访问2.html时,跳转到index.jsp?pageNum=2
      # rewrite ^2.html$  /index.jsp?pageNum=2 break; # break redirect last
      rewrite ^/([0-9]+).html$ index.jsp?pageNum=$1 # $1 表示第一个匹配的规则(这里指的是^/([0-9]+).html$)
      proxy_pass http://192.168.44.104:8080;
    }
    location ~*/(js|img|css) {
      root html;
      index index.html index.htm;
    }
    error_page 500 502 503 504 /50x.html;
    location = /50x.html {
      root html;
    }
}
同时使用负载均衡
# 应用服务器防火墙配置
开启防火墙
systemctl start firewalld
重启防火墙
systemctl restart firewalld
重载规则
firewall-cmd --reload
查看已配置规则
firewall-cmd --list-all

指定端口和ip访问
firewall-cmd --permanent --add-rich-rule="rule family="ipv4" source address="192.168.44.101" port protocol="tcp" port="8080" accept" # 添加完防火墙规则之后,要重新加载一下防火墙规则 systemctl restart firewalld

移除规则
firewall-cmd --permanent --remove-rich-rule="rule family="ipv4: source address="192.168.44.101" port port="8080" protocol="tcp" accept"

网关配置
upsteam httpds {
  server 192.168.44.102 weight=8 down;
  server 192.168.44.103:8080 weight=2;
  server 192.168.44.104:8080 weight=1 backup;
}
location / {
    rewrite ^/([0-9]+).html$  /index.jsp?pageNum=$1  redirect;
}
9.负载均衡+URLRewrite
网关:
  应用服务器开启防火墙
  配置指定端口和ip访问
在网关上配置URLRewrite

10.nginx防盗链
http协议中的referrer
nginx防盗链配置
  valid_referers none | blocked | server_names | strings……;

  none,检测Refer头域不存在的情况。
  blocked,检测Referer头域的值被防火墙或者代理服务器删除或伪装的情况。这种情况该头域的值不以"http://"或"https://"开头。
  server_names,设置一个或多个URL,检测Referer头域的值是否是这些URL中的某一个。
  在需要防盗链的location中配置:
    upstream httpds {
      server 192.168.44.102 weight=8 down;
      server 192.168.44.104:8080 weight=1 backup;
    }

    server {
        listen 80;
        server_name localhost;

        location / {
          rewrite ^/([0-9]+).html$ /index.jsp?pageNum=$1 break;
          proxy_pass http://httpds;
        }

        location ~*/(js|img|css) {
          valid_referers 192.168.44.101; #
          valid_referers none 192.168.44.101; # 浏览器访问192.168.44.102/img/logo.png能正常显示logo图片,在浏览器“检查”的请求头中不包含refer字段。
          if ($invalid_referer) { #
            return 403; #
          }
          root html;
          index index.html index.htm;
        }

        error_page 500 502 503 504 /50x.html;
        location =/50x.html {
          root html;
        }
    }

    使用curl测试:
      curl -I http://192.168.44.101/img/logo.png
    带引用:
      curl -e "http://baidu.com" -I http://192.168.44.101/img/logo.png # -e 引用地址,refer事http://baidu.com,也就是从http://baidu.com开始访问。由于valid_refer后限制有效的refer是192.168.44.101,所以从http://baidu.com访问会被禁止(Forbidden)

返回错误码
返回错误页面
整合rewrite返回报错图片

浏览器html页面中文乱码,是字符集的问题,可以在html文件中添加meta,改正乱码问题。
<head>
<meta charset='utf-8'>
</head>

  upstream httpds {
      server 192.168.44.102 weight=8 down;
      server 192.168.44.104:8080 weight=1 backup;
    }

    server {
        listen 80;
        server_name localhost;

        location / {
          rewrite ^/([0-9]+).html$ /index.jsp?pageNum=$1 break;
          proxy_pass http://httpds;
        }

        location ~*/(js|img|css) {
          valid_referers 192.168.44.101; #
          valid_referers none 192.168.44.101; # 浏览器访问192.168.44.102/img/logo.png能正常显示logo图片,在浏览器“检查”的请求头中不包含refer字段。
          if ($invalid_referer) { #
            # return 403; #
            # return 401; # 返回错误码
            rewrite ^/ /img/x.png break; # 整合rewrite返回报错图片
          }
          root html;
          index index.html index.htm;
        }

        error_page 500 502 503 504 /50x.html;
        location =/50x.html {
          root html;
        }
    }
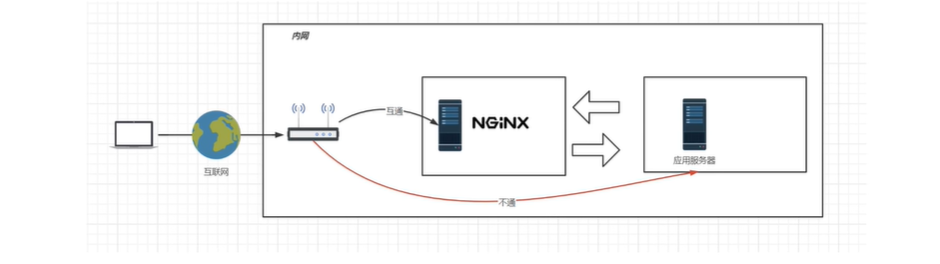
10.高可用配置
高可用场景及解决方案
安装keepalived
选举方式


高可用配置
安装keepalived

1.编译安装:
下载地址:http://www.keepalived.org/download.html#
如遇报错提示:
  configure:error:
    !!! OpenSSL is not properly installed on your system. !!!
    !!! Can not include OpenSSL headers files. !!!
安装依赖:
  yum install openssl-devel

2.yum安装
  yum install keepalived -y

配置
  使用yum安装后配置文件在:/etc/keepalived/keepalived.conf

最小配置:
  第一台机器 192.168.44.101
    !configuration File for keepalived
    global defs {
      router_id lb111
    }

    vrrp_instance VL-1 { # vrrp是keepalived在内网当中通讯的协议
      state MASTER
      interface eth0  # 机器网卡的名称
        virtual_router_id 51
        priority 100  # 竞选时的优先级别
        advert_int 1
        authentication { # 想要加入一组机器当中的认证配置,不需修改
          auth_type PASS
          auth_pass 1111
        }
        virtual_ipaddress { # 虚拟出来的一组vip(虚拟ip地址),其实一个就行了
          # 192.168.200.16
          # 192.168.200.17
          # 192.168.200.18
          192.168.44.200
        }
    }

 启动192.168.44.101机器的keepalived,查看当前机器ip:
    systemctl start keepalived
    ip addr  # 发现多了一个ip地址
      inet 192.168.44.200/32 scope global ens33


第二台机器 192.168.44.100
!configuration File for keepalived
    global defs {
      router_id lb110 # 随便修改成一个新的router_id名称
    }

    vrrp_instance VL-1 { # vrrp是keepalived在内网当中通讯的协议
      state BACKUP
      interface eth0  # 机器网卡的名称
        virtual_router_id 51
        priority 100  # 竞选时的优先级别
        advert_int 1
        authentication { # 想要加入一组机器当中的认证配置,不需修改
          auth_type PASS
          auth_pass 1111
        }
        virtual_ipaddress { # 虚拟出来的一组vip(虚拟ip地址),其实一个就行了
          192.168.44.200
        }
    }

  启动192.168.44.100机器的keepalived,查看当前机器ip:
    systemctl start keepalived
    ip addr  # 只有当前机器的网卡地址,没有vip。


这里记住,使用keepalived做互为备份机器中的keepalived配置中的vrrp_instance的名称以及authentication的配置必须一致。如果对不上,无法加入到一组当中。

在windows主机的cmd中 ping 192.168.44.200能通。

现在关掉192.168.44.101这台机器,再次ping 192.168.44.200能继续通。
查看backup机器(192.168.44.100),ip addr 发现vip已经漂移到这台机器上了。

以上两台机器上的keepalived进程互发数据包,bakcup上的keepalived进程检测MASTER上的keepalived进程是否挂掉,然后决定是否将vip漂移到自身这台机器上。实际上keepalived还没起到检测MASTER中nginx进程是否挂掉,然后做漂移。。这时就需要写一个脚本,脚本、keepalived、nginx彼此之间是独立的。脚本访问nginx进程,响应是否是正常的200,如果不是200,就kill掉MASTER中的keepalived进程,随后vip飘走了。
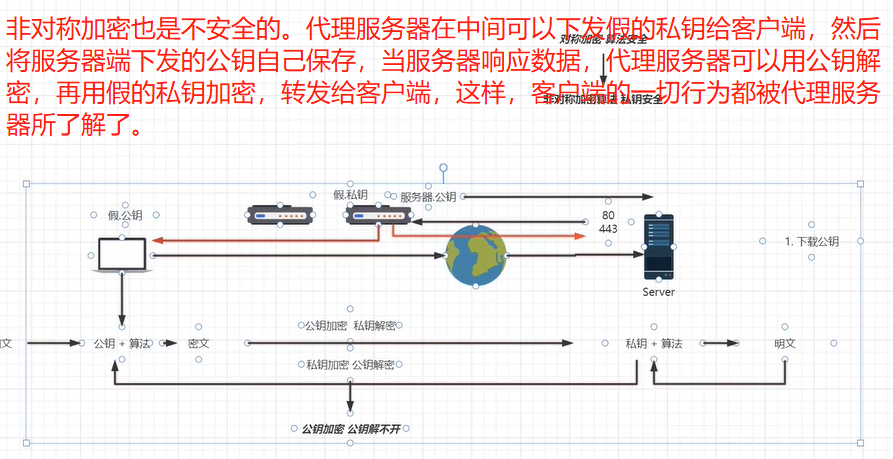
11.https证书配置
不安全的http协议
https原理
  CA机构
  证书
  客户端(浏览器)
  服务器端
证书自签名
在线证书申请

不安全的http协议:
https也是不安全的。。。。。。。
openssl

openssl包含:SSL协议库、应用程序以及密码算法库

自签名:OpenSSL,系统内置
图形化工具XCA:下载地址 http://www.hohnstaedt.de/xca/index.php/download
vps购买
安装环境:使用lnmp集成方式部署  https://oneinstack.com

解析域名到主机:参考视频  https://www.bilibili.com/video/BV1yS4y1N76R?p=48
证书申请:参考视频 https://www.bilibili.com/video/BV1yS4y1N76R?p=49

证书安装:
  server {
    listen 443 ssl;
    server_name localhost;

    # ssl_certificate /data/cert/server.crt; # 绝对路径
    # ssl_certificate_key /data/cert/server.key; # 绝对路径
    ssl_certificate 7477542_www.upguigu.com.pem; # 相对路径,把证书放到 /usr/local/nginx/conf目录中,默认在这个目录中寻找证书文件
    ssl_certificate_key 7477542_www.upguigu.com.key;
  }

systemctl restart nginx
浏览器访问:https://upguigu.com

http协议跳转https

return 301 https://$server_name$request_uri;

server {
  listen 80;
  server_name www.upguigu.com upguigu.com;
  access_log /data/wwwlogs/access_nginx.log combined;
  return 301 https://$server_name$request_uri; # 访问http的请求自动跳转到https上。也可以使用rewrite
    root html;
}

 浙公网安备 33010602011771号