QT相关
Qt 优秀视频资源
1,
链接:https://pan.baidu.com/s/1SNkIkEFAOCjZYbq4YqxM3w
提取码:qzk1
它里面使用Python作为开发语言,使用PyQt5来大体的介绍了QWidget相关的各个类的使用,比较适合入门
2,
https://www.bilibili.com/video/BV1AX4y1w7Nt
这套视频是b站的免费视频,它里面使用C++作为开发语言。它使用QCreator作为开发工具,
使用QDesigner和代码混合的方式进行编程,
也讲解了更多的主题(传统控件,代理,文件操作,QSql,QPainter,QGraphics,QCharts,3d图表,自定义插件等)。
它的一个缺点是没有使用VS作为开发工具,建议学习这套视频的时候可以使用VS!
基础知识
输出函数
可以使用 qlogging.h 中的qInfo ,也可以使用 QDebug 中的qDebug。
例子:


#include "mainwindow.h"
#include "ui_mainwindow.h"

#include "qlogging.h"
#include "QDebug"

MainWindow::MainWindow(QWidget *parent)
    : QMainWindow(parent)
    , ui(new Ui::MainWindow)
{
    ui->setupUi(this);

    qInfo()<<"hello QT 1";
    qDebug()<<"hello QT 2";

}

MainWindow::~MainWindow()
{
    delete ui;
}
定时器
使用QTimer,
三步骤: 1,创建QTimer 2, connect 信号槽, 3 timer.start(dura)
例子:
#include "mainwindow.h"
#include "ui_mainwindow.h"
#include "QDebug"
#include "QTimer"

MainWindow::MainWindow(QWidget *parent)
    : QMainWindow(parent)
    , ui(new Ui::MainWindow)
{
    ui->setupUi(this);

    timer = new QTimer();
    connect(timer,&QTimer::timeout,this,&MainWindow::print);
    timer->start(1000);

    connect(ui->pushButton,&QPushButton::clicked,this,&MainWindow::print);
}

MainWindow::~MainWindow()
{
    delete ui;
}


void MainWindow::print()
{
    qDebug()<< "size "<<size();
}
其他方法:
使用QObject中带的 startTimer 和 timerEvent
class AnalogClockWindow :public RasterWindow
{
public:
    AnalogClockWindow();

protected:
    void timerEvent(QTimerEvent *event) override;

private:
    int mn_timerId;
};

AnalogClockWindow::AnalogClockWindow()
{
    mn_timerId = startTimer(1000);
}

void AnalogClockWindow::timerEvent(QTimerEvent *event)
{
    if (event->timerId() == mn_timerId)
    {
        qDebug() << "-----------1s----------- ";
    }
}
Qt使用 MSVC编译器 中文乱码问题
一,使用Qt creator
在Qt Creator中使用msvc的编译器
两个问题:1,编译失败 2 运行时乱码
1,编译时失败的原因是因为creator 创建文件是utf8 不带bom,但是 msvc是微软的,使用utf8要带bom,所以编译失败。
2,运行时乱码的解决方法是 在当前的文件头加上 #pragma execution_character_set("utf-8")
https://blog.csdn.net/u013001137/article/details/103934813
二,使用VS
VS默认创建的文件是utf8无bom,写中文会导致文件编码改变,和第一种情况一样,保证文件编码为utf8-bom,然后使用#pragma execution_character_set("utf-8")
可以下载VS插件:force utf8(with bom)
总结就是 使用msvc编译器要保证 文件编码为utf8-bom,然后在文件头加上 #pragma execution_character_set("utf-8")
QT改变QComboBox Item的间距
    class PopupItemDelegate : public QStyledItemDelegate
    {
    public:
        using QStyledItemDelegate::QStyledItemDelegate;
        QSize sizeHint(const QStyleOptionViewItem &option, const QModelIndex &index) const
        {
            QSize s = QStyledItemDelegate::sizeHint(option, index);
            s.setHeight(20);
            return s;
        }
    };

        // 方法一
    //QListView *fontSizeView = new QListView(ui.comboBox);
    //ui.comboBox->setView(fontSizeView);

    // 方法二
    ui.comboBox->view()->setItemDelegate(new PopupItemDelegate(ui.comboBox));
    ui.comboBox->addItems({ "一号","二号","三号","四号","五号","六号","七号" });
QT 多UI 和 自定义QDesigner插件
1,多UI:我们新建QT Widget Class 生成 .h .cpp .ui ,可以在ui中快速布局,在.h 和 .cpp 中进行事件的重写等一些DIY操作。使用的时候,拖入适当的控件,将其提升为前面自定义的类即可。
2,自定义QDesigner插件:我们也可以通过将常用的控件打包成.h .lib .dll 将其放入到QDesigner的插件目录中,这样后面就可以像自带的控件一样进行拖拽。
具体方法是 QtCreator新建项目 -> 其他项目 -> Qt 设计师自定义控件。 需要注意的是:最后编译输出的时候,要加入头文件<QtUiPlugin/QDesignerExportWidget>,然后使用QDESIGNER_WIDGET_EXPORT声明所要输出的类,不然编译出的lib dll 中将没有该类,最后使用的时候也会报错。
以上情形都是因为QT自带的控件不满足我们的使用需求,例如没有好看的样式,没有相应的事件(例如QLineEdit中就没有鼠标点击信号发出来)。
一般使用第一种方法,因为第二种比较简便,而且如果有新的需求可以随时更改,而第一种则需要重新生成dll。
QLabel 显示图片(图片大小跟随label的改变而改变)
QLabel lblImage;
lblImage->setPixmap( QPixmap( "big_image.jpg" ) );
lblImage->setScaledContents( true );
lblImage->setSizePolicy( QSizePolicy::Ignored, QSizePolicy::Ignored );
setScaledContents(true) 和 setSizePolicy( QSizePolicy::Ignored, QSizePolicy::Ignored );QPainter 绘图,平移和旋转时候遇到的问题
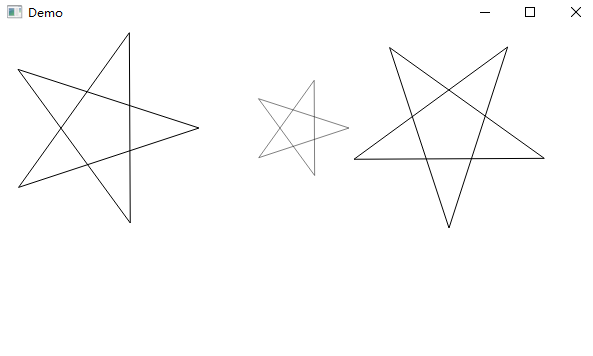
由于QPainter默认是以左上角来的,所以会和我们期望中的中心点平移和旋转有差异,所以在平移和旋转之前我们需要进行一定的操作,才能达到我们想要的效果。
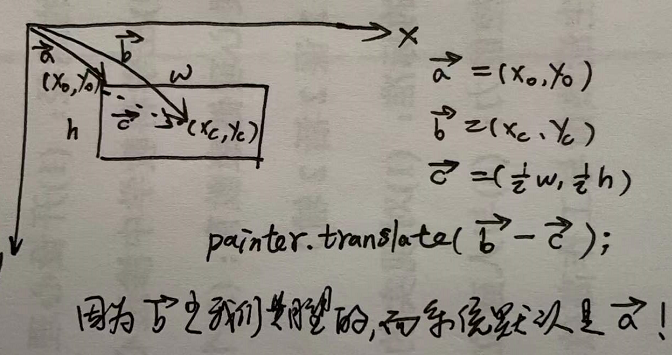
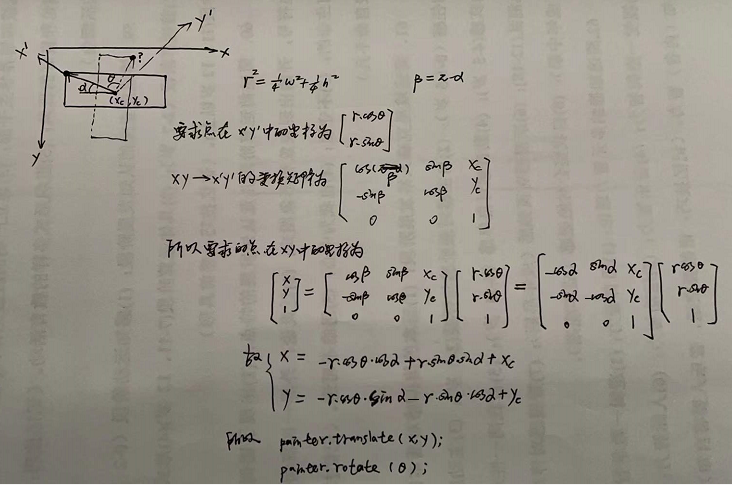
void Demo::paintEvent(QPaintEvent *event)
{
    QPainter painter(this);
    painter.setRenderHint(QPainter::Antialiasing);
    painter.setRenderHint(QPainter::TextAntialiasing);

    //生成五角星的5个顶点的
    qreal R = 100;
    QPolygonF starPolygon;
    starPolygon << QPointF(2*R, R);
    for (int i = 1; i < 5; ++i)
        starPolygon << QPointF(R + R * std::cos(1.2 * i * 3.14),
            R + R * std::sin(1.2 * i * 3.14));

    // 在中心( 100 100) 画一个 R = 100 的五角星
    painter.save();
    QPointF center(100, 100);
    QPointF rVec(100, 100);
    painter.translate(center - rVec);
    painter.drawPolygon(starPolygon);
    painter.restore();

    // 在中心( 300 100) 画一个 R = 50 的五角星
    painter.save();
    center = QPointF(300, 100);
    rVec = QPointF(50, 50);
    painter.translate(center - rVec);
    painter.scale(0.5, 0.5);
    painter.drawPolygon(starPolygon);
    painter.restore();

    // 在中心( 450 100) 画一个 R = 100 的五角星
    // 旋转的话 需要注意 系统默认是以左上角旋转的,比较麻烦一些
    painter.save();
    float w = 2*R;
    float h = 2*R;
    float alpha = atan2(h,w);          // 均为弧度
    float theta = 90*3.1415926/180.0;
    float r = std::sqrt(1.0 / 4.0*(h*h + w * w));
    float xc = (450 - R)+ 1 / 2.*w;
    float yc = (100 - R) + 1 / 2.*h;
    float xDes = -r * std::cos(theta)*std::cos(alpha) + r * std::sin(theta)*std::sin(alpha) + xc;
    float yDes = -r * std::cos(theta)*std::sin(alpha) - r * std::sin(theta)*std::cos(alpha) + yc;
    painter.translate(xDes, yDes);
    painter.rotate(theta * 180 / 3.1415926);
    painter.drawPolygon(starPolygon);
    painter.restore();

}
qInstallMessageHandler问题
在release 模式下,是无法获取到 日志的文件名,行号,函数名的,需要额外的配置
//Qt Creator下,在pro文件中添加下面这一行
DEFINES += QT_MESSAGELOGCONTEXT
//Visual Studio中,在项目解决方案属性-》 C/C++ -》 预处理器 -》 预处理器定义。
//添加下列信息
QT_MESSAGELOGCONTEXTQt 嵌入ocx插件(windows上)
使用步骤
1,注册插件进入系统中
1.1 把*.ocx拷贝到C:\Windows\SysWOW64
1.2 以管理员身份运行cmd,切换到上述目录,执行regsvr32 *.ocx即可注册成功
2,获取插件的uuid
2.1 利用oleviewer.exe打开ocx文件查看。可利用everything搜索oleviewer.exe来查找它的位置。
3,生成对应的.h 和.cpp文件
3.1 利用QT提供的dumpcpp.exe(一般在QT安装目录)来将*.ocx生成相应的文件,例如dumpcpp.exe {00000000-0000-0000-0000-000000000000}。此时就会生成h和cpp 文件。
QTVS中使用ocx控件示例
https://github.com/zzzcb/qt/tree/main/qt_vs_project/qt_ocx
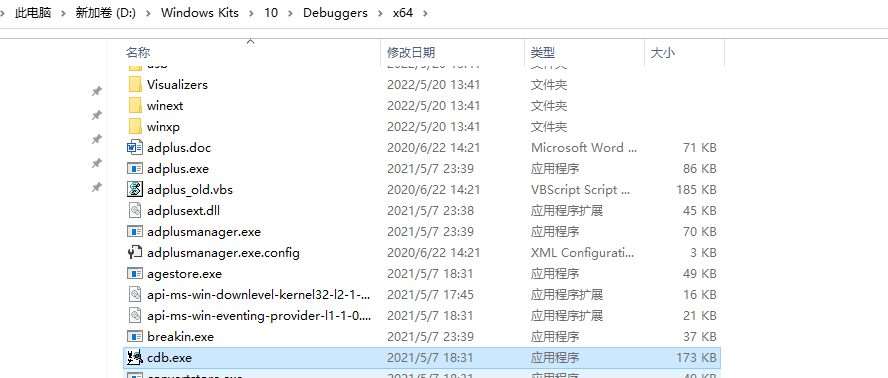
Qt creator 中配置CDB
参考文档:https://blog.csdn.net/libaineu2004/article/details/89445792
安装CDB
CDB(command line debugger)是MSVC版本QT调试用的。正如GDB是mingw版的QT一样。
安装Visual Studio是没有cdb的。需要手动安装。运行winsdksetup.exe,从中选择cdb。
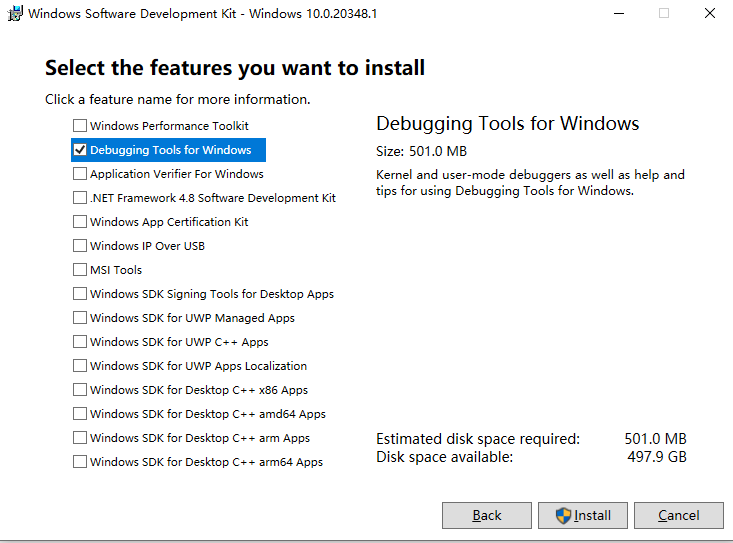
安装完成后可以在如下目录中找到cdb.exe
Qt 中的坐标系
https://programmer.ink/think/hello-qt-qt-coordinate-system.html
1. Physical Coordinate System
The physical coordinate system is the device coordinate system, where the origin is in the upper left corner, in pixels, the X coordinate grows to the right, and the Y coordinate grows down.

2. Logical Coordinate System
An Abstract coordinate system whose units are determined by a specific problem and whose direction of growth is determined by a specific problem.

QPainter draws graphics using a logical coordinate system, in which the size and location of graphics are converted to a physical coordinate system and then drawn on the device. By default, the logical coordinate system is the same as the physical coordinate system.

3. Viewport
A view port is any specified rectangular area in a physical coordinate system.

4. Windows
A window is a rectangular area corresponding to a physical coordinate system in a logical coordinate system.

Viewport and window are the same rectangle in different coordinate systems. There is a mapping relationship between the viewport and the coordinate points in the window. Viewport and window can convert each other by coordinate transformation.
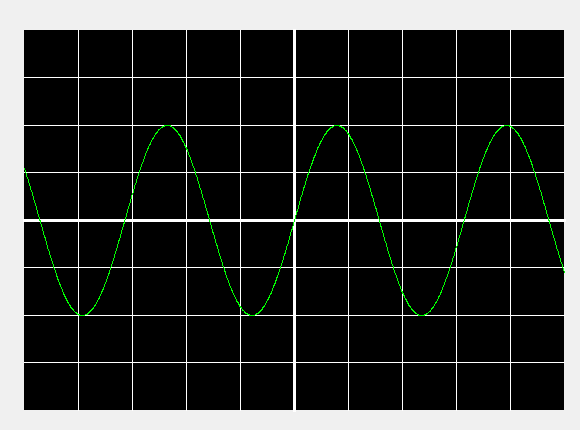
#ifndef SINEWAVE_H
#define SINEWAVE_H


#include <QWidget>
#include <QPainter>

class SineWave : public QWidget
{
    Q_OBJECT
private:
    void drawBackGround(QPainter* painter);
    void drawCave(QPainter* painter);
    void paintEvent(QPaintEvent *event);
public:
    SineWave(QWidget *parent = 0);
    ~SineWave();
};

#endif // SINEWAVE_H
#include "sinewave.h"
#include <QPen>
#include <QPointF>
#include <qmath.h>
#include <QDebug>

SineWave::SineWave(QWidget *parent):QWidget(parent)
{

}

SineWave::~SineWave()
{

}

void SineWave::drawBackGround(QPainter* painter)
{
    QPen pen;
    pen.setStyle(Qt::SolidLine);
    painter->setViewport(50, 50, width()-100, height()-100);
    painter->setWindow(-10, 2, 20, -4); // (-10, 2)    (10, -2)
    painter->fillRect(-10, 2, 20, -4, Qt::black);

    pen.setColor(Qt::white);
    pen.setWidth(0);
    painter->setPen(pen);

    painter->drawLine(QPointF(-10, 1.5), QPointF(10, 1.5));
    painter->drawLine(QPointF(-10, 1), QPointF(10, 1));
    painter->drawLine(QPointF(-10, 0.5), QPointF(10, 0.5));
    painter->drawLine(QPointF(-10, -0.5), QPointF(10, -0.5));
    painter->drawLine(QPointF(-10, -1), QPointF(10, -1));
    painter->drawLine(QPointF(-10, -1.5), QPointF(10, -1.5));

    painter->drawLine(QPointF(-8, 2), QPointF(-8, -2));
    painter->drawLine(QPointF(-6, 2), QPointF(-6, -2));
    painter->drawLine(QPointF(-4, 2), QPointF(-4, -2));
    painter->drawLine(QPointF(-2, 2), QPointF(-2, -2));
    painter->drawLine(QPointF(2, 2), QPointF(2, -2));
    painter->drawLine(QPointF(4, 2), QPointF(4, -2));
    painter->drawLine(QPointF(6, 2), QPointF(6, -2));
    painter->drawLine(QPointF(8, 2), QPointF(8, -2));


    pen.setWidthF(3.0);
    pen.setCosmetic(true);
    painter->setPen(pen);
    painter->drawLine(QPointF(-10, 0), QPointF(10, 0));   // x
    painter->drawLine(QPointF(0, 2), QPointF(0, -2));     // y
}


void SineWave::SineWave::drawCave(QPainter* painter)
{
    QPen pen;
    pen.setColor(Qt::green);
    pen.setWidth(0);

    painter->setPen(pen);
    for(double x=-10; x<10; x+=0.01)
    {
          double y = qSin(x);
          painter->drawPoint(QPointF(x, y));
    }
}

void SineWave::paintEvent(QPaintEvent *event)
{
    QPainter painter(this);
    drawBackGround(&painter);
    drawCave(&painter);
}
Qt 中类型转换
如果知道父类一定会转换为某个子类,则用static_cast,它没有做动态类型检测,所以速度更快。它的返回值无法判断是否转换成功。
如果父类可能会转换为多个子类,则用qobject_cast,它只支持继承于QObject的类,可以通过返回值判断是否转换成功。
如果父类可能会转换为多个子类,且该类未继承QObject,则用dynamic_cast, 可以通过返回值判断是否转换成功。
如果是在QGraphicsView框架中,可以使用qgraphicsitem_cast,可以通过其返回值来判断是否转换成功。前提是要重写type()函数。
如果是在QStyleOption中,qstyleoption_cast,进行转换
Qt 中信号槽
DirectConnection
	slot立即执行,slot在 signalling线程 执行
QueuedConnection
	当 receiver's thread 回到事件循环时执行slot,slot在 receiver's thread 执行
BlockingQueuedConnection
	与 QueuedConnection 相同,不过 signalling线程 阻塞直到slot结束
	如果receiver存活于signalling thread 将会导致死锁
想让slot在哪个线程执行?
	signalling thread: -> DirectConnection
	receiver's thread:
		是否阻塞 signalling thread?:
			不阻塞 -> QueuedConnection
			阻塞   -> BlockingQueuedConnection

 浙公网安备 33010602011771号