Linux_C_C++_Makefile_CMake_SystemCall_LinuxThread_LInuxNetworkProgramming_IOMultiplexing
Windows VS 静态链接库和动态链接库
https://www.cnblogs.com/qinguoyi/p/7257353.html
Linux
Linux的文件类型:
普通文件: -
目录文件: d dict
链接文件: l link
设备文件: 字符设备文件 c char,块设备文件 b block
管道文件: p pipe
套接字文件 s socket
Snippets in Vim
https://blog.prismatik.com.au/snippets-in-vim-43cf2ad79000


" ultisnips =============
" Track the engine.
Plugin 'SirVer/ultisnips'
" Snippets are separated from the engine. Add this if you want them:
Plugin 'honza/vim-snippets'"
" ultisnips =============

" ultisnips =============
" Trigger configuration. You need to change this to something else than <tab> if you use https://github.com/Valloric/YouCompleteMe.
let g:UltiSnipsExpandTrigger="<c-l>"
let g:UltiSnipsJumpForwardTrigger="<c-j>"
let g:UltiSnipsJumpBackwardTrigger="<c-k>"
" ultisnips =============
find 查找文件/文件中含有的内容
find / -name stdio.h #  在/ 目录下查找stdio.h 的文件
sudo find / -name "*.h" | xargs grep "struct sockaddr {"  # 在 / 目录下的所有h 文件中查找  struct sockaddr {
preview window in Vim(ycm):
The top window is called the preview window. So any of <c-w>z, <c-w><c-z> or :pc[lose][!] should work.
The below is the help for :help :pclose
CTRL-W z        CTRL-W_z
CTRL-W CTRL-Z   CTRL-W_CTRL-Z
:pc :pclose
:pc[lose][!]    Close any "Preview" window currently open.  When the 'hidden'
                option is set, or when the buffer was changed and the [!] is
                used, the buffer becomes hidden (unless there is another
                window editing it).  The command fails if any "Preview" buffer
                cannot be closed.  See also :close.
Another relevant help page would be :help preview-window
terminals, shells, consoles, and command lines
If you're exploring Linux or Unix, you might hear the terms terminal, command line, shell, and console, and you may justifiably be confused about which is which and whether they're the same thing. They're definitely all related, but there are nuances to each that have important implications. This article guides you through the terminology of Linux text-based interfaces.
https://www.redhat.com/sysadmin/terminals-shells-consoles
terminator 的使用:
https://terminator-gtk3.readthedocs.io/en/latest/ 官方文档
https://www.cnblogs.com/qianxunman/p/13565988.html
ctrl shift e 快捷键可能会有问题:1,ibus-setup冲突 2,搜狗输入法也可能冲突。
或者干脆直接修改快捷键: 全选窗口:ctrl+alt+9 取消为:ctrl+alt+0 水平分割:ctl+alt+h 垂直分割:ctrl+alt +v
Step by step breakdown of /dev/null
https://medium.com/@codenameyau/step-by-step-breakdown-of-dev-null-a0f516f53158
Newcomers to Bash programming will sooner or later come across /dev/null and another obscure jargon: > /dev/null 2>&1. It may look confusing but it’s fairly simple to understand and a fundamental part of shell programming. So let’s break it down with step-by-step examples.
To begin, /dev/null is a special file called the null device in Unix systems. Colloquially it is also called the bit-bucket or the blackhole because it immediately discards anything written to it and only returns an end-of-file EOF when read.
How to get the date and time values in a C program?
#include <stdio.h>
#include <time.h>

int main()
{
  time_t t = time(NULL);
  struct tm tm = *localtime(&t);
  printf("now: %d-%02d-%02d %02d:%02d:%02d\n", tm.tm_year + 1900, tm.tm_mon + 1, tm.tm_mday, tm.tm_hour, tm.tm_min, tm.tm_sec);
}
export command in linux:
https://www.geeksforgeeks.org/export-command-in-linux-with-examples/
卸载一个环境变量使用 unset ,
例如:
env
export zcb=helloworld
env
unset zcb
history
#include <stdio.h> // for printf()
#include <stdlib.h> // for getenv()

int main(){

    char * ret = getenv("HOME"); // 区分大小写
    printf("%s\n",ret);


    return 0;
}
gcc 静态库和动态库:

void func01();
#include "func01.h"
#include <stdio.h>

void func01(){
    printf("我是 func01\n");
}
其他文件夹:
#include <stdio.h>
#include "func01.h"

int main(){


    printf("这是主函数,下面将调用 func01\n");
    func01();


    return 0;
}
gcc 编译生成静态库:
- gcc func01.c -c 只编译不链接,此时会生成 func01.o
- ar rcs -o lib_func01.a func01.o , 吧func01.o 变为静态库,
gcc 静态库 的使用:
- gcc main.c -o output -L./ lib_func01.a ,-L 用于指定目录,
gcc 编译生成动态库:
- gcc -shared -fPIC -o lib_func01.so func01.c ,直接将 func01.c 变为 动态库 lib_func01.so
gcc 动态库 的使用:
- gcc main.c -o output -L../ -lmath ,-L 用于指定目录,-l 用于指定库名 该命令指的是 上级目录存在一个 libmath.so 的动态库
- 注: 生成的程序执行起来如果报错,export LD_LIBRARY_PATH=.:$LD_LIBRARY_PATH,把当前目录添加进环境变量。
Difference between Static and Shared libraries
在编程中,库是可以在程序中重用的预编译代码片段的集合。库简化了程序员的生活,因为它们提供了可重用的函数、例程、类、数据结构等等
它们可以在程序中重用。
静态库:
静态库或静态链接库是一组例程、外部函数和变量,它们在编译时在调用程序中解析,并由编译器、链接器或绑定器复制到目标应用程序中,从而生成一个对象文件和一个独立的可执行文件。这个可执行文件和编译它的过程都被称为程序的静态构建。历史上,库只能是静态的。
动态库
动态库是.so(在Windows.dll或OS X.dylib中)文件。
这些链接是动态链接的,只需包含库的地址(相比之下静态链接则浪费空间)。动态链接在运行时链接库。因此,所有的函数都在内存空间的一个特殊位置,每个程序都可以访问它们,而不需要它们的多个副本。
Following are some important points about static libraries.
1. For a static library, the actual code is extracted from the library by the linker and used to build the final executable at the point you compile/build your application.
2. Each process gets its own copy of the code and data. Where as in case of dynamic libraries it is only code shared, data is specific to each process. For static libraries memory footprints are larger. For example, if all the window system tools were statically linked, several tens of megabytes of RAM would be wasted for a typical user, and the user would be slowed down by a lot of paging.
3. Since library code is connected at compile time, the final executable has no dependencies on the library at run time i.e. no additional run-time loading costs, it means that you don’t need to carry along a copy of the library that is being used and you have everything under your control and there is no dependency.
4. In static libraries, once everything is bundled into your application, you don’t have to worry that the client will have the right library (and version) available on their system.
5. One drawback of static libraries is, for any change(up-gradation) in the static libraries, you have to recompile the main program every time.
6. One major advantage of static libraries being preferred even now “is speed”. There will be no dynamic querying of symbols in static libraries. Many production line software use static libraries even today.
C:
数组指针 和 指针数组 :
数组指针是个指针, 指针数组是个数组,
int main(){

int a = 1;
int b = 2;
int* arr1[]={&a,&b}; // 指针数组,arr1 这个数组中存放了 int * 的指针

int temp[]={a,b,a};
int (* arr2)[3]=&temp; // 数组指针,arr2 是个地址,它指向了 temp 这个数组
return 0; }
int arr1 [] = {1,2,3};
如何表示 &arr1 的类型: int (*)[3];
int func01(){};
如何表示func01 的类型: int ();
如何表示&func01 的类型:int (*)();
int func02(int a,int b);
如何表示func02 的类型:int (int,int);
如何表示&func02 的类型: int (*)(int,int);
#include <stdio.h>

int func01(int a,int b){
    return a+b;
}
int func02(int f(int ,int )){
    int res = f(10,20);
    printf("%d\n",res);

    return 0;
}
int main(){
    func02(func01);


    return 0;

}
#include <stdio.h>

int func01(int a,int b){
    return a+b;
}
int func02(int (*f)(int ,int )){
    int res = (*f)(10,20);

    printf("%d\n",res);

    return 0;
}
int main(){
    func02(&func01);

    return 0;

}
#include <stdio.h>

int func01(int arr []){

    printf("%d \n",arr[0]);
    return 0;
}
int main(){

    int aaa[]={1,2,3};
    func01(aaa);

    return 0;
}
#include <stdio.h>

int func01(int (*arr) [3]){
    printf("%d \n",(*arr)[0]);
    return 0;
}
int main(){

    int aaa[]={1,2,3};
    func01(&aaa);

    return 0;
}
stat() function in c:
需要引入头文件 <sys/stat.h>
#include <stdio.h>
#include <sys/stat.h>

int main(){

    struct stat stat_of_file;
    stat("zcb.txt",&stat_of_file);
    printf("st_mode %o \n",stat_of_file.st_mode);
    printf("st_uid %d\n",stat_of_file.st_uid);
    printf("st_gid %d\n",stat_of_file.st_gid);
    printf("st_blksize %ld\n",stat_of_file.st_blksize);
    printf("st_size %ld\n",stat_of_file.st_size);
    printf("st_nlink %ld\n",stat_of_file.st_nlink);// 硬链接数
    printf("File Permission User\n");
    printf((stat_of_file.st_mode & S_IRUSR)?"r":"-");
    printf((stat_of_file.st_mode & S_IWUSR)?"w":"-");
    printf((stat_of_file.st_mode & S_IXUSR)?"x":"-");
    printf("\nFile Permission Group\n");
    printf((stat_of_file.st_mode & S_IRGRP)?"r":"-");
    printf((stat_of_file.st_mode & S_IWGRP)?"w":"-");
    printf((stat_of_file.st_mode & S_IXGRP)?"x":"-");
    printf("\nFile Permission Others\n");
    printf((stat_of_file.st_mode & S_IROTH)?"r":"-");
    printf((stat_of_file.st_mode & S_IWOTH)?"w":"-");
    printf((stat_of_file.st_mode & S_IXOTH)?"x":"-");
    printf("\n");


    return 0;
}
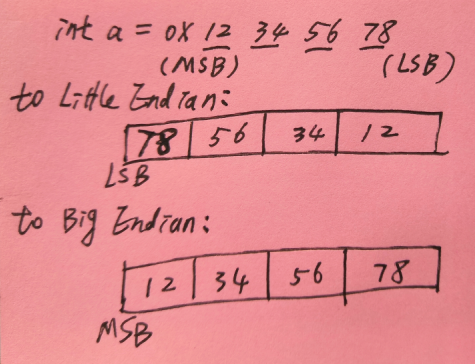
Little and Big Endian Mystery
最简单的 一个图:
https://www.geeksforgeeks.org/little-and-big-endian-mystery/
What are these?
Little and big endian are two ways of storing multibyte data-types ( int, float, etc). In little endian machines, last byte of binary representation of the multibyte data-type is stored first. On the other hand, in big endian machines, first byte of binary representation of the multibyte data-type is stored first.
Suppose integer is stored as 4 bytes (For those who are using DOS based compilers such as C++ 3.0 , integer is 2 bytes) then a variable x with value 0x01234567 will be stored as following.
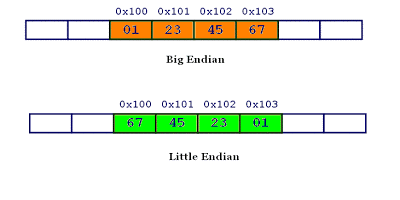
- Memory representation of integer ox01234567 inside Big and little endian machines
How to see memory representation of multibyte data types on your machine?
Here is a sample C code that shows the byte representation of int, float and pointer.
#include <stdio.h>

/* function to show bytes in memory, from location start to start+n*/
void show_mem_rep(char *start, int n)
{
    int i;
    for (i = 0; i < n; i++)
        printf(" %.2x", start[i]);
    printf("\n");
}

/*Main function to call above function for 0x01234567*/
int main()
{
int i = 0x01234567;
show_mem_rep((char *)&i, sizeof(i));
getchar();
return 0;
}
When above program is run on little endian machine, gives “67 45 23 01” as output , while if it is run on big endian machine, gives “01 23 45 67” as output.
Is there a quick way to determine endianness of your machine?
There are n no. of ways for determining endianness of your machine. Here is one quick way of doing the same.
#include <stdio.h>
int main()
{
   unsigned int i = 1;
   char *c = (char*)&i;
   if (*c)
       printf("Little endian");
   else
       printf("Big endian");
   getchar();
   return 0;
}
In the above program, a character pointer c is pointing to an integer i. Since size of character is 1 byte when the character pointer is de-referenced it will contain only first byte of integer. If machine is little endian then *c will be 1 (because last byte is stored first) and if machine is big endian then *c will be 0.
函数指针
#include <stdio.h>
#include <stdlib.h>

int compare(const void* a,const void* b){
    return *(int*)a-*(int*)b;;
}

int main(){
    int arr[] = {1,2,3,23,32,1,2,3543,23,5,42,34};
    int n = sizeof(arr)/sizeof(arr[0]);
    qsort(arr,n,sizeof(int),compare);//函数指针的运用
    for (int i=0;i<n;i++){
        printf("%d\n",arr[i]);
    }


    return 0;
}
C++:
std:: string
#include <iostream>
#include <string>

using namespace std;

void split(string s,string token){
    int pos;
    string tar;
    while((pos = s.find(token))!= -1){
        tar = s.substr(0,pos);
        s.erase(0,pos+token.length());
        cout << tar << endl;
    }
    cout << s << endl;

    return ;
}


int main(){

    string s("hello>=world>=woqu>=nimade");
    split(s,">=");


    return 0;
}
class 里面的权限修饰符:
public : 谁都可以看
private : 只有member function 和 friend function 可以看到
protected: 只有member function 和 friend function 和 subclass 可以看到
class 的继承模式:
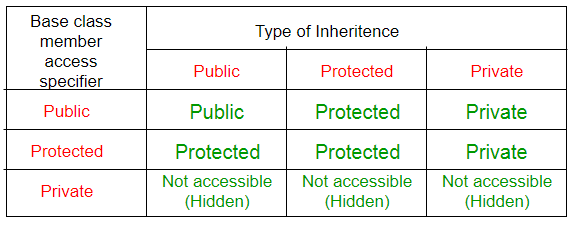
public 最善良, protected 第二孬,private 最孬~ , 还有 基类中的 private 修饰的不能被继承~
Operator Overloading
#include <iostream>
using namespace std;

class Complex{
    private:
        int real,imag;
    public:
        Complex(int r = 0,int i=0){
            this->real  = r;
            this->imag  = i;
        }
        Complex operator+(const Complex& c){
            return Complex(real+c.real,imag+c.imag);
        }
        void print(){
            cout << real << "+" << imag<<" i"<<  endl;
        }

};

int main(){
    Complex c1(10,8),c2(20,10);
    c1.print();
    c2.print();
    Complex res = c1 + c2;
    res.print();


    return 0;
}
#include <iostream>
using namespace std;

class Complex{
    private:
        int real,imag;
    public:
        Complex(int r = 0,int i=0){
            this->real  = r;
            this->imag  = i;
        }
/*        Complex operator+(const Complex& c){
            return Complex(real+c.real,imag+c.imag);
        }
        */
        friend Complex operator+(const Complex&,const Complex&);
        void print(){
            cout << real << "+" << imag<<" i"<<  endl;
        }

};
Complex operator+(const Complex& c1,const Complex& c2){
    return Complex(c1.real+c2.real,c1.imag+c2.imag);
}

int main(){
    Complex c1(10,8),c2(20,10),c3(30,10);
    c1.print();
    c2.print();
    c3.print();
    Complex res = c1 + c2 + c3;
    res.print();


    return 0;
}
Can we overload all operators?
Almost all operators can be overloaded except few. Following is the list of operators that cannot be overloaded.
   . (dot)
   ::
   ?:
   sizeof
Why can’t . (dot), ::, ?: and sizeof be overloaded?
see this: https://www.stroustrup.com/bs_faq2.html#overload-dot
Can I define my own operators?
Sorry, no. The possibility has been considered several times, but each time I/we decided that the likely problems outweighed the likely benefits.
Important points about operator overloading
1) For operator overloading to work, at least one of the operands must be a user defined class object.
2) Assignment Operator: Compiler automatically creates a default assignment operator with every class. The default assignment operator does assign all members of right side to the left side and works fine most of the cases (this behavior is same as copy constructor). See this for more details.
VTable & VPtr
https://thispointer.com/how-virtual-functions-works-internally-using-vtable-and-vpointer/
Singleton pattern in c++:
#include <iostream>
using namespace std;

class ChairMan{
    private:
        ChairMan(){
            cout << "创建 ChairMan" << endl;
        }
        ChairMan(const ChairMan & cm){
        }
        static ChairMan *chairman;
    public:
        static ChairMan* getInstance(){
            return chairman;
        }
        void print(){
            cout << "同志们好" << endl;
        }
};
ChairMan* ChairMan::chairman = new ChairMan();

int main(){

    cout << " main 调用" <<endl;
    ChairMan * cm = ChairMan::getInstance();
    cm->print();
    cout << cm << endl;


    return 0;
}
Templates in c++:
https://www.geeksforgeeks.org/templates-cpp/
主要用到两个关键字 template 和 typename (经常被 class 替换)
#include <iostream>
using namespace std;

template <typename T> // 'typename' keyword usually replaced by 'class' keyword
T myMax(T x,T y){
    return x > y ?x:y;
}

int main(){

    cout << myMax<int>(1,2) << endl;
    cout << myMax<char>('a','A') << endl;


    return 0;
}

类中使用 泛型:
#include <iostream>
#include <string>
using namespace std;

template <typename T>
class Array{
    private:
        T* ptr;
        int size;
    public:
        Array(T arr[],int s){
            ptr = new T[s];
            size = s;
            for(int i=0;i<size;i++)
                ptr[i] = arr[i];
        }
        void print(){
            for(int i=0;i<size;i++)
                cout << ptr[i]<< " ";
            cout << endl;
        }
};

int main(){
    int a[10] = {1,2,3,4,5,6,7,8,9,10};
    Array<int> arr1(a,10);
    arr1.print();


    string b[3] = {"hello","world","c++"};
    Array<string> arr2(b,3);
    arr2.print();

    double c[3] = {10.44,3.33,6.66};
    Array<double>* arr3 = new Array<double>(c,3);
    arr3->print();

    return 0;
}
多个泛型一起用:
#include <iostream>
#include <string.h>
using namespace std;

template <class T,class U>
class A{
    private:
        T t;
        U u;
    public:
        A(T t,U u){
            this->t = t;
            this->u = u;
            cout << "constructor called" << endl;
        }
        void print(){
            cout << t<< "|" << u<< endl;
        }
};

int main(){
    A<string,int> a("tom",20);
    a.print();

    A<string,double> a2("jane",20000.56);
    a2.print();

    return 0;
}
Generics in C++
泛型编程,
https://www.geeksforgeeks.org/generics-in-c/
c++ 操作字符串(使用 stringstream)
头文件是<sstream>
#include <iostream>
#include <sstream>
#include <string.h>
using namespace std;

int main(){

    stringstream ss;
    int a = 2020;
    double b = 16.27;
    ss << a << " " << b;

    string s1,s2;
    ss >> s1 >> s2;
    cout << "s1:" << s1<< endl;
    cout << "s2:" << s2<< endl;

    cout <<"=================="<<endl;

    stringstream ss2;
    ss2 <<"2020 16.27";
    int a2;
    double b2;
    ss2 >> a2 >> b2;

    cout << "a2:" << a2<< endl;
    cout << "b2:" << b2<< endl;

    cout <<"=================="<<endl;

    stringstream ss3;
    string name = "tom";
    int age = 18;
    ss3 << "Name:" <<name<<" Age:"<< age;
    string res = ss3.str();
    cout << res << endl;


    return 0;
}
c++ 输出一个字符/字符串 n次
#include <iostream>
#include <string>
using namespace std;

int main(){
    // 打印多个字符
    cout<<string(10,'*') << endl;

    // 打印多个 字符串
    for(int i=0;i<10;i++){
        cout << "hello";
    }

    return 0;
}
左移运算符重载:
#include <iostream>
#include <sstream>
#include <string.h>

using namespace std;

class Person{
    private:
        string name;
        int age;
    public:
        Person(string name,int age){
            this->name = name;
            this->age = age;
        }
        string print(){
            stringstream ss;
            ss << name << age;
            return ss.str();
        }
};

ostream& operator<<(ostream& o,Person &p){
    return o<<p.print();
}

int main(){
    Person p("tom",18);
    cout << p.print()<< endl;
    cout << p << endl;


    return 0;
}
cout 是 ostream 类型,
cin 是 istream 类型,它们都在 <iostream> 中,
抽象类 和 纯虚函数:
#include <iostream>
using namespace std;

class Base{
    private:
        int x;
    public:
        virtual void func() = 0;
        int getX(){
            return x;
        }
};
class Son:public Base{
    private:
        int y;
    public:
        void func(){
            cout << "son's func called." << endl;
        }
};

int main(){

    Base* b = new Son();
    b->func();


    return 0;
}
1,子类必须要实现 所有的纯虚函数,(不然,那么子类也变成了抽象类)
2,抽象类无法实例化,
#include <iostream>
using namespace std;

class Base{
    private:
        int x;
    public:
        virtual void func() = 0;
        int getX(){
            return x;
        }
};
class Son1:public Base{ // 此时 Son1 也变为了 一个抽象类
};
class Son2:public Son1{
    private:
        int y;
    public:
        void func(){
            cout << "son's func called." << endl;
        }
};

int main(){

    Base* b = new Son2();
    b->func();


    return 0;
}
Inheriting from a template class
https://blog.feabhas.com/2014/06/template-inheritance/
#include <iostream>
using namespace std;

template<class T>
class Base{
    private:
        T data;
    public:
        void set(const T& val){
            data = val;
        }
        T get(){
            return data;
        }
};

template <class T>
class Son:public Base<T>{
    public:
        void set(const T& v){
            cout << "new set" <<endl;
            Base<T>::set(v);
        }
};

int main(){

    Son<int> son = Son<int>();
    son.set(10);
    cout << son.get() <<endl;


    return 0;
}
type cast in c++
https://www.geeksforgeeks.org/type-conversion-in-c/
1, Implicit Type Conversion Also known as ‘automatic type conversion’.
bool -> char -> short int -> int ->

unsigned int -> long -> unsigned ->

long long -> float -> double -> long double
It is possible for implicit conversions to lose information, signs can be lost (when signed is implicitly converted to unsigned), and overflow can occur (when long long is implicitly converted to float).
2,Explicit Type Conversion: This process is also called type casting and it is user-defined. Here the user can typecast the result to make it of a particular data type.
In C++, it can be done by two ways:
a, Converting by assignment: This is done by explicitly defining the required type in front of the expression in parenthesis. This can be also considered as forceful casting. Syntax: (type) expression
b, Conversion using Cast operator: A Cast operator is an unary operator which forces one data type to be converted into another data type.
C++ supports four types of casting:
- Static Cast
- Dynamic Cast
- Const Cast
- Reinterpret Cast
#include <iostream>
using namespace std;
int main()
{
    float f = 3.5;

    // using cast operator
    int b = static_cast<int>(f);

    cout << b;
}
exception handling
https://www.geeksforgeeks.org/exception-handling-c/
#include <iostream>
#include <string.h>
using namespace std;


class MyException:public exception{
    string msg;
    public:
        MyException(string msg){
            this->msg = msg;
        }
        string what(){
            return this->msg;
        }
};


int main(){

    try{
        throw MyException("my exception");
    }catch(MyException e){
        cout <<e.what()<< endl;
    }catch(exception e2){
        //other exception
        cout <<e2.what()<< endl;
    }catch(...){
        //any type exception
        cout <<"final exception"<< endl;
    }


}
Stack Unwinding in C++
https://www.geeksforgeeks.org/stack-unwinding-in-c/
File operation in C++
https://www.geeksforgeeks.org/file-handling-c-classes/
In C++, files are mainly dealt by using three classes fstream, ifstream, ofstream available in <fstream >headerfile.
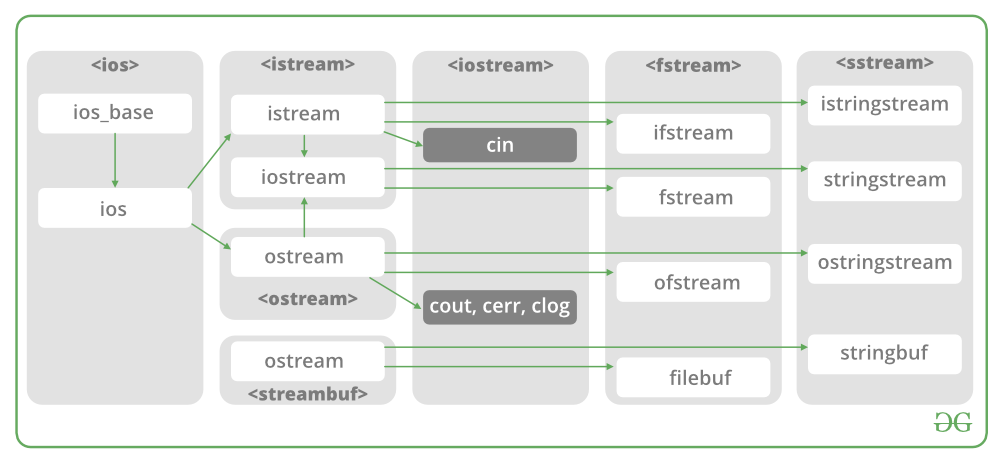
ifstream 和 ofstream :
#include <iostream>
#include <fstream>
using namespace std;


int main(){

    // 写文件
    ofstream ofs;
    ofs.open("test.txt");
    ofs << "Hello world\n";
    ofs << "我爱中国\n";
    ofs.close();

    // 读文件
    ifstream ifs;
    ifs.open("test.txt");

    string line;
    while(ifs){
        getline(ifs,line);
        if(line != "")
            cout << line << endl;
    }
    ifs.close();


    return 0;
}
使用fstream 读写:
#include <iostream>
#include <fstream>
using namespace std;


int main(){

    fstream fs;
    // 写文件
    fs.open("test.txt",ios::trunc|ios::out|ios::in);
    fs << "hello wolrd" << endl;
    fs << "你好世界" << endl;


    // 读文件
    fs.seekg(0,ios::beg);
    string line;
    while(fs){
        getline(fs,line);
        if(line != "")
            cout << line << endl;
    }
    fs.close();


    return 0;
}
Anonymous class and lambda expression in c++
https://www.geeksforgeeks.org/anonymous-classes-in-cpp/
https://www.geeksforgeeks.org/lambda-expression-in-c/
lambda express Syntax :
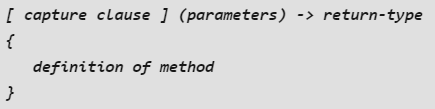
A lambda expression can have more power than an ordinary function by having access to variables from the enclosing scope. We can capture external variables from enclosing scope by three ways :
Capture by reference
Capture by value
Capture by both (mixed capture)
Syntax used for capturing variables :
[&] : capture all external variable by reference
[=] : capture all external variable by value
[a, &b] : capture a by value and b by reference
#include <iostream>
#include <vector>
using namespace std;

int main(){

    vector<int> v1 = {3,1,7,9};
    vector<int> v2 = {10,2,7,16,9};

    // can access v1 and v2 reference
    auto pushinto = [&](int m){
        v1.push_back(m);
        v2.push_back(m);
    };
    pushinto(20);

    // can access v1 by copy
    auto printinfo = [v1](){
        for(auto p = v1.begin();p != v1.end();p++){
            cout <<*p << endl;
        }
    };

    // can access v1 and v2 by copy
    auto printinfo2 = [=](){
        for(auto p = v1.begin();p != v1.end();p++){
            cout <<*p << endl;
        }
        for(auto p = v2.begin();p != v2.end();p++){
            cout <<*p << endl;
        }
    };

    // can access v1 reference and access v2 by copy
    auto printinfo3 = [&v1,v2](){
        for(auto p = v1.begin();p != v1.end();p++){
            cout <<*p << endl;
        }
        for(auto p = v2.begin();p != v2.end();p++){
            cout <<*p << endl;
        }
    };


}
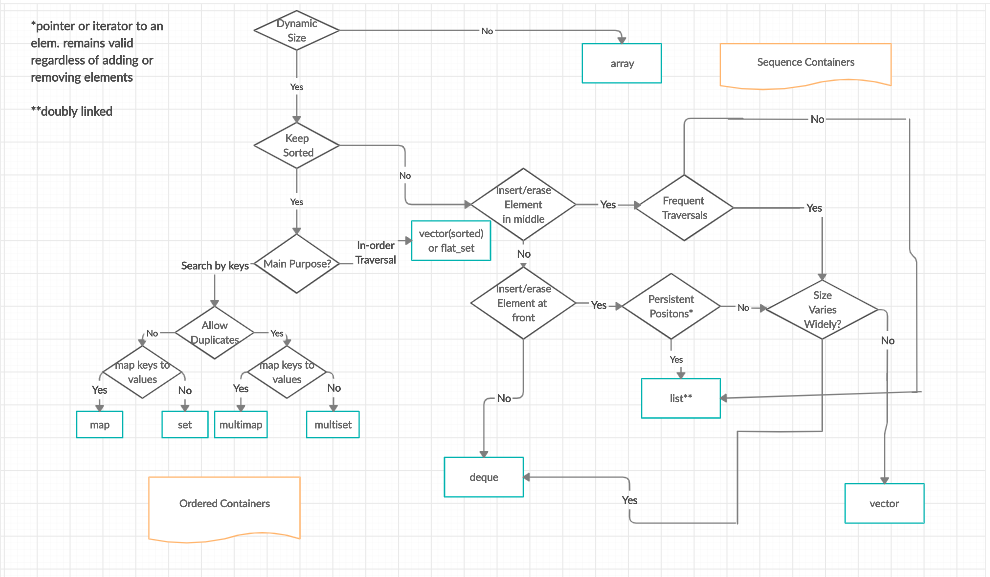
STL in c++:
https://www.geeksforgeeks.org/the-c-standard-template-library-stl/
STL has four components
- Containers
- Algorithms
- Iterators
- Functions
一:Containers
Sequence Containers: implement data structures which can be accessed in a sequential manner.(1-5).
1,vector
https://www.geeksforgeeks.org/vector-in-cpp-stl/
#include <iostream>
#include <vector>
using namespace std;

int main(){

    vector<int> v1;
    for (int i=0;i<= 5;i++)
        v1.push_back(i);

    // 1
    cout << "111111111"<< endl;
    for(vector<int>::iterator i=v1.begin();i!=v1.end();i++){ // 或者写为 auto
        cout << *i << endl;
   //     *i = 10; // 可以修改
    }
    for(auto i=v1.begin();i!=v1.end();i++){
        cout << *i << endl;
    }
    // 2
    cout << "2222222"<< endl;
    for(vector<int>::const_iterator i=v1.cbegin();i!=v1.cend();i++){
        cout << *i << endl;
        //*i = 10;// 报错
    }


    // 3
    cout << "333333333"<< endl;
    for(vector<int>::reverse_iterator i=v1.rbegin();i!=v1.rend();i++){
        cout << *i << endl;
    }
    // 4
    cout << "444444444"<< endl;
    for(vector<int>::const_reverse_iterator i=v1.crbegin();i!=v1.crend();i++){
        cout << *i << endl;
    }


    return 0;
}
#include <iostream>
#include <vector>
using namespace std;

int main(){

    vector<int> v1;
    for(int i =0;i<5;i++)
        v1.push_back(i);

    cout <<"size: "<<v1.size()<< endl;
    cout <<"capacity: "<<v1.capacity()<< endl;
    cout <<"maxsize: "<<v1.max_size()<< endl;

    // resize
    v1.resize(4);
    cout <<"size: "<<v1.size()<< endl;
    cout <<"capacity: "<<v1.capacity()<< endl;
    for(auto i = v1.cbegin();i!=v1.cend();i++)
        cout <<*i<< endl;

    // isempty
    if(v1.empty())
        cout << "vector is empty"<< endl;
    else
        cout << "vector is not empty"<< endl;

    // shrink to fit
    v1.shrink_to_fit();
    cout <<"size: "<<v1.size()<< endl;
    cout <<"capacity: "<<v1.capacity()<< endl;
    for(auto i = v1.cbegin();i!=v1.cend();i++)
        cout <<*i<< endl;


    return 0;
}
#include <iostream>
#include <vector>
using namespace std;

int main(){

    vector<int> v1;
    for(int i =0;i<10;i++)
        v1.push_back(i);

    cout << "Reference operator [] v1[2]:"<< v1[2]<< endl;
    cout << "at v1.at(3) :"<< v1.at(3) << endl;
    cout << "front v1.front():" << v1.front()<< endl;
    cout << "back v1.back():" << v1.back()<< endl;

    // pointer to the first element
    int* pos = v1.data();
    cout << "first element is: " << *pos << endl;


    return 0;
}
#include <iostream>
#include <vector>
using namespace std;

int main(){

    vector<int> v1;

    v1.assign(5,88);// fill the array with 5 个88
    for(auto i = v1.cbegin();i!=v1.cend();i++)
        cout << *i<< endl;

    v1.push_back(15);
    int n = v1.size(); // size
    cout << "the last element is: " << v1[n-1] << endl;

    // remove last element
    v1.pop_back();
    n = v1.size(); // size
    cout << "the last element is: " << v1[n-1] << endl;

    // insert element in specific position
    v1.insert(v1.begin()+1,11);
    for(auto i = v1.cbegin();i!=v1.cend();i++)
        cout << *i<< endl;
    cout <<"======="<< endl;
    // remove element in specific position
    v1.erase(v1.begin()+2);
    for(auto i = v1.cbegin();i!=v1.cend();i++)
        cout << *i<< endl;

    // clear the vector
    v1.clear();
    cout<<"Vector size after clear() :" << v1.size()<<endl;

    // swap two vector
    vector<int> v2,v3;
    v2.push_back(1);
    v2.push_back(2);
    v3.push_back(3);
    v3.push_back(4);

    cout <<"Vector2 : "<< endl;
    for(auto i = v2.cbegin();i!=v2.cend();i++)
        cout << *i<< endl;

    cout <<"Vector3 : "<< endl;
    for(auto i = v3.cbegin();i!=v3.cend();i++)
        cout << *i<< endl;

    v2.swap(v3);
    cout << "After swap:" <<endl;

    cout <<"Vector2 : "<< endl;
    for(auto i = v2.cbegin();i!=v2.cend();i++)
        cout << *i<< endl;

    cout <<"Vector3 : "<< endl;
    for(auto i = v3.cbegin();i!=v3.cend();i++)
        cout << *i<< endl;

    vector<int> v4;
    v4.push_back(5);
    v4.push_back(6);
    v4.push_back(7);
    v4.push_back(8);
    // swap v4(size =4) and v2(size=2)
    v4.swap(v2);
    cout <<"Vector2 : "<< endl;
    for(auto i = v2.cbegin();i!=v2.cend();i++)
        cout << *i<< endl;

    cout <<"Vector4 : "<< endl;
    for(auto i = v4.cbegin();i!=v4.cend();i++)
        cout << *i<< endl;


    return 0;
}
2,list
https://www.geeksforgeeks.org/list-cpp-stl/
#include <iostream>
#include <list>
using namespace std;

void showList(list<int> l){
    for(auto i = l.cbegin();i!=l.cend();i++)
        cout<< *i << endl;
}

int main(){
    list<int> l1,l2;
    for(int i=0;i<10;++i){
        l1.push_back(i*2);
        l2.push_front(i*3);
    }
    cout << "list 1 : "<< endl;
    showList(l1);
    cout << "list 2 : "<< endl;
    showList(l2);

    cout << "list 1's front: " << l1.front() << endl;
    cout << "list 1's back: " << l1.back() << endl;

    cout <<"list 1 pop_front:"<< endl;
    l1.pop_front();
    showList(l1);
    cout <<"list 1 pop_back:"<< endl;
    l1.pop_back();
    showList(l1);


    cout << "list 2 reverse: " << endl;
    l2.reverse();
    showList(l2);

    cout <<" list 2 sort :"<< endl;
    l2.sort();
    showList(l2);


    return 0;
}
#include <iostream>
#include <list>

using namespace std;

void showList(list<int>& l){
    for(auto it=l.cbegin();it!=l.cend();++it)
        cout << *it<<endl;
}

int main(){

    // splice 的使用
    list<int> l1 = {1,2,3,4};
    list<int> l2 = {5,6,7};


    list<int>::iterator it = l1.begin();
    ++it;
    l1.splice(it,l2);

    cout << "list l1: " <<endl;
    showList(l1);

    cout << "list l2: " <<endl;
    showList(l2);


    list<int> l3 = {1,2,3,4};
    list<int> l4 = {5,6,7};
    l3.splice(l3.begin(),l4,l4.begin());// 移动一个元素
    cout << "list l3: " <<endl;
    showList(l3);

    cout << "list l4: " <<endl;
    showList(l4);

    list<int> l5 = {1,2,3,4};
    list<int> l6 = {5,6,7,8,9};
    auto it1 = l6.begin();
    ++it1;
    l5.splice(l5.begin(),l6,it1,l6.end()); // move 6,7,8 to l5's begin

    cout << "list l5: " <<endl;
    showList(l5);

    cout << "list l6: " <<endl;
    showList(l6);


    return 0;
}
#include <iostream>
#include <list>

using namespace std;

void showList(list<int>& l){
    for(auto it=l.cbegin();it!=l.cend();++it)
        cout << *it<<endl;
}
bool compare(int a,int b){
    return a < b;
}

int main(){

    list<int> l1 = {1,3,2,4};
    list<int> l2 = {5,7,6};

    l1.merge(l2);
    //l1.merge(l2,compare);
    cout << "list l1: " << endl;
    showList(l1);
    cout << "list l2: " << endl;
    showList(l2);


    return 0;
}
3,deque
https://www.geeksforgeeks.org/deque-cpp-stl/
double ended queue,
#include <iostream>
#include <deque>

using namespace std;

void showDeque(deque<int>& d){
    for(auto it=d.cbegin();it!=d.cend();++it)
        cout << *it<<endl;
}

int main(){

    deque<int> dq1;
    dq1.push_back(10);
    dq1.push_front(20);
    dq1.push_back(30);
    dq1.push_front(40);
    showDeque(dq1);

    cout << "deque size: " << dq1.size()<< endl;
    cout << "deque max size: " << dq1.max_size()<< endl;

    cout <<"deque at 2: " <<dq1.at(2) << endl;
    cout <<"deque front : " <<dq1.front() << endl;
    cout <<"deque back : " <<dq1.back() << endl;


    cout << "deque pop_front"  << endl;
    dq1.pop_front();
    showDeque(dq1);

    cout << "deque pop_back"  << endl;
    dq1.pop_back();
    showDeque(dq1);


}
4,array
https://www.geeksforgeeks.org/array-class-c/
The introduction of array class from C++11 has offered a better alternative for C-style arrays. The advantages of array class over C-style array are :-
- Array classes knows its own size, whereas C-style arrays lack this property. So when passing to functions, we don’t need to pass size of Array as a separate parameter.
- With C-style array there is more risk of array being decayed into a pointer. Array classes don’t decay into pointers
- Array classes are generally more efficient, light-weight and reliable than C-style arrays.
#include <iostream>
#include <array>

using namespace std;


int main(){

    array<int,6> arr = {1,2,3,4,5,6};

    // arr.at(i)
    for(int i=0;i<6;i++)
        cout << arr.at(i)  << endl;

    // arr[i]
    for(int i=0;i<6;i++)
        cout << arr[i]  << endl;

    // front and back
    cout << arr.front() << arr.back() << endl;

    // size
    cout << arr.size()<< endl;

    // max size
    cout << arr.max_size()<< endl;

    //fill
    arr.fill(0);
    for(auto it =arr.cbegin();it!=arr.cend();it++)
        cout << *it<< endl;


}
5,forward_list
https://www.geeksforgeeks.org/forward-list-c-set-1-introduction-important-functions/
It differs from list by the fact that forward list keeps track of location of only next element while list keeps track to both next and previous elements, thus increasing the storage space required to store each element. The drawback of forward list is that it cannot be iterated backwards and its individual elements cannot be accessed directly.
Forward List is preferred over list when only forward traversal is required (same as singly linked list is preferred over doubly linked list) as we can save space. Some example cases are, chaining in hashing, adjacency list representation of graph, etc.
#include <iostream>
#include <forward_list>

using namespace std;

void showForwardList(forward_list<int> flist){
    for(int& item:flist)
        cout << item<< endl;
}

int main(){

    forward_list<int> flist1;
    forward_list<int> flist2;

    // forward_list::assign()
    flist1.assign({1,2,3,4});
    flist2.assign(5,10);// 5个 10

    // print forward_list
    cout << "forward_list list1:" << endl;
    showForwardList(flist1);

    cout << "forward_list list2:" << endl;
    showForwardList(flist2);

    // push_front pop_front
    flist1.push_front(11);
    cout << "forward_list list1:" << endl;
    showForwardList(flist1);

    flist1.pop_front();
    cout << "forward_list list1:" << endl;
    showForwardList(flist1);

    // insert_after  erase_after
    auto it1 = flist1.begin();
    it1++;
    flist1.insert_after(it1,{77,88});
    cout <<"insert_after list1" << endl;
    showForwardList(flist1);

    flist1.erase_after(it1);
    cout <<"erase_after list1" << endl;
    showForwardList(flist1);

    // remove and remove_if
    forward_list<int> list3 = {10,20,30,25,40,40,11,40};
    list3.remove(40); // remove all 40
    cout <<"remove all 40: " << endl;
    showForwardList(list3);

    list3.remove_if(
            [](int a){
                 return a>= 25;
            }
         ); // remove all 40
    cout <<"remove all item >= 25: " << endl;
    showForwardList(list3);

    // splice_after
    forward_list<int> list4 = {10,20,30};
    forward_list<int> list5 = {40,50,60};
    list4.splice_after(++list4.begin(),list5);
    cout << "forward_list list4:" << endl;
    showForwardList(list4);

    cout << "forward_list list5:" << endl;
    showForwardList(list5);


}
Container Adaptors : provide a different interface for sequential containers.(6-8)
An Introduction to Container Adapters in C++:
https://stackoverflow.com/questions/3873802/what-are-containers-adapters-c
6,stack
https://www.geeksforgeeks.org/stack-in-cpp-stl/
Stacks are a type of container adaptors with LIFO(Last In First Out) type of working, where a new element is added at one end and (top) an element is removed from that end only.
#include <iostream>
#include <stack>

using namespace std;

void showStack(stack<int> ss){
//    stack<int> ss = s;
    while(!ss.empty()){
        int ret = ss.top();
        cout << ret << endl;
        ss.pop();
    }
}

int main(){
    // stack  先进后出
    stack<int> s1;
    s1.push(10);
    s1.push(20);
    s1.push(30);

    showStack(s1);

    cout <<"queue q1 size:" << s1.size()<< endl;
    cout <<"queue q1 front:" << s1.top()<< endl;

    s1.pop();
    cout << "after pop(): " << endl;
    showStack(s1);


}
7,queue
https://www.geeksforgeeks.org/sort-algorithms-the-c-standard-template-library-stl/
Queues are a type of container adaptors which operate in a first in first out (FIFO) type of arrangement. Elements are inserted at the back (end) and are deleted from the front.
#include <iostream>
#include <queue>

using namespace std;

void showQueue(queue<int> q){
    while(!q.empty()){
        int ret = q.front();
        cout << ret << endl;
        q.pop();
    }
}

int main(){
    // queue back 进 front 出
    queue<int> q1;
    q1.push(10);
    q1.push(20);
    q1.push(30);

    showQueue(q1);

    cout <<"queue q1 size:" << q1.size()<< endl;
    cout <<"queue q1 front:" << q1.front()<< endl;
    cout <<"queue q1 back:" << q1.back()<< endl;

    q1.pop();
    cout << " after pop(): " << endl;
    showQueue(q1);

    q1.push(40);
    cout << " after push(): " << endl;
    showQueue(q1);


}
8,priority_queue
https://www.geeksforgeeks.org/priority-queue-in-cpp-stl/
Priority queues are a type of container adapters, specifically designed such that the first element of the queue is the greatest of all elements in the queue and elements are in non increasing order(hence we can see that each element of the queue has a priority{fixed order}).
#include <iostream>
#include <queue> // priority_queue 也在这里
using namespace std;

void showpq(priority_queue<int> pq){
    while(!pq.empty()){
        cout << pq.top()<< endl;
        pq.pop();
    }
}

int main(){

    priority_queue<int> pq1;
    pq1.push(10);
    pq1.push(30);
    pq1.push(5);
    pq1.push(1);
    pq1.push(20);

    cout << "priority_queue pq1:" << endl;
    showpq(pq1);

    cout <<"priority_queue size:" << pq1.size()<< endl;
    cout <<"priority_queue top:" << pq1.top()<< endl;

    cout <<"after pop(): " << endl;
    pq1.pop();
    showpq(pq1);


    return 0;
}
// C++ program to demonstrate min heap
#include <iostream>
#include <queue>

using namespace std;

void showpq(priority_queue <int, vector<int>, greater<int>> gq)
{
    priority_queue <int, vector<int>, greater<int>> g = gq;
    while (!g.empty())
    {
        cout << '\t' << g.top();
        g.pop();
    }
    cout << '\n';
}

int main ()
{
    priority_queue <int, vector<int>, greater<int>> gquiz;
    gquiz.push(10);
    gquiz.push(30);
    gquiz.push(20);
    gquiz.push(5);
    gquiz.push(1);

    cout << "The priority queue gquiz is : ";
    showpq(gquiz);

    cout << "\ngquiz.size() : " << gquiz.size();
    cout << "\ngquiz.top() : " << gquiz.top();


    cout << "\ngquiz.pop() : ";
    gquiz.pop();
    showpq(gquiz);

    return 0;
}
Note : The above syntax is difficult to remembers, so in case of numeric values, we can multiply values with -1 and use max heap to get the effect of min heap
#include <iostream>
#include <queue> // priority_queue 也在这里
using namespace std;

void showpq(priority_queue<int> pq){
    while(!pq.empty()){
        cout << -1*pq.top()<< endl;
        pq.pop();
    }
}

int main(){

    // 实现 min heap    默认是max heap
    priority_queue<int> pq1;
    pq1.push(-10);
    pq1.push(-30);
    pq1.push(-5);
    pq1.push(-1);
    pq1.push(-20);

    cout << "priority_queue pq1:" << endl;
    showpq(pq1);

    cout <<"priority_queue size:" << pq1.size()<< endl;
    cout <<"priority_queue top:" << pq1.top()<< endl;

    cout <<"after pop(): " << endl;
    pq1.pop();
    showpq(pq1);


    return 0;
}
Associative Containers : implement sorted data structures that can be quickly searched (O(log n) complexity).(9-12)
9, set:
https://www.geeksforgeeks.org/set-in-cpp-stl/
Sets are a type of associative containers in which each element has to be unique, because the value of the element identifies it. The value of the element cannot be modified once it is added to the set, though it is possible to remove and add the modified value of that element.
#include <iostream>
#include <set>

using namespace std;

void showSet(set<int> s){
    for(auto it=s.cbegin();it!=s.cend();it++)
        cout << *it << endl;
}

int main(){

    set<int> s1; // 默认是 升序 排序
    s1.insert(40);
    s1.insert(20);
    s1.insert(30);
    s1.insert(10);
    s1.insert(40); // only one 40 will be added to

    cout << "display set" << endl;
    showSet(s1);


    return 0;
}
10, multiset
https://www.geeksforgeeks.org/multiset-in-cpp-stl/
Multisets are a type of associative containers similar to set, with an exception that multiple elements can have same values.
#include <iostream>
#include <set>

using namespace std;

void showMultiSet(multiset<int> ms){
    for(auto it=ms.cbegin();it!=ms.cend();it++)
        cout << *it << endl;
}

int main(){

    multiset<int> ms1; // 默认是 升序 排序
    ms1.insert(40);
    ms1.insert(20);
    ms1.insert(30);
    ms1.insert(10);
    ms1.insert(40);

    cout << "display multiset" << endl;
    showMultiSet(ms1);


    return 0;
}
11, map
https://www.geeksforgeeks.org/map-associative-containers-the-c-standard-template-library-stl/
Maps are associative containers that store elements in a mapped fashion. Each element has a key value and a mapped value. No two mapped values can have same key values.
补充: std::pair:
https://www.geeksforgeeks.org/returning-multiple-values-from-a-function-using-tuple-and-pair-in-c/
#include <iostream>
#include <string>
#include <map>

using namespace std;

void showMap(map<string,int> m){
    for(auto it = m.cbegin();it!= m.cend();it++)
        cout << it->first << " | " << it->second << endl;
}

int main(){

    map<string,int> m1;
    m1.insert(pair<string,int>("tom",18));
    m1.insert(pair<string,int>("jack",28));
    cout << "display map" << endl;
    showMap(m1);


    return 0;
}
12 , multimap
https://www.geeksforgeeks.org/multimap-associative-containers-the-c-standard-template-library-stl/
Multimap is similar to map with an addition that multiple elements can have same keys. Also, it is NOT required that the key value and mapped value pair has to be unique in this case.
#include <iostream>
#include <string>
#include <map>

using namespace std;

void showMultiMap(multimap<string,int> mm){
    for(auto it = mm.cbegin();it!= mm.cend();it++)
        cout << it->first << " | " << it->second << endl;
}

int main(){

    multimap<string,int> mm1;
    mm1.insert(pair<string,int>("tom",18));
    mm1.insert(pair<string,int>("jack",28));
    mm1.insert(pair<string,int>("tom",18));
    mm1.insert(pair<string,int>("tom",28));
    cout << "display multi map" << endl;
    showMultiMap(mm1);


    return 0;
}
Unordered Associative Containers : implement unordered data structures that can be quickly searched(13-16)
13 , unordered_set
https://www.geeksforgeeks.org/unordered_set-in-cpp-stl/
14 , unordered_multiset
https://www.geeksforgeeks.org/unordered_multiset-and-its-uses/
15 , unordered_map
https://www.geeksforgeeks.org/unordered_map-in-cpp-stl/
16 , unordered_multimap
https://www.geeksforgeeks.org/unordered_multimap-and-its-application/
总结:

二:Algorithms
The header algorithm defines a collection of functions especially designed to be used on ranges of elements.They act on containers and provide means for various operations for the contents of the containers.
1,sorting
https://www.geeksforgeeks.org/sort-algorithms-the-c-standard-template-library-stl/
Sorting is one of the most basic functions applied to data. It means arranging the data in a particular fashion, which can be increasing or decreasing. There is a builtin function in C++ STL by the name of sort().
This function internally uses IntroSort. In more details it is implemented using hybrid of QuickSort, HeapSort and InsertionSort.By default, it uses QuickSort but if QuickSort is doing unfair partitioning and taking more than N*logN time, it switches to HeapSort and when the array size becomes really small, it switches to InsertionSort.
The prototype for sort is :
sort(startaddress, endaddress)

startaddress: the address of the first element of the array
endaddress: the address of the next contiguous location of the last element of the array.
So actually sort() sorts in the range of [startaddress,endaddress)
#include <iostream>
#include <algorithm>
using namespace std;

void show(int* arr,int len){
    for(int i=0;i<len;i++)
        cout << arr[i] << endl;
}

int main(){
    int arr[] = {1,5,8,9,10,3,2,4,0};
    int len = sizeof(arr)/sizeof(arr[0]);
    cout << "before sorting is: " << endl;
    show(arr,len);

    sort(arr,arr+len);

    cout << "after sorting is: " << endl;
    show(arr,len);


    return 0;
}
2,searching
https://www.geeksforgeeks.org/binary-search-algorithms-the-c-standard-template-library-stl/
Binary search is a widely used searching algorithm that requires the array to be sorted before search is applied. The main idea behind this algorithm is to keep dividing the array in half (divide and conquer) until the element is found, or all the elements are exhausted.
It works by comparing the middle item of the array with our target, if it matches, it returns true otherwise if the middle term is greater than the target, the search is performed in the left sub-array.
If the middle term is less than target, the search is performed in the right sub-array.
The prototype for binary search is :
binary_search(startaddress, endaddress, valuetofind)

startaddress: the address of the first element of the array.
endaddress: the address of the last element of the array.
valuetofind: the target value which we have to search for.
#include <iostream>
#include <algorithm>
using namespace std;

void show(int* arr,int len){
    for(int i=0;i<len;i++)
        cout << arr[i] << endl;
}

int main(){
    int arr[] = {1,5,8,9,10,3,2,4,0};
    int len = sizeof(arr)/sizeof(arr[0]);
    sort(arr,arr+len);
    show(arr,len);

    if(binary_search(arr,arr+len,5))
        cout << "element found in the array" << endl;
    else
        cout << "element not found in the array" << endl;

    if(binary_search(arr,arr+len,11))
        cout << "element found in the array" << endl;
    else
        cout << "element not found in the array" << endl;


    return 0;
}
3, Important STL Algorithms
https://www.geeksforgeeks.org/c-magicians-stl-algorithms/
For all those who aspire to excel in competitive programming, only having a knowledge about containers of STL is of less use till one is not aware what all STL has to offer.
STL has an ocean of algorithms, for all < algorithm > library functions : Refer here.
Non-Manipulating Algorithms:
- sort(first_iterator, last_iterator) – To sort the given vector.
- reverse(first_iterator, last_iterator) – To reverse a vector.
- *max_element (first_iterator, last_iterator) – To find the maximum element of a vector.
- *min_element (first_iterator, last_iterator) – To find the minimum element of a vector.
- accumulate(first_iterator, last_iterator, initial value of sum) – Does the summation of vector elements
- count(first_iterator, last_iterator,x) – To count the occurrences of x in vector.
- find(first_iterator, last_iterator, x) – Points to last address of vector ((name_of_vector).end()) if element is not present in vector.
- binary_search(first_iterator, last_iterator, x) – Tests whether x exists in sorted vector or not.
- lower_bound(first_iterator, last_iterator, x) – returns an iterator pointing to the first element in the range [first,last) which has a value not less than ‘x’.
- upper_bound(first_iterator, last_iterator, x) – returns an iterator pointing to the first element in the range [first,last) which has a value greater than ‘x’.
Some Manipulating Algorithms:
- arr.erase(position to be deleted) – This erases selected element in vector and shifts and resizes the vector elements accordingly.
- arr.erase(unique(arr.begin(),arr.end()),arr.end()) – This erases the duplicate occurrences in sorted vector in a single line.
- next_permutation(first_iterator, last_iterator) – This modified the vector to its next permutation.
- prev_permutation(first_iterator, last_iterator) – This modified the vector to its previous permutation.
- distance(first_iterator,desired_position) – It returns the distance of desired position from the first iterator.This function is very useful while finding the index.
3,Useful Array algorithms
https://www.geeksforgeeks.org/useful-array-algorithms-in-c-stl/
#include <iostream>
#include <algorithm>
#include <numeric> // for iota
using namespace std;

void show(int* arr,int len){
    for(int i=0;i<len;i++)
        cout << arr[i] << endl;
}

int main(){
    int arr[] = {1,5,8,9,10,3,2,4,0};
    int len = sizeof(arr)/sizeof(arr[0]);
    bool ret = all_of(arr,arr+len,[](int x){return x>0;}); // 查看是否所有的元素都 > 0
    if(ret)
        cout << "all are positive ele"  << endl;
    else
        cout << "all are not positive ele"  << endl;

    ret = any_of(arr,arr+len,[](int x){return x>0;}); // 查看是否存在一个元素 > 0
    if(ret)
        cout << "exist a positive ele"  << endl;
    else
        cout << "don't exist positive ele"  << endl;

    ret = none_of(arr,arr+len,[](int x){return x <0;}); // 查看是否 所有元素都不满足 <0
    if(ret)
        cout << "yes"  << endl;
    else
        cout << "no"  << endl;


    int newarr[10];
    copy_n(arr,3,newarr); //copy n element to new arr.   Note: deep copy
    // display new arr
    for (int i=0;i<3;++i)
        cout << newarr[i] << endl;

    // iota()
    // to assign continuous val to array
    int arr2[6]  = {0};
    iota(arr2,arr2+6,20); // 头文件是  <numeric>
    cout << "after iota(20)" << endl;
    for(int i=0;i<6;i++)
        cout << arr2[i] << endl; // 20 21 22 23 24 25


    return 0;
}
4,Partition Operations
https://www.geeksforgeeks.org/stdpartition-in-c-stl/
C++ has a class in its STL algorithms library which allows us easy partition algorithms using certain inbuilt functions. Partition refers to act of dividing elements of containers depending upon a given condition.
#include <iostream>
#include <algorithm> // for partition algorithm
#include <vector>

using namespace std;

int main(){
    vector<int> vect = {2,1,5,6,8,7};

    // Checking if vector is partitioned
    // using is_partitioned()
    bool ret = is_partitioned(vect.begin(),vect.end(),[](int x){return x%2 == 0;});
    if (ret)
        cout << "Vector is partitioned" << endl;
    else
        cout << "Vector is not partitioned" << endl;

    partition(vect.begin(),vect.end(),[](int x){return x%2== 0;});

    ret = is_partitioned(vect.begin(),vect.end(),[](int x){return x%2 == 0;});
    if (ret)
        cout << "Vector is partitioned" << endl;
    else
        cout << "Vector is still not partitioned" << endl;
    cout <<"display vector after parition" << endl;
    for(int &x:vect)
        cout << x<< endl;


    return 0;
}
#include <iostream>
#include <algorithm> // for partition algorithm
#include <vector>

using namespace std;

int main(){
    vector<int> vect = {2,1,8,6,5,7};

    // partitioning vector using stable_partition()
    // in sorted order
    stable_partition(vect.begin(),vect.end(),[](int x){return x%2== 0;});

    cout <<"display vector after parition" << endl;
    for(int &x:vect)
        cout << x<< endl;

    // using partition_point() to get ending position of partition // 在这之前应该已经进行了分区
    auto it_end = partition_point(vect.begin(),vect.end(),[](int x){return x%2==0;});
    cout << "partition_point :" << endl;
    for(auto it = vect.begin();it!=it_end;it++)
        cout <<*it <<endl; //2 8 6


    return 0;
}
5, valarray class in C++
https://www.geeksforgeeks.org/std-valarray-class-c/
C++98 introduced a special container called valarray to hold and provide mathematical operations on arrays efficiently.
- It supports element-wise mathematical operations and various forms of generalized subscript operators, slicing and indirect access.
- As compare to vectors, valarrays are efficient in certain mathematical operations than vectors also.
Public member functions in valarray class :
a. apply() :- This function applies the manipulation given in its arguments to all the valarray elements at once and returns a new valarray with manipulated values.
b. sum() :- This function returns the summation of all the elements of valarrays at once.
#include <iostream>
#include <valarray>

using namespace std;

int main(){
    valarray<int> valarr = {10,2,20,1,30};
    // apply()
    valarray<int> newValArr = valarr.apply([](int x){return x= x+5;});

    cout << "display valarr" << endl;
    for(int & item:newValArr)
        cout << item<< endl;

    // sum()
    int res = valarr.sum();
    cout <<res << endl;

    res = newValArr.sum();
    cout <<res << endl;

    return 0;
}
c. min() :- This function returns the smallest element of valarray.
d. max() :- This function returns the largest element of valarray.
// C++ code to demonstrate the working of
// max() and min()
#include<iostream>
#include<valarray> // for valarray functions
using namespace std;
int main()
{
    // Initializing valarray
    valarray<int> varr = { 10, 2, 20, 1, 30 };

    // Displaying largest element of valarray
    cout << "The largest element of valarray is : ";
    cout << varr.max() << endl;

    // Displaying smallest element of valarray
    cout << "The smallest element of valarray is : ";
    cout << varr.min() << endl;

    return 0;

}
e. shift() :- This function returns the new valarray after shifting elements by the number mentioned in its argument. If the number is positive, left-shift is applied, if number is negative, right-shift is applied.
f. cshift() :- This function returns the new valarray after circularly shifting(rotating) elements by the number mentioned in its argument. If the number is positive, left-circular shift is applied, if number is negative, right-circular shift is applied.
#include <iostream>
#include <valarray>

using namespace std;

int main(){
    valarray<int> valarr = {10,2,20,1,30};


    // using shift() to shift elements to left
    // shifts valarray by 2 position
    valarray<int> ret =  valarr.shift(2);
    cout << "after shift(2) :"<< endl;
    for(int& item:ret)
        cout << item<< endl;

    // using cshift() to circulary shift elements to right
    // rotates valarray by 3 position
    valarray<int> ret2=  valarr.cshift(-3);
    cout << "after cshift(-3) :"<< endl;
    for(int& item:ret2)
        cout << item<< endl;


    return 0;
}
g. swap() :- This function swaps one valarray with other.
三:Functor
The STL includes classes that overload the function call operator. Instances of such classes are called function objects or functors. Functors allow the working of the associated function to be customized with the help of parameters to be passed.
1,Functors
https://www.geeksforgeeks.org/functors-in-cpp/
Please note that the title is Functors (Not Functions)!!
Consider a function that takes only one argument. However, while calling this function we have a lot more information that we would like to pass to this function, but we cannot as it accepts only one parameter. What can be done?
One obvious answer might be global variables. However, good coding practices do not advocate the use of global variables and say they must be used only when there is no other alternative.
Functors are objects that can be treated as though they are a function or function pointer. Functors are most commonly used along with STLs in a scenario like following:
Below program uses transform() in STL to add 1 to all elements of arr[].
#include <iostream>
#include <algorithm> // for transform();

using namespace std;

int increment(int x){return x+1;}
int main(){

    int arr[] = {1,2,3,4,5};
    int len = sizeof(arr)/sizeof(arr[0]);

    // Apply increment to all elements of
    // arr[] and store the modified elements
    // back in arr[]
    transform(arr,arr+len,arr,increment);
    for(int& item:arr)
        cout << item<< endl;
    return 0;
}
This code snippet adds only one value to the contents of the arr[]. Now suppose, that we want to add 5 to contents of arr[].
See what’s happening? As transform requires a unary function(a function taking only one argument) for an array, we cannot pass a number to increment(). And this would, in effect, make us write several different functions to add each number. What a mess. This is where functors come into use.
A functor (or function object) is a C++ class that acts like a function. Functors are called using the same old function call syntax. To create a functor, we create a object that overloads the operator().
#include <iostream>
#include <algorithm> // for transform();

using namespace std;

// A Functor
class increment{
    private:
        int num;
    public:
        increment(int n):num(n){}

        // This operator overloading enables calling operator function() on objects of increment
        int operator()(int arr_num) const{
            return num + arr_num;
        }


};

int main(){

    int arr[] = {1,2,3,4,5};
    int len = sizeof(arr)/sizeof(arr[0]);

    transform(arr,arr+len,arr,increment(1));
    for(int& item:arr)
        cout << item<< endl;

    cout << "=====" <<endl;
    transform(arr,arr+len,arr,increment(5));
    for(int& item:arr)
        cout << item<< endl;


    return 0;
}
2, 系统内建 Functor :
#include <iostream>
#include <algorithm> // for transform
#include <functional> // for in-build Functor

using namespace std;


int main(){

    int arr[] = {1,2,3,4,5};
    int len = sizeof(arr) /sizeof(arr[0]);


    // 6 个 算术Functor   只有negate 是 一元运算 其余都是二元运算
    // negate 取反
    transform(arr,arr+len,arr,negate<int>());
    for(int& item:arr)
        cout <<item <<endl;

    int arr1[]  = {10,20,30,40,50};
    len = sizeof(arr1)/sizeof(arr1[0]);
    int arr2[]  = {4,5,6,7,8};
    int res[len];
    // plus
    cout <<"plus" << endl;
    transform(arr1,arr1+len,arr2,res,plus<int>());
    for(int& item:res)
        cout <<item <<endl;

    // minus
    cout <<"minux" <<endl;
    transform(arr1,arr1+len,arr2,res,minus<int>());
    for(int& item:res)
        cout <<item <<endl;

    // multiplies
    cout << "multiplies" << endl;
    transform(arr1,arr1+len,arr2,res,multiplies<int>());
    for(int& item:res)
        cout <<item <<endl;

    // divides // 整除
    cout << "divides" << endl;
    transform(arr1,arr1+len,arr2,res,divides<int>());
    for(int& item:res)
        cout <<item <<endl;

    // modulus  取模
    cout << "modulus" << endl;
    transform(arr1,arr1+len,arr2,res,modulus<int>());
    for(int& item:res)
        cout <<item <<endl;


    return 0;
}
#include <iostream>
#include <algorithm> // for transform
#include <functional> // for in-build Functor

using namespace std;


int main(){

    // 6 个 关系Functor 都是二元运算符

    int arr1[]  = {4,4,7,7,8};
    int len = sizeof(arr1)/sizeof(arr1[0]);
    int arr2[]  = {4,5,6,7,8};
    bool res[len];
    // equal_to  等于
    cout <<"equal_to" << endl;
    transform(arr1,arr1+len,arr2,res,equal_to<int>());
    for(bool& item:res)
        cout <<item <<endl;

    // not_equal_to 不等于
    cout <<"not_equal_to" <<endl;
    transform(arr1,arr1+len,arr2,res,not_equal_to<int>());
    for(bool& item:res)
        cout <<item <<endl;

    // greater 大于
    cout <<"greater" <<endl;
    transform(arr1,arr1+len,arr2,res,greater<int>());
    for(bool& item:res)
        cout <<item <<endl;

    // greater_equal 大于等于
    cout <<"greater_equal" <<endl;
    transform(arr1,arr1+len,arr2,res,greater_equal<int>());
    for(bool& item:res)
        cout <<item <<endl;

    // less 小于
    cout <<"less" <<endl;
    transform(arr1,arr1+len,arr2,res,less<int>());
    for(bool& item:res)
        cout <<item <<endl;

    // less_equal 小于等于
    cout <<"less_equal" <<endl;
    transform(arr1,arr1+len,arr2,res,less_equal<int>());
    for(bool& item:res)
        cout <<item <<endl;


    return 0;
}
#include <iostream>
#include <algorithm> // for transform
#include <functional> // for in-build Functor

using namespace std;


int main(){

    // 3 个 逻辑Functor, not 为一元运算符,其他均为二元运算符

    // logical_not
    int arr1[]  = {4,4,0,7,8};
    int len = sizeof(arr1)/sizeof(arr1[0]);
    transform(arr1,arr1+len,arr1,logical_not<int>());
    cout << "logical_not" << endl;
    for (int& item:arr1)
        cout << item<< endl;

    int arr2[]  = {4,1,0,7,8};
    int arr3[]  = {0,0,1,7,8};
    int res[len];

    // logical_and
    transform(arr2,arr2+len,arr3,res,logical_and<int>());
    cout << "logical_and" << endl;
    for(int& item:res)
        cout << item << endl;

    // logical_or
    transform(arr2,arr2+len,arr3,res,logical_or<int>());
    cout << "logical_or" << endl;
    for(int& item:res)
        cout << item << endl;


    return 0;
}
四:Iterators
As the name suggests, iterators are used for working upon a sequence of values. They are the major feature that allow generality in STL.
1,Introduction to Iterators in C++
https://www.geeksforgeeks.org/introduction-iterators-c/
An iterator is an object (like a pointer) that points to an element inside the container. We can use iterators to move through the contents of the container. They can be visualized as something similar to a pointer pointing to some location and we can access the content at that particular location using them.
Iterators play a critical role in connecting algorithm with containers along with the manipulation of data stored inside the containers. The most obvious form of an iterator is a pointer. A pointer can point to elements in an array and can iterate through them using the increment operator (++). But, all iterators do not have similar functionality as that of pointers.
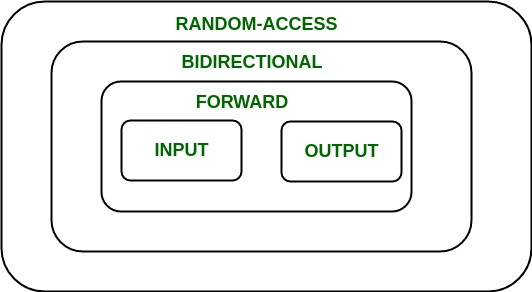
Depending upon the functionality of iterators they can be classified into five categories, as shown in the diagram below with the outer one being the most powerful one and consequently the inner one is the least powerful in terms of functionality.
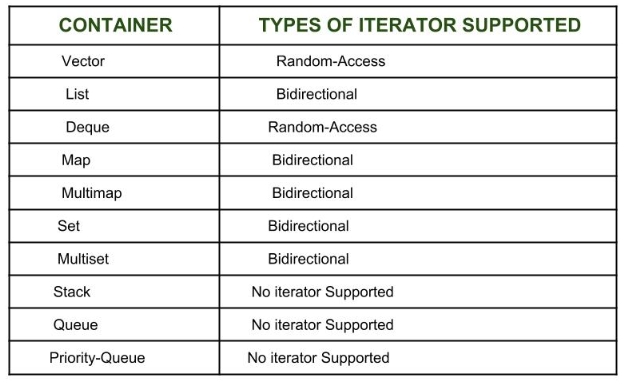
Now each one of these iterators are not supported by all the containers in STL, different containers support different iterators(现在STL中并不是所有的容器都支持这些迭代器,不同的容器支持不同的迭代器), like vectors support Random-access iterators, while lists support bidirectional iterators. The whole list is as given below:
Types of iterators: Based upon the functionality of the iterators, they can be classified into five major categories:
- Input Iterators: They are the weakest of all the iterators and have very limited functionality. They can only be used in a single-pass algorithms, i.e., those algorithms which process the container sequentially, such that no element is accessed more than once.
- Output Iterators: Just like input iterators, they are also very limited in their functionality and can only be used in single-pass algorithm, but not for accessing elements, but for being assigned elements.
- Forward Iterator: They are higher in the hierarachy than input and output iterators, and contain all the features present in these two iterators. But, as the name suggests, they also can only move in a forward direction and that too one step at a time.
- Bidirectional Iterators: They have all the features of forward iterators along with the fact that they overcome the drawback of forward iterators, as they can move in both the directions, that is why their name is bidirectional.
- Random-Access Iterators: They are the most powerful iterators. They are not limited to moving sequentially, as their name suggests, they can randomly access any element inside the container. They are the ones whose functionality are same as pointers.
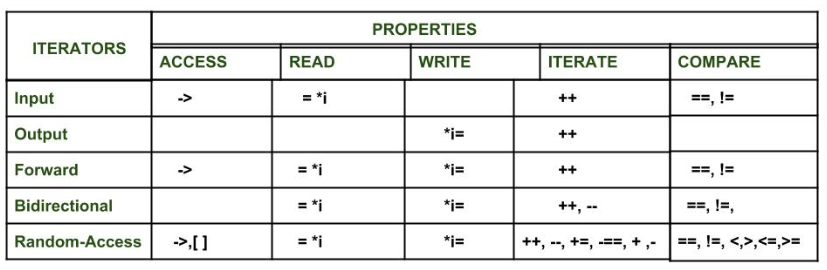
2,Iterators in C++ STL
https://www.geeksforgeeks.org/iterators-c-stl/
Iterators are used to point at the memory addresses of STL containers. They are primarily used in sequence of numbers, characters etc. They reduce the complexity and execution time of program.
1. begin() :- This function is used to return the beginning position of the container.
2. end() :- This function is used to return the after end position of the container.
#include <iostream>
#include <vector>

using namespace std;

int main(){

    vector<int> v1 = {1,2,3,4,5,6};
    for(vector<int>::iterator it = v1.begin();it!=v1.end();it++)
        cout << *it << endl;


    return 0;
}
3. advance() :- This function is used to increment the iterator position till the specified number mentioned in its arguments.
#include <iostream>
#include <vector>

using namespace std;

int main(){

    vector<int> v1 = {1,2,3,4,5,6};


    vector<int>::iterator it = v1.begin();


    advance(it,3);// point to index=3
    cout << *it << endl;


    return 0;
}
4. next() :- This function returns the new iterator that the iterator would point after advancing the positions mentioned in its arguments.
5. prev() :- This function returns the new iterator that the iterator would point after decrementing the positions mentioned in its arguments.
#include <iostream>
#include <vector>

using namespace std;

int main(){

    vector<int> v1 = {1,2,3,4,5,6,7};


    vector<int>::iterator it1 = v1.begin();
    vector<int>::iterator it2 = v1.end();

    auto it11 = next(it1,3);
    auto it22 = prev(it2,3);

    cout << *it11 << endl;
    cout << *it22 << endl;


    return 0;
}
6. inserter() :- This function is used to insert the elements at any position in the container. It accepts 2 arguments, the container and iterator to position where the elements have to be inserted.
#include <iostream>
#include <vector>

using namespace std;

int main(){

    vector<int> v1 = {1,2,3,4,5,6,7};
    vector<int> v2 = {8,8,8};


    vector<int>::iterator it1 = v1.begin();
    advance(it1,3);

    copy(v2.begin(),v2.end(),inserter(v1,it1)); // add v2 to v1(idx=3)
    for(int& item:v1)
        cout <<item<< endl;


    return 0;
}
五:Utility Library
Defined in header <utility>.
https://www.geeksforgeeks.org/pair-in-cpp-stl/
c++ 其他:
C++ bind1st and bind2nd
https://davidaneiss.wordpress.com/2013/09/10/understanding-the-stls-bind1st-and-bind2nd/
C++ is quite a strongly typed language - if a function requires an argument of type int and you provide a string, the compiler will complain. This is a good thing in that errors are reduced but it makes generic code (code which will work with different types of arguments) harder to write. Some of the apparent complexity of C++ (bind1st, for example) is due to the methods required to resolve this conflict of needs.
To many people, the bind1st() and bind2nd() functions seem like some kind of mysterious C++/STL voodoo, but its not as arcane as it might sound.
The background here is that we need to convert a function that requires two arguments into a function that requires only one. That function is wrapped into a functor. Recall that a functor is an class which has operator() defined, so it can be called like a function, but can have state (e.g., member variables). This is often used in the context of one of STL’s algorithms.
STL’s algorithms usually operate on unary functions (functions that require one parameter) but we often want to parameterize the said functor with two parameters, and hence need a bridge between these two cases.
So, lets say that you were iterating over some set of values and then wanted to count the occurrences of values for which some condition were true. What we want to do is use STL’s count_if() algorithm. count_if() is a templatized function that takes 3 parameters, the first and second being the begin and end iterators of the collection, and the 3rd must be what is called a UnaryPredicate(一元谓词,就是返回类型是bool 的 Functor).
So you could write such a functor that defines:
bool operator() (const typename &valInContainer)
{
// perform some test on valInContainer and return true/false
}
In this case, the functor takes just one argument. But what if we wanted to generalize the functor? For instance, what if we wanted to “perform some test on valInContainer” but that test involved some other value. In this case, we could hardcode our constant into the predicate’s operator(). This will work fine, but its not a general approach, since we might need to write another predicate class for a different constant value if that need arose.
In our above code, we could change it as follows:
bool operator()(const typename &valInContainer,const typename &comparisonValue)
{
// perform some test on valInContainer compared to
// comparisonValue and return true/false
}
That’s fine, but now we have a binary operator, and what we needed was a unary operator. Ok, so this is where bind1st() and bind2nd() come into the picture. You can use these to create an interface to the operator() that accepts the one parameter but supplies the second parameter. The bind1st() supplies the argument to the first place, so the second one is then the passed in argument, while bind2nd() does the opposite.
So effectively, when you bind1st(foo, 1), you are generating a functor with operator() defined to accept one parameter, but then turns around and calls your foo’s operator() with the value 1 as the first parameter and the accepted paremter as the second. bind2nd does the exact same thing, but with the second parameter being fixed as the argument to the bind2nd() function.
So, knowing this now, you could write the count_if() as,
count_if(container.begin(), container.end(), bind2nd(greater<int>(), 7));
In this case, we have a container that we are iterating over, and use the greater functor and bind the second argument 7 to it, producing a unary functor that compares its input to the value 7. This is then used by count_if to count all elements of said container that are greater than 7.
#include <iostream>
#include <vector>
#include <algorithm> // for count_if

using namespace std;

int main(){

    vector<int> v1 ={1,2,3,4,5,6,7,8,9,10};

    int cnt = count_if(v1.begin(),v1.end(),bind2nd(greater<int>(),6)); // item > 6
    cout<< cnt << endl;

    cnt = count_if(v1.begin(),v1.end(),bind1st(greater<int>(),6)); // 6 > item
    cout<< cnt << endl;

    return 0;
}
Make:
https://opensource.com/article/18/8/what-how-makefile
Basic examples
To summarize, below is the syntax of a typical rule:
target: prerequisites
<TAB> recipe
.PHONY : all sayhello generate clean

all:sayhello generate

sayhello:
	@echo "hello world"

generate:
	@touch "zcb.txt"

clean:
	@rm *.txt
Variables
In the above example, most target and prerequisite values are hard-coded, but in real projects, these are replaced with variables and patterns.
The simplest way to define a variable in a makefile is to use the = operator.
CC = gcc
CC = ${CC}    # 报错   Recursive variable 'CC' references itself (eventually).  Stop.

all:
    @echo ${CC}
To avoid this scenario, we can use the := operator (this is also called the simply expanded variable). We should have no problem running the makefile below:
CC := gcc
CC := ${CC}   # 不会报错

all:
    @echo ${CC}
# Advanced Example !!!
.PHONY : all clean

CC = gcc
SRCS = $(wildcard *.c)
BINS = $(SRCS:%.c=%)

all:${BINS}

%:%.o
	${CC} $< -o $@

%.o:%.c
	${CC} $< -c

clean:
	rm -rf *.o ${BINS}
Types of Prerequisites
There are actually two different types of prerequisites understood by GNU make: normal prerequisites such as described in the previous section, and order-only prerequisites.
Consider an example where your targets are to be placed in a separate directory, and that directory might not exist before make is run. In this situation, you want the directory to be created before any targets are placed into it but, because the timestamps on directories change whenever a file is added, removed, or renamed, we certainly don’t want to rebuild all the targets whenever the directory’s timestamp changes. One way to manage this is with order-only prerequisites: make the directory an order-only prerequisite on all the targets:

OBJDIR := objdir
OBJS := $(addprefix $(OBJDIR)/,aa.o bb.o cc.o dd.o)

all:$(OBJS)
	@echo 1

$(OBJDIR)/%.o:%.c
	@echo 2
	gcc $< -c -o $@

$(OBJS): | $(OBJDIR)
# 不能有 recipe

$(OBJDIR):
	@echo 3
	mkdir $(OBJDIR)
a:b
	touch a
b:c
	touch b
c:
	touch c

x:|y
	touch x
y:|z
	touch y
z:
	touch z
Makefile Function:
wildcard:
收集文件
objs := $(wildcard *.c)

all:
        @echo $(objs)

#output:
#c.c a.c b.c d.c
patsubst:
按照指定的pattern 来替换文本,
objs := $(patsubst %.c,%.o,$(wildcard *.c)) # 将.c 文件替换为 .o 文件
objs2 := $(patsubst %hello,%world,worldhello)

all:
        @echo $(objs)
        @echo $(objs2)

#output:
#c.o a.o b.o d.o
#worldworld
More Details:
https://www.gnu.org/software/make/manual/make.pdf
CMake:
https://cliutils.gitlab.io/modern-cmake/
difference between Make(Makefile) and CMake:
Make (or rather a Makefile) is a buildsystem - it drives the compiler and other build tools to build your code.
CMake is a generator of buildsystems. It can produce Makefiles, it can produce Ninja build files, it can produce KDEvelop or Xcode projects, it can produce Visual Studio solutions. From the same starting point, the same CMakeLists.txt file. So if you have a platform-independent project, CMake is a way to make it buildsystem-independent as well.
target_include_directories:
Now we've specified a target, how do we add information about it?
For example, maybe it needs an include directory,
if statement in cmake:
cmake_minimum_required(VERSION 3.10)

project(zcb)

set(CMAKE_CXX_STANDARD 14)

set(zcb on)

if(${zcb})
    message(STATUS "zcb on")
else()
    message(STATUS "zcb off")
endif()
if(variable)
    # If variable is `ON`, `YES`, `TRUE`, `Y`, or non zero number
else()
    # If variable is `0`, `OFF`, `NO`, `FALSE`, `N`, `IGNORE`, `NOTFOUND`, `""`, or ends in `-NOTFOUND`
endif()
# If variable does not expand to one of the above, CMake will expand it then try again
Macros and Functions
cmake_minimum_required(VERSION 3.10)

project(zcb)

set(CMAKE_CXX_STANDARD 14)

function(myfunc01)
    message(STATUS "hello world")
endfunction()

myfunc01()

function(myfunc02 arg1)
    message(STATUS "hello ${arg1}")
endfunction()

myfunc02("world02")
cmake_minimum_required(VERSION 3.10)

project(zcb)

set(CMAKE_CXX_STANDARD 14)

macro(mymacro01)
    message(STATUS "hello world")
endmacro()

mymacro01()

macro(mymacro02 arg1)
    message(STATUS "hello ${arg1}")
endmacro()

mymacro02("world02")
difference between macro and function:
cmake_minimum_required(VERSION 3.10)

project(zcb)

set(CMAKE_CXX_STANDARD 14)

set(var "ABC")

macro(Moo arg)
    message("arg = ${arg}")
    set(arg "abc")
    message("# after change the value of arg.")
    message("arg = ${arg}")
endmacro()
message("=== call macro ===")
Moo(${var})

function(Foo arg)
    message("arg = ${arg}")
    set(arg "abc")
    message("# after change the value of arg.")
    message("arg = ${arg}")
endfunction()
message("=== call function ===")
Foo(${var})

#output:
#=== call macro ===
#arg = ABC
# after change the value of arg.
#arg = ABC
#=== call function ===
#arg = ABC
# after change the value of arg.
#arg = abc
Note that the parameters to a macro and values such as ARGN are not variables in the usual CMake sense. They are string replacements much like the C preprocessor would do with a macro. If you want true CMake variables and/or better CMake scope control you should look at the function command.
Configure File

#include <iostream>
#include "config.h" // 这个文件将会由 cmake 生成
using namespace std;

int main(){

    cout << age << endl;

}
cmake_minimum_required(VERSION 3.10)

project(zcb)

set(CMAKE_CXX_STANDARD 14)

configure_file(
    "${PROJECT_SOURCE_DIR}/config.h.in"
    "${PROJECT_SOURCE_DIR}/config.h"
    )

add_executable(output a.cpp)
#define age 18
使用cmake 生成库:
#include "a.h"
#include <iostream>
using namespace std;

void print(){

    cout << "hello i'm a.cpp" <<endl;

}
#ifndef A_H
#define A_H

void print();


#endif
cmake_minimum_required(VERSION 3.10)

project(zcb)

set(CMAKE_CXX_STANDARD 14)

add_library(mydll SHARED a.cpp a.h)
导入第三方依赖(库):
目录结构:
├── CMakeLists.txt
├── include
│ └── a.h
├── libmydll.so
└── main.cpp
https://github.com/zzzcb/cmake/tree/master/cmake_3rd_dependence
使用 find_library():
cmake_minimum_required(VERSION 3.10)

project(zcb)

set(CMAKE_CXX_STANDARD 14)

#1 导入头文件
include_directories("include")

#2 得到可执行文件
add_executable(main main.cpp)

#3 使用 find_library 查找库文件 赋给变量 ,链接的时候可以直接使用变量
# 第一个MYLIB 表示变量名,即找到之后用这个变量来存着库文件
# 第二个mydll 表示要查找的库名称。 cmake具有隐式命名的规则, libaa.so  , 那么此处只需要写aa即可
# 第三个 HINTS 也可以写成PATHS 表示指定路径的意思
# 第四个 后面写的就是地址,表示到这个地址去查找库文件, 地址可以写多个。
find_library(MYLIB mydll PATHS ${PROJECT_SOURCE_DIR}/)


#4 链接第三方库 mydll 动态库
target_link_libraries(main ${MYLIB})
查找指定路径下的多个库文件:
有时候一个项目会打出来多个so文件,它们会放在同一个目录中,此时可以使用find_library 配合 foreach 来查找库
# 设置在哪些路径下查找动态库
set(GOOGLE_PATH ${PROJECT_SOURCE_DIR}/3rdparty/google/heima/lib)
set(GOOGLE_PATH ${GOOGLE_PATH} ${PROJECT_SOURCE_DIR}/3rdparty/google/itcast/lib)

# 设置查找的动态库有哪些
set(GOOGLE_LIBS_COM itcast heima)


# 遍历循环动态库,其实就是遍历两次,第一次遍历得到 itcast名字, 第二次得到heima的名字
# 这里只是遍历得到名字而已。
foreach(google_com ${GOOGLE_LIBS_COM})

# 遍历第一次去查找libitcast.so , 第二次去查找libheima.so
# 所以前面的这个变量名称也得跟着动态变化,不能固定写,否则永远只会有一个so文件。
    find_library(lib_${google_com} ${google_com} PATHS
            ${GOOGLE_PATH}
            NO_DEFAULT_PATH)

# 找到之后,使用变量GOOGLE_LIB寄存起来,使用增量设置。
    set(GOOGLE_LIB ${GOOGLE_LIB}; ${lib_${google_com}})
endforeach()

# 添加执行程序
add_executable(main main.cpp)

# 最后在这里与程序关联上
target_link_libraries(main ${GOOGLE_LIB})
System Calls in Linux:
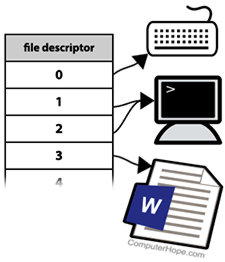
What is the File Descripter??
https://www.computerhope.com/jargon/f/file-descriptor.htm
File descriptor is integer that uniquely identifies an opened file.
file descriptors are known as file handles.
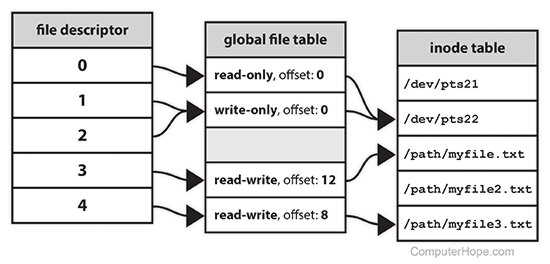
max number of file descriptor
To ensure good server performance, the total number of client connections, database files, and log files must not exceed the maximum file descriptor limit on the operating system (ulimit -n). By default, the directory server allows an unlimited number of connections but is restricted by the file descriptor limit on the operating system. Default, Linux systems limit the number of file descriptors that any one process may open to 1024 per process. (This condition is not a problem on Solaris machines, x86, x64, or SPARC).
After the directory server has exceeded the file descriptor limit of 1024 per process, any new process and worker threads will be blocked.
#include <stdio.h> // for sprintf()
#include <fcntl.h> // for creat()
#include <sys/stat.h> // for mkdir()
#include <string.h> //for memset()
#include <unistd.h> //for close()

int main(){

    // 创建 1025 个文件
    char buf[100] = {0};
    mkdir("aa",S_IRWXU|S_IRWXG|S_IROTH|S_IXOTH); // 创建目录aa  权限是 rwx rwx r-x
    for(int i=0;i<1025;i++){
        sprintf(buf,"aa/file%d.txt",i);
        int fd = creat(buf,S_IRUSR|S_IWUSR|S_IRGRP|S_IWGRP|S_IROTH); // rw- rw- r--
        //close(fd); // 如果不关闭 一个进程只能创建 1021 个文件(默认3个 文件描述符已经被占用了)  ,如果close(fd) 的话,就可以任意创建了

        memset(buf,0,sizeof(buf));
    }

    return 0;
}
How to set ulimit and file descriptors limit on Linux Servers
ulimit -n 查看最大文件描述符 的数量
ulimit -n 2048 临时设置文件描述符 的数量
要永久更改可以修改文件 /etc/security/limit.conf
file descriptor redirection
目录结构:
.
└── main.c
ls main.c aa 2>a.txt # 表示如果 ls main.c aa命令 有stderr 会重定向到a.txt
ls main.c aa 1>a.txt # 表示如果 ls main.c aa 命令 有stdout 会重定向到a.txt
ls main.c aa 2>a.txt 1>&2 # 表示如果 ls main.c aa命令 有stderr 会重定向到a.txt, 如果是stdout ,会重定向到stderr ,从而重定向到 a.txt
ls main.c aa 1>a.txt 2>&1 # 表示如果 ls main.c aa 命令 有stdout 会重定向到a.txt,如果是stderr,会重定向到stdout ,从而重定向到 a.txt
errnum:
错误信息,
/usr/include/asm-generic/errno-base.h
/usr/include/asm-generic/errno.h
char *strerror(int errnum); 查看对应errornum 的对应信息
#include <stdio.h> // for printf()
#include <string.h> // for strerror()

int main(){

    for (int i=0;i<100;i++){
        char * s = strerror(i);
        printf("%s\n",s);
    }

    return 0;
}
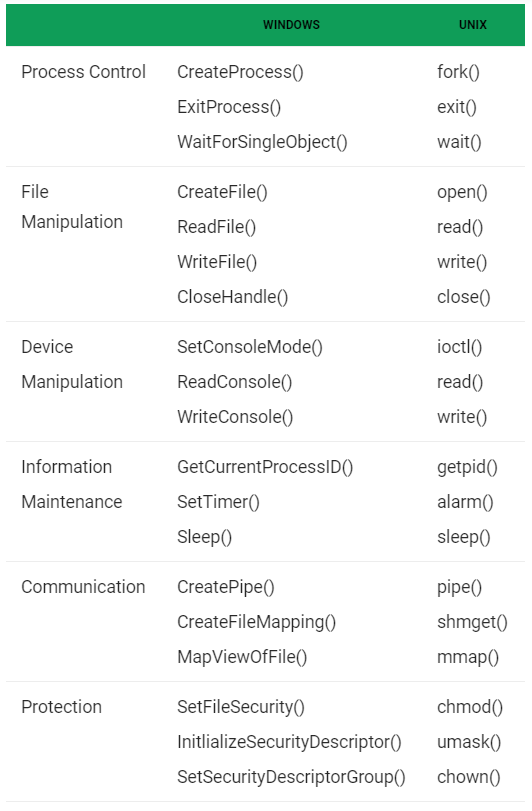
What is System Calls?
In computing, a system call is the programmatic way in which a computer program requests a service from the kernel of the operating system it is executed on. A system call is a way for programs to interact with the operating system. A computer program makes a system call when it makes a request to the operating system’s kernel. System call provides the services of the operating system to the user programs via Application Program Interface(API). It provides an interface between a process and operating system to allow user-level processes to request services of the operating system. System calls are the only entry points into the kernel system. All programs needing resources must use system calls.
Services Provided by System Calls :
- Process creation and management
- Main memory management
- File Access, Directory and File system management
- Device handling(I/O)
- Protection
- Networking, etc.
Types of System Calls : There are 5 different categories of system calls –
- Process control: end, abort, create, terminate, allocate and free memory.
- File management: create, open, close, delete, read file etc.
- Device management
- Information maintenance
- Communication
Some Examples of Windows and Unix System Calls:
其他函数:
- For file I/0
- creat(name, permissions)
- open(name, mode)
- close(fd)
- read(fd, buffer, num)
- write(fd, buffer, num)
- stat(name, buffer)
- fstat(fd, buffer)
- For process control
- fork()
- wait(status)
- execl(), execlp(), execv(), execvp()
- exit()
- signal(sig, handler)
- kill(sig, pid)
- For interprocess communication
- pipe(fildes)
System Calls vs Library Routines
The tricky thing about system calls is that they look very much like a library routine (or a regular function) that you have already been using (for instance, printf). The only way to tell which is a library routine and which is a system call is to remember which is which.
Another way to obtain information about the system call is to refer to Section 2 of the man pages. For instance, to find more about the "read" system call you could type:
man read
Some library functions have embedded system calls. For instance, the library routines scanf and printf make use of the system calls read and write. The relationship of library functions and system calls is shown in the below diagram (taken from John Shapley Gray's Interprocess Communications in UNIX)
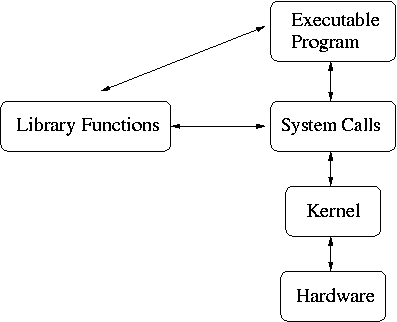
The arrows in the diagram indicate possible paths of communication. As shown, executable programs may make use of system calls directly to request the kernel to perform a specific function. Or, the executable program may invoke a library function which in turn may perform system calls.
For file I/0
- creat()
- open()
- read()
- write()
- close()
- stat()
- fstat()
- lstat()
- lseek()
- access()
- fcntl()
- dup()
- dup2()
1, creat():
Used to Create a new empty file.
Syntax in C language:
int creat(char *filename, mode_t mode)
Parameter :
- filename : name of the file which you want to create
- mode : indicates permissions of new file.
- S_IRUSR
- S_IRGRP
- S_IROTH
- S_IWUSR
- S_IWGRP
- S_IWOTH
- S_IXUSR
- S_IXGRP
- S_IXOTH
- S_RWXU
- S_RWXG
- S_RWXO
Returns :
- return first unused file descriptor (generally 3 when first creat use in process beacuse 0, 1, 2 fd are reserved)
- return -1 when error
How it work in OS
- Create new empty file on disk
- Create file table entry
- Set first unused file descriptor to point to file table entry
- Return file descriptor used, -1 upon failure
#include <stdio.h>
#include <fcntl.h>

int main(){

    int fd = creat("zcb.txt",S_IRUSR|S_IWUSR);
    if(fd <0)
        perror("creat() error");

    printf("新创建的文件描述符为 :%d\n",fd);


    return 0;
}
2, open():
Used to Open the file for reading, writing or both.
Syntax in C language
#include <fcntl.h>  // file control
int open (const char* Path, int flags [, int mode ]);
Parameters
- Path : path to file which you want to use
- use absolute path begin with “/”, when you are not work in same directory of file.
- Use relative path which is only file name with extension, when you are work in same directory of file.
- flags : How you like to use
- O_RDONLY: read only, O_WRONLY: write only, O_RDWR: read and write, O_CREAT: create file if it doesn’t exist, O_EXCL: prevent creation if it already exists
How it works in OS
- Find existing file on disk
- Create file table entry
- Set first unused file descriptor to point to file table entry
- Return file descriptor used, -1 upon failure
#include <stdio.h>
#include <fcntl.h>

int main(){


    int fd = open("zcb.txt",O_RDWR);
    if(fd <0)
        perror("open() error");

    printf("新打开的文件描述符为 :%d\n",fd);


    return 0;
}
3, read():
From the file indicated by the file descriptor fd, the read() function reads cnt bytes of input into the memory area indicated by buf. A successful read() updates the access time for the file.
Syntax in C language
#include <unistd.h>   // unix  std
size_t read (int fd, void* buf, size_t cnt);
Parameters
- fd: file descripter
- buf: buffer to read data from
- cnt: length of buffer
Returns: How many bytes were actually read
- return Number of bytes read on success
- return 0 on reaching end of file
- return -1 on error
- return -1 on signal interrupt
Important points
- buf needs to point to a valid memory location with length not smaller than the specified size because of overflow.
- fd should be a valid file descriptor returned from open() to perform read operation because if fd is NULL then read should generate error.
- cnt is the requested number of bytes read, while the return value is the actual number of bytes read. Also, some times read system call should read less bytes than cnt.
#include <stdio.h> //for printf perror
#include <stdlib.h> // for malloc
#include <string.h> // for memset
#include <fcntl.h> // for open()
#include <unistd.h> // for read()

int main(){


    int fd = open("zcb.txt",O_RDWR);
    if(fd <0)
        perror("open() error");
    else{
        char * p = (char *)malloc(sizeof(char)*100);
        int cnt;
        while((cnt = read(fd,p,100))>0){
            printf("%s",p);
            memset(p,0,100);
        }
    }

    return 0;
}
4, write():
Writes cnt bytes from buf to the file or socket associated with fd. cnt should not be greater than INT_MAX (defined in the limits.h header file). If cnt is zero, write() simply returns 0 without attempting any other action.
#include <unistd.h>
size_t write (int fd, void* buf, size_t cnt);
Parameters
- fd: file descripter
- buf: buffer to write data to
- cnt: length of buffer
Returns: How many bytes were actually written
- return Number of bytes written on success
- return 0 on reaching end of file
- return -1 on error
- return -1 on signal interrupt
Important points
- The file needs to be opened for write operations
- buf needs to be at least as long as specified by cnt because if buf size less than the cnt then buf will lead to the overflow condition.
- cnt is the requested number of bytes to write, while the return value is the actual number of bytes written. This happens when fd have a less number of bytes to write than cnt.
- If write() is interrupted by a signal, the effect is one of the following:
-If write() has not written any data yet, it returns -1 and sets errno to EINTR.
-If write() has successfully written some data, it returns the number of bytes it wrote before it was interrupted.
#include <stdio.h> //for printf perror
#include <string.h> // for strlen()
#include <fcntl.h> // for open()
#include <unistd.h> // for write()

int main(){


    int fd = open("zcb.txt",O_RDWR);
    if(fd <0)
        perror("open() error");
    else{
        char s[] = "hello world,我爱这世界\n";
        write(fd,s,strlen(s));
    }

    return 0;
}
5, close():
Tells the operating system you are done with a file descriptor and Close the file which pointed by fd.
Syntax in C language
#include <unistd.h>
int close(int fd);
Parameter
- fd :file descriptor
Return
- 0 on success.
- -1 on error.
How it works in the OS
- Destroy file table entry referenced by element fd of file descriptor table
– As long as no other process is pointing to it! - Set element fd of file descriptor table to NULL
#include <stdio.h> //for printf perror
#include <stdlib.h> // for exit()
#include <string.h> // for strlen()
#include <fcntl.h> // for open()
#include <unistd.h> // for read() write() close()

int main(){


    int fd = open("zcb.txt",O_RDWR);
    if(fd <0){
        perror("open() error");
        exit(1);
    }

    else{
        // something
    }
    if(close(fd) <0 ){
        perror("close() error");
        exit(1);
    }

    return 0;
}
6, stat():
Syntax in C language
#include <sys/stat.h>
int stat(const char *pathname, struct stat *statbuf);
#include <stdio.h>
#include <sys/stat.h>

int main(){

    struct stat stat_of_file;
    stat("zcb.txt",&stat_of_file);
    printf("st_mode %o \n",stat_of_file.st_mode);
    printf("st_uid %d\n",stat_of_file.st_uid);
    printf("st_gid %d\n",stat_of_file.st_gid);
    printf("st_blksize %ld\n",stat_of_file.st_blksize);
    printf("st_size %ld\n",stat_of_file.st_size);
    printf("st_nlink %ld\n",stat_of_file.st_nlink);// 硬链接数
    printf("File Permission User\n");
    printf((stat_of_file.st_mode & S_IRUSR)?"r":"-");
    printf((stat_of_file.st_mode & S_IWUSR)?"w":"-");
    printf((stat_of_file.st_mode & S_IXUSR)?"x":"-");
    printf("\nFile Permission Group\n");
    printf((stat_of_file.st_mode & S_IRGRP)?"r":"-");
    printf((stat_of_file.st_mode & S_IWGRP)?"w":"-");
    printf((stat_of_file.st_mode & S_IXGRP)?"x":"-");
    printf("\nFile Permission Others\n");
    printf((stat_of_file.st_mode & S_IROTH)?"r":"-");
    printf((stat_of_file.st_mode & S_IWOTH)?"w":"-");
    printf((stat_of_file.st_mode & S_IXOTH)?"x":"-");
    printf("\n");


    return 0;
}
7, fstat():
fstat is a system call that is used to determine information about a file based on its file descriptor.
Syntax in C language
#include <sys/stat.h>
int fstat(int fd, struct stat *statbuf);
#include <stdio.h> // for printf() perror()
#include <stdlib.h> // for exit()
#include <fcntl.h> // for open()
#include <unistd.h> // for close()
#include <sys/stat.h> //for stat() fstat() lstat()

int main(){
    int fd = open("zcb.txt",O_RDWR);
    if(fd < 0 ){
        perror("open() error");
        exit(1);
    }

    struct stat status_of_file;
    fstat(fd,&status_of_file);
    // do something with status_of_file object


    if(close(fd)< 0 ){
        perror("close() error");
        exit(1);
    }


    return 0;
}
8, lstat():
lstat is a system call that is used to determine information about a file based on its filename.
lstat is exactly the same as the stat system call. The only difference between the two is when the filename refers to a link. When this is the case, lstat returns information about the link itself, whereas stat returns information about the actual file.
9, lseek():
lseek is a system call that is used to change the location of the read/write pointer of a file descriptor. The location can be set either in absolute or relative terms.
off_t lseek(int fildes, off_t offset, int whence);
| Field | Description |
|---|---|
| int fildes | The file descriptor of the pointer that is going to be moved. |
| off_t offset | The offset of the pointer (measured in bytes). |
| int whence | The method in which the offset is to be interpreted (relative, absolute, etc.). Legal values for this variable are provided at the end. |
| return value | Returns the offset of the pointer (in bytes) from the beginning of the file. If the return value is -1, then there was an error moving the pointer. |
Available Values for whence
| Value | Meaning |
|---|---|
| SEEK_SET | Offset is to be measured in absolute terms. |
| SEEK_CUR | Offset is to be measured relative to the current location of the pointer. |
| SEEK_END | Offset is to be measured relative to the end of the file. |
#include <stdio.h> // for printf() perror()
#include <stdlib.h> // for exit()
#include <fcntl.h> // for open()
#include <unistd.h> // for close() lseek()

int main(){
    int fd = open("zcb.txt",O_RDWR);
    if(fd < 0 ){
        perror("open() error");
        exit(1);
    }

    lseek(fd,3,SEEK_SET); // 此时的位置是 3
    lseek(fd,3,SEEK_CUR); // 此时的位置是 6
    lseek(fd,3,SEEK_END); // 此时的位置是 倒数第3


    if(close(fd)< 0 ){
        perror("close() error");
        exit(1);
    }


    return 0;
}
10, access():
access() checks whether the calling process can access the file pathname.If pathname is a symbolic link, it is dereferenced.
#include <unistd.h>
int access(const char *pathname, int mode);
The mode specifies the accessibility check(s) to be performed, and is
either the value F_OK, or a mask consisting of the bitwise OR of one or
more of R_OK, W_OK, and X_OK. F_OK tests for the existence of the file.
R_OK, W_OK, and X_OK test whether the file exists and grants read, write,
and execute permissions, respectively.
RETURN VALUE:
On success (all requested permissions granted, or mode is F_OK and the file
exists), zero is returned. On error (at least one bit in mode asked for a
permission that is denied, or mode is F_OK and the file does not exist, or
some other error occurred), -1 is returned, and errno is set appropriately.
#include <stdio.h> // for printf() perror()
#include <stdlib.h> // for exit()
#include <unistd.h> // for  access()

int main(){

    int ret = access("zcb.txt",F_OK);
    if(ret <0 ){
        perror("file don't exist");
        exit(1);
    }
    printf("file exist\n");


    return 0;
}
11, fcntl():
阻塞和非阻塞:
1,阻塞:
A blocking system call is one that must wait until the action can be completed. read() would be a good example - if no input is ready, it'll sit there and wait until some is (provided you haven't set it to non-blocking, of course, in which case it wouldn't be a blocking system call). 例如,read() 函数在读设备文件,读管道,读网络 的时候,
Note : stdin ,stdout ,stderr 对应的设备文件是 /dev/tty .
#include <stdio.h>
#include <fcntl.h> // for open()
#include <unistd.h> // for read() close()
#include <string.h> // for memset()

int main(){

    int fd = open("/dev/tty",O_RDWR);

    char buf[100];
    int cnt = 0;
    while(1){
        cnt = read(fd,buf,sizeof(buf)); // 这里将会阻塞
        if(cnt){
            printf("already read: %s",buf);
        }
        memset(buf,0,sizeof(buf));
    }
    close(fd);

    return 0;
}
2, 非阻塞,
可以通过 设置 O_NONBLOCK 来设置非阻塞,
#include <stdio.h>
#include <fcntl.h> // for open()
#include <unistd.h> // for read() close() sleep()
#include <string.h> // for memset()

int main(){

    int fd = open("/dev/tty",O_RDWR|O_NONBLOCK); // 此时程序就不会阻塞了

    char buf[100];
    int cnt = 0;
    while(1){
        cnt = read(fd,buf,sizeof(buf)); // 读取不到 返回-1
        if(cnt > 0){
            printf("[already read %d]: %s",cnt,buf);
            memset(buf,0,sizeof(buf));
        }
        sleep(1); // 每次睡 1s
    }
    close(fd);

    return 0;
}
fcntl - manipulate file descriptor
#include <fcntl.h>
int fcntl(int fd, int cmd, ... /* arg */ );
#include <stdio.h> // for printf() perror()
#include <stdlib.h> // for exit()
#include <unistd.h> // for  close()
#include <fcntl.h> // for oepn() fcntl()

int main(){


    int fd = open("zcb.txt",O_RDWR);
    if(fd < 0 ){
        perror("open() error");
        exit(1);
    }

    // 改变 zcb.txt 的fd // 此时 fd 依然指向zcb.txt | 此时 newfd 和fd 都指向 zcb.txt
    printf("old file descriptor is :%d \n",fd);
    int newfd = fcntl(fd,F_DUPFD);
    printf("new file descriptor is :%d \n",newfd);


    if(close(fd) < 0 || close(newfd) ){
        perror("close(fd) error");
        exit(1);
    }


    return 0;
}
通过fcntl 设置 文件为非阻塞
100002
104002
running ...
running ...
sdfkl
[already read 6]: sdfkl
running ...
running ...
running ...
running ...
running ...
running ...
running ...
running ...
running ...
running ...
12, dup():
The dup() system call creates a copy of a file descriptor.
- It uses the lowest-numbered unused descriptor for the new descriptor.
- If the copy is successfully created, then the original and copy file descriptors may be used interchangeably.
- They both refer to the same open file description and thus share file offset and file status flags.
Syntax:
int dup(int oldfd);
oldfd: old file descriptor whose copy is to be created.
#include <stdio.h> // for printf() perror()
#include <fcntl.h> // for open()
#include <stdlib.h> // for exit()
#include <unistd.h> // for dup()
#include <string.h> // for strlen()

int main(){

    int fd = open("zcb.txt",O_WRONLY|O_APPEND);
    if(fd <0 ){
        perror("open() error");
        exit(1);
    }

    int copy_fd = dup(fd);

    char s1[] = "hello world\n";
    char s2[] = "world hello\n";

    write(copy_fd,s1,strlen(s1));
    write(fd,s2,strlen(s2));


    return 0;
}
13, dup2():
The dup2() system call is similar to dup() but the basic difference between them is that instead of using the lowest-numbered unused file descriptor, it uses the descriptor number specified by the user.
Syntax:
int dup2(int oldfd, int newfd);
oldfd: old file descriptor
newfd new file descriptor which is used by dup2() to create a copy.
Important points:
- Include the header file unistd.h for using dup() and dup2() system call.
- If the descriptor newfd was previously open, it is silently closed before being reused.
- If oldfd is not a valid file descriptor, then the call fails, and newfd is not closed.
- If oldfd is a valid file descriptor, and newfd has the same value as oldfd, then dup2() does
nothing, and returns newfd.
#include <stdio.h> // for printf() perror()
#include <fcntl.h> // for open()
#include <stdlib.h> // for exit()
#include <unistd.h> // for dup() dup2()
#include <string.h> // for strlen()

int main(){

    int fd = open("zcb.txt",O_WRONLY|O_APPEND);
    if(fd <0 ){
        perror("open() error");
        exit(1);
    }

    int copy_fd = dup2(fd,100); // 返回的copy_fd 是我们自己指定的 100

    char s1[] = "hello world\n";
    char s2[] = "world hello\n";

    write(copy_fd,s1,strlen(s1));
    write(fd,s2,strlen(s2));


    return 0;
}
#include <stdio.h> // for printf() perror()
#include <fcntl.h> // for open()
#include <stdlib.h> // for exit()
#include <unistd.h> // for dup() dup2()

int main(){

    int fd = open("zcb.txt",O_WRONLY|O_APPEND);
    if(fd <0 ){
        perror("open() error");
        exit(1);
    }

    int copy_fd = dup2(fd,1);  // 此时1不在指向stdout ,而是指向zcb.txt
    // 流程是:系统发现了 1 已经被占用了(stdout),所以会关闭1,然后再重新使用指向到 zcb.txt

    printf("copy_fd:%d \n",copy_fd); // 这也会到 zcb.txt 中

    // 此时 printf() 就不会输出到屏幕, 而是到我们的 zcb.txt
    printf("hello world\n");
    printf("把发生的开发及\n");


    return 0;
}
#include <stdio.h> // for printf() perror()
#include <fcntl.h> // for open()
#include <stdlib.h> // for exit()
#include <unistd.h> // for dup() dup2()

int main(){

    int fd = open("zcb.txt",O_WRONLY|O_APPEND);
    if(fd <0 ){
        perror("open() error");
        exit(1);
    }

    // 需求: 先输出到文件,再输出到屏幕

    int fd2 = dup(1);// fd2 和 1  指向着 屏幕; fd 指向 zcb.txt
    dup2(fd,1); //fd 和 1 此时指向了 zcb.txt, 1 不再指向 stdout; fd2 指向屏幕
    printf("hello world\n"); // 输出到文件zcb.txt
    fflush(stdout);  // stdout 代表1 文件描述符的指针


    dup2(fd2,1);// fd2 和 1 又都指向 屏幕 , fd 指向zcb.txt
    printf("把发生的开发及\n"); // 输出到屏幕


    return 0;
}
For process control
- fork()
- exec family
- getpid()
- getppid()
- 孤儿(orphan)/僵尸(zombie) 进程
- 守护进程 (Daemon process)
- wait()
- waitpid()
- exit()
- signal()
- sigaction()
- kill()
1, fork()
Fork system call is used for creating a new process, which is called child process, which runs concurrently with the process that makes the fork() call (parent process). After a new child process is created, both processes will execute the next instruction following the fork() system call. A child process uses the same pc(program counter), same CPU registers, same open files which use in the parent process.
It takes no parameters and returns an integer value. Below are different values returned by fork().
Negative Value: creation of a child process was unsuccessful.
Zero: Returned to the newly created child process.
Positive value: Returned to parent or caller. The value contains process ID of newly created child process.
#include <stdio.h> // for printf()
#include <unistd.h> // for fork()


int main(){

    fork();
    printf("hello world\n");


    return 0;
}
#include <stdio.h> // for printf()
#include <unistd.h> // for fork()


int main(){

    fork();
    fork();
    fork();
    printf("hello world\n");


    return 0;
}
#include <stdio.h>   // for printf()
#include <unistd.h>  // for fork()
void forkexample()
{
    // child process because return value zero
    if (fork() == 0)
        printf("Hello from Child!\n");

    // parent process because return value non-zero.
    else
        printf("Hello from Parent!\n");
}
int main()
{
    forkexample();
    return 0;
}

/* output
1.
Hello from Child!
Hello from Parent!
     (or)
2.
Hello from Parent!
Hello from Child!


*/
/*

In the above code, a child process is created. fork() returns 0 in the child process and positive integer in the parent process.
Here, two outputs are possible because the parent process and child process are running concurrently. So we don’t know whether the OS will first give control to the parent process or the child process.
*/
#include <stdio.h>  // for printf()
#include <unistd.h> // for fork()

void forkexample()
{
    int x = 1;

    if (fork() == 0)
        printf("Child has x = %d\n", ++x);
    else
        printf("Parent has x = %d\n", --x);
}
int main()
{
    forkexample();
    return 0;
}

/*
output :
Parent has x = 0
Child has x = 2
     (or)
Child has x = 2
Parent has x = 0

*/

/*
Here, global variable change in one process does not affected two other processes because data/state of two processes are different. And also parent and child run simultaneously so two outputs are possible.
*/
创建n个子进程,
例如,创建5个子进程,
#include <stdio.h> // for printf()
#include <unistd.h> // for fork() getpid() getppid() sleep()


int main(){

    for(int i=0;i<5 ;i++){

        if(fork() == 0){
            //child
            printf("[child %d]:pid:%d ppid:%d\n",i,getpid(),getppid());
            break;
        }else{
            //parent
            printf("[parent 第%d次生产]:pid:%d ppid:%d\n",i,getpid(),getppid());
        }
    }

    while(1){
        sleep(1);
    }

    return 0;
}

/*
[parent 第0次生产]:pid:6673 ppid:2184
[parent 第1次生产]:pid:6673 ppid:2184
[parent 第2次生产]:pid:6673 ppid:2184
[parent 第3次生产]:pid:6673 ppid:2184
[parent 第4次生产]:pid:6673 ppid:2184
[child 4]:pid:6678 ppid:6673
[child 3]:pid:6677 ppid:6673
[child 2]:pid:6676 ppid:6673
[child 1]:pid:6675 ppid:6673
[child 0]:pid:6674 ppid:6673
*/
#include <stdio.h> // for printf()
#include <unistd.h> // for fork() sleep()


int a = 10;
int main(){
    if(fork() == 0){
        //child
        a = 20;
        printf("child::a: %d\n",a);
        return 0;
    }else{
        //parent
    }

    sleep(1); // 确保 子进程 已经修改a 为20
    printf("parent::a: %d\n",a);


    return 0;
}
/* output:
 * child::a: 20
 * parent::a: 10
 */
/* 输出表明 父进程 和 子进程 不共享 全局变量
 */
fork() vs exec() family
The use of fork and exec exemplifies the spirit of UNIX in that it provides a very simple way to start new processes.
The fork call basically makes a duplicate of the current process, identical in almost every way. Not everything is copied over (for example, resource limits in some implementations) but the idea is to create as close a copy as possible.
The new process (child) gets a different process ID (PID) and has the PID of the old process (parent) as its parent PID (PPID). Because the two processes are now running exactly the same code, they can tell which is which by the return code of fork - the child gets 0, the parent gets the PID of the child. This is all, of course, assuming the fork call works - if not, no child is created and the parent gets an error code.
The exec call is a way to basically replace the entire current process with a new program. It loads the program into the current process space and runs it from the entry point.
Programs that know they're finished and just want to run another program don't need to fork, exec and then wait for the child. They can just load the child directly into their process space.
Note that there is a whole family of exec calls (execl, execle, execve and so on) but exec in context here means any of them.
The following diagram illustrates the typical fork/exec operation where the bash shell is used to list a directory with the ls command:
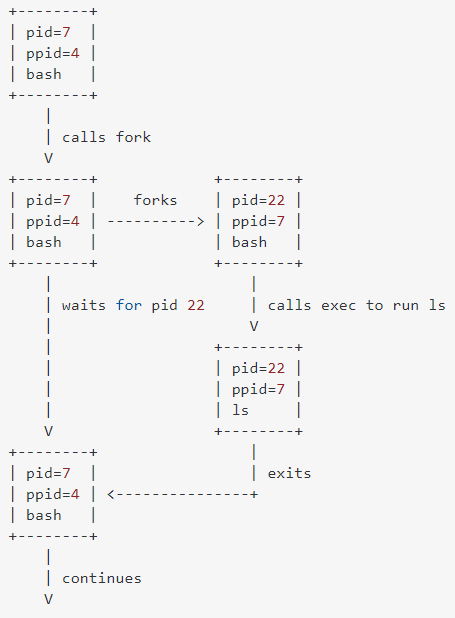
2, exec family
The exec family of functions replaces the current running process with a new process. It can be used to run a C program by using another C program. It comes under the header file unistd.h. There are many members in the exec family which are shown below with examples.
a, execvp : Using this command, the created child process does not have to run the same program as the parent process does. The exec type system calls allow a process to run any program files, which include a binary executable or a shell script .
Syntax:
int execvp (const char *file, char *const argv[]);
file: points to the file name associated with the file being executed.
argv: is a null terminated array of character pointers.
#include <stdio.h> // for printf()
#include <unistd.h> // for execvp()


int main(){

    char *args[] = {"./a.out",NULL}; // a.out 是已经存在的一个可执行程序
    execvp(args[0],args);
    /*
    All statements are ignored after execvp() call as this whole
                process is replaced by another process (./a.out)
                */
    printf("ending...\n");

    return 0;
}
b, execv : This is very similar to execvp() function in terms of syntax as well. The syntax of execv() is as shown below:
Syntax:
int execv(const char *path, char *const argv[]);
path: should point to the path of the file being executed.
argv[]: is a null terminated array of character pointers.
#include <stdio.h> // for printf()
#include <unistd.h> // for execvp()


int main(){

    char *args[] = {"./a.out",NULL}; // a.out 是已经存在的一个可执行程序
    execv(args[0],args);
    /*
    All statements are ignored after execv() call as this whole
                process is replaced by another process (./a.out)
                */
    printf("ending...\n");

    return 0;
}
c, execlp and execl : These two also serve the same purpose but the syntax of them are a bit different which is as shown below:
Syntax:
int execlp(const char *file, const char *arg,.../* (char  *) NULL */);
int execl(const char *path, const char *arg,.../* (char  *) NULL */);
file: file name associated with the file being executed
const char *arg and ellipses : describe a list of one or more pointers to null-terminated strings that represent the argument list available to the executed program.
d, execvpe and execle : These two also serve the same purpose but the syntax of them are a bit different from all the above members of exec family. The synatxes of both of them are shown below :
Syntax:
int execvpe(const char *file, char *const argv[],char *const envp[]);

Syntax:
int execle(const char *path, const char *arg, .../*, (char *) NULL,
char * const envp[] */);
The syntaxes above shown has one different argument from all the above exec members, i.e.
char * const envp[]: allow the caller to specify the environment of the executed program via the argument envp.
envp:This argument is an array of pointers to null-terminated strings and must be terminated by a null pointer. The other functions take the environment for the new process image from the external variable environ in the calling process.
3, getpid
returns the process ID of the calling process. This is often used by routines that generate unique temporary filenames.
Syntax:
pid_t getpid(void);
Return type: getpid() returns the process ID of the current process. It never throws any error therefore is always successful.
#include <stdio.h> // for printf()
#include <unistd.h> // for getpid()


int main(){

    int pid = getpid();
    printf("parent: %d\n",pid);
    if(fork() == 0){
        // child
    }else{
        // parent
    }

    return 0;
}
4, getppid
returns the process ID of the parent of the calling process. If the calling process was created by the fork() function and the parent process still exists at the time of the getppid function call, this function returns the process ID of the parent process. Otherwise, this function returns a value of 1 which is the process id for init process.
Syntax:
pid_t getppid(void);
Return type: getppid() returns the process ID of the parent of the current process. It never throws any error therefore is always successful.
#include <stdio.h> // for printf()
#include <unistd.h> // for getpid() getppid()


int main(){

    int pid = getpid();
    printf("parent::pid: %d\n",pid);
    int ppid = getppid();
    printf("parent::ppid: %d\n",ppid);

    if(fork() == 0){
        // child
    }else{
        // parent
    }

    return 0;
}
/*
   parent::pid: 4785
   parent::ppid: 2184
*/
#include <stdio.h> // for printf()
#include <unistd.h> // for getpid() getppid() sleep()


int main(){

    int pid = getpid();
    printf("parent::pid: %d\n",pid);
    int ppid = getppid();
    printf("parent::ppid: %d\n",ppid);

    if(fork() == 0){
        // child
        int child_pid = getpid();
        printf("child::pid: %d\n",child_pid);
        int child_ppid = getppid();
        printf("child::ppid: %d\n",child_ppid);
    }else{
        // parent
        sleep(1); // 为了不让 父进程死那么快, 不让子进程中的getppid() 得到的就是1 了
    }

    return 0;
}
/*
    parent::pid: 5205
    parent::ppid: 2184
    child::pid: 5206
    child::ppid: 5205
*/
5, 僵尸(zombie)/ 孤儿(orphan)进程
Zombie Process
A zombie process is a process whose execution is completed but it still has an entry in the process table. Zombie processes usually occur for child processes, as the parent process still needs to read its child’s exit status. Once this is done using the wait system call, the zombie process is eliminated from the process table. This is known as reaping the zombie process.
A diagram that demonstrates the creation and termination of a zombie process is given as follows:

#include <stdio.h> // for printf()
#include <unistd.h> // for fork() sleep()
#include <stdlib.h> // for exit()


int main(){

    if(fork() == 0){
        // children
        printf("parent ppid:%d child pid :%d\n",getppid(),getpid());
        exit(0);
    }else{
        // parent
        sleep(50); // 父进程没有 wait() // 此时 子进程就 变为了 zombie 进程
    }

    return 0;
}
Some of the important points of zombie processes:
- All the memory and resources allocated to a process are deallocated when the process terminates using the exit() system call. But the process’s entry in the process table is still available. This process is now a zombie process.
- The exit status of the zombie process zombie process can be read by the parent process using the wait() system call. After that, the zombie process is removed from the system. Then the process ID and the process table entry of the zombie process can be reused.
- If the parent process does not use the wait() system call, the zombie process is left in the process table. This creates a resource leak.
- If the parent process is not running anymore, then the presence of a zombie process indicates an operating system bug. This may not be a serious problem if there are a few zombie processes but under heavier loads, this can create issues for the system such as running out of process table entries.
- The zombie processes can be removed from the system by sending the SIGCHLD signal to the parent, using the kill command. If the zombie process is still not eliminated from the process table by the parent process, then the parent process is terminated if that is acceptable.
Dangers of Zombie Processes:
Zombie processes don't use any system resources but they do retain their process ID. If there are a lot of zombie processes, then all the available process ID’s are monopolized by them. This prevents other processes from running as there are no process ID’s available.
The presence of zombie processes also indicates an operating system bug if their parent processes are not running anymore. This is not a serious problem if there are a few zombie processes but under heavier loads, this can create issues for the system.
Orphan Process
Orphan means someone whose parents are dead. The same way this is a process, whose parents are dead, that means parents are either terminated, killed or exited but the child process is still alive.
#include <stdio.h> // for printf()
#include <unistd.h> // for fork() sleep()
#include <stdlib.h> // for exit()


int main(){

    if(fork() == 0){
        // children  // 子进程将会变为 孤儿进程  // 父进程死了,子进程还活着
        printf("parent:%d  child:%d\n",getppid(),getpid());

        sleep(50);
        printf("hello world\n");
    }else{
        // parent
        sleep(3);
    }

    return 0;
}
Reasons for Orphan Processes:
A process can be orphaned either intentionally or unintentionally. Sometime a parent process exits/terminates or crashes leaving the child process still running, and then they become orphans.
Also, a process can be intentionally orphaned just to keep it running. For example when you need to run a job in the background which don’t need any manual intervention and going to take long time, then you detach it from user session and leave it there. Same way, when you need to run a process in the background for infinite time, you need to do the same thing. Processes running in the background like this are known as daemon process.
At the same time, when a client connects to a remote server and initiated a process, and due to some reason the client crashes unexpectedly, the process on the server becomes Orphan.
Finding a Orphan Process:
It’s very easy to spot a Orphan process. Orphan process is a user process, which is having init (process id – 1) as parent. You can use this command in linux to find the Orphan processes.
# ps -elf | awk '{if ($5 == 1&& $3 !="root") {print $0 }}'
This will show you all the orphan processes running in your system. The output from this command confirms that they are Orphan processes but doesn’t mean that they are all useless, so confirm from some other source also before killing them.
Killing a Orphan Process:
As orphaned processes waste server resources, so it’s not advised to have lots of orphan processes running into the system. To kill a orphan process is same as killing a normal process.
kill <PID>
If that don’t work then simply use
# kill -9 <PID>
6, 守护进程 (Daemon process)
Daemons are processes that are often started when the system is bootstrapped and terminate only when the system is shut down. Because they don’t have a controlling terminal, they run in the background. UNIX systems have numerous daemons that perform day-to-day activities.
For developing a daemon process program in linux, one should keep in mind following points:
a, Remove association of the daemon process with any terminal: The best way to disassociate any process from a terminal is by creating a child process and terminating its parent parent. Any process initiated through a terminal will have the terminal as its parent. Hence, any child process forked out of a terminal initiated process would have terminal as its grandparent.
Terminal > Process1 > childProcess2
Terminating Process1 disassociates childProcess2 from its grandparent Terminal.(终止Process1 将childProcess2与其祖父母 Terminal 断开关联)
Following source code illustrates the same:
#include <stdio.h> // for printf()
#include <unistd.h> // for fork()
#include <stdlib.h> // for exit()


int main(){

    int ret = fork();
    if(ret == 0){
        // child

    }else{
        // parent
        printf("child pid : %d \n",ret);
        exit(0);
    }

    return 0;
}
b, Change the file mode maskings: Since, the newly created daemon process should be able to open, read and write any file anywhere, lets un-mask any file modes it has inherited as defaults. So, we give all the file rights to the daemon process through the unmask call.
umask(0);
c, Create a new session: Create a new session, so as the kernal could take care of the daemon process and identify it in the newly created session through its session id returned by this call.
With this call, the daemon process is no longer a child process, but a process group leader now.
    sid = setsid();//set new session
    if(sid < 0)
    {
        exit(1);
    }
d , Close standard inputs, outputs and errors: Since, a daemon process does not involve any user interaction, it is highly recommended to explicitly close the standard file descriptors i.e. stdout, stdin and stderr.
   close(STDIN_FILENO);
    close(STDOUT_FILENO);
    close(STDERR_FILENO);
e , A daemon process logic: There has to be a something for the daemon process to-do in the background, which is the logic of the daemon process. It could be anything based upon your requirement. The logic could be an infinite loop logic, i.e which keeps running in the background until the system kernal terminates. Or else, it could be a terminatory logic, which does its tasks and exits silently.
In our example, lets just open a file and write into it after every 1 second for a total of 10 seconds.
    fp = fopen ("zcb.txt", "w+");
    while (i < 10)
    {
        sleep(1);
        fprintf(fp, "%d", i);
        i++;
    }
    fclose(fp);
Here, it opens a file in the current directory in write mode and writes out the value of 'i' after every 1 second. The process continues till 10 seconds and terminates silently closing the file.
#include <stdio.h> // for printf() fopen() fclose()
#include <unistd.h> // for fork() close()
#include <stdlib.h> // for exit()
#include <sys/stat.h> // for umask()


int main(){

    int ret = fork();
    if(ret == 0){
        // child
    }else if(ret < 0){
        printf("fork failed\n");
        exit(1); // fork failed
    }
    else{
        // parent
        printf("child pid : %d \n",ret);
        // a
        exit(0);
    }

    // b
    umask(0); // give all file rights to the daemon process

    // c
    int sid = setsid(); // set new session
    if(sid < 0 ){
        printf("sid failed\n");
        exit(1);
    }

    // d
    close(STDIN_FILENO);
    close(STDOUT_FILENO);
    close(STDERR_FILENO);

    // e
    FILE * fp = fopen("zcb.txt","w+");
    for(int i=0;i< 10;i++ ){
        sleep(1);
        fprintf(fp,"%d\n",i);
    }
    fclose(fp);

    return 0;
}
6, wait()
The wait system-call puts the process to sleep and waits for a child-process to end. It then fills in the argument with the exit code of the child-process (if the argument is not NULL).
#include <stdio.h> // for printf()
#include <unistd.h>  // for fork()
#include <stdlib.h> // for exit()
#include <sys/wait.h> // for wait()


int main(){


    if(fork() == 0 ){
        //child
        exit(2);
    }else{
        // parent
        int exit_code; // 传出参数
        wait(&exit_code); // 将会被赋值为 2
        printf("child-process exit with : %d\n",WEXITSTATUS(exit_code));
        // 如果不需要 ,直接  wait(NULL);

    }

    return 0;
}
#include <stdio.h> // for printf()
#include <unistd.h>  // for fork()
#include <stdlib.h> // for exit()
#include <sys/wait.h> // for wait()


int main(){

    for(int i=0;i<5;i++){
        if(fork()== 0){
            // child
            printf("dada... \n");
            exit(i);
        }else{
            // parent
        }
    }

    int exit_code;
    int ret = wait(&exit_code); // 返回值是 wait 到的子进程的 pid
    printf("%d\n",ret);
    printf("child-process exit with : %d\n",WEXITSTATUS(exit_code));


    return 0;
}
wait 多个 子进程:
wait waits for a child process to terminate, and returns that child process's pid. On error (eg when there are no child processes), -1 is returned. So, basically, the code keeps waiting for child processes to finish, until the waiting errors out, and then you know they are all finished.
#include <stdio.h> // for printf()
#include <unistd.h>  // for fork()
#include <stdlib.h> // for exit()
#include <sys/wait.h> // for wait()


int main(){

    for(int i=0;i<5;i++){
        if(fork()== 0){
            // child
            printf("dada... \n");
            exit(i);
        }else{
            // parent
        }
    }

//    sleep(1);
    int exit_code;
    while((wait(&exit_code)) > 0){ // wait all child-process exit
        printf("child-process exit with : %d\n",WEXITSTATUS(exit_code));
    }

    return 0;
}
7, waitpid()
We know if more than one child processes are terminated, then wait() reaps any arbitrarily child process but if we want to reap any specific child process, we use waitpid() function.
Syntax in c language:
pid_t waitpid (child_pid, &status, options);
Options Parameter
- If 0 means no option parent has to wait for terminates child.
- If WNOHANG means parent does not wait if child does not terminate just check and return waitpid().(not block parent process)
- If child_pid is -1 then means any arbitrarily child, here waitpid() work same as wait() work.
Return value of waitpid()
- pid of child, if child has exited
- 0, if using WNOHANG and child hasn’t exited
#include <stdio.h> // for printf()
#include <unistd.h>  // for fork()
#include <stdlib.h> // for exit()
#include <sys/wait.h> // for wait()


int main(){

    int pid[5];
    for(int i=0;i<5;i++){
        if((pid[i]=fork())== 0){
            // child
            printf("dada... \n");
            exit(i);
        }else{
            // parent
        }
    }

    int exit_code;
    for(int i=0;i< 5;i++ ){
        waitpid(pid[i],&exit_code,0); // 会阻塞到这 ,然后wait 指定的 process
        printf("child-process exit with : %d\n",WEXITSTATUS(exit_code));
    }

    return 0;
}
WNOHANG 做轮训使用:
#include <stdio.h> // for printf()
#include <unistd.h>  // for fork()
#include <stdlib.h> // for exit() rand()
#include <sys/wait.h> // for wait()
#include <time.h> // for time()


int main(){


    srand(time(NULL));

    int pid[5];
    for(int i=0;i<5;i++){
        if((pid[i]=fork())== 0){
            // child
            printf("dada... \n");
            // sleep random second
            sleep(rand()%5+1);// 1 -> 5 随机
            exit(i);
        }else{
            // parent
        }
    }

    // 轮训来查看 是否有 子进程退出   // 1s 轮训一次
    int exit_code;
    while(1){
        sleep(1);
        int ret = waitpid(WAIT_ANY,&exit_code,WNOHANG); // 不会阻塞到这
        // 如果ret 为0 表示 child process hasn't exited
        // > 0 表示 exited's process pid
        if(ret == 0 ){
            printf("no child process exit\n");
        }else if(ret > 0){
            printf("child process:%d has exited\n",ret);
        }else if(ret < 0){
            printf("all child process has exited\n");
        }
        // do other processing
        printf("Other processing...\n");
    }

    return 0;
}
/*
 * dada...
 * dada...
 * dada...
 * dada...
 * dada...
 * no child process exit
 * Other processing...
 * child process:18416 has exited
 * Other processing...
 * child process:18417 has exited
 * Other processing...
 * child process:18418 has exited
 * Other processing...
 * child process:18419 has exited
 * Other processing...
 * child process:18420 has exited
 * Other processing...
 * all child process has exited
 * Other processing...
 * all child process has exited
 * Other processing...
 * all child process has exited
 * Other processing...
 * all child process has exited
 * Other processing...
 */
8, exit()
exit() terminates the calling process without executing the rest code which is after the exit() function.
#include <stdio.h> //for printf()
#include <stdlib.h> //for exit()


int main(){

    printf("begin\n");

    exit(1);


    printf("end\n");

    return 0;
}
9, signal()
a ,Signals in Linux
Signals in Linux is a very important concept to understand. This is because signals are used in some of the common activities that you do through Linux command line. For example, whenever you press Ctrl+c to terminate an executing command from command line, you use signals.
Whenever you use 'kill -9 [pid]' to kill a process, you use signals. So, it is very useful to know at least the basics of signals and that is exactly what we will discuss in this tutorial.
What is a Signal?:
A signal is nothing but a way of communicating a message from one process to another. These messages are popularly known as notifications which the receiving process is free to process, ignore or leave it up to the OS to take default action[接收进程可以自由处理、忽略或将其留给操作系统来执行默认操作] (more on these options later). A notification sent by the sender process to the receiving process can be of various types. For example, a notification can be to kill the receiving process or let it know that it has accessed an invalid memory area or it can be a notification of the availability of a resource (that was busy earlier) etc. So, you can see that signals are nothing but just another way of IPC (inter Process Communication).
Why Are Signals Important?
Signals are important, in-fact very important because they drive some of the most popular programming and system administration activities. For example, let's take the example of a debugger. Most of the programmers use a debugger to debug their program code while it is executing. If you would have ever used a debugger, you would know that breakpoints are used to halt the execution of a program at specified lines of code.
Did you ever think what makes a program aware that a breakpoint has been hit and it needs to halt the execution? Yes, it is a signal (SIGSTOP) that is sent to the program in this case. And when the user is done with debugging, a signal (SIGCONT) is sent to the program -- after which the program continues the execution.
So, this was one example. But there are numerous other activities that are completely dependent on signals.
How a Program Handles Signals?
A program can handle signals in the following three ways:
A program may provide its own signal handler for handling a particular signal - This is especially important in those cases where a program has to perform some tasks (for example - memory clean-up activities) in response to the received signal. A signal handler is nothing but a function defined in the program code that gets executed automatically (actually it gets triggered by the OS kernel) when a signal is received by the program.
A Program may do nothing on receipt of a signal - Every signal has a default action associated with it. In a scenario where a program just doesn't care for a signal, the default action corresponding to that particular signal is taken by the OS kernel.
A program may choose to ignore a signal - In this situation, the signal (or set of signals) are blocked and are hence not delivered to the program. A program may choose to ignore signals which -- the programmer thinks -- are irrelevant to it.
Different Types Of Signals:
To get a list of signals supported on your Linux system, just issue the following command:
kill -l
The -l option of the kill command is used to list the signal names. Here is the output of this command on my system:
1) SIGHUP 2) SIGINT 3) SIGQUIT 4) SIGILL 5) SIGTRAP
6) SIGABRT 7) SIGBUS 8) SIGFPE 9) SIGKILL 10) SIGUSR1
11) SIGSEGV 12) SIGUSR2 13) SIGPIPE 14) SIGALRM 15) SIGTERM
16) SIGSTKFLT 17) SIGCHLD 18) SIGCONT 19) SIGSTOP 20) SIGTSTP
21) SIGTTIN 22) SIGTTOU 23) SIGURG 24) SIGXCPU 25) SIGXFSZ
26) SIGVTALRM 27) SIGPROF 28) SIGWINCH 29) SIGIO 30) SIGPWR
31) SIGSYS 34) SIGRTMIN 35) SIGRTMIN+1 36) SIGRTMIN+2 37) SIGRTMIN+3
38) SIGRTMIN+4 39) SIGRTMIN+5 40) SIGRTMIN+6 41) SIGRTMIN+7 42) SIGRTMIN+8
43) SIGRTMIN+9 44) SIGRTMIN+10 45) SIGRTMIN+11 46) SIGRTMIN+12 47) SIGRTMIN+13
48) SIGRTMIN+14 49) SIGRTMIN+15 50) SIGRTMAX-14 51) SIGRTMAX-13 52) SIGRTMAX-12
53) SIGRTMAX-11 54) SIGRTMAX-10 55) SIGRTMAX-9 56) SIGRTMAX-8 57) SIGRTMAX-7
58) SIGRTMAX-6 59) SIGRTMAX-5 60) SIGRTMAX-4 61) SIGRTMAX-3 62) SIGRTMAX-2
63) SIGRTMAX-1 64) SIGRTMAX
So you can see that the output consists of all the signals supported by my system. To get an idea about some of the popular signals, read C++Signals tutorial.
If you are a system administrator or a power command line user, you would have definitely used the following command to kill a process :
kill -9 <pid>
Where pid is the identifier of the process that you want to kill.
Did you ever think what exactly -9 signifies? Well, it signifies a signal with numeric value 9. Yes, signals (as you can see in the output of 'kill -l' above) have numeric values associated with them. To know which signal has numeric value of 9, use the following command:
$ kill -l 9
KILL
So you can see that numeric value 9 corresponds to SIGKILL. Similarly, if it required to translate a signal name to its numeric value, you can use the same command.
For example :
$ kill -l KILL
9
So you can see that this way, numeric value corresponding to a signal name can be fetched.
SIGSTOP AND SIGKILL Signals:
The signals SIGSTOP and SIGKILL deserve a special mention because of the fact that these signals cannot be handled by programs.
SIGSTOP - This signal is sent by a process in order to halt a program so that it can be debugged. Now, suppose if the programs were given the capability of handling this signal and a program accidentally chooses to ignore this signal, then that program cannot be debugged ever.
SIGKILL - This signal is sent by a process in order to terminate the receiving process immediately. This means that the termination is abnormal and not graceful. This signal is used in cases where a process hangs or is to be terminated immediately -- for example, this signal is used by OS kernel sometimes when the system is shutdown.
Characteristics Of Signals(信号的特征)
Here are some of the important characteristics of Linux signals:
- If a process has multiple threads then a signal interrupts only a single thread and not the complete process -- This applies to Linux kernel version 2.6 and higher.
- A signal handler can also get interrupted by the receipt of another signal
- Besides standard set of signals. There can be user defined signals too.
- In terms of code, signal handling can be done by using functions like signal() and sigaction().
b ,signal() Function
In this article, we will discuss the practical aspects of signal handling in Linux through the signal() function. All the explanations will be accompanied by practical examples.
Signal Handlers
A signal handler is special function (defined in the software program code and registered with the kernel) that gets executed when a particular signal arrives. This causes the interruption of current executing process and all the current registers are also saved. The interrupted process resumes once the signal handler returns.
The signal() Function
The simplest way to register signal handler function with the kernel is by using the signal() function.
Here is the syntax of signal() function :
#include <signal.h>

typedef void (*sighandler_t)(int);

sighandler_t signal(int signum, sighandler_t handler);
So you can see that a signal handler is a function that accepts an integer argument but returns void. The signal handler can be registered with kernel using the signal() function (described above) that accepts a particular signal number and signal handler function name (though there can be other values for the second argument but we will discuss them later).
Here is a working example of signal handling in Linux through the signal() function :
#include <stdio.h> //for printf()
#include <stdlib.h> //for exit()
#include <signal.h>// for signal() SIGINT
#include <unistd.h> // for sleep()

void sig_handler(int sig_num){
    if(sig_num == SIGINT){
        printf("Caught the SIGINT signal\n");
    }else{
        printf("Caught the signal number [%d]\n",sig_num);
    }
    // Do all the neccary clean-up work here

    exit(sig_num);
}

int main(){
    // register signal handler through the signal() function.
    signal(SIGINT,sig_handler);

    while(1){
        sleep(1); //simulate a delay -- as if the program is doing some other stuff
    }


    return 0;
}
In the program code shown above :
Inside the main() function, the signal() function is used to register a handler (sig_handler()) for SIGINT signal.
The while loop simulates an infinite delay. So, the program waits for SIGNIT signal infinitely.
The signal handler 'sig_handler' prints a debug statement by checking if the desired signal is SIGINT or not.
The signal handler is mostly used to do all the clean-up and other related stuff after a signal is delivered to a process.
Here is the output of this program :
$ ./sig_example
^C
Caught the SIGINT signal
So you can see that the program was executed and then the signal SIGINT is passed to it by pressing the Ctrl+c key combination. As can be seen from the debug print in the output, the signal handler was executed as soon as the signal SIGINT was delivered to the process.
Disposition Of A Signal
To understand the concept of disposition of a signal, lets revisit the declaration of signal function :
sighandler_t signal(int signum, sighandler_t handler);
The second argument to the signal() function is known as the disposition of a signal. As of now, we learned that the second argument is a signal handling function but this is not the only type of signal disposition method. Other ways of disposition of a a signal are to specify SIG_IGN (ignore)or SIG_DFL (default) as the second argument to the signal function.
If the disposition is set to SIG_IGN then the signal (passed as the first argument to signal() function) is ignored and not delivered to the process but if the disposition is set to SIG_DFL then the default action corresponding to that signal is taken.
Here is an example of a code that ignores the SIGINT signal :
#include <stdio.h> //for printf()
#include <stdlib.h> //for exit()
#include <signal.h>// for signal() SIGINT
#include <unistd.h> // for sleep()


int main(){
    // register signal handler through the signal() function.
    signal(SIGINT,SIG_IGN); //sig ignore

    while(1){
        sleep(1); //simulate a delay -- as if the program is doing some other stuff
    }

    return 0;
}
So you can see that there is no signal handler function now as the second argument to the signal function is replaced with SIG_IGN.
Here is the output of this program :
$ ./sig_example
^C^C^C^C^C^C^C^C^C^C^C^C^C^C^C^C^C^C^C^C
So you can see that despite of repeatedly pressing Ctrl+c, the process was not affected in any way. This is because the signal SIGINT (generated when Ctrl+c is pressed) is ignored.
Similarly, here is a program code that leaves SIGINT to its default action :
#include <stdio.h> //for printf()
#include <stdlib.h> //for exit()
#include <signal.h>// for signal() SIGINT
#include <unistd.h> // for sleep()


int main(){
    // register signal handler through the signal() function.
    signal(SIGINT,SIG_DFL); //default signal handler

    while(1){
        sleep(1); //simulate a delay -- as if the program is doing some other stuff
    }

    return 0;
}
So you can see that the second argument to the signal function (in the code shown above) is replaced with SIG_DFL in this case.
And here is the output of this program :
$ ./sig_example
^C
$
The signal() Function Limitations
Though the signal() function is the oldest and the easiest way to handle signals, it has a couple of major limitations :
- Other signals are not blocked by the signal() function while the signal handler is executing for current signal. This may produce undesired results.
- The signal action for a particular signal is reset to its default value i.e., SIG_DFL as soon as the signal is delivered. This means that even if the signal handler again sets the signal action as the first step, there is a possible time window in which the signal may occur again while its action is set to SIG_DFL.
Due to these major limitations, it is now advised to use the function sigaction() that overcomes all these limitations.
10, sigaction()
#include <signal.h>
int sigaction(int signum, const struct sigaction *act,struct sigaction *oldact);
The sigaction() system call is used to change the action taken by a process on receipt of a specific signal.
signum specifies the signal and can be any valid signal except SIGKILL and SIGSTOP.
If act is non-null, the new action for signal signum is installed from act. If oldact is non-null, the previous action is saved in oldact.
The sigaction structure is defined as something like
struct sigaction {
    void (*sa_handler)(int);
    void (*sa_sigaction)(int, siginfo_t *, void *);
    sigset_t sa_mask;
    int sa_flags;
    void (*sa_restorer)(void);
}
On some architectures a union is involved: do not assign to both sa_handler and sa_sigaction.
The sa_restorer element is obsolete and should not be used. POSIX does not specify a sa_restorer element.
sa_handler specifies the action to be associated with signum and may be SIG_DFL for the default action, SIG_IGN to ignore this signal, or a pointer to a signal handling function. This function receives the signal number as its only argument.
If SA_SIGINFO is specified in sa_flags, then sa_sigaction (instead of sa_handler) specifies the signal-handling function for signum. This function receives the signal number as its first argument, a pointer to a siginfo_t as its second argument and a pointer to a ucontext_t (cast to void *) as its third argument.
sa_mask gives a mask of signals which should be blocked during execution of the signal handler. In addition, the signal which triggered the handler will be blocked, unless the SA_NODEFER flag is used.
sa_flags specifies a set of flags which modify the behaviour of the signal handling process. It is formed by the bitwise OR of zero or more of the following:
| Tag | Description |
|---|---|
| SA_NOCLDSTOP | |
| If signum is SIGCHLD, do not receive notification when child processes stop (i.e., when they receive one of SIGSTOP, SIGTSTP, SIGTTIN or SIGTTOU) or resume (i.e., they receive SIGCONT) (see wait(2)). | |
| SA_NOCLDWAIT | |
| (Linux 2.6 and later) If signum is SIGCHLD, do not transform children into zombies when they terminate. See also waitpid(2). | |
| SA_RESETHAND | |
| Restore the signal action to the default state once the signal handler has been called. SA_ONESHOT is an obsolete, non-standard synonym for this flag. | |
| SA_ONSTACK | |
| Call the signal handler on an alternate signal stack provided by sigaltstack(2). If an alternate stack is not available, the default stack will be used. | |
| SA_RESTART | |
| Provide behaviour compatible with BSD signal semantics by making certain system calls restartable across signals. | |
| SA_NODEFER | |
| Do not prevent the signal from being received from within its own signal handler. SA_NOMASK is an obsolete, non-standard synonym for this flag. | |
| SA_SIGINFO | |
| The signal handler takes 3 arguments, not one. In this case, sa_sigaction should be set instead of sa_handler. (The sa_sigaction field was added in Linux 2.1.86.) | |
sigaction() returns 0 on success and -1 on error.
#include <stdio.h> //for printf() perror()
#include <signal.h>// for sigaction()
#include <unistd.h> // for sleep()
#include <string.h> // for memset()

static void handler(int signum,siginfo_t *siginfo,void* context){
    printf("Signal number: %d\n",siginfo->si_signo);
    printf("Sending PID: %ld\n",(long)siginfo->si_pid);
    printf("Real user ID of sending process: %ld\n",(long)siginfo->si_uid);

}

int main(){

    struct sigaction act;
    memset(&act,'\0',sizeof(act));

    //Use the sa_sigaction field because the handles has two additional parameters
    act.sa_sigaction = &handler;

    //The SA_SIGINFO flag tells sigaction() to use the sa_sigaction field, not sa_handler
    act.sa_flags = SA_SIGINFO;

    if(sigaction(SIGINT,&act,NULL)<0){
        perror("sigaction");
        return 1;
    }

    while(1){
        sleep(5);
    }


    return 0;
}
了解更多 : $ man 2 sigaction
11, kill()
kill - send signal to a process
#include <signal.h>
int kill(pid_t pid, int sig);
#include <stdio.h> // for printf()
#include <unistd.h> // for fork() sleep()
#include <signal.h> // for kill()
#include <stdlib.h> // for exit()


int main(){

    int ret = fork();
    if(ret == 0 ){
        // child
        //will not ever get to 15, because
        //the parent process will kill it
        for(int i=0;i<15;i++){
            printf("in child process\n");
            sleep(1);
        }
    }else if(ret >0 ){
        // parent
        for(int i=0;i<5;i++) {
            printf("in parent process\n");
            sleep(1);
        }
        kill(ret,SIGKILL);
    }else{
        // something error
        //exit(1);
        exit(EXIT_FAILURE);
    }


    //return 0;
    return EXIT_SUCCESS;
}
For interprocess communication
- pipe() 无名管道
- FIFO 有名管道
- mmap()
1, pipe():
Conceptually, a pipe is a connection between two processes, such that the standard output from one process becomes the standard input of the other process. In UNIX Operating System, Pipes are useful for communication between related processes(inter-process communication).
- Pipe is one-way communication only i.e we can use a pipe such that One process write to the pipe, and the other process reads from the pipe. It opens a pipe, which is an area of main memory that is treated as a “virtual file”.
- The pipe can be used by the creating process, as well as all its child processes, for reading and writing. One process can write to this “virtual file” or pipe and another related process can read from it.
- If a process tries to read before something is written to the pipe, the process is suspended until something is written.
- The pipe system call finds the first two available positions in the process’s open file table and allocates them for the read and write ends of the pipe.
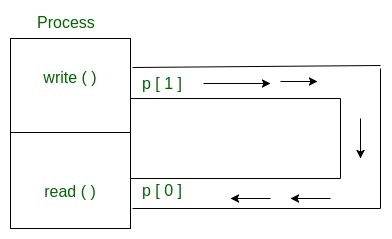
Syntax in C language:
int pipe(int fds[2]);

Parameters :
fd[0] will be the fd(file descriptor) for the read end of pipe.
fd[1] will be the fd for the write end of pipe.
Returns :
0 on Success.
-1 on error.
Pipes behave FIFO(First in First out), Pipe behave like a queue data structure. Size of read and write don’t have to match here. We can write 512 bytes at a time but we can read only 1 byte at a time in a pipe.
#include <stdio.h> // for printf()
#include <unistd.h> // for pipe()
#include <stdlib.h> // for exit()

int main(){

    int fds[2];
    if(pipe(fds)< 0 ){
        exit(1);
    }

    char* msg1 = "helloworld1";
    char* msg2 = "helloworld2";
    char* msg3 = "helloworld3";

    // write pipe
    write(fds[1],msg1,12);
    write(fds[1],msg2,12);
    write(fds[1],msg3,12);

    char buf[12];
    for(int i=0;i<3;i++){
        // read pipe
        read(fds[0],buf,12);
        printf("%s\n",buf);
    }


    return 0;
}
Parent and child sharing a pipe
When we use fork in any process, file descriptors remain open across child process and also parent process. If we call fork after creating a pipe, then the parent and child can communicate via the pipe.
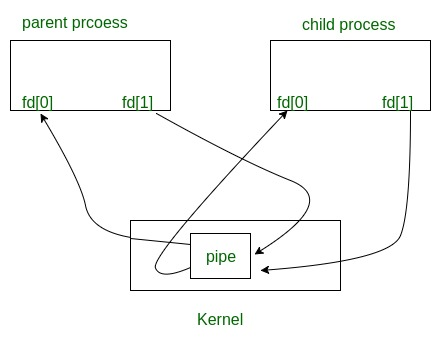
#include <stdio.h> // for printf()
#include <unistd.h> // for pipe() sleep()
#include <stdlib.h> // for exit()
#include <wait.h> // for wait()

int main(){

    char* msg1 = "helloworld1";
    char* msg2 = "helloworld2";
    char* msg3 = "helloworld3";

    int fds[2];
    if(pipe(fds)< 0 ){ // 创建 pipe
        exit(1);
    }

    if(fork() == 0){
        printf("parent:%d child:%d \n",getppid(),getpid());
        // child
        sleep(1); // 1s 之后 写入内容
        write(fds[1],msg1,12);
        sleep(2); // 2s 之后 写入内容
        write(fds[1],msg2,12);
        sleep(3); // 3s 之后 写入内容
        write(fds[1],msg3,12);

    }else{
        // parent
        char buf[12];
        int cnt;
        while((cnt = read(fds[0],buf,12))>0){
            printf("%s\n",buf);
        }

        printf("Finished reading\n");

        wait(NULL); // 等待子进程结束
    }


    return 0;
}

/*
hello world, #1
hello world, #2
hello world, #3
(hangs)         //program does not terminate but hangs
*/
#include <stdio.h> // for printf()
#include <unistd.h> // for pipe() sleep()
#include <stdlib.h> // for exit()
#include <wait.h> // for wait()

int main(){

    char* msg1 = "helloworld1";
    char* msg2 = "helloworld2";
    char* msg3 = "helloworld3";

    int fds[2];
    if(pipe(fds)< 0 ){ // 创建 pipe
        exit(1);
    }

    if(fork() == 0){
        printf("parent:%d child:%d \n",getppid(),getpid());
        // child
        sleep(1); // 1s 之后 写入内容
        write(fds[1],msg1,12);
        sleep(2); // 2s 之后 写入内容
        write(fds[1],msg2,12);
        sleep(3); // 3s 之后 写入内容
        write(fds[1],msg3,12);

        close(fds[1]);// 关闭 child 的写端

    }else{
        // parent
        // 关闭parent 的 写端
        close(fds[1]);

        char buf[12];
        int cnt;
        while((cnt = read(fds[0],buf,12))>0){
            printf("%s\n",buf);
            if(cnt == 0){
                // 写端 管道 全部关闭了
                break;
            }
        }

        printf("Finished reading\n");

        wait(NULL); // 等待子进程结束
    }


    return 0;
}
#include <stdio.h> // for printf()
#include <unistd.h> // for pipe() sleep()
#include <stdlib.h> // for exit()
#include <wait.h> // for wait()

int main(){

    char* msg1 = "helloworld1";

    int fds[2];
    if(pipe(fds)< 0 ){ // 创建 pipe
        exit(1);
    }

    if(fork() == 0){
        close(fds[0]); // 关闭child 的 读端

        printf("parent:%d child:%d \n",getppid(),getpid());
        // child
        sleep(3); // 3s 之后 写入内容
        write(fds[1],msg1,12); // 全部读 端都关闭了, 此时再写就会 触发信号 SIGPIPE //查看要用父进程 wait()

    }else{
        // parent
        // 关闭parent 的 读端
        close(fds[0]);

        int status;
        wait(&status); // 等待子进程结束
        printf("%d\n",status);

    }

    return 0;
}
/*
 * parent:17341 child:17342
 * 13 // 13 就是 PIPE
 */
| Pros(优点) | Cons(缺点) |
| Naturally synchronized | Less memory size (4K) |
| Simple to use and create | Only related process can communicate. |
| No extra system calls required to Communicate (read/write) | Only two process can communicate |
| One directional communication | |
| Kernel is involved |
2, FIFO:
An unnamed pipe(pipe) has no backing file: the system maintains an in-memory buffer to transfer bytes from the writer to the reader. Once the writer and reader terminate, the buffer is reclaimed, so the unnamed pipe goes away. By contrast, a named pipe(FIFO) has a backing file and a distinct API.
Let's look at another command line example to get the gist of named pipes. Here are the steps:
- Open two terminals. The working directory should be the same for both.
- In one of the terminals, enter these two commands (the prompt again is %, and my comments start with ##):
% mkfifo tester  ## creates a backing file named tester
% cat tester     ## type the pipe's contents to stdout

At the beginning, nothing should appear in the terminal because nothing has been written yet to the named pipe.
- In the second terminal, enter the command
% cat > tester  ## redirect keyboard input to the pipe
hello, world!   ## then hit Return key
bye, bye        ## ditto
<Control-C>     ## terminate session with a Control-C

Whatever is typed into this terminal is echoed in the other. Once Ctrl+C is entered, the regular command line prompt returns in both terminals: the pipe has been closed.- Clean up by removing the file that implements the named pipe
% unlink tester
As the utility's name mkfifo implies, a named pipe also is called a FIFO because the first byte in is the first byte out, and so on. There is a library function named mkfifo that creates a named pipe in programs.
#include <stdio.h> // for printf()
#include <sys/stat.h> // for mkfifo()
#include <fcntl.h> // for open()
#include <unistd.h> // for sleep()
#include <string.h> // for memset()


int main(){

    const char* pipeName = "./fifoChannel";
    mkfifo(pipeName,0666);
    int fd = open(pipeName,O_WRONLY);

    //循环写
    char buf[256]={0};
    for(int i=0;i<1000;i++){
        memset(buf,'\0',strlen(buf));
        sprintf(buf,"hello world%d\n",i);
        write(fd,buf,strlen(buf));
        sleep(1);
    }

    close(fd);

    return 0;
}
#include <stdio.h> // for printf()
#include <sys/stat.h> // for mkfifo()
#include <fcntl.h> // for open()
#include <unistd.h> // for sleep()
#include <string.h> // for memset()


int main(){

    const char* pipeName = "./fifoChannel";
    int fd = open(pipeName,O_RDONLY);

    //循环读
    char buf[256]={0};
    int cnt;
    while((cnt = read(fd,buf,sizeof(buf))) > 0 ){
        printf("%s",buf);
        memset(buf,'\0',strlen(buf));
    }

    close(fd);
    return 0;
}
3, mmap():
The mmap() function is used for mapping between a process address space and either files or devices. When a file is mapped to a process address space, the file can be accessed like an array in the program. This is one of the most efficient ways to access data in the file and provides a seamless coding interface that is natural for a data structure that can be assessed without he abstraction of reading and writing from files. In this article, we are going to discuss how to use the mmap() function in Linux. So, let’s get started.
Syntax:
#include <sys/mman.h>
void * mmap (void *address, size_t length, int protect, int flags, int filedes,off_t offset)
Arguments:
The function takes 6 arguments:
a. address:
This argument gives a preferred starting address for the mapping. If another mapping does not exist there, then the kernel will pick a nearby page boundary and create the mapping; otherwise, the kernel picks a new address. If this argument is NULL, then the kernel can place the mapping anywhere it sees fit.
b. length:
This is the number of bytes which to be mapped.
c. protect:
This argument is used to control what kind of access is permitted. This argument may be logical ‘OR’ of the following flags PROT_READ | PROT_WRITE | PROT_EXEC | PROT_NONE. The access types of read, write and execute are the permissions on the content.
d. flags:
This argument is used to control the nature of the map. Following are some common values of the flags:
- MAP_SHARED: This flag is used to share the mapping with all other processes, which are mapped to this object. Changes made to the mapping region will be written back to the file.
- MAP_PRIVATE: When this flag is used, the mapping will not be seen by any other processes, and the changes made will not be written to the file.
- MAP_ANONYMOUS / MAP_ANON: This flag is used to create an anonymous mapping. Anonymous mapping means the mapping is not connected to any files. This mapping is used as the basic primitive to extend the heap.
- MAP_FIXED: When this flag is used, the system has to be forced to use the exact mapping address specified in the address If this is not possible, then the mapping will be failed.
e. filedes:
This is the file descriptor which has to be mapped.
f. offset:
This is offset from where the file mapping started. In simple terms, the mapping connects to (offset) to (offset+length-1) bytes for the file open on filedes descriptor.
Return values:
On success, the mmap() returns 0; for failure, the function returns MAP_FAILED.
Pictorially, we can represent the map function as follows:
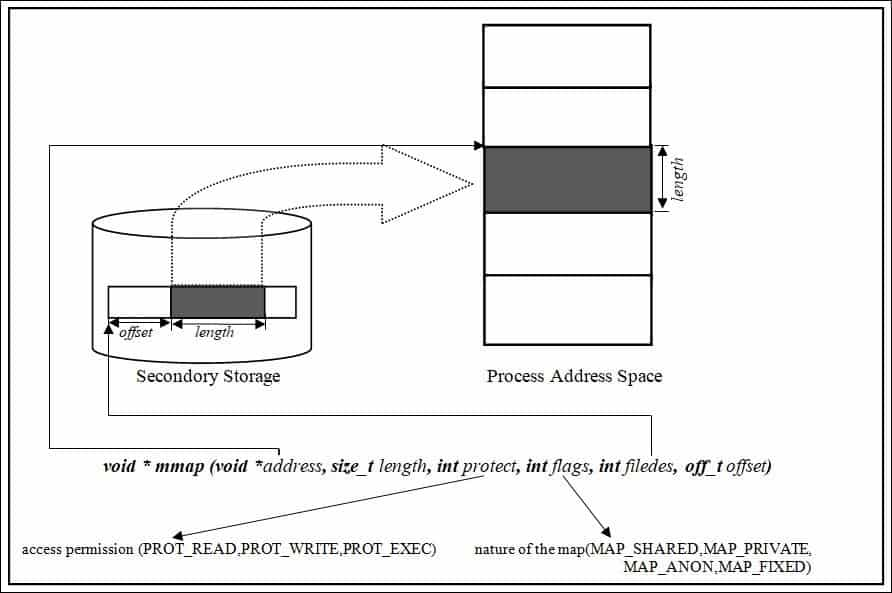
For unmap the mapped region munmap() function is used :
Syntax:
int munmap(void *address, size_t length);
Return values:
On success, the munmap() returns 0; for failure, the function returns -1.
Examples:
Now we will see an example program for each of the following using mmap() system call:
- Memory allocation (Example1.c)
- Reading file (Example2.c)
- Writing file (Example3.c)
- Interprocess communication (Example4.c)
#include <stdio.h> // for printf()
#include <sys/mman.h> // for mmap()

int main(){

    int* ptr = (int *)mmap(NULL,5*sizeof(int),PROT_READ|PROT_WRITE,MAP_PRIVATE|MAP_ANONYMOUS,0,0);
    if(ptr == MAP_FAILED){
        // mmap 失败
        printf("Mapping failed\n");
        return 1;
    }

    for(int i=0;i<5;i++){
        ptr[i] = i*10;
    }

    for(int i=0;i<5;i++){
        printf("[%d]",ptr[i]);
    }
    printf("\n");

    int err = munmap(ptr,5*sizeof(int));
    if(err != 0 ){
        printf("UnMapping Failed\n");
        return 1;
    }

    return 0;
}
In Example1.c we allocate memory using mmap. Here we used PROT_READ | PROT_WRITE protection for reading and writing to the mapped region. We used the MAP_PRIVATE | MAP_ANONYMOUS flag. MAP_PRIVATE is used because the mapping region is not shared with other processes, and MAP_ANONYMOUS is used because here, we have not mapped any file. For the same reason, the file descriptor and the offset value is set to 0.
#include <stdio.h> // for printf()
#include <sys/mman.h> // for mmap() munmap()
#include <stdlib.h> // for exit()
#include <fcntl.h> // for oepn()
#include <sys/stat.h> // for fstat()
#include <unistd.h> // for close()

int main(int argc,char* argv[]){
    if(argc < 2 ){
        printf("file path not mentioned\n");
        exit(0);
    }
    const char * filePath = argv[1];
    int fd = open(filePath,O_RDWR);
    if(fd < 0 ){
        printf("could not open [%s] file\n",filePath);
        exit(1);
    }

    struct stat stat_of_file;
    int err = fstat(fd,&stat_of_file);
    if(err < 0 ){
        printf("fstat file failed\n");
        exit(1);
    }

    char* ptr = (char *)mmap(NULL,stat_of_file.st_size,PROT_READ|PROT_WRITE,MAP_SHARED,fd,0);

    if(ptr == MAP_FAILED){
        printf("Mapping failed\n");
        exit(1);
    }
    close(fd);

    int cnt =  write(1,ptr,stat_of_file.st_size); // 输出到 屏幕
    if(cnt != stat_of_file.st_size){
        printf("write to stdout failed\n");
    }

    err = munmap(ptr,stat_of_file.st_size);
    if(err != 0){
        printf("Unmapping failed\n");
        exit(1);
    }

    return 0;
}
#include <stdio.h> // for printf()
#include <sys/mman.h> // for mmap() munmap()
#include <stdlib.h> // for exit()
#include <fcntl.h> // for oepn()
#include <sys/stat.h> // for fstat()
#include <unistd.h> // for close()

int main(int argc,char* argv[]){
    if(argc < 2 ){
        printf("file path not mentioned\n");
        exit(0);
    }
    const char * filePath = argv[1];
    int fd = open(filePath,O_RDWR);
    if(fd < 0 ){
        printf("could not open [%s] file\n",filePath);
        exit(1);
    }

    struct stat stat_of_file;
    int err = fstat(fd,&stat_of_file);
    if(err < 0 ){
        printf("fstat file failed\n");
        exit(1);
    }
    int fileSize = stat_of_file.st_size;

    char* ptr = (char *)mmap(NULL,fileSize,PROT_READ|PROT_WRITE,MAP_SHARED,fd,0);

    if(ptr == MAP_FAILED){
        printf("Mapping failed\n");
        exit(1);
    }
    close(fd);

    int cnt =  write(1,ptr,fileSize); // 输出到 屏幕
    if(cnt != fileSize){
        printf("write to stdout failed\n");
    }

    // reverse the file contents   // 已经反映到 文件了
    for(int i=0;i<fileSize/2;i++){
        char cTemp = ptr[i];
        ptr[i] = ptr[fileSize-i-1];
        ptr[fileSize-i-1] = cTemp;
    }

    // 再次输出到屏幕
    write(1,ptr,fileSize); // 输出到 屏幕
    if(cnt != fileSize){
        printf("write to stdout failed\n");
    }

    err = munmap(ptr,fileSize);
    if(err != 0){
        printf("Unmapping failed\n");
        exit(1);
    }

    return 0;
}
In Example3.c we have read and then write to the file.
#include <stdio.h> // for printf()
#include <sys/mman.h> // for mmap() munmap()
#include <stdlib.h> // for exit()
#include <unistd.h> // for fork()
#include <wait.h> // for waitpid()

int main(int argc,char* argv[]){

    int* ptr =(int *)mmap(NULL,5*sizeof(int),PROT_READ|PROT_WRITE,MAP_SHARED|MAP_ANONYMOUS,0,0);

    if(ptr == MAP_FAILED){
        printf("Mapping failed \n");
        exit(1);
    }

    for(int i=0;i<5;i++){
        ptr[i] = i+1;
    }
    printf("ptr 's data:\n'");
    for(int i=0;i<5;i++){
        printf("[%d] ",ptr[i]);
    }
    printf("\n");

    int ret = fork();
    if(ret == 0 ){
        // child
        for(int i =0;i< 5;i++) {
            ptr[i] = ptr[i] + 10;
        }
    }else{
        // parent
        waitpid(ret,NULL,0);
        printf("Parent: \n");
        printf("Updated value:\n");
        for(int i=0;i<5;i++){
            printf("[%d] ",ptr[i]);
        }
        printf("\n");
    }


    int err = munmap(ptr,5*sizeof(int));
    if(err != 0 ){
        printf("Unmapping failed\n");
        exit(1);
    }

    return 0;
}
/*
 * ptr 's data:
 * '[1] [2] [3] [4] [5]
 * Parent:
 * Updated value:
 * [11] [12] [13] [14] [15]
 */
In Example4.c first the array is initialized with some values, then the child process updates the values. The parent process reads the values updated by the child because the mapped memory is shared by both processes.
Conclusion:
The mmap() is a powerful system call. This function should not be used when there are portability issues (当存在可移植性问题时)because this function is only supported by the Linux environment.
Linux Threads
A thread of execution is often regarded as the smallest unit of processing that a scheduler works on.
A process can have multiple threads of execution which are executed asynchronously.
This asynchronous execution brings in the capability of each thread handling a particular work or service independently. Hence multiple threads running in a process handle their services which overall constitutes the complete capability of the process.
In this article we will touch base on the fundamentals of threads and build the basic understanding required to learn the practical aspects of Linux threads.
Why Threads are Required?
Now, one would ask why do we need multiple threads in a process?? Why can’t a process with only one (default) main thread be used in every situation.
Well, to answer this lets consider an example :
Suppose there is a process, that receiving real time inputs and corresponding to each input it has to produce a certain output. Now, if the process is not multi-threaded ie if the process does not involve multiple threads, then the whole processing in the process becomes synchronous. This means that the process takes an input processes it and produces an output.
The limitation in the above design is that the process cannot accept an input until its done processing the earlier one and in case processing an input takes longer than expected then accepting further inputs goes on hold.
To consider the impact of the above limitation, if we map the generic example above with a socket server process that can accept input connection, process them and provide the socket client with output. Now, if in processing any input if the server process takes more than expected time and in the meantime another input (connection request) comes to the socket server then the server process would not be able to accept the new input connection as its already stuck in processing the old input connection. This may lead to a connection time out at the socket client which is not at all desired.
This shows that synchronous model of execution cannot be applied everywhere and hence was the requirement of asynchronous model of execution felt which is implemented by using threads.
Difference Between threads and processes
Following are some of the major differences between the thread and the processes :
- Processes do not share their address space while threads executing under same process share the address space.
- From the above point its clear that processes execute independent of each other and the synchronization between processes is taken care by kernel only while on the other hand the thread synchronization has to be taken care by the process under which the threads are executing
- Context switching between threads is fast as compared to context switching between processes
- The interaction between two processes is achieved only through the standard inter process communication while threads executing under the same process can communicate easily as they share most of the resources like memory, text segment etc
User threads Vs Kernel Threads
Threads can exist in user space as well as in kernel space.
A user space threads are created, controlled and destroyed using user space thread libraries. These threads are not known to kernel and hence kernel is nowhere involved in their processing. These threads follow co-operative multitasking where-in a thread releases CPU on its own wish ie the scheduler cannot preempt the thread. Th advantages of user space threads is that the switching between two threads does not involve much overhead and is generally very fast while on the negative side since these threads follow co-operative multitasking so if one thread gets block the whole process gets blocked.
A kernel space thread is created, controlled and destroyed by the kernel. For every thread that exists in user space there is a corresponding kernel thread. Since these threads are managed by kernel so they follow preemptive multitasking where-in the scheduler can preempt a thread in execution with a higher priority thread which is ready for execution. The major advantage of kernel threads is that even if one of the thread gets blocked the whole process is not blocked as kernel threads follow preemptive scheduling while on the negative side the context switch is not very fast as compared to user space threads.
If we talk of Linux then kernel threads are optimized to such an extent that they are considered better than user space threads and mostly used in all scenarios except where prime requirement is that of cooperative multitasking.
Problem with Threads
There are some major problems that arise while using threads :
- Many operating system does not implement threads as processes rather they see threads as part of parent process. In this case, what would happen if a thread calls fork() or even worse what if a thread execs a new binary?? These scenarios may have dangerous consequences for example in the later problem the whole parent process could get replaced with the address space of the newly exec’d binary. This is not at all desired. Linux which is POSIX complaint makes sure that calling a fork() duplicates only the thread that has called the fork() function while an exec from any of the thread would stop all the threads in the parent process.
- Another problem that may arise is the concurrency problems. Since threads share all the segments (except the stack segment) and can be preempted at any stage by the scheduler than any global variable or data structure that can be left in inconsistent state by preemption of one thread could cause severe problems when the next high priority thread executes the same function and uses the same variables or data structures.
For the problem 1 mentioned above, all we can say is that its a design issue and design for applications should be done in a way that least problems of this kind arise.
For the problem 2 mentioned above, using locking mechanisms programmer can lock a chunk of code inside a function so that even if a context switch happens (when the function global variable and data structures were in inconsistent state) then also next thread is not able to execute the same code until the locked code block inside the function is unlocked by the previous thread (or the thread that acquired it).
Thread Identification
Just as a process is identified through a process ID, a thread is identified by a thread ID. But interestingly, the similarity between the two ends here.
- A process ID is unique across the system where as a thread ID is unique only in context of a single process.
- A process ID is an integer value but the thread ID is not necessarily an integer value. It could well be a structure
- A process ID can be printed very easily while a thread ID is not easy to print.
The above points give an idea about the difference between a process ID and thread ID.
Thread ID is represented by the type ‘pthread_t’. As we already discussed that in most of the cases this type is a structure, so there has to be a function that can compare two thread IDs.
#include <pthread.h>
int pthread_equal(pthread_t tid1, pthread_t tid2);
So as you can see that the above function takes two thread IDs and returns nonzero value if both the thread IDs are equal or else it returns zero.
Another case may arise when a thread would want to know its own thread ID. For this case the following function provides the desired service.
#include <pthread.h>
pthread_t pthread_self(void);
So we see that the function ‘pthread_self()’ is used by a thread for printing its own thread ID.
Now, one would ask about the case where the above two function would be required. Suppose there is a case where a link list contains data for different threads. Every node in the list contains a thread ID and the corresponding data. Now whenever a thread tries to fetch its data from linked list, it first gets its own ID by calling ‘pthread_self()’ and then it calls the ‘pthread_equal()’ on every node to see if the node contains data for it or not.
An example of the generic case discussed above would be the one in which a master thread gets the jobs to be processed and then it pushes them into a link list. Now individual worker threads parse the linked list and extract the job assigned to them.
Thread Creation
Normally when a program starts up and becomes a process, it starts with a default thread. So we can say that every process has at least one thread of control. A process can create extra threads using the following function :
#include <pthread.h>
int pthread_create(pthread_t *restrict tidp, const pthread_attr_t *restrict attr, void *(*start_rtn)(void), void *restrict arg)
The above function requires four arguments, lets first discuss a bit on them :
- The first argument is a pthread_t type address. Once the function is called successfully, the variable whose address is passed as first argument will hold the thread ID of the newly created thread.
- The second argument may contain certain attributes which we want the new thread to contain. It could be priority etc.
- The third argument is a function pointer. This is something to keep in mind that each thread starts with a function and that functions address is passed here as the third argument so that the kernel knows which function to start the thread from.
- As the function (whose address is passed in the third argument above) may accept some arguments also so we can pass these arguments in form of a pointer to a void type. Now, why a void type was chosen? This was because if a function accepts more than one argument then this pointer could be a pointer to a structure that may contain these arguments.
A Practical Thread Example
Following is the example code where we tried to use all the three functions discussed above.
#include <stdio.h> // for printf()
#include <pthread.h> // p thread 's p is protable(POSIX Portable Operating System Interface) // 可移植的  // for pthread_create()
#include <string.h> // for strerror()
#include <unistd.h> // for sleep()


pthread_t tids[2];

void* doSomething(void* arg){

    pthread_t tid = pthread_self();

    if(pthread_equal(tid,tids[0])){
        // first thread
        printf("first thread processing...\n");
    }else{
        // second thread
        printf("second thread processing...\n");
    }

    return NULL;
}


int main(){

    int err;
    for(int i=0;i<2;i++){
        err = pthread_create(&tids[i],NULL,&doSomething,NULL);
        if(err != 0){
            printf("pthread_create failed,[%s]\n",strerror(err));
        }else{
            printf("pthread_create successfully\n");
        }
    }

    sleep(5);

    return 0;
}
So what this code does is :
- It uses the pthread_create() function to create two threads
- The starting function for both the threads is kept same.
- Inside the function ‘doSomeThing()’, the thread uses pthread_self() and pthread_equal() functions to identify whether the executing thread is the first one or the second one as created.
Now, when the above code is run, following was the output :
$ ./threads
pthread_create successfully
pthread_create successfully
second thread processing...
first thread processing...
As seen in the output, first thread is created and it starts processing, then the second thread is created and then it starts processing. Well one point to be noted here is that the order of execution of threads is not always fixed. It depends on the OS scheduling algorithm.
Note: To compile a code containing calls to posix APIs, please use the compile option ‘-pthread’.
Thread Termination
As already discussed above that each program starts with at least one thread which is the thread in which main() function is executed. So maximum lifetime of every thread executing in the program is that of the main thread. So, if we want that the main thread should wait until all the other threads are finished then there is a function pthread_join().
#include <pthread.h>
int pthread_join(pthread_t thread, void **rval_ptr);
The function above makes sure that its parent thread does not terminate until it is done. This function is called from within the parent thread and the first argument is the thread ID of the thread to wait on and the second argument is the return value of the thread on which we want to the parent thread to wait. If we are not interested in the return value then we can set this pointer to be NULL.
If we classify on a broader level, then we see that a thread can terminate in three ways :
- If the thread returns from its start routine.
- If it is canceled by some other thread. The function used here is pthread_cancel().
- If its calls pthread_exit() function from within itself.
The focus here would be on pthread_exit(). Its prototype is as follows :
#include <pthread.h>
void pthread_exit(void *rval_ptr);
So we see that this function accepts only one argument, which is the return from the thread that calls this function. This return value is accessed by the parent thread which is waiting for this thread to terminate. The return value of the thread terminated by pthread_exit() function is accessible in the second argument of the pthread_join which just explained above.
#include <stdio.h> // for printf()
#include <pthread.h> // p thread 's p is protable(POSIX Portable Operating System Interface) // 可移植的  // for pthread_create()
#include <string.h> // for strerror()
#include <unistd.h> // for sleep()
#include <stdlib.h> // for srand() rand()
#include <time.h> // for time()

pthread_t tids[2];

void* doSomething(void* arg){

    int t = rand()%5;
    pthread_t tid = pthread_self();

    if(pthread_equal(tid,tids[0])){
        // first thread
        sleep(t);
        printf("first thread processing...%d\n",t);
    }else{
        // second thread
        sleep(t);
        printf("second thread processing...%d\n",t);
    }
    return NULL;
}


int main(){
    srand(time(NULL));

    int err;
    for(int i=0;i<2;i++){
        err = pthread_create(&tids[i],NULL,&doSomething,NULL);
        if(err != 0){
            printf("pthread_create failed,[%s]\n",strerror(err));
        }else{
            printf("pthread_create successfully\n");
        }
    }

//    sleep(4); // 这样做 没有下面的好
    for(int i=0;i<2;i++){
        pthread_join(tids[i],NULL); // 按顺序一个一个 join
    }

    return 0;
}
#include <stdio.h> // for printf()
#include <pthread.h> // p thread 's p is protable(POSIX Portable Operating System Interface) // 可移植的  // for pthread_create()
#include <string.h> // for strerror()  strcpy()
#include <unistd.h> // for sleep()
#include <stdlib.h> // for srand() rand()
#include <time.h> // for time()

pthread_t tids[2];
int ret1; // 第一个线程 返回的值
char ret2[12]={'\0'};

void* doSomething(void* arg){

    int t = rand()%5;
    pthread_t tid = pthread_self();

    if(pthread_equal(tid,tids[0])){
        // first thread
        sleep(t);
        ret1 = 100;
        pthread_exit(&ret1); // 下面的代码 就不会执行了
        printf("first thread processing...%d\n",t);
    }else{
        // second thread
        sleep(t);
        strcpy(ret2,"hello world");
        pthread_exit(&ret2); // 下面的代码 就不会执行了
        printf("second thread processing...%d\n",t);
    }
    return NULL;
}


int main(){
    srand(time(NULL));

    int err;
    for(int i=0;i<2;i++){
        err = pthread_create(&tids[i],NULL,&doSomething,NULL);
        if(err != 0){
            printf("pthread_create failed,[%s]\n",strerror(err));
        }else{
            printf("pthread_create successfully\n");
        }
    }

    int* ret11;
    char* ret22;
    pthread_join(tids[0],(void **)&ret11); // join 第一个线程
    pthread_join(tids[1],(void **)&ret22); //join 第二个线程
    printf("第一个线程返回的是:[%d]\n",*ret11);
    printf("第一个线程返回的是:[%s]\n",ret22);


    return 0;
}

/*
 * pthread_create successfully
 * pthread_create successfully
 * 第一个线程返回的是:[100]
 * 第一个线程返回的是:[hello world]
 */
Mutex lock for Linux Thread Synchronization
Thread synchronization is defined as a mechanism which ensures that two or more concurrent processes or threads do not simultaneously execute some particular program segment known as a critical section. Processes’ access to critical section is controlled by using synchronization techniques. When one thread starts executing the critical section (a serialized segment of the program) the other thread should wait until the first thread finishes. If proper synchronization techniques are not applied, it may cause a race condition where the values of variables may be unpredictable and vary depending on the timings of context switches of the processes or threads.
Thread Synchronization Problems
An example code to study synchronization problems :
#include <stdio.h> // for printf()
#include <pthread.h> // for pthread_create()
#include <unistd.h> // for sleep()
#include <stdlib.h> // for srand() rand()
#include <time.h> // for time()


pthread_t tids[2];
int counter;

void* doSomething(void* arg){
    for(int i=0;i<10;i++){
        int temp = counter + 1;
        sleep(rand()%2); // 0-1 s  //这期间 counter 可能已经被另一个线程修改了
        counter = temp;
    }
    return NULL;
}

int main(){


    srand(time(NULL));
    int err;
    for(int i=0;i<2;i++){
        err = pthread_create(&tids[i],NULL,&doSomething,NULL);
        if(err != 0){
            printf("thread_create failed\n");
        }
    }

    pthread_join(tids[0],NULL);
    pthread_join(tids[1],NULL);

    printf("final counter:%d\n",counter);


    return 0;
}
How to solve it ?
The most popular way of achieving thread synchronization is by using Mutexes.
Mutex
- A Mutex is a lock that we set before using a shared resource and release after using it.
- When the lock is set, no other thread can access the locked region of code.
- So we see that even if thread 2 is scheduled while thread 1 was not done accessing the shared resource and the code is locked by thread 1 using mutexes then thread 2 cannot even access that region of code.
- So this ensures synchronized access of shared resources in the code.
Working of a mutex
- Suppose one thread has locked a region of code using mutex and is executing that piece of code.
- Now if scheduler decides to do a context switch, then all the other threads which are ready to execute the same region are unblocked.
- Only one of all the threads would make it to the execution but if this thread tries to execute the same region of code that is already locked then it will again go to sleep.
- Context switch will take place again and again but no thread would be able to execute the locked region of code until the mutex lock over it is released.
- Mutex lock will only be released by the thread who locked it.
- So this ensures that once a thread has locked a piece of code then no other thread can execute the same region until it is unlocked by the thread who locked it.
Hence, this system ensures synchronization among the threads while working on shared resources.
A mutex is initialized and then a lock is achieved by calling the following two functions : The first function initializes a mutex and through second function any critical region in the code can be locked.
- int pthread_mutex_init(pthread_mutex_t *restrict mutex, const pthread_mutexattr_t *restrict attr) : Creates a mutex, referenced by mutex, with attributes specified by attr. If attr is NULL, the default mutex attribute (NONRECURSIVE) is used.
Returned value
If successful, pthread_mutex_init() returns 0, and the state of the mutex becomes initialized and unlocked.
If unsuccessful, pthread_mutex_init() returns -1. - int pthread_mutex_lock(pthread_mutex_t *mutex) : Locks a mutex object, which identifies a mutex. If the mutex is already locked by another thread, the thread waits for the mutex to become available. The thread that has locked a mutex becomes its current owner and remains the owner until the same thread has unlocked it. When the mutex has the attribute of recursive, the use of the lock may be different. When this kind of mutex is locked multiple times by the same thread, then a count is incremented and no waiting thread is posted. The owning thread must call pthread_mutex_unlock() the same number of times to decrement the count to zero.
Returned value
If successful, pthread_mutex_lock() returns 0.
If unsuccessful, pthread_mutex_lock() returns -1.
The mutex can be unlocked and destroyed by calling following two functions :The first function releases the lock and the second function destroys the lock so that it cannot be used anywhere in future.
- int pthread_mutex_unlock(pthread_mutex_t *mutex) : Releases a mutex object. If one or more threads are waiting to lock the mutex, pthread_mutex_unlock() causes one of those threads to return from pthread_mutex_lock() with the mutex object acquired. If no threads are waiting for the mutex, the mutex unlocks with no current owner. When the mutex has the attribute of recursive the use of the lock may be different. When this kind of mutex is locked multiple times by the same thread, then unlock will decrement the count and no waiting thread is posted to continue running with the lock. If the count is decremented to zero, then the mutex is released and if any thread is waiting for it is posted.
Returned value
If successful, pthread_mutex_unlock() returns 0.
If unsuccessful, pthread_mutex_unlock() returns -1 - int pthread_mutex_destroy(pthread_mutex_t *mutex) : Deletes a mutex object, which identifies a mutex. Mutexes are used to protect shared resources. mutex is set to an invalid value, but can be reinitialized using pthread_mutex_init().
Returned value
If successful, pthread_mutex_destroy() returns 0.
If unsuccessful, pthread_mutex_destroy() returns -1.
#include <stdio.h> // for printf()
#include <pthread.h> // for pthread_create()
#include <unistd.h> // for sleep()
#include <stdlib.h> // for srand() rand()
#include <time.h> // for time()


pthread_t tids[2];
int counter;
pthread_mutex_t lock;

void* doSomething(void* arg){
    for(int i=0;i<10;i++){
        pthread_mutex_lock(&lock); // 加锁

        int temp = counter + 1;
        sleep(rand()%2); // 0-1 s
        counter = temp;

        pthread_mutex_unlock(&lock);// 解锁
    }
    return NULL;
}

int main(){

    // init lock
    int ret = pthread_mutex_init(&lock,NULL);
    if(ret != 0){
        printf("mutex init failed\n");
        return 1;
    }

    srand(time(NULL));
    int err;
    for(int i=0;i<2;i++){
        err = pthread_create(&tids[i],NULL,&doSomething,NULL);
        if(err != 0){
            printf("thread_create failed\n");
        }
    }

    pthread_join(tids[0],NULL);
    pthread_join(tids[1],NULL);

    printf("final counter:%d\n",counter);

    pthread_mutex_destroy(&lock);


    return 0;
}
Linux network programming
TCP/IP Protocol Fundamentals
Have you ever wondered how your computer talks to other computers on your local LAN or to other systems on the internet?
Understanding the intricacies of how computers interact is an important part of networking and is of equal interest to a sysadmin as well as to a developer. In this article, we will make an attempt to discuss the concept of communication from the very basic fundamental level that needs to be understood by everybody.
TCP/IP PROTOCOL SUITE
Communications between computers on a network is done through protocol suits. The most widely used and most widely available protocol suite is TCP/IP protocol suite. A protocol suit consists of a layered architecture where each layer depicts some functionality which can be carried out by a protocol. Each layer usually has more than one protocol options to carry out the responsibility that the layer adheres to. TCP/IP is normally considered to be a 4 layer system. The 4 layers are as follows :
- Application layer
- Transport layer
- Network layer
- Data link layer
1. Application layer
This is the top layer of TCP/IP protocol suite. This layer includes applications or processes that use transport layer protocols to deliver the data to destination computers.
At each layer there are certain protocol options to carry out the task designated to that particular layer. So, application layer also has various protocols that applications use to communicate with the second layer, the transport layer. Some of the popular application layer protocols are :
- HTTP (Hypertext transfer protocol)
- FTP (File transfer protocol)
- SMTP (Simple mail transfer protocol)
- SNMP (Simple network management protocol) etc
2. Transport Layer
This layer provides backbone to data flow between two hosts. This layer receives data from the application layer above it. There are many protocols that work at this layer but the two most commonly used protocols at transport layer are TCP and UDP.
TCP is used where a reliable connection is required while UDP is used in case of unreliable connections.
The Difference Between Stream-oriented(TCP) and message-oriented(UDP)
TCP being stream-oriented is expected to receive data from the application, regardless of its size, and be responsible for segmenting that data before preparing it for transport and handing it over to the Network layer or IP. UDP being a datagram-oriented protocol, will not do any segmenting of data as it expects the data to be already "segmented" from the application.
Here's a diagram showing two applications - App 1 is using TCP while App 2 is using UDP. This illustrates where the data is broken into pieces depending on which protocol is used. You might notice that wherever the message-oriented protocol is, the layer above it needs to handle breaking up the data.
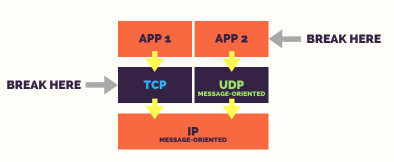
Here's another (zoom in) diagram showing how the stream of data from the Application is received by TCP and is broken into smaller segments before passing them to IP.

As for UDP, there's no need for another diagram. Just imagine the process in the middle done by TCP is pushed back to the Application.
The two images below show you what's the difference between a stream-oriented protocol (TCP) and a message-oriented protocol (UDP) when observed end-to-end. Is a picture (or two) really worth a thousand words?
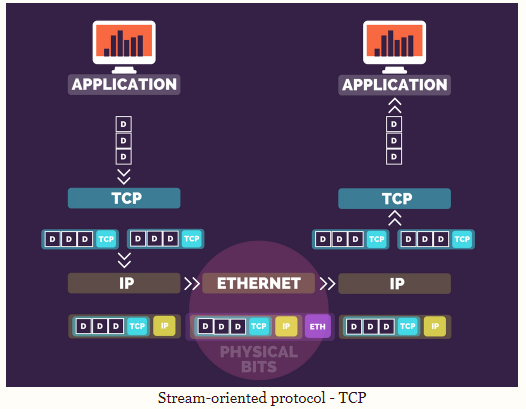

3. Network Layer
This layer is also known as Internet layer. The main purpose of this layer is to organize or handle the movement of data on network. By movement of data, we generally mean routing of data over the network. The main protocol used at this layer is IP. While ICMP(used by popular ‘ping’ command) and IGMP are also used at this layer.
4. Data Link Layer
This layer is also known as network interface layer. This layer normally consists of device drivers in the OS and the network interface card attached to the system. Both the device drivers and the network interface card take care of the communication details with the media being used to transfer the data over the network. In most of the cases, this media is in the form of cables. Some of the famous protocols that are used at this layer include ARP(Address resolution protocol), PPP(Point to point protocol) etc.
TCP/IP CONCEPT EXAMPLE
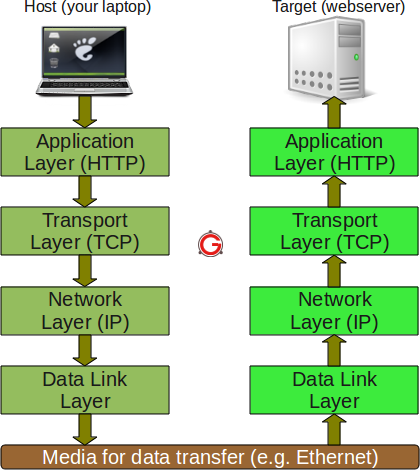
socket programming
Typically two processes communicate with each other on a single system through one of the following inter process communication techniques.
- Pipes
- Message queues
- Shared memory
There are several other methods. But the above are some of the very classic ways of interprocess communication.
But have you ever given a thought over how two processes communicate across a network?
For example, when you browse a website, on your local system the process running is your web browser, while on the remote system the process running is the web server. So this is also an inter process communication but the technique through which they communicate with each other is SOCKETS.
What is a SOCKET?
In layman’s term, a Socket is an end point of communication between two systems on a network. To be a bit precise, a socket is a combination of IP address and port on one system. So on each system a socket exists for a process interacting with the socket on other system over the network. A combination of local socket and the socket at the remote system is also known a ‘Four tuple’ or ‘4-tuple’. Each connection between two processes running at different systems can be uniquely identified through their 4-tuple.
There are two types of network communication models:
- OSI
- TCP/IP
While OSI is more of a theoretical model, the TCP/IP networking model is the most popular and widely used.
TCP three handshakes & four waves
Here is a picture of TCP message format:

Some important fields are as follows:
1, Serial number and confirmation number
Each TCP message has a serial number and a confirmation number, which can guarantee the reliability of data transmission in combination with retransmission mechanism
- Seq sequence number: each byte in the TCP connection byte stream will have a number. When the connection is established, TCP selects an initial sequence number (random number), and then sends a packet (message) every time
Serial number +1Ensure that the serial number of each packet is different when sending different packets
- ACK confirmation number: indicates that the sequence number of the first byte of the next message segment to be received is
seq+1, the ACK confirmation number will be sent only when the previous byte has been received and the ACK flag bit is set to 1.
2, 6 flag bits
There are 6 flag bits in the TCP message, each of which occupies 1 bit and has 6 bits in total. The value of each bit is only 0 and 1
- SYN: synchronization flag bit. When syn = 1, it means that this is a connection request message
- ACK: confirmation flag bit. When ack = 1, it means that the confirmation number is valid. When TCP sends ACK, it is equivalent to the returned result, and it needs to have the confirmation number to correspond with the sent message.
- Fin: stop flag bit, when fin = 1, it means that the sender’s data of this message segment has been sent, and it is required to release the TCP connection
- PSH: push flag bit. When PSH = 1, it means that this segment of message has high priority. The receiver should push it to the application program as soon as possible, instead of waiting for the whole TCP cache to be filled and delivered
- Urg: emergency flag bit. When urg = 1, it means that the emergency pointer is valid. There is emergency data in this message to be transmitted as soon as possible, instead of being transmitted in the original order
- Rst: reset flag bit. When RST = 1, it means that there is an error in the TCP connection. You need to release and reestablish the connection
Establishing a TCP connection: three handshakes
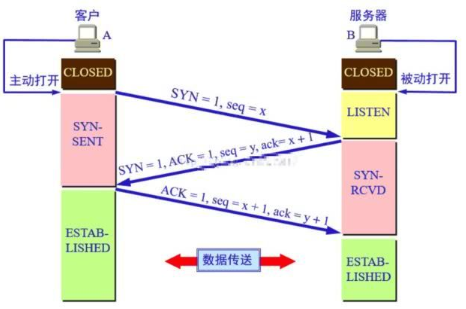
Disconnect TCP: wave four times
Because the TCP connection isDuplexTherefore, each direction must be closed separately. When a party completes its data transmission task, it can send aFINTerminate flag bit to terminate the connection in this direction,Received a finMeansThere is no data flow in this direction。 A TCP connection can still send data after receiving a fin. The first party to close will execute Active closure, and the other partyPassive closure。
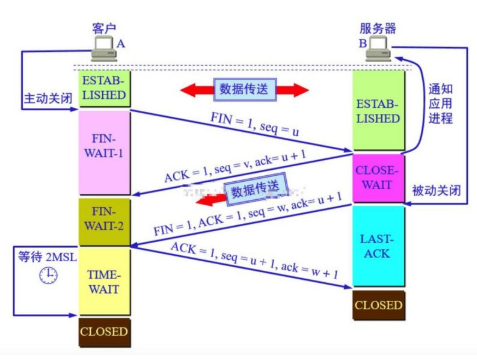
State overview
- Listen: listen for connection requests from remote TCP ports
- Syn-sent: wait for matching connection request after sending connection request
- Syn-received: wait for confirmation of connection request after receiving and sending a connection request
- Established: represents an open connection, and data can be transferred to the user
- Fin-wait-1: wait for the remote TCP connection interrupt request or the confirmation of the previous connection interrupt request
- Fin-wait-2: waiting for connection interrupt request from remote TCP
- Close-wait: wait for the connection interruption request from the local user
- Closing: wait for remote TCP to confirm the connection interruption
- Last-ack: wait for the confirmation of the original connection interruption request to the remote TCP
- Time-wait: wait enough time to ensure that the remote TCP receives the confirmation of the connection interruption request
- Closed: no connection status
Note:
In the process of ending the connection, why does the client have to wait for 2msl to close the TCP connection after receiving the connection release message segment from the server?
The reason is to ensure that the server receives the last confirmation message from the client. If this message is lost and the server does not receive the confirmation message, the connection release message will be retransmitted over time. At this time, the client connection has been closed and can not respond, which results in the situation that the server does not stop retransmitting the connection release message and can not enter the closed state normally. Wait for 2msl to ensure that the server receives the final confirmation; if the server does not receive it, then within 2msl, the client must receive the retransmission message from the server, and then the client will retransmit the confirmation message and reset the timer.
code in c:
Sockets can be used in many languages like Java, C++ etc but here in this article, we will understand the socket communication in its purest form (i.e in C programming language)

TCP EXAMPLE:
Example1: Lets create a server that continuously runs and sends the date and time as soon as a client connects to it.
#include <stdio.h> // for printf()
#include <sys/socket.h> // for socket()  bind() listen() accept() send() recv()
#include <netinet/in.h> // for  struct sockaddr_in
#include <arpa/inet.h> // for htonl() htons()
#include <time.h> // for time()
#include <string.h> // for memset()
#include <unistd.h> // for write() close()  sleep()

int main(){

    int listenfd = socket(AF_INET,SOCK_STREAM,0);


    // bind
    struct sockaddr_in servaddr;
    servaddr.sin_family = AF_INET;
    servaddr.sin_addr.s_addr = htonl(INADDR_ANY); // h:host n:network l:long s:short  // htonl() htons() ntohl() ntohs()  //#define INADDR_ANY ((in_addr_t) 0x00000000)
    // NOTE:
    //bind() of INADDR_ANY does NOT "generate a random IP".
    //1,It binds the socket to all available interfaces.
    //2,For a server, you typically want to bind to all interfaces - not just "localhost".
    //3,If you wish to bind your socket to localhost only, the syntax would be
        //my_sockaddress.sin_addr.s_addr = inet_addr("127.0.0.1"); // The inet_addr() function converts the Internet host address cp from IPv4 num‐bers-and-dots  notation into binary data in network byte order.
    servaddr.sin_port = htons(8888);
    bind(listenfd,(struct sockaddr *)&servaddr,sizeof(servaddr));


    // listen
    listen(listenfd,10); // max length = 10 ,more detail : man listen

    int connfd;
    char buf[1025]={'\0'};
    time_t ticks;
    struct tm tm;
    while(1){
        // accept
        connfd = accept(listenfd,(struct sockaddr*)NULL,NULL); // 客户端的信息

        ticks = time(NULL);
        tm = *localtime(&ticks);
        memset(buf,'\0',sizeof(buf));
        sprintf(buf,"now: %d-%02d-%02d %02d:%02d:%02d", tm.tm_year + 1900, tm.tm_mon + 1, tm.tm_mday, tm.tm_hour, tm.tm_min, tm.tm_sec);

        write(connfd,buf,strlen(buf));

        close(connfd);

        sleep(1);

    }

    close(listenfd);


    return 0;
}
#include <stdio.h> // for printf()
#include <sys/socket.h> // for socket()
#include <netinet/in.h> // for sockaddr_in
#include <arpa/inet.h> // for inet_addr() htons() htonl()
#include <unistd.h> // for read() write()
#include <string.h> // for memset()


int main (){

    // socket
    int sockfd = socket(AF_INET,SOCK_STREAM,0);

    // connect
    struct sockaddr_in sockaddr;
    sockaddr.sin_family = AF_INET;
    sockaddr.sin_addr.s_addr = inet_addr("127.0.0.1");
    sockaddr.sin_port = htons(8888);

    int ret =  connect(sockfd,(struct sockaddr *)&sockaddr,sizeof(sockaddr));
    if(ret < 0  ){
        // failed
        printf("connect failed\n");
    }

    int cnt;
    char buf[1025];
    while((cnt = read(sockfd,buf,sizeof(buf)))>0){
        printf("%s\n",buf);
        memset(buf,0,sizeof(buf));
    }
    if(cnt <0){
        // error
    }

    close(sockfd);

    return 0;
}
$ ./client
now: 2020-09-06 17:33:44
NOTE:
1,The bind() function accepts a pointer to a sockaddr, but in all examples I've seen, a sockaddr_in structure is used instead, and is cast to sockaddr?
ANSER:
sockaddr is a generic descriptor for any kind of socket operation, whereas sockaddr_in is a struct specific to IP-based communication (IIRC, "in" stands for "InterNet"). As far as I know, this is a kind of "polymorphism" . By the way,sockaddr_in6 is for IPv6 addresses, sockaddr_un for Unix domain sockets .
2, 如何查找定义 struct sockaddr_in 结构体的头文件?
sudo find /usr/include -name *.h | xargs grep 'struct sockaddr_in'
结果:
/usr/include/netinet/in.h:struct sockaddr_in
Example2 :Handle multiple socket connections
#include <stdio.h> // for printf()
#include <sys/socket.h> // for socket()  bind() listen() accept() send() recv()
#include <netinet/in.h> // for  struct sockaddr_in
#include <arpa/inet.h> // for htonl() htons()
#include <time.h> // for time()
#include <string.h> // for memset()
#include <unistd.h> // for write() close()  sleep()

int main(){

    int listenfd = socket(AF_INET,SOCK_STREAM,0);


    // bind
    struct sockaddr_in servaddr;
    servaddr.sin_family = AF_INET;
    servaddr.sin_addr.s_addr = htonl(INADDR_ANY);
    servaddr.sin_port = htons(8888);
    bind(listenfd,(struct sockaddr *)&servaddr,sizeof(servaddr));


    // listen
    listen(listenfd,10); // max length = 10 ,more detail : man listen

    int connfd;
    char buf[1025]={'\0'};
    time_t ticks;
    struct tm tm;
    while(1){
        // accept
        connfd = accept(listenfd,(struct sockaddr*)NULL,NULL); // 客户端的信息
        if(connfd <0){
            printf("accept failed\n");
            return 1;
        }
        printf("client 来了\n");

        ticks = time(NULL);
        tm = *localtime(&ticks);
        memset(buf,'\0',sizeof(buf));
        sprintf(buf,"now: %d-%02d-%02d %02d:%02d:%02d", tm.tm_year + 1900, tm.tm_mon + 1, tm.tm_mday, tm.tm_hour, tm.tm_min, tm.tm_sec);

        write(connfd,buf,strlen(buf));

        close(connfd);

        sleep(1);

    }

    close(listenfd);


    return 0;
}
#include <stdio.h> // for printf() #include <sys/socket.h> // for socket() #include <netinet/in.h> // for sockaddr_in #include <arpa/inet.h> // for inet_addr() htons() htonl() #include <unistd.h> // for read() write() #include <string.h> // for memset() int main (){ // socket int sockfd = socket(AF_INET,SOCK_STREAM,0); // connect struct sockaddr_in sockaddr; sockaddr.sin_family = AF_INET; sockaddr.sin_addr.s_addr = inet_addr("127.0.0.1"); sockaddr.sin_port = htons(8888); int ret = connect(sockfd,(struct sockaddr *)&sockaddr,sizeof(sockaddr)); if(ret < 0 ){ // failed printf("connect failed\n"); } int cnt; char buf[1025]; while((cnt = read(sockfd,buf,sizeof(buf)))>0){ printf("%s\n",buf); memset(buf,0,sizeof(buf)); } if(cnt <0){ // error } close(sockfd); return 0; }
#include <stdlib.h> // for system() #include <unistd.h> // for sleep() int main(){ for(int i=0;i<20;i++){ system("./client"); sleep(1); // 1s执行一次 } return 0; }
此时,开两个客户端 分别执行 main.c 的可执行文件,
输出如下:
now: 2020-09-06 21:25:45 now: 2020-09-06 21:25:46 now: 2020-09-06 21:25:47 now: 2020-09-06 21:25:48 now: 2020-09-06 21:25:50 now: 2020-09-06 21:25:52 now: 2020-09-06 21:25:54 now: 2020-09-06 21:25:56 now: 2020-09-06 21:25:58 now: 2020-09-06 21:26:00 now: 2020-09-06 21:26:02 now: 2020-09-06 21:26:04 now: 2020-09-06 21:26:06 now: 2020-09-06 21:26:08 now: 2020-09-06 21:26:10 now: 2020-09-06 21:26:12 now: 2020-09-06 21:26:14 now: 2020-09-06 21:26:16 now: 2020-09-06 21:26:18 now: 2020-09-06 21:26:20
now: 2020-09-06 21:25:49 now: 2020-09-06 21:25:51 now: 2020-09-06 21:25:53 now: 2020-09-06 21:25:55 now: 2020-09-06 21:25:57 now: 2020-09-06 21:25:59 now: 2020-09-06 21:26:01 now: 2020-09-06 21:26:03 now: 2020-09-06 21:26:05 now: 2020-09-06 21:26:07 now: 2020-09-06 21:26:09 now: 2020-09-06 21:26:11 now: 2020-09-06 21:26:13 now: 2020-09-06 21:26:15 now: 2020-09-06 21:26:17 now: 2020-09-06 21:26:19 now: 2020-09-06 21:26:21 now: 2020-09-06 21:26:22 now: 2020-09-06 21:26:23 now: 2020-09-06 21:26:24
Example3 :Handle multiple socket connections with threads
To handle every connection we need a separate handling code to run along with the main server accepting connections.
One way to achieve this is using threads. The main server program accepts a connection and creates a new thread to handle communication for the connection, and then the server goes back to accept more connections.
#include <stdio.h> // for printf() #include <sys/socket.h> // for socket() bind() listen() accept() send() recv() #include <netinet/in.h> // for struct sockaddr_in #include <arpa/inet.h> // for htonl() htons() #include <time.h> // for time() #include <string.h> // for memset() #include <unistd.h> // for write() close() sleep() #include <pthread.h> // for pthread_create() struct conninfo{ char ip[128]; int connfd; }; void * doSomething(void *info){ struct conninfo clientInfo = *(struct conninfo *)info; char buf[1025]= {'\0'}; // write printf("client 来了,ip:%s\n",clientInfo.ip); time_t ticks = time(NULL); struct tm tm = *localtime(&ticks); sprintf(buf,"now: %d-%02d-%02d %02d:%02d:%02d", tm.tm_year + 1900, tm.tm_mon + 1, tm.tm_mday, tm.tm_hour, tm.tm_min, tm.tm_sec); write(clientInfo.connfd,buf,strlen(buf)); close(clientInfo.connfd); return NULL; } int main(){ int listenfd = socket(AF_INET,SOCK_STREAM,0); // bind struct sockaddr_in servaddr; servaddr.sin_family = AF_INET; servaddr.sin_addr.s_addr = htonl(INADDR_ANY); servaddr.sin_port = htons(8888); bind(listenfd,(struct sockaddr *)&servaddr,sizeof(servaddr)); // listen listen(listenfd,10); // max length = 10 ,more detail : man listen int connfd; while(1){ // accept struct sockaddr_in connaddr; int sockaddr_len = sizeof(connaddr); connfd = accept(listenfd,(struct sockaddr*)&connaddr,(socklen_t *)&sockaddr_len); // 客户端的信息 if(connfd <0){ printf("accept failed\n"); return 1; } // 创建 线程 // 客户端的信息 struct conninfo clientInfo; clientInfo.connfd = connfd; char temp[128]; sprintf(temp,"%s:%d",inet_ntoa(connaddr.sin_addr),connaddr.sin_port); strcpy(clientInfo.ip,temp); pthread_t tid; pthread_create(&tid,NULL,doSomething,(void *)&clientInfo); } close(listenfd); return 0; }
#include <stdio.h> // for printf() #include <sys/socket.h> // for socket() #include <netinet/in.h> // for sockaddr_in #include <arpa/inet.h> // for inet_addr() htons() htonl() #include <unistd.h> // for read() write() #include <string.h> // for memset() int main (){ // socket int sockfd = socket(AF_INET,SOCK_STREAM,0); // connect struct sockaddr_in sockaddr; sockaddr.sin_family = AF_INET; sockaddr.sin_addr.s_addr = inet_addr("127.0.0.1"); sockaddr.sin_port = htons(8888); int ret = connect(sockfd,(struct sockaddr *)&sockaddr,sizeof(sockaddr)); if(ret < 0 ){ // failed printf("connect failed\n"); } int cnt; char buf[1025]; while((cnt = read(sockfd,buf,sizeof(buf)))>0){ printf("%s\n",buf); memset(buf,0,sizeof(buf)); } if(cnt <0){ // error } close(sockfd); return 0; }
开两个客户端 分别执行 main.c 的可执行文件,
#include <stdlib.h> // for system() #include <unistd.h> // for sleep() int main(){ for(int i=0;i<20;i++){ system("./client"); sleep(1); // 1s执行一次 } return 0; }
client 来了,ip:127.0.0.1:28877 client 来了,ip:127.0.0.1:29389 client 来了,ip:127.0.0.1:29901 client 来了,ip:127.0.0.1:30413 client 来了,ip:127.0.0.1:30925 client 来了,ip:127.0.0.1:31437 client 来了,ip:127.0.0.1:31949 client 来了,ip:127.0.0.1:32461 client 来了,ip:127.0.0.1:32973 client 来了,ip:127.0.0.1:33485 client 来了,ip:127.0.0.1:33997 client 来了,ip:127.0.0.1:34509 client 来了,ip:127.0.0.1:35021 client 来了,ip:127.0.0.1:35533 client 来了,ip:127.0.0.1:36045 client 来了,ip:127.0.0.1:36557 client 来了,ip:127.0.0.1:37069 client 来了,ip:127.0.0.1:37581 client 来了,ip:127.0.0.1:38093 client 来了,ip:127.0.0.1:38605 client 来了,ip:127.0.0.1:39117 client 来了,ip:127.0.0.1:39629 client 来了,ip:127.0.0.1:40141 client 来了,ip:127.0.0.1:40653 client 来了,ip:127.0.0.1:41165 client 来了,ip:127.0.0.1:41677 client 来了,ip:127.0.0.1:42189 client 来了,ip:127.0.0.1:42701 client 来了,ip:127.0.0.1:43213 client 来了,ip:127.0.0.1:43725 client 来了,ip:127.0.0.1:44237 client 来了,ip:127.0.0.1:44749 client 来了,ip:127.0.0.1:45261 client 来了,ip:127.0.0.1:45773 client 来了,ip:127.0.0.1:46285 client 来了,ip:127.0.0.1:46797 client 来了,ip:127.0.0.1:47309 client 来了,ip:127.0.0.1:47821 client 来了,ip:127.0.0.1:48333 client 来了,ip:127.0.0.1:48845
now: 2020-09-06 22:08:20 now: 2020-09-06 22:08:21 now: 2020-09-06 22:08:22 now: 2020-09-06 22:08:23 now: 2020-09-06 22:08:24 now: 2020-09-06 22:08:25 now: 2020-09-06 22:08:26 now: 2020-09-06 22:08:27 now: 2020-09-06 22:08:28 now: 2020-09-06 22:08:29 now: 2020-09-06 22:08:30 now: 2020-09-06 22:08:31 now: 2020-09-06 22:08:32 now: 2020-09-06 22:08:33 now: 2020-09-06 22:08:34 now: 2020-09-06 22:08:35 now: 2020-09-06 22:08:36 now: 2020-09-06 22:08:37 now: 2020-09-06 22:08:38 now: 2020-09-06 22:08:39
now: 2020-09-06 22:08:24 now: 2020-09-06 22:08:25 now: 2020-09-06 22:08:26 now: 2020-09-06 22:08:27 now: 2020-09-06 22:08:28 now: 2020-09-06 22:08:29 now: 2020-09-06 22:08:30 now: 2020-09-06 22:08:31 now: 2020-09-06 22:08:32 now: 2020-09-06 22:08:33 now: 2020-09-06 22:08:34 now: 2020-09-06 22:08:35 now: 2020-09-06 22:08:36 now: 2020-09-06 22:08:37 now: 2020-09-06 22:08:38 now: 2020-09-06 22:08:39 now: 2020-09-06 22:08:40 now: 2020-09-06 22:08:41 now: 2020-09-06 22:08:42 now: 2020-09-06 22:08:43
Example4 : Here we are exchanging one hello message between server and client to demonstrate the client/server model.
#include <stdio.h> // for printf() #include <sys/socket.h> // for socket() bind() listen() accept() #include <netinet/in.h> // for struct sockaddr_in #include <arpa/inet.h> // for htons() htonl() #include <unistd.h> // for read() write() #include <string.h> // strlen() int main(){ // socket int listenfd = socket(AF_INET,SOCK_STREAM,0); if(listenfd <0){ printf("create socket error\n"); return 1; } // bind struct sockaddr_in sockaddr; sockaddr.sin_family = AF_INET; sockaddr.sin_addr.s_addr = htonl(INADDR_ANY); sockaddr.sin_port = htons(8888); int ret = bind(listenfd,(struct sockaddr*)&sockaddr,sizeof(sockaddr)); if(ret <0){ printf("bind error\n"); return 1; } // listen ret = listen(listenfd,10) ; if(ret <0){ printf("bind error\n"); return 1; } // accept struct sockaddr_in connaddr; int connaddlen = sizeof(connaddr); int connfd = accept(listenfd,(struct sockaddr*)&connaddr,(socklen_t *)&connaddlen); if(connfd <0 ){ printf("accept error\n"); return 1; } printf("conn 连接成功\n"); printf("客户端ip:%s:%d\n", inet_ntoa(connaddr.sin_addr),connaddr.sin_port); //ntoa() 返回 char* // read char buf[1025]= {'\0'}; int cnt = read(connfd,buf,sizeof(buf)); if(cnt < 0 ){ printf("read error\n"); return 1; } printf("recv[server] : %s\n",buf); // write char s[] = "hell world"; ret = write(connfd,s,strlen(s)); if(ret < 0 ){ printf("write error\n"); return 1; } return 0; }
#include <stdio.h> // for printf() #include <sys/socket.h> // for socket() connect() #include <netinet/in.h> // for struct sockaddr_in #include <arpa/inet.h> // for inet_addr() htons() #include <unistd.h> // for write() read() #include <string.h> // for strlen() int main(){ // socket int sockfd = socket(AF_INET,SOCK_STREAM,0); if(sockfd <0 ){ printf("socket failed\n"); return 1; } // connect struct sockaddr_in sockaddr; sockaddr.sin_family = AF_INET; sockaddr.sin_addr.s_addr =inet_addr("127.0.0.1"); sockaddr.sin_port = htons(8888); int ret = connect(sockfd,(struct sockaddr*)&sockaddr,sizeof(sockaddr)); if(ret <0 ){ printf("connect failed\n"); return 1; } char s[]="你好服务端我是客户端"; // write write(sockfd,s,strlen(s)); // read char buf[1025]={'\0'}; read(sockfd,buf,sizeof(buf)); printf("服务端的回复是:%s\n",buf); return 0; }
Example5 : 设置端口复用
#include <stdio.h> // for printf() #include <sys/socket.h> // for socket() bind() listen() accept() send() recv() #include <netinet/in.h> // for struct sockaddr_in #include <arpa/inet.h> // for htonl() htons() #include <time.h> // for time() #include <string.h> // for memset() #include <unistd.h> // for write() close() sleep() #include <pthread.h> // for pthread_create() struct conninfo{ char ip[128]; int connfd; }; void * doSomething(void *info){ struct conninfo clientInfo = *(struct conninfo *)info; char buf[1025]= {'\0'}; // write printf("client 来了,ip:%s\n",clientInfo.ip); time_t ticks = time(NULL); struct tm tm = *localtime(&ticks); sprintf(buf,"now: %d-%02d-%02d %02d:%02d:%02d", tm.tm_year + 1900, tm.tm_mon + 1, tm.tm_mday, tm.tm_hour, tm.tm_min, tm.tm_sec); write(clientInfo.connfd,buf,strlen(buf)); close(clientInfo.connfd); return NULL; } int main(){ int listenfd = socket(AF_INET,SOCK_STREAM,0); int optval = 1; int ret = setsockopt(listenfd,SOL_SOCKET,SO_REUSEADDR,&optval,sizeof(optval)); // 设置 端口服用 // 不然要1min 左右 server 才可以再次复用8888 端口 if(ret < 0 ){ printf("setsockopt failed\n"); return 1; } // bind struct sockaddr_in servaddr; servaddr.sin_family = AF_INET; servaddr.sin_addr.s_addr = htonl(INADDR_ANY); servaddr.sin_port = htons(8888); bind(listenfd,(struct sockaddr *)&servaddr,sizeof(servaddr)); // listen ret = listen(listenfd,10); // max length = 10 ,more detail : man listen if(ret <0){ perror("listen failed:"); return 1; } int connfd; while(1){ // accept struct sockaddr_in connaddr; int sockaddr_len = sizeof(connaddr); connfd = accept(listenfd,(struct sockaddr*)&connaddr,(socklen_t *)&sockaddr_len); // 客户端的信息 if(connfd <0){ printf("accept failed\n"); return 1; } // 创建 线程 // 客户端的信息 struct conninfo clientInfo; clientInfo.connfd = connfd; char temp[128]; sprintf(temp,"%s:%d",inet_ntoa(connaddr.sin_addr),connaddr.sin_port); strcpy(clientInfo.ip,temp); pthread_t tid; pthread_create(&tid,NULL,doSomething,(void *)&clientInfo); } close(listenfd); return 0; }
Example6 : 设置端口复用
服务端一直发送时间到客户端,服务端程序如何处理客户端关闭的情况?(要用信号处理)
#include <stdio.h> // for printf() #include <sys/socket.h> // for socket() bind() listen() accept() send() recv() #include <netinet/in.h> // for struct sockaddr_in #include <arpa/inet.h> // for htonl() htons() #include <time.h> // for time() #include <string.h> // for memset() #include <unistd.h> // for write() close() sleep() #include <pthread.h> // for pthread_create() #include <signal.h> // for signal() #include <stdlib.h> // for exit() struct conninfo{ char ip[128]; int connfd; }; void * doSomething(void *info){ struct conninfo clientInfo = *(struct conninfo *)info; char buf[1025]= {'\0'}; // write printf("client 来了,ip:%s\n",clientInfo.ip); while(1){ time_t ticks = time(NULL); struct tm tm = *localtime(&ticks); memset(buf,'\0',sizeof(buf)); sprintf(buf,"now: %d-%02d-%02d %02d:%02d:%02d", tm.tm_year + 1900, tm.tm_mon + 1, tm.tm_mday, tm.tm_hour, tm.tm_min, tm.tm_sec); int cnt = write(clientInfo.connfd,buf,strlen(buf)); if(cnt < 0 ){ // -1 close(clientInfo.connfd); break; // client is closed } sleep(1); } return NULL; } void sig_handler(int sig_num){ printf("signal exception: %d\n",sig_num); } int main(){ // register signal handler // 处理 客户端关闭的情况 signal(SIGPIPE,sig_handler); int listenfd = socket(AF_INET,SOCK_STREAM,0); int optval = 1; int ret = setsockopt(listenfd,SOL_SOCKET,SO_REUSEADDR,&optval,sizeof(optval)); // 设置 端口服用 // 不然要1min 左右 server 才可以再次复用8888 端口 if(ret < 0 ){ printf("setsockopt failed\n"); return 1; } // bind struct sockaddr_in servaddr; servaddr.sin_family = AF_INET; servaddr.sin_addr.s_addr = htonl(INADDR_ANY); servaddr.sin_port = htons(8888); bind(listenfd,(struct sockaddr *)&servaddr,sizeof(servaddr)); // listen ret = listen(listenfd,10); // max length = 10 ,more detail : man listen if(ret <0){ perror("listen failed:"); return 1; } int connfd; while(1){ // accept struct sockaddr_in connaddr; int sockaddr_len = sizeof(connaddr); connfd = accept(listenfd,(struct sockaddr*)&connaddr,(socklen_t *)&sockaddr_len); // 客户端的信息 if(connfd <0){ printf("accept failed\n"); return 1; } // 创建 线程 // 客户端的信息 struct conninfo clientInfo; clientInfo.connfd = connfd; char temp[128]; sprintf(temp,"%s:%d",inet_ntoa(connaddr.sin_addr),connaddr.sin_port); strcpy(clientInfo.ip,temp); pthread_t tid; pthread_create(&tid,NULL,doSomething,(void *)&clientInfo); } close(listenfd); return 0; }
#include <stdio.h> // for printf() #include <sys/socket.h> // for socket() #include <netinet/in.h> // for sockaddr_in #include <arpa/inet.h> // for inet_addr() htons() htonl() #include <unistd.h> // for read() write() #include <string.h> // for memset() int main (){ // socket int sockfd = socket(AF_INET,SOCK_STREAM,0); // connect struct sockaddr_in sockaddr; sockaddr.sin_family = AF_INET; sockaddr.sin_addr.s_addr = inet_addr("127.0.0.1"); sockaddr.sin_port = htons(8888); int ret = connect(sockfd,(struct sockaddr *)&sockaddr,sizeof(sockaddr)); if(ret < 0 ){ // failed printf("connect failed\n"); } int cnt; char buf[1025]; while(1){ cnt = read(sockfd,buf,sizeof(buf)); printf("%s\n",buf); memset(buf,'\0',sizeof(buf)); } close(sockfd); return 0; }
UDP EXAMPLE:
Example1:
IO MULTIPLEXING – SELECT VS POLL VS EPOLL
One basic concept of Linux (actually Unix) is the rule that everything in Unix/Linux is a file. Each process has a table of file descriptors that point to files, sockets, devices and other operating system objects.
Typical system that works with many IO sources has an initializaion phase and then enter some kind of standby mode – wait for any client to send request and response it.
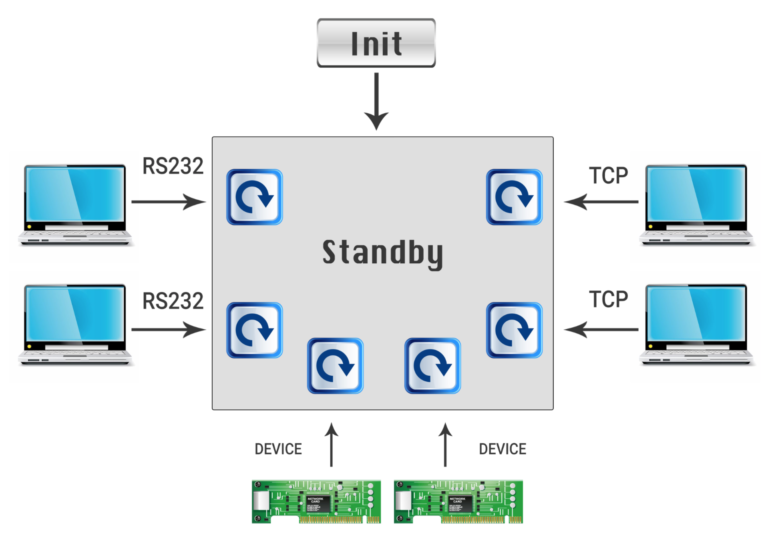
Simple solution is to create a thread (or process) for each client , block on read until a request is sent and write a response. This is working ok with a small amount of clients but if we want to scale it to hundred of clients, creating a thread for each client is a bad idea.
IO Multiplexing
The solution is to use a kernel mechanism for polling over a set of file descriptors[使用内核机制对一组文件描述符进行轮询]. There are 3 options you can use in Linux:
- select(2)
- poll(2)
- epoll
All the above methods serve the same idea, create a set of file descriptors , tell the kernel what would you like to do with each file descriptor (read, write, ..) and use one thread to block on one function call until at least one file descriptor requested operation available
Select System Call
The select( ) system call provides a mechanism for implementing synchronous multiplexing I/O
int select(int nfds, fd_set *readfds, fd_set *writefds, fd_set *exceptfds, struct timeval *timeout);
A call to select( ) will block until the given file descriptors are ready to perform I/O, or until an optionally specified timeout has elapsed
The watched file descriptors are broken into three sets
- File descriptors listed in the readfds set are watched to see if data is available for reading.
- File descriptors listed in the writefds set are watched to see if a write operation will complete without blocking.
- File descriptors in the exceptfds set are watched to see if an exception has occurred, or if out-of-band data is available (these states apply only to sockets).
A given set may be NULL, in which case select( ) does not watch for that event.
On successful return, each set is modified such that it contains only the file descriptors that are ready for I/O of the type delineated by that set
Example: 向客户端提供时间
#include <stdio.h> // for printf() #include <unistd.h> // for fork() sleep() #include <stdlib.h> // for exit() #include <sys/socket.h> // for socket() #include <netinet/in.h> // for struct sockaddr_in #include <string.h> // for memset() #include <arpa/inet.h> // for inet_addr() htons() #include <time.h> // for time() #include <signal.h> // for signal() #include <pthread.h> // for pthread_create() #include <vector> using namespace std; void signal_handler(int sig_num){ printf("sig_num%d\n",sig_num); } int main(){ signal(SIGPIPE,signal_handler); // socket int listenfd = socket(AF_INET,SOCK_STREAM,0); if(listenfd<0 ){ printf("socket create failed\n"); return 1; } int optval = 1; setsockopt(listenfd,SOL_SOCKET,SO_REUSEADDR,&optval,sizeof(optval)); // bind struct sockaddr_in servaddr; servaddr.sin_family = AF_INET; servaddr.sin_addr.s_addr = htonl(INADDR_ANY); servaddr.sin_port = htons(8888); bind(listenfd,(struct sockaddr*)&servaddr,sizeof(servaddr)); // listen listen(listenfd,5); // select() fd_set rset,wset,rtemp,wtemp; // rset 往里读 wset 往外写 FD_ZERO(&rset); FD_ZERO(&wset); FD_SET(listenfd,&rset); int maxfd = listenfd; while(1){ // 监听 rtemp = rset; wtemp = wset; select(maxfd+1,&rtemp,&wtemp,NULL,NULL); // 会修改 rtemp 和 wtemp // 客户端发起了新的连接 if(FD_ISSET(listenfd,&rtemp)){ // accept struct sockaddr_in connaddr; int connaddr_len = sizeof(connaddr); int connfd = accept(listenfd,(struct sockaddr*)&connaddr,(socklen_t *)&connaddr_len);// accept 阻塞 printf("新的客户端ip:%s:%d\n",inet_ntoa(connaddr.sin_addr),connaddr.sin_port); // 将connfd 加入到 wset 中 FD_SET(connfd,&wset); // 更新最大文件描述符 maxfd = maxfd > connfd?maxfd:connfd; } // 向已经连接的客户端 发送数据 vector<int> toClient; for(int i = listenfd+1;i<= maxfd;i++ ) { if(FD_ISSET(i,&wtemp)){ toClient.push_back(i); } } char buf[1025]; time_t ticks; struct tm tm; sleep(1); ticks = time(NULL); tm = *localtime(&ticks); memset(buf,'\0',sizeof(buf)); sprintf(buf,"now: %d-%02d-%02d %02d:%02d:%02d", tm.tm_year + 1900, tm.tm_mon + 1, tm.tm_mday, tm.tm_hour, tm.tm_min, tm.tm_sec); //1s 后向 所有客户端 发送 for(auto i = toClient.cbegin();i!=toClient.cend();i++){ int connfd = *i; int cnt = write(connfd,buf,strlen(buf)); if(cnt < 0 ){ // -1 // 客户端 断开连接 printf("客户端 断开连接\n"); close(connfd); // 从wset 中删除 该fd FD_CLR(connfd,&wset); } } // 清空 toClient toClient.clear(); } return 0; }
#include <stdio.h> // for printf() #include <sys/socket.h> // for socket() #include <netinet/in.h> // for sockaddr_in #include <arpa/inet.h> // for inet_addr() htons() htonl() #include <unistd.h> // for read() write() #include <string.h> // for memset() int main (){ // socket int sockfd = socket(AF_INET,SOCK_STREAM,0); // connect struct sockaddr_in sockaddr; sockaddr.sin_family = AF_INET; sockaddr.sin_addr.s_addr = inet_addr("127.0.0.1"); sockaddr.sin_port = htons(8888); int ret = connect(sockfd,(struct sockaddr *)&sockaddr,sizeof(sockaddr)); if(ret < 0 ){ // failed printf("connect failed\n"); } char buf[1025] = {'\0'}; int cnt; while(1){ cnt = read(sockfd,buf,sizeof(buf)); if(cnt <= 0 ){ break; } printf("[recv]:%s %d\n",buf,cnt); memset(buf,0,sizeof(buf)); } close(sockfd); return 0; }
Select 的优缺点:
优点:
跨平台
缺点:
每次都要拷贝fd_set
每次都要线性遍历 fd_set
支持文件描述符数量少,默认是1024
Poll System call
Unlike select(), with its inefficient three bitmask-based sets of file descriptors, poll( ) uses a single array of nfds pollfd structures. the prototype is simpler:
int poll (struct pollfd *fds, unsigned int nfds, int timeout);
struct pollfd {
int fd;
short events;
short revents;
};
For each file descriptor build an object of type pollfd and fill the required events. after poll returns check the revents field(内核给的反馈).
Example: 向客户端提供时间
#include <stdio.h> // for printf() #include <unistd.h> // for fork() sleep() #include <stdlib.h> // for exit() #include <sys/socket.h> // for socket() #include <netinet/in.h> // for struct sockaddr_in #include <string.h> // for memset() #include <arpa/inet.h> // for inet_addr() htons() #include <time.h> // for time() #include <signal.h> // for signal() #include <pthread.h> // for pthread_create() #include <poll.h> // for poll() #include <vector> using namespace std; void signal_handler(int sig_num){ printf("sig_num%d\n",sig_num); } int main(){ signal(SIGPIPE,signal_handler); // socket int listenfd = socket(AF_INET,SOCK_STREAM,0); if(listenfd<0 ){ printf("socket create failed\n"); return 1; } int optval = 1; setsockopt(listenfd,SOL_SOCKET,SO_REUSEADDR,&optval,sizeof(optval)); // bind struct sockaddr_in servaddr; servaddr.sin_family = AF_INET; servaddr.sin_addr.s_addr = htonl(INADDR_ANY); servaddr.sin_port = htons(8888); bind(listenfd,(struct sockaddr*)&servaddr,sizeof(servaddr)); // listen listen(listenfd,5); // poll() struct pollfd fds[1024]; int maxindex = 0; for(int i=0;i<1024;i++){ fds[i].fd = -1; // -1 表示 未被占用 } fds[0].fd = listenfd; fds[0].events = POLLIN; // 检测 读事件 while(1){ // 监听 int cnt = poll(fds,maxindex+1,-1); // -1 表示 阻塞 // 客户端发起了新的连接 if(fds[0].revents & POLLIN){ // accept struct sockaddr_in connaddr; int connaddr_len = sizeof(connaddr); int connfd = accept(listenfd,(struct sockaddr*)&connaddr,(socklen_t *)&connaddr_len);// accept 阻塞 printf("新的客户端ip:%s:%d\n",inet_ntoa(connaddr.sin_addr),connaddr.sin_port); // 查找一个最小的没有被占用的文件描述符的位置 ,// 将connfd 加入到 fds 中 for(int i=0;i<1024;i++){ if(fds[i].fd == -1){ // 没有被占用 fds[i].fd = connfd; fds[i].events = POLLOUT; // 更新最大文件描述符 maxindex = maxindex >i ?maxindex:i; break; } } } // 向已经连接的客户端 发送数据 vector<int> toClient; for(int i = 1;i <= maxindex;i++ ) { if(fds[i].fd== -1){ // 未被占用 continue; }else{ if(fds[i].events & POLLOUT){ // 往外写 toClient.push_back(i); } } } char buf[1025]; time_t ticks; struct tm tm; sleep(1); ticks = time(NULL); tm = *localtime(&ticks); memset(buf,'\0',sizeof(buf)); sprintf(buf,"now: %d-%02d-%02d %02d:%02d:%02d", tm.tm_year + 1900, tm.tm_mon + 1, tm.tm_mday, tm.tm_hour, tm.tm_min, tm.tm_sec); //1s 后向 所有客户端 发送 for(auto i = toClient.cbegin();i!=toClient.cend();i++){ int idx = *i; int cnt = write(fds[idx].fd,buf,strlen(buf)); if(cnt < 0 ){ // -1 // 客户端 断开连接 printf("客户端 断开连接\n"); close(fds[idx].fd); // 将文件描述符重置为 -1 fds[idx].fd = -1; } } // 清空 toClient toClient.clear(); } return 0; }
#include <stdio.h> // for printf() #include <sys/socket.h> // for socket() #include <netinet/in.h> // for sockaddr_in #include <arpa/inet.h> // for inet_addr() htons() htonl() #include <unistd.h> // for read() write() #include <string.h> // for memset() int main (){ // socket int sockfd = socket(AF_INET,SOCK_STREAM,0); // connect struct sockaddr_in sockaddr; sockaddr.sin_family = AF_INET; sockaddr.sin_addr.s_addr = inet_addr("127.0.0.1"); sockaddr.sin_port = htons(8888); int ret = connect(sockfd,(struct sockaddr *)&sockaddr,sizeof(sockaddr)); if(ret < 0 ){ // failed printf("connect failed\n"); } char buf[1025] = {'\0'}; int cnt; while(1){ cnt = read(sockfd,buf,sizeof(buf)); if(cnt <= 0 ){ break; } printf("[recv]:%s %d\n",buf,cnt); memset(buf,0,sizeof(buf)); } close(sockfd); return 0; }
Poll 的优缺点:
优点:
不用每次都要拷贝fds 数组
没有上限限制,
缺点:
不跨平台
与select 一样,需要轮询fds 数组来获取就绪的描述符
Epoll System Call
While working with select and poll we manage everything on user space and we send the sets on each call to wait. To add another socket we need to add it to the set and call select/poll again.
Epoll* system calls help us to create and manage the context in the kernel. We divide the task to 3 steps:
- create a context in the kernel using epoll_create
- add and remove file descriptors to/from the context using epoll_ctl
- wait for events in the context using epoll_wait
#include <stdio.h> // for printf() #include <unistd.h> // for fork() sleep() #include <stdlib.h> // for exit() #include <sys/socket.h> // for socket() #include <netinet/in.h> // for struct sockaddr_in #include <string.h> // for memset() #include <arpa/inet.h> // for inet_addr() htons() #include <time.h> // for time() #include <signal.h> // for signal() #include <pthread.h> // for pthread_create() #include <sys/epoll.h> // for epoll_create() epoll_ctl() epoll_wait() #include <vector> using namespace std; void signal_handler(int sig_num){ printf("sig_num%d\n",sig_num); } int main(){ signal(SIGPIPE,signal_handler); // socket int listenfd = socket(AF_INET,SOCK_STREAM,0); if(listenfd<0 ){ printf("socket create failed\n"); return 1; } int optval = 1; setsockopt(listenfd,SOL_SOCKET,SO_REUSEADDR,&optval,sizeof(optval)); // bind struct sockaddr_in servaddr; servaddr.sin_family = AF_INET; servaddr.sin_addr.s_addr = htonl(INADDR_ANY); servaddr.sin_port = htons(8888); bind(listenfd,(struct sockaddr*)&servaddr,sizeof(servaddr)); // listen listen(listenfd,5); // epoll_create() int epfd = epoll_create(2000); // 如果不够会自己增加 是个树结构,返回的是根 // epoll_ctl() struct epoll_event epo_evt; epo_evt.events = EPOLLIN; epo_evt.data.fd = listenfd; epoll_ctl(epfd,EPOLL_CTL_ADD,listenfd,&epo_evt); // epoll_wait() struct epoll_event all[2000]; // 传出参数 while(1){ // 使用epoll 通知内核 int ret = epoll_wait(epfd,all,sizeof(all)/sizeof(all[0]),-1); // 返回 number of fd printf("%d\n",ret); vector<int> toClient; //************ 遍历all 中前 ret 个元素 ************* for(int i=0;i<ret;i++){ int fd = all[i].data.fd; // 有新的客户端连接 if(fd == listenfd){ // accept struct sockaddr_in connaddr; int connaddr_len = sizeof(connaddr); int connfd = accept(listenfd,(struct sockaddr*)&connaddr,(socklen_t *)&connaddr_len);// accept 阻塞 printf("新的客户端ip:%s:%d\n",inet_ntoa(connaddr.sin_addr),connaddr.sin_port); // 将connfd 加入到 all 中 struct epoll_event temp; temp.events = EPOLLOUT; temp.data.fd = connfd; epoll_ctl(epfd,EPOLL_CTL_ADD,connfd,&temp); }else{ // 向已经连接的客户端 发送数据 if(all[i].events&EPOLLOUT){ // 只往外写 toClient.push_back(i); } } } char buf[1025]; time_t ticks; struct tm tm; sleep(1); ticks = time(NULL); tm = *localtime(&ticks); memset(buf,'\0',sizeof(buf)); sprintf(buf,"now: %d-%02d-%02d %02d:%02d:%02d", tm.tm_year + 1900, tm.tm_mon + 1, tm.tm_mday, tm.tm_hour, tm.tm_min, tm.tm_sec); //1s 后向 所有客户端 发送 for(auto i = toClient.cbegin();i!=toClient.cend();i++){ int fd = all[*i].data.fd; int cnt = write(fd,buf,strlen(buf)); if(cnt < 0 ){ // -1 // 客户端 断开连接 printf("客户端 断开连接\n"); close(fd); // 删除该 位置的 文件描述符 epoll_ctl(epfd,EPOLL_CTL_DEL,fd,NULL); } } // 清空 toClient toClient.clear(); } return 0; }
#include <stdio.h> // for printf() #include <sys/socket.h> // for socket() #include <netinet/in.h> // for sockaddr_in #include <arpa/inet.h> // for inet_addr() htons() htonl() #include <unistd.h> // for read() write() #include <string.h> // for memset() int main (){ // socket int sockfd = socket(AF_INET,SOCK_STREAM,0); // connect struct sockaddr_in sockaddr; sockaddr.sin_family = AF_INET; sockaddr.sin_addr.s_addr = inet_addr("127.0.0.1"); sockaddr.sin_port = htons(8888); int ret = connect(sockfd,(struct sockaddr *)&sockaddr,sizeof(sockaddr)); if(ret < 0 ){ // failed printf("connect failed\n"); } char buf[1025] = {'\0'}; int cnt; while(1){ cnt = read(sockfd,buf,sizeof(buf)); if(cnt <= 0 ){ break; } printf("[recv]:%s %d\n",buf,cnt); memset(buf,0,sizeof(buf)); } close(sockfd); return 0; }
NOTE:
Question:in epoll_ctl() why need fd twice?
Answer:
Actually you don't have to set event.data.fd. It's a union, you can set other members. When epoll_wait returns you get the event.data associated with the descriptor that became interesting:
typedef union epoll_data {
void *ptr;
int fd;
uint32_t u32;
uint64_t u64;
} epoll_data_t;Which means you're completely free not to put anything in fd and put something in ptr instead (for example).
the fd in epoll_data is not intended to be used by the system but by myself.
epoll 的优缺点:
优点:
epoll has better performance – O(1) instead of O(n)
没有上限限制,
缺点:
不跨平台,linux 特有
与select 一样,需要轮询fds 数组来获取就绪的描述符
其他:
关于C/C++ 操作符的优先级:
C 中的优先级:
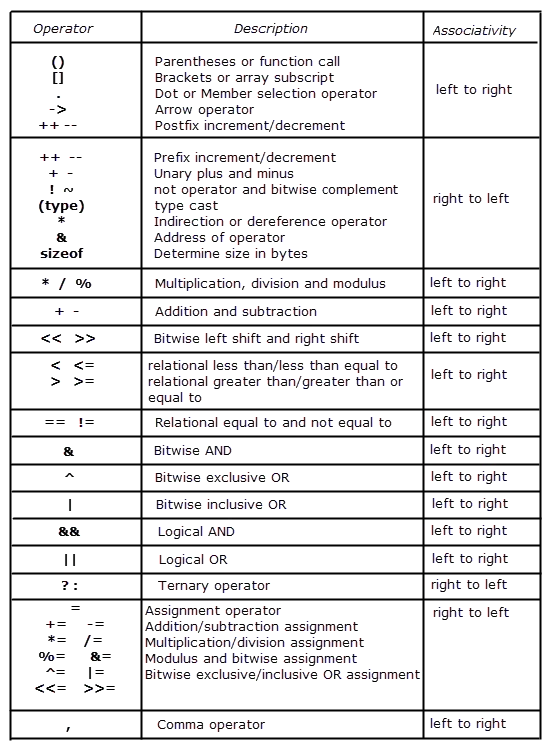
例子:
int(*A3)[3] 和 int(*A4[3] )
C/C++ 的优先级:


 浙公网安备 33010602011771号