Python的重要知识点汇总3
git 的使用:
git三个工作区切换:
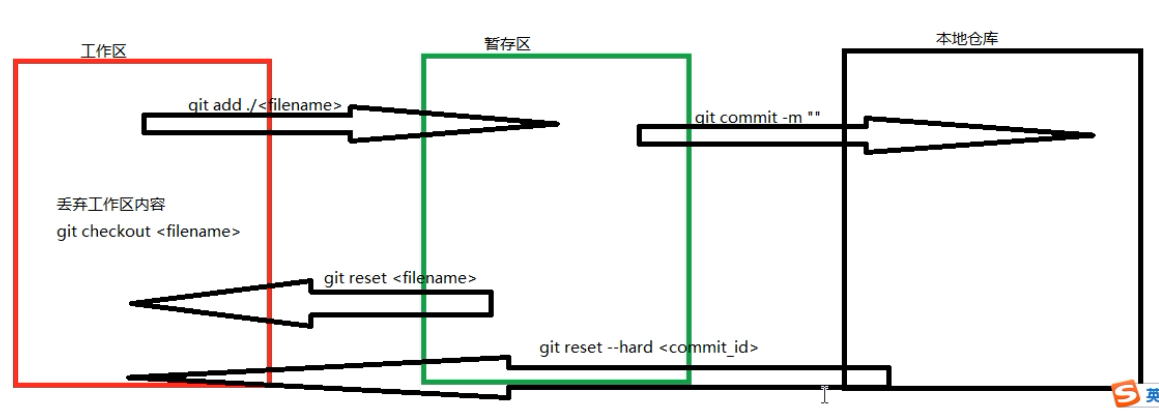
常用的是版本回退 ,(注:加上--hard 是把内容也会回退)
提交代码到master上:


mkdir test
git init
git pull https://github.com/zzzcb/xxx.git  # 先将远端的拉过来
cp 要提交的文件  .   # 拷贝到test 中
git add  要提交的文件
git commit -m "注释"
git remote add origin https://github.com/zzzcb/xxx.git
git push -u origin master
公钥,私钥:

Redis :
https://www.cnblogs.com/GGGG-XXXX/articles/9289135.html
https://www.runoob.com/redis/redis-intro.html
非关系型数据库,是个高性能的 key-value 数据库(大字典) , key 全部是字符串,value支持5中类型,
string(字符串),
hash(哈希),(字典)
list(列表),
set(集合)
及 zset(sorted set:有序集合)
mysql 是操作磁盘的, redis 是操作内存的,
redis 默认端口号: 6379
字典的操作:
 1 import redis
 2
 3 conn = redis.Redis(
 4     host='127.0.0.1',
 5     port=6379,
 6     decode_responses=True  # 如果不设置 返回的是 bytes
 7 )
 8
 9 # 我们要操作的 数据
10 # {
11 #     'people':{
12 #         'name':'xxx',
13 #         'age':18,
14 #         'sex':'男'
15 #     }
16 # }
17
18 '''
19 conn.hset('people','name','xxx')
20 conn.hset('people','age',18)
21 conn.hset('people','sex','男')
22
23 conn.hget('people','name')
24 conn.hget('people','age')
25 conn.hget('people','sex')
26 '''
27
28
29 # 上面操作太 麻烦了,
30 conn.hmset('people',{'name':'xxx','age':18})
31
32 ret = conn.hmget('people',['name','age'])
33 print(ret) #['xxx', '18']
34
35 ret = conn.hgetall('people')
36 print(ret) #{'name': 'xxx', 'age': '18'}
37 print(type(ret)) #<class 'dict'>
注:关于嵌套的字典(对象):从第二层起, val,就只能是字符串
例如如下数据:
{
    'person':{
        'father':{
          'name':'xx',
          'age':18,
        },
    }
}
 1 import redis
 2
 3 conn = redis.Redis(
 4     host='127.0.0.1',
 5     port=6379,
 6     decode_responses=True  # 如果不设置 返回的是 bytes
 7 )
 8
 9 # 我们要操作的 数据
10 # {
11 #     'person':{
12 #         'father':{
13 #           'name':'xx',
14 #           'age':18,
15 #         },
16 #     }
17 # }
18
19 d = {
20   'name':'xx',
21   'age':18,
22 }
23 # conn.hset('person','father',d) # 这是不行的,从第二层起, val,就只能是字符串,所以需要 json 序列化
24 # print(conn.hget('person','father'))
25
26 import json
27 conn.hset('person','father',json.dumps(d)) # 这样才对
28 print(conn.hget('person','father'))  # {"name": "xx", "age": 18}
redis 的 数据库 :

redis 的连接池 :
连接池,维持5个连接,用于连接到redis ,这样就不用一直创建连接了,
 1 import redis
 2
 3 # 创建连接池
 4 pool = redis.ConnectionPool(host='localhost', port=6379,max_connections=5,decode_responses=True)
 5
 6
 7 # 使用连接池 连接到 redis
 8 conn = redis.Redis(connection_pool=pool)
 9 conn.hset('person','name','tom')
10 print(conn.hget('person','name'))
redis 的事务 :
redis 的命令是具有原子性的,例如 hmget() ,如果其中有一个失败,都失败,
redis 的事务是不具有原子性的,它是一个失败,其他照常执行,
 1 from utils.redis_pool import pool
 2
 3 conn = redis.Redis(connection_pool=pool)
 4
 5 # 初始化事务对象
 6 pipe = conn.pipeline()
 7
 8 # 向 pipe 中加入 操作
 9 try:
10     pipe.set('name1','tom')
11     pipe.get('name1')
12     pipe.set('name2','tom','tom2') # 语法是不对的,应该报错
13
14     ret = pipe.execute()# 此时才会执行 上面所有的操作
15     #ret 是上面操作执行的 返回值,
16 except:
17     print(conn.get('name1')) # 如果能拿到 name1 说明 redis 不具有原子性
redis 的发布订阅者模式 :
 1 import redis
 2 from utils.redis_pool import pool
 3 conn = redis.Redis(connection_pool=pool)
 4 # 第一步 生成一个订阅者
 5 sub = conn.pubsub()
 6 # 第二步 订阅一个消息
 7 sub.subscribe('xxx')       # xxx 是个key
 8 # 第三步 死循环一直等待监听结果
 9 while True:
10     print('I am working ~~~')
11     msg = sub.parse_response()
12     print(msg)
1 import redis
2 from utils.redis_pool import pool
3 conn = redis.Redis(connection_pool=pool)
4
5 # 发布消息
6 pub = conn.publish('xxx','000000000')
Linux 随笔:
https://www.cnblogs.com/pyyu/p/9276851.html
Linux 目录:
/opt 安装大型软件,例如mysql ,ngix ,python 等第三方软件
/home 普通用户目录
/etc 放配置文件,
Linux 命令:
1,find 路径 -name 搜索内容
2,ps -ef :查看进程
3,grep 过滤, ps -ef 返回一堆信息,然后grep 过滤下: ps -ef | grep a.txt 过滤出我们想要的信息
4,netstat -tunlp 查看服务运行在 什么端口上,
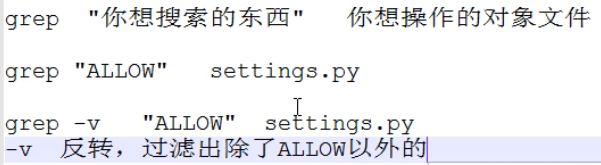
grep 文本过滤工具: find是搜索一个 文件或文件夹, grep 是在一个文件中搜索,过滤文本,
5,scp 命令:
Linux 远程传输文件之 scp 命令,
scp是 secure copy的缩写, scp是linux系统下基于ssh登陆进行安全的远程文件拷贝命令
用法:
scp 你想上传的文件 远程主机地址:绝对路径
scp 你想下载远程主机的文件 本地的路径


-r 参数 可以递归传输整个目录
关于防火墙:
注意点:
1.关闭linux防火墙,linux防火墙用于控制 程序端口的,出入规则,
iptables -F 清空防火墙,为了实验方便
iptables -L 查看防火墙规则
永久关闭防火墙,防止下次开机自启
systemctl stop/start/restart firewalld #关闭firewalld服务,此条命令,下次开机还会自启
systemctl disable/enable firewalld #永久关闭防火墙,开启自启
2.关闭系统自带的,美国航空局的selinux
getenforce 获取selinux状态 如果是 Enforcing就是开启状态
setenforce 0 临时关闭selinux
如何永久关闭selinx
1.找到配置文件
vim /etc/selinx/config
SELINUX=disabled
2.重启服务器,永久生效
如何查看 /var/log/ 文件夹的大小 :
6,du 查看文件/文件夹大小 (常用 du -sh )
du -h ./* 统计当前目录所有文件的大小,且显示 mb 单位
-s 合计,统计
统计/var/log/文件夹大小
du -sh /var/log # s是合计 在一起
7 top 命令:
top 命令用于动态地监视进程活动与系统负载等信息
8 free -m 命令:
查看 内存信息
9 wget 命令:
wget命令用于在终端下载网络文件
参数是 wget [参数] 下载地址
传输到windows,得安装一个上传下载工具,工具包的名字是 lrzsz
yum install lrzsz -y
安装完之后 就有 rz(接受/上传 文件) sz(发送/下载) 两个命令
rz 直接回车,接受一个文件到linux
sz 文件名 发送这个文件 到 windows
9 id 命令:
id命令查看用户的身份信息
id root
id tom
10 rm 反向删除:
rm -rf !(a.c) #删除a.c文件之外的所有文件
rm -rf !(a.c | b.c) #删除a.c和b.c文件之外的所有文件
用户管理:
通过root用户新建普通用户,uid是从 1000开始的,系统服务的用户,默认是在1-1000以内的
useradd 用户名
passwd 用户名
userdel -r 用户名 (家目录也会被删除)
用户身份切换
su - 用户名
中间的横杠,表示完全环境变量切换
logout 用于退出当前用户回话
文件目录权限 :
主u 组g 其他o
chmod u+x 文件/ 文件夹
chmod 770 文件/ 文件夹
chown 更改属主
chgrp 更改属组
-rw-r--r--. 1 root root 0 Jan 9 08:40 xxxxxx
可读可写权限 链接数 属主 属组 日期相关 文件名
user 属主 属于某个人的
group 属组 这个用户属于某个组
other 对于既不属于某个用户,也不属于某个组,就是一个其他人的身份
- rw- r-- r--
文件类型 (user属主) (组权限) (其他人权限)
r w x 的意思:
1,对于文件来说, r 可读, w可写 ,x可执行
2, 对于文件夹来说:
r 可以ls 可以ls查看文件夹内容
w 可以进入目录,创建文本 touch
x 可进入目录 可以 cd
软连接 (快捷方式) :
安装Pytho3 :
/opt/python3/bin/python3.6
1.安装python3解释器 (二选一即可,推荐使用path路径设置)
1.安装python3解释器 (二选一即可,推荐使用path路径设置)
1.安装python3解释器 (二选一即可,推荐使用path路径设置)
/opt/python3/bin/python3.6
直接输入python3,定位到/opt/python3/bin/python3.6 ,解决方案
1.添加path
echo $PATH
[root@qishione tmp]# echo $PATH
/usr/local/sbin:/usr/local/bin:/sbin:/bin:/usr/sbin:/usr/bin:/root/bin
2.添加软连接 (不如path来的彻底,方便)
ln -s 目标文件 快捷方式的路径
#这条命令,仅仅是添加了python3.6的解释器
ln -s /opt/python3/bin/python3.6 /usr/local/bin/python3
ln -s /opt/python3/bin/pip3 /usr/local/bin/pip3
tar 解压 压缩 :
tar -zxvf 文件 解压
tar -zcvf 文件 压缩
kill :
kill pid
kill -9 pid
-9参数,发送一个强制终止信号
pkill 支持正则匹配的kill命令
pkill vim 一次性杀死所有关vim的进程
linux设置支持中文
1.第一个设置linux系统的编码 utf8
1.设置一个文件/etc/locale.conf
vim /etc/locale.conf
2.写入新的变量
[root@qishione opt]# cat /etc/locale.conf
LANG="zh_CN.UTF-8"
2.设置远程登录软件的编码 xshell utf8
保证xshell也是utf-8 就行
df 命令:
linux查看磁盘空间的命令
df -h
linux DNS服务
dns域名解析系统
domain name server
dns解析原理:
1.当用户在浏览器输入 www.baidu.com的时候
2.第一步去本地dns缓存中查找域名记录,如果没有就去
3. /etc/hosts文件中,查找是否有本地解析记录,如果没有
4.去/etc/resolv.conf 指定的dns服务器中查找记录,如果没有,就是公网根本没有注册这个域名
dns就是网络上一个 key-value的域名数据库
linux的dns配置文件
1. /etc/hosts 优先级最高,本地dns记录解析 ,如果买不起域名,就用这个,做本地测试开发
2. [root@qishione opt]# cat /etc/resolv.conf
# Generated by NetworkManager
nameserver 119.29.29.29 #主dns记录
nameserver 223.5.5.5 #备dns记录
114.114.114.114 114的dns服务器
119.29.29.29 腾讯的dns服务器
223.5.5.5 阿里巴巴的dns服务器
223.6.6.6 阿里巴巴的dns服务器
nslookup 域名查找命令
支持交互式的
直接 nslookup
参数形式的
nsllokup pythonav.cn
linux的计划任务
到了某个设置的时间,自动的执行某个任务
crontab -l 查看计划任务的规则
crontab -e 编辑定时任务
定时任务的语法练习
分 时 日 月 周 命令的绝对路径
* * * * * 命令 每分钟执行一次命令
每天的下午4点28分 执行 重启nginx的命令
分 时 日 月 周 命令的绝对路径
* * * * *
28 16 * * * systemctl restart nginx
#每分钟执行一次命令
分 时 日 月 周 命令的绝对路径
* * * * *
, 1,5,10 第1分钟,5分钟,10分钟 11:01 11:05 11:10
- 10-20 第10分钟到-20分钟之间都执行
10,11,12,13...20
#每小时的3,15分组执行命令
分 时 日 月 周 命令的绝对路径
* * * * *
3,15 * * * * 命令绝对路径
#在上午8-11点的第3和第15分钟执行
分 时 日 月 周 命令的绝对路径
* * * * *
3,15 8-11 * * * 命令
#每晚21:30执行命令
分 时 日 月 周 命令的绝对路径
* * * * *
30 21 * * *
#没周六、日的下午1:30执行命令
分 时 日 月 周 命令的绝对路径
* * * * *
30 13 * * 6,7
#每周一到周五的凌晨1点,清空/tmp目录的所有文件
分 时 日 月 周 命令的绝对路径
* * * * *
0 1 * * 1-5 /usr/bin/rm -rf /tmp/*
#每晚的21:30重启nginx
分 时 日 月 周 命令的绝对路径
* * * * *
30 21 * * *
#每月的1,10,22日的4:45重启nginx
分 时 日 月 周 命令的绝对路径
* * * * *
45 4 1,10,22 * * 重启nginx
#每个星期一的上午8点到11点的第3和15分钟执行命令
分 时 日 月 周 命令的绝对路径
* * * * *
3,15 8-11 * * 1 执行命令
linux 软件包管理:
windows
exe 直接运行即可
macos叫做
xx.dmg格式的
centos系列的的软件包格式是
rpm 格式
mysql-5-3-4.rpm
redis-3-4-3.rpm
nginx2-3-2.rpm
rpm管理软件包的命令,很难用,需要手动解决以来关系( 不用 ,用yum )
rpm -ivh mysql-5-3-4.rpm 提示我少了什么。。。
我去rpm -ivh 少的东西安装好之后。。。。又告诉我少了什么。。。。
yum的工具,自动去下载某个yum仓库的 rpm软件包,并且自动搜索软件以来,解决软件依赖,如同pip3 工具
yum载linux中的 yum仓库是
/etc/yum.repos.d
并且在这个目录,只有以 .repo的文件结尾,才会识别为是一个yum仓库
自定义yum仓库,修改yum源,为什么要修改pip3源呢?,
为什么要修改?
yum默认配置的是centos的国外仓库地址,修改为阿里云的yum仓库,加速下载
配置阿里云yum源的步骤
1.备份旧的yum源
cd /etc/yum.repos.d/
mkdir allbak
mv * allbak
2.下载新的阿里云yum源
wget -O /etc/yum.repos.d/CentOS-Base.repo http://mirrors.aliyun.com/repo/Centos-7.repo
-O 指定下载后的文件,存放到某个路径,切改名
配置第三方软件源,epel源
wget -O /etc/yum.repos.d/epel.repo http://mirrors.aliyun.com/repo/epel-7.repo
3.清空旧的yum缓存
yum clean all
4.生成新的阿里云的yum缓存
yum makecache
5.安装一个软件,测试一下
yum install redis -y #查看redis是从哪个yum源来的
-y 一路默认的yes
6.只有通过yum安装的软件,才可以通过systemctl 管理
systemctl start/stop/restart/status redis
系统服务管理命令:
systemctl start/stop/restart/status redis
systemctl stop/start network
systemctl enable redis #开启加载redis
systemctl disable redis #禁止redis开机自启
重启,关机:
重启机器的命令 reboot
关机命令 poweroff
编译安装Python3:
1.下载python3源码包

wget https://www.python.org/ftp/python/3.6.2/Python-3.6.2.tgz


2.下载python3编译的依赖包(复制粘贴

)
yum install gcc patch libffi-devel python-devel  zlib-devel bzip2-devel openssl-devel ncurses-devel sqlite-devel readline-devel tk-devel gdbm-devel db4-devel libpcap-devel xz-devel -y


3.解压缩源码包
	tar -xvf Python-3.6.2.tgz
4.进入源码包文件夹
	cd  Python-3.6.2
5.编译且安装
	1.进入源码包目录
	2.  ls查看源码包内容
	3.  释放编译文件 Makefile
		./configure --prefix=/opt/python36/
			--prefix 这个参数 是制定一个安装路径
	4.编译
		make
	5.编译安装,此步才会最终生成 /opt/python36/
		make install
	6.进入/opt目录查看python36文件夹,我们要的python3都在这里了
		cd /opt/
		ls

6.更改linux的path变量,添加python3

	#一定要将python3的目录放在第一位
	#一定要将python3的目录放在第一位
	#一定要将python3的目录放在第一位
	PATH=/opt/python36/bin:/usr/local/sbin:/usr/local/bin:/usr/sbin:/usr/bin:/root/bin

	为了永久生效path设置,添加到/etc/profile全局环境变量配置文件中

	vim /etc/profile
	PATH=/opt/python36/bin:/usr/local/sbin:/usr/local/bin:/usr/sbin:/usr/bin:/root/bin
	读取配置文件/etc/profile
	source /etc/profile

7.安装django模块
pip3 install -i https://pypi.douban.com/simple  django==1.11.16

8.查看当前解释器的python模块有哪些
pip3 list
虚拟环境 virtualenv:
1.下载virtualenv
pip3 install -i https://pypi.douban.com/simple

2.使用命令创建新的分身(解释器的分身)
virtualenv --no-site-packages --python=python3     qishi1


3.查看qishi1这个分身文件夹
ls

4.激活分身,激活解释器

source /opt/qishidjango/mysite/qishifenshen1/bin/activate


5.检查虚拟环境的意义所在,以及是否成功
echo $PATH  查看激活了虚拟环境,是否正常
which  python3
which  pip3  是否都来自虚拟环境


6.在虚拟环境中安装django1.11.16模块
pip3 install https://pypi.douban.com/simple  django==1.11.16


7.通过命令创建django项目,测试访问
	cd  /opt    回到opt目录
	1.第一步
		django-admin startproject    mysite
	2.第二步 修改django的settings文件
		vim mysite/mysite/settings.py
		修改
		ALLOW_HOSTS=['*']
	3.启动项目
		python3  manage.py runserver 0.0.0.0:8000
	4.确保防火墙已经关闭
		iptables -F
	5.在浏览器中访问 192.168.11.37:8000

8.退出虚拟环境
deactivate
如何确保本地开发环境,和线上一致性?
1.导出当前解释器的模块
pip3 freeze > requirements.txt
2.将这个文件requirements.txt,上传至服务器,在新的虚拟环境中安装
pip3 install -r requirements.txt
virtualenv 的不足:
1.创建很麻烦 命令太长
2.创建的虚拟环境管理很麻烦
所以,有了virtualenvwrapper工具
1.统一的对虚拟环境管理
2.创建使用虚拟环境的命令 很齐全,很简单
virtualenvwrapper 工具:
安装配置

注意退出所有的虚拟环境!!! 在物理环境下安装

1.下载模块
	pip3 install virtualenvwrapper

2.设置linux的用户个人配置文件~/.bashrc
	vim ~/.bashrc
	写入以下三行命令
		WORKON_HOME=~/Envs   #设置virtualenv的统一管理目录,以后自动下载的虚拟环境,全都放这了
		VIRTUALENVWRAPPER_PYTHON=/opt/python36/bin/python3    #指定python解释器的本体
		source /opt/python36/bin/virtualenvwrapper.sh #执行virtualenvwrapper安装脚本(可以用find / -name virtualenvwrapper.sh  来查找文件所在位置)

3.退出会话,重新登录生效,且每次登录的时候,就自动加载virtualenvwrapper工具


4.查看virtualevnwrapper工具是否可以使用,学习他的工具命令

	lsvirtualenv
	列举所有的虚拟环境。

	cdvirtualenv
	导航到当前激活的虚拟环境的目录中,比如说这样您就能够浏览它的 site-packages 。

	cdsitepackages
	和上面的类似,但是是直接进入到 site-packages 目录中。


	lssitepackages
	创建一个虚拟环境:


	mkvirtualenv my_django115
	这会在 ~/Envs 中创建 my_django115 文件夹。

	在虚拟环境上工作:激活虚拟环境my_django115
	workon my_django115


	再创建一个新的虚拟环境
	mkvirtualenv my_django2

	virtualenvwrapper 提供环境名字的tab补全功能。
	当有很多环境, 并且很难记住它们的名字时,这就显得很有用。

	workon还可以任意停止你当前的环境,可以在多个虚拟环境中来回切换
	workon django1.15

	workon django2.0

	也可以手动停止虚拟环境
	deactivate

	删除虚拟环境,需要先退出虚拟环境
	rmvirtualenv my_django115
linux 下如何安装软件:
1,yum 一切都可yum
2, 源码包编译安装 (可自定制功能,且安装最新的软件) wget
3, 手动rpm 安装,(垃圾)
linux 安装mariadb:
yum 安装Mariadb in centos7
	1.新建一个yum源仓库
		touch /etc/yum.repos.d/Mariadb.repo
	2.在这个yum源仓库文件中,添加仓库url地址
	[mariadb]
	name = MariaDB
	baseurl = http://mirrors.aliyun.com/mariadb/yum/10.0/centos7-amd64/
	gpgkey= http://mirrors.aliyun.com/mariadb/yum/RPM-GPG-KEY-MariaDB
	gpgcheck=1

	3.一条命令安装mariadb
	yum install MariaDB-server MariaDB-client -y


	4,启动mariadb数据库
	systemctl start/stop/status/restart mariadb/mysql

	5,新建 /etc/my.cnf   # 还有更多配置可以自行添加
		[mysqld]
		socket=/var/lib/mysql/mysql.sock

	6,启动mariadb 数据库服务之后,初始化数据库
	mysql_secure_installation    输入这条命令直接Enter键,并设置root 密码

	7,然后登陆数据库:
	mysql -u root -p

	8,
	mysql>GRANT ALL PRIVILEGES ON *.* TO 'root'@'%' IDENTIFIED BY 'your_password' WITH GRANT OPTION;     #允许root用户远程访问(默认远程连接是不能使用root用户来连接的)
	mysql>FLUSH PRIVILEGES;     #刷新权限
#=============================
一,使用yum安装
	1.我们当前的是阿里云的yum源(下载速度特别快)
	通过
	yum install  mariadb  发现版本如下,版本特别低,且安装包特别小,

	mariadb                        x86_64                   1:5.5.60-1.el7_5                   base                   8.9 M

	2.我们可以配置mariadb官方的yum源(官方的mariadb包一定是最新的,最好的,功能最全的,但是下载速度可能很慢)

	配置官方mariadb的yum源步骤
		1.新建一个yum源仓库
			touch /etc/yum.repos.d/Mariadb.repo
		2.在这个yum源仓库文件中,添加仓库url地址
			[mariadb]
			name = MariaDB
			baseurl = http://yum.mariadb.org/10.1/centos7-amd64
			gpgkey=https://yum.mariadb.org/RPM-GPG-KEY-MariaDB
			gpgcheck=1

		3.一条命令安装mariadb
		yum install MariaDB-server MariaDB-client -y


		由于官方的下载网速忒慢了,我们学习使用阿里云的mariadb数据库
		由于官方的下载网速忒慢了,我们学习使用阿里云的mariadb数据库


	 安装阿里云的mariadb
	 yum install mariadb-server mariadb -y
mariadb 10.0 的yum安装步骤
	1.新建一个yum源仓库
		touch /etc/yum.repos.d/Mariadb.repo
	2.在这个yum源仓库文件中,添加仓库url地址
		[mariadb]
		name = MariaDB
		baseurl = http://mirrors.aliyun.com/mariadb/yum/10.0/centos7-amd64/
		gpgkey= http://mirrors.aliyun.com/mariadb/yum/RPM-GPG-KEY-MariaDB
		gpgcheck=1

	3.一条命令安装mariadb
	yum install MariaDB-server MariaDB-client -y
epel.repo 配置:
[epel]
name=Extra Packages for Enterprise Linux 7 - $basearch
baseurl=http://mirrors.aliyun.com/epel/7/$basearch
failovermethod=priority
enabled=1
gpgcheck=0
gpgkey=file:///etc/pki/rpm-gpg/RPM-GPG-KEY-EPEL-7

[epel-debuginfo]
name=Extra Packages for Enterprise Linux 7 - $basearch - Debug
baseurl=http://mirrors.aliyun.com/epel/7/$basearch/debug
failovermethod=priority
enabled=0
gpgkey=file:///etc/pki/rpm-gpg/RPM-GPG-KEY-EPEL-7
gpgcheck=0

[epel-source]
name=Extra Packages for Enterprise Linux 7 - $basearch - Source
baseurl=http://mirrors.aliyun.com/epel/7/SRPMS
failovermethod=priority
enabled=0
gpgkey=file:///etc/pki/rpm-gpg/RPM-GPG-KEY-EPEL-7
gpgcheck=0
CentOS-Base.repo
# CentOS-Base.repo
#
# The mirror system uses the connecting IP address of the client and the
# update status of each mirror to pick mirrors that are updated to and
# geographically close to the client.  You should use this for CentOS updates
# unless you are manually picking other mirrors.
#
# If the mirrorlist= does not work for you, as a fall back you can try the
# remarked out baseurl= line instead.
#
#

[base]
name=CentOS-$releasever - Base - mirrors.aliyun.com
failovermethod=priority
baseurl=http://mirrors.aliyun.com/centos/$releasever/os/$basearch/
        http://mirrors.aliyuncs.com/centos/$releasever/os/$basearch/
        http://mirrors.cloud.aliyuncs.com/centos/$releasever/os/$basearch/
gpgcheck=1
gpgkey=http://mirrors.aliyun.com/centos/RPM-GPG-KEY-CentOS-7

#released updates
[updates]
name=CentOS-$releasever - Updates - mirrors.aliyun.com
failovermethod=priority
baseurl=http://mirrors.aliyun.com/centos/$releasever/updates/$basearch/
        http://mirrors.aliyuncs.com/centos/$releasever/updates/$basearch/
        http://mirrors.cloud.aliyuncs.com/centos/$releasever/updates/$basearch/
gpgcheck=1
gpgkey=http://mirrors.aliyun.com/centos/RPM-GPG-KEY-CentOS-7

#additional packages that may be useful
[extras]
name=CentOS-$releasever - Extras - mirrors.aliyun.com
failovermethod=priority
baseurl=http://mirrors.aliyun.com/centos/$releasever/extras/$basearch/
        http://mirrors.aliyuncs.com/centos/$releasever/extras/$basearch/
        http://mirrors.cloud.aliyuncs.com/centos/$releasever/extras/$basearch/
gpgcheck=1
gpgkey=http://mirrors.aliyun.com/centos/RPM-GPG-KEY-CentOS-7

#additional packages that extend functionality of existing packages
[centosplus]
name=CentOS-$releasever - Plus - mirrors.aliyun.com
failovermethod=priority
baseurl=http://mirrors.aliyun.com/centos/$releasever/centosplus/$basearch/
        http://mirrors.aliyuncs.com/centos/$releasever/centosplus/$basearch/
        http://mirrors.cloud.aliyuncs.com/centos/$releasever/centosplus/$basearch/
gpgcheck=1
enabled=0
gpgkey=http://mirrors.aliyun.com/centos/RPM-GPG-KEY-CentOS-7

#contrib - packages by Centos Users
[contrib]
name=CentOS-$releasever - Contrib - mirrors.aliyun.com
failovermethod=priority
baseurl=http://mirrors.aliyun.com/centos/$releasever/contrib/$basearch/
        http://mirrors.aliyuncs.com/centos/$releasever/contrib/$basearch/
        http://mirrors.cloud.aliyuncs.com/centos/$releasever/contrib/$basearch/
gpgcheck=1
enabled=0
gpgkey=http://mirrors.aliyun.com/centos/RPM-GPG-KEY-CentOS-7
1,启动mariadb数据库
systemctl start/stop/status/restart mariadb/mysql
2,启动mariadb 数据库服务之后,初始化数据库
mysql_secure_installation 直接输入这条命令,并设置root 密码
3,然后登陆数据库:
mysql -u root -p
4,设置mariadb数据库支持中文
vim /etc/my.cnf 配置文件,写入如下配置
[mysqld]
character-set-server=utf8
collation-server=utf8_general_ci
log-error=/var/log/mysqld.log
datadir=/var/lib/mysql
socket=/var/lib/mysql/mysql.sock
# Disabling symbolic-links is recommended to prevent assorted security risks
symbolic-links=0
# Settings user and group are ignored when systemd is used.
# If you need to run mysqld under a different user or group,
# customize your systemd unit file for mariadb according to the
# instructions in http://fedoraproject.org/wiki/Systemd
[client]
default-character-set=utf8
[mysql]
default-character-set=utf8
[mysqld_safe]
log-error=/var/log/mariadb/mariadb.log
pid-file=/var/run/mariadb/mariadb.pid
设置完之后,重启数据库服务, 登录数据库,查看中文编码设置 \s 查看,
linux 安装 node:
centos7 安装 node
1,wget https://npm.taobao.org/mirrors/node/latest-v9.x/node-v9.0.0-linux-x64.tar.gz
 然后解压 到/opt

2,  ln -s /opt/node-v9.0.0-linux-x64/bin/node /usr/bin/node
	ln -s /opt/nodejs/node-v9.0.0-linux-x64/bin/npm /usr/bin/npm

3,  由于众所周知的原因,可以考虑切换源为 taobao 源
	npm set registry https://registry.npm.taobao.org/
linux 安装 redis :
redis数据库的安装配置:
	1.安装方式可以yum,可以编译,可以rpm
	1.使用编译安装
		1.下载redis源码包
		wget http://download.redis.io/releases/redis-4.0.10.tar.gz
		2.解压缩redis源码包
		tar -zxvf  redis-4.0.10.tar.gz

		3.进入redis源码包目录
		cd redis-4.0.10

		3.编译且安装
		make && make install
1,安装好之后,配置一个文件,用于启动,
新建 redis-6380.conf 文件:
在redis-6380.conf配置文件中,定制一些安全参数
端口更改
后台运行
设置redis密码
设置redis启动ip地址
redis-6380.conf配置如下: (真正放入 文件 不要带注释)
		redis-6380.conf配置如下
			port 6380   					#运行在6380的redis数据库实例
			daemonize yes 					  #后台运行redis
			pidfile /data/6380/redis.pid	#存放redis pid的文件
			loglevel notice					#日志等级
			logfile "/data/6380/redis.log"	#指定redis日志文件的生成目录
			dir /data/6380					#指定redis数据文件夹的目录
			protected-mode yes
			requirepass   haohaio   	    #设置redis的密码
2,启动redis 的服务端,指定配置文件启动
redis-server redis-6380.conf
3,访问redis 数据库
redis-cli -p 6380 -a haohaio
redis-cli -p 6380 -a haohaio
-p 设置redis链接的端口
-a 显式的填写密码
显式 填写密码 不太安全,
可以如下: redis-cli -p 6380 , 然后,进入之后 auth + 密码
nginx 及 nginx 反向代理 ***:
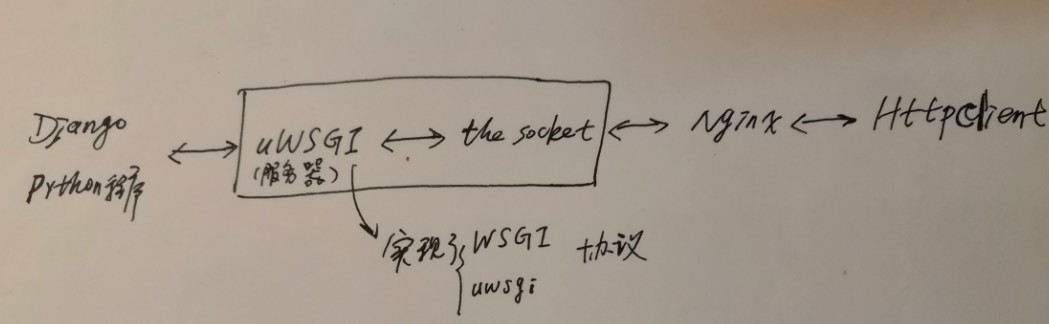
django 项目部署就是 通过nginx 转发给 uwsgi 的
1,web服务器和web框架的关系

	web服务器(nginx):接收HTTP请求(例如www.pythonav.cn/xiaocang.jpg)并返回数据.

		web服务器不和数据库打交道
		nginx
		apache
		lighthttp
		IIS(windows下的web服务器)


	web框架(django,flask):开发web应用程序,处理接收到的数据

		django   大而全 ,为了新闻设计,功能特别多,form表单,xxxxxxx,臃肿  每秒吞吐量600 req/s
		flask    轻量,什么功能都没有,一切靠插件							900/s
		tornado   异步非阻塞        1200  req/s
		sanic    python3.7   uvloop   select模型       2600  req/s


		golang   高并发  内置了  goroutine  轻量级的协成   进程 线程  协程(greenlet  gevent)
		一秒钟,运行成千上万的协程
		net/http    6W req/s

		linux  ab压测命令


2,nginx的优势
是c语言开发的一个web框架  官方声称支持10W+的并发   nginx+ uwsgi(多进程) + django

tengine (更牛逼)+ uwsgi(多进程) + django


3,两种技术栈:
不花钱的:
centos7 +  python3.6  + mariadb  +  redis  +    django +   nginx  +  vue  +   git     便宜,免费


花钱的老企业,国企,外企:
redhat   +  java      +  oracle  +  memcachd  +  tomcat  +  apache +  svn      闭源收费的技术栈


红帽操作系统有问题之后,有专业的红帽资格认证工程师,进行工单处理
认证都是需要花钱
rhcsa  红帽系统管理
rhce  红帽工程师认证
rhca   红帽的架构师


4,nginx安装配置
	1.编译安装nginx软件,此步非常重要,
	1.编译安装nginx软件,此步非常重要,
	1.编译安装nginx软件,此步非常重要,
	1.编译安装nginx软件,此步非常重要,
	1.编译安装nginx软件,此步非常重要,
	0.yum install gcc patch libffi-devel python-devel  zlib-devel bzip2-devel openssl-devel ncurses-devel sqlite-devel readline-devel tk-devel gdbm-devel db4-devel libpcap-devel xz-devel openssl openssl-devel -y

	1.下载源码包 (在/opt下 )
	wget -c https://nginx.org/download/nginx-1.12.0.tar.gz

	2.解压缩源码
	tar -zxvf nginx-1.12.0.tar.gz

	3.配置,编译安装
	./configure --prefix=/opt/nginx112/ [--with-http_ssl_module] 开启ssl 模块

		然后 make && make install


	4.启动nginx,进入sbin目录,找到nginx启动命令

	cd sbin
	./nginx #启动
	./nginx -s stop #关闭
	./nginx -s reload #平滑重启 ,修改了nginx.conf之后,可以不重启服务,加载新的配置


5,linux屏保安装
	1.下载屏保软件源码包
	wget https://jaist.dl.sourceforge.net/project/cmatrix/cmatrix/1.2a/cmatrix-1.2a.tar.gz
	2.解压缩源码包
	tar -zxvf cmatrix-1.2a.tar.gz
	3.进入源码包目录
	cd cmatrix-1.2a/
	4.释放编译文件
	 ./configure --prefix=/opt/cmatrix/
	 5.编译且安装
	 make && make install
	 6.进入安装屏保软件的目录
	 cd /opt/cmatrix/
	 7.执行屏保命令
	 ./bin/cmatrix


6.分析nginx的工作目录,内容
	[root@qishione nginx112]# ls
	client_body_temp  conf  fastcgi_temp  html  logs  proxy_temp  sbin  scgi_temp  uwsgi_temp


	conf   存放nginx的配置文件的
		nginx.conf 这里是控制nginx所有功能的文件

	html   存放网页html的目录
		index.html
	logs   存放log日志文件

	sbin    存放nginx可执行命令的
		nginx脚本命令


7, nginx.conf  核心配置如下:  (文件的语法是 左面是关键字, 右面是值)

	worker_processes  5;  #定义nginx工作进程数  以cpu核数为数量

	#error_log  logs/error.log; #错误日志
	#http定义代码主区域
	http {
		include       mime.types;
		default_type  application/octet-stream;
		#定义nginx的访问日志功能
		#nginx会有一个accses.log功能,查看用户访问的记录

		log_format  main  '$remote_addr - $remote_user [$time_local] "$request" '
						  '$status $body_bytes_sent "$http_referer" '
						  '"$http_user_agent" "$http_x_forwarded_for"'; #http_x_forwarded_for 使用代理ip主机的真实ip

		#开启日志功能
		access_log  logs/access.log  main;
		sendfile        on;
		keepalive_timeout  65; # 保持长连接的超时时间


		gzip  on; # 压缩 将文件压缩之后 再传输   开启gzip压缩传输

		server {   #虚拟主机1  定义一个 斗鱼网站

			listen       80;     #定义nginx的访问入口端口,访问地址是  192.168.11.37:80

			server_name  www.xxxxx.com; #定义网站的域名www.xxxxx.com 如果没有域名,就填写服务器的ip地址  192.168.11.37


			#nginx的url域名匹配  #最低级的匹配,只要来自于上面配置域名,都会走到这个location
			location / {
				root   html;   #这个root 定义网页根目录(以nginx安装的目录为相对路径)  # 可修改
				index  index.html index.htm;  #index参数定义网站的首页文件名,默认的文件名 (默认是80端口下的 index.html )
			}
			#错误页面的优化
			error_page  400 401  402  403  404   /40x.html;(/指的网页根目录 默认是 html )
		}
	}


8,nginx多虚拟主机的配置 (一个服务器跑多个 站点 )  #方法是通过加上多个 server标签
	虚拟主机分类:
		1,基于域名  通过不同域名区分不同的虚拟主机(运用最广泛)
		2,基于端口  通过不同端口 区分


	1.在nginx.conf中添加两个虚拟主机标签  server{}
	配置文件如下
		server {
			listen       80;
			server_name  xxjd.com; #110.20.220.220
			location / {
				root   /opt/jd;
				index  index.html;
			}
			error_page  404              /40x.html;
			error_page   500 502 503 504  /50x.html;
			location = /50x.html {
				root   html;
			}
		}
		server {
			listen 80;
			server_name  xxtb.com; #220.23.34.234
			location  /  {
			root  /opt/tb;
			index  index.html;
			}
		}


	2.重启nginx,加载新的配置
		nginx -s stop
		nginx


	3.修改windows的本地hosts解析文件,用于域名解析

		windows的hosts文件路径
		C:\Windows\System32\drivers\etc

		写入如下配置
		192.168.11.37  xxjd.com
		192.168.11.37  xxtb.com


	4.准备两个虚拟主机的 index.html文件
		/opt/jd/index.html  写入  我是京东
		/opt/tb/index.html   写入  我是淘宝


	5.在windows浏览器中,查看两个域名对应到的虚拟主机
		分别访问qishijd.com 域名
		然后访问qishitb.com 域名,查看网站的资料的内容变化


9,nginx访问日志功能
	配置方式
	1.修改nginx.conf配置文件,打开如下配置注释

		log_format  main  '$remote_addr - $remote_user [$time_local] "$request" '
						  '$status $body_bytes_sent "$http_referer" '
						  '"$http_user_agent" "$http_x_forwarded_for"';

		#开启日志功能           注: 实时监控的命令  tail -f
		access_log  logs/access.log  main;


10,nginx拒绝访问功能
在某一个虚拟主机下,顶一个deny参数,可以拒绝ip地址对虚拟主机的访问

server {
        listen       80;
        server_name  xxjd.com;

        location / {
            #deny  192.168.11.0/24; #只要192.168.11.xx 24代表该网段所有ip,  访问 xxjd.com/ 就拒绝它
            root   /opt/jd;
            index  index.html index.htm;
        }
        error_page  404              /40x.html;
        error_page   500 502 503 504  /50x.html;
        location = /50x.html {
            root   html;
        }
    }


11,nginx的代理功能

	生活中的代理:

		代购
		我们花钱,  给 做代理的 这个人 ,,   这个代理 去国外买东西,邮寄给我们

	用户发送 www.xxx.com:80 nginx 只能处理服务器上的 静态资源


	补:
		静态资源:
			css js  html  mp4

		动态资源:
			与数据库交互,从数据库中取出数据,这个资源
			数据库数据变化的时候,用户是不会感知到的,请求的借口根本没有变化

	正向代理: 代理的是客户端 (vpn)
	反向代理: 代理的是服务端


	web 的流程:
		用户  >  nginx    >    uwsgi(django)
		用户  <  nginx    <   uwsgi(django)

	nginx  的角色就是 反向代理 代理我们服务端

							  django1
		用户 -->   nginx -->  django2
							  django3


12,nginx的反向代理:
	1.实验准备,准备2台nginx机器
	机器1  192.168.11.37  用作  web服务器,用作数据返回
	机器2  192.168.11.167   用作nginx反向代理服务器


	在windows中访问 代理服务器,然后让代理服务器 去拿 web服务器的数据

	windows   >   192.168.11.158   >   192.168.11.37


	windows   <   192.168.11.158   <   192.168.11.37


	1.准备机器1,只是对数据页面的一个返回
	server {
			listen       80;
			server_name  192.168.11.37;

			#charset koi8-r;
			location / {
				root   html;
				index  index.html index.htm;
			}

			}


	2.准备机器2,用作nginx的反向代理服务器,这个机器不存数据,只转发请求
	配置如下
	server {
			listen       80;
			server_name  192.168.11.158;

			#charset koi8-r;

			#access_log  logs/host.access.log  main;
			#在这里进行反向代理配置
			#192.168.11.158/
			location / {
				#root   html;
				#index  index.html index.htm;
				proxy_pass http://192.168.11.37;
			}

	}


13,nginx的负载均衡,顾名思义,
	压力分担
	1.集群是什么
		一堆服务器做一件事

	2.集群性能很高
		淘宝本来的核心支付服务器是小型机,非常昂贵,且难以维护
		后来都讲 服务器更换为集群架构
		一堆便宜的服务器,维护者一个功能运转

	3.高可用
		单点机器很可能宕机
		集群单机机器宕机,不会影响整体的运转


14,nginx负载均衡的配置
	1.实验如下
	准备三台机器
	机器1   nginx负载均衡器(发牌的荷官)   192.168.11.158
		nginx.conf配置如下

			#定义nginx负载均衡池,里面默认是轮训算法
			#也可以用weight 权重算法
			#也可以用ip_hash 算法     每个请求按访问IP的hash结果分配,这样来自同一IP的固定访问一个后端服务器


			upstream nginx_pools {    #upstream 是个关键字    #nginx_pools 我们定义的   负载均衡的名字

				server  192.168.11.37  weight=10; # weight 是权重  分配权重   #ip_hash 是同一个ip网段的都
				server 192.168.11.167  weight=1;
			}
			server {
				listen       80;
				server_name  192.168.11.158;

				#charset koi8-r;

				#access_log  logs/host.access.log  main;
				#在这里进行反向代理配置
				#192.168.11.158/
				location / {

					proxy_pass http://nginx_pools;

				}
			}

	机器2   准备nginx  返回页面数据        192.168.11.37
		nginx.conf配置如下
				server {
					listen       80;
					server_name  192.168.11.37;
					location / {
						root   /opt/jd;
						index  index.html index.htm;
					}
					error_page  404              /40x.html;
					error_page   500 502 503 504  /50x.html;
					location = /50x.html {
						root   html;
					}
		}


	机器3   也准备nginx  返回页面数据      192.168.11.167
	 server {
			listen       80;
			server_name  192.168.11.167;

			#charset koi8-r;

			#access_log  logs/host.access.log  main;

			location / {
				root   html;
				index  index.html index.htm;
			}


	2.分别启动三台机器,三个nginx服务

	3.在windows中访问负载均衡器的地址,查看请求分发,


15,我们的 django 项目部署就是 通过nginx 转发给 uwsgi 的
杀死uwsgi:
killall -s INT uwsgi
部署supercrm 项目***:
1.部署supercrm项目前提
	-熟悉linux操作
	-上传supercrm项目到linux服务器
		-使用xftp工具,进项上传文件夹,将supercrm代码,传到linux服务器当中

	-完成python3解释器的安装


	-完成virtualenvwrapper工具的配置,解决虚拟环境问题
		1.新建一个supercrm虚拟环境用于运行  crm项目


	-完成centos7下安装配置mariadb数据库,且创建数据库数据,迁移导入supercrm数据
		#centos7底下,mariadb就是mysql数据库,只是包名的不同
			yum install mariadb-server  mariadb  -y
		#启动mariadb服务端
			systemctl start mariadb
		#使用客户端去链接mysql服务端
			1,本地连接
			mysql -uroot -p


			2,如果远程连接,注意,linux的数据库,需要对root用户设置远程链接的权限
			授权所有的权限,在所有库,所有表  对  root用户在所有的主机上, 设置权限密码是  redhat
			grant all privileges on *.* to root@'%' identified by 'redhat';

			#刷新授权表
			flush privileges;


			注意,linux的防火墙要给关闭,否则windows去链接linux的3306端口可能被拒绝


		**********************************
		将windows 上的数据 导入到 Linux下的 数据库中
			1.mysql数据的导出,与导入
			这个命令是在linux/windows中敲的(生成一个 .dump 文件)
				mysqldump -u root -p --all-databases >  win.dump

			2.上传这个数据文件到linux数据库中(xftp)

			3.在linux的mysql,导入这个数据文件
				mysql -uroot -p   <   /opt/win.dump


	-测试使用linux的python解释器去运行项目(注意要解决解释器的模块问题,才能正常运转项目)
		python3 manage.py runserver 0.0.0.0:8000

	-完成nginx的安装配置,了解nginx.conf如何配置


	-完成uWSGI命令学习,使用uWSGI启动supercrm项目,支持多进程

	-完成nginx处理supercrm项目的静态文件

	-最终效果

	访问nginx的80端口,即可找到supercrm应用,且保证静态文件页面正常


2,nginx+uwsgi+django+supervisor   (django自己也能运行一个web界面,但是默认用的wsgiref单机模块,性能比较低)

	wsgi是一个web应用协议

	一:基于wsgi运行的 web框架:
		基于wsgi运行的框架有bottle,DJango,Flask,用于解析动态HTTP请求

	二:基于wsgi运行的web服务器:
		它才是提供wbe界面给与访问的(django 默认用的是wsgiref )

		1,wsgiref
				django自带的web服务器
		2,Gunicorn
			用于linux的 python wsgi Http服务器,常用于各种django,flask结合部署服务器。
		3,mode_wsgi
			实现了Apache与wsgi应用程序的结合
		4,uWSGI
			C语言开发,快速,自我修复,开发人员友好的WSGI服务器,用于Python Web应用程序的专业部署和开发

			注:
				uwsgi在运行django项目的时候,必须找到django的wsgi.py文件,的文件内容中的参数 application = get_wsgi_application()
				报错如下:
					no application  .....
					#解决办法就是 uwsgi,一定要找打wsgi.py这个文件


	为什么要用nginx:
		因为uwsgi对静态文件的处理很差,然而nginx处理静态文件是一把手,并且nginx默认是80端口 ,而uwsgi等动态的框架,端口一般是8000-9000


	nginx 配置 uwsgi 转发给django 后端
		location / {

			include    uwsgi_params; #include也是一个包含语法,将uwsgi_params中的参数,导入到nginx转发请求中 uwsgi_params这个文件默认在 nginx112/conf/

			#uwsgi_pass 也是反向代理,并且是支持nginx和uwsgi之间 # 它类似于proxy_pass ( nginx接收到请求,直接转发请求给另一台机器去处理)
			uwsgi_pass localhost:9000;
		}


	安装uwsgi这个支持并发的web服务器
		我们用它去启动django


		1.安装uwsgi
			pip3 install uwsgi
		2.使用学习uwsgi命令,如何启动python应用
			通过uwsgi运行一个python web文件
			touch test.py 写入如下内容
				def application(env, start_response):
					start_response('200 OK', [('Content-Type','text/html')])
					return [b"i am  alex"] # python3
		3.通过命令去启动python web应用
			uwsg --http :8000   --wsgi-file  test.py
				--http 指明是 http协议
				--wsgi-file  指定一个支持python wsgi协议的文件( 例如:django项目下的 wsgi.py )

		4.通过uwsgi启动django项目
			uwsgi --http :8000 --module  supercrm.wsgi (注意这里要 找到supercrm目录)


		5.uwsgi自动重启python程序
			uwsgi --http :8000  --module  supercrm.wsgi  --py-autoreload=1  【py-autoreload  参数 】

			注: uwsgi 自动重启:
				pycharm 就是帮我们做了重启,项目,所以我们改变代码,前端可以直接看到效果


		# 第5步 命令太长了,一般将参数 放入 ini 文件
		6.使用uwsgi.ini配置文件去启动项目,这个文件自己去创建即可,放哪都可以   (注意配置 文件后面中文 去掉 )
				[uwsgi]
				# Django-related settings
				# the base directory (full path)

				chdir           = /opt/supercrm  #写上项目的绝对路径
				# Django's wsgi file


				module          = supercrm.wsgi  #填写找到django的wsgi文件,填写相对路径,以chdir参数为相对路径
				# the virtualenv (full path)

				home            = /root/Envs/my_django_01/ #填写虚拟环境的绝对路径
				# process-related settings
				# master

				master          = true  #启动uwsgi主进程
				# maximum number of worker processes
				processes       = 5


				# the socket (use the full path to be safe
				#socket          = 0.0.0.0:8000     #如果你使用了nginx,做反向代理,必须填写socket链接,而不是http参数


				http = 0.0.0.0:8000                #如果你不用nginx,直接使用uwsgi,运行一个http服务端,就用这个http参数


				# ... with appropriate permissions - may be needed
				# chmod-socket    = 664
				# clear environment on exit
				vacuum          = true


		7. 指定配置文件去启动uwsgi
		uwsgi --ini  uwsgi.ini


		8.使用ngixn处理django的静态文件
			1.设置django的静态文件目录,收集一下
			修改supercrm/settings.py ,写入如下参数
				STATIC_ROOT= '/opt/static'

			2.使用命令收集django的静态文件(收集好之后 放到/opt/static 下 )
				python3 manage.py collectstatic

			3.查看django的静态文件收集目录
				ls /opt/static

			4.配置nginx,反向代理,找到uwsgi项目,且配置nginx处理uwsgi的静态文件
				nginx.conf 修改配置如下

					server {
						listen       80;
						server_name  paixiaosenxx.xyz;

						location / {  #只要用户访问80 就走这个location匹配>,反向代理给uwsgi:
							include    uwsgi_params;
							uwsgi_pass  0.0.0.0:8000;
						}

						location  /static  {  #当用户请求是qishijd.com/static/的时候  就会进入这个location匹配  通过alias参数进行路径别名,让nginx去/opt/static底下去找静>态资源
								alias  /opt/static;
						}
					}

		9.访问域名或者ip,查看项目
		qishijd.com/login  查看静态页面是否正常


	supervisor 工具:
		我们的项目通过命令行启动,这样不行,ctrl + c 之后就挂了
		一般公司会用一个进程管理工具,去启动,管理多个项目,supervisor

		注: 这个东西有个坑,不能用Python3 (pip install )下载,要使用python2(easy_install  ),去下载supervisor ,
			1,安装:
			easy_install supervisor (使用之前 需要 yum install python-setuptools)


			2.使用supervisor命令,生成配置文件
			echo_supervisord_conf   >  /etc/supervisor.conf


			3.在这个配置文件中,写入我们想要管理的任务
				vim /etc/supervisor.conf
				在最底行写入如下配置
				#定义一个任务,名字自定义
				#commnad=参数,定义我们启动项目的命令
				[program:crm_supercrm]
				command=/root/Envs/django_01/bin/uwsgi    /opt/supercrm/uwsgi.ini
				stopasgroup=true     ;默认为false,进程被杀死时,是否向这个进程组发送stop信号,包括子进程
				killasgroup=true     ;默认为false,向进程组发送kill信号,包括子进程


			4.通过配置文件启动supervisor  服务
				supervisord -c /etc/supervisor.conf

			5.启动了supervisor服务后,管理任务
				supervisorctl -c /etc/supervisor.conf

				任务管理命令如下:有两种,一个是交互式,一个是参数形式
					#参数形式
						supervisorctl -c /etc/supervisor.conf stop/start/restart   all
						supervisorctl -c /etc/supervisor.conf start crm_supercrm

					#交互式形式
						supervisorctl -c /etc/supervisor.conf
Django + uWSGI + Nginx:
https://uwsgi.readthedocs.io/en/latest/tutorials/Django_and_nginx.html
flask 框架:
flask 框架: https://www.cnblogs.com/DragonFire/category/1246076.html
与django 的对比:
1,Django Web框架 -
Django 原生组件非常丰富 - 教科书式框架
Django.Model - ORM
Django.Form
Django.ModelForm
Django.Session Model
Admin CsrfToken
Django 加载项巨大 资源浪费
2, Flask Web框架 -
Flask 非常短小精悍 - 精简到只有一个 Session
Flask 第三方组件 非常全
Flask 第三方组件 - 运行稳定性相对较差
3,二者的应用场景:
Django 适合大型 密集型
Flask 适合小型 API服务类项目
Flask 之Hello World:
pip install flask 之后,
会默认安装以下:
Jinja2 :(它是模板渲染库,本质就是字符串的匹配 )
MarkupSafe :返回安全标签 只要Flask 返回模板或者标签时都会依赖MarkupSafe
Werkzeug :德文“工具” 相当于django 的 uWSGI (它们的底层是 WSGI) Flask项目启动都是基于Werkzeug
三行启动flask 提供服务:
在test.py 中写入:
from flask import Flask
app = Flask(__name__)
app.run()
六行 搞定 HelloWorld :
from flask import Flask
app = Flask(__name__)

@app.route('/index')
def index():
    return 'Hello World'

app.run()
from flask import Flask  # 导入Flask 类创建Flask应用对象
app = Flask(__name__)

@app.route("/index")  # 为 Flask 应用对象增加路由
def index():  # 与路由绑定的视图函数 视图函数名尽可能保持唯一
    return "HelloWorld"  # “” 相当于 Django 中的 HttpResponse


if __name__ == '__main__':
    app.run()  # 启动Flask 应用
flask 的请求返回函数:
    from flask import render_template
    from flask import redirect
    from flask import send_file
    from flask import jsonify
        django 中                     flask 中1.HTTPResponse("HelloWorld")       "HelloWorld"
    2.render("test.html")              render_template("test.html") # 默认存放路径是"templates"
    3.redirect("/home")                redirect("/home")
    4.                                 send_file("文件路径") 返回文件  #[可以返回 普通文件,二进制文件(.jpg,.mp3,.mp4)]
    5.                                 jsonify("字符串或数据类型")      返回标准格式的JSON字符串    from flask import render_template


    send_file 的原理:
        # 打开并返回文件内容 自动识别文件类型 ,返回时在ResponseHeaders中加入
        Content-Type:文件类型  注:文件类型 是可以被客户端识别的文件类型
            #不能识别的类型 下载处理 (浏览器会下载)
            #如果不能识别,Content-Type 是: x-ms x表示二进制 ms表示微软

    jsonify 的原理:
        返回时 修改 Content-Type 为 application/json
        #它常用于API接口:结合 ajax 请求,ajax 会默认将 application/json 的返回值 变为一个object 我们直接点就可了
from flask import Flask, send_file, jsonify
app = Flask(__name__)

@app.route("/index")
def index():
    return "HelloWorld"
@app.route('/get_file')
def get_file():
    return send_file('test01.py')
    # return send_file('1.jpg')
    # return send_file('2.mp3')
    # return send_file('3.mp4')
@app.route('/get_data')
def get_data():
    d = {
        "name":"tom",
        "age":18
    }
    return jsonify(d)
    # return d # 新版本也可以直接返回,但是它本质还是调用的 jsonify(d)
flask 中的request:
import os

from flask import Flask,render_template,request

app = Flask(__name__)
app.debug = True  # 开启 修改文件 自动重启

@app.route("/index") # 默认的请求都是 get 请求 ,如果post 会报 405 错误
def index():
    return "HelloWorld"


@app.route('/login',methods=['get','post'])
def login():
    # 如何获取 request 呢? 需要导入from flask import request
    if request.method == 'GET':
        print('这是 GET请求 ')
        return render_template('login.html')
    elif request.method == 'POST':
        # 在django 中获取FormData 是从 request.POST 获取,
        # 在flask 中是从 request.form 获取的

        # 在django 中获取URL的信息 是从 request.GET 获取,
        # 在flask 中是从 request.args 获取的

        # 注: 当提交的 Content-Type 是application/json 时,此时这个数据不会放在request.form 也不在 request.args ,而是在 request.json

        # 当用户 提交的Content-Type 无法被识别( 或不包含 form 字眼的 ) 的时候,此时,的所提交的东西都会被放在 request.data 中

        print(request.form)
        print(request.url)
        return 'ok'


@app.route('/upload_file',methods=['get','post'])
def upload_file():
    if request.method == 'GET':
        return render_template('upload.html')
    else:
        print(request.files) # ImmutableMultiDict([('my_file', <FileStorage: '原型图.png' ('image/png')>)])

        my_file = request.files.get('my_file') # my_file 是 flask 的FileStorage 对象
        # my_file.save(my_file.filename)

        ret = os.path.join('xxx',my_file.filename)
        my_file.save(ret)
        return 'ok'


if __name__ == '__main__':
    app.run()  # 启动Flask 应用
flask 中的session:
from flask import session (session 在sessions 文件中 )
注:需要在app.secretkey 设置,( 加密的时候会用 )
Flask 中的session ,
Sessino 是保存在 服务器端的 键值对
Cookie 是保存在本地浏览器的 键值对
但是,我们可以在浏览器中找到 session ,这种机制叫 交由客户端 保管
from flask import Flask,session

app = Flask(__name__)
app.debug = True
app.secret_key = '123456' # session 解密的时候 会用到

@app.route("/index")
def index():
    session['username'] = 'tom'
    session['pwd'] = 'zxcvbnm'
    return "HelloWorld"

@app.route("/test")
def test():
    print(session.get('username'))
    print(session.get('pwd'))

    return "ok"


if __name__ == '__main__':
    app.run()  # 启动Flask 应用
flask 中的jinja2 :
 1 from flask import Flask, session, render_template
 2
 3 app = Flask(__name__) # __name__ 字符串 一个名字而已
 4 app.debug = True
 5
 6 @app.template_global()
 7 def add(a,b):
 8     return a+b
 9
10 @app.route('/test')
11 def test():
12     return render_template('test.html',stu_obj={'name':'tom','age':19},stu_list=[1,2,3,4,5,6], stu_dict={0:{'name':'tom','age':19},1:{'name':'tom','age':19}})
13
14 if __name__ == '__main__':
15     app.run()  # 启动Flask 应用
 1 <!DOCTYPE html>
 2 <html lang="zh-CN">
 3 <head>
 4   <title>学生信息</title>
 5 </head>
 6 <body>
 7     {{ stu_obj.name }}
 8     {{ stu_obj.get('age') }}
 9 {#    {{ stu_obj['gender'] }}#}
10     <hr>
11     {% for item in stu_list %}
12         {{ item }}
13     {% endfor %}
14
15 {#    {{ stu_dict.items }}#}
16     <hr>
17 {#    {% for key in stu_dict %}#}
18 {#        {{ key }}#}
19 {#    {% endfor %}#}
20 {#    <hr>#}
21 {##}
22 {#    {% for key in stu_dict %}#}
23 {#        {{ stu_dict[key] }}#}
24 {#    {% endfor %}#}
25
26     {% for key,value in stu_dict.items() %} <!-- 用这种  -->
27         {{ key }}
28         {{ value  }}
29     {% endfor %}
30
31     <hr>
32     <!--  模板中使用函数  全局装饰下:@app.template_global()   -->
33     {{ add(1,3) }}
34     <hr>
35
36 </body>
37 </html>
flask 中的 路由装饰器的参数 :
1,endpoint
它是app.view_functions 这个字典中的key ,【源码中可以看出 】, { ‘key1’:视图函数1 ,‘key2’:视图函数2}
路由来了之后会先找 endpoint ,然后使用它对应的视图函数,
from flask import Flask, session, render_template

app = Flask(__name__)
app.debug = True
app.secret_key = 'zxcvbnm'

# 装饰器
def desc(func):
    def inner(*args,**kwargs):
        if session.get('username') == 'tom':
            print('sucess')
            return func(*args,**kwargs)
        else:
            print('fail')
            session['username'] = 'tom'
            return 'fail'
    return inner

@app.route('/home',endpoint='api1') # 如果options 不传endpoint ,那么默认的endpoint 就是 被装饰函数名本身
@desc    # 装饰器的执行顺序是 从下往上
def home():
    return 'ok'

@app.route('/my',endpoint='api2')
@desc
def my():
    return render_template('test.html')

if __name__ == '__main__':
    app.run()  # 启动Flask 应用
2,url_for函数:
它可以反向解析 endpoint 多对应的视图函数的请求路径,
from flask import Flask, render_template ,url_for

app = Flask(__name__)
app.debug = True
app.secret_key = 'zxcvbnm'


@app.route('/home',endpoint='api1')
def home():
    print(url_for('api2')) # 打印 /my
    return 'ok'

@app.route('/my',endpoint='api2')
def my():
    return render_template('test.html')

if __name__ == '__main__':
    app.run()  # 启动Flask 应用
3,methods 参数:
它是指允许的 访问方式,默认是 (‘get’,)。 注意,该参数为可迭代对象,
4,redirect_to 参数:
永久重定向,没有经过视图函数层,直接跳转, 它的应用场景是 当一个url 不存在了,可以直接永久重定向到 新的url ,
总结:它的应用场景很少,
5,strict_slashes 参数:
是否严格要求路由匹配,就是 一个 /
6, defaults={'id':1} ,可以在视图函数中接收 (不重要)
7,动态路由参数 :
from flask import Flask, render_template

app = Flask(__name__)
app.debug = True

@app.route('/home/<int:page>_<int:row>_<int:column>')
def home(page,row,column):
    print(f'这是第{page}页,第{row}行,第{column}列')
    return 'ok'

@app.route('/my')
def my():
    return render_template('test.html')

if __name__ == '__main__':
    app.run()  # 启动Flask 应用
应用场景:结合 send_file 来返回指定目录的文件 http://127.0.0.1:5000/<folder>/<file>
flask 中的 实例化配置 :
app = Flask()
def __init__(
    self,
    import_name,
    static_url_path=None,  # 它比 static_folder 多了个 /
    static_folder="static",
    static_host=None,
    host_matching=False,
    subdomain_matching=False,
    template_folder="templates",
    instance_path=None,
    instance_relative_config=False,
    root_path=None,
):
flask 中的 app.config 配置 :
它是个字典 ,默认配置 在 app.default_config
eg:
app.config["DEBUG"] = True
app.config["SECRET_KEY"] = "xxxxyyyyy"
DEBUG 模式
TESTING 模式
SESSION_COOKIE_NAME
"ENV": None,
"DEBUG": None,开启编辑时代码重启 Log打印级别最低 错误信息透传
"TESTING": False,无限接近生产环境 代码编辑不会重启 Log级别较高 错误信息不再透传
"PROPAGATE_EXCEPTIONS": None,
"PRESERVE_CONTEXT_ON_EXCEPTION": None,
"SECRET_KEY": None,
"PERMANENT_SESSION_LIFETIME": timedelta(days=31),
"USE_X_SENDFILE": False,
"SERVER_NAME": None,
"APPLICATION_ROOT": "/",
"SESSION_COOKIE_NAME": "session",存放在浏览器cookie中session的名称  注: 第一个字符不能是空格

"SESSION_COOKIE_DOMAIN": None,
"SESSION_COOKIE_PATH": None,
"SESSION_COOKIE_HTTPONLY": True,
"SESSION_COOKIE_SECURE": False,
"SESSION_COOKIE_SAMESITE": None,
"SESSION_REFRESH_EACH_REQUEST": True,
"MAX_CONTENT_LENGTH": None,
"SEND_FILE_MAX_AGE_DEFAULT": timedelta(hours=12),
"TRAP_BAD_REQUEST_ERRORS": None,
"TRAP_HTTP_EXCEPTIONS": False,
"EXPLAIN_TEMPLATE_LOADING": False,
"PREFERRED_URL_SCHEME": "http",
"JSON_AS_ASCII": True,
"JSON_SORT_KEYS": True,
"JSONIFY_PRETTYPRINT_REGULAR": False,
"JSONIFY_MIMETYPE": "application/json", # 改变 Content-Type
"TEMPLATES_AUTO_RELOAD": None,
"MAX_COOKIE_SIZE": 4093,
app.config 快速配置:
可以将配置放到一个类中做类属性,然后 使用app.config.from_object()
app = Flask(__name__)
class TestingConfig:
    TESTING = True
    PERMANENT_SESSION_LIFETIME =  3600
    SESSION_COOKIE_NAME = 'xhshdc'
    SECRET_KEY = '!@#$#$#%$%'

class DebugConfig:
    DEBUG = True
    PERMANENT_SESSION_LIFETIME =  3600
    SESSION_COOKIE_NAME = 'xhshdc'
    SECRET_KEY = '!@#$#$#%$%'
app.config.from_object(DebugConfig)
# app.config.from_object(TestingConfig)
flask 中的 蓝图 Blueprint :
相当于 Django 中的 app01 ,它的作用是 功能隔离,路由隔离,
from flask import Flask

app = Flask(__name__)

# 注册 蓝图
from app01.views import app01
app.register_blueprint(app01)

@app.route('/my')
def my():
    return 'ok'

if __name__ == '__main__':
    app.run()  # 启动Flask 应用
from flask import Blueprint

app01 = Blueprint('app01',__name__,url_prefix='/app01') # 把 Blueprint 对象当成不能 run 的 Flask 对象即可
@app01.route('login')
def login():
    return 'I am Blueprint'
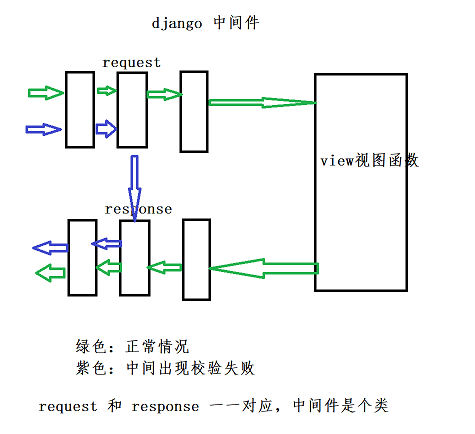
flask 中的 特殊装饰器 :
模拟django 中的 中间件,
1,@app.before_request
2,@app.after_request 相应之前
3,@app.errorhandler 错误处理
如果视图函数很多一个一个的加装饰器 做校验 肯定不行,
注: after_request(response) 一定要有 参数,并要 return 掉,
django 和 flask 的对比:
1,django 的中间件:
2,flask 中模拟的中间件(装饰器)
@app.errorhandler 装饰器:
from flask import Flask

app = Flask(__name__)

@app.errorhandler(404)
def error(errmsg):
    print(errmsg)

    return '你访问的页面不存在'

@app.route('/my')
def my():
    return 'ok'

if __name__ == '__main__':
    app.run()  # 启动Flask 应用
flask 多目录 (模拟django 结构):
https://files.cnblogs.com/files/zach0812/flask%E6%A8%A1%E6%8B%9FDjango%E7%9B%AE%E5%BD%95.zip
flask 的CBV 方式:
一个应用就是修改源码,自定义请求方式(反爬)
from flask import Flask

app = Flask(__name__)

@app.route('/index')
def index():
    return '这是index页面'

# 要继承 MethodView
from flask.views import MethodView
class Login(MethodView):
    def get(self):
        return '这是Login 的get请求'
    def post(self):
        return '这是Login 的post请求'
    def put(self):
        return '这是Login 的put请求'
    def delete(self):
        return '这是Login 的delete请求'

    def dsb(self):
        return '这是Login 的 dsb 请求' # 此时要修改源码

# 给视图函数 添加路由
app.add_url_rule('/login',view_func=Login.as_view(name='login')) # 这个name 就是 endpoint

if __name__ == '__main__':
    app.run()
flask 三方组件之 Flask-Session :
flask内置的session 安全性较差,它的优势是 不占用一点服务器的空间,
这个三方插件 是将 session 存到 服务器的redis 中,(注: redis 最好在内网使用,安全)
 1 from flask import Flask,session
 2 from flask_session import Session # 三方组件 Session
 3 app = Flask(__name__)
 4
 5 # app.session_interface =SecureCookieSessionInterface() # 原生的session 配置
 6 # app.config['DEBUG'] = True
 7 # 三方组件的存活空间  在 config 之后, 蓝图之前
 8 #================================
 9 app.config['SESSION_TYPE']='redis'
10 # app.config['SESSION_REDIS'] = redis
11 Session(app)
12
13 #================================
14 # app.register_blueprint()
15
16 @app.route('/login')
17 def login():
18     session['username'] = 'tom' # 此时再存 就存到了redis 中, key 是:‘session:905407db-d295-40a2-b3b9-515963446bf8’ # 后面的数字是 存在浏览器中的
19     return 'ok'
20
21 if __name__ == '__main__':
22     app.run()
线程安全 (threading 模块中的 local 用法):
它本质是 以空间 换取 线程使用公共资源的安全,
from threading import Thread,local
import time

class Test(local):  # local 的底层是会 开辟新的空间存 t.num
    pass
t = Test()
t.num = 0        # t.num 为公共资源

def add(i):
    t.num = i
    time.sleep(1)
    print(t.num)

if __name__ == '__main__':
    for i in range(20):
        thread = Thread(target=add,args=(i,))
        thread.start()
如果不用 local 的话,情况如下:
from threading import Thread,local
import time

class Test():  # local 的底层是会 开辟新的空间存 t.num
    pass
t = Test()
t.num = 0        # t.num 为公共资源

def add(i):
    t.num = i
    time.sleep(1)
    print(t.num)

if __name__ == '__main__':
    for i in range(20):
        thread = Thread(target=add,args=(i,))
        thread.start()
当然,也可以自己 拷贝 公共资源,
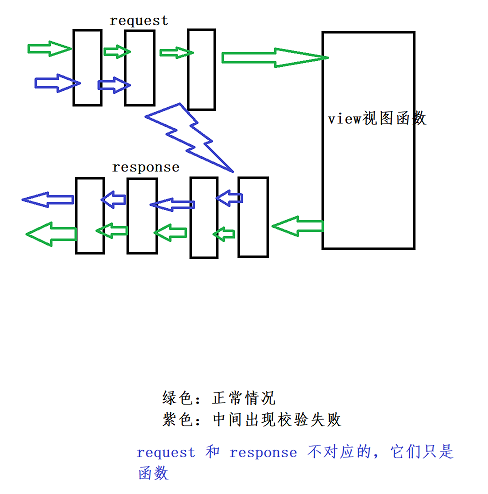
flask 请求上文 应用 下文 :
请求是如何到达 flask 应用的,
会先经过WSGI协议(flask 中为 werkzeug,django 中为 uwsgi ),然后再到 flask 应用,
这个请求上下文就是 WSGI 和 应用之间 做的事情,
请求上文:
WSGI 序列化好的environ 放到了 app.__call__() 中了,
通过app.request_class() 将 environ 生成 flask 中的request
然后把 request 和 session 给了 ctx
然后把 ctx 加入到 了 rv 列表中,
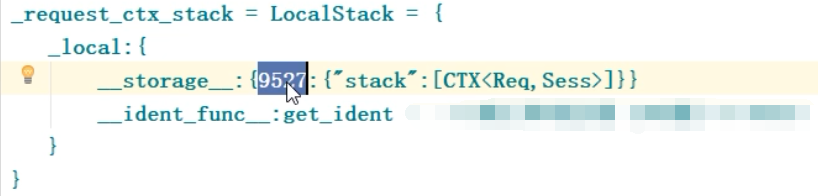
最后:把rv 放到了 _request_ctx_stack 的_local 的_storage 属性(是个字典)中
请求下文:
是将 ctx 从 rv 中pop 出去,
flask 应用上下文 :
app.app_context()
with app.app_context() as app_ctx:
print(app_ctx.app) # 它就是 Flask 的 app
websocket :
pip install gevent-websocket
flask 结合 gevent-websocket 可以 构建 websocket (默认的flask只能支持 http )
from geventwebsocket.handler import WebSocketHandler
from geventwebsocket.server import WSGIServer
from geventwebsocket.websocket import WebSocket  # 语法提示作用

from flask import Flask,request
app = Flask(__name__)

# websocket 的三个状态
'''
1, 连接
3, 服务器主动断开连接
'''
@app.route("/test")
def test():
    sk = request.environ.get('wsgi.websocket') #type:WebSocket
    while  1:
        msg = sk.receive() # msg  接收信息
        print(msg)  # 接收 websocket 的客户端发来的消息
        sk.send('你去死吧')
    # return 'ok'

if __name__ == '__main__':
    http_serv = WSGIServer(("127.0.0.1", 5000), app, handler_class=WebSocketHandler)  # environment
    http_serv.serve_forever()
<!DOCTYPE html>
<html lang="zh-CN">
<head>
    <meta charset="utf-8">
    <meta http-equiv="X-UA-Compatible" content="IE=edge">
    <meta name="viewport" content="width=device-width, initial-scale=1">
    <title>hello world</title>

</head>
<body>
    <h1>你好,世界!</h1>
    <script>
        let ws = new WebSocket("ws://127.0.0.1:5000/test");  // 连接到 服务端
        //ws.send('hello world');  // 这是会报错 因为js 中 ws 还没创建成功

        // 要用 回调函数  当ws 创建完成 调用下面的 函数
        ws.onopen = function () {
            ws.send('hello world') ;
        };

        // 当 收到消息的时候调用这个函数
        ws.onmessage=function (res) {
            console.log(res.data);
        };
    </script>
</body>
</html>
websocket 实现群聊:
 1 from geventwebsocket.handler import WebSocketHandler
 2 from geventwebsocket.server import WSGIServer
 3 from geventwebsocket.websocket import WebSocket  # 语法提示作用
 4 from flask import Flask,request
 5 app = Flask(__name__)
 6
 7 sock_list = []
 8 @app.route("/test")
 9 def test():
10     sk = request.environ.get('wsgi.websocket') #type:WebSocket
11     sock_list.append(sk)
12     while 1:
13         msg = sk.receive() # msg  接收信息
14         print(msg)
15         for item in sock_list:
16             if item == sk:
17                 continue
18             item.send(msg) # 转发给 其他客户端
19
20 if __name__ == '__main__':
21     http_serv = WSGIServer(("127.0.0.1", 5000), app, handler_class=WebSocketHandler)  # environment
22     http_serv.serve_forever()
<!DOCTYPE html>
<html lang="zh-CN">
<head>
    <meta charset="utf-8">
    <meta http-equiv="X-UA-Compatible" content="IE=edge">
    <meta name="viewport" content="width=device-width, initial-scale=1">
    <title>hello world</title>

</head>
<body>
    <h1>你好,世界!</h1>
    <script>
        let ws = new WebSocket("ws://127.0.0.1:5000/test");  // 连接到 服务端
        //ws.send('hello world');  // 这是会报错 因为js 中 ws 还没创建成功

        // 要用 回调函数  当ws 创建完成 调用下面的 函数
        ws.onopen = function () {
            ws.send('hello world') ;
        };

        // 当 收到消息的时候调用这个函数
        ws.onmessage=function (res) {
            console.log(res.data);
        };
    </script>
</body>
</html>
#########
 1 from geventwebsocket.handler import WebSocketHandler
 2 from geventwebsocket.server import WSGIServer
 3 from geventwebsocket.websocket import WebSocket  # 语法提示作用
 4 from flask import Flask,request
 5 app = Flask(__name__)
 6
 7 sock_list = []
 8 @app.route("/test")
 9 def test():
10     sk = request.environ.get('wsgi.websocket') #type:WebSocket
11     sock_list.append(sk)
12     while 1:
13         try: # 如果 监听的客户端 关闭了  将其 踢出列表
14             msg = sk.receive() # msg  接收信息
15         except:
16             sock_list.remove(sk)
17             break # 一定要 break 出去
18
19
20         for item in sock_list:
21             if item == sk:
22                 continue
23             try:
24                 item.send(msg) # 转发给 其他客户端
25             except:
26                 continue
27
28     return 'ok'
29
30
31 if __name__ == '__main__':
32     http_serv = WSGIServer(("127.0.0.1", 5000), app, handler_class=WebSocketHandler)  # environment
33     http_serv.serve_forever()
#########
点对点聊天,私聊,
 1 import json
 2
 3 from geventwebsocket.handler import WebSocketHandler # ws 协议请求处理
 4 from geventwebsocket.server import WSGIServer # 替换Flask 原有的WSGI
 5 from geventwebsocket.websocket import WebSocket # 语法提示
 6
 7 from flask import Flask, request, render_template
 8
 9 app = Flask(__name__)
10
11 socket_dict = {}
12
13 @app.route("/ws/<username>")
14 def ws(username):
15     sock = request.environ.get("wsgi.websocket",None) # type:WebSocket
16     # 1.不是WS协议上来的请求 None
17     # 2.WS协议认证失败 None
18     if not sock :
19         return "请使用WS协议连接"
20
21     # if socket_dict.get(username).closed:
22     #     return "已经登陆"
23
24     socket_dict[username] = sock
25     print(len(socket_dict),socket_dict)
26
27     while True:
28         msg = sock.receive()
29         print(type(msg),msg)
30         msg_dict = json.loads(msg)
31         recv = msg_dict.get("recv")
32         recv_sock = socket_dict.get(recv)
33         recv_sock.send(msg)
34
35
36 @app.route("/")
37 def index():
38     return render_template("ws_client_2.html")
39
40 if __name__ == '__main__':
41     http_serv = WSGIServer(("0.0.0.0",9527),app,handler_class=WebSocketHandler)
42     http_serv.serve_forever()
<!DOCTYPE html>
<html lang="zh-CN">
<head>
  <meta charset="utf-8">
  <meta http-equiv="X-UA-Compatible" content="IE=edge">
  <meta name="viewport" content="width=device-width, initial-scale=1">
  <!-- 上述3个meta标签*必须*放在最前面,任何其他内容都*必须*跟随其后! -->
  <title>Bootstrap 101 Template</title>
  <!-- Bootstrap -->
</head>
<body>
<h1>你好,世界!</h1>
你的名字:<input type="text" id="username"><button id="createws">登录聊天室</button>
<p>给<input type="text" id="recv">发送<input type="text" id="text">内容 <button id="send">点击发送消息</button></p>
<div id="content_list">

</div>
</body>
<script type="application/javascript">
  var ws = null;
  document.getElementById("createws").onclick = function () {
      var username = document.getElementById("username").value;
      ws = new WebSocket("ws://192.168.14.26:9527/ws/"+username);
      ws.onopen = function () {
          alert("欢迎进入九聊");
      };
      ws.onmessage = function (eventMessage) {
          var msg = JSON.parse(eventMessage.data);
          console.log(msg);
          var p = document.createElement("p");
          p.innerText = msg.sender + " : " + msg.msg;
          document.getElementById("content_list").appendChild(p);
      };
  };


  // 回调函数
  // onopen websocket连接建立完成 status == 1
  // ws.onopen = function () {
  //     ws.send("Hello");
  // };
  // onmessage websocket 接收到消息时 执行


  // ws.onclose

  // ws.send("123");

  document.getElementById("send").onclick = function () {
      var recv = document.getElementById("recv").value;
      var msg = document.getElementById("text").value;
      var sender = document.getElementById("username").value;

      var send_msg = {
          "sender":sender,
          "recv": recv,
          "msg":msg
      };
      console.log(send_msg);

      ws.send(JSON.stringify(send_msg));
  };
</script>
</html>
mui 框架 :
elastic search(es) :
https://www.cnblogs.com/Neeo/category/1442079.html
权威指南: https://es.xiaoleilu.com/index.html
杂乱:
后端返回前端数据格式:
 1 class Response:
 2     def __init__(self):
 3         self.code = 1000
 4         self.msg = None
 5         self.data = None
 6
 7     @property
 8     def dict(self):
 9         return self.__dict__
10 res = Response()
11 res.code = 10001
12 res.msg = 'ok'
13 res.data = {'name':'tom','age':18}
14 print(res.dict)
class MyResponse:
    '''
    code :
    10000 正常
    10001 失败
    '''
    def __init__(self,code=10000,msg=None,data=None):
        self.code = code
        self.msg = msg
        self.data = data

    @property
    def dict(self):
        return self.__dict__
MathJax 公式显示 :
 1 <!DOCTYPE html>
 2 <html>
 3 <head>
 4   <title>MathJax TeX Test Page</title>
 5   <script type="text/x-mathjax-config">
 6       MathJax.Hub.Config({tex2jax: {inlineMath: [['$','$'], ['\\(','\\)']]}});
 7   </script>
 8   <script src="https://cdnjs.cloudflare.com/ajax/libs/mathjax/2.7.2/MathJax.js?config=TeX-AMS_HTML"></script>
 9
10 </head>
11 <body>
12     <img src="https://img.zcool.cn/community/01bb6b55431ac00000019ae95b75ae.jpg@1280w_1l_2o_100sh.jpg"></img>
13 </body>
14 </html>
另有微信小程序 的towxml https://github.com/sbfkcel/towxml
Python 遍历一个文件夹所有文件并重命名:
import os
def all_path(dirname):
    result = []#所有的文件
    for maindir, subdir, file_name_list in os.walk(dirname):
        for filename in file_name_list:
            apath = os.path.join(maindir, filename)#合并成一个完整路径
            result.append(apath)
    for idx,path in enumerate(result):
      print(idx,path)
      os.rename(path,f'D:\壁纸\文件夹\{idx}.jpg')
    # return result
print(all_path("D:\壁纸\文件夹"))
Python 正则(点 匹配包含换行符在内的所有字符 ):
data = '''hello 123455
world'''
pattern = re.compile('hello(.*?)world',re.DOTALL)
ret = pattern.findall(data)
print(ret)

 浙公网安备 33010602011771号