08第二种定时器_封装动画函数_轮播图_offset系列
前面复习:

下面会说第二种定时器。
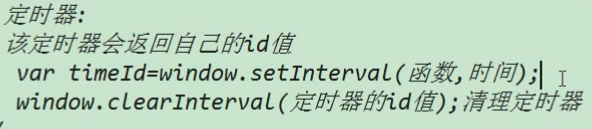
第二种定时器:
第一种的定时器回顾:

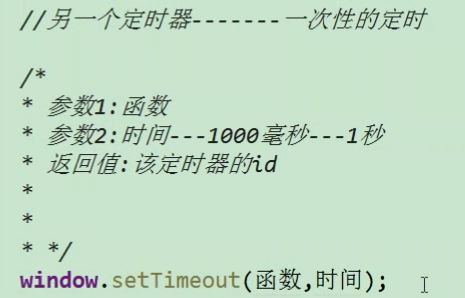
另一个定时器 setTimeout() 它是一个一次性的定时器:
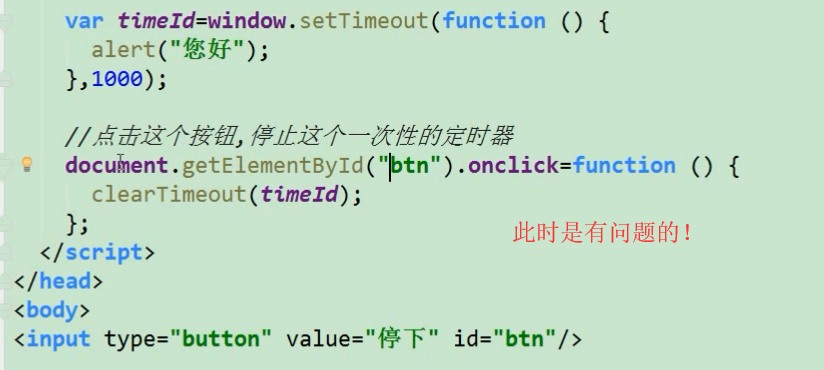
因为,代码是从上往下执行的,btn 还没有生成,所以getElementById("btn").onclick = 肯定是会报错的。
它是一次性的定时器,如果没有取消的话,它会一直占着空间,所以一般都要写按钮btn 去取消timeId .


 1 <!DOCTYPE>
 2 <html lang="en">
 3     <head>
 4         <meta charset="UTF-8">
 5         <title>这是网页标题</title>
 6     </head>
 7     <body>
 8         <input type="button" value="停止" id="btn">
 9
10         <script src="js/common.js"></script>
11         <script>
12             //注册定时器(一次性的)
13             var timeId = window.setTimeout(function () {
14                 console.log("hehhehe");
15             },5000); //5s 之后调用
16
17             //注册点击事件 (点击之后取消定时器)
18             getId$("btn").onclick = function () {
19                 window.clearTimeout(timeId);
20             };
21         </script>
22     </body>
23 </html>
注:定时器一般还是使用第一种定时器。一次性的定时器用的比较少。
定时器(第一种)案例:协议按钮禁用:
 1 <!DOCTYPE>
 2 <html lang="en">
 3     <head>
 4         <meta charset="UTF-8">
 5         <title>这是网页标题</title>
 6     </head>
 7     <body>
 8         <textarea name="texta" id="" cols="30" rows="10">必须看完,fasdf进度款sea大姐夫会计法大水坑借方考虑将大家开始的加法,发的空间风口浪尖反倒是咖啡加快。你必须同意才可以注册。
 9
10         </textarea>
11         <input type="button" value="请仔细阅读协议(5)" id="btn" disabled >
12
13         <script src="js/common.js"></script>
14         <script>
15             //注册定时器
16             var sec =5;
17             var timeId = window.setInterval(function () {
18                 sec--;
19                 if(sec<0){
20                     window.clearInterval(timeId);  //当sec <0 时,就取消定时器。
21                     getId$("btn").value="同意";
22                     getId$("btn").disabled=false;
23                 }else{
24                     getId$("btn").value="请仔细阅读协议("+sec+")";
25                 }
26             },1000);
27
28         </script>
29     </body>
30 </html>
 1 <!DOCTYPE>
 2 <html lang="en">
 3     <head>
 4         <meta charset="UTF-8">
 5         <title>这是网页标题</title>
 6     </head>
 7     <body>
 8         <textarea name="texta" id="" cols="30" rows="10">必须看完,fasdf进度款sea大姐夫会计法大水坑借方考虑将大家开始的加法,发的空间风口浪尖反倒是咖啡加快。你必须同意才可以注册。
 9
10         </textarea>
11         <input type="button" value="请仔细阅读协议(5)" id="btn" disabled >
12
13         <script src="js/common.js"></script>
14         <script>
15             //注册定时器
16             var sec =5;
17             var timeId = window.setInterval(function () {
18                 sec--;
19                 getId$("btn").value="请仔细阅读协议("+sec+")";
20                 if(sec<0){
21                     window.clearInterval(timeId);  //当sec <0 时,就取消定时器。
22                     getId$("btn").value="同意";
23                     getId$("btn").disabled=false;
24                 }
25             },1000);
26
27         </script>
28     </body>
29 </html>
定时器 案例:div 的渐变:
透明度的设置是通过 style.opacity 来设置的。
opacity 是不透明的意思。
所以 1 代表不透明 0 代表完全透明。
 1 <!DOCTYPE>
 2 <html lang="en">
 3     <head>
 4         <meta charset="UTF-8">
 5         <title>这是网页标题</title>
 6
 7         <style>
 8             div{
 9                 width: 300px;
10                 height: 300px;
11                 background-color: darkred;
12             }
13         </style>
14
15     </head>
16     <body>
17         <div id="dv"></div>
18         <input type="button" value="开始渐变" id="btn">
19
20
21         <script src="js/common.js"></script>
22         <script>
23             getId$("btn").onclick = function () {
24                 //其实 渐变是假的, 它真实改变的是透明度
25                 var opacity =10;
26                 var timeId = window.setInterval(function () {
27                     opacity --;
28                     getId$("dv").style.opacity = opacity/10;  //不透明度  (之所以用10是因为整数比小数更精确。)
29
30                     if(opacity <=0){
31                         window.clearInterval(timeId);
32                     }
33                 },1000); //1 s变一次
34             };
35         </script>
36     </body>
37 </html>
定时器 案例:点击按钮设置 div 的宽度:
 1 <!DOCTYPE>
 2 <html lang="en">
 3     <head>
 4         <meta charset="UTF-8">
 5         <title>这是网页标题</title>
 6
 7         <style>
 8             *{
 9                 margin:0;
10                 padding:0;
11             }
12             div{
13                 width: 200px;
14                 height: 100px;
15                 background-color: darkred;
16                 border-radius: 50px;
17             }
18         </style>
19     </head>
20     <body>
21         <div id="dv"></div>
22         <input type="button" value="变宽" id="btn">
23         <script src="js/common.js"></script>
24         <script>
25             getId$("btn").onclick = function () {
26                 var width = 200;
27
28                 var timeId = window.setInterval(function () {
29                     width +=10;
30                     getId$("dv").style.width = width;
31                     if(width>=800){
32                         window.clearInterval(timeId);  //如果大于 等于800 就取消定时器
33                     }
34                 },200);  //0.2s 变宽一次
35             };
36         </script>
37     </body>
38 </html>
定时器 案例:点击按钮移动元素:
这里需要注意的是:对于style中的设置,如果再上面的style中写设置,Js无法直接通过属性名获取到。
但是如果是使用style属性设置的,可以通过js获取。

也不是没办法获取,只是不能直接获取,获取方法如下:
offset+首字母大写的属性名 进行获取。例如(offsetLeft)但是就不用再用style了,即getId("dv").offsetLeft; 而不是getId("dv").style.offsetLeft;
 1 <!DOCTYPE>
 2 <html lang="en">
 3     <head>
 4         <meta charset="UTF-8">
 5         <title>这是网页标题</title>
 6
 7         <style>
 8             *{
 9                 margin:0;
10                 padding:0;
11             }
12             input{
13                 margin-top: 20px;
14             }
15             div{
16                 width:100px;
17                 height: 50px;
18                 background-color: green;
19                 margin-top: 30px;
20             /*    div要移动,所以要脱离文档流*/
21                 position: absolute;
22                 left: 50px;
23             }
24
25         </style>
26     </head>
27     <body>
28         <input type="button" value="移动到400" id="btn1">
29         <input type="button" value="移动到800" id="btn2">
30         <div id="dv"></div>
31
32
33         <script src="js/common.js"></script>
34         <script>
35             // 点击第一个按钮 移动到400px
36             getId$("btn1").onclick = function(){
37                 var timeId = setInterval(function () {
38                     //获取div 的当前位置
39                     var current = getId$("dv").offsetLeft; //数字类型   没有 px
40                     //速度  每次移动多少px
41                     var step = 10;
42                     current += step;
43                     //将每次移动后的位置 设置上去
44                     getId$("dv").style.left = current +"px";
45                     if(current == 400){
46                         window.clearInterval(timeId);
47                     }
48                 },20); //0.02s
49             };
50             // 点击第二个按钮 移动到800px
51
52
53
54
55         </script>
56     </body>
57 </html>
它是有问题的,每点击一次按钮就会创建一个定时器,所以如果点击多次按钮就会创建多个定时器,div移动的速度也就越来越快了。
我们现在要做的是无论点击多少次按钮,只开启一个定时器。
 1 <!DOCTYPE>
 2 <html lang="en">
 3     <head>
 4         <meta charset="UTF-8">
 5         <title>这是网页标题</title>
 6
 7         <style>
 8             *{
 9                 margin:0;
10                 padding:0;
11             }
12             input{
13                 margin-top: 20px;
14             }
15             div{
16                 width:100px;
17                 height: 50px;
18                 background-color: green;
19                 margin-top: 30px;
20             /*    div要移动,所以要脱离文档流*/
21                 position: absolute;
22                 left: 50px;
23             }
24
25         </style>
26     </head>
27     <body>
28         <input type="button" value="移动到400" id="btn1">
29         <input type="button" value="移动到800" id="btn2">
30         <div id="dv"></div>
31
32
33         <script src="js/common.js"></script>
34         <script>
35             // 点击第一个按钮 移动到400px
36             getId$("btn1").onclick = function(){
37                 var timeId = setInterval(function () {
38                     //获取div 的当前位置
39                     var current = getId$("dv").offsetLeft; //数字类型   没有 px
40                     //速度  每次移动多少px
41                     var step = 10;
42                     current = current<400?current+step:current-step;
43                     //将每次移动后的位置 设置上去
44                     getId$("dv").style.left = current +"px";
45                     if(current == 400){
46                         window.clearInterval(timeId);
47                     }
48                 },20); //0.02s
49             };
50             // 点击第二个按钮 移动到800px
51             getId$("btn2").onclick = function(){
52                 var timeId = setInterval(function () {
53                     //获取div 的当前位置
54                     var current = getId$("dv").offsetLeft; //数字类型   没有 px
55                     //速度  每次移动多少px
56                     var step = 10;
57                     current += step;
58                     //将每次移动后的位置 设置上去
59                     getId$("dv").style.left = current +"px";
60                     if(current == 800){
61                         window.clearInterval(timeId);
62                     }
63                 },20); //0.02s
64             };
65         </script>
66     </body>
67 </html>
上面代码有很多bug ,下面解决。
封装动画函数:
把上面的逻辑封装成一个函数,
 1 <!DOCTYPE>
 2 <html lang="en">
 3     <head>
 4         <meta charset="UTF-8">
 5         <title>这是网页标题</title>
 6         <style>
 7             *{
 8                 margin:0;
 9                 padding:0;
10             }
11             input{
12                 margin-top: 20px;
13             }
14             div{
15                 width:100px;
16                 height: 50px;
17                 background-color: green;
18                 margin-top: 30px;
19             /*    div要移动,所以要脱离文档流*/
20                 position: absolute;
21                 left: 50px;
22             }
23
24         </style>
25     </head>
26     <body>
27         <input type="button" value="移动到400" id="btn1">
28         <input type="button" value="移动到800" id="btn2">
29         <div id="dv"></div>
30
31
32         <script src="js/common.js"></script>
33         <script>
34             // 点击第一个按钮 移动到400px
35             getId$("btn1").onclick = function(){
36                animation(getId$("dv"),400);
37             };
38             // 点击第二个按钮 移动到800px
39             getId$("btn2").onclick = function(){
40                 animation(getId$("dv"),800);
41             };
42             function animation(ele, targetPos) {
43                 var timeId = setInterval(function () {
44                     //获取div 的当前位置
45                     var current = ele.offsetLeft; //数字类型   没有 px
46                     //速度  每次移动多少px
47                     var step = 10;
48                     current += step;
49                     //将每次移动后的位置 设置上去
50                     ele.style.left = current +"px";
51                     if(current == targetPos){
52                         window.clearInterval(timeId);
53                     }
54                 },20); //0.02s
55             }
56         </script>
57     </body>
58 </html>
现在的问题是:回不来 和 如果step =9的话,不能准确到位置。
 1 <!DOCTYPE>
 2 <html lang="en">
 3     <head>
 4         <meta charset="UTF-8">
 5         <title>这是网页标题</title>
 6         <style>
 7             *{
 8                 margin:0;
 9                 padding:0;
10             }
11             input{
12                 margin-top: 20px;
13             }
14             div{
15                 width:100px;
16                 height: 50px;
17                 background-color: green;
18                 margin-top: 30px;
19             /*    div要移动,所以要脱离文档流*/
20                 position: absolute;
21                 left: 50px;
22             }
23
24         </style>
25     </head>
26     <body>
27         <input type="button" value="移动到400" id="btn1">
28         <input type="button" value="移动到800" id="btn2">
29         <div id="dv"></div>
30
31
32         <script src="js/common.js"></script>
33         <script>
34             // 点击第一个按钮 移动到400px
35             getId$("btn1").onclick = function(){
36                animation(getId$("dv"),400);
37             };
38             // 点击第二个按钮 移动到800px
39             getId$("btn2").onclick = function(){
40                 animation(getId$("dv"),800);
41             };
42             function animation(ele, targetPos) {
43                 var timeId = setInterval(function () {
44                     //获取div 的当前位置
45                     var current = ele.offsetLeft; //数字类型   没有 px
46                     //速度  每次移动多少px
47                     var step = 10;
48                     step = current<targetPos?step:-step;
49                     //如果还有的距离小于step 就继续走。反之,直接设定为目标
50                     if(Math.abs(targetPos -current) > Math.abs(step)){
51                         current +=step;
52                         ele.style.left = current +"px";
53                     }else{
54                         window.clearInterval(timeId);
55                         ele.style.left = targetPos +"px";
56                     }
57                 },20); //0.02s
58             }
59         </script>
60     </body>
61 </html>
现在的代码中只剩一个问题,就是每次点击按钮都会启动一个定时器,多次点击按钮会是速度增快。
下面解决它。
 1 <!DOCTYPE>
 2 <html lang="en">
 3     <head>
 4         <meta charset="UTF-8">
 5         <title>这是网页标题</title>
 6         <style>
 7             *{
 8                 margin:0;
 9                 padding:0;
10             }
11             input{
12                 margin-top: 20px;
13             }
14             div{
15                 width:100px;
16                 height: 50px;
17                 background-color: green;
18                 margin-top: 30px;
19             /*    div要移动,所以要脱离文档流*/
20                 position: absolute;
21                 left: 50px;
22             }
23
24         </style>
25     </head>
26     <body>
27         <input type="button" value="移动到400" id="btn1">
28         <input type="button" value="移动到800" id="btn2">
29         <div id="dv"></div>
30
31
32         <script src="js/common.js"></script>
33         <script>
34             // 点击第一个按钮 移动到400px
35             getId$("btn1").onclick = function(){
36                animation(getId$("dv"),400);
37             };
38             // 点击第二个按钮 移动到800px
39             getId$("btn2").onclick = function(){
40                 animation(getId$("dv"),800);
41             };
42             function animation(ele, targetPos) {
43                 //点击的时候先清理定时器  (保证无论点击多少次,都是只有一个定时器在起作用)
44                 window.clearInterval(ele.timeId);
45
46                 ele.timeId = setInterval(function () {
47                     //获取div 的当前位置
48                     var current = ele.offsetLeft; //数字类型   没有 px
49                     //速度  每次移动多少px
50                     var step = 10;
51                     step = current<targetPos?step:-step;
52                     //如果还有的距离小于step 就继续走。反之,直接设定为目标
53                     if(Math.abs(targetPos -current) > Math.abs(step)){
54                         current +=step;
55                         ele.style.left = current +"px";
56                     }else{
57                         window.clearInterval(ele.timeId);
58                         ele.style.left = targetPos +"px";
59                     }
60                 },20); //0.02s
61             }
62         </script>
63     </body>
64 </html>
动画函数总结: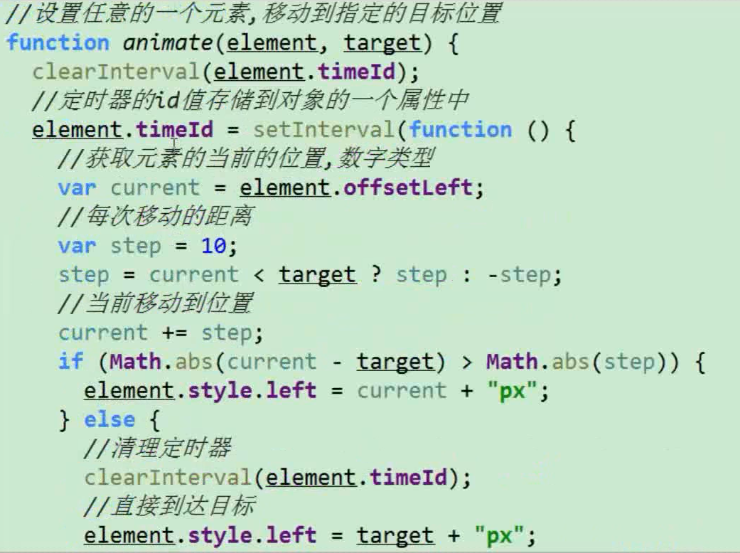
轮播图
简单的轮播图:

轮播图要实现 三个功能:
1, 自动切换
2,点击小圆点切换
3,点击左右箭头切换
  1 <!DOCTYPE>
  2 <html lang="en">
  3     <head>
  4         <meta charset="UTF-8">
  5         <title>这是网页标题</title>
  6         <style>
  7             *{
  8                 margin: 0;
  9                 padding: 0;
 10             }
 11             li{
 12                 list-style: none;
 13             }
 14             img{
 15                 vertical-align: top;
 16             }
 17             .box{
 18                 width:520px;
 19                 height: 280px;
 20                 margin: 100px auto;
 21                 padding: 5px;
 22                 border:1px solid #ccc;
 23             }
 24             .inner{
 25                 width:520px;
 26                 height: 280px;
 27                 background-color: pink;
 28                 overflow: hidden;
 29                 position: relative;
 30             }
 31             .inner ul{
 32                 width: 1000%;
 33                 position: absolute;
 34                 top:0;
 35                 left: 0;
 36             }
 37             .inner li{
 38                 float: left;
 39             }
 40             .square{
 41                 position: absolute;
 42                 right: 10px;
 43                 bottom: 10px;
 44
 45             }
 46             .square span{
 47                 display: inline-block;
 48                 width: 16px;
 49                 height: 16px;
 50                 background-color: #fff;
 51                 text-align: center;
 52                 line-height: 16px;
 53                 cursor: pointer;
 54             }
 55             .square span.current{
 56                 background-color: orange;
 57                 color: #fff;
 58             }
 59
 60
 61
 62         </style>
 63     </head>
 64     <body>
 65         <div class="box" id="box">
 66             <div class="inner"> <!-- 相框-->
 67                 <ul>
 68                     <li><a href="#"><img src="images/0.jpg" alt=""></a></li>
 69                     <li><a href="#"><img src="images/1.jpg" alt=""></a></li>
 70                     <li><a href="#"><img src="images/2.jpg" alt=""></a></li>
 71                     <li><a href="#"><img src="images/3.jpg" alt=""></a></li>
 72                 </ul>
 73                 <div class="square">
 74                     <span class="current">1</span>
 75                     <span>2</span>
 76                     <span>3</span>
 77                     <span>4</span>
 78                 </div>
 79             </div>
 80         </div>
 81         <script src="js/common.js"></script>
 82         <script>
 83             //获取 最外面的 div
 84             var box = getId$("box");
 85             //获取相框
 86             var inner = box.children[0];
 87             //获取ul
 88             var ulObj = inner.children[0];
 89             //获取所有的span
 90             var spanObjs = inner.children[1].children;
 91
 92             //获取相框的宽度
 93             var imgWidth = inner.offsetWidth;
 94
 95             //循环所有的span 标签,注册鼠标进入事件
 96             for (var i =0;i<spanObjs.length;i++){
 97                 spanObjs[i].setAttribute("index",i);
 98                 spanObjs[i].onmouseenter = function () {
 99                     //先干掉所有的span 的(类样式)背景颜色
100                     for (var j=0;j<spanObjs.length;j++){
101                         spanObjs[j].removeAttribute("class");
102                     }
103                     //设置当前的span 的(类样式)背景颜色
104                     this.className = "current";
105
106                     //移动Ul (图片宽度 * 索引值)  但是索引值不能直接拿到,需要事先保存在属性中,(自定义),见上面
107                     var idx = this.getAttribute("index");
108                     //用animation () 函数 这是之前封装的。
109                     animation(ulObj,-idx*imgWidth);
110                 };
111             }
112         </script>
113     </body>
114 </html>
注:这里面是有bug 的,当从第一个直接点到第六个的话,应该以最快的速度移动过去!
再次更新common.js 的代码(新加入动画移动函数 animation() ):
 1 /**
 2  * 根据id 或者根据tagName 返回相应的元素
 3  * */
 4 function getId$(id){
 5    return document.getElementById(id);
 6 }
 7 function getTags$(tagName) {
 8     return document.getElementsByTagName(tagName)
 9 }
10
11 //绑定事件 和 取消绑定的 兼容代码:
12 function addEventListener(ele, type, fn) {
13     if(ele.addEventListener){
14         ele.addEventListener(type,fn,false);
15     }else if(ele.attachEvent){
16         ele.attachEvent("on"+type,fn);
17     }else{
18         ele["on"+type] = fn;
19     }
20 }
21
22 function removeEventListener(ele, type, fn) {
23     if(ele.removeEventListener){
24         ele.removeEventListener(type,fn,false);
25     }else if(ele.detachEvent){
26         ele.detachEvent("on"+type,fn);
27     }else{
28         ele["on"+type] =null;
29     }
30 }
31
32 /*
33 * 将制定的元素移动到指定的位置
34 * */
35 function animation(ele, targetPos) {
36     //点击的时候先清理定时器  (保证无论点击多少次,都是只有一个定时器在起作用)
37     window.clearInterval(ele.timeId);
38
39     ele.timeId = setInterval(function () {
40         //获取div 的当前位置
41         var current = ele.offsetLeft; //数字类型   没有 px
42         //速度  每次移动多少px
43         var step = 10;
44         step = current<targetPos?step:-step;
45         //如果还有的距离小于step 就继续走。反之,直接设定为目标
46         if(Math.abs(targetPos -current) > Math.abs(step)){
47             current +=step;
48             ele.style.left = current +"px";
49         }else{
50             window.clearInterval(ele.timeId);
51             ele.style.left = targetPos +"px";
52         }
53     },20); //0.02s
54 }
左右焦点轮播图:
1 <!DOCTYPE html> 2 <html lang="en"> 3 <head> 4 <meta charset="UTF-8"> 5 <title></title> 6 <style> 7 body, ul, li, img { 8 margin: 0; 9 padding: 0; 10 list-style: none; 11 } 12 #box { 13 width: 520px; 14 height: 280px; 15 padding: 5px; 16 position: relative; 17 border: 1px solid #ccc; 18 margin: 100px auto; 19 } 20 .ad{ 21 width: 520px; 22 height: 280px; 23 position: relative; 24 overflow: hidden; /*它要 结合 position使用*/ 25 } 26 ul{ 27 width:2600px; 28 position: absolute; 29 } 30 ul li{ 31 height: 280px; 32 } 33 ul a{ 34 display: inline-block; 35 height: 280px; 36 } 37 ul li{ 38 float: left; 39 } 40 #focusD{ 41 display: none; 42 } 43 #focusD span { 44 width: 40px; 45 height: 40px; 46 background: #000; 47 border: 1px solid #fff; 48 opacity: 0.3; 49 50 51 position: absolute; 52 left: 5px; 53 top: 50%; 54 margin-top: -20px; 55 cursor: pointer; 56 line-height: 40px; 57 text-align: center; 58 59 font-family: '黑体'; 60 font-size: 30px; 61 color: #fff; 62 font-weight: bold; 63 } 64 #focusD #right { 65 right: 5px;!important; 66 left: auto; 67 } 68 69 </style> 70 </head> 71 <body> 72 <div id="box" class="all"> <!--相框--> 73 <div class="ad"> 74 <ul id="imgs"> 75 <li><a href=""><img src="images/01.jpg"/></a></li> 76 <li><a href=""><img src="images/02.jpg"/></a></li> 77 <li><a href=""><img src="images/03.jpg"/></a></li> 78 <li><a href=""><img src="images/04.jpg"/></a></li> 79 <li><a href=""><img src="images/05.jpg"/></a></li> 80 </ul> 81 </div> 82 <div id="focusD"><span id="left"><</span><span id="right">></span> 83 </div> 84 </div> 85 <script src="js/common.js"></script> 86 <script> 87 //获取最外面的 div 88 var box = getId$("box"); 89 //获取 ad 90 var ad = box.children[0]; 91 //获取ad 的宽度 92 var imgWidth = ad.offsetWidth; 93 //获取 ul 94 var ulObj = ad.children[0]; 95 96 97 //获取 左右焦点的div 98 var forcusD = getId$("focusD"); 99 100 //鼠标进入box 显示焦点 ,离开异常 焦点 101 box.onmouseenter = function(){ 102 focusD.style.display = "block"; 103 }; 104 box.onmouseleave = function(){ 105 focusD.style.display = "none"; 106 }; 107 108 109 //点击右边按钮 110 var index = 0; 111 getId$("right").onclick = function () { 112 if(index <ulObj.children.length-1){ 113 index ++; 114 animation(ulObj,-index*imgWidth); 115 } 116 }; 117 //点击左边按钮 118 getId$("left").onclick = function () { 119 if(index >0){ 120 index--; 121 animation(ulObj,-index*imgWidth); 122 } 123 }; 124 </script> 125 </body> 126 </html>
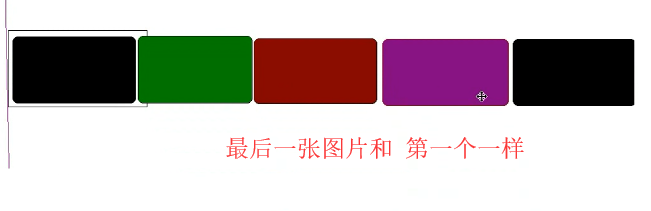
无缝连接的轮播图:
 1 <!DOCTYPE html>
 2 <html lang="en">
 3 <head>
 4     <meta charset="UTF-8">
 5     <title></title>
 6     <style>
 7         * {
 8             margin: 0;
 9             padding: 0;
10         }
11         li {
12             list-style: none;
13             /*height: 280px;*/ /*它的作用和下面的img 的作用一样 */
14         }
15         img {
16             vertical-align: top;
17         }
18         /*取消图片底部3像素距离*/
19         .box {
20             width: 520px;
21             height: 280px;
22             border: 1px solid red;
23             padding: 5px;
24             margin: 100px auto;
25             position: relative;
26         }
27         .box .inner{
28             width: 520px;
29             height: 280px;
30             position: relative;
31             overflow: hidden;
32         }
33         .box ul {
34             width: 2600px;
35             position: absolute;
36             left: 0;
37             top: 0;
38         }
39         .box ul li {
40             float: left;
41         }
42     </style>
43 </head>
44 <body>
45     <div class="box" id="screen">
46         <div class="inner">
47             <ul>
48                 <li><img src="images/01.jpg" alt=""></li>
49                 <li><img src="images/02.jpg" alt=""></li>
50                 <li><img src="images/03.jpg" alt=""></li>
51                 <li><img src="images/04.jpg" alt=""></li>
52                 <li><img src="images/01.jpg" alt=""></li>
53             </ul>
54         </div>
55     </div>
56     <script src="js/common.js"></script>
57     <script>
58         var current = 0;
59         function func() {
60             current -= 520;
61             //获取到ul 标签
62             var ulObj = getId$("screen").children[0].children[0];
63             ulObj.style.left =current +"px";
64             if(current <= -2080) {
65                 current = 0;
66                 ulObj.style.left = 0 + "px";
67             }
68         }
69         var timeId =  window.setInterval(func,1000);
70         //鼠标进入就停止 轮播
71         getId$("screen").onmouseenter = function () {
72             window.clearInterval(timeId);
73         };
74         //鼠标离开就 继续
75         getId$("screen").onmouseleave = function () {
76             //再开一个定时器
77             timeId = window.setInterval(func,1000);
78         };
79     </script>
80 </body>
81 </html>
完整的轮播图(重点):
完整的轮播图有三个功能:
1,下面有按钮
2,左右有焦点箭头
3,可以自动无缝切换。
1 <!DOCTYPE html> 2 <html lang="en"> 3 <head> 4 <meta charset="UTF-8"> 5 <title>这是网页标题</title> 6 <style type="text/css"> 7 * { 8 padding: 0; 9 margin: 0; 10 list-style: none; 11 border: 0; 12 } 13 14 .all { 15 width: 500px; 16 height: 200px; 17 padding: 7px; 18 border: 1px solid #ccc; 19 margin: 100px auto; 20 position: relative; 21 } 22 23 .frame { 24 width: 500px; 25 height: 200px; 26 overflow: hidden; 27 position: relative; 28 } 29 30 .frame li { 31 width: 500px; 32 height: 200px; 33 overflow: hidden; 34 float: left; 35 } 36 37 .frame ul { 38 position: absolute; 39 left: 0; 40 top: 0px; 41 width: 3000px; 42 } 43 44 .all ol { 45 position: absolute; 46 right: 10px; 47 bottom: 10px; 48 line-height: 20px; 49 text-align: center; 50 } 51 52 .all ol li { 53 float: left; 54 width: 20px; 55 height: 20px; 56 background: #fff; 57 border: 1px solid #ccc; 58 margin-left: 10px; 59 cursor: pointer; 60 } 61 62 .all ol li.current { 63 background: #DB192A; 64 } 65 66 #arrow { 67 display: none; 68 } 69 70 #arrow span { 71 width: 40px; 72 height: 40px; 73 position: absolute; 74 left: 5px; 75 top: 50%; 76 margin-top: -20px; 77 background: #000; 78 cursor: pointer; 79 line-height: 40px; 80 text-align: center; 81 font-weight: bold; 82 font-family: '黑体'; 83 font-size: 30px; 84 color: #fff; 85 opacity: 0.3; 86 border: 1px solid #fff; 87 } 88 89 #arrow #right { 90 right: 5px; 91 left: auto; 92 } 93 </style> 94 </head> 95 <body> 96 <div class="all" id='box'> 97 <div class="frame"> <!--相框--> 98 <ul> 99 <li><img src="https://i0.hdslb.com/bfs/archive/f82e1715d1c57b72825ca3938b98dbf69a56951e.png@880w_440h.png" 100 width="500" height="200"/></li> 101 <li><img 102 src="https://i0.hdslb.com/bfs/sycp/creative_img/201911/30c5024e3f3be4c1e48c1e1920b4cdbc.jpg@880w_440h.jpg" 103 width="500" height="200"/></li> 104 <li><img src="https://i0.hdslb.com/bfs/archive/2577043c0a90ee3a1816bc217bc727353b011b8d.jpg@880w_440h.webp" 105 width="500" height="200"/></li> 106 </ul> 107 <ol> <!--ol 中放的是 小按钮,通过动态得到li 的个数然后再设置按钮个数 --> 108 </ol> 109 </div> 110 <div id="arrow"><span id="left"><</span><span id="right">></span></div> 111 </div> 112 <script src="js/common.js"></script> 113 <script> 114 //一 115 //1获取 最外面的div 116 var all = getId$("box"); 117 //2获取 相框 118 var picFrame = all.children[0]; 119 var width = picFrame.offsetWidth; //获取相框的宽度 120 //3相框中有 两个元素 ul图片 和 ol 小按钮 121 var ulObj = picFrame.children[0]; 122 var olObj = picFrame.children[1]; 123 //ul 中的所有li 对象 124 var imglists = ulObj.children; //可以通过对象获取li的个数 125 //4获取焦点的 div 126 // var arrow = all.children[1]; 127 var arrow = getId$("arrow"); 128 129 var idx = 0; //全局变量 ,为了使得当点击箭头时候,和按钮的效果保持一致 130 //二 创建小按钮 131 for(var i=0;i<imglists.length;i++){ 132 var liObj = document.createElement("li"); 133 //添加自定义属性idx 为了能够找到它,计算移动的距离时候使用 134 liObj.setAttribute("index",i); 135 liObj.innerText = i+1; 136 olObj.appendChild(liObj); 137 138 //注册鼠标点击事件 139 liObj.onmouseenter = function () { 140 //1 先干掉所有ol中的背景颜色 141 var btns = olObj.children; 142 for (var i=0;i<btns.length;i++){ 143 btns[i].removeAttribute("class");//它会直接删除class 这个属性 144 // btns[i].className =""; //它不会去掉class这个属性, 145 } 146 //2 设置当前的li 背景颜色 147 this.className = "current"; 148 // var cur = liObj.getAttribute("idx"); //错误 149 // btns[cur].className = "current"; 150 151 //3 获取当前按钮中 index 值 152 idx = this.getAttribute("index"); 153 animation(ulObj,-idx*width); 154 }; 155 } 156 //设置 ol中第一个小按钮的背景颜色 157 olObj.children[0].className = "current"; 158 159 //三 克隆 第一个li 160 //克隆ul 中第一个li 然后加入到ul 的最后 161 var newLi = ulObj.children[0].cloneNode(true); //参数true 表示克隆包含标签中的内容 162 ulObj.appendChild(newLi); 163 164 //四 鼠标进入最外面div 显示左右箭头 165 all.onmouseenter = function () { 166 arrow.style.display = "block"; 167 }; 168 //鼠标离开最外面div 显示左右箭头 169 all.onmouseleave = function () { 170 arrow.style.display = "none"; 171 }; 172 //五 左右按钮点击事件 173 function clickRight() { 174 if(idx == imglists.length - 1){ 175 idx = 0; 176 ulObj.style.left = "0px"; 177 } 178 idx++; 179 animation(ulObj,-idx*width); 180 181 //如果idx == imglists.length-1,此时用户以为的是第一张图片 实际是最后一张 182 if(idx == imglists.length-1 ){ 183 olObj.children[imglists.length -2].removeAttribute("class"); 184 olObj.children[0].className = "current"; 185 }else{ 186 //清除所有的颜色 187 var btns = olObj.children; 188 for (var i=0;i<btns.length;i++){ 189 btns[i].removeAttribute("class"); 190 } 191 //设置当前的有背景颜色 192 btns[idx].className = "current"; 193 } 194 }; 195 getId$("right").onclick = clickRight; 196 getId$("left").onclick = function () { 197 if(idx == 0){ 198 ulObj.style.left =-(imglists.length-1)*width + "px"; 199 idx = imglists.length - 1; 200 } 201 idx --; 202 animation(ulObj,-idx*width); 203 204 //下面改变按钮的颜色 205 var btns = olObj.children; 206 for (var i=0 ;i<btns.length;i++){ 207 btns[i].removeAttribute("class"); 208 } 209 btns[idx].className = "current"; 210 } 211 212 //六 实现轮播图的自动功能 213 //来个定时器,不停的调用点击按钮 事件处理函数 即可 214 //首先要手动调用一次 函数 215 clickRight(); 216 var timeId = window.setInterval(clickRight,2000); //2s 调用一次 右面按钮 事件处理函数 217 //鼠标进入最外面的div 清理定时器 218 all.onmouseenter = function () { 219 window.clearInterval(timeId); 220 }; 221 //鼠标离开最外面定时器 再次设定一个新的定时器 222 all.onmouseleave = function () { 223 timeId = window.setInterval(clickRight,2000); 224 } 225 </script> 226 </body> 227 </html>
offset系列:
三大系列:
现在是offset系列 中的属性。
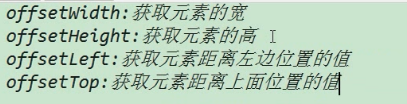
注: 通过style.width 是得不到的。
继续:
当子级元素没有脱离文档流时,

当子级元素脱离文档流时,

 1 <!DOCTYPE html>
 2 <html lang="en">
 3 <head>
 4     <meta charset="UTF-8">
 5     <title></title>
 6     <style>
 7         * {
 8             margin: 0;
 9             padding: 0;
10         }
11         input{
12             position: absolute;
13             top: 250px;
14         }
15         #dv1{
16             width: 200px;
17             height: 200px;
18             background-color: red;
19             margin-left: 100px;
20             padding-left: 20px;
21             border: 10px solid cyan;
22             position: relative;
23         }
24         #dv2{
25             width: 50px;
26             height: 50px;
27             background-color: green;
28             position: absolute;
29             left: 10px;
30         }
31
32     </style>
33 </head>
34 <body>
35     <div id="dv1">
36         <div id="dv2"></div>
37     </div>
38     <input type="button" value="显示效果" id="btn">
39     <script src="js/common.js"></script>
40     <script>
41         getId$("btn").onclick = function () {
42             console.log(getId$("dv2").offsetLeft);
43         };
44     </script>
45 </body>
46 </html>
总结就是当子级元素没有脱标时,offset和父级元素 的margin border padding 还有自己的margin都有关
如果子级元素脱标时,offset 和父级就没关系了,只和自己的 left 和 margin 有关了。
直接通过document 获取元素:
获取body title html 。
 1 <!DOCTYPE html>
 2 <html lang="en">
 3     <head>
 4         <meta charset="UTF-8">
 5         <title>这是网页的标题</title>
 6     </head>
 7     <body>
 8
 9         <script src="js/common.js"></script>
10         <script>
11             //获取  body
12             console.log(document.body); //因为只有一个 它得到的是标签,是个元素
13             //获取  title
14             console.log(document.title);   //它得到的是 里面的值
15             document.title = "我是个大帅哥"; //修改标题
16             //获取 html
17             // console.log(document.html); //这是不对的。应该如下
18             console.log(document.documentElement);   //它才是html
19
20         </script>
21     </body>
22 </html>
案例:图片跟着鼠标飞:
 1 <!DOCTYPE html>
 2 <html lang="en">
 3     <head>
 4         <meta charset="UTF-8">
 5         <title>这是网页的标题</title>
 6         <style>
 7             img{
 8                 width: 50px;
 9                 height: 50px;
10                 position: absolute;
11             }
12         </style>
13     </head>
14     <body>
15         <img src="images/01.jpg" alt="" id="img">
16         <script src="js/common.js"></script>
17         <script>
18             document.onmousemove = function (evt) {
19                 getId$("img").style.left = evt.clientX +"px";
20                 getId$("img").style.top = evt.clientY +"px";
21             };
22         </script>
23     </body>
24 </html>

 浙公网安备 33010602011771号