服务注册与发现
随着业务的发展,用户量日益上升,单一的系统越来越庞大、越来越复杂,单纯的提升服务器性能始终有见顶的一天,我们可以通过分布式技术,例如:服务器集群,水平业务划分,应用分解,系统分流,微服务架构等方式来解决系统性能问题和复杂业务问题。在微服务架构或分布式环境下,服务注册与发现不可或缺。
在微服务架构下,一个应用被拆解为若干个微服务,组成一个分布式应用,各种服务间互相调用。另一方面,出于性能或可用性的考虑,一个微服务常常会部署多份,组成一个集群。如何自动确定系统中有哪些服务、一个服务有哪些实例、这些服务的地址等信息等是个问题,服务注册与发现组件用于解决该问题。
服务注册与发现组件有zookeeper、etcd、consul、eureka等。这里介绍consul。
在生产环境中,特别是在分布式环境或微服务架构下,服务数量众多,此时往往需要做到服务注册、发现、配置的自动化,以能在服务增加或减少时自动调整配置,避免人工配置。Consul + Consul-Template + Registrator (+ Nginx + Docker )是个完美搭配,以下介绍这三者。
1、Consul
(以下以 Consul v1.3.0 为例)
1.1、What
Consul是HashiCorp公司推出的开源工具,用于实现分布式系统的服务发现与配置。它具备以下特性:
- 服务发现:Consul提供了通过DNS或者HTTP接口的方式来注册服务和发现服务。
- 健康检测:Consul的Client提供了健康检查的机制,在服务发现时可以忽略有故障的服务,从而避免流量被转发到有故障的服务上。
- Key/Value存储:应用程序可根据自己的需要使用Consul提供的Key/Value存储。 Consul提供了简单易用的HTTP接口,结合其他工具可以实现动态配置、功能标记、领导选举等功能。
- 多数据中心:Consul支持开箱即用的多数据中心。这意味着用户不需要建立额外的抽象层就能让业务扩展到多个区域。
Consul采用Go开发而成,使用Raft算法(比Zookeeper等采用的复杂的Paxos算法更简单)来保证数据一致性。
与其他分布式服务注册与发现的方案相比,Consul的方案更“一站式”:内置了服务注册与发现框架、分布一致性协议实现、健康检查、Key/Value存储、多数据中心方案,不再需要依赖其他工具(比如ZooKeeper等),此外,提供了HTTP Rest API、DNS API等,易用性强。
1.2、Consul架构及角色
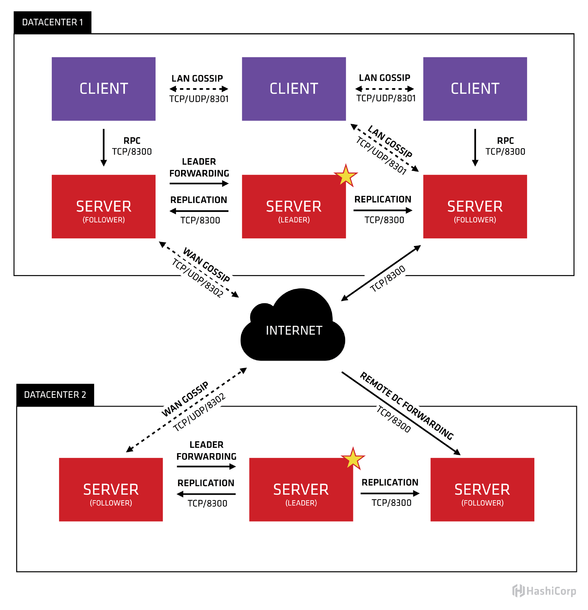
Consul架构如上图所示,相关名词有Consul Server、Client、Agent。
万变不离其宗,作为一个分布式组件,Consul中的节点也是C/S架构的,具有Client和Server两种类型或称角色;不管哪种角色,每个Consul节点都是一个Consul Agent;若干个Consul Agent组成了一个Consul Cluster。
- Consul Cluster:所有Consul Agent组成的整体,包括若干个Consul Client和若干Consul Server节点。
- Consul Server:用于维护Consul Cluster的状态信息。 官方建议是:至少要运行3个或者3个以上的Consul Server。 多个server之中需要选举一个leader,该选举过程Consul基于Raft协议实现。多个Server节点上的Consul数据信息保持强一致性。在局域网内与本地客户端通讯,通过广域网与其他数据中心通讯。
- Consul Client:一个Client是一个转发所有RPC到Server的代理。只维护自身的状态,用来处理健康检查、将HTTP和DNS接口请求转发到服务节点等。Client不会参与leader选举因此不会成为leader。
一个Consul Cluster中必须至少一个Server,可以没有Client。
(ps:这里的Agent与通常理解中的 'Agent' 含义不一样,后者通常指本地代理,负责转发本地调用者的读写请求到Server并返回给调用者。如Zookeeper的Client(某种语言的SDK)相当于Zookeeper Server的 ‘Agent’ 。故Consul Client更像是通常理解中的 ‘Agent’ ,而Consul Agent更像是Zookeeper Server & Client)
1.3、安装与运行
1.3.1、安装
Consul用Go实现,因此具有天然可移植性(支持 Linux、windows 和macOS)。Consul安装非常简单,安装包仅包含一个可执行文件,只需要下载对应OS的软件包并解压后就可使用(官方下载地址:https://www.consul.io/downloads.html)
验证安装: $ consul ,类似输出如下:


 1 Usage: consul [--version] [--help] <command> [<args>]
 2
 3 Available commands are:
 4     agent          Runs a Consul agent
 5     catalog        Interact with the catalog
 6     connect        Interact with Consul Connect
 7     event          Fire a new event
 8     exec           Executes a command on Consul nodes
 9     force-leave    Forces a member of the cluster to enter the "left" state
10     info           Provides debugging information for operators.
11     intention      Interact with Connect service intentions
12     join           Tell Consul agent to join cluster
13     keygen         Generates a new encryption key
14     keyring        Manages gossip layer encryption keys
15     kv             Interact with the key-value store
16     leave          Gracefully leaves the Consul cluster and shuts down
17     lock           Execute a command holding a lock
18     maint          Controls node or service maintenance mode
19     members        Lists the members of a Consul cluster
20     monitor        Stream logs from a Consul agent
21     operator       Provides cluster-level tools for Consul operators
22     reload         Triggers the agent to reload configuration files
23     rtt            Estimates network round trip time between nodes
24     services       Interact with services
25     snapshot       Saves, restores and inspects snapshots of Consul server state
26     validate       Validate config files/directories
27     version        Prints the Consul version
28     watch          Watch for changes in Consul
1.3.2、运行Consul Agent
(更多详细命令可以通过加 -h 查看,如 consul -h 、 consul agent -h )
启动:所谓启动就是运行一个Consul Agent实例,可以作为Server或Client角色运行。
运行一个Consul Server Agent: consul agent -data-dir /consul/data -bind=$localPublicIP -node=node_$localPublicIP -client=0.0.0.0 -ui -retry-join=$joinedConsulServerIP -server -bootstrap-expect 1
运行一个Consul Client Agent: consul agent -data-dir /consul/data -bind=$localPublicIP -node=node_$localPublicIP -client=0.0.0.0 -ui -retry-join=$joinedConsulServerIP
主要参数说明:(两个必须参数,更多关于参数含义见官方文档:https://www.consul.io/docs/agent/options.html)
-data-dir :必须,用于指定状态数据的存储目录
-bind :必须,Sets the bind address for cluster communication,指定用于集群内节点间通信的IP,默认是0.0.0.0,但机子有多个IP时必须显示指定一个。只能是IP,若跨数据中心则须是公网IP
-node :指定本Agent在集群中的名称,须唯一。默认采用机器的hostname,建议采用IP
-client :Sets the address to bind for client access. This includes RPC, DNS, HTTP and HTTPS (if configured)。相当于白名单,允许哪些来源的IP可以访问本Agent,可以用来控制是否允许远程访问,默认为127.0.0.1,指定为0.0.0.0则允许所有来源的IP访问。
-ui :Enables the built-in static web UI server,在server、client上均可启用,但看到的东西一样(因为看到的是同一个集群的信息)。默认访问地址:http://${IP}/8500
-retry-join :启动时将本Agent加入到指定IP所代表的Agent所在的集群,该IP地址可以为一个Client或Server的地址。(也可用 -join 参数,但显然此带重试的参数更好)。问题:join到多个server addr以防一个unreachable?
-server :以Server模式运行Agent,没有该参数则以Client模式运行
-bootstrap-expect :仅用于server模式的agent。用于指定一个datacenter中有多少个server,这些server上此值需要一样。Consul会等这些Server都启动后才会开始可用。
-dev :创建一个开发环境下的server节点。该参数配置下,不会有任何持久化操作即不会有任何数据写入到磁盘,因此此模式不能用于生产环境,仅用于测试。
Consul Agent启动后会默认监听5个端口:
8300: replication、leader farwarding的端口
8301: lan gossip的端口
8302: wan gossip的端口
8500: web ui界面的端口
8600: 使用dns协议查看节点信息的端口
停止:Ctrl + V
1.4、使用
与其他服务注册与发现组件相比,Consul还提供了HTTP API和DNS API,使得非常易用。
这里列举各功能下的几个常用API使用示例,供日后快速查阅。
1.4.1、endpoints
consul的主要接口是RESTful HTTP API,该API可以用来增删查改nodes、services、checks、configguration等。所有的endpoints主要分为以下类别:
kv - Key/Value存储
agent - Agent控制
catalog - 管理nodes和services
health - 管理健康监测
session - Session操作
acl - ACL创建和管理
event - 用户Events
status - Consul系统状态
各模块具体内容可参阅:https://my.oschina.net/FrankXin/blog/1524853,如:
/v1/catalog/register : Registers a new node, service, or check
/v1/catalog/deregister : Deregisters a node, service, or check
/v1/catalog/datacenters : Lists known datacenters
/v1/catalog/nodes : Lists nodes in a given DC
/v1/catalog/services : Lists services in a given DC
/v1/catalog/service/<service> : Lists the nodes in a given service
/v1/catalog/node/<node> : Lists the services provided by a node
1.4.2、查看集群信息
通过CommandLine查看集群信息示例:
$ consul members     # 列出集群Agent成员
$ consul info |grep leader  # 列出集群Leader列表
$ consul catalog services  # 列出集群中的服务列表
members命令的输出是基于gossip协议的且其内容是最终一致的。也就是说,在任何时候在本地代理看到的内容可能与当前服务器中的状态并不是绝对一致的。若需要强一致性的信息,可用如下的HTTP API。
通过HTTP API查看集群信息示例:
# 集群server成员
$ curl 127.0.0.1:8500/v1/status/peers

# 集群Raft leader
$ curl 127.0.0.1:8500/v1/status/leader

# 注册的所有服务
$ curl 127.0.0.1:8500/v1/catalog/services
$ curl 127.0.0.1:8500/v1/catalog/service/$servicename

# 集群节点详细信息
$ curl 127.0.0.1:8500/v1/catalog/nodes
$ curl 127.0.0.1:8500/v1/catalog/node/$nodename
1.4.3、服务注册、删除、发现
更多可参考官方文档:https://www.consul.io/api/agent/service.html
(1)服务注册:Consul支持两种服务注册方式,推荐后者
法一:通过配置文件注册:写好.json配置文件并在启动agent时通过 -config-dir 指定该配置文件,文件内容示例如下(可不全指定各字段):
 1     {
 2         "service": {
 3             "id":"xx_ss_manage_service",
 4             "name": "ss_manage_service",
 5             "tags": ["sensestudy,backend,java"],
 6             "address": "10.5.6.47",
 7             "port": 8081,
 8             "checks": [ //会周期性检查服务健康,对于HTTP返回2xx则认为健康
 9                 {
10                     "http": "http://10.5.6.47:8081",
11                     "interval": "10s"
12                 },//可以多个
13                 {
14                     "tcp": "10.9.10.173:8081",
15                     "interval": "10s"
16                 }
17             ]
18         }
19     }
服务会被注册到使用该配置文件的Agent上。
法二:通过HTTP API注册。具体而言,可通过本地agent(/v1/agent/service/register,此时服务信息里可不用指定agent node等信息),也可通过catalog注册(/v1/catalog/register,需要提供node、address等更多信息)
curl -X PUT -d '{"name":"sensestudy_manage_server_java","tags":["java"],"port":8081,"checks":[{"tcp":"localhost:8081","interval":"10s"}]}' http://$agentHost:8500/v1/agent/service/register
注:用PUT方法,PUT的值为上面配置文件里service的值;服务会被注册到http链接中agentHost所对应的Agent上
注:
- 多个同name的service可以注册到同一个agnet上,但其service id须不同;不同agnet上也可以有同name的service,其service id也可以相同。可知,agnet + service id才是整个集群中唯一的。
- 若注册时不指定service的IP则会默认采用所注册到的agent的IP;若不指定service id则默认采用service name。正因为如此,若注册时不指定IP和ID则同一个node上没法注册多个同名的服务。
- 若一个Agent挂了,则该Agent及注册到其下的service会被从cluster中移除。
(2)服务删除:以HTTP API为例,删除时是删除指定Agent上的一个或若干服务
curl -X PUT $scheme://$agentHost:8500/v1/agent/service/deregister/$servicename :删除指定Agent上的指定服务
以上述命令为基础,删除本地Agent上的所有服务: curl http://localhost:8500/v1/agent/services?pretty | jq -r "to_entries|map(\"\(.key)\")|.[]" | xargs -I {} curl -X PUT http://localhost:8500/v1/agent/service/deregister/{}
(3)服务发现:以HTTP API为例,与服务注册类似,可以查某个agent下的服务,也可以通过catalog查集群中的服务。
curl $scheme://$agentHost:8500/v1/catalog/services :查集群中的所有服务,在任意一个agent上得到的结果均一样
curl $scheme://$agentHost:8500/v1/catalog/service/$servicename :查集群中的某个服务,在任意一个agent上得到的结果均一样
curl $scheme://$agentHost:8500/v1/agent/services :获取指定Agent上的所有服务
curl $scheme://$agentHost:8500/v1/agent/service/$servicename :获取指定Agent上的某个服务
注:
- url最后加 pretty 参数可以格式化展示json结果,如: curl -s http://localhost:8500/v1/agent/services?pretty ,也可借助其他工具如: curl -s http://localhost:8500/v1/agent/services | python -m json.tool
- 注册服务时若未设置某些字段如adress,则查询时对于上述后两个接口也不会有该字段值(为空)、而对于上述前两个接口则adress会为所在Agent的adress。
- 根据Agent启动时-client的配置,有可能上述命令执行失败
1.4.4、健康检查
参阅:https://www.consul.io/docs/agent/checks.html
1.4.5、键值存储
参阅:https://www.cnblogs.com/java-zhao/p/5381892.html
1.5、Consul Docker
官网:https://hub.docker.com/_/consul/
“ Consul should always be run with --net=host in Docker because Consul's consensus and gossip protocols are sensitive to delays and packet loss ”
consul用于服务注册,由于应用通过查询注册到consul上的服务来与服务连接,而服务通常通过本地Agent来注册到consul上(注册时通常不指定服务地址,从而服务的地址为所注册到的agent的地址)。故docker里consul Agent的地址需要是其他机子能访问到的,通过--net=host达到该目的。
示例:(查看Dockerfile可知该Consul Image的data-dir默认为/consul/data且有个匿名卷)
Server Agent:
docker run -d --net=host --restart=always --name $consulContainerName consul agent -node=node_$localPublicIP -bind=$localPublicIP -client=0.0.0.0 -ui -retry-join=$joinedConsulServerIP -server -bootstrap-expect 1
Client Agent: docker run -d --net=host --restart=always --name $consulContainerName consul agent -node=node_$localPublicIP -bind=$localPublicIP -client=0.0.0.0 -ui -retry-join=$joinedConsulServerIP
2、Consul-Template
下载地址:https://releases.hashicorp.com/consul-template/ (下载后即可使用)
Consul-Template用于根据模板配置文件生成真实配置文件。它会监控Consul上服务的变化,并在变化时自动根据模板文件生成新的文件(如nginx配置文件),此外还可以在生成文件后执行用户指定的命令。
模板示例:以下是一个nginx配置文件模板
log_format  myLogFormat  '$remote_addr - $remote_user [$time_local] "$request" '
                         '$status $body_bytes_sent "$http_referer" '
                         '"$http_user_agent" "$proxy_add_x_forwarded_for" '
                         'upstream:"$upstream_addr" upstreamResponseTime:$upstream_response_time ';


client_max_body_size 100m;

upstream httpServer {
  least_conn;
  {{range service "ss_manage_service"}}server {{.Address}}:{{.Port}} max_fails=3 fail_timeout=60 weight=1;
  {{else}}server 127.0.0.1:65535; # force a 502{{end}}
}

server {
  listen 80 default_server;

  access_log  /var/log/nginx/access.log  myLogFormat;

  location / {
    proxy_pass $scheme://httpServer;
    proxy_set_header X-Forwarded-For $proxy_add_x_forwarded_for;
    proxy_set_header Host $host;
    proxy_set_header X-Real-IP $remote_addr;
  }
}
命令示例: consul-template -consul localhost:8500 -retry 30s -template /tmp/zsmtest/nginx.conf.consultemplate:/tmp/zsmtest/nginx.conf:' nginx -s reload && echo generate new config file ' ,服务加入或离开时根据模板生成新的配置文件。
-consul :指定consul地址
-retry :consul不用时重试间隔
-template :指定模板文件位置、生成的文件的位置、生成文件后执行的命令。可以指定多个-template以根据多个模板生成多个文件。
更多使用指南见:https://book-consul-guide.vnzmi.com/11_consul_template.html
3、Registrator
Registrator用于自动发现其所在宿主机上运行的Docker container中的服务,并将服务注册到服务注册组件(如Consul、Zookeeper、etcd等)。当某个服务挂了,Registrator会自动将之deregister。
官方文档:http://gliderlabs.github.io/registrator/latest/user/services/
Registrator Docker:https://hub.docker.com/r/gliderlabs/registrator/
以下以Registrator + Consul为例。这里Registrator版本为v7
3.1、原理
Registrator以容器方式运行,其启动后会自动获取宿主机上的Docker container列表 并 将有显式指定 宿主机到容器端口映射( -p $publish_port:$expose_port 或 -P )的容器 作为服务注册到Consul。
- 若一个容器内有多个运行程序且都做了端口映射则会有多个服务被注册到consul。
- 会忽略没有映射宿主机端口的容器,如--net=host的container,要想该容器不被忽略,可以在docker启动时加入-p参数。
3.2、运行
3.2.1、示例
启动命令示例: docker run -d --net=host --restart=always --name $registratorContainerName -v /var/run/docker.sock:/tmp/docker.sock gliderlabs/registrator -ip=$localPublicIP consul://localhost:8500
-ip :可选。指定被Registrator注册到Consul上的service的ip。若不指定此参数则采用 -consul 参数的IP值。
被Registrator注册到Consul上的service的ip为该值、端口为service所在容器的publish port(可以通过启动时给registrator加 -internal参数使之用expose port)
由于一个service是要被其他service访问的,故通常需要将此 -ip 设为非环回地址: -ip=<external ip of my local machine>
-consul :可选。指定service注册到哪个Agent上,默认是127.0.0.1。实际部署时每个Consul Agent所在主机都要运行一个Registrator,故此值为默认即可。
更多启动参数及其默认值:
-cleanup=false: Remove dangling services
-deregister="always": Deregister exited services "always" or "on-success"
-internal=false: Use internal ports instead of published ones
-ip="": IP for ports mapped to the host
-resync=0: Frequency with which services are resynchronized
-retry-attempts=0: Max retry attempts to establish a connection with the backend. Use -1 for infinite retries
-retry-interval=2000: Interval (in millisecond) between retry-attempts.
-tags="": Append tags for all registered services
-ttl=0: TTL for services (default is no expiry)
-ttl-refresh=0: Frequency with which service TTLs are refreshed
defalut service name、id、address:被Registrator注册到Consul上的服务的命名、ID、地址等值如下:
default service name:<base(container-image)>[-<exposed-port> if >1 ports]
default service ID:<hostname>:<container-name>:<exposed-port>[:udp if udp],这里hostname是指宿主机的
default IP and Port:前者 -ip 的值,如果为配置则用consul地址值中的ip;后者为$publish_port(若启动Registrator时指定了-internal参数则为$expose_port)
3.2.2、配置
可以配置service name、tag、helth check等。
方法:在启动docker服务时传入环境变量或标签,registrator会使用该变量来命名服务或进行健康检查等。如 SERVICE_x_NAME ,x is the internal exposed port,可以不指定x,如SERVICE_NAME,但一个容器内有多个监听端口时需要指定端口x。
示例:
-e SERVICE_3306_NAME=ss_mysql_service # service name
-e SERVICE_3306_TAGS=sensestudy,backend,mysql # service tag
-e SERVICE_3306_CHECK_TCP=true # health check
更多配置参阅:http://gliderlabs.github.io/registrator/latest/user/services/
更多健康检查配置参阅:http://gliderlabs.github.io/registrator/latest/user/backends/#consul
3.2.3 docker中 consul和registrator结合
#!/bin/bash
set -u

localPublicIP=10.152.42.99
joinedConsulServerIP=10.152.42.99

# start consul agent
consulContainerName=consul_sensestudy
docker rm -f -v $consulContainerName
docker run -d --net=host --restart=always --name $consulContainerName  consul:1.3.0 agent -node=node_$localPublicIP  -bind=$localPublicIP  -client=0.0.0.0 -ui -retry-join=$joinedConsulServerIP -server -bootstrap-expect 1

# start registrator
registratorContainerName=registrator_sensestudy
docker rm -f -v $registratorContainerName
docker run -d --net=host --restart=always --name $registratorContainerName -v /var/run/docker.sock:/tmp/docker.sock gliderlabs/registrator -ip=$localPublicIP   consul://localhost:8500
4、SpringCloud项目中使用Consul
4.1、服务注册
在SpringCloud(SpringBoot)项目中只需要少量配置就可以将项目自动注册到Consul。
1、引入依赖:
<dependency>
    <groupId>org.springframework.cloud</groupId>
    <artifactId>spring-cloud-starter-consul-discovery</artifactId>
</dependency>
2、配置启用Consul:
spring:
  cloud:
    consul:
      enabled: true
      host: localhost
      port: 8500
      discovery:
#        serviceName: ${spring.application.name} #if not configured, use application in default
        tags: sensestudy,coursecenter
        healthCheckInterval: 15s
        fail-fast: false
        prefer-ip-address: true
#        health-check-path: ${server.servlet.context-path}/actuator/health
4.2、服务方法的定义和实现
api定义:
@RequestMapping("/api/v1")
public interface CourseApi {

    @GetMapping("/course")
    public BaseResp<CourseEntity> getCourseEntity(@RequestParam("courseId") String courseId);
}
api实现:
@RestController
public class ContrseController implements CourseApi {
    @Autowired
    private CourseService courseService;

    @Override
    public BaseResp<CourseEntity> getCourseEntity(String courseId) {
        CourseEntity courseEntity = courseService.getByCourseId(courseId);
        return BaseResp.generateSuccess(courseEntity);
    }
}
api client(也可以与api定义合二为一):
@FeignClient(value = "sensestudy-coursecenter", fallback = CourseFeignFallback.class)//通过fallback指定服务调用时的熔断机制,另一种为通过FallBackFactory指定
public interface CourseFeignClient extends CourseApi { }


//fallback style
@Component
public class CourseFeignFallback implements CourseFeignClient {
    @SuppressWarnings("unchecked")
    @Override
    public BaseResp<CourseEntity> getCourseEntity(String courseId) {
        return BaseResp.DEFAULT_FALLBACK_RESP;
    }
}

//FallbackFactory style
@Component
public class CourseFeignFallback implements FallbackFactory<CourseFeignClient> {
    @Override
    public CourseFeignClient create(Throwable throwable) {
        String msg = throwable == null ? "" : throwable.getMessage();
        if (!StringUtils.isEmpty(msg)) {
            log.error(msg);
        }
        return new CourseFeignClient() {
            @SuppressWarnings("unchecked")
            @Override
            public BaseResp<CourseEntity> getCourseEntity(String courseId) {
                return BaseResp.DEFAULT_FALLBACK_RESP;
            }

        };
    }

}
4.3、发现
服务发现借助于Feign Client。
1、依赖及配置:与注册时的一样,只不过需加个feign依赖
<dependency>
    <groupId>org.springframework.cloud</groupId>
    <artifactId>spring-cloud-starter-openfeign</artifactId>
</dependency>
2、在项目main方法上启用FeignClient: @EnableFeignClients(basePackages = "xxx")
3、Feign调用的代码示例:
@RestController
class TestController {
    @Autowired
    private CourseFeignClient courseFeignClient;

    @GetMapping("/api/course")
    public BaseResp<CourseEntity> test() {
        return courseFeignClient.getCourseEntity("");
    }
}
注:默认情况下,引入api client后,服务提供方的请求映射在服务消费方也会生效,导致混淆或冲突,可以通过配置避免:
@Configuration
@ConditionalOnClass({ Feign.class })
public class FeignConfiguration {// 解决@FeignClient中的@RequestMapping也被服务调用方加载的问题:@FeignClient中的@RequestMapping也被

    @Bean
    public WebMvcRegistrations feignWebRegistrations() {
        return new WebMvcRegistrations() {
            @Override
            public RequestMappingHandlerMapping getRequestMappingHandlerMapping() {
                return new FeignRequestMappingHandlerMapping();
            }
        };
    }

    private static class FeignRequestMappingHandlerMapping extends RequestMappingHandlerMapping {
        @Override
        protected boolean isHandler(Class<?> beanType) {
            return super.isHandler(beanType) && !AnnotatedElementUtils.hasAnnotation(beanType, FeignClient.class);
        }
    }
}
详情可参阅:https://cloud.tencent.com/developer/article/1072494、https://juejin.im/entry/5b20a2c25188257d6c047d2d、https://my.oschina.net/u/1758970/blog/1798279
4、 配置启用熔断机制(可选): feign.hystrix.enabled=true ,Feign的fallback是通过Hystrix实现的,故该配置为true时fallback才能生效。
4.3、健康检查
可借助actuator对应用进行监控,包括health、info、metrics等
引入如下依赖即可:
<dependency>
    <groupId>org.springframework.boot</groupId>
    <artifactId>spring-boot-starter-actuator</artifactId>
</dependency>
可以进行进一步配置:
spring:
  management: #actuator config
  endpoints:
    web:
      exposure:
        include: "*"
注意:默认情况下,对一个项目健康检查时,如果项目中引入了Spring的MySQL、Redis、MongoDB等组件(即引入Spring的相关包)则会同时检查项目中相关组件的健康状态,只要有一个相关组件不健康,则认为该项目也不健康。当然,可以设置不同时检查相关组件,如management.health.redis.enabled=false。这是个大坑。
5、二次开发
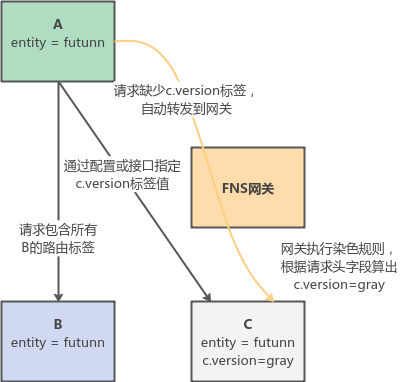
默认情况下,注册到同一注册中心下的各服务是可以互相访问的。很多企业会基于开源的注册中心组件进行二次开发,以可自定义服务间的可见性逻辑,从而实现灰度发布、流量控制等功能。例如:
流量路由:选择可通的目标服务实例——给服务赋予不同标签,注册中心根据标签匹配度返回对应的被调方实例,只有调用者与被调者标签一样才返回被调方实例,从而实现可见性控制。
流量染色:控制可通的目标服务实例——对于调用方没带标签的,注册中心根据管理员配置的规则赋予不同的标签,使之被路由到不同实例,从而实现不同的路由策略。例如根据userId范围、根据一段时间内请求者的比例等。
负载均衡:从可通的目标服务实例选择最终要访问的实例。从粒度上看,有 就近访问(global / area / region / zone ,全球、同国家、同城市、同机房中心)、负载均衡(加权随机、一致性哈希等) 等
其他
这就是二次开发的必要性,以前还一直以为有了开源的为啥不直接用还要二次开发、以为是为了KPI,从这可看出,二次开发还是很必要的。
6、参考资料
https://www.hi-linux.com/posts/6132.html
阅读推荐:http://blog.didispace.com/consul-service-discovery-exp/

 浙公网安备 33010602011771号