
SpringMVC(十六):如何使用编程方式替代/WEB-INF/web.xml中的配置信息
在构建springmvc+mybatis项目时,更常用的方式是采用web.xml来配置,而且一般情况下会在web.xml中使用ContextLoaderListener加载applicationContext-*.xml,在DispatcherServlet中配置${servlet-name}-servlet.xml。
但是实际上除了采用xml方式,在springmvc+mybatis项目中也可以采用纯代码+注解方式来替换web.xml、applicationContext-*.xml、${servlet-name}-servlet.xml。
下边我们先展示下采用web.xml配置方式,后边讲解如何使用代码+注解方式来替换的方案(所有代码请参考:https://github.com/478632418/springmv_without_web_xml/tree/master/test-pro-02)。
SpringMVC+Mybatis采用web.xml整合
/WEB-INF/web.xml配置
在/WEB-INF/web.xml中一般需要配置两个部分主要内容:ContextLoaderListener、DispatcherServlet。
一般web.xml配置信息如下:
<?xml version="1.0" encoding="UTF-8"?>
<web-app xmlns:xsi="http://www.w3.org/2001/XMLSchema-instance"
xmlns="http://xmlns.jcp.org/xml/ns/javaee"
xsi:schemaLocation="http://xmlns.jcp.org/xml/ns/javaee http://xmlns.jcp.org/xml/ns/javaee/web-app_3_1.xsd"
id="WebApp_ID"
version="3.1">

  <!-- 加载spring容器 -->
  <context-param>
      <param-name>contextConfigLocation</param-name>
      <param-value>classpath:applicationContext.xml</param-value>
  </context-param>
  <listener>
      <listener-class>org.springframework.web.context.ContextLoaderListener</listener-class>
  </listener>
      <!-- 文件上传与下载过滤器:form表单中存在文件时,该过滤器可以处理http请求中的文件,被该过滤器过滤后会用post方法提交,form表单需设为enctype="multipart/form-data"-->
    <!-- 注意:必须放在HiddenHttpMethodFilter过滤器之前 -->
    <filter>
        <filter-name>multipartFilter</filter-name>
        <filter-class>org.springframework.web.multipart.support.MultipartFilter</filter-class>
        <init-param>
            <param-name>multipartResolverBeanName</param-name>
            <!--spring中配置的id为multipartResolver的解析器-->
            <param-value>multipartResolver</param-value>
        </init-param>
    </filter>
    <filter-mapping>
        <filter-name>multipartFilter</filter-name>
        <!--<servlet-name>springmvc</servlet-name>-->
        <url-pattern>/*</url-pattern>
    </filter-mapping>

    <!--
    注意:HiddenHttpMethodFilter必须作用于dispatcher前
    请求method支持 put 和 delete 必须添加该过滤器
    作用:可以过滤所有请求,并可以分为四种
    使用该过滤器需要在前端页面加隐藏表单域
    <input type="hidden" name="_method" value="请求方式(put/delete)">
    post会寻找_method中的请求式是不是put 或者 delete,如果不是 则默认post请求
    -->
    <filter>
        <filter-name>hiddenHttpMethodFilter</filter-name>
        <filter-class>org.springframework.web.filter.HiddenHttpMethodFilter</filter-class>
    </filter>
    <filter-mapping>
        <filter-name>hiddenHttpMethodFilter</filter-name>
        <!--servlet为springMvc的servlet名 -->
        <servlet-name>springmvc</servlet-name>
        <!--可以通过配置覆盖默认'_method'值 -->
        <init-param>
            <param-name>methodParam</param-name>
            <param-value>_method</param-value>
        </init-param>
        <!--<url-pattern>/*</url-pattern>-->
    </filter-mapping>
    <!--结束后端数据输出到前端乱码问题-->
    <filter>
        <filter-name>characterEncodingFilter</filter-name>
        <filter-class>org.springframework.web.filter.CharacterEncodingFilter</filter-class>
        <init-param>
            <param-name>encoding</param-name>
            <param-value>UTF-8</param-value>
        </init-param>
        <init-param>
            <param-name>forceEncoding</param-name>
            <param-value>true</param-value>
        </init-param>
    </filter>
    <filter-mapping>
        <filter-name>characterEncodingFilter</filter-name>
        <url-pattern>/*</url-pattern>
    </filter-mapping>
  <!-- springmvc前端控制器 -->
  <servlet>
      <servlet-name>springmvc</servlet-name>
      <servlet-class>org.springframework.web.servlet.DispatcherServlet</servlet-class>
      <init-param>
          <param-name>contextConfigLocation</param-name>
          <param-value>classpath:springmvc-servlet.xml</param-value>
      </init-param>
      <load-on-startup>1</load-on-startup>
  </servlet>
  <servlet-mapping>
        <servlet-name>springmvc</servlet-name>
        <url-pattern>/</url-pattern>
  </servlet-mapping>
  <servlet-mapping>
        <servlet-name>default</servlet-name>
        <url-pattern>*.js</url-pattern>
  </servlet-mapping>
</web-app>
备注:
1)上边关于spring的ApplicationContext配置有两处:ContextLoaderListener、DispatcherServlet,一般理解为:ContextLoaderListener为spring的parent ApplicationContext,DispatcherServlet为spring的child ApplicationContext。
2)ContextLoaderListener与DispatcherServlet所创建的上下文ApplicationContext的区别:
- ContextLoaderListener中创建ApplicationContext主要用于整个Web应用程序需要共享的一些组件,比如DAO,数据库的ConnectionFactory、multipartResolver等。而由DispatcherServlet创建的ApplicationContext主要用于和该Servlet相关的一些组件,比如Controller、ViewResovler等。
- 对于作用范围而言,在DispatcherServlet中可以引用由ContextLoaderListener所创建的ApplicationContext,而反过来不行。
- 为什么multipartResolver需要配置在ContextLoaderListener的applicationContext.xml?具体可以查看MultipartFilter中的代码:
 View Code
public class MultipartFilter extends OncePerRequestFilter {

    /**
     * The default name for the multipart resolver bean.
     */
    public static final String DEFAULT_MULTIPART_RESOLVER_BEAN_NAME = "filterMultipartResolver";

    private final MultipartResolver defaultMultipartResolver = new StandardServletMultipartResolver();

    private String multipartResolverBeanName = DEFAULT_MULTIPART_RESOLVER_BEAN_NAME;


    /**
     * Set the bean name of the MultipartResolver to fetch from Spring's
     * root application context. Default is "filterMultipartResolver".
     */
    public void setMultipartResolverBeanName(String multipartResolverBeanName) {
        this.multipartResolverBeanName = multipartResolverBeanName;
    }

    /**
     * Return the bean name of the MultipartResolver to fetch from Spring's
     * root application context.
     */
    protected String getMultipartResolverBeanName() {
        return this.multipartResolverBeanName;
    }


    /**
     * Check for a multipart request via this filter's MultipartResolver,
     * and wrap the original request with a MultipartHttpServletRequest if appropriate.
     * <p>All later elements in the filter chain, most importantly servlets, benefit
     * from proper parameter extraction in the multipart case, and are able to cast to
     * MultipartHttpServletRequest if they need to.
     */
    @Override
    protected void doFilterInternal(
            HttpServletRequest request, HttpServletResponse response, FilterChain filterChain)
            throws ServletException, IOException {

        MultipartResolver multipartResolver = lookupMultipartResolver(request);

        HttpServletRequest processedRequest = request;
        if (multipartResolver.isMultipart(processedRequest)) {
            if (logger.isTraceEnabled()) {
                logger.trace("Resolving multipart request");
            }
            processedRequest = multipartResolver.resolveMultipart(processedRequest);
        }
        else {
            // A regular request...
            if (logger.isTraceEnabled()) {
                logger.trace("Not a multipart request");
            }
        }

        try {
            filterChain.doFilter(processedRequest, response);
        }
        finally {
            if (processedRequest instanceof MultipartHttpServletRequest) {
                multipartResolver.cleanupMultipart((MultipartHttpServletRequest) processedRequest);
            }
        }
    }

    /**
     * Look up the MultipartResolver that this filter should use,
     * taking the current HTTP request as argument.
     * <p>The default implementation delegates to the {@code lookupMultipartResolver}
     * without arguments.
     * @return the MultipartResolver to use
     * @see #lookupMultipartResolver()
     */
    protected MultipartResolver lookupMultipartResolver(HttpServletRequest request) {
        return lookupMultipartResolver();
    }

    /**
     * Look for a MultipartResolver bean in the root web application context.
     * Supports a "multipartResolverBeanName" filter init param; the default
     * bean name is "filterMultipartResolver".
     * <p>This can be overridden to use a custom MultipartResolver instance,
     * for example if not using a Spring web application context.
     * @return the MultipartResolver instance
     */
    protected MultipartResolver lookupMultipartResolver() {
        WebApplicationContext wac = WebApplicationContextUtils.getWebApplicationContext(getServletContext());
        String beanName = getMultipartResolverBeanName();
        if (wac != null && wac.containsBean(beanName)) {
            if (logger.isDebugEnabled()) {
                logger.debug("Using MultipartResolver '" + beanName + "' for MultipartFilter");
            }
            return wac.getBean(beanName, MultipartResolver.class);
        }
        else {
            return this.defaultMultipartResolver;
        }
    }

}
在代码中lookupMultipartResolver()方法:
    protected MultipartResolver lookupMultipartResolver() {
        WebApplicationContext wac = WebApplicationContextUtils.getWebApplicationContext(getServletContext());
        String beanName = getMultipartResolverBeanName();
        if (wac != null && wac.containsBean(beanName)) {
            if (logger.isDebugEnabled()) {
                logger.debug("Using MultipartResolver '" + beanName + "' for MultipartFilter");
            }
            return wac.getBean(beanName, MultipartResolver.class);
        }
        else {
            return this.defaultMultipartResolver;
        }
    }
在lookupMultipartResovler()方法中,会调用WebApplicationContextUtils.getWebApplicationContext(getServletContext())---根据子上下文(DipatcherServlet的上下文)获取根上下文(ContextLoaderListener的上下文)。如果返回的结果为空,或者返回山下文中未配置multipartResolver都会直接使用默认的defaultMultipartResovler。

3)web.xml中还配置三个filter:characterEncodingFilter(编码解析)、hiddenHttpMethodFilter(实现支持put、delete提交)、multipartFilter(定制上传文件的解析组件一般不指定默认使用:StandardServletMultipartResolver)。使用hiddenHttpMethodFilter+multipartFilter可以实现:使用put方式上传文件。
MultipartResolver是一个为多文件上传提供了解决方案的策略接口,将普通的HttpServletRequest封装成MultipartHttpServletRequest,在Spring中常见的两个实现方式,分别是:
1)StandardServletMultipartResolver:使用Servlet3.0标准上传方式,将HttpServletRequest转化为StandardServletMultipartResolver,以tomcat为例,从 Tomcat 7.0.x的版本开始就支持 Servlet 3.0了。
2)CommonsMultipartResolver:使用apache的common-fileupload,将HttpServletRequest转化为DefaultMultipartHttpServletRequest(需要依赖common-fileupload.jar,common-io.jar)。
4)一般情况下ContextLoaderListener配置的xml文件名称格式为:applicationContext-*.xml;DispatcherServlet配置的xml的文件名称格式为:${servlet-name}-servlet.xml。
5)如果不配置ContextLoaderListener,这时是无法实现CommonMutilpartResolver+Put上传文件;若只是在ContextLoaderListener(全局配置项)中配置,而没有配置DispatcherServlet ,那么aop会无效。
applicationContext-*.xml配置
1)一般情况下,applicationContext-*.xml中会配置DAO,数据库的ConnectionFactory、multipartResolver等。
2)该配置文件在web.xml中由ContextLoaderListener来加载。
applicationContext.xml示例:
<beans xmlns="http://www.springframework.org/schema/beans"
    xmlns:xsi="http://www.w3.org/2001/XMLSchema-instance" xmlns:mvc="http://www.springframework.org/schema/mvc"
    xmlns:context="http://www.springframework.org/schema/context"
    xmlns:aop="http://www.springframework.org/schema/aop" xmlns:tx="http://www.springframework.org/schema/tx"
    xsi:schemaLocation="http://www.springframework.org/schema/beans
        http://www.springframework.org/schema/beans/spring-beans-3.2.xsd
        http://www.springframework.org/schema/mvc
        http://www.springframework.org/schema/mvc/spring-mvc-3.2.xsd
        http://www.springframework.org/schema/context
        http://www.springframework.org/schema/context/spring-context-3.2.xsd
        http://www.springframework.org/schema/aop
        http://www.springframework.org/schema/aop/spring-aop-3.2.xsd
        http://www.springframework.org/schema/tx
        http://www.springframework.org/schema/tx/spring-tx-3.2.xsd ">

      <!--扫描Service里面的注解-->
    <context:component-scan base-package="com.dx.test.service"></context:component-scan>

    <!-- 文件上传注意id -->
    <bean id="multipartResolver" class="org.springframework.web.multipart.commons.CommonsMultipartResolver">
        <!-- 配置默认编码 -->
        <property name="defaultEncoding" value="utf-8"></property>
        <!-- 配置文件上传的大小 -->
        <property name="maxUploadSize" value="1048576"></property>
    </bean>

      <!-- 数据库连接池配置文件Dao层 -->
       <!-- 加载配置文件 -->
    <context:property-placeholder location="classpath:db.properties"/>
       <!-- 数据库连接池,使用dbcp -->
    <bean id="dataSource" class="com.alibaba.druid.pool.DruidDataSource" init-method="init" destroy-method="close">
        <property name="url" value="${jdbc.url}"/>
        <property name="username" value="${jdbc.username}"/>
        <property name="password" value="${jdbc.password}"/>
        <property name="maxActive" value="10"/>
        <property name="maxIdle" value="5"/>
    </bean>
    <!-- SqlSessionFactory配置 -->
    <bean id="sqlSessionFactory" class="org.mybatis.spring.SqlSessionFactoryBean">
        <property name="dataSource" ref="dataSource" />
        <!-- 加载mybatis的全局配置文件 -->
        <property name="configLocation"  value="classpath:sqlMapConfig.xml"/>
        <!-- 自动扫描mapping.xml文件,**表示迭代查找,也可在sqlMapConfig.xml中单独指定xml文件-->
        <property name="mapperLocations" value="classpath:com/dx/test/**/*.xml" />
    </bean>

     <!-- mapper扫描器 -->
    <bean class="org.mybatis.spring.mapper.MapperScannerConfigurer">
        <!-- 扫描包路径,如果需要扫描多个包,中间使用半角逗号隔开  -->
        <property name="basePackage" value="com.Dao"/>
        <property name="sqlSessionFactoryBeanName" value="sqlSessionFactory"/>
    </bean>

     <!-- 事务管理器-->
    <bean id="transactionManager" class="org.springframework.jdbc.datasource.DataSourceTransactionManager">
        <property name="dataSource" ref="dataSource"/>
    </bean>
 </beans>
其中db.properties是配置的数据库连接信息,比如:
jdbc.url=jdbc\:oracle\:thin\:@localhost\:8080\:orcl
jdbc.username=admin
jdbc.password=pass123
${servlet-name}-servlet.xml配置
1)一般情况下,${servlet-name}-servlet.xml中会配置:由DispatcherServlet创建的ApplicationContext主要用于和该Servlet相关的一些组件,比如Controller、ViewResovler等。
2)该配置文件在web.xml中由DipatcherServlet来加载。
springmvc-servlet.xml示例:
<beans xmlns="http://www.springframework.org/schema/beans"
    xmlns:xsi="http://www.w3.org/2001/XMLSchema-instance" xmlns:mvc="http://www.springframework.org/schema/mvc"
    xmlns:context="http://www.springframework.org/schema/context"
    xmlns:aop="http://www.springframework.org/schema/aop" xmlns:tx="http://www.springframework.org/schema/tx"
    xsi:schemaLocation="http://www.springframework.org/schema/beans
        http://www.springframework.org/schema/beans/spring-beans-3.2.xsd
        http://www.springframework.org/schema/mvc
        http://www.springframework.org/schema/mvc/spring-mvc-3.2.xsd
        http://www.springframework.org/schema/context
        http://www.springframework.org/schema/context/spring-context-3.2.xsd
        http://www.springframework.org/schema/aop
        http://www.springframework.org/schema/aop/spring-aop-3.2.xsd
        http://www.springframework.org/schema/tx
        http://www.springframework.org/schema/tx/spring-tx-3.2.xsd ">


    <!-- 开启controller注解支持 -->
    <!-- 注意事项请参考:http://jinnianshilongnian.iteye.com/blog/1762632 -->
    <context:component-scan base-package="com.Controller" use-default-filters="false">
        <context:include-filter type="annotation" expression="org.springframework.stereotype.Controller" />
        <context:include-filter type="annotation" expression="org.springframework.web.bind.annotation.ControllerAdvice" />
    </context:component-scan>
    <!--使用mvc:annotation-driven代替上边注解映射器和注解适配器 配置 如果使用mvc:annotation-driven就不用配置上面的
        RequestMappingHandlerMapping和RequestMappingHandlerAdapter-->
    <mvc:annotation-driven></mvc:annotation-driven>

    <!-- 单独使用jsp视图解析器时,可以取消掉注释,同时注释掉:下边的‘配置多个视图解析’配置-->
    <!--
    <bean class="org.springframework.web.servlet.view.InternalResourceViewResolver">
        <property name="prefix" value="/WEB-INF/view/"/>
        <property name="suffix" value=".jsp"/>
    </bean>
    -->

    <!-- 使用thymeleaf解析  -->
    <bean id="templateResolver" class="org.thymeleaf.spring5.templateresolver.SpringResourceTemplateResolver">
      <property name="prefix" value="/WEB-INF/templates/" />
      <!--<property name="suffix" value=".html" />-->
      <property name="templateMode" value="HTML" />
      <property name="characterEncoding" value="UTF-8"/>
      <property name="cacheable" value="false" />
    </bean>

    <bean id="templateEngine" class="org.thymeleaf.spring5.SpringTemplateEngine">
      <property name="templateResolver" ref="templateResolver" />
    </bean>

    <!--单独使用thymeleaf视图引擎时,可以取消掉注释,同时注释掉:下边的‘配置多个视图解析’配置 -->
    <!--
    <bean class="org.thymeleaf.spring5.view.ThymeleafViewResolver">
      <property name="templateEngine" ref="templateEngine" />
      <property name="characterEncoding" value="UTF-8"/>
    </bean>
    -->

    <!--  配置多个视图解析 参考:https://blog.csdn.net/qq_19408473/article/details/71214972-->
    <bean class="org.springframework.web.servlet.view.ContentNegotiatingViewResolver">
        <property name="viewResolvers">
            <!--
            此时,
            返回视图:return "abc.jsp" ,将使用jsp视图解析器,jsp的视图模板文件在/WEB-INF/views/下;
            返回视图:return "abc.html",将使用 thymeleaf视图解析器,thymeleaf的视图模板文件在/WEB-INF/templates/下。
            -->
            <list>
                <!--used thymeleaf  -->
                <bean class="org.thymeleaf.spring3.view.ThymeleafViewResolver">
                    <property name="characterEncoding" value="UTF-8"/>
                    <property name="templateEngine" ref="templateEngine" />
                    <property name="viewNames" value="*.html"/>
                    <property name="order" value="2" />
                </bean>
                <!-- used jsp -->
                <bean class="org.springframework.web.servlet.view.InternalResourceViewResolver">
                    <property name="prefix" value="/WEB-INF/views/"/>
                    <!--<property name="suffix" value=".jsp"/>-->
                    <property name="viewNames" value="*.jsp"/>
                    <property name="order" value="1" />
                </bean>
            </list>
        </property>
    </bean>
</beans>
注意:
1)上边配置文件包含了多视图解析器,支持jsp、thymeleaf两种视图解析器,关于多视图解析器配置以及使用方式请参考《springmvc 同时配置thymeleaf和jsp两种模板引擎》
2)实际上可以单独配置他们任意两种方式。
SpringMVC+Mybatis使用代码+注解方式整合
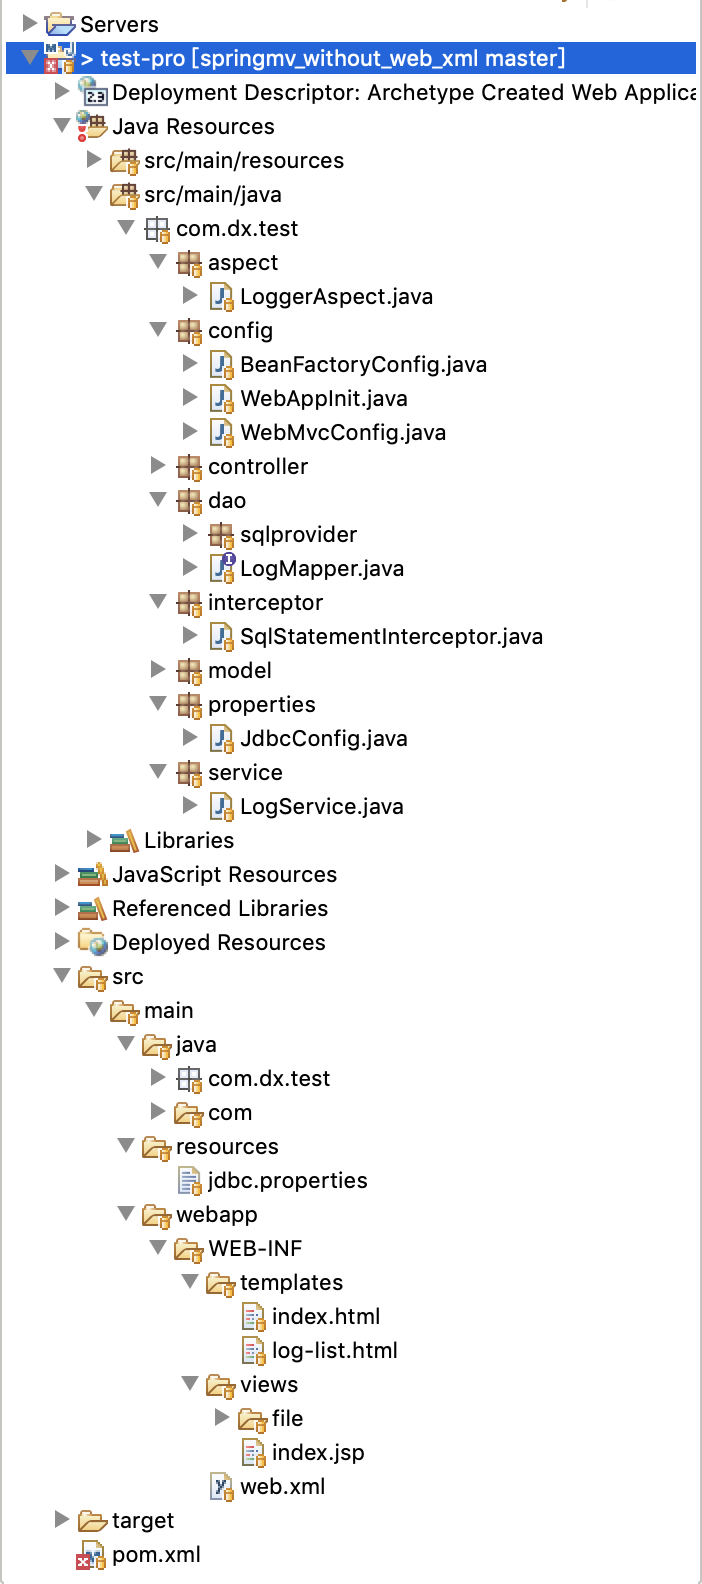
整体项目结构:
pom.xml如下:
<project xmlns="http://maven.apache.org/POM/4.0.0"
    xmlns:xsi="http://www.w3.org/2001/XMLSchema-instance"
    xsi:schemaLocation="http://maven.apache.org/POM/4.0.0 http://maven.apache.org/maven-v4_0_0.xsd">
    <modelVersion>4.0.0</modelVersion>
    <groupId>com.dx.test</groupId>
    <artifactId>test-pro</artifactId>
    <packaging>war</packaging>
    <version>0.0.1-SNAPSHOT</version>
    <name>test-pro Maven Webapp</name>
    <url>http://maven.apache.org</url>

    <properties>
        <project.build.sourceEncoding>UTF-8</project.build.sourceEncoding>
        <maven.compiler.source>1.8</maven.compiler.source>
        <maven.compiler.target>1.8</maven.compiler.target>
        <org.springframework.version>5.2.0.RELEASE</org.springframework.version>
        <com.alibaba.version>1.1.21</com.alibaba.version>
        <mysql.version>8.0.11</mysql.version>
        <org.mybatis.version>3.4.6</org.mybatis.version>
        <org.mybatis.spring.version>2.0.3</org.mybatis.spring.version>
        <org.aspectj.version>1.9.4</org.aspectj.version>
        <jackson.version>2.9.10.1</jackson.version>
    </properties>

    <dependencies>
        <dependency>
            <groupId>org.springframework</groupId>
            <artifactId>spring-web</artifactId>
            <version>${org.springframework.version}</version>
        </dependency>
        <dependency>
            <groupId>org.springframework</groupId>
            <artifactId>spring-webmvc</artifactId>
            <version>${org.springframework.version}</version>
        </dependency>
        <dependency>
            <groupId>org.springframework</groupId>
            <artifactId>spring-tx</artifactId>
            <version>${org.springframework.version}</version>
        </dependency>
        <dependency>
            <groupId>org.springframework</groupId>
            <artifactId>spring-jdbc</artifactId>
            <version>${org.springframework.version}</version>
        </dependency>
        <dependency>
            <groupId>org.springframework</groupId>
            <artifactId>spring-core</artifactId>
            <version>${org.springframework.version}</version>
        </dependency>
        <dependency>
            <groupId>org.springframework</groupId>
            <artifactId>spring-beans</artifactId>
            <version>${org.springframework.version}</version>
        </dependency>
        <dependency>
            <groupId>org.springframework</groupId>
            <artifactId>spring-context</artifactId>
            <version>${org.springframework.version}</version>
        </dependency>
        <dependency>
            <groupId>org.springframework</groupId>
            <artifactId>spring-context-support</artifactId>
            <version>${org.springframework.version}</version>
        </dependency>
        <dependency>
            <groupId>org.springframework</groupId>
            <artifactId>spring-aop</artifactId>
            <version>${org.springframework.version}</version>
        </dependency>

        <!--AOP aspectjweaver 支持 -->
        <dependency>
            <groupId>org.aspectj</groupId>
            <artifactId>aspectjweaver</artifactId>
            <version>${org.aspectj.version}</version>
        </dependency>
        <!-- https://mvnrepository.com/artifact/org.aspectj/aspectjrt -->
        <dependency>
            <groupId>org.aspectj</groupId>
            <artifactId>aspectjrt</artifactId>
            <version>${org.aspectj.version}</version>
        </dependency>

        <!-- https://mvnrepository.com/artifact/org.thymeleaf/thymeleaf -->
        <dependency>
            <groupId>org.thymeleaf</groupId>
            <artifactId>thymeleaf</artifactId>
            <version>3.0.9.RELEASE</version>
        </dependency>

        <!-- https://mvnrepository.com/artifact/org.thymeleaf/thymeleaf-spring5 -->
        <dependency>
            <groupId>org.thymeleaf</groupId>
            <artifactId>thymeleaf-spring5</artifactId>
            <version>3.0.9.RELEASE</version>
        </dependency>

        <!--访问RDBMS-MySQL依赖 -->
        <!--MyBatis -->
        <dependency>
            <groupId>org.mybatis</groupId>
            <artifactId>mybatis</artifactId>
            <version>${org.mybatis.version}</version>
        </dependency>
        <!-- Mybatis自身实现的Spring整合依赖 -->
        <dependency>
            <groupId>org.mybatis</groupId>
            <artifactId>mybatis-spring</artifactId>
            <version>${org.mybatis.spring.version}</version>
        </dependency>


        <!--MySql数据库驱动 -->
        <!-- https://mvnrepository.com/artifact/com.alibaba/druid -->
        <dependency>
            <groupId>com.alibaba</groupId>
            <artifactId>druid</artifactId>
            <version>${com.alibaba.version}</version>
        </dependency>
        <dependency>
            <groupId>mysql</groupId>
            <artifactId>mysql-connector-java</artifactId>
            <version>${mysql.version}</version>
        </dependency>

        <!--Rest Support支持 -->
        <dependency>
            <groupId>com.fasterxml.jackson.core</groupId>
            <artifactId>jackson-databind</artifactId>
            <version>${jackson.version}</version>
        </dependency>
        <dependency>
            <groupId>com.fasterxml.jackson.dataformat</groupId>
            <artifactId>jackson-dataformat-xml</artifactId>
            <version>${jackson.version}</version>
        </dependency>
        <dependency>
            <groupId>com.fasterxml.jackson.module</groupId>
            <artifactId>jackson-module-parameter-names</artifactId>
            <version>${jackson.version}</version>
        </dependency>

        <!--form 设置为enctype="multipart/form-data",多文件上传,在applicationContext.xml中配置了bean
            multipartResolver时,需要依赖该包。 -->
        <dependency>
            <groupId>commons-fileupload</groupId>
            <artifactId>commons-fileupload</artifactId>
            <version>1.4</version>
        </dependency>

        <dependency>
            <groupId>commons-io</groupId>
            <artifactId>commons-io</artifactId>
            <version>2.5</version>
        </dependency>

        <!-- 编译依赖 -->
        <dependency>
            <groupId>javax.servlet</groupId>
            <artifactId>javax.servlet-api</artifactId>
            <version>3.1.0</version>
        </dependency>
        <dependency>
            <groupId>jstl</groupId>
            <artifactId>jstl</artifactId>
            <version>1.2</version>
        </dependency>

        <!--日志支持 -->
        <dependency>
            <groupId>org.slf4j</groupId>
            <artifactId>slf4j-api</artifactId>
            <version>1.7.26</version>
        </dependency>
        <dependency>
            <groupId>org.slf4j</groupId>
            <artifactId>slf4j-log4j12</artifactId>
            <version>1.7.26</version>
        </dependency>
        <dependency>
            <groupId>log4j</groupId>
            <artifactId>log4j</artifactId>
            <version>1.2.17</version>
        </dependency>

        <dependency>
            <groupId>junit</groupId>
            <artifactId>junit</artifactId>
            <version>4.11</version>
            <scope>test</scope>
        </dependency>
    </dependencies>

    <build>
        <finalName>test-pro</finalName>
    </build>
</project>
替代web.xml的WebAppInit.java
public class WebAppInit extends AbstractAnnotationConfigDispatcherServletInitializer {
    @Override
    protected Class<?>[] getRootConfigClasses() {
        return new Class[] { BeanFactoryConfig.class };
    }

    @Override
    protected Class<?>[] getServletConfigClasses() {
        return new Class[] { WebMvcConfig.class };
    }

    @Override
    protected String[] getServletMappings() {
        return new String[] { "/" };
    }

    /**
     * 设置Multipart具体细节(必须)  <br>
     * 指定文件存放的临时路径 <br>
     * 上传文件最大容量  <br>
     * 整个请求的最大容量  <br>
     * 0表示将所有上传的文件写入到磁盘中 <br>
     */
    @Override
    protected void customizeRegistration(ServletRegistration.Dynamic registration) {
        registration.setMultipartConfig(new MultipartConfigElement("/Users/dz/temp", 20971520, 41943040, 0));
    }

    /**
      * 配置其他的 servlet 和 filter*/
     @Override
     public void onStartup(ServletContext servletContext) throws ServletException {
          FilterRegistration.Dynamic encodingFilter = servletContext.addFilter("encodingFilter", CharacterEncodingFilter.class);
          encodingFilter.setInitParameter("encoding", String.valueOf(StandardCharsets.UTF_8));
          encodingFilter.setInitParameter("forceEncoding", "true");
          encodingFilter.addMappingForUrlPatterns(null, false, "/*");

          FilterRegistration.Dynamic httpMethodFilter = servletContext.addFilter("hiddenHttpMethodFilter", HiddenHttpMethodFilter.class);
          httpMethodFilter.setInitParameter("method", "_method");
          httpMethodFilter.addMappingForUrlPatterns(null, false, "/*");

          FilterRegistration.Dynamic multipartFilter = servletContext.addFilter("multipartFilter", MultipartFilter.class);
          multipartFilter.setInitParameter("multipartResolverBeanName", "multipartResolver");
          multipartFilter.addMappingForUrlPatterns(null, false, "/*");

          super.onStartup(servletContext);
     }
}
备注:
1)getServletConfigClasses() 方法相当于web.xml中配置applicationContext-*.xml;
2)getServletMappings()方法相当于web.xml中配置${servlet-name}-servlet.xml。
3)customizeRegistration(..)中注册MutilPartConfigElement()是为了解决上传文件问题,否则上传文件会抛出异常:registration.setMultipartConfig(new MultipartConfigElement("/Users/dz/temp", 20971520, 41943040, 0));
4)另外在该配置文件中还注册了三个filter:multipartResolver、hiddenHttpMethodFilter、ecodingFilter。
替代applicationContext-*.xml的BeanFactoryConfig.java
@Configuration
@ComponentScan(basePackages = { "com.dx.test.service", "com.dx.test.properties" })
@MapperScans(value = { @MapperScan("com.dx.test.dao") })
@EnableTransactionManagement
public class BeanFactoryConfig {
    @Autowired
    private JdbcConfig jdbcConfig;

    @Bean
    public DataSource dataSource() {
        DruidDataSource druidDataSource = new DruidDataSource();
        druidDataSource.setUrl(jdbcConfig.getUrl());
        druidDataSource.setUsername(jdbcConfig.getUsername());
        druidDataSource.setPassword(jdbcConfig.getPassword());
        druidDataSource.setMaxActive(jdbcConfig.getPoolMaxActive());
        druidDataSource.setInitialSize(jdbcConfig.getPoolInit());
        druidDataSource.setMinIdle(jdbcConfig.getPoolMinIdle());

        return druidDataSource;
    }

    /**
     * mybatis plugin 打印执行sql
     * */
    @Bean
    public SqlStatementInterceptor sqlStatementInterceptor() {
        return new SqlStatementInterceptor();
    }

    @Bean
    public SqlSessionFactoryBean sqlSessionFactoryBean(DataSource dataSource) throws IOException {
        SqlSessionFactoryBean sqlSessionFactoryBean = new SqlSessionFactoryBean();
        sqlSessionFactoryBean.setDataSource(dataSource);
        sqlSessionFactoryBean.setTypeAliasesPackage("com.dx.test.model");
        // 添加mybatis plugin实现打印执行sql
        sqlSessionFactoryBean.setPlugins(sqlStatementInterceptor());

        // 动态获取SqlMapper
        PathMatchingResourcePatternResolver pathResource = new PathMatchingResourcePatternResolver();
        sqlSessionFactoryBean.setMapperLocations(pathResource.getResources("classpath*:/mappers/*.xml"));
        return sqlSessionFactoryBean;
    }

    @Bean
    public PlatformTransactionManager transactionManager(DataSource dataSource) {
        DataSourceTransactionManager transactionManager = new DataSourceTransactionManager();
        transactionManager.setDataSource(dataSource);
        return transactionManager;
    }

    // 配置MultipartResolver 解析器
    @Bean
    public MultipartResolver multipartResolver() {
        CommonsMultipartResolver multipartRe = new CommonsMultipartResolver();
        multipartRe.setMaxUploadSize(1024000000);
        multipartRe.setResolveLazily(true);
        multipartRe.setMaxInMemorySize(4096);
        multipartRe.setDefaultEncoding("UTF-8");// 设置默认字符集
//      try {
//            multipartRe.setUploadTempDir(new FileSystemResource("/tmp/spittr/uploads"));
//        } catch (IOException e) {
//            e.printStackTrace();
//        }

        return multipartRe;
    }
}
备注:
上边代码一共配置了一下信息:
1)MultipartResolver bean配置,在web.xml中添加的 multipartFilter 会依赖该配置;
2)SqlSessionFactoryBean bean配置,mybatis连接数据库使用,并且该bean内部配置mybatis的配置:dataSource/typeAliasesPackage/puglins/mybatis的mapper配置文件路径:classpath*:/mappers/*.xml,注意:plugins下注入了bean(SqlStatementInterceptor是一个mybatis的plugin),其他代码:
/**
 * 数据库操作性能拦截器,记录耗时
 * 来自:https://blog.csdn.net/sys1159378858/article/details/84665653
 */
@Intercepts(value = {
        @Signature(type = Executor.class, method = "update", args = { MappedStatement.class, Object.class }),
        @Signature(type = Executor.class, method = "query", args = { MappedStatement.class, Object.class,
                RowBounds.class, ResultHandler.class, CacheKey.class, BoundSql.class }),
        @Signature(type = Executor.class, method = "query", args = { MappedStatement.class, Object.class,
                RowBounds.class, ResultHandler.class }) })
public class SqlStatementInterceptor implements Interceptor {
    private static Logger logger = Logger.getLogger(SqlStatementInterceptor.class);
    private Properties properties;

    @Override
    public Object intercept(Invocation invocation) throws Throwable {
        Object returnValue;
        long start = System.currentTimeMillis();
        returnValue = invocation.proceed();
        long end = System.currentTimeMillis();
        long time = end - start;
        try {
            final Object[] args = invocation.getArgs();
            // 获取原始的ms
            MappedStatement ms = (MappedStatement) args[0];
            Object parameter = null;
            // 获取参数,if语句成立,表示sql语句有参数,参数格式是map形式
            if (invocation.getArgs().length > 1) {
                parameter = invocation.getArgs()[1];
            }
            String sqlId = ms.getId();// 获取到节点的id,即sql语句的id
            BoundSql boundSql = ms.getBoundSql(parameter); // BoundSql就是封装myBatis最终产生的sql类
            Configuration configuration = ms.getConfiguration(); // 获取节点的配置
            String sql = getSql(configuration, boundSql, sqlId, time); // 获取到最终的sql语句
            logger.error(sql);
            logger.warn(sql);
            System.out.println(sql);
        } catch (Exception e) {
            logger.error("拦截sql处理出差" + e.getMessage());
            e.printStackTrace();
        }
        return returnValue;
    }

    // 封装了一下sql语句,使得结果返回完整xml路径下的sql语句节点id + sql语句
    public static String getSql(Configuration configuration, BoundSql boundSql, String sqlId, long time) {
        String sql = showSql(configuration, boundSql);
        StringBuilder str = new StringBuilder(100);
        str.append("============================begin【sql】================================\n");
        str.append(sqlId);
        str.append(":耗时【");
        str.append(time);
        str.append("】毫秒");
        str.append(sql);
        str.append("\n============================end【sql】================================");
        return str.toString();
    }

    /* <br> *如果参数是String,则添加单引号, 如果是日期,则转换为时间格式器并加单引号; 对参数是null和不是null的情况作了处理<br> */
    private static String getParameterValue(Object obj) {
        String value = null;
        if (obj instanceof String) {
            value = "'" + obj.toString() + "'";
        } else if (obj instanceof Date) {
            DateFormat formatter = DateFormat.getDateTimeInstance(DateFormat.DEFAULT, DateFormat.DEFAULT, Locale.CHINA);
            value = "'" + formatter.format(new Date()) + "'";
        } else {
            if (obj != null) {
                value = obj.toString();
            } else {
                value = "";
            }

        }
        return value;
    }

    // 进行?的替换
    public static String showSql(Configuration configuration, BoundSql boundSql) {
        Object parameterObject = boundSql.getParameterObject(); // 获取参数
        List<ParameterMapping> parameterMappings = boundSql.getParameterMappings();
        String sql = boundSql.getSql().replaceAll("[\\s]+", " "); // sql语句中多个空格都用一个空格代替
        if (!CollectionUtils.isEmpty(parameterMappings) && parameterObject != null) {
            TypeHandlerRegistry typeHandlerRegistry = configuration.getTypeHandlerRegistry(); // 获取类型处理器注册器,类型处理器的功能是进行java类型和数据库类型的转换<br>
                                                                                                // //
                                                                                                // 如果根据parameterObject.getClass()可以找到对应的类型,则替换
            if (typeHandlerRegistry.hasTypeHandler(parameterObject.getClass())) {
                sql = sql.replaceFirst("\\?", Matcher.quoteReplacement(getParameterValue(parameterObject)));

            } else {
                MetaObject metaObject = configuration.newMetaObject(parameterObject);// MetaObject主要是封装了originalObject对象,提供了get和set的方法用于获取和设置originalObject的属性值,主要支持对JavaBean、Collection、Map三种类型对象的操作
                for (ParameterMapping parameterMapping : parameterMappings) {
                    String propertyName = parameterMapping.getProperty();
                    if (metaObject.hasGetter(propertyName)) {
                        Object obj = metaObject.getValue(propertyName);
                        sql = sql.replaceFirst("\\?", Matcher.quoteReplacement(getParameterValue(obj)));
                    } else if (boundSql.hasAdditionalParameter(propertyName)) {
                        Object obj = boundSql.getAdditionalParameter(propertyName); // 该分支是动态sql
                        sql = sql.replaceFirst("\\?", Matcher.quoteReplacement(getParameterValue(obj)));
                    } else {
                        sql = sql.replaceFirst("\\?", "缺失");
                    } // 打印出缺失,提醒该参数缺失并防止错位
                }
            }
        }
        return sql;
    }

    @Override
    public Object plugin(Object arg0) {
        return Plugin.wrap(arg0, this);
    }

    @Override
    public void setProperties(Properties arg0) {
        this.properties = arg0;
    }
}
更多信息请查阅:《SpringMVC打印完整SQL并记录SQL耗时》。
3)transactionManager,事务管理器;
4)JdbcConfig是注入的bean对象,用来加载jdbc.properties配置文件内容。具体代码:
@Component
@Configuration
@PropertySource(value = {"classpath:jdbc.properties"})
public class JdbcConfig {
    @Value("${jdbc.driver}")
    private String driver;
    @Value("${jdbc.url}")
    private String url;
    @Value("${jdbc.username}")
    private String username;
    @Value("${jdbc.password}")
    private String password;
    @Value("${jdbc.pool.init}")
    private int poolInit;
    @Value("${jdbc.pool.minIdle}")
    private int poolMinIdle;
    @Value("${jdbc.pool.maxActive}")
    private int poolMaxActive;
    @Value("${jdbc.testSql}")
    private String testSql;

    public String getDriver() {
        return driver;
    }

    public String getUrl() {
        return url;
    }

    public String getUsername() {
        return username;
    }

    public String getPassword() {
        return password;
    }

    public int getPoolInit() {
        return poolInit;
    }

    public int getPoolMinIdle() {
        return poolMinIdle;
    }

    public int getPoolMaxActive() {
        return poolMaxActive;
    }

    public String getTestSql() {
        return testSql;
    }

    /**
     * <!-- 数据库配置文件位置 -->
     * <context:property-placeholder location="classpath:jdbc.properties" />
     * 更多信息请参考:https://blog.csdn.net/wrs120/article/details/84554366
     * */
//    @Bean
//    public static PropertySourcesPlaceholderConfigurer propertySourcesPlaceholderConfigurer() {
//        return new PropertySourcesPlaceholderConfigurer();
//    }
}
/src/main/resources/jdbc.properties:
#jdbc settings
jdbc.driver=com.mysql.cj.jdbc.Driver
jdbc.url=jdbc:mysql://localhost:3306/mydb?useUnicode=true&characterEncoding=utf8&serverTimezone=GMT%2B8&useSSL=false
jdbc.username=root
jdbc.password=123456

#pool settings
jdbc.pool.init=1
jdbc.pool.minIdle=3
jdbc.pool.maxActive=20

#jdbc.testSql=SELECT 'x'
jdbc.testSql=SELECT 'x' FROM DUAL
5)类上通过注解方式指定了mybatis的model类,service;
6)类上通过@EnableTransactionManagement开启了事务管理。
替代${serlvet-name}-servlet.xml的WebMvcConfig.java
@Configuration
@EnableWebMvc
@ComponentScans(value = { @ComponentScan("com.dx.test.controller"), @ComponentScan("com.dx.test.aspect") })
@EnableAspectJAutoProxy(proxyTargetClass = true)
public class WebMvcConfig implements WebMvcConfigurer {
    // https://blog.csdn.net/tianjun2012/article/details/47809739
    @Bean
    public LoggerAspect loggerAspect() {
        return new LoggerAspect();
    }

    // 日期输出格式化
    @Override
    public void configureMessageConverters(List<HttpMessageConverter<?>> converters) {
        Jackson2ObjectMapperBuilder builder = new Jackson2ObjectMapperBuilder().indentOutput(true)
                .dateFormat(new SimpleDateFormat("yyyy-MM-dd HH:mm:ss")).modulesToInstall(new ParameterNamesModule());

        converters.add(new MappingJackson2HttpMessageConverter(builder.build()));
        converters.add(new MappingJackson2XmlHttpMessageConverter(builder.createXmlMapper(true).build()));
    }

    // 解决静态资源加载问题
    @Override
    public void addResourceHandlers(ResourceHandlerRegistry registry) {
        registry.addResourceHandler("/static/**").addResourceLocations("/static/").setCachePeriod(3000);
    }

    // 接收格式控制
    @Override
    public void addFormatters(FormatterRegistry registry) {
        registry.addFormatter(new DateFormatter("yyyy-MM-dd HH:mm:ss"));
    }

    /**
     * 下面三个bean 配置 Thymeleaf 模板
     */
    @Bean
    public SpringResourceTemplateResolver templateResolver() {
        SpringResourceTemplateResolver templateResolver = new SpringResourceTemplateResolver();
        templateResolver.setPrefix("/WEB-INF/templates/");
        //templateResolver.setSuffix(".html");
        templateResolver.setTemplateMode(TemplateMode.HTML);
        templateResolver.setCharacterEncoding(String.valueOf(StandardCharsets.UTF_8));
        templateResolver.setCacheable(false);
        return templateResolver;
    }

    @Bean
    public TemplateEngine templateEngine(SpringResourceTemplateResolver templateResolver) {
        SpringTemplateEngine templateEngine = new SpringTemplateEngine();
        templateEngine.setTemplateResolver(templateResolver);
        return templateEngine;
    }

    //@Bean
    public ViewResolver viewResolver(TemplateEngine templateEngine) {
        ThymeleafViewResolver viewResolver = new ThymeleafViewResolver();
        viewResolver.setTemplateEngine((ISpringTemplateEngine) templateEngine);
        viewResolver.setCharacterEncoding(String.valueOf(StandardCharsets.UTF_8));
        viewResolver.setViewNames(new String[] {"*.html"});
        viewResolver.setOrder(1);
        return viewResolver;
    }

    // 配置jsp 视图解析器
    //@Bean
    public ViewResolver viewResolver() {
        InternalResourceViewResolver resolver = new InternalResourceViewResolver();
        resolver.setPrefix("/WEB-INF/views/");// 设置预加载路径/目录
        //resolver.setSuffix(".jsp"); // 设置允许后缀 //返回时也自动匹配到该后缀
        resolver.setExposeContextBeansAsAttributes(true);
        resolver.setViewNames("*.jsp");
        resolver.setOrder(2);
        return resolver;
    }

    // 参考:https://blog.csdn.net/qq_19408473/article/details/71214972
    @Bean
    public ContentNegotiatingViewResolver viewResolvers(){
        ContentNegotiatingViewResolver contentNegotiatingViewResolver=new ContentNegotiatingViewResolver();

        List<ViewResolver> viewResolverList=new ArrayList<ViewResolver>();
        // <!--used thymeleaf  -->
        viewResolverList.add(viewResolver(templateEngine(templateResolver())));
        // <!-- used jsp -->
        viewResolverList.add(viewResolver());

        contentNegotiatingViewResolver.setViewResolvers(viewResolverList);

        return contentNegotiatingViewResolver;
    }
}
注意:
1)@EnableAspectJAutoProxy(proxyTargetClass = true)+bean loggerAspect()实现注入AspectJ,LoggerAspect用来拦截各个controller的方法,在方法调用前后打印参数信息:
// 来自:https://www.cnblogs.com/qinglangyijiu/p/8425653.html
/**
 * 切面通知包含:<br>
 * 前置通知(@Before,在执行方法之前,参数为JoinPoint)<br>
 * 后置通知(@After,无论方法抛不抛异常都会执行,所以获取不到方法的返回值。参数为JoinPoint)<br>
 * 返回通知(@AfterReturning,在方法正常结束后执行,可以获取到方法的返回值。参数为JoinPoint和result(Object))<br>
 * 异常通知(@AfterThrowing,在方法抛出异常时执行,可以获取到异常对象,且可以指定在出现特定异常时执行的代码,参数为JoinPoint何Exception)<br>
 * 环绕通知(@Around,环绕通知需要携带的类型为ProceedingJoinPoint类型的参数,
 * 环绕通知包含前置、后置、返回、异常通知;ProceedingJoinPoin
 * 类型的参数可以决定是否执行目标方法,且环绕通知必须有返回值,返回值即目标方法的返回值)<br>
 */
@Aspect // 该标签把LoggerAspect类声明为一个切面
@Order(1) // 设置切面的优先级:如果有多个切面,可通过设置优先级控制切面的执行顺序(数值越小,优先级越高)
@Component // 该标签把LoggerAspect类放到IOC容器中
public class LoggerAspect {
    /**
     * 定义一个方法,用于声明切入点表达式,方法中一般不需要添加其他代码 使用@Pointcut声明切入点表达式
     * 后面的通知直接使用方法名来引用当前的切点表达式;如果是其他类使用,加上包名即可
     */
    @Pointcut("execution(public * com.dx.test.controller.*Controller.*(..))")
    //@Pointcut("execution(* com.dx.test.controller.*.*(..))")
    public void declearJoinPointExpression() {

    }

    /**
     * 前置通知
     *
     * @param joinPoint
     */
    @Before("declearJoinPointExpression()") // 该标签声明次方法是一个前置通知:在目标方法开始之前执行
    public void beforMethod(JoinPoint joinPoint) {
        String methodName = joinPoint.getSignature().getName();
        List<Object> args = Arrays.asList(joinPoint.getArgs());
        System.out.println("this method " + methodName + " begin. param<" + args + ">");
    }

    /**
     * 后置通知(无论方法是否发生异常都会执行,所以访问不到方法的返回值)
     *
     * @param joinPoint
     */
    @After("declearJoinPointExpression()")
    public void afterMethod(JoinPoint joinPoint) {
        String methodName = joinPoint.getSignature().getName();
        System.out.println("this method " + methodName + " end.");
    }

    /**
     * 返回通知(在方法正常结束执行的代码) 返回通知可以访问到方法的返回值!
     *
     * @param joinPoint
     */
    @AfterReturning(value = "declearJoinPointExpression()", returning = "result")
    public void afterReturnMethod(JoinPoint joinPoint, Object result) {
        String methodName = joinPoint.getSignature().getName();
        System.out.println("this method " + methodName + " end.result<" + result + ">");
    }

    /**
     * 异常通知(方法发生异常执行的代码) 可以访问到异常对象;且可以指定在出现特定异常时执行的代码
     *
     * @param joinPoint
     * @param ex
     */
    @AfterThrowing(value = "declearJoinPointExpression()", throwing = "ex")
    public void afterThrowingMethod(JoinPoint joinPoint, Exception ex) {
        String methodName = joinPoint.getSignature().getName();
        System.out.println("this method " + methodName + " end.ex message<" + ex + ">");
    }

    /**
     * 环绕通知(需要携带类型为ProceedingJoinPoint类型的参数) 环绕通知包含前置、后置、返回、异常通知;ProceedingJoinPoin
     * 类型的参数可以决定是否执行目标方法 且环绕通知必须有返回值,返回值即目标方法的返回值
     *
     * @param point
     */
    @Around(value = "declearJoinPointExpression()")
    public Object aroundMethod(ProceedingJoinPoint point) {
        Object result = null;
        String methodName = point.getSignature().getName();
        try {
            // 前置通知
            System.out.println("The method " + methodName + " start. param<" + Arrays.asList(point.getArgs()) + ">");
            // 执行目标方法
            result = point.proceed();
            // 返回通知
            System.out.println("The method " + methodName + " end. result<" + result + ">");
        } catch (Throwable e) {
            // 异常通知
            System.out.println("this method " + methodName + " end.ex message<" + e + ">");
            throw new RuntimeException(e);
        }
        // 后置通知
        System.out.println("The method " + methodName + " end.");
        return result;
    }
}
具体请参考:《springmvc配置AOP的两种方式》
2)@EnableSpringMvc:注解的类自身来实现WebMvcConfigurer接口,然后在该类中重写需要覆盖的默认配置所对应的方法或者添加相关配置。
3)@Configuration:用于定义配置类,可替换xml配置文件,被注解的类内部包含有一个或多个被@Bean注解的方法,这些方法将会被AnnotationConfigApplicationContext或AnnotationConfigWebApplicationContext类进行扫描,并用于构建bean定义,初始化Spring容器。
4)@ComponentScans用来自动扫描加载bean,这里自动扫描的aspect类所在包和controller包。
5)bean viewResolvers()中注解了两个视图解析器:jsp、thymeleaf。注解中隐含的意思:
5.1)当访问controller方法中返回视图的名字后缀是*.jsp时,会去/WEB-INF/views下加载解析该视图x.jsp。
5.2)当访问controller方法中返回视图的名字后缀是*.html时,会去/WEB-INF/templates下加载解析该视图x.html。
对于SpringMVC+Mybatis整合应用测试:
初始化数据库:
新建mydb的mysql库,新建表:
CREATE TABLE `log` (
  `id` bigint(11) NOT NULL AUTO_INCREMENT COMMENT '自增id',
  `title` varchar(256) CHARACTER SET utf8 COLLATE utf8_general_ci NOT NULL COMMENT '日志标题',
  `content` text CHARACTER SET utf8 COLLATE utf8_general_ci COMMENT '日志内容',
  `module_type` varchar(32) NOT NULL COMMENT '模块类型',
  `operate_type` varchar(32) NOT NULL COMMENT '操作类型',
  `data_id` varchar(64) NOT NULL COMMENT '操作数据记录id',
  `create_time` datetime NOT NULL COMMENT '日志记录时间',
  `create_user` varchar(64) CHARACTER SET utf8 COLLATE utf8_general_ci NOT NULL COMMENT '操作人',
  `create_user_id` varchar(64) NOT NULL COMMENT '操作人id',
  PRIMARY KEY (`id`)
) ENGINE=InnoDB AUTO_INCREMENT=104 DEFAULT CHARSET=utf8
添加model/dao/service/controller/视图文件/配置web.xml
1)添加model
ModuleType.java
public enum ModuleType {
    Unkown(0),
    /**
     * 文章模块
     */
    Article_Module(1),
    /**
     * 文章分类模块
     **/
    Article_Category_Module(2),
    /**
     * 配置模块
     */
    Settings_Module(3);

    private int value;

    ModuleType(int value) {
        this.value = value;
    }

    public int getValue() {
        return this.value;
    }
}
OperateType.java
public enum OperateType {
    /**
     * 如果0未占位,可能会出现错误。
     * */
    Unkown(0),
    /**
     * 新增
     */
    Create(1),
    /**
     * 修改
     */
    Modify(2),
    /**
     * 删除
     */
    Delete(3),
    /**
     * 查看
     */
    View(4),
    /**
     * 作废
     */
    UnUsed(5);

    private int value;

    OperateType(int value) {
        this.value = value;
    }

    public int getValue() {
        return this.value;
    }
}
Log.java
public class Log {
    private Long id; // 自增id
    private String title;// 日志msg
    private ModuleType moduleType;// 日志归属模块
    private OperateType operateType; // 日志操作类型
    private String dataId; // 操作数据id
    private String content; // 日志内容简介
    private Date createTime; // 新增时间
    private String createUser; // 新增人
    private String createUserId; // 新增人id

    public Long getId() {
        return id;
    }

    public void setId(Long id) {
        this.id = id;
    }

    public String getTitle() {
        return title;
    }

    public void setTitle(String title) {
        this.title = title;
    }

    public ModuleType getModuleType() {
        return moduleType;
    }

    public void setModuleType(ModuleType moduleType) {
        this.moduleType = moduleType;
    }

    public OperateType getOperateType() {
        return operateType;
    }

    public void setOperateType(OperateType operateType) {
        this.operateType = operateType;
    }

    public String getDataId() {
        return dataId;
    }

    public void setDataId(String dataId) {
        this.dataId = dataId;
    }

    public String getContent() {
        return content;
    }

    public void setContent(String content) {
        this.content = content;
    }

    public Date getCreateTime() {
        return createTime;
    }

    public void setCreateTime(Date createTime) {
        this.createTime = createTime;
    }

    public String getCreateUser() {
        return createUser;
    }

    public void setCreateUser(String createUser) {
        this.createUser = createUser;
    }

    public String getCreateUserId() {
        return createUserId;
    }

    public void setCreateUserId(String createUserId) {
        this.createUserId = createUserId;
    }

    @Override
    public String toString() {
        return "Log [id=" + id + ", title=" + title + ", moduleType=" + moduleType + ", operateType=" + operateType
                + ", dataId=" + dataId + ", content=" + content + ", createTime=" + createTime + ", createUser="
                + createUser + ", createUserId=" + createUserId + "]";
    }

}
ArticleModel.java
/**
 * 文章内容
 */
public class ArticleModel implements Serializable {
    private static final long serialVersionUID = 1L;
    private Long id;
    private Long categoryId;
    private String title;
    private String content;

    private Date createTime;
    private String createUser;
    private String createUserId;
    private Date modifyTime;
    private String modifyUser;
    private String modifyUserId;

    public ArticleModel() {
    }

    public ArticleModel(Long id, Long categoryId, String title, String content) {
        this.id = id;
        this.categoryId = categoryId;
        this.title = title;
        this.content = content;
    }

    /**
     * @return the id
     */
    public Long getId() {
        return id;
    }

    /**
     * @param id the id to set
     */
    public void setId(Long id) {
        this.id = id;
    }

    /**
     * @return the categoryId
     */
    public Long getCategoryId() {
        return categoryId;
    }

    /**
     * @param categoryId the categoryId to set
     */
    public void setCategoryId(Long categoryId) {
        this.categoryId = categoryId;
    }

    /**
     * @return the title
     */
    public String getTitle() {
        return title;
    }

    /**
     * @param title the title to set
     */
    public void setTitle(String title) {
        this.title = title;
    }

    /**
     * @return the content
     */
    public String getContent() {
        return content;
    }

    /**
     * @param content the content to set
     */
    public void setContent(String content) {
        this.content = content;
    }

    /**
     * @return the createTime
     */
    public Date getCreateTime() {
        return createTime;
    }

    /**
     * @param createTime the createTime to set
     */
    public void setCreateTime(Date createTime) {
        this.createTime = createTime;
    }

    /**
     * @return the createUser
     */
    public String getCreateUser() {
        return createUser;
    }

    /**
     * @param createUser the createUser to set
     */
    public void setCreateUser(String createUser) {
        this.createUser = createUser;
    }

    /**
     * @return the createUserId
     */
    public String getCreateUserId() {
        return createUserId;
    }

    /**
     * @param createUserId the createUserId to set
     */
    public void setCreateUserId(String createUserId) {
        this.createUserId = createUserId;
    }

    /**
     * @return the modifyTime
     */
    public Date getModifyTime() {
        return modifyTime;
    }

    /**
     * @param modifyTime the modifyTime to set
     */
    public void setModifyTime(Date modifyTime) {
        this.modifyTime = modifyTime;
    }

    /**
     * @return the modifyUser
     */
    public String getModifyUser() {
        return modifyUser;
    }

    /**
     * @param modifyUser the modifyUser to set
     */
    public void setModifyUser(String modifyUser) {
        this.modifyUser = modifyUser;
    }

    /**
     * @return the modifyUserId
     */
    public String getModifyUserId() {
        return modifyUserId;
    }

    /**
     * @param modifyUserId the modifyUserId to set
     */
    public void setModifyUserId(String modifyUserId) {
        this.modifyUserId = modifyUserId;
    }

    @Override
    public String toString() {
        return "ArticleModel{" +
                "id=" + id +
                ", categoryId=" + categoryId +
                ", title='" + title + '\'' +
                ", content='" + content + '\'' +
                '}';
    }
}
2)添加dao
LogSqlProvider.java
public class LogSqlProvider {
    /**
     * 生成插入日志SQL
     * @param log 日志实体
     * @return 插入日志SQL
     * */
    public String insert(Log log) {
        return new SQL() {
            {
                INSERT_INTO("log");
                INTO_COLUMNS("title", "module_type", "operate_type","data_id", "content", "create_time","create_user","create_user_id");
                INTO_VALUES("#{title}", "#{moduleType,typeHandler=org.apache.ibatis.type.EnumOrdinalTypeHandler}", "#{operateType,typeHandler=org.apache.ibatis.type.EnumOrdinalTypeHandler}","#{dataId}", "#{content}", "now()","#{createUser}","#{createUserId}");
            }
        }.toString();
    }


}
LogMapper.java
@Mapper
public interface LogMapper {
    /**
     * 入库日志
     *
     * @param log 待入库实体
     * @return 影响条数
     */
    @Options(useCache = true, flushCache = Options.FlushCachePolicy.TRUE, useGeneratedKeys = true, keyProperty = "id", keyColumn = "id")
    @InsertProvider(type = LogSqlProvider.class, method = "insert")
    public int insert(Log log);

    /**
     * 根据文章id,查询日志详情
     *
     * @param id 日志id
     * @return 返回查询到的日志详情
     */
    @Options(useCache = true, flushCache = Options.FlushCachePolicy.FALSE, timeout = 60000)
    @Results(id = "logResult", value = {
            @Result(property = "id", column = "id", id = true),
            @Result(property = "title", column = "title"),
            @Result(property = "content", column = "content"),
            @Result(property = "moduleType", column = "module_type", javaType = ModuleType.class,typeHandler = EnumOrdinalTypeHandler.class),
            @Result(property = "operateType", column = "operate_type", javaType = OperateType.class,typeHandler = EnumOrdinalTypeHandler.class),
            @Result(property = "dataId", column = "data_id"),
            @Result(property = "createUser", column = "create_user"),
            @Result(property = "createUserId", column = "create_user_id"),
            @Result(property = "createTime", column = "create_time")
            })
    @Select({ "select * from `log` where `id`=#{id}" })
    Log getById(@Param("id") Long id);

    @Options(useCache = true, flushCache = Options.FlushCachePolicy.FALSE, timeout = 60000)
    @ResultMap("logResult")
    @Select({ "select * from `log` " })
    List<Log> getList();

    @Options(useCache = true, flushCache = Options.FlushCachePolicy.FALSE, timeout = 60000)
    @ResultMap("logResult")
    @Select({ "select * from `log` where `id`<#{log.id}" })
    List<Log> getListWithPager(@Param("log")Log log,@Param("pageNum") int pageNum,@Param("pageSize") int pageSize);
}
3)添加service
LogService.java
@Service
public class LogService {
    @Autowired
    private LogMapper logMapper;

    public int insert(Log log) {
        return this.logMapper.insert(log);
    }

    public Log getById(Long id) {
        return this.logMapper.getById(id);
    }

    public List<Log> getList() {
        return this.logMapper.getList();
    }

    public List<Log> getListWithPager(Log log, int pageNum, int pageSize) {
        return this.logMapper.getListWithPager(log, pageNum, pageSize);
    }
}
4)添加controller
HomeController.java
@Controller
public class HomeController {
    @Autowired
    private LogService logService;

    /**
     * 测试:走 Jsp 视图引擎,去/WEB-INF/views/下找 index.jsp 视图
     * */
    @RequestMapping(value = "/", method = RequestMethod.GET)
    public String def() {
        return "index.jsp";
    }
    /**
     * 测试:走 Jsp 视图引擎,去/WEB-INF/views/下找 index.jsp 视图
     * */
    @RequestMapping(value = "/index", method = RequestMethod.GET)
    public String index() {
        return "index.jsp";
    }

    /**
     * 测试:走 Thymeleaf 视图引擎
     * */
    @RequestMapping(value="/log-list",method = RequestMethod.GET)
    public ModelAndView logList(Map<String, Object> map) {
        ModelAndView mView=new ModelAndView();
        mView.setViewName("log-list.html");
        mView.addObject("logs", logService.getList());

        return mView;
    }
}
FileController.java
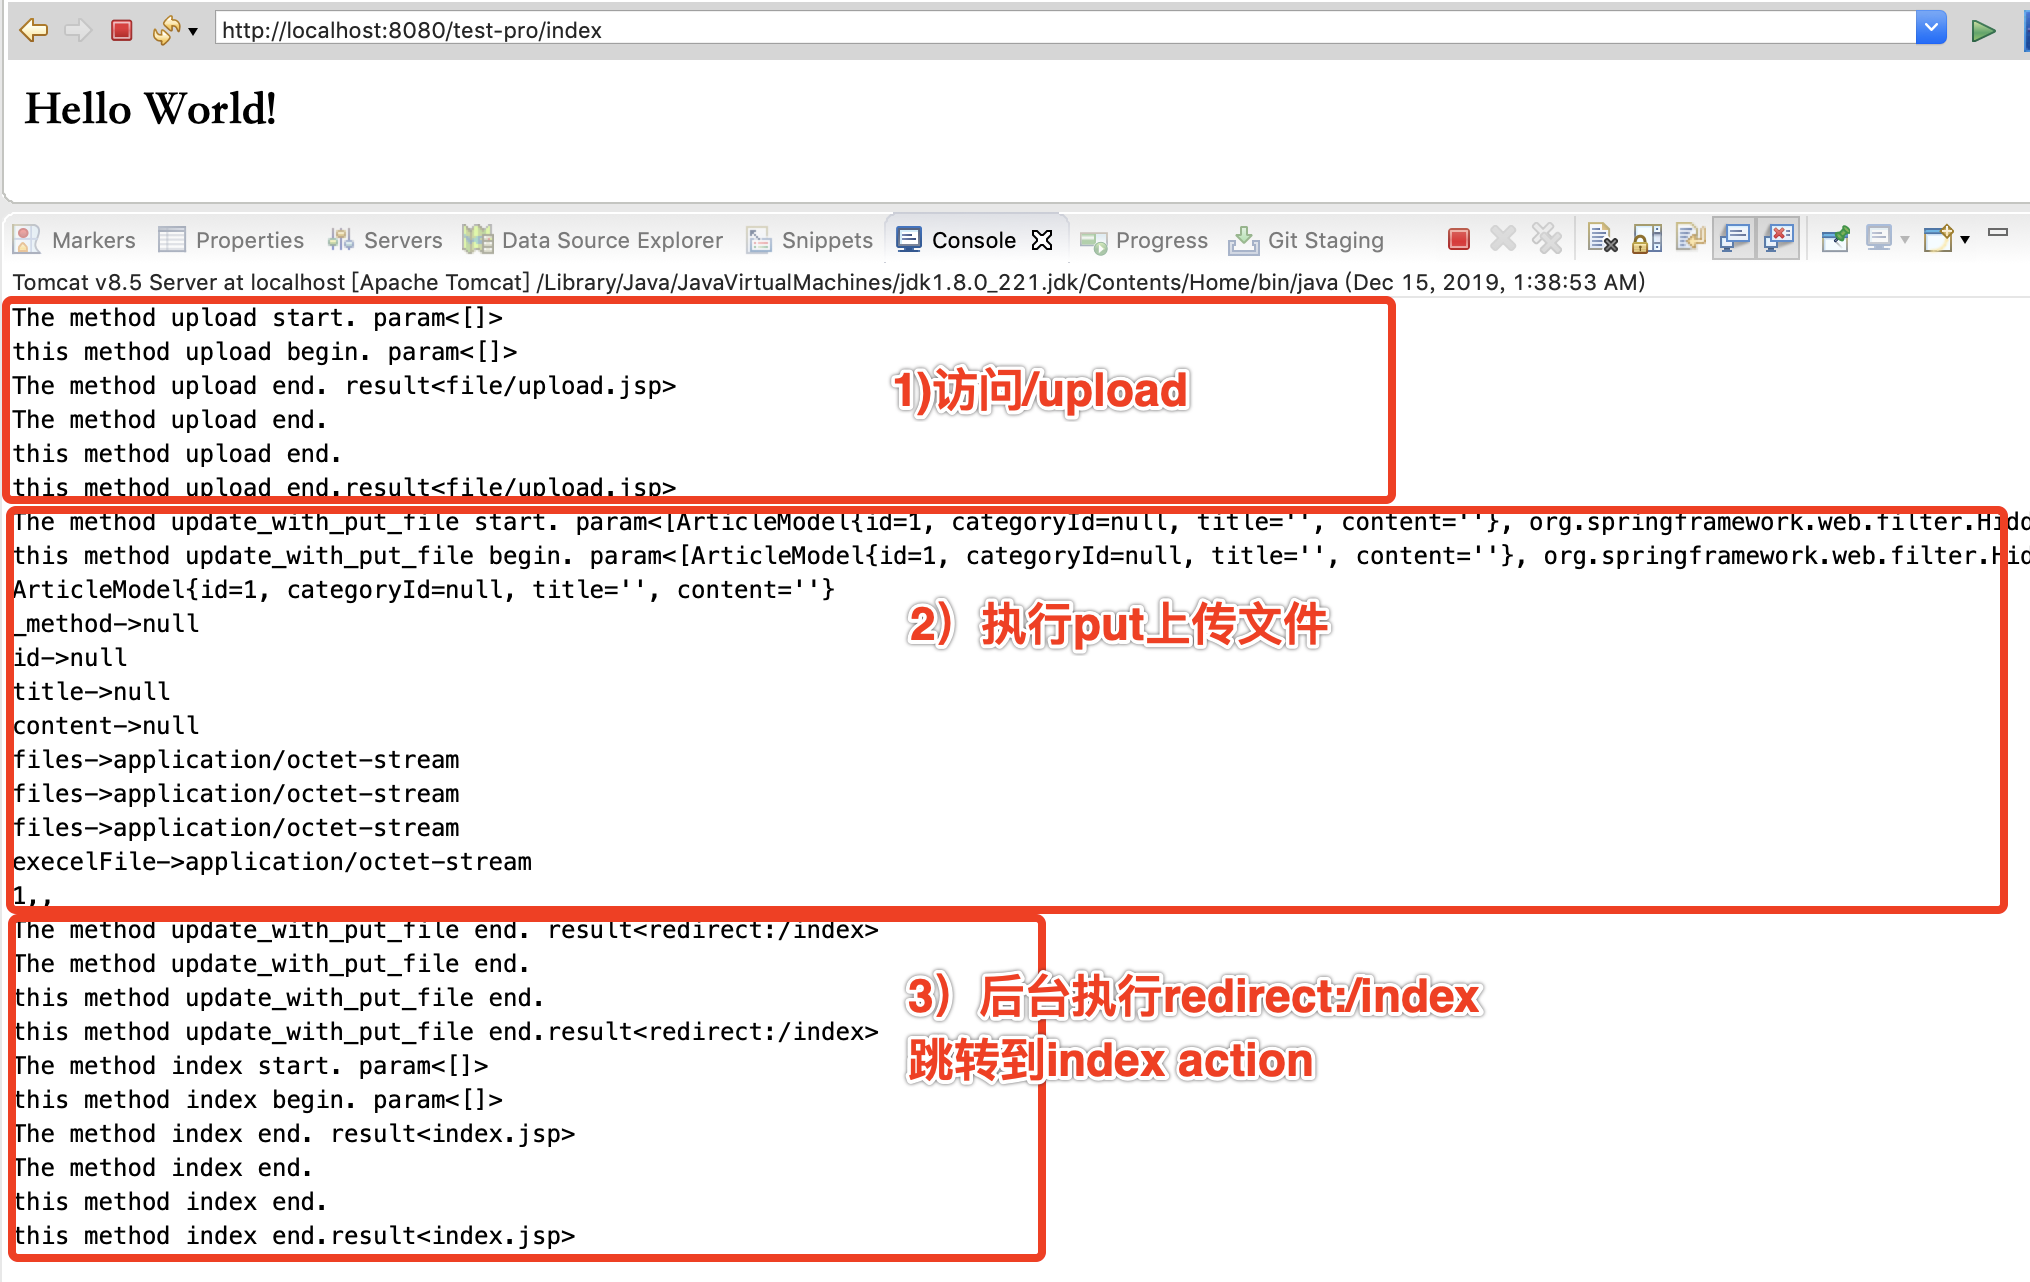
@Controller
public class FileController {
    /**
     * 测试:走 Jsp 视图引擎,去/WEB-INF/views/下找 index.jsp 视图
     * */
    @RequestMapping(value = "/upload", method = RequestMethod.GET)
    public String upload() {
        return "file/upload.jsp";
    }

    /**
     * 测试:走 Jsp 视图引擎,去/WEB-INF/views/下找 index.jsp 视图
     * */
    // 参考:https://blog.csdn.net/qq_27607965/article/details/80332467
    @RequestMapping(value = "/update_with_put_file", method = RequestMethod.PUT)
    //@ResponseBody
    public String update_with_put_file(@ModelAttribute(value = "article") ArticleModel article, HttpServletRequest request) throws IOException, ServletException {
        System.out.println(article);
        Collection<Part> parts = request.getParts();
        for (Part part : parts) {
            System.out.println(part.getName() + "->" + part.getContentType());
        }

        String id = request.getParameter("id");
        String title = request.getParameter("title");
        String content = request.getParameter("content");
        System.out.println(String.format("%s,%s,%s", id, title, content));

        return "redirect:/index";
    }

    /**
     * 测试:走 Jsp 视图引擎,去/WEB-INF/views/下找 index.jsp 视图
     * */
    @RequestMapping(value = "/update_with_post_file", method = RequestMethod.POST)
    public String update_with_post_file(@ModelAttribute(value = "article") ArticleModel article, HttpServletRequest request) throws IOException, ServletException {
        System.out.println(article);
        Collection<Part> parts = request.getParts();
        for (Part part : parts) {
            System.out.println(part.getName() + "->" + part.getContentType());
        }

        String id = request.getParameter("id");
        String title = request.getParameter("title");
        String content = request.getParameter("content");
        System.out.println(String.format("%s,%s,%s", id, title, content));

        return "index.jsp";
    }
}
LogController.java
@RestController
@RequestMapping("/api/v1")
public class LogController {
    @Autowired
    private LogService logService;

    @RequestMapping(value = "/logs", method = RequestMethod.GET)
    @ResponseBody
    public List<Log> getAll() {
        return logService.getList();
    }

    @RequestMapping(value = "/log/{id}", method = RequestMethod.GET)
    @ResponseBody
    public Log getById(Long id) {
        return this.logService.getById(id);
    }

    @RequestMapping(value = "/log/create", method = RequestMethod.GET)
    @ResponseBody
    public int create() {
        Log log = new Log();
        log.setTitle("test log title");
        log.setContent("test log content");
        log.setModuleType(ModuleType.Article_Module);
        log.setOperateType(OperateType.Modify);
        log.setDataId(String.valueOf(1L));
        log.setCreateTime(new Date());
        log.setCreateUser("create user");
        log.setCreateUserId("user-0001000");

        int result = this.logService.insert(log);
        return result;
    }
}
备注:
该类不需要视图,是采用restful方式访问。
5)在src/main/webapp/WEB-INF/下添加视图文件:
/WEB-INF/templates/index.html
<h1>Thymeleaf Index Page</h1>
/WEB-INF/templates/log-list.html
<!DOCTYPE html>
<html xmlns:th="http://www.thymeleaf.org">
  <head>
    <title>Good Thymes Virtual Grocery</title>
    <meta http-equiv="Content-Type" content="text/html; charset=UTF-8" />
  </head>
  <body>
    <h1>Log list</h1>

    <table>
      <tr>
        <th>id</th>
        <th>title</th>
        <th>model type</th>
        <th>operate type</th>
        <th>data id</th>
        <th>content</th>
        <th>create time</th>
        <th>create user</th>
        <th>create user id</th>
      </tr>
      <tr th:each="log : ${logs}">
        <td th:text="${log.id}">id</td>
        <td th:text="${log.title}">title</td>
        <td th:text="${log.moduleType}">module type</td>
        <td th:text="${log.operateType}">operate type</td>
        <td th:text="${log.dataId}">data id</td>
        <td th:text="${log.content}">content</td>
        <td th:text="${log.createTime}">create time</td>
        <td th:text="${log.createUser}">create user</td>
        <td th:text="${log.createUserId}">create user id</td>
      </tr>
    </table>
  </body>
</html>
/WEB-INF/views/index.jsp
<%@ page language="java" pageEncoding="UTF-8"%>
<%@ taglib uri="http://www.springframework.org/tags/form" prefix="form" %>
<%@ taglib uri="http://java.sun.com/jsp/jstl/core" prefix="c"%>
<!-- 屏蔽tomcat 自带的 EL表达式 -->
<%@ page isELIgnored="false" %>
<html>
<body>
<h2>Hello World!</h2>
</body>
</html>
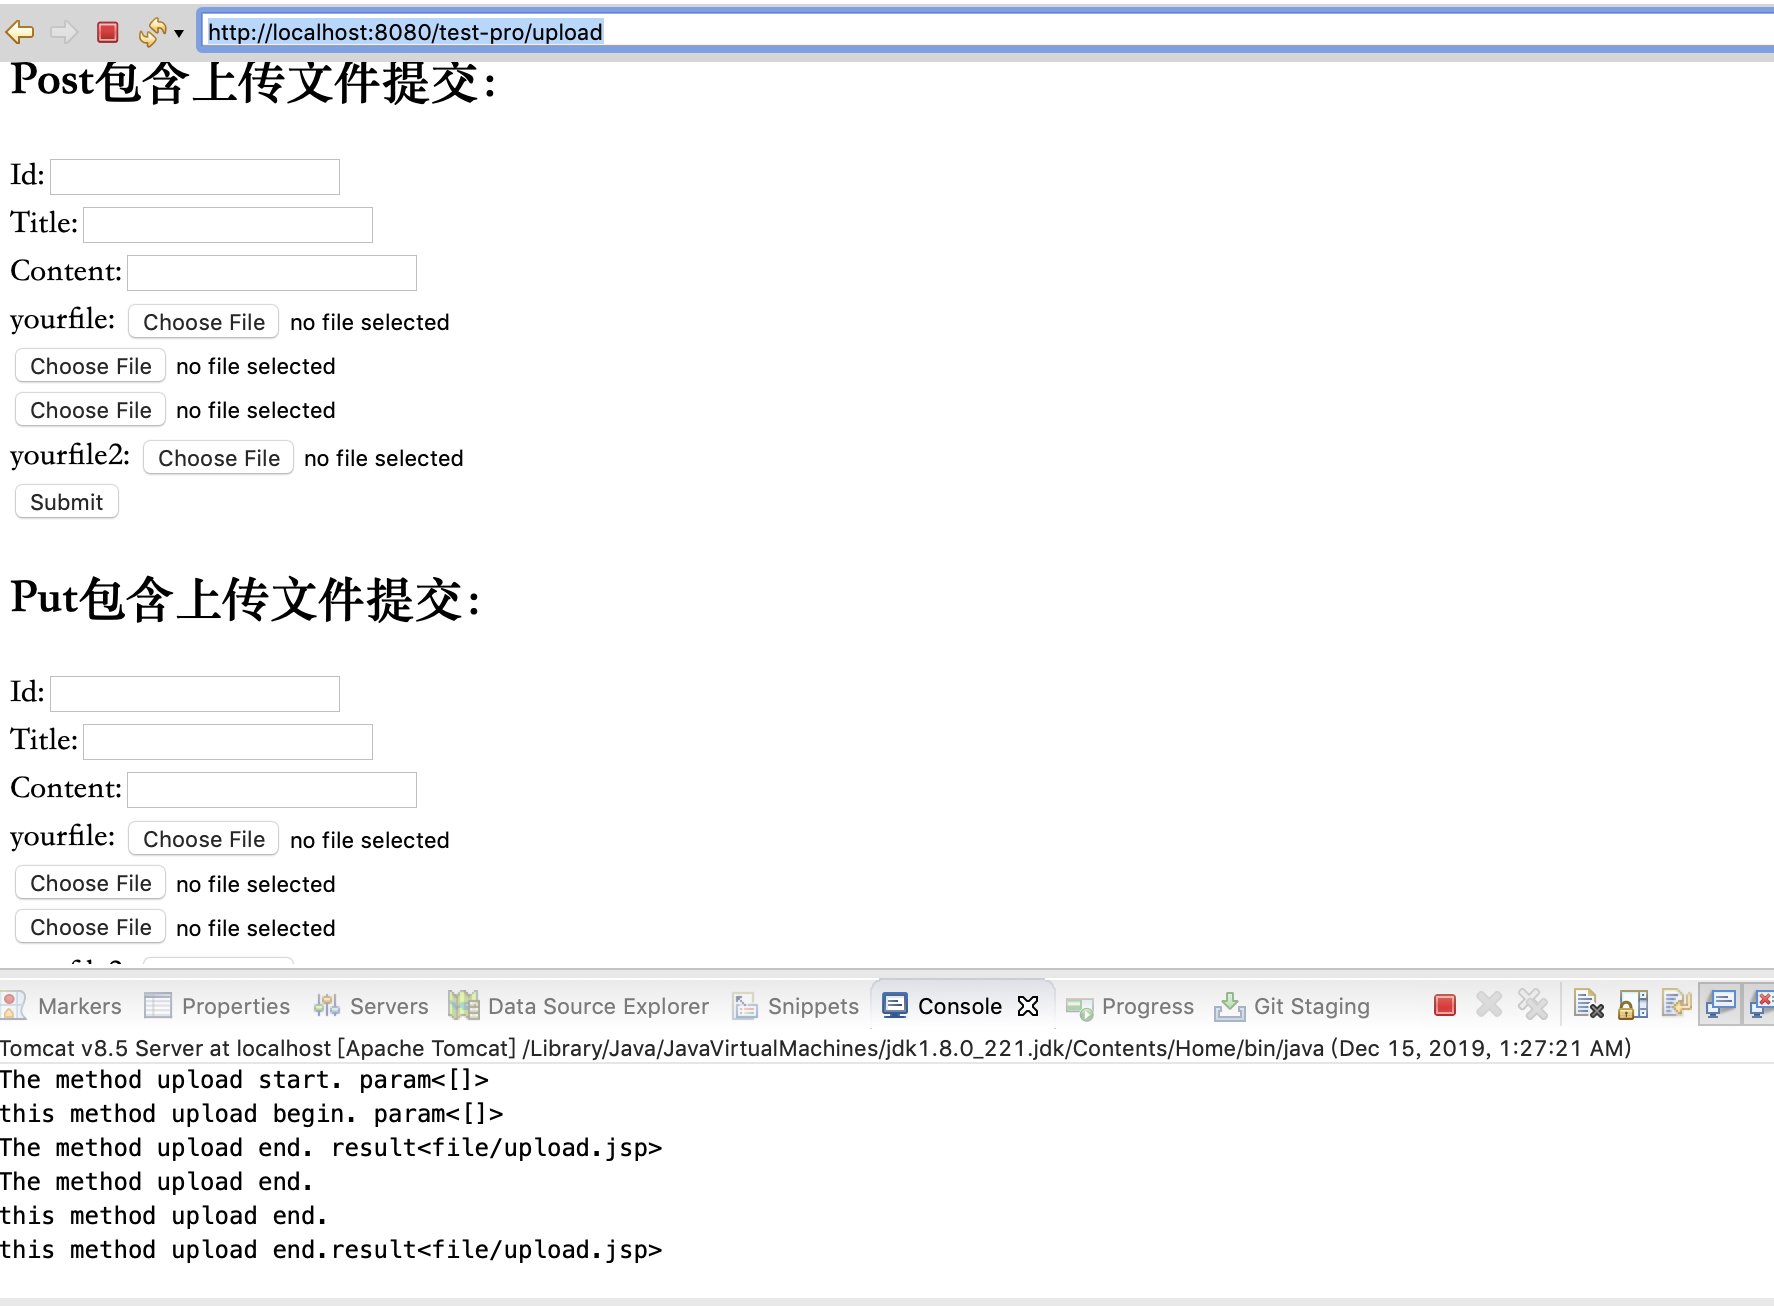
/WEB-INF/views/file/upload.jsp
<%@ page language="java" pageEncoding="UTF-8"%>
<%@ taglib uri="http://www.springframework.org/tags/form" prefix="form" %>
<%@ taglib uri="http://java.sun.com/jsp/jstl/core" prefix="c"%>
<!-- 屏蔽tomcat 自带的 EL表达式 -->
<%@ page isELIgnored="false" %>
<html>
<body>
    <h2>Post包含上传文件提交:</h2>
    <form method="POST" name="article" action="${pageContext.request.contextPath }/update_with_post_file" enctype="multipart/form-data">
        <!-- <input type="hidden" name="_method" value="PUT" />  -->
        Id:<input name="id" id="id" value="${article.id}" /><br />
        Title:<input name="title" id="title" value="${article.title}" /><br />
        Content:<input name="content" id="content" value="${article.content}" /><br />
        yourfile:
        <input type="file" name="files" /><br />
        <input type="file" name="files" /><br />
        <input type="file" name="files" /><br />
        yourfile2:
        <input type="file" name="execelFile" /><br />
        <input type="submit" value="Submit" />
    </form>
    <h2>Put包含上传文件提交:</h2>
    <form method="POST" name="article" action="${pageContext.request.contextPath }/update_with_put_file/" enctype="multipart/form-data">
        <input type="hidden" name="_method" value="PUT" />
        Id:<input name="id" id="id" value="${article.id}" /><br />
        Title:<input name="title" id="title" value="${article.title}" /><br />
        Content:<input name="content" id="content" value="${article.content}" /><br />
        yourfile:
        <input type="file" name="files" /><br />
        <input type="file" name="files" /><br />
        <input type="file" name="files" /><br />
        yourfile2:
        <input type="file" name="execelFile" /><br />
        <input type="submit" value="Submit" />
    </form>
</body>
</html>
6)/src/main/webapp/WEB-INF/web.xml配置内容:
<!DOCTYPE web-app PUBLIC
 "-//Sun Microsystems, Inc.//DTD Web Application 2.3//EN"
 "http://java.sun.com/dtd/web-app_2_3.dtd" >

<web-app>
  <display-name>Archetype Created Web Application</display-name>
</web-app>
测试访问
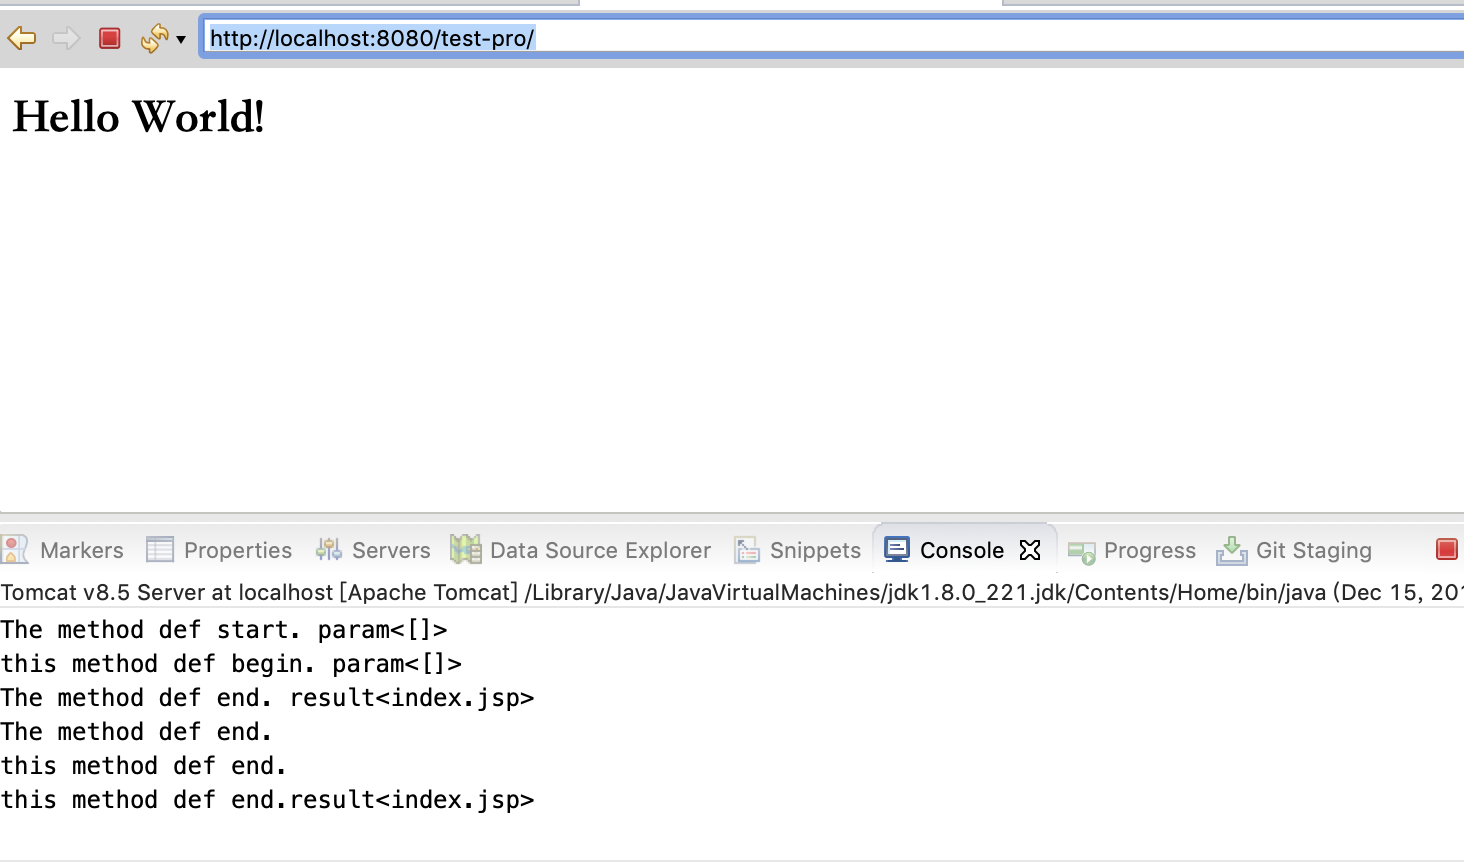
访问http://localhost:8080/test-pro,使用jsp视图引擎,渲染页面/WEB-INF/views/index.jsp。
访问http://localhost:8080/test-pro/index,使用jsp视图引擎,渲染页面/WEB-INF/views/index.jsp。
访问http://localhost:8080/test-pro/upload,使用jsp视图引擎,渲染页面/WEB-INF/views/file/upload.jsp,在该视图中支持post+commonMultipartResolver和put+commonMultipartResovler实现上传文件的用法。
访问http://localhost:8080/test-pro/api/v1/logs,使用restful访问所有日志信息。
访问http://localhost:8080/test-pro/api/v1/log/{id},使用restful访问某个日志信息。
访问http://localhost:8080/test-pro/api/v1/log/create,使用restful访问新增日志信息。
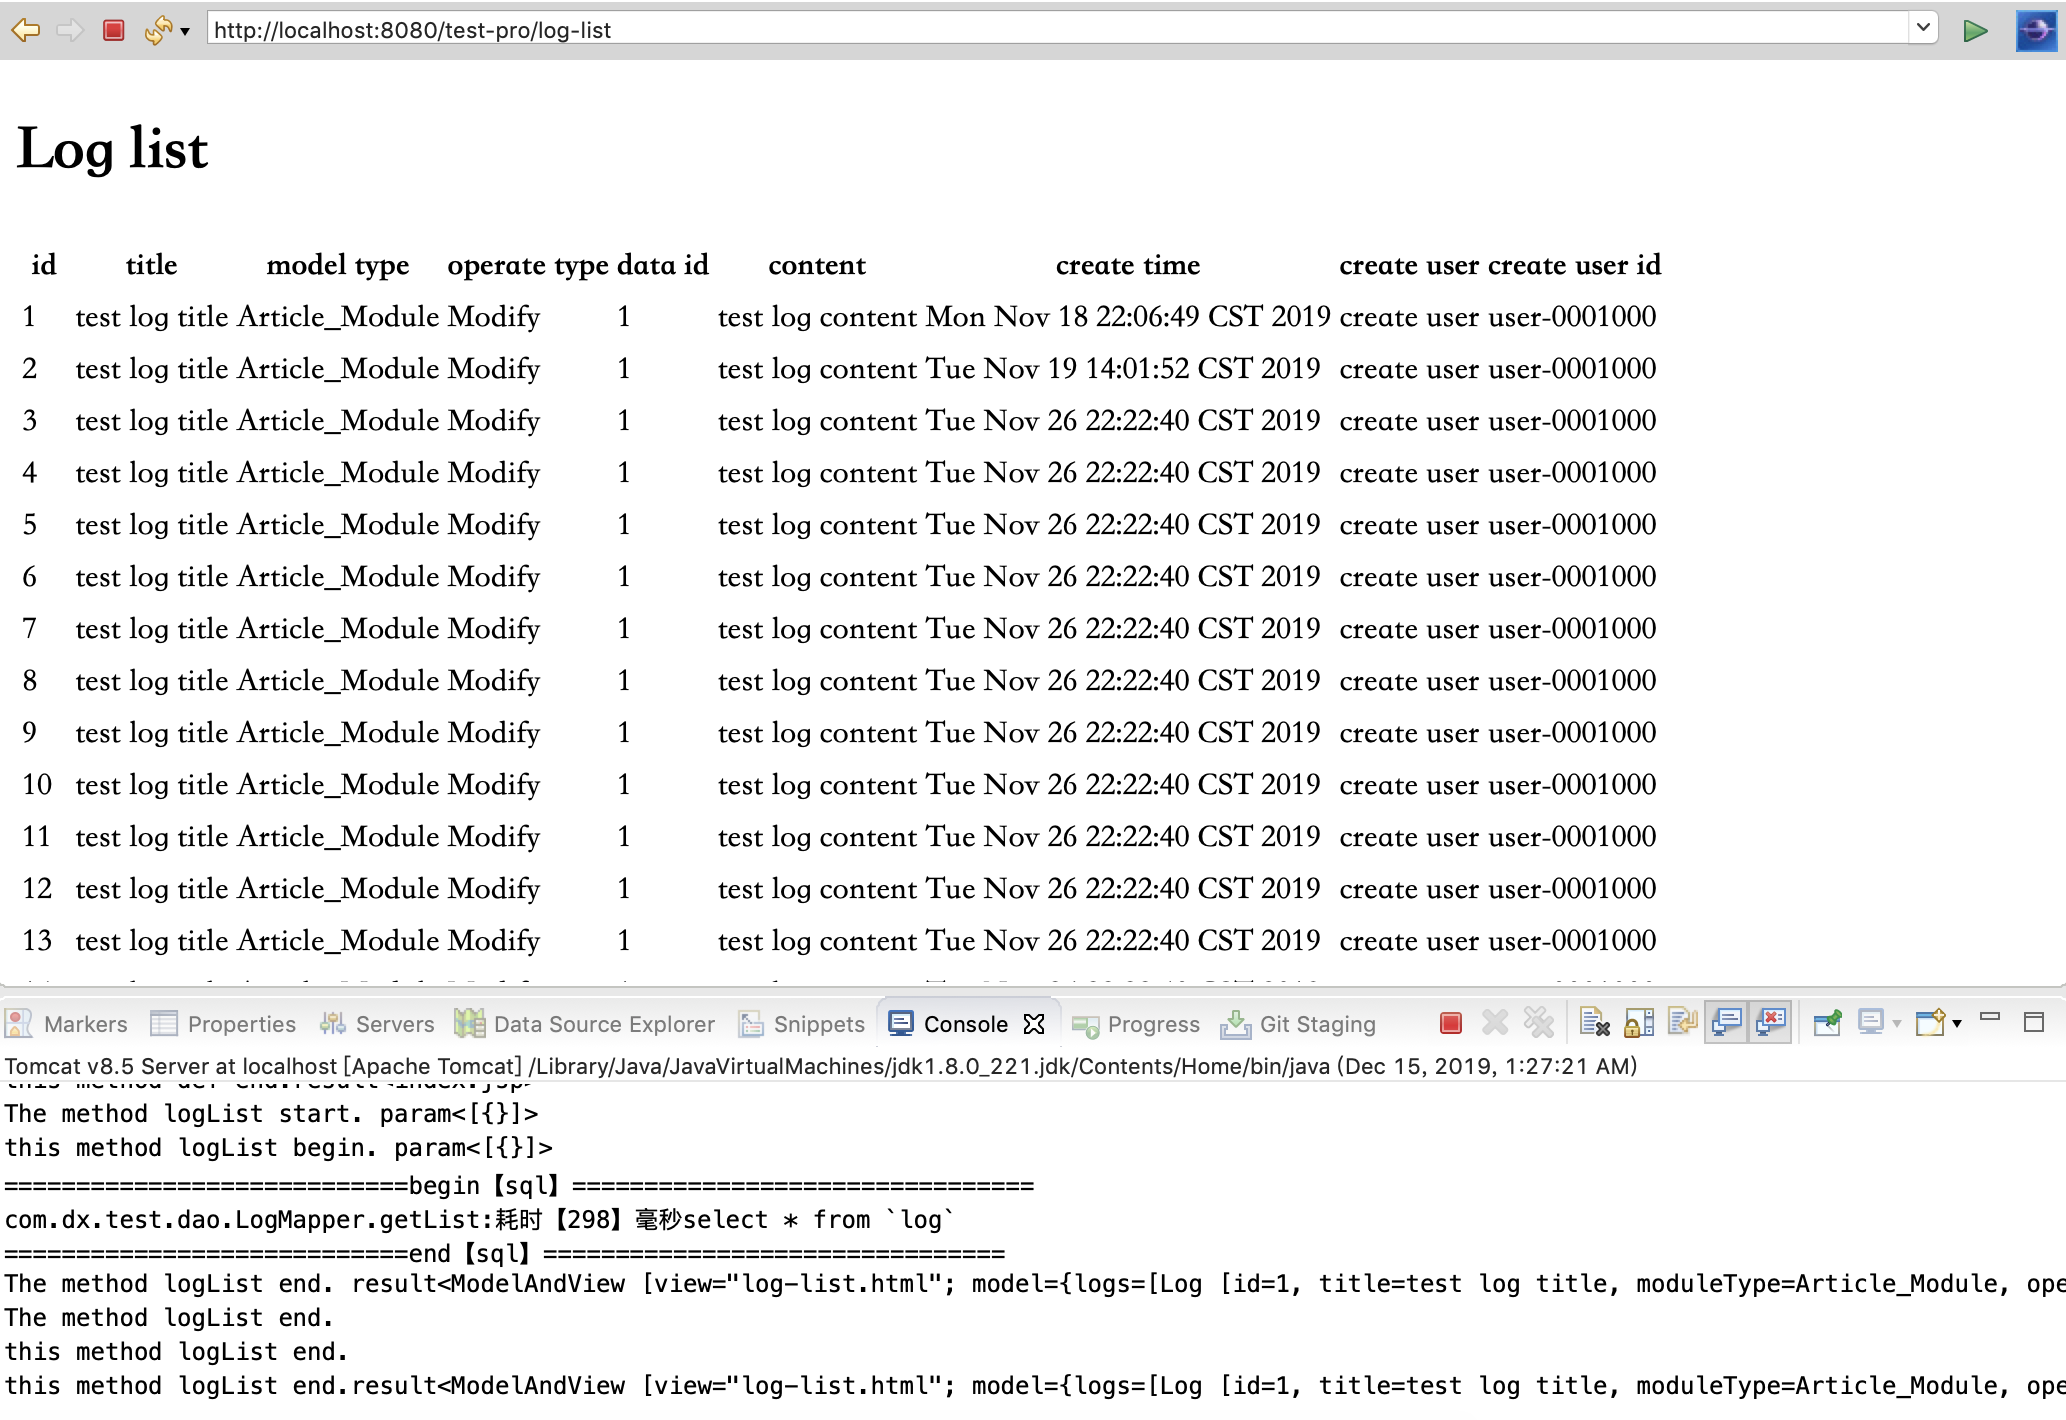
访问http://localhost:8080/test-pro/log-list,使用thymeleaf视图引擎,渲染页面/WEB-INF/templates/log-list.html页面,页面中会渲染日志列表。
参考:
《【小家Spring】Spring MVC控制器中Handler的四种实现方式:Controller、HttpRequestHandler、Servlet、@RequestMapping》
《SpringMVC的REST中错误:HTTP Status 405 - JSPs only permit GET POST or HEAD.》
《springmvc 同时配置thymeleaf和jsp两种模板引擎》
基础才是编程人员应该深入研究的问题,比如:
1)List/Set/Map内部组成原理|区别
2)mysql索引存储结构&如何调优/b-tree特点、计算复杂度及影响复杂度的因素。。。
3)JVM运行组成与原理及调优
4)Java类加载器运行原理
5)Java中GC过程原理|使用的回收算法原理
6)Redis中hash一致性实现及与hash其他区别
7)Java多线程、线程池开发、管理Lock与Synchroined区别
8)Spring IOC/AOP 原理;加载过程的。。。
【+加关注】。

 浙公网安备 33010602011771号