


深入解析:分布式之RabbitMQ的使用(2)
文章目录
主题模式(通配符模式)
接着上一篇的接着讲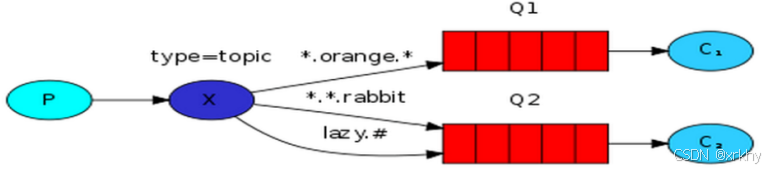
Topic:主题模式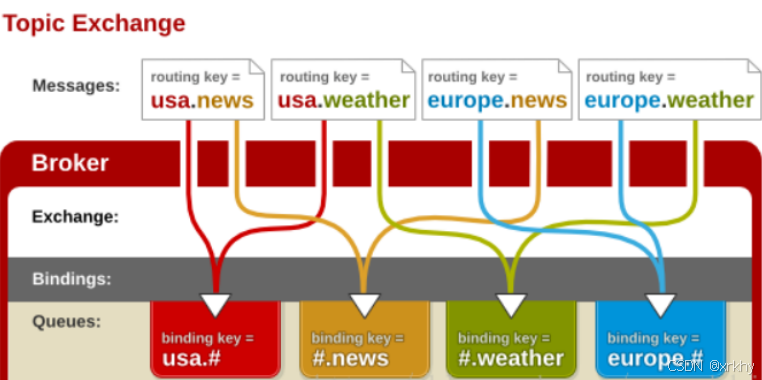
# 匹配一个或多个 (user.msg.1) 也就是user后跟多个点(类似多级文件夹)* 匹配一个 (user.goods) user后跟一个.(类似于一级文件夹)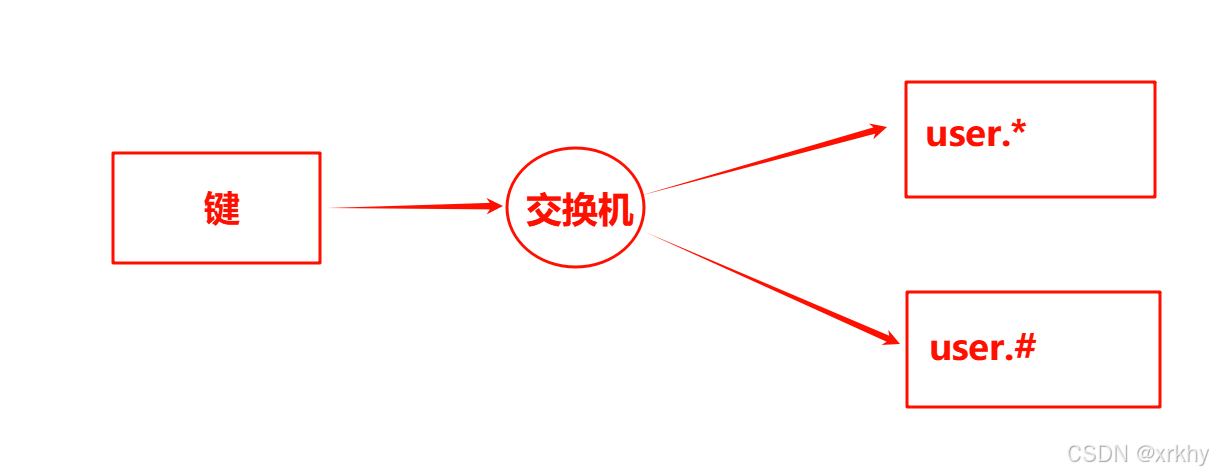
生产者
语法
// 发送消息
// 参数一: 交换机名称
// 参数二: 队列名称(在简单队列和Work模式已经演示过了)/路由键
// 参数三: 消息的持久化
// 参数四: 要发送的消息
channel.basicPublish("exchange", "user.1", null, msg.getBytes());
package com.hsh.test05;
import com.hsh.utils.ConnectionUtils;
import com.rabbitmq.client.Channel;
import com.rabbitmq.client.Connection;
public class Producer01
{
public static void main(String[] args) {
System.out.println("生产者启动...");
// 获得连接
Connection connection = ConnectionUtils.getConnection();
try {
// 创建通道
Channel channel = connection.createChannel();
// 创建交换机
// 参数一: 交换机名称
// 参数二: 处理路由键(这个后面讲不着急)
channel.exchangeDeclare("exchange", "topic");
// 定义要发送的消息
String msg = "我是user消息";
// 发送消息
// 参数一: 交换机名称
// 参数二: 队列名称(在简单队列和Work模式已经演示过了)/路由键
// 参数三: 消息的持久化
// 参数四: 要发送的消息
channel.basicPublish("exchange", "user.1", null, msg.getBytes());
System.out.println("生产者发送消息:" + msg);
channel.close();
connection.close();
}catch (Exception e){
e.printStackTrace();
}
}
}消费者
语法
// 绑定交换机
// 参数一:队列名称
// 参数二:交换机名称
// 参数三:路由key
channel.queueBind("errorMessage", "exchange", "user.*");
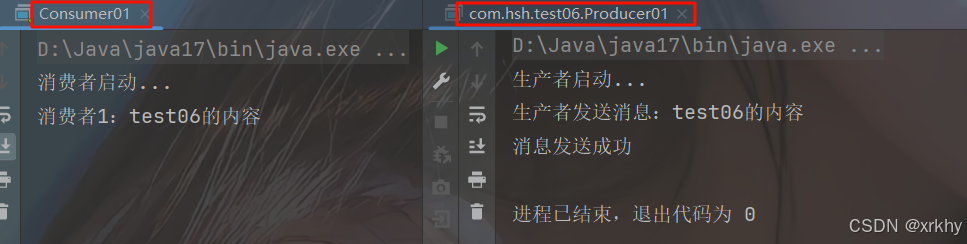
channel.queueBind("errorMessage", "exchange", "user.#");消费者01
package com.hsh.test05;
import com.hsh.utils.ConnectionUtils;
import com.rabbitmq.client.*;
import java.io.IOException;
/**
* @author xrkhy
* @date 2025/9/23 9:44
* @description
*/
public class Consumer01
{
public static void main(String[] args) {
System.out.println("消费者启动...");
try {
// 获得连接
Connection connection = ConnectionUtils.getConnection();
// 创建通道
Channel channel = connection.createChannel();
// 连接队列
channel.queueDeclare("allMessage", false, false, false, null);
// 绑定交换机
// 参数一:队列名称
// 参数二:交换机名称
// 参数三:路由key
channel.queueBind("allMessage", "exchange", "user.*");
// 监听 true自动反馈
DefaultConsumer defaultConsumer = new DefaultConsumer(channel){
@Override
public void handleDelivery(String consumerTag, Envelope envelope, AMQP.BasicProperties properties, byte[] body) throws IOException {
String message = new String(body, "UTF-8");
System.out.println("消费者1:" + message);
}
};
// 监听
channel.basicConsume("allMessage", true, defaultConsumer);
}catch (Exception e){
e.printStackTrace();
}
}
}
package com.hsh.test05;
import com.hsh.utils.ConnectionUtils;
import com.rabbitmq.client.*;
import java.io.IOException;
/**
* @author xrkhy
* @date 2025/9/23 9:44
* @description
*/
public class Comsumer02
{
public static void main(String[] args) {
System.out.println("消费者启动...");
try {
// 获得连接
Connection connection = ConnectionUtils.getConnection();
// 创建通道
Channel channel = connection.createChannel();
// 连接队列
channel.queueDeclare("errorMessage", false, false, false, null);
// 绑定交换机
// 参数一:队列名称
// 参数二:交换机名称
// 参数三:路由key
channel.queueBind("errorMessage", "exchange", "user.#");
// 监听 true自动反馈
DefaultConsumer defaultConsumer = new DefaultConsumer(channel){
@Override
public void handleDelivery(String consumerTag, Envelope envelope, AMQP.BasicProperties properties, byte[] body) throws IOException {
String message = new String(body, "UTF-8");
System.out.println("消费者2:" + message);
}
};
// 监听
channel.basicConsume("errorMessage", true, defaultConsumer);
}catch (Exception e){
e.printStackTrace();
}
}
}运行结果
这里还是先去启动生产者,再去启动消费者,最后再去启动生产者。
修改生产者为多个点再次运行
String msg = "我是user.msg.1消息";
channel.basicPublish("exchange", "user.msg.1", null, msg.getBytes());
发现只有消费者2才有。
消息确认机制
我们之前讲了消费者和RabbitMQ的持久化如下图。
但是我们如何确保生产者的数据能够到达RabbitMQ呢?这就是消息确认机制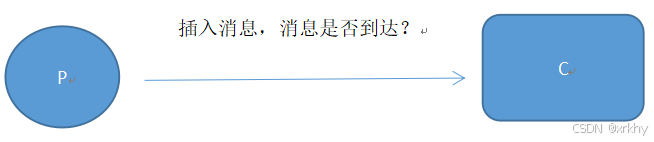
生产者将消息发送出去之后,消息有没有到达rabbitm服务器?(默认不知道)
两种方式可以确认:
- AMQP协议中实现了事务机制
- Confirm模式
AMQP协议中实现了事务机制
语法
channel.txSelect()声明启动事务模式;
channel.txCommit()提交事务;
channel.txRollback()回滚事务;
模式缺点:降低系统吞吐量
下面开始代码演示
生产者
在test06中新建Producer01
package com.hsh.test06;
import com.hsh.utils.ConnectionUtils;
import com.rabbitmq.client.Channel;
import com.rabbitmq.client.Connection;
import java.io.IOException;
import java.util.concurrent.TimeoutException;
/**
* @author xrkhy
* @date 2025/9/22 18:52
* @description
*/
public class Producer01
{
public static void main(String[] args) {
System.out.println("生产者启动...");
Connection connection = null;
Channel channel = null;
// 定义是否发送成功
int cnt = 0;
try {
// 获得连接
connection = ConnectionUtils.getConnection();
// 创建通道
channel = connection.createChannel();
// 创建队列声明
channel.queueDeclare("test06", false, false, false, null);
// 定义发送消息的数据
String message = "test06的内容";
// 声明事务
channel.txSelect();
// 发送消息
channel.basicPublish("", "test06", null, message.getBytes());
// 报错
int i = 1/0;
// 提交事务
channel.txCommit();
System.out.println("生产者发送消息:" + message);
}catch (Exception e){
e.printStackTrace();
// 报错就事务回滚
try {
channel.txRollback();
System.out.println("事务回滚");
cnt++;
} catch (Exception ex) {
e.printStackTrace();
}
}finally {
try {
channel.close();
connection.close();
} catch (Exception e) {
e.printStackTrace();
}
}
System.out.println("消息发送"+(cnt==0?"成功":"失败"));
}
}
消费者
在test06中新建Consumer01
package com.hsh.test06;
import com.hsh.utils.ConnectionUtils;
import com.rabbitmq.client.*;
import java.io.IOException;
/**
* @author xrkhy
* @date 2025/9/22 18:53
* @description
*/
public class Consumer01
{
public static void main(String[] args) {
System.out.println("消费者启动...");
try {
// 获得连接
Connection connection = ConnectionUtils.getConnection();
// 创建通道
Channel channel = connection.createChannel();
// 连接队列
channel.queueDeclare("test06", false, false, false, null);
// 监听 true自动反馈
DefaultConsumer defaultConsumer = new DefaultConsumer(channel){
@Override
public void handleDelivery(String consumerTag, Envelope envelope, AMQP.BasicProperties properties, byte[] body) throws IOException {
String message = new String(body, "UTF-8");
System.out.println("消费者1:" + message);
}
};
channel.basicConsume("test06", true, defaultConsumer);
}catch (Exception e){
e.printStackTrace();
}
}
}
运行结果
将生产者的int i = 1/0;取消注释,再次测试,如果回滚说明成功
Confirm模式
方式一:channel.waitForConfirms()普通发送方确认模式;
方式二:channel.waitForConfirmsOrDie()批量确认模式;
方式三:channel.addConfirmListener()异步监听发送方确认模式;
普通发送确认模式
Connection conn = ConnectionUtils.getConnection();
Channel ch = conn.createChannel();
ch.queueDeclare(QUEUE_NAME,false,false,false,null);
String str = "holle wzy 333";
ch.confirmSelect();
//开启消息确认模式
ch.basicPublish("",QUEUE_NAME,null,str.getBytes());
//加入错误代码后事务回滚
int i = 1/0;
if(ch.waitForConfirms())
{
System.out.println("消息确认发送");
}
ch.close();
conn.close();
ch.confirmSelect()声明开启发送方确认模式,再使用ch.waitForConfirms()等待消息被服务器确认即可。
批量确认模式
// 声明队列
channel.queueDeclare(QUEUE_NAME, false, false, false, null);
// 开启发送方确认模式
channel.confirmSelect();
for (int i = 0; i <
10; i++) {
String message = "holle wzy 333";
channel.basicPublish("", QUEUE_NAME, null, message.getBytes("UTF-8"));
}
channel.waitForConfirmsOrDie();
//直到所有信息都发布,只要有一个未确认就会IOException
System.out.println("全部执行完成");
ch.confirmSelect()声明开启发送方确认模式,再使用ch.waitForConfirmsOrDie()等待消息被服务器确认即可。
异步监听发送方确认模式
// 开启发送方确认模式
channel.confirmSelect();
for (int i = 0; i <
10; i++) {
String message = "holle wzy "+i;
channel.basicPublish("", QUEUE_NAME, null, message.getBytes("UTF-8"));
}
//异步监听确认和未确认的消息
channel.addConfirmListener(new ConfirmListener() {
@Override
public void handleNack(long deliveryTag, boolean multiple) throws IOException {
System.out.println("未确认消息,标识:" + deliveryTag);
}
@Override
public void handleAck(long deliveryTag, boolean multiple) throws IOException {
System.out.println(String.format("已确认消息,标识:%d,多个消息:%b", deliveryTag, multiple));
}
});
异步模式的优点,就是执行效率高,不需要等待消息执行完,只需要监听消息即可。
deliveryTag:如果是多条,这个就是最后一条消息的tag
Multiple: 是否多条
SpringBoot整合RabbitMQ
引入依赖
<!-- 注释之前的依赖 -->
  <!--<dependency>-->
  <!-- <groupId>com.rabbitmq</groupId>-->
  <!-- <artifactId>amqp-client</artifactId>-->
  <!-- <version>5.7.1</version>-->
  <!--</dependency>-->
  <!-- 添加依赖 -->
    <dependency>
    <groupId>org.springframework.boot</groupId>
    <artifactId>spring-boot-starter-amqp</artifactId>
    </dependency>
    <!-- 引入lombok -->
      <dependency>
      <groupId>org.projectlombok</groupId>
      <artifactId>lombok</artifactId>
      <optional>true</optional>
</dependency>由于集成的RabbitMQ的依赖中包含amqp-client所以不会报错。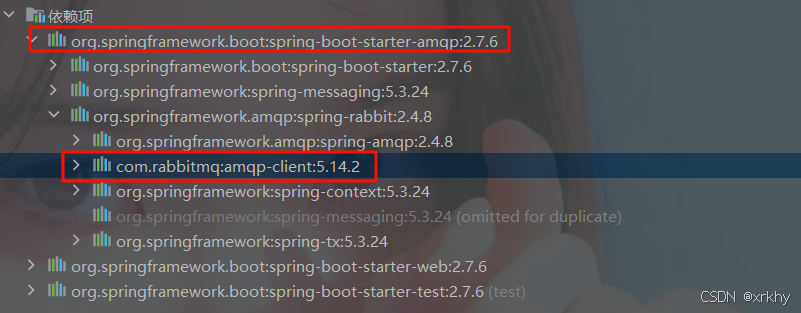
修改配置yml
把application.properties修改为application.yml。
spring:
rabbitmq:
host: 127.0.0.1
port: 5672
username: guest
password: guest
加入启动类
由于我们之前把启动类删除了,现在在加上。
注意要在com…hsh下新建Rabbitmq01Application文件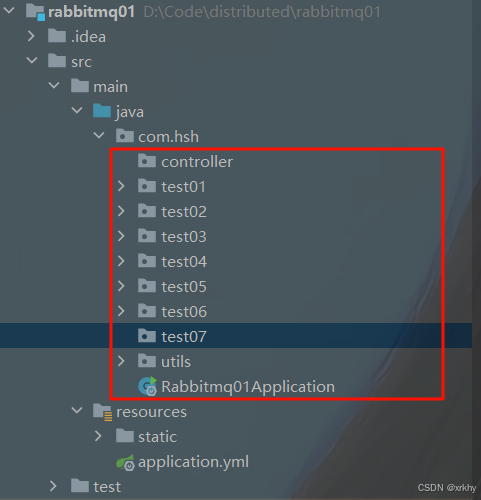
package com.hsh;
import org.springframework.boot.SpringApplication;
import org.springframework.boot.autoconfigure.SpringBootApplication;
@SpringBootApplication
public class Rabbitmq01Application
{
public static void main(String[] args) {
SpringApplication.run(Rabbitmq01Application.class, args)
;
}
}
SpringBoot中的简单队列
在springboot中编写队列时,一般在消费者创建队列就行了,生产者不需要创建队列。
controller层编写生产者
package com.hsh.controller;
import org.springframework.amqp.rabbit.core.RabbitTemplate;
import org.springframework.beans.factory.annotation.Autowired;
import org.springframework.web.bind.annotation.RequestMapping;
import org.springframework.web.bind.annotation.RestController;
@RestController
@RequestMapping("/index")
public class IndexController
{
// 注入RabbitMQ模版
@Autowired
private RabbitTemplate rabbitTemplate;
@RequestMapping("/send")
public String index(){
// 向队列发送消息
rabbitTemplate.convertAndSend("简单队列", "test06的内容");
return "发送成功";
}
}
编写消费者
package com.hsh.controller;
import org.springframework.amqp.rabbit.annotation.Queue;
import org.springframework.amqp.rabbit.annotation.RabbitListener;
import org.springframework.stereotype.Component;
@Component
public class ConsumerRabbitListenrs
{
@RabbitListener(queuesToDeclare = @Queue("简单队列"))
// 上面注解相当于 queueDeclare("简单队列", false, false, false, null);
public void receive01(String message){
System.out.println("消费者1:" + message);
}
}
运行结果
浏览器输入http://localhost:8080/index/send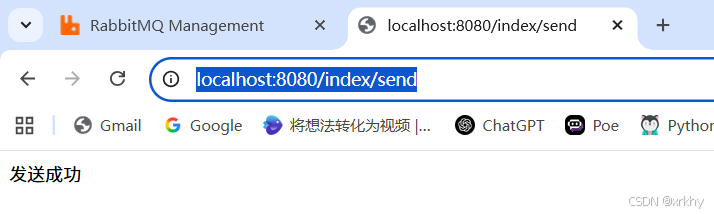
idea的控制台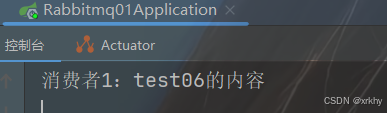
RabbitMQ可视化工具
SpringBoot工作队列模型
生产者
package com.hsh.controller;
import org.springframework.amqp.rabbit.core.RabbitTemplate;
import org.springframework.beans.factory.annotation.Autowired;
import org.springframework.web.bind.annotation.RequestMapping;
import org.springframework.web.bind.annotation.RestController;
@RestController
@RequestMapping("/index")
public class IndexController
{
@Autowired
private RabbitTemplate rabbitTemplate;
@RequestMapping("/send")
public String index(){
// 向队列发送消息
for (int i = 0; i <
10; i++){
rabbitTemplate.convertAndSend("work", "work的内容" + i);
}
return "发送成功";
}
}
消费者
package com.hsh.controller;
import org.springframework.amqp.rabbit.annotation.Queue;
import org.springframework.amqp.rabbit.annotation.RabbitListener;
import org.springframework.stereotype.Component;
@Component
public class ConsumerRabbitListenrs
{
@RabbitListener(queuesToDeclare = @Queue("work"))
// 上面注解相当于 queueDeclare("work队列", false, false, false, null);
public void receive01(String message){
System.out.println("消费者1:" + message);
}
@RabbitListener(queuesToDeclare = @Queue("work"))
// 上面注解相当于 queueDeclare("work队列", false, false, false, null);
public void receive02(String message){
System.out.println("消费者2:" + message);
}
}
运行结果
浏览器输入http://localhost:8080/index/send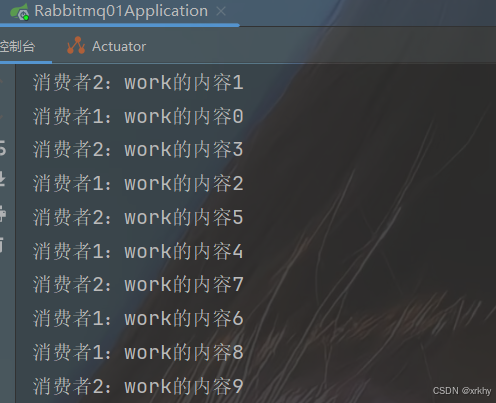
SpringBoot发送对象如何接收
我们先来配置Goods类
package com.hsh.pojo;
import lombok.Data;
import java.io.Serializable;
@Data
public class Goods
implements Serializable {
private Integer goodsId;
private String goodsName;
}
注意实体类必须序列化
生产者
package com.hsh.controller;
import com.hsh.pojo.Goods;
import org.springframework.amqp.rabbit.core.RabbitTemplate;
import org.springframework.beans.factory.annotation.Autowired;
import org.springframework.web.bind.annotation.RequestMapping;
import org.springframework.web.bind.annotation.RestController;
@RestController
@RequestMapping("/index")
public class IndexController
{
@Autowired
private RabbitTemplate rabbitTemplate;
@RequestMapping("/send")
public String index(){
Goods goods =new Goods();
goods.setGoodsId(1);
// 向队列发送消息
for (int i = 0; i <
10; i++){
goods.setGoodsName("商品"+ i);
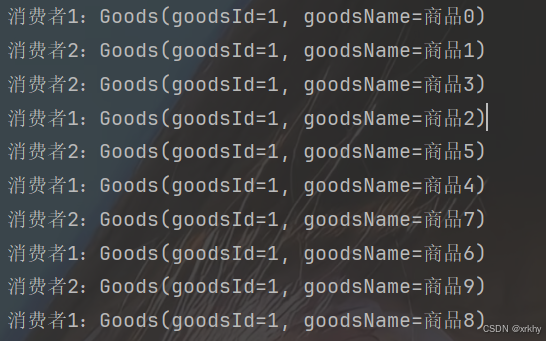
rabbitTemplate.convertAndSend("work", goods);
}
return "发送成功";
}
}消费者
Goods goods = (Goods) SerializationUtils.deserialize(message.getBody());package com.hsh.controller;
import com.hsh.pojo.Goods;
import org.springframework.amqp.core.Message;
import org.springframework.amqp.rabbit.annotation.Queue;
import org.springframework.amqp.rabbit.annotation.RabbitListener;
import org.springframework.amqp.utils.SerializationUtils;
import org.springframework.stereotype.Component;
@Component
public class ConsumerRabbitListenrs
{
@RabbitListener(queuesToDeclare = @Queue("work"))
// 上面注解相当于 queueDeclare("简单队列", false, false, false, null);
public void receive01(Message message){
Goods goods = (Goods) SerializationUtils.deserialize(message.getBody());
System.out.println("消费者1:" + goods);
}
@RabbitListener(queuesToDeclare = @Queue("work"))
// 上面注解相当于 queueDeclare("简单队列", false, false, false, null);
public void receive02(Message message){
Goods goods = (Goods) SerializationUtils.deserialize(message.getBody());
System.out.println("消费者2:" + goods);
}
}运行结果
SpringBoot公平分发和手动/自动反馈
添加配置
spring:
rabbitmq:
host: 127.0.0.1
port: 5672
username: guest
password: guest
listener:
simple:
acknowledge-mode: manual # 开启手动反馈 相当于channel.basicConsume("队列名", false, defaultConsumer);
生产者
package com.hsh.controller;
import com.hsh.pojo.Goods;
import org.springframework.amqp.rabbit.core.RabbitTemplate;
import org.springframework.beans.factory.annotation.Autowired;
import org.springframework.web.bind.annotation.RequestMapping;
import org.springframework.web.bind.annotation.RestController;
@RestController
@RequestMapping("/index")
public class IndexController
{
@Autowired
private RabbitTemplate rabbitTemplate;
@RequestMapping("/send")
public String index(){
Goods goods =new Goods();
// 向队列发送消息
for (int i = 0; i <
10; i++){
goods.setGoodsId(i);
goods.setGoodsName("商品"+ i);
rabbitTemplate.convertAndSend("work", goods);
}
return "发送成功";
}
}
消费者
package com.hsh.controller;
import com.hsh.pojo.Goods;
import com.rabbitmq.client.Channel;
import org.springframework.amqp.core.Message;
import org.springframework.amqp.rabbit.annotation.Queue;
import org.springframework.amqp.rabbit.annotation.RabbitListener;
import org.springframework.amqp.utils.SerializationUtils;
import org.springframework.stereotype.Component;
import java.io.IOException;
@Component
public class ConsumerRabbitListenrs
{
@RabbitListener(queuesToDeclare = @Queue("work"))
// 上面注解相当于 queueDeclare("简单队列", false, false, false, null);
public void receive01(Message message, Channel channel){
Goods goods = null;
try {
goods = (Goods) SerializationUtils.deserialize(message.getBody());
if(goods.getGoodsId() == 4){
int i = 1/0;
}
System.out.println("消费者1:" + goods);
// 手动反馈
// 第一个参数:envelope.getDeliveryTag() 当前消息的编号 我在上面的输出打印了可以看看
// 第二个参数:false单挑消息应答,true批量应答
channel.basicAck(message.getMessageProperties().getDeliveryTag(), false);
} catch (Exception e) {
e.printStackTrace();
System.out.println("第"+message.getMessageProperties().getDeliveryTag()+"条处理失败,放回队列,内容是:"+goods);
try {
// 拒绝消息
// 参数1: 消息的编号
// 参数2:表示是否进行批量操作 默认false
// 参数3:被拒绝的消息是否重新入队
// 当设置为 true时,RabbitMQ 会将被拒绝的消息重新放回原始队列的尾部,以便可以再次被消费
// 当设置为 false时,RabbitMQ 会将消息从队列中删除,不会重新入队
channel.basicNack(message.getMessageProperties().getDeliveryTag(),false,true);
} catch (Exception ex) {
ex.printStackTrace();
}
} finally {
// 无论失败还是成功,都需要执行睡眠一会
try {
Thread.sleep(1000);
} catch (Exception e) {
e.printStackTrace();
}
}
}
@RabbitListener(queuesToDeclare = @Queue("work"))
// 上面注解相当于 queueDeclare("简单队列", false, false, false, null);
public void receive02(Message message, Channel channel){
Goods goods = null;
try {
goods = (Goods) SerializationUtils.deserialize(message.getBody());
System.out.println("消费者2:" + goods);
// 手动反馈
// 第一个参数:envelope.getDeliveryTag() 当前消息的编号 我在上面的输出打印了可以看看
// 第二个参数:false单挑消息应答,true批量应答
channel.basicAck(message.getMessageProperties().getDeliveryTag(), false);
} catch (Exception e) {
e.printStackTrace();
System.out.println("第"+message.getMessageProperties().getDeliveryTag()+"条处理失败,放回队列,内容是:"+goods);
try {
// 拒绝消息
// 参数1: 消息的编号
// 参数2:表示是否进行批量操作 默认false
// 参数3:被拒绝的消息是否重新入队
// 当设置为 true时,RabbitMQ 会将被拒绝的消息重新放回原始队列的尾部,以便可以再次被消费
// 当设置为 false时,RabbitMQ 会将消息从队列中删除,不会重新入队
channel.basicNack(message.getMessageProperties().getDeliveryTag(),false,true);
} catch (Exception ex) {
ex.printStackTrace();
}
} finally {
// 无论失败还是成功,都需要执行睡眠一会
try {
Thread.sleep(1000);
} catch (Exception e) {
e.printStackTrace();
}
}
}
}
运行结果
报错放回之前队列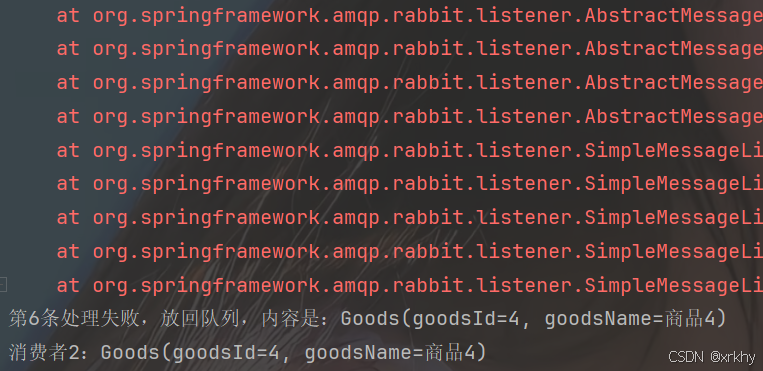
订阅模型
生产者
public void topic() {
for (int i = 0; i <
10; i++) {
if (i == 4) {
rabbitTemplate.convertAndSend("report", "user.vip.msg", "vip消息" + i);
continue;
} if (i == 8){
rabbitTemplate.convertAndSend("report", "user.vip.gift", "vip礼物" + i);
continue;
}
rabbitTemplate.convertAndSend("report", "user.msg", "用户消息" + i);
}
}
消费者
@RabbitListener(bindings = {
@QueueBinding(
value = @Queue, //临时队列
exchange = @Exchange(value = "report", type = "topic"), //指定交换机
key = {
"user.#"
}
)
})
public void receive2(String message) {
System.out.println("消费者2->" + message);
}
 浙公网安备 33010602011771号