

自定义控件2.第一个自定义view
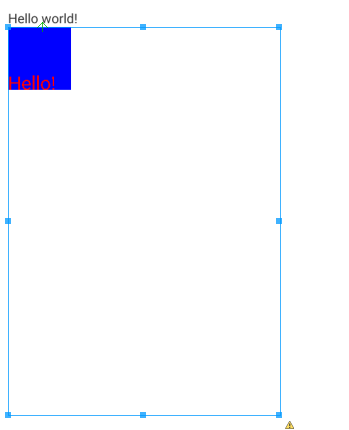
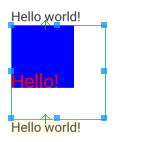
自定义一个View, 继承自 View, 实现如下效果: ![]()
![]()
![]()
![]()

其实就是一个宽高为100的蓝色方块, 左下角红色字题 Hello! (上面的Hello world 是系统的 TextView).
1. 继承 View, 重写 onDraw 方法
/*** 自定义一个简单的 View** @author GAOYUAN**/public class CustomView1 extends View {private Paint mPaint = new Paint();private Rect mRect = new Rect();- // 一般要实现下面两个构造方法
public CustomView1(Context context) {super(context);}- // 第二个参数后面会讲到
public CustomView1(Context context, AttributeSet attrs) {super(context, attrs);}@Overrideprotected void onDraw(Canvas canvas) {super.onDraw(canvas);mPaint.setStyle(Style.FILL);mPaint.setColor(Color.BLUE);mRect.set(0, 0, 100, 100);// Avoid object allocations during draw/layout operations (preallocate// and reuse instead)// 避免在 draw/layout 方法中进行对象分配, 提前分配, 或者重用.// canvas.drawRect(new Rect(0, 0, 100, 100), mPaint);canvas.drawRect(mRect, mPaint);// mPaint.reset();mPaint.setColor(Color.RED);mPaint.setTextSize(30.0f);// 注意, 画文字的时候, 是从左下角开始画的.canvas.drawText("Hello!", 0, 100, mPaint);}}
这里面有几个注意的点, 在注释里写的都比较详细了.
2. 在布局文件中使用
<TextViewandroid:id="@+id/tv_hello"android:layout_width="wrap_content"android:layout_height="wrap_content"android:text="@string/hello_world" /><com.gaoyuan4122.customui.views.CustomView1android:id="@+id/cv_custom1"android:layout_width="wrap_content"android:layout_height="wrap_content"android:layout_below="@id/tv_hello" /><TextViewandroid:id="@+id/tv_hello2"android:layout_width="wrap_content"android:layout_height="wrap_content"android:text="@string/hello_world"android:layout_below="@id/cv_custom1" />
最外层是 RelativeLayout, 这里就不写了, 注意要使用自定义View的全名作为标签名.
3. 关于控件的宽高
上面这样就实现了想要的效果, 但是有个问题是, 布局文件中, 给这个控件设置的宽高为 wrap_content, 但是实际上这个控件的宽高却是 match_parent, 它下面的 TextView没有显示出来, 如下如所示.
这涉及到了View 的测量和绘制过程, 这里可以先这样理解: 我们并没有设置它的宽高, 虽然写了 wrap_content, 但是系统并不知道这个 "content" 到底是多大, 所以系统默认就把可以给的最大的绘制区域给它了, 从效果上来看好像是 match_parent. 但是, 如果给它设置一个确切的宽高, 他就会按照设置的显示:
<TextViewandroid:id="@+id/tv_hello"android:layout_width="wrap_content"android:layout_height="wrap_content"android:text="@string/hello_world" /><com.gaoyuan4122.customui.views.CustomView1android:id="@+id/cv_custom1"android:layout_width="100dp"android:layout_height="100dp"android:layout_below="@id/tv_hello" /><TextViewandroid:id="@+id/tv_hello2"android:layout_width="wrap_content"android:layout_height="wrap_content"android:text="@string/hello_world"android:layout_below="@id/cv_custom1" />
显示效果如下:
下面先简单的解决一下这个问题, 重写 CustomView1 的 onMeasure 方法:
@Overrideprotected void onMeasure(int widthMeasureSpec, int heightMeasureSpec) {widthMeasureSpec = MeasureSpec.makeMeasureSpec(100, MeasureSpec.EXACTLY);heightMeasureSpec = MeasureSpec.makeMeasureSpec(100, MeasureSpec.EXACTLY);super.onMeasure(widthMeasureSpec, heightMeasureSpec);}
这段话的意思是告诉父控件我的大小是100*100, 无论怎样都是这么大, 此时布局文件中的宽高都还是 wrap_content, 效果就变成下面的样子了:
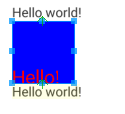
并且, 无论宽高设置的是多少, 都是100*100. 这里就先这样做, 后面会说 onMeasure 的意思.

 浙公网安备 33010602011771号