二十二、DevOps:基于Tekton的云原生平台落地(三)
二十二、DevOps:基于Tekton的云原生平台落地(三)
1、Tekton概念及特性
1.1 Tekton初识
Tekton 是一个云原生的 CI/CD 流水线解决方案,属于 Linux 基金会较为流行的开源项目之一。Tekton 以 Kubernetes 资源的形式部署在集群上,包含一组 Kubernetes 自定义资源共同构成了一个完整的生态系统。Tekton 的核心资源包括 StepAction、Task、TaskRun、Pipeline、PipelineRun 等,可以使用 Kubectl 管理 Tekton 的资源,或配置和执行流水线。
1.2 Tekton 核心功能
- 云原生:基于 Kubernetes 设计,所有任务均以容器运行,且按需创建和销毁
- 标准化:Tekton 运行在 Kubernetes 集群上,所有资源均以 CRD 定义,符合代码即基础设施
- 可移植性:基于标准 CRD 资源构建,可以一键式跨集群迁移
- 可扩展性:Tekton 随集群扩展,无需任何修改即可增加工作负载
- 事件驱动:支持事件驱动模式,可以接收外部 webhook 事件触发流水线
- 社区生态:具备社区和 Task Hub,可以选择已有 Task 集成各种工具
1.3 Tekton 核心资源
- StepAction:Tekton 提供的一种用于定义可复用工作单元的资源,一般用于定义具体的执行步骤,比如构建、扫描等
- Task:用于定义一系列有序的步骤,每个步骤用于调用特定的工具处理特定的任务,可以指定具体的命令,也可以绑定 StepActions
- Tekton Pipeline:Tekton Pipeline 为 Tekton 的基础,由多个 Task 组成,作为构建 CI/CD 流水线的基础模块
- Tekton Triggers:Tekton 事件触发组件,可以用于接收外部系统的事件,之后进行流水线的执行
- Tekton CLI:Tekton 提供的客户端工具,可以使用 tkn 与 Tekton 交互
- Tekton Dashboard:Tekton 提供的基于 Web 的图形界面
- TaskRun:用于实例化特定任务(Task)相当于调用 Task 执行任务
- PipelineRun:用于实例化特定流水线(Pipeline)相当于执行 Pipeline 中定义的任务
2、Tekton实践
2.1 Tekton部署
# 安装 Tekton:
[root@k8s-master01 ~]# curl -o tekton-release.yaml https://storage.googleapis.com/tekton-releases/pipeline/latest/release.yaml
[root@k8s-master01 ~]# kubectl apply --filename tekton-release.yaml

# 查看状态:
[root@k8s-master01 ~]# kubectl get po -n tekton-pipelines
NAME                                           READY   STATUS    RESTARTS   AGE
tekton-events-controller-99665746c-2nf6p       1/1     Running   0          8m4s
tekton-pipelines-controller-7595d6585d-hg9tc   1/1     Running   0          8m4s
tekton-pipelines-webhook-5967d74cc4-zsfls      1/1     Running   0          8m3s
# 安装 Tekton Dashboard:
[root@k8s-master01 ~]# curl -o dashboard-release.yaml https://storage.googleapis.com/tekton-releases/dashboard/latest/release.yaml
[root@k8s-master01 ~]# kubectl apply --filename dashboard-release.yaml

# 查看状态:
[root@k8s-master01 ~]# kubectl get po -n tekton-pipelines
NAME                                           READY   STATUS    RESTARTS   AGE
tekton-dashboard-7d4499b584-ghmg9              1/1     Running   0          91s
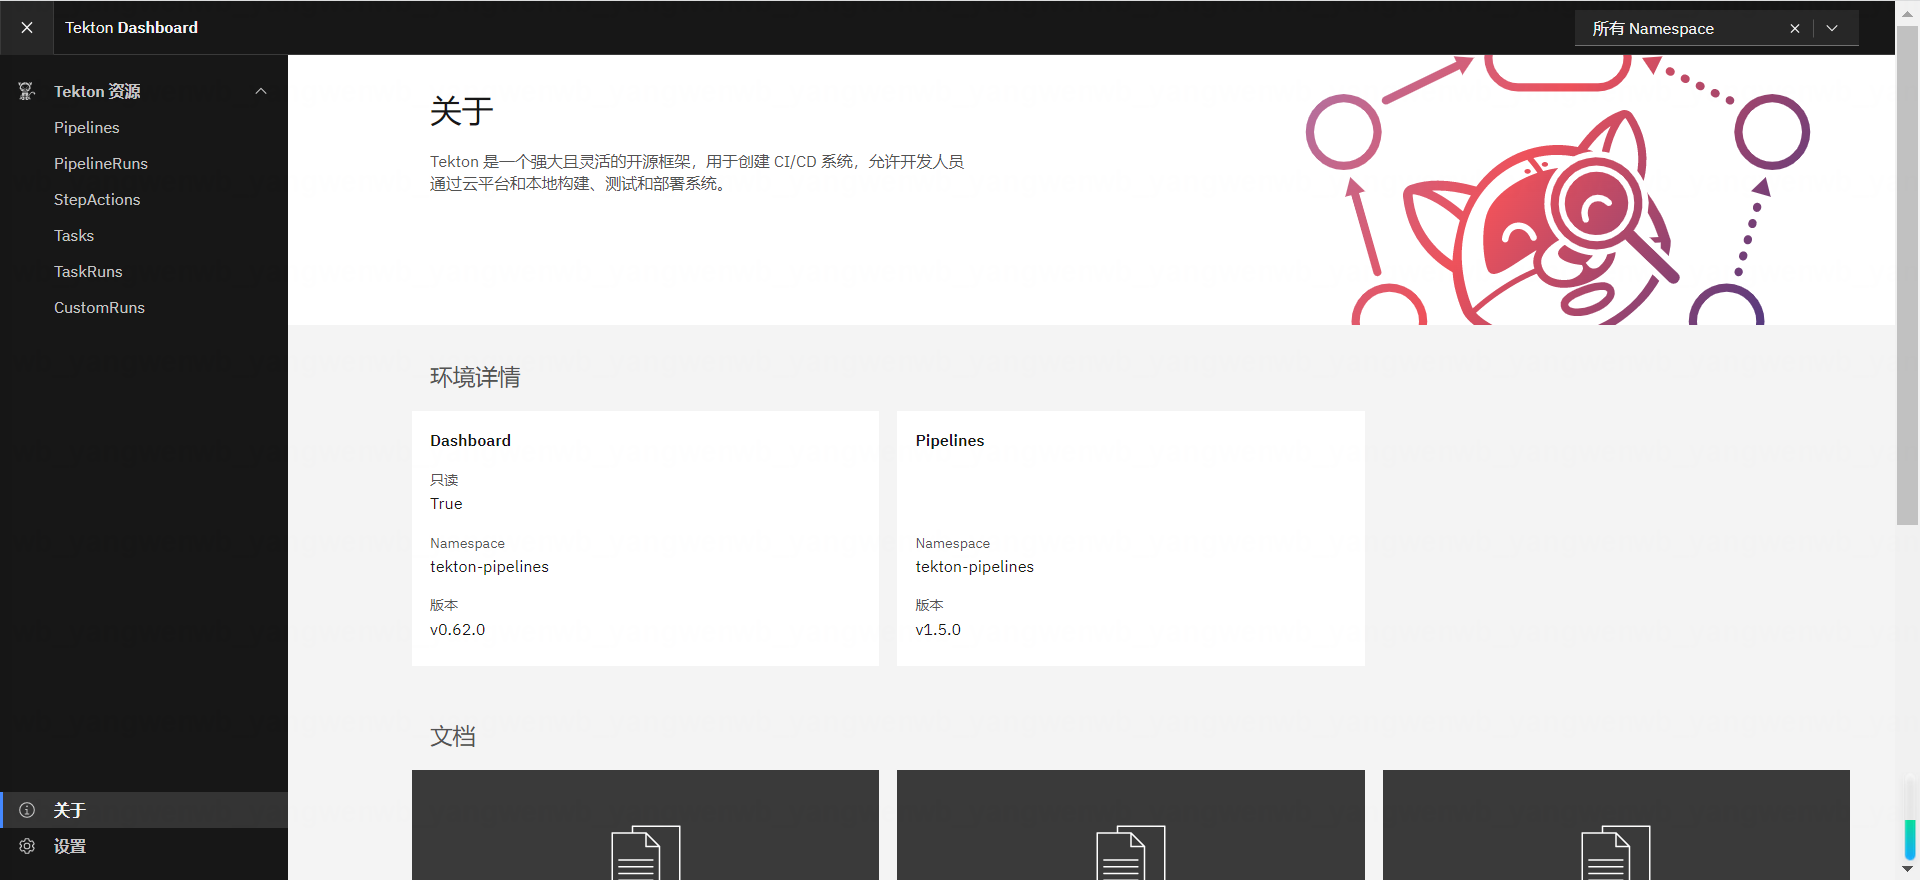
等待所有 Pod 启动完成后,更改 Dashboard 的 Service 为 NodePort:
[root@k8s-master01 ~]# kubectl edit svc tekton-dashboard -n tekton-pipelines
sessionAffinity: None
  type: NodePort

[root@k8s-master01 ~]# kubectl get svc -n tekton-pipelines
NAME                          TYPE        CLUSTER-IP       EXTERNAL-IP   PORT(S)                              AGE
tekton-dashboard              NodePort    10.106.102.181   <none>        9097:31869/TCP                       3m6s
tekton-events-controller      ClusterIP   10.110.221.223   <none>        9090/TCP,8008/TCP,8080/TCP           11m
tekton-pipelines-controller   ClusterIP   10.100.69.160    <none>        9090/TCP,8008/TCP,8080/TCP           11m
tekton-pipelines-webhook      ClusterIP   10.104.253.49    <none>        9090/TCP,8008/TCP,443/TCP,8080/TCP   11m
之后通过 NodePort 访问 Tekton Dashboard:
2.2 Tekton初体验
# 创建一个 task:
[root@k8s-master01 ~]# vim 01-task-hello.yaml
[root@k8s-master01 ~]# cat 01-task-hello.yaml
apiVersion: tekton.dev/v1
kind: Task
metadata:
  name: hello
spec:
  steps:
  - name: echo
    image: crpi-q1nb2n896zwtcdts.cn-beijing.personal.cr.aliyuncs.com/ywb01/alpine:3.9-tomcat
    script: |
      #!/bin/sh
      echo "Hello World"

[root@k8s-master01 ~]# kubectl create -f 01-task-hello.yaml
[root@k8s-master01 ~]# kubectl get task
NAME    AGE
hello   4s

# Task 是一种资源,不会真正的执行,执行需要使用 TaskRun 进行调度:
[root@k8s-master01 ~]# vim 01-taskrun-hello.yaml
[root@k8s-master01 ~]# cat 01-taskrun-hello.yaml
apiVersion: tekton.dev/v1
kind: TaskRun
metadata:
  name: hello-task-run # taskrun name
spec:
  taskRef:
    name: hello # task name

[root@k8s-master01 ~]# kubectl create -f 01-taskrun-hello.yaml
[root@k8s-master01 ~]# kubectl get taskrun
NAME             SUCCEEDED   REASON      STARTTIME   COMPLETIONTIME
hello-task-run   True        Succeeded   2m11s       13s

[root@k8s-master01 ~]# kubectl get po
NAME                 READY   STATUS      RESTARTS   AGE
hello-task-run-pod   0/1     Completed   0          2m14s
[root@k8s-master01 ~]# kubectl logs -f hello-task-run-pod -c step-echo
Hello World
# 接着创建第二个 task,并使用 params 接收参数:
[root@k8s-master01 ~]# vim 02-task-hello.yaml
[root@k8s-master01 ~]# cat 02-task-hello.yaml
apiVersion: tekton.dev/v1
kind: Task
metadata:
  name: goodbye
spec:
  params: # 可以接收 taskRun 和 pipeline 的参数
  - name: username
    type: string
  steps:
  - name: goodbye
    image: crpi-q1nb2n896zwtcdts.cn-beijing.personal.cr.aliyuncs.com/ywb01/alpine:3.9-tomcat
    script: |
      #!/bin/sh
      echo "Goodbye $(params.username)!"

[root@k8s-master01 ~]# kubectl create -f 02-task-hello.yaml
[root@k8s-master01 ~]# kubectl get task
NAME      AGE
goodbye   4s
hello     9m41s

# 创建 TaskRun,并传递参数:
[root@k8s-master01 ~]# vim 02-taskrun-hello.yaml
[root@k8s-master01 ~]# cat 02-taskrun-hello.yaml
apiVersion: tekton.dev/v1
kind: TaskRun
metadata:
  name: goodbye-task-run # taskrun name
spec:
  taskRef:
    name: goodbye # task name
  params:
  - name: username
    value: "yunwei"

[root@k8s-master01 ~]# kubectl create -f 02-taskrun-hello.yaml
[root@k8s-master01 ~]# kubectl get taskrun
NAME               SUCCEEDED   REASON      STARTTIME   COMPLETIONTIME
goodbye-task-run   True        Succeeded   7s          2s

[root@k8s-master01 ~]# kubectl get po
NAME                   READY   STATUS      RESTARTS   AGE
goodbye-task-run-pod   0/1     Completed   0          25s
[root@k8s-master01 ~]# kubectl logs -f goodbye-task-run-pod -c step-goodbye
Goodbye yunwei!
2.3 Pipelines初体验
接下来创建一个 Pipeline,包含上述两个 task:
[root@k8s-master01 ~]# vim 03-pipeline-hello-goodbye.yaml
[root@k8s-master01 ~]# cat 03-pipeline-hello-goodbye.yaml
apiVersion: tekton.dev/v1
kind: Pipeline
metadata:
  name: hello-goodbye
spec:
  params: # 也可以接收 pipelineRun 的参数
  - name: username
    type: string
  tasks:
  - name: hello
    taskRef:
      name: hello
  - name: goodbye
    runAfter: # 在上个 task 结束之后运行
    - hello
    taskRef:
      name: goodbye
    params: # 传递参数
    - name: username
      value: $(params.username) # 参数来自 spec.params 下面的参数,也就是pipelineRun 传递的参数


[root@k8s-master01 ~]# kubectl create -f 03-pipeline-hello-goodbye.yaml
[root@k8s-master01 ~]# kubectl get pipeline
NAME            AGE
hello-goodbye   24s
Pipeline 和 task 一样,是一种资源定义,不会执行,需要创建一个 pipelineRun 进行调度和执行:
[root@k8s-master01 ~]# vim 03-pipelinerun-hello-goodbye.yaml
[root@k8s-master01 ~]# cat 03-pipelinerun-hello-goodbye.yaml
apiVersion: tekton.dev/v1
kind: PipelineRun
metadata:
  name: hello-goodbye-run
spec:
  pipelineRef:
    name: hello-goodbye
  params: # 传递参数
  - name: username
    value: "Tekton"

# 创建 PipelineRun:
[root@k8s-master01 ~]# kubectl create -f 03-pipelinerun-hello-goodbye.yaml
[root@k8s-master01 ~]# kubectl get pipelinerun
NAME                SUCCEEDED   REASON      STARTTIME   COMPLETIONTIME
hello-goodbye-run   True        Succeeded   28s         18s

# 此时的 PipelineRun 会创建两个 taskRun 进行任务的调度:
[root@k8s-master01 ~]# kubectl get taskrun
NAME                        SUCCEEDED   REASON      STARTTIME   COMPLETIONTIME
...
hello-goodbye-run-goodbye   True        Succeeded   32s         27s
hello-goodbye-run-hello     True        Succeeded   37s         32s
...

# 查看创建的 Pod:
[root@k8s-master01 ~]# kubectl get po
NAME                            READY   STATUS      RESTARTS   AGE
...
hello-goodbye-run-goodbye-pod   0/1     Completed   0          41s
hello-goodbye-run-hello-pod     0/1     Completed   0          46s
...

[root@k8s-master01 ~]# kubectl logs -f hello-goodbye-run-goodbye-pod -c step-goodbye
Goodbye Tekton!

[root@k8s-master01 ~]# kubectl logs -f hello-goodbye-run-hello-pod -c step-echo
Hello World
2.4 常用Task
2.4.1 代码拉取Task
比如想要拉取代码,可以使用 git-clone 这个 task:https://hub.tekton.dev/tekton/task/gitclone
# 接下来创建该 Task:
[root@k8s-master01 ~]# curl -o git-clone.yaml https://raw.githubusercontent.com/tektoncd/catalog/main/task/git-clone/0.6/git-clone.yaml

[root@k8s-master01 ~]# kubectl apply -f git-clone.yaml
[root@k8s-master01 ~]# kubectl get task
NAME        AGE
git-clone   4s
首先需要用到的 workspace 是 output,下载的代码会保存在该 workspace。接下来给 tekton
# 创建一个专用的用来存储代码及工作目录的 PVC:
[root@k8s-master01 ~]# vim tekton-workspace-pvc.yaml
[root@k8s-master01 ~]# cat tekton-workspace-pvc.yaml
apiVersion: v1
kind: PersistentVolumeClaim
metadata:
  name: tekton-workspace
  namespace: default
  labels: {}
  annotations: {}
spec:
  resources:
    requests:
      storage: 100Gi
  volumeMode: Filesystem
  storageClassName: nfs-csi
  accessModes:
  - ReadWriteMany

[root@k8s-master01 ~]# kubectl create -f tekton-workspace-pvc.yaml
[root@k8s-master01 ~]# kubectl get pvc
NAME               STATUS   VOLUME                                     CAPACITY   ACCESS MODES   STORAGECLASS   VOLUMEATTRIBUTESCLASS   AGE
tekton-workspace   Bound    pvc-f9240e7f-e667-401c-b5fe-db6cf7cfce9a   100Gi      RWX            nfs-csi        <unset>                 8s
# 接下来创建 TaskRun 拉取代码,并保存至该 PVC:
[root@k8s-master01 ~]# vim 04-taskrun-git-clone.yaml
[root@k8s-master01 ~]# cat 04-taskrun-git-clone.yaml
apiVersion: tekton.dev/v1
kind: TaskRun
metadata:
  name: git-clone-run # taskrun name
spec:
  workspaces:
  - name: output
    persistentVolumeClaim:
      claimName: tekton-workspace
  taskRef:
    name: git-clone # task name
  params:
  - name: url
    value: "https://gitee.com/dukuan/krm.git"
  - name: gitInitImage
    value: "crpi-q1nb2n896zwtcdts.cn-beijing.personal.cr.aliyuncs.com/ywb01/git-init:v0.29.0"
  - name: revision
    value: main

[root@k8s-master01 ~]# kubectl create -f 04-taskrun-git-clone.yaml
[root@k8s-master01 ~]# kubectl get taskrun
NAME                        SUCCEEDED   REASON      STARTTIME   COMPLETIONTIME
git-clone-run               True        Succeeded   75s         7s

[root@k8s-master01 ~]# kubectl get po
NAME                            READY   STATUS      RESTARTS   AGE
git-clone-run-pod               0/1     Completed   0          72s
# 在 PVC 中查看数据:
[root@habor ~]# ll /data/nfs/pvc-f9240e7f-e667-401c-b5fe-db6cf7cfce9a
total 112
-rw-r--r-- 1 root root  5632 Oct 25 15:19 deploy.md
-rw-r--r-- 1 root root 82769 Oct 25 15:19 image.png
drwxr-xr-x 2 root root  4096 Oct 25 15:19 images
-rw-r--r-- 1 root root  4726 Oct 25 15:19 krm.yaml
-rw-r--r-- 1 root root  1064 Oct 25 15:19 LICENSE
-rw-r--r-- 1 root root  2771 Oct 25 15:19 README.md
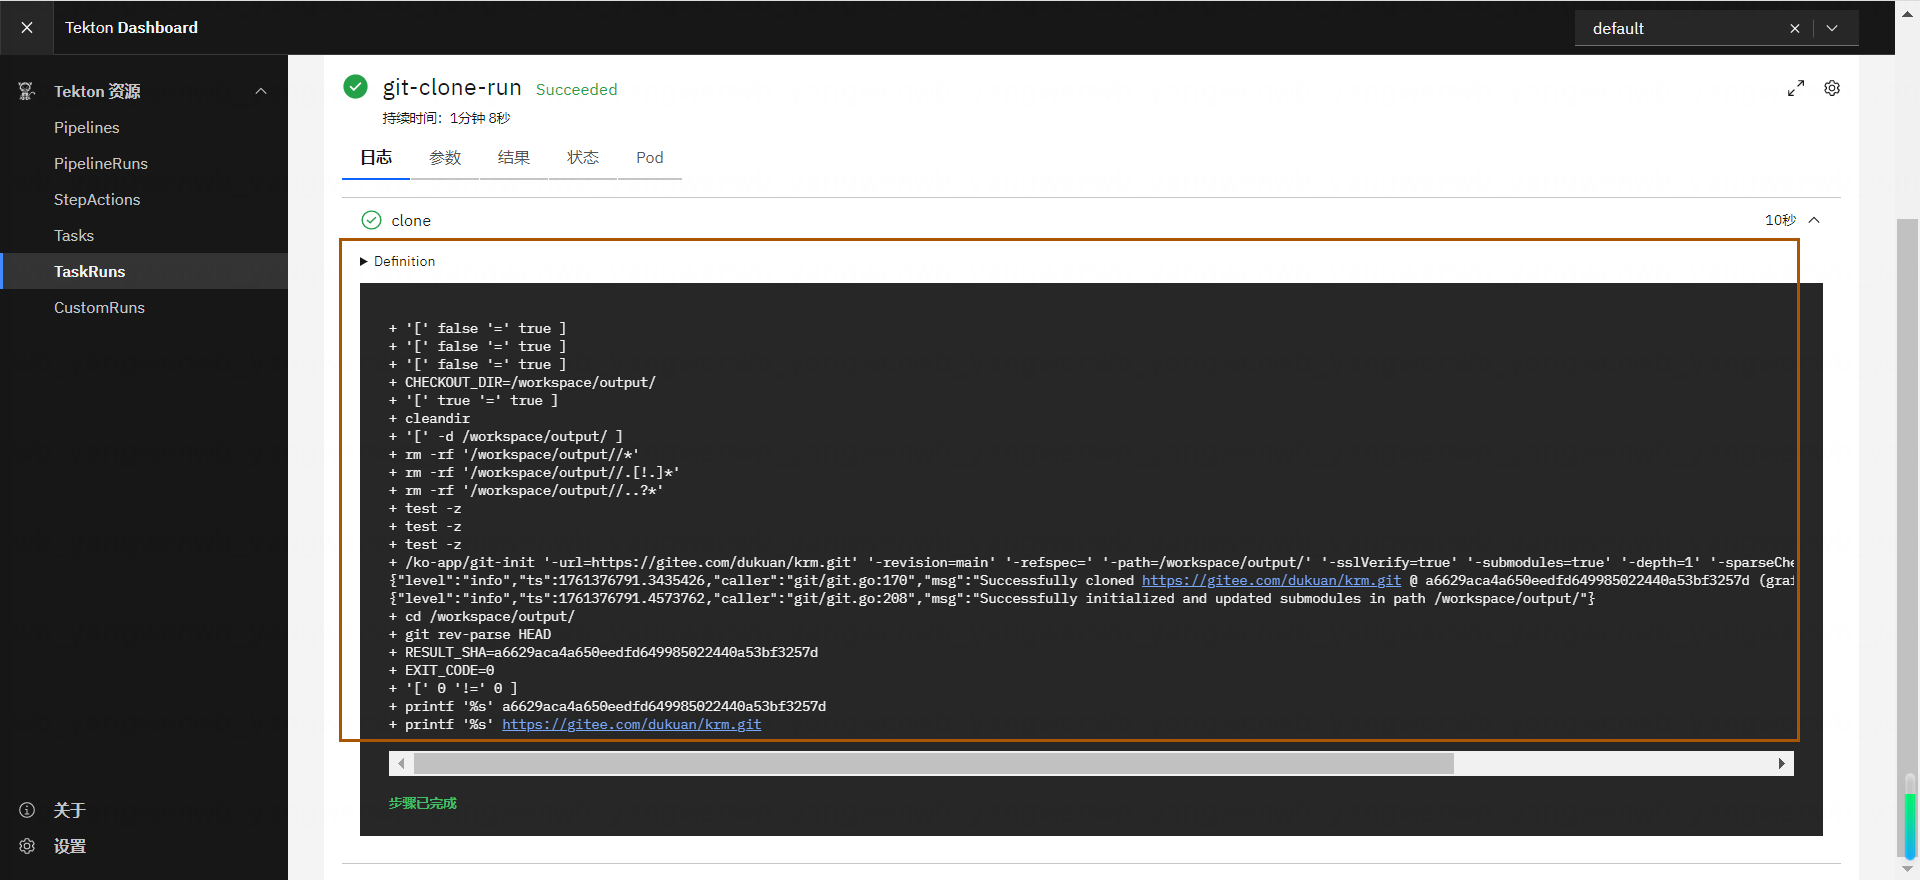
Tekton Dashboard上面可以看到拉取的日志
2.4.2 拉取私有仓库代码
如果需要拉取私有仓库的代码,需要配置 SSH 的私钥并挂载到 Task。
# 首先生成 SSH 的密钥:
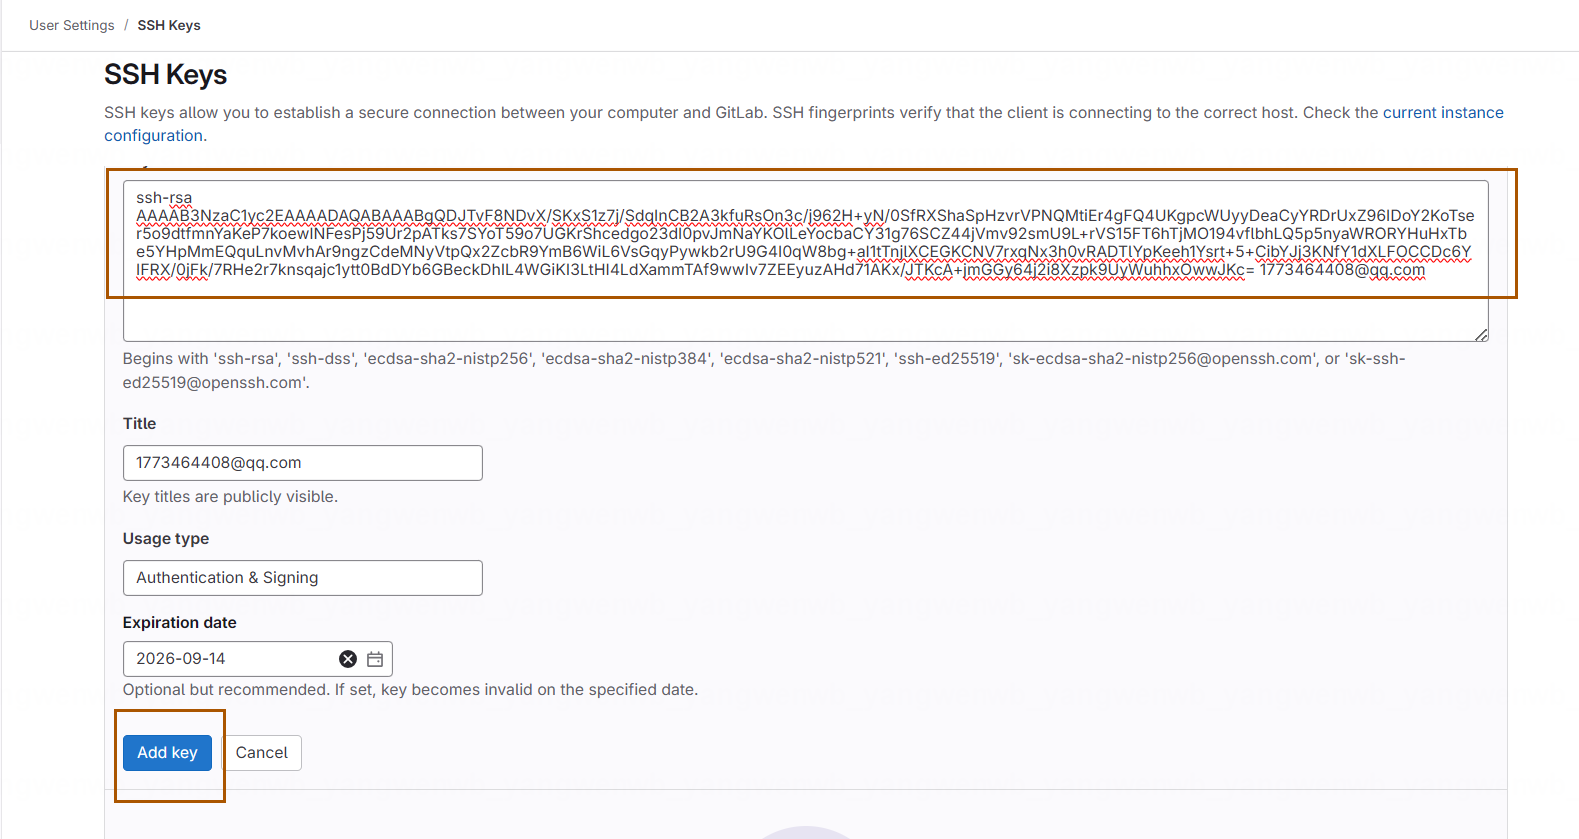
[root@k8s-master01 ~]# ssh-keygen -t rsa -C "1773464408@qq.com"
# 查看公钥:
[root@k8s-master01 ~]# cat .ssh/id_rsa.pub
ssh-rsa AAAAB3NzaC1yc2EAAAADAQABAAABgQDJTvF8NDvX/SKxS1z7j/SdqInCB2A3kfuRsOn3c/j962H+yN/0SfRXShaSpHzvrVPNQMtiEr4gFQ4UKgpcWUyyDeaCyYRDrUxZ96IDoY2KoTser5o9dtfmnYaKeP7koewINFesPj59Ur2pATks7SYoT59o7UGKrShcedgo23dI0pvJmNaYKOlLeYocbaCY31g76SCZ44jVmv92smU9L+rVS15FT6hTjMO194vflbhLQ5p5nyaWRORYHuHxTbe5YHpMmEQquLnvMvhAr9ngzCdeMNyVtpQx2ZcbR9YmB6WiL6VsGqyPywkb2rU9G4I0qW8bg+aI1tTnjlXCEGKCNV7rxqNx3h0vRADTlYpKeeh1Ysrt+5+CibYJj3KNfY1dXLFOCCDc6YIFRX/0jFk/7RHe2r7knsqajc1ytt0BdDYb6GBeckDhIL4WGiKI3LtHI4LdXammTAf9wwIv7ZEEyuzAHd71AKx/JTKcA+jmGGy64j2i8Xzpk9UyWuhhxOwwJKc= 1773464408@qq.com
接下来把公钥导入到代码仓库的 SSH 公钥中:
# 创建 Secret 保存私钥,用于 Tekton 挂载:
[root@k8s-master01 ~]# kubectl create secret generic git-ssh-auth --from-file=id_rsa=/root/.ssh/id_rsa --dry-run=client -oyaml > git-secret.yaml

# 编辑该 Secret 添加 config 字段:
[root@k8s-master01 ~]# vim git-secret.yaml
data:
  config: U3RyaWN0SG9zdEtleUNoZWNraW5nIG5vIApVc2VyS25vd25Ib3N0c0ZpbGUgL2Rldi9udWxsCg==
...

# 创建 Secret:
[root@k8s-master01 ~]# kubectl create -f git-secret.yaml
[root@k8s-master01 ~]# kubectl get secret
NAME           TYPE     DATA   AGE
git-ssh-auth   Opaque   2      13s
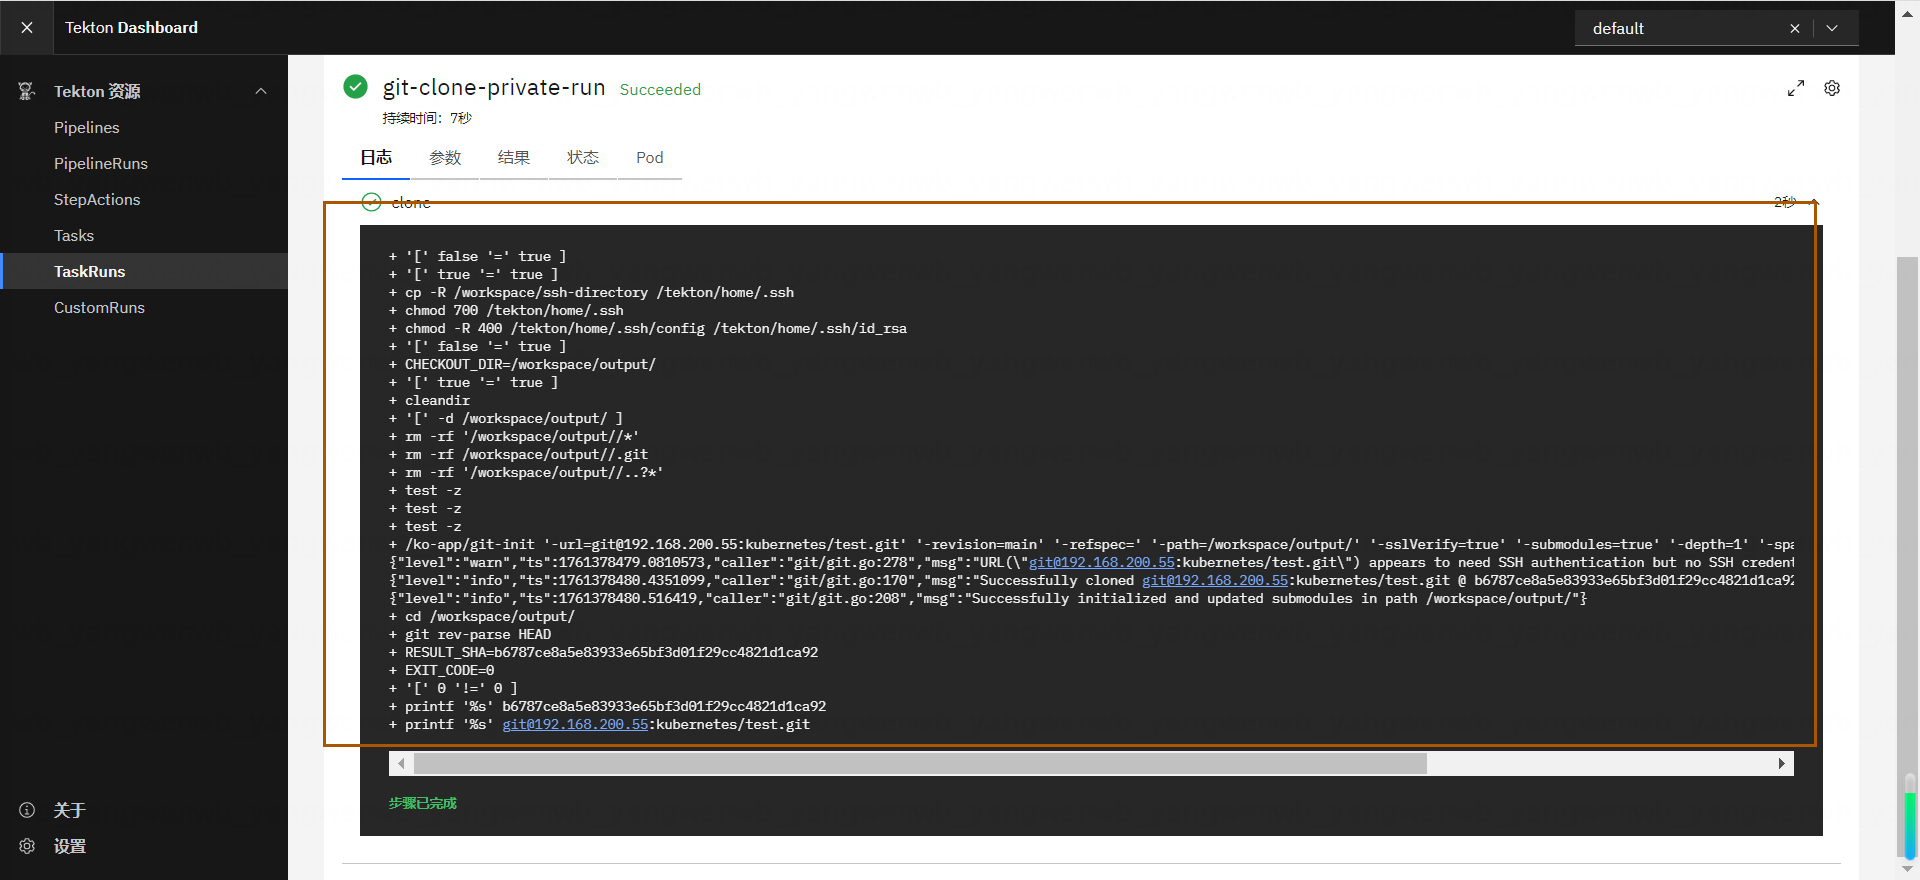
创建 TaskRun,拉取私有仓库代码:
[root@k8s-master01 ~]# vim 04-taskrun-git-clone-private.yaml
[root@k8s-master01 ~]# cat 04-taskrun-git-clone-private.yaml
apiVersion: tekton.dev/v1
kind: TaskRun
metadata:
  name: git-clone-private-run # taskrun name
spec:
  workspaces:
  - name: output
    persistentVolumeClaim:
      claimName: tekton-workspace
  - name: ssh-directory
    secret:
      secretName: git-ssh-auth
  taskRef:
    name: git-clone # task name
  params:
  - name: url
    value: "git@192.168.200.55:kubernetes/test.git"
  - name: gitInitImage
    value: "crpi-q1nb2n896zwtcdts.cn-beijing.personal.cr.aliyuncs.com/ywb01/git-init:v0.29.0"
  - name: revision
    value: main

[root@k8s-master01 ~]# kubectl create -f 04-taskrun-git-clone-private.yaml
[root@k8s-master01 ~]# kubectl get taskrun
NAME                        SUCCEEDED   REASON      STARTTIME   COMPLETIONTIME
git-clone-private-run       True        Succeeded   30s         23s

[root@k8s-master01 ~]# kubectl get po
NAME                            READY   STATUS      RESTARTS   AGE
git-clone-private-run-pod       0/1     Completed   0          32s
Tekton Dashboard上面可以看到拉取的日志
2.4.3 自定义工作目录
上述定义了工作目录 PVC,但是拉取代码时,全部下载到了同一个目录,此时多个任务同时处理时会产生冲突,所以不同服务或者不同任务的工作目录应该独立。
此时可以在 TaskRun 的 PVC 中指定 subPath:
[root@k8s-master01 ~]# vim 05-taskrun-git-clone-subpath.yaml
[root@k8s-master01 ~]# cat 05-taskrun-git-clone-subpath.yaml
apiVersion: tekton.dev/v1
kind: TaskRun
metadata:
  name: git-clone-run-subpath # taskrun name
spec:
  workspaces:
  - name: output
    persistentVolumeClaim:
      claimName: tekton-workspace
    subPath: "git-clone-run-subpath"    # 指定目录
  taskRef:
    name: git-clone # task name
  params:
  - name: url
    value: "https://gitee.com/dukuan/krm.git"
  - name: gitInitImage
    value: "crpi-q1nb2n896zwtcdts.cn-beijing.personal.cr.aliyuncs.com/ywb01/git-init:v0.29.0"
  - name: revision
    value: main
指定 subPath 后,代码会下载到 PVC 的 git-clone-run-subpath 目录:
[root@k8s-master01 ~]# kubectl create -f 05-taskrun-git-clone-subpath.yaml

[root@habor ~]# ll /data/nfs/pvc-f9240e7f-e667-401c-b5fe-db6cf7cfce9a
total 8
drwxr-xr-x 4 root root  114 Oct 25 15:54 git-clone-run-subpath
-rw-r--r-- 1 root root 6154 Oct 25 15:48 README.md
除了上述手动指定工作目录,也可以使用 Tekton 的内置变量自动配置 subPath,比如使用
PipelineRun 和 TaskRun 的名字作为子目录,随后会在 PipelineRun 中演示,所有可用的变量可以在 https://tekton.dev/docs/pipelines/variables/#variables-available-in-a-pipeline 中获取。
2.4.4 初始化Task
下载代码后,可能需要进行一些初始化操作,比如获取 Commit 信息、生成镜像的 TAG 等。
此时可以单独创建一个用来初始化的 Task:
[root@k8s-master01 ~]# vim 06-init-task.yaml
[root@k8s-master01 ~]# cat 06-init-task.yaml
apiVersion: tekton.dev/v1
kind: Task
metadata:
  name: init
spec:
  description: "生成初始化信息"
  # 定义一个 workspace,后续需要把拉取代码的工作目录挂载到该 workspace
  workspaces:
  - name: source
  steps:
  - name: read
    image: registry.cn-beijing.aliyuncs.com/dotbalo/git-init:v0.29.0
    # 指定当前 task 的工作目录为 workspace 的路径
    workingDir: $(workspaces.source.path)
    script: |
      #!/usr/bin/env sh
      ls
      ln -sf /usr/share/zoneinfo/Asia/Shanghai /etc/localtime ; echo "Asia/Shanghai" > /etc/timezone
      CUR_DATE=`TZ='Asia/Shanghai' date '+%Y%m%d-%H%M%S'`
      # 获取本次提交的 Commit 信息
      COMMIT_MESSAGE=`git log -1 --pretty=format:'%h : %an %s'`
      CUR_DATE=`date '+%Y%m%d-%H%M%S'`
      SHORT_COMMIT=`git log -n 1 --pretty=format:'%h'`
      TAG=`echo "${CUR_DATE}-${SHORT_COMMIT}"`
      echo $TAG

[root@k8s-master01 ~]# kubectl create -f 06-init-task.yaml
[root@k8s-master01 ~]# kubectl get task
NAME        AGE
...
init        5s
接下来创建一个 TaskRun 执行该 Task
[root@k8s-master01 ~]# vim 06-init-taskrun.yaml
[root@k8s-master01 ~]# cat 06-init-taskrun.yaml
apiVersion: tekton.dev/v1
kind: TaskRun
metadata:
  name: init-taskrun # taskrun name
spec:
  workspaces:
  - name: source
    persistentVolumeClaim:
      claimName: tekton-workspace
    subPath: "git-clone-run-subpath"
  taskRef:
    name: init # task name

[root@k8s-master01 ~]# kubectl create -f 06-init-taskrun.yaml
[root@k8s-master01 ~]# kubectl get taskrun
NAME                        SUCCEEDED   REASON      STARTTIME   COMPLETIONTIME
...
init-taskrun                True        Succeeded   52s         29s
创建该 TaskRun 后,查看该 Pod 的日志:
[root@k8s-master01 ~]# kubectl get po
NAME                            READY   STATUS      RESTARTS   AGE
...
init-taskrun-pod                0/1     Completed   0          58s

[root@k8s-master01 ~]# kubectl logs -f init-taskrun-pod -c step-read
LICENSE
README.md
deploy.md
image.png
images
krm.yaml
20251025-081930-a6629ac
2.4.5 结果存储results
有时候在一个 task 执行某个操作后,需要记录一下结果,然后根据这个结果去判定是否应
该继续执行,或者要使用这个结果去执行其它的动作。比如根据上个 task 生成的 tag 进行镜像的构建,此时由初始化生成的 tag 需要传递到构建镜像的 task,这个需求可以使用 results 去实现。
Results 一般用于存储各个过程产生的临时数据,比如由初始化 task 产生的数据,可以保留在 results 中,其他 task 可以通过 results 获取数据。
接下来修改初始化 Task,添加 results,把 tag 结果保存:
[root@k8s-master01 ~]# vim 06-init-task-res.yaml
[root@k8s-master01 ~]# cat 06-init-task-res.yaml
apiVersion: tekton.dev/v1
kind: Task
metadata:
  name: init
spec:
  description: "生成初始化信息"
  # 定义一个 workspace,后续需要把拉取代码的工作目录挂载到该 workspace
  workspaces:
  - name: source
  results:      # 添加tag
  - name: tag
    description: result for tag
  steps:
  - name: read
    image: crpi-q1nb2n896zwtcdts.cn-beijing.personal.cr.aliyuncs.com/ywb01/git-init:v0.29.0
    # 指定当前 task 的工作目录为 workspace 的路径
    workingDir: $(workspaces.source.path)
    script: |
      #!/usr/bin/env sh
      ls
      # 获取本次提交的 Commit 信息
      COMMIT_MESSAGE=`git log -1 --pretty=format:'%h : %an %s'`
      CUR_DATE=`date '+%Y%m%d-%H%M%S'`
      SHORT_COMMIT=`git log -n 1 --pretty=format:'%h'`
      TAG=`echo "${CUR_DATE}-${SHORT_COMMIT}"`
      echo $TAG
      # 把 TAG 的值,写入到 results 中
      # tag 是结果的变量名,可以自定义
      # results 和 path 是固定格式
      echo $TAG | tee $(results.tag.path)

[root@k8s-master01 ~]# kubectl replace -f 06-init-task-res.yaml
保存后的 results,可以在 Pipeline 中使用如下方式获取:
    params:
    - name: tag
      # tasks 固定写法,init 为产生 result 的 task,tag 是 result 名字
      value: $(tasks.init.results.tag)
2.4.6 串联多任务Pipelines
接下来创建一个 Pipeline,结合上述测试的 task,进行联合工作,并且使用 results 传递数据。说先创建一个额外的 task,用来接收 tag 参数并展示:
[root@k8s-master01 ~]# vim 07-show-tag-task.yaml
[root@k8s-master01 ~]# cat 07-show-tag-task.yaml
apiVersion: tekton.dev/v1
kind: Task
metadata:
  name: show-tag
spec:
  description: Read and display TAG.
  # 通过 params 获取 pipeline 传递过来的 results 值
  params:
  - name: tag
  steps:
  - name: read
    image: crpi-q1nb2n896zwtcdts.cn-beijing.personal.cr.aliyuncs.com/ywb01/alpine:3.9-tomcat
    script: |
      #!/usr/bin/env sh
      echo $(params.tag)

[root@k8s-master01 ~]# kubectl create -f 07-show-tag-task.yaml
接下来创建一个 Pipeline,把各个 task 串在一起:
[root@k8s-master01 ~]# vim 07-pipeline-git-init-show.yaml
[root@k8s-master01 ~]# cat 07-pipeline-git-init-show.yaml
apiVersion: tekton.dev/v1
kind: Pipeline
metadata:
  name: git-init-show
spec:
  description: |
    下载代码,初始化并存储数据.
  # 以下为 pipeline 可以接收的参数,使用 pipelineRun 可以进行传参
  params:
  - name: url # 用于接收代码地址
    type: string
    description: The git repo URL to clone from.
  - name: gitInitImage
    type: string
    # 配置一个默认值后续 Run 的时候就不需要再次传递
    default: crpi-q1nb2n896zwtcdts.cn-beijing.personal.cr.aliyuncs.com/ywb01/git-init:v0.29.0
  # 定义 pipeline 的 workspace
  workspaces:
  - name: share-data # 配置一个 workspace 保留共享数据
    description: |
      This workspace contains the cloned repo files, so they can be readby the next task.
  # 拉取代码 ssh 配置
  - name: ssh-directory
    description: My ssh credentials
  # 定义该 pipeline 指定的 task
  tasks:
  - name: fetch-source
    taskRef:
      name: git-clone
    workspaces: # 把 pipeline 的 share-data workspace 挂载到 git-clone 的 output 的 workspace
    - name: output
      workspace: share-data
    # 把接收到的 ssh-directory 传递给 task 的 ssh-directory
    - name: ssh-directory
      workspace: ssh-directory
    # 传递给 task 的参数
    params:
    - name: url
      value: $(params.url) # 从 pipeline 的 params 获取参数并传递
    - name: gitInitImage
      value: $(params.gitInitImage)
  - name: init
    # 等代码拉取 task 结束后执行初始化
    runAfter: ["fetch-source"]
    taskRef:
      name: init
    workspaces:
    - name: source
      workspace: share-data
  - name: show-tag
    # 等待 init 结束获取 tag 的值
    runAfter: ["init"]
    taskRef:
      name: show-tag
    params:
    - name: tag
    # 通过$(tasks.生产 result 的 task 的名字.results.result 名字)获取 result 结果
      value: $(tasks.init.results.tag)

[root@k8s-master01 ~]# kubectl create -f 07-pipeline-git-init-show.yaml
接下来创建 pipelineRun:
[root@k8s-master01 ~]# cat 07-pipelinerun-git-init-show.yaml
apiVersion: tekton.dev/v1beta1
kind: PipelineRun
metadata:
# 自动生成名字
generateName: clone-and-init
spec:
pipelineRef:
name: git-init-show
# 定义 workspace
workspaces:
# 把 K8s 的 PVC 挂载到 shared-data workspace
- name: share-data
persistentVolumeClaim:
claimName: tekton-workspace
# 使用 pipelineRun 的名字作为子目录
subPath: $(context.pipelineRun.name)
# 把 K8s 的 secret 挂载到 git-credentials workspace
- name: ssh-directory
secret:
secretName: git-ssh-auth
# 传递参数给 pipeline
params:
- name: url
value: git@192.168.200.55:kubernetes/test.git
- name: revision
value: "main"
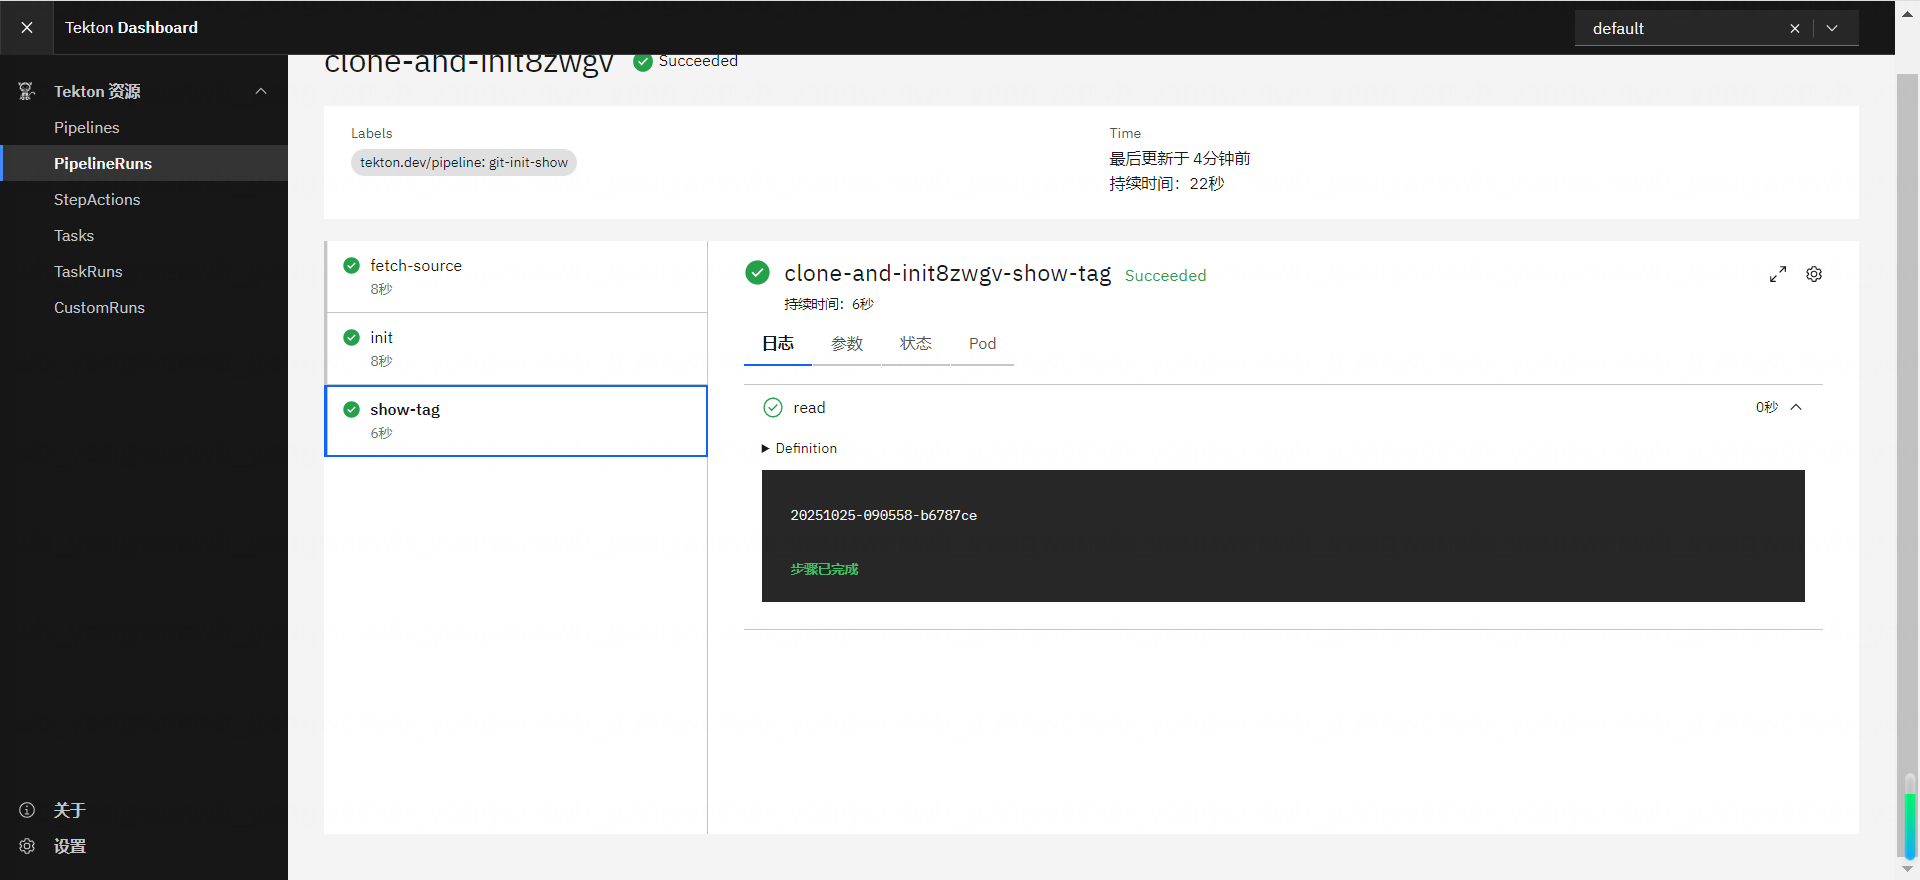
[root@k8s-master01 ~]# kubectl create -f 07-pipelinerun-git-init-show.yaml
# 查看该 pipelineRun 创建的 taskRun:
[root@k8s-master01 ~]# kubectl get taskrun | grep clone-and-init
clone-and-init8zwgv-fetch-source   True        Succeeded   2m3s        116s
clone-and-init8zwgv-init           True        Succeeded   116s        108s
clone-and-init8zwgv-show-tag       True        Succeeded   108s        102s

# 查看创建的 Pod:
[root@k8s-master01 ~]# kubectl get po | grep clone-and-init
clone-and-init8zwgv-fetch-source-pod   0/1     Completed   0          2m15s
clone-and-init8zwgv-init-pod           0/1     Completed   0          2m8s
clone-and-init8zwgv-show-tag-pod       0/1     Completed   0          2m
Tekton Dashboard上面可以看到执行动作
2.4.7 代码构建Task
上述任务已经实现了代码下载、初始化和数据传递的功能,接下来再添加代码构建的 Task。需要注意构建任务,针对不同的语言需要的环境和命令是不同的,所以该 Task 需要从参数获取构建命令和构建的基础镜像:
[root@k8s-master01 ~]# vim 08-task-build.yaml
[root@k8s-master01 ~]# cat 08-task-build.yaml
apiVersion: tekton.dev/v1
kind: Task
metadata:
  name: build
spec:
  description: Code Build
  workspaces:
  - name: source
  params: # 参数也可以大写
  - name: BUILD_COMMAND
  - name: BUILD_IMAGE
  steps:
  - name: build
    image: $(params.BUILD_IMAGE)
    workingDir: $(workspaces.source.path)
    script: |
      #!/usr/bin/env sh
      pwd
      ls
      echo $(params.BUILD_COMMAND)
      $(params.BUILD_COMMAND)

[root@k8s-master01 ~]# kubectl create -f 08-task-build.yaml
接下来把该 Task 添加到 Pipeline 中:
[root@k8s-master01 ~]# vim 08-pipeline-git-init-build.yaml
[root@k8s-master01 ~]# cat 08-pipeline-git-init-build.yaml
apiVersion: tekton.dev/v1
kind: Pipeline
metadata:
  name: git-init-build
spec:
  description: |
    下载代码,初始化并存储数据.
  # 以下为 pipeline 可以接收的参数,使用 pipelineRun 可以进行传参
  params:
  - name: url # 用于接收代码地址
    type: string
    description: The git repo URL to clone from.
  - name: gitInitImage
    type: string
    # 配置一个默认值后续 Run 的时候就不需要再次传递
    default: crpi-q1nb2n896zwtcdts.cn-beijing.personal.cr.aliyuncs.com/ywb01/git-init:v0.29.0
  - name: BUILD_IMAGE
    type: string
    default: crpi-q1nb2n896zwtcdts.cn-beijing.personal.cr.aliyuncs.com/ywb01/alpine:3.9-tomcat
  - name: BUILD_COMMAND
    type: string
    default: ls
  # 定义 workspace
  workspaces:
  - name: share-data # 配置一个 workspace 保留共享数据
    description: |
      This workspace contains the cloned repo files, so they can be read by the next task.
  # 拉取代码 ssh 配置
  - name: ssh-directory
    description: My ssh credentials
  # 定义改 pipeline 指定的 task
  tasks:
  - name: fetch-source
    taskRef:
      name: git-clone
    workspaces:
    - name: output
      workspace: share-data
    # 把接收到的 ssh-directory 传递给 task 的 ssh-directory
    - name: ssh-directory
      workspace: ssh-directory
    # 传递给 task 的参数
    params:
    - name: url
      value: $(params.url) # 从 pipeline 的 params 获取参数并传递
    - name: gitInitImage
      value: $(params.gitInitImage)
  - name: init
    # 等代码拉取 task 结束后执行初始化
    runAfter: ["fetch-source"]
    taskRef:
      name: init
    workspaces:
    - name: source
      workspace: share-data
  - name: build # 代码下载后即可开始编译
    runAfter: ["fetch-source"]
    taskRef:
      name: build
    workspaces:
    - name: source
      workspace: share-data
    params:
    - name: BUILD_COMMAND
      value: $(params.BUILD_COMMAND)
    - name: BUILD_IMAGE
      value: $(params.BUILD_IMAGE)

[root@k8s-master01 ~]# kubectl create -f 08-pipeline-git-init-build.yaml
接下来创建 pipelineRun:
[root@k8s-master01 ~]# vim 08-pipelinerun-git-init-build.yaml
[root@k8s-master01 ~]# cat 08-pipelinerun-git-init-build.yaml
apiVersion: tekton.dev/v1
kind: PipelineRun
metadata:
  # 自动生成名字
  generateName: clone-and-init
spec:
  pipelineRef:
    name: git-init-build
  # 定义 workspace
  workspaces:
  - name: share-data
    persistentVolumeClaim:
      claimName: tekton-workspace
    # 使用 pipelineRun 的名字作为子目录
    subPath: $(context.pipelineRun.name)
  # 把 K8s 的 secret 挂载到 git-credentials workspace
  - name: ssh-directory
    secret:
      secretName: git-ssh-auth
  # 传递参数给 pipeline
  params:
  - name: url
    value: git@192.168.200.55:kubernetes/vue-project.git
  - name: revision
    value: "master"
  - name: BUILD_IMAGE
    value: crpi-q1nb2n896zwtcdts.cn-beijing.personal.cr.aliyuncs.com/ywb01/node:16.17.0-apline-cnpm
  - name: BUILD_COMMAND
    value: |-
      cnpm install
      npm run build
      ls
      ls dist

[root@k8s-master01 ~]# kubectl create -f 08-pipelinerun-git-init-build.yaml
Tekton Dashboard上面可以看到执行动作
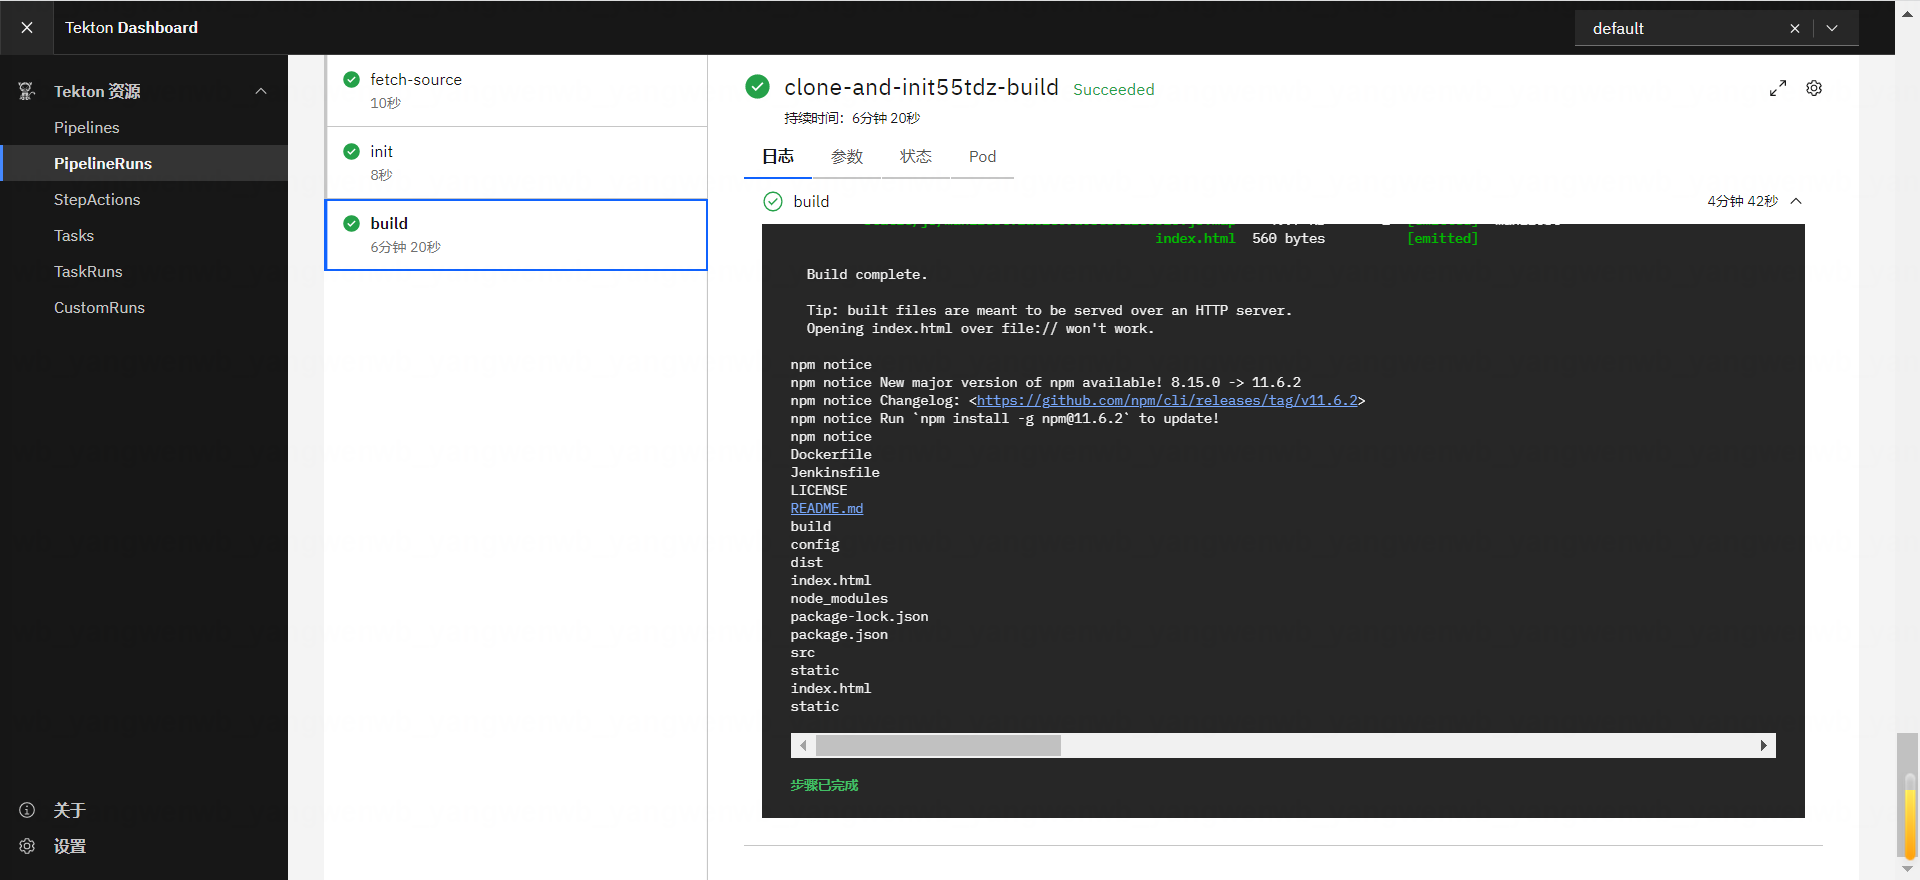
2.4.8 镜像构建Task
上述已经执行了代码构建,并且生成了产物,接下来可以创建一个 Kaniko 的 Task,用于构建镜像和上传镜像,同时记录镜像地址。
首先创建 Secret 记录 docker 的配置文件:
[root@k8s-master01 ~]# docker login crpi-q1nb2n896zwtcdts.cn-beijing.personal.cr.aliyuncs.com
Usernam
Error: Non-null Username Required
[root@k8s-master01 ~]# docker login crpi-q1nb2n896zwtcdts.cn-beijing.personal.cr.aliyuncs.com
Username: ywb1108
Password:

WARNING! Your credentials are stored unencrypted in '/root/.docker/config.json'.
Configure a credential helper to remove this warning. See
https://docs.docker.com/go/credential-store/

Login Succeeded

[root@k8s-master01 ~]# ls ~/.docker/config.json
/root/.docker/config.json

# 创建 Secret:
[root@k8s-master01 ~]# kubectl create secret generic docker-credentials --from-file=/root/.docker/config.json
接下来创建一个 Kaniko Task:
[root@k8s-master01 ~]# vim 09-task-kaniko.yaml
[root@k8s-master01 ~]# cat 09-task-kaniko.yaml
apiVersion: tekton.dev/v1
kind: Task
metadata:
  name: kaniko
  labels:
    app.kubernetes.io/version: "0.6"
  annotations:
    tekton.dev/pipelines.minVersion: "0.17.0"
    tekton.dev/categories: Image Build
    tekton.dev/tags: image-build
    tekton.dev/displayName: "Build and upload container image using Kaniko"
    tekton.dev/platforms: "linux/amd64,linux/arm64,linux/ppc64le"
spec:
  description: >-
    This Task builds a simple Dockerfile with kaniko and pushes to a registry.
    This Task stores the image name and digest as results, allowing Tekton Chains to pick up that an image was built & sign it.
  params:
  - name: IMAGE_URL
    type: string
  - name: DOCKERFILE
    description: Path to the Dockerfile to build.
    default: ./Dockerfile
  - name: CONTEXT
    description: The build context used by Kaniko.
    default: ./
  - name: EXTRA_ARGS
    type: array
    default: []
  - name: BUILDER_IMAGE
    description: The image on which builds will run (default latest)
    default: crpi-q1nb2n896zwtcdts.cn-beijing.personal.cr.aliyuncs.com/ywb01/executor:v1.22.0
  workspaces:
  - name: source
    description: Holds the context and Dockerfile
  # 挂载 docker 的配置文件,用于访问镜像仓库
  - name: docker-credentials
    description: Includes a docker `config.json`
    optional: true
    mountPath: /kaniko/.docker
  results:
  - name: IMAGE_URL
    description: URL of the image just built.
  steps:
  - name: build-and-push
    workingDir: $(workspaces.source.path)
    image: crpi-q1nb2n896zwtcdts.cn-beijing.personal.cr.aliyuncs.com/ywb01/kaniko-executor:debug
    script: |
      executor -c . --insecure --skip-tls-verify -d $(params.IMAGE_URL)
    securityContext:
      runAsUser: 0
  - name: write-url
    image: crpi-q1nb2n896zwtcdts.cn-beijing.personal.cr.aliyuncs.com/ywb01/git-init:v0.29.1
    script: |
      set -e
      image="$(params.IMAGE_URL)"
      echo -n "${image}" | tee "$(results.IMAGE_URL.path)"

[root@k8s-master01 ~]# kubectl create -f 09-task-kaniko.yaml
接下来创建 Dockerfile,放置于代码根目录:
新建 Pipeline 添加镜像构建 Task:
[root@k8s-master01 ~]# vim 09-pipeline-git-init-build-kaniko.yaml
[root@k8s-master01 ~]# cat 09-pipeline-git-init-build-kaniko.yaml
apiVersion: tekton.dev/v1
kind: Pipeline
metadata:
  name: git-init-build-kaniko
spec:
  description: |
    下载代码,初始化并存储数据.
  # 以下为 pipeline 可以接收的参数,使用 pipelineRun 可以进行传参
  params:
  - name: url # 用于接收代码地址
    type: string
    description: The git repo URL to clone from.
  - name: revision
    type: string
  - name: gitInitImage
    type: string
    # 配置一个默认值后续 Run 的时候就不需要再次传递
    default: crpi-q1nb2n896zwtcdts.cn-beijing.personal.cr.aliyuncs.com/ywb01/git-init:v0.29.0
  - name: BUILD_IMAGE
    type: string
    default: crpi-q1nb2n896zwtcdts.cn-beijing.personal.cr.aliyuncs.com/ywb01/alpine:3.9-tomcat
  - name: BUILD_COMMAND
    type: string
    default: ls
  # 添加用于镜像的参数
  - name: DOCKERFILE
    type: string
    default: ./Dockerfile
  - name: REGISTRY
    type: string
  - name: REPOSTORY
    type: string
  - name: IMAGE_NAME
    type: string
  # 定义 workspace
  workspaces:
  - name: share-data # 配置一个 workspace 保留共享数据
    description: |
      This workspace contains the cloned repo files, so they can be read by the next task.
  # 拉取代码 ssh 配置
  - name: ssh-directory
    description: My ssh credentials
  # 添加 docker 认证
  - name: docker-credentials
    description: docker credentials
  # 定义改 pipeline 指定的 task
  tasks:
  - name: fetch-source
    taskRef:
      name: git-clone
    workspaces:
    - name: output
      workspace: share-data
    # 把接收到的 ssh-directory 传递给 task 的 ssh-directory
    - name: ssh-directory
      workspace: ssh-directory
    # 传递给 task 的参数
    params:
    - name: url
      value: $(params.url) # 从 pipeline 的 params 获取参数并传递
    - name: gitInitImage
      value: $(params.gitInitImage)
    - name: revision
      value: $(params.revision)
  - name: init
    # 等代码拉取 task 结束后执行初始化
    runAfter: ["fetch-source"]
    taskRef:
      name: init
    workspaces:
    - name: source
      workspace: share-data
  - name: build
    runAfter: ["fetch-source"]
    taskRef:
      name: build
    workspaces:
    - name: source
      workspace: share-data
    params:
    - name: BUILD_COMMAND
      value: $(params.BUILD_COMMAND)
    - name: BUILD_IMAGE
      value: $(params.BUILD_IMAGE)
  # 添加 kaniko task
  - name: kaniko
    runAfter: ["build"]
    taskRef:
      name: kaniko
    workspaces:
    - name: source
      workspace: share-data
    - name: docker-credentials
      workspace: docker-credentials
    params:
    - name: IMAGE_URL
      value: $(params.REGISTRY)/$(params.REPOSTORY)/$(params.IMAGE_NAME):$(tasks.init.results.tag)

[root@k8s-master01 ~]# kubectl create -f 09-pipeline-git-init-build-kaniko.yaml
创建 PipelineRun 执行构建:
[root@k8s-master01 ~]# vim 09-pipelinerun-git-init-build-kaniko.yaml
[root@k8s-master01 ~]# cat 09-pipelinerun-git-init-build-kaniko.yaml
apiVersion: tekton.dev/v1
kind: PipelineRun
metadata:
  # 自动生成名字
  generateName: build-push
spec:
  pipelineRef:
    name: git-init-build-kaniko
  # 定义 workspace
  workspaces:
  - name: share-data
    persistentVolumeClaim:
      claimName: tekton-workspace
    # 使用 pipelineRun 的名字作为子目录
    subPath: $(context.pipelineRun.name)
  # 把 K8s 的 secret 挂载到 git-credentials workspace
  - name: ssh-directory
    secret:
      secretName: git-ssh-auth
  - name: docker-credentials
    secret:
      secretName: docker-credentials
  # 传递参数给 pipeline
  params:
  - name: url
    value: git@192.168.200.55:kubernetes/vue-project.git
  - name: revision
    value: "tekton"
  - name: BUILD_IMAGE
    value: crpi-q1nb2n896zwtcdts.cn-beijing.personal.cr.aliyuncs.com/ywb01/node:16.17.0-apline-cnpm
  - name: BUILD_COMMAND
    value: |-
      cnpm install
      npm run build
      ls
      ls dist
  - name: REGISTRY
    value: crpi-q1nb2n896zwtcdts.cn-beijing.personal.cr.aliyuncs.com
  - name: REPOSTORY
    value: ywb01
  - name: IMAGE_NAME
    value: vue-project

[root@k8s-master01 ~]# kubectl create -f 09-pipelinerun-git-init-build-kaniko.yaml
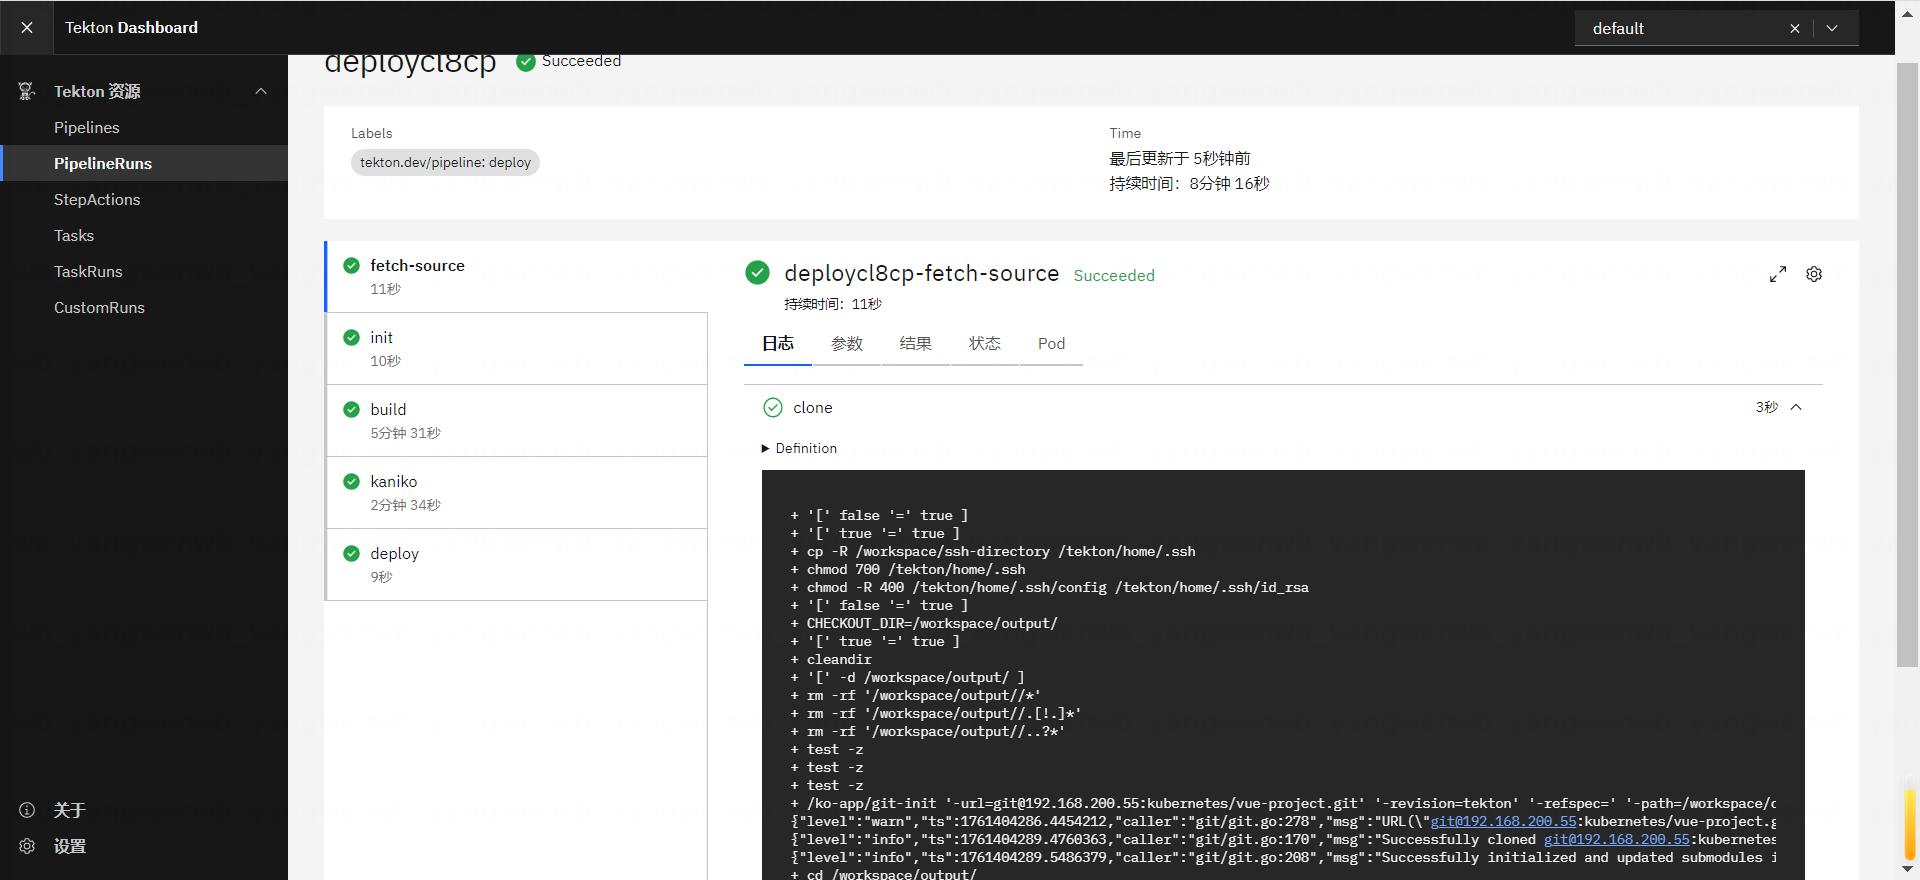
Tekton Dashboard上面可以看到执行动作
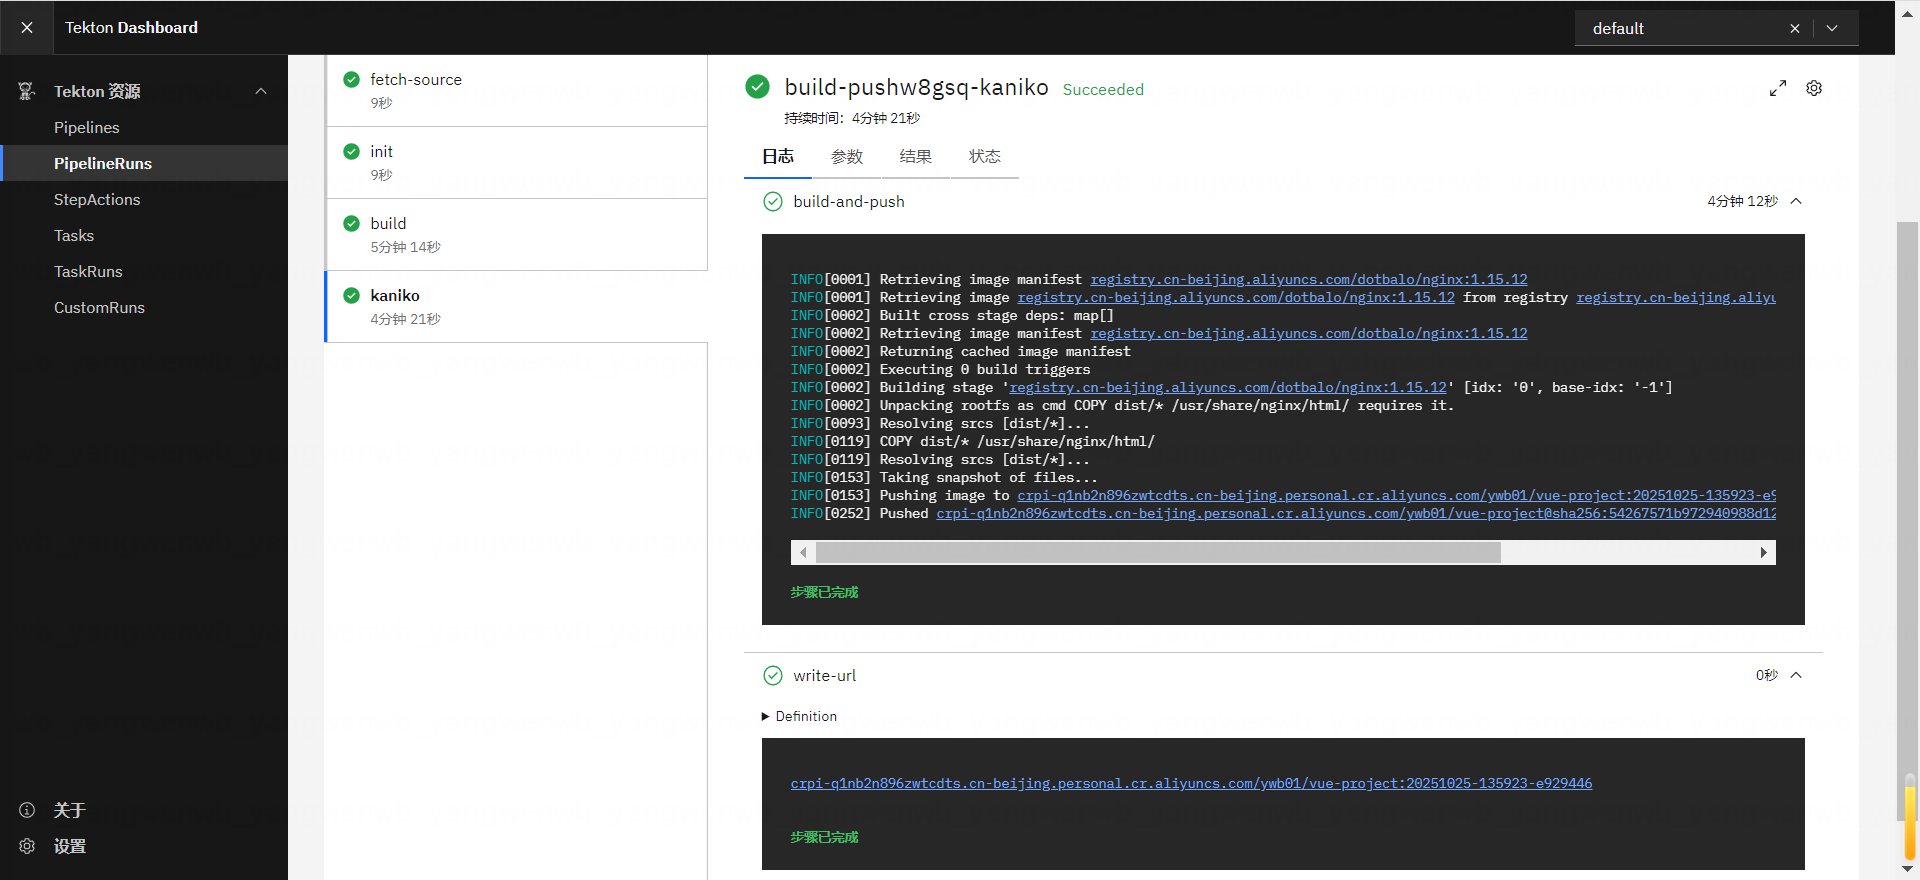
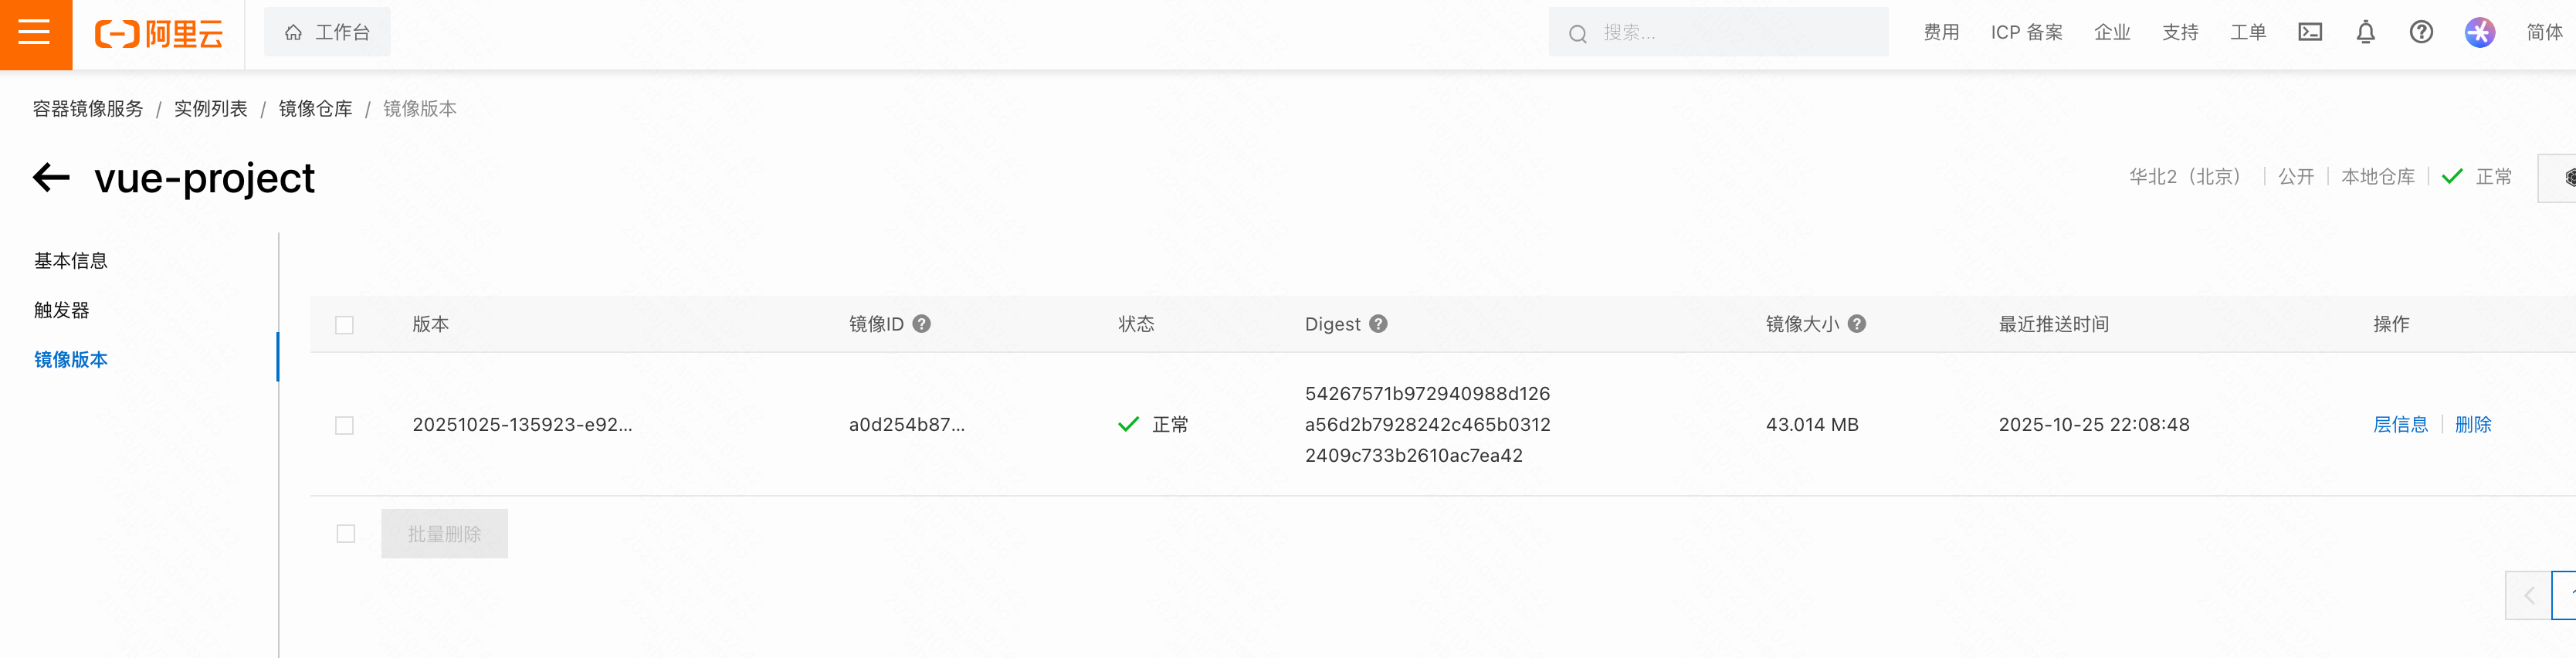
阿里云镜像平台
2.4.9 服务发版Task
最后就可以通过一个发版的 Task,把最新的镜像发布到 Kubernetes。
首先创建一个 kubeconfig 的 secret:
[root@k8s-master01 ~]# kubectl create secret generic kubeconfig --from-file=study-kubeconfig=/root/.kube/config
接下来创建一个测试的 Deployment:
[root@k8s-master01 ~]# kubectl create deploy vue-project --image=crpi-q1nb2n896zwtcdts.cn-beijing.personal.cr.aliyuncs.com/ywb01/vue-project:20251025-135923-e929446
接下创建一个用于部署的 Task:
[root@k8s-master01 ~]# vim 10-task-deploy.yaml
[root@k8s-master01 ~]# cat 10-task-deploy.yaml
apiVersion: tekton.dev/v1
kind: Task
metadata:
  name: deploy
spec:
  description: deploy to kubernetes by kubectl
  workspaces:
  - name: kubeconfig
    mountPath: /mnt/kubeconfig
  params:
  - name: IMAGE_URL
    type: string
  - name: NAMESPACE
    type: string
    default: default
  - name: DEPLOY_NAME
    type: string
  - name: CONTAINER_NAME
    type: string
  - name: KUBECONFIG_PATH
    type: string
  steps:
  - name: deploy
    image: crpi-q1nb2n896zwtcdts.cn-beijing.personal.cr.aliyuncs.com/ywb01/kubectl:devops
    script: |
      pwd
      ls /mnt/kubeconfig
      echo "Deploy version: $(params.IMAGE_URL)"
      echo "kubectl --kubeconfig /mnt/kubeconfig/$(params.KUBECONFIG_PATH) -n $(params.NAMESPACE) set image deploy $(params.DEPLOY_NAME) $(params.CONTAINER_NAME)=$(params.IMAGE_URL)"
      kubectl --kubeconfig /mnt/kubeconfig/$(params.KUBECONFIG_PATH) -n $(params.NAMESPACE) set image deploy $(params.DEPLOY_NAME) $(params.CONTAINER_NAME)=$(params.IMAGE_URL)
      kubectl --kubeconfig /mnt/kubeconfig/$(params.KUBECONFIG_PATH) -n $(params.NAMESPACE) get po

[root@k8s-master01 ~]# kubectl create -f 10-task-deploy.yaml
Pipeline 添加发版的 Task:
[root@k8s-master01 ~]# vim 10-pipeline-git-init-build-deploy.yaml
[root@k8s-master01 ~]# cat 10-pipeline-git-init-build-deploy.yaml
apiVersion: tekton.dev/v1
kind: Pipeline
metadata:
  name: deploy
spec:
  description: |
    下载代码,初始化并存储数据.
  # 以下为 pipeline 可以接收的参数,使用 pipelineRun 可以进行传参
  params:
  - name: url # 用于接收代码地址
    type: string
    description: The git repo URL to clone from.
  - name: revision
    type: string
  - name: gitInitImage
    type: string
    # 配置一个默认值后续 Run 的时候就不需要再次传递
    default: crpi-q1nb2n896zwtcdts.cn-beijing.personal.cr.aliyuncs.com/ywb01/git-init:v0.29.0
  - name: BUILD_IMAGE
    type: string
    default: crpi-q1nb2n896zwtcdts.cn-beijing.personal.cr.aliyuncs.com/ywb01/alpine:3.9-tomcat
  - name: BUILD_COMMAND
    type: string
    default: ls
  # 添加用于镜像的参数
  - name: DOCKERFILE
    type: string
    default: ./Dockerfile
  - name: REGISTRY
    type: string
  - name: REPOSTORY
    type: string
  - name: IMAGE_NAME
    type: string
  - name: NAMESPACE
    type: string
    default: default
  - name: DEPLOY_NAME
    type: string
  - name: CONTAINER_NAME
    type: string
  - name: KUBECONFIG_PATH
    type: string
  # 定义 workspace
  workspaces:
  - name: share-data # 配置一个 workspace 保留共享数据
    description: |
      This workspace contains the cloned repo files, so they can be read by the next task.
  # 拉取代码 ssh 配置
  - name: ssh-directory
    description: My ssh credentials
  # 添加 docker 认证
  - name: docker-credentials
    description: docker credentials
  - name: kubeconfig
    description: kubernetes kubeconfig
  # 定义改 pipeline 指定的 task
  tasks:
  - name: fetch-source
    taskRef:
      name: git-clone
    workspaces:
    - name: output
      workspace: share-data
    # 把接收到的 ssh-directory 传递给 task 的 ssh-directory
    - name: ssh-directory
      workspace: ssh-directory
    # 传递给 task 的参数
    params:
    - name: url
      value: $(params.url) # 从 pipeline 的 params 获取参数并传递
    - name: gitInitImage
      value: $(params.gitInitImage)
    - name: revision
      value: $(params.revision)
  - name: init
    # 等代码拉取 task 结束后执行初始化
    runAfter: ["fetch-source"]
    taskRef:
      name: init
    workspaces:
    - name: source
      workspace: share-data
  - name: build
    runAfter: ["fetch-source"]
    taskRef:
      name: build
    workspaces:
    - name: source
      workspace: share-data
    params:
    - name: BUILD_COMMAND
      value: $(params.BUILD_COMMAND)
    - name: BUILD_IMAGE
      value: $(params.BUILD_IMAGE)
  # 添加 kaniko task
  - name: kaniko
    runAfter: ["build"]
    taskRef:
      name: kaniko
    workspaces:
    - name: source
      workspace: share-data
    - name: docker-credentials
      workspace: docker-credentials
    params:
    - name: IMAGE_URL
      value: $(params.REGISTRY)/$(params.REPOSTORY)/$(params.IMAGE_NAME):$(tasks.init.results.tag)
  # 添加 deploy task
  - name: deploy
    runAfter: ["build"]
    taskRef:
      name: deploy
    workspaces:
    - name: kubeconfig
      workspace: kubeconfig
    params:
    - name: IMAGE_URL
      value: $(params.REGISTRY)/$(params.REPOSTORY)/$(params.IMAGE_NAME):$(tasks.init.results.tag)
    - name: NAMESPACE
      value: $(params.NAMESPACE)
    - name: DEPLOY_NAME
      value: $(params.DEPLOY_NAME)
    - name: CONTAINER_NAME
      value: $(params.CONTAINER_NAME)
    - name: KUBECONFIG_PATH
      value: $(params.KUBECONFIG_PATH)

[root@k8s-master01 ~]# kubectl create -f 10-pipeline-git-init-build-deploy.yaml
最后创建 pipelineRun 实现自动发版:
[root@k8s-master01 ~]# vim 10-pipelinerun-git-init-build-deploy.yaml
[root@k8s-master01 ~]# cat 10-pipelinerun-git-init-build-deploy.yaml
apiVersion: tekton.dev/v1
kind: PipelineRun
metadata:
  # 自动生成名字
  generateName: deploy
spec:
  pipelineRef:
    name: deploy
  # 定义 workspace
  workspaces:
  - name: share-data
    persistentVolumeClaim:
      claimName: tekton-workspace
    # 使用 pipelineRun 的名字作为子目录
    subPath: $(context.pipelineRun.name)
  # 把 K8s 的 secret 挂载到 git-credentials workspace
  - name: ssh-directory
    secret:
      secretName: git-ssh-auth
  - name: docker-credentials
    secret:
      secretName: docker-credentials
  - name: kubeconfig
    secret:
      secretName: kubeconfig
  # 传递参数给 pipeline
  params:
  - name: url
    value: git@192.168.200.55:kubernetes/vue-project.git
  - name: revision
    value: "tekton"
  - name: BUILD_IMAGE
    value: crpi-q1nb2n896zwtcdts.cn-beijing.personal.cr.aliyuncs.com/ywb01/node:16.17.0-apline-cnpm
  - name: BUILD_COMMAND
    value: |-
      cnpm install
      npm run build
      ls
      ls dist
  - name: REGISTRY
    value: crpi-q1nb2n896zwtcdts.cn-beijing.personal.cr.aliyuncs.com
  - name: REPOSTORY
    value: ywb01
  - name: IMAGE_NAME
    value: vue-project
  - name: NAMESPACE
    value: default
  - name: DEPLOY_NAME
    value: vue-project
  - name: CONTAINER_NAME
    value: vue-project
  - name: KUBECONFIG_PATH
    value: study-kubeconfig

[root@k8s-master01 ~]# kubectl create -f 10-pipelinerun-git-init-build-deploy.yaml
Tekton Dashboard上面可以看到执行动作
3、Tekton企业落地实战
3.1 GitLab 安装
GitLab 在企业内经常用于代码的版本控制,也是 DevOps 平台中尤为重要的一个工具。
3.1.1 关闭机器防火墙和 selinux
# 关闭防火墙
[root@gitlab ~]# systemctl disable --now firewalld
[root@gitlab ~]# systemctl disable --now dnsmasq

# 关闭selinux
[root@gitlab ~]# setenforce 0
[root@gitlab ~]# sed -i 's#SELINUX=enforcing#SELINUX=disabled#g' /etc/sysconfig/selinux
[root@gitlab ~]# sed -i 's#SELINUX=enforcing#SELINUX=disabled#g' /etc/selinux/config
3.1.2 安装gitlab
[root@gitlab ~]# wget https://mirrors.tuna.tsinghua.edu.cn/gitlab-ce/yum/el9/gitlab-ce-17.9.8-ce.0.el9.x86_64.rpm
[root@gitlab ~]# yum install gitlab-ce-17.9.8-ce.0.el9.x86_64.rpm -y
# 修改配置
[root@gitlab ~]# vim /etc/gitlab/gitlab.rb
[root@gitlab ~]# sed -n "32p;2346p" /etc/gitlab/gitlab.rb
external_url 'http://192.168.200.55'    # 将 external_url 更改为自己的发布地址,可以是服务器的 IP,也可以是一个可被解析的域名
prometheus['enable'] = false            # 关闭 Prometheus 插件(可选)

# 更改完成后需要重新加载配置文件
[root@gitlab ~]# gitlab-ctl reconfigure
....
Notes:
Default admin account has been configured with following details:
Username: root
Password: You didn't opt-in to print initial root password to STDOUT.
Password stored to /etc/gitlab/initial_root_password. This file will be cleaned up in first reconfigure run after 24 hours.

NOTE: Because these credentials might be present in your log files in plain text, it is highly recommended to reset the password following https://docs.gitlab.com/ee/security/reset_user_password.html#reset-your-root-password.

gitlab Reconfigured!
之后可以通过 浏览器访 问 GitLab,账号 root,默认密码在/etc/gitlab/initial_root_password:
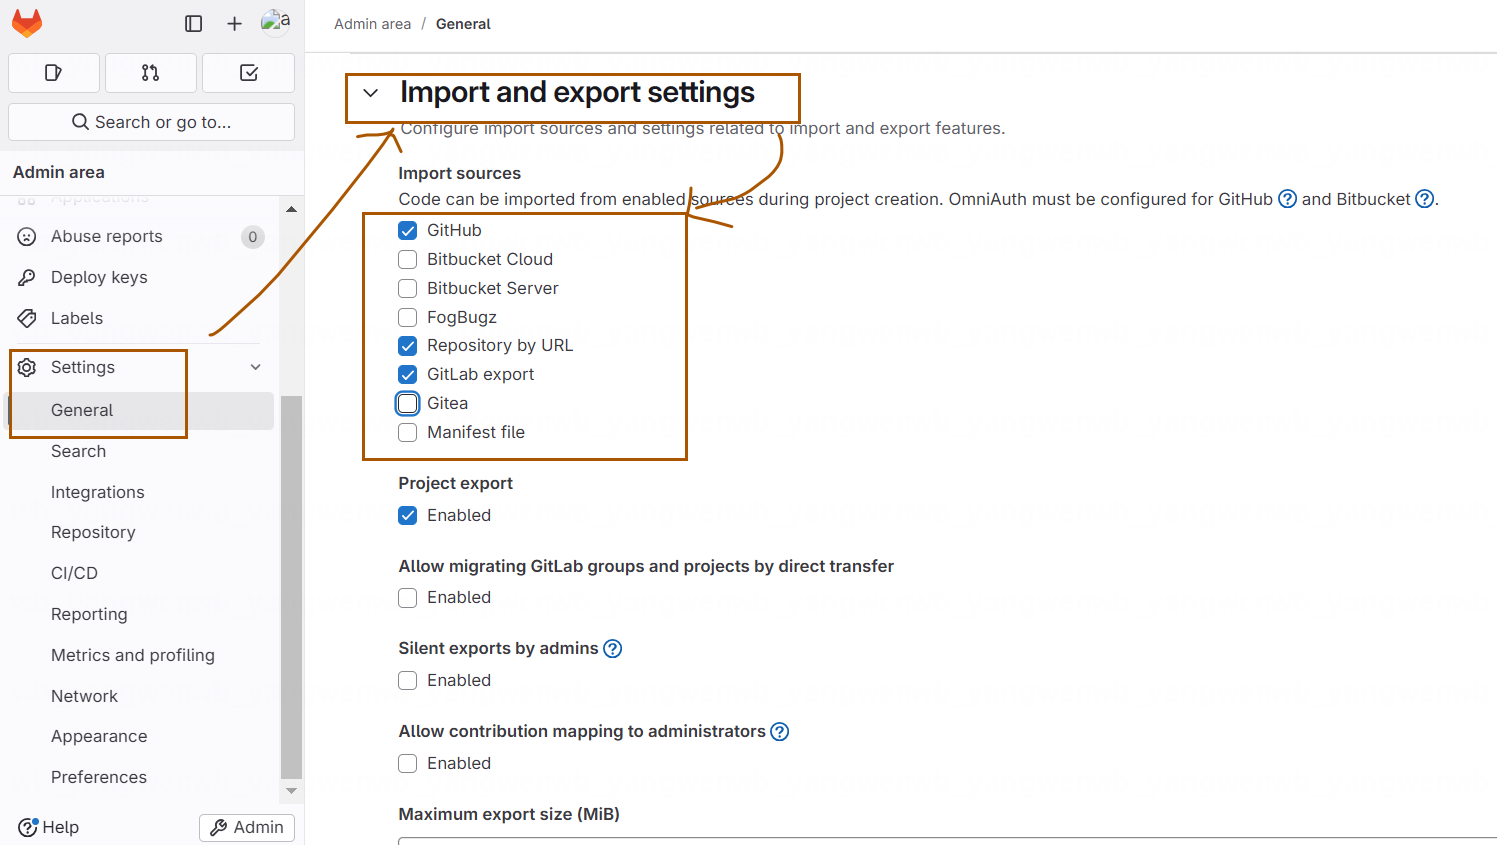
登录后,开启 import 功能,可以从外部仓库导入代码到 Gitlab:
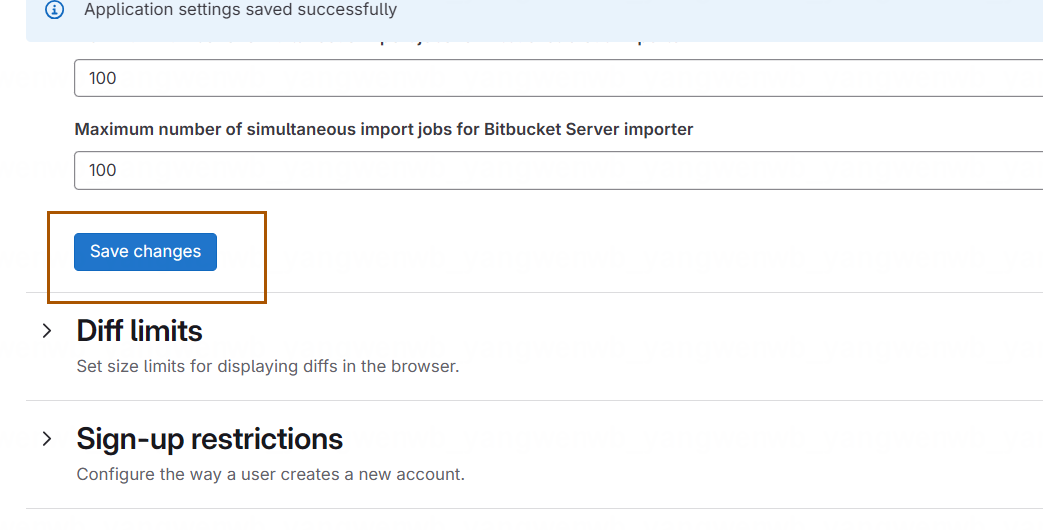
最后记得点击保存
3.1.3 创建项目
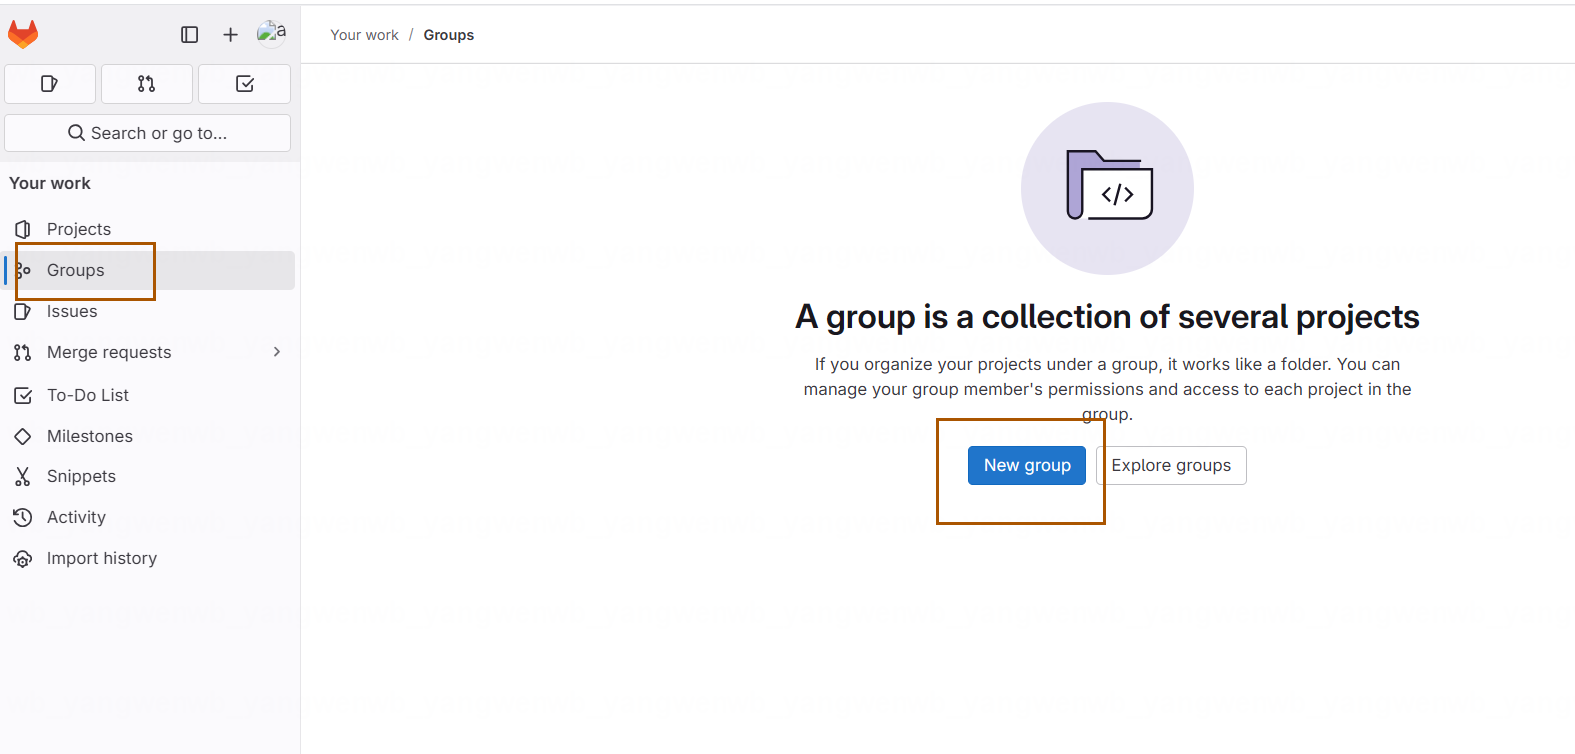
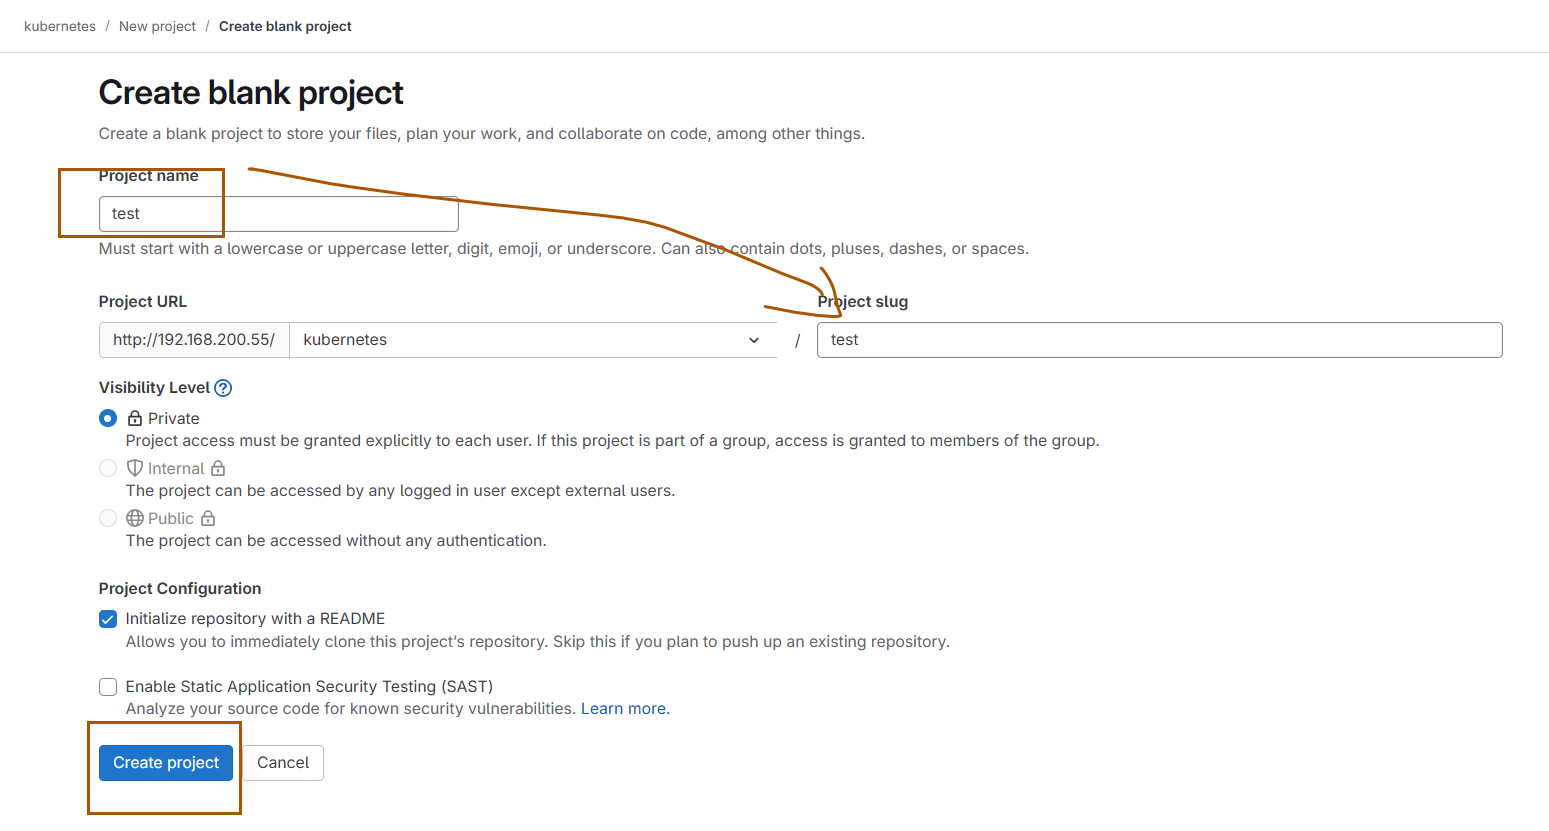
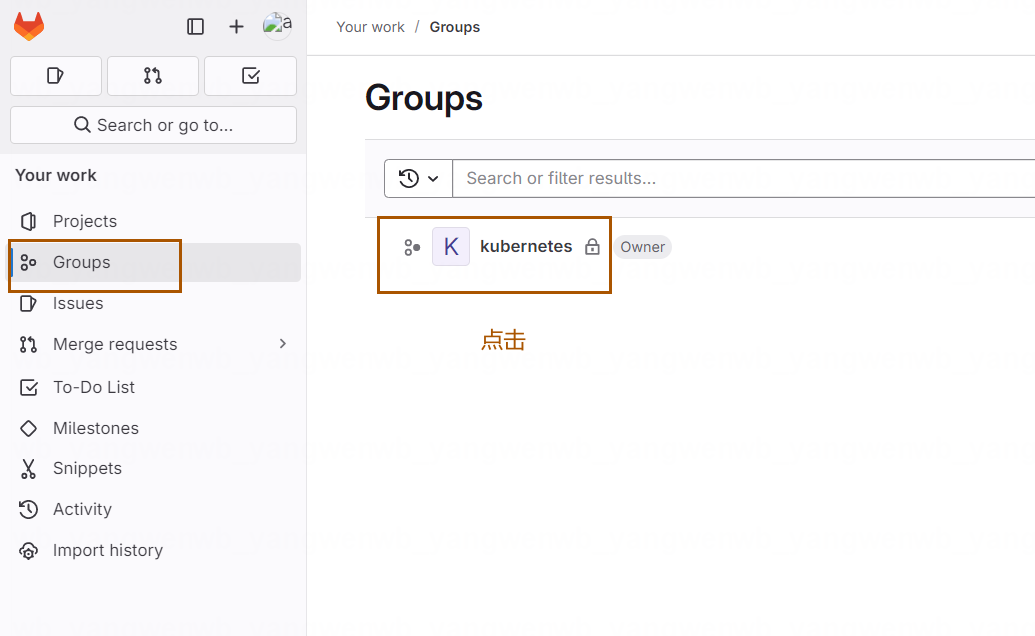
1、创建一个测试项目,进行一些简单的测试。首先创建一个组:
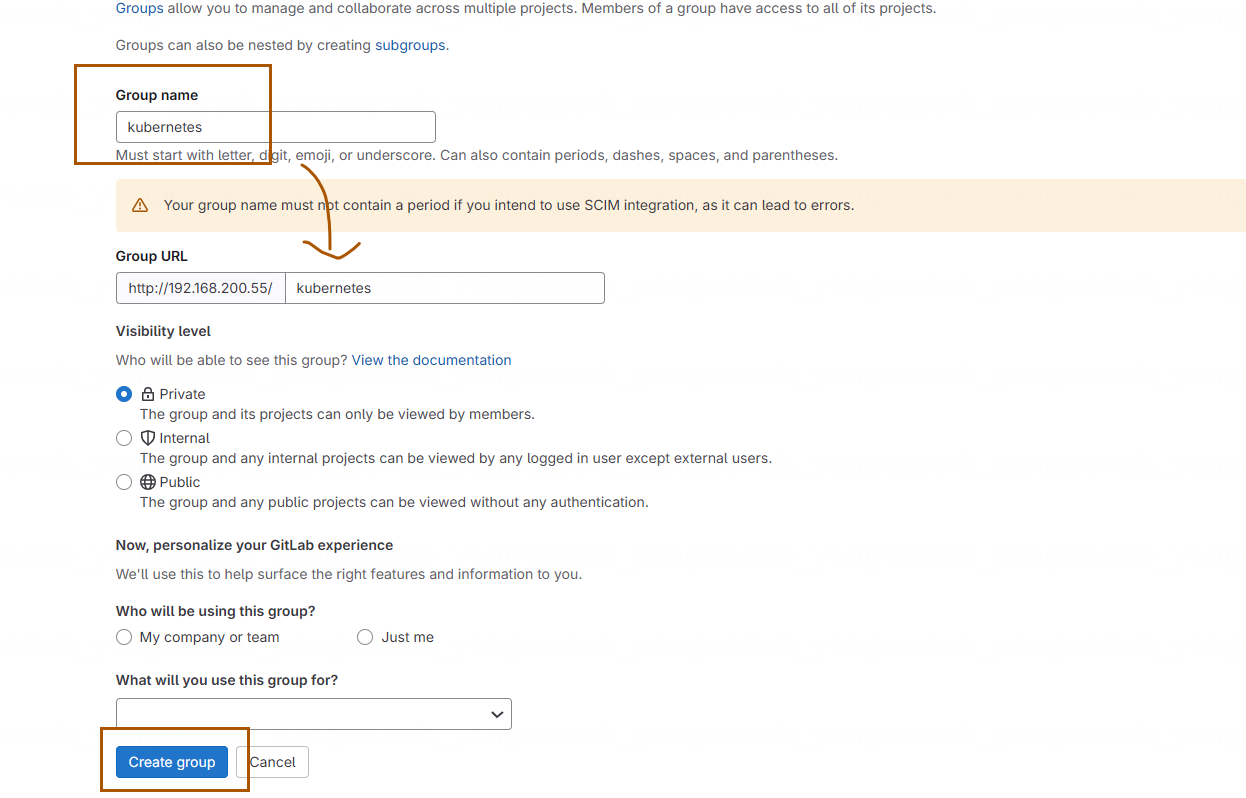
组名为 kubernetes,类型为 Private,之后点击 Create group 即可:
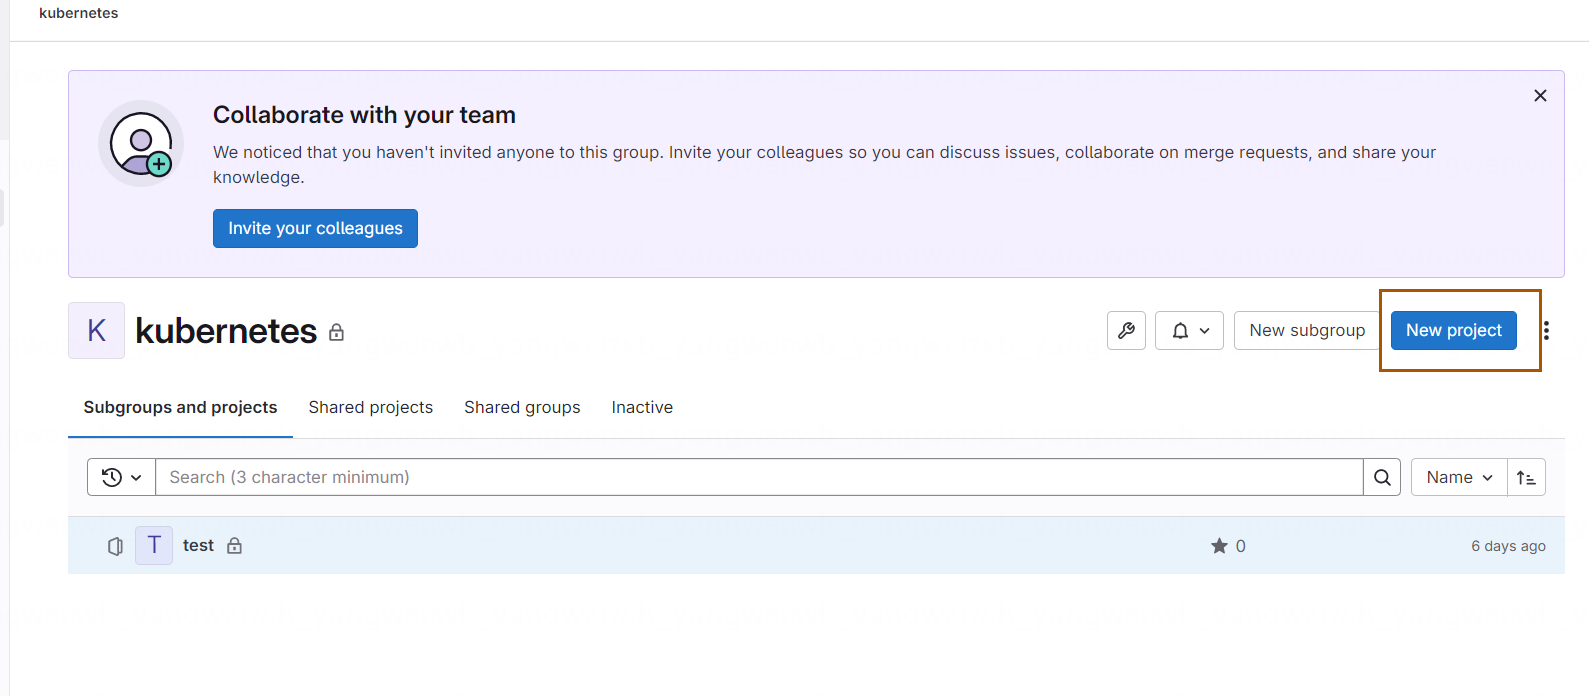
之后在该组下创建一个 Project:

选择创建一个空的项目:
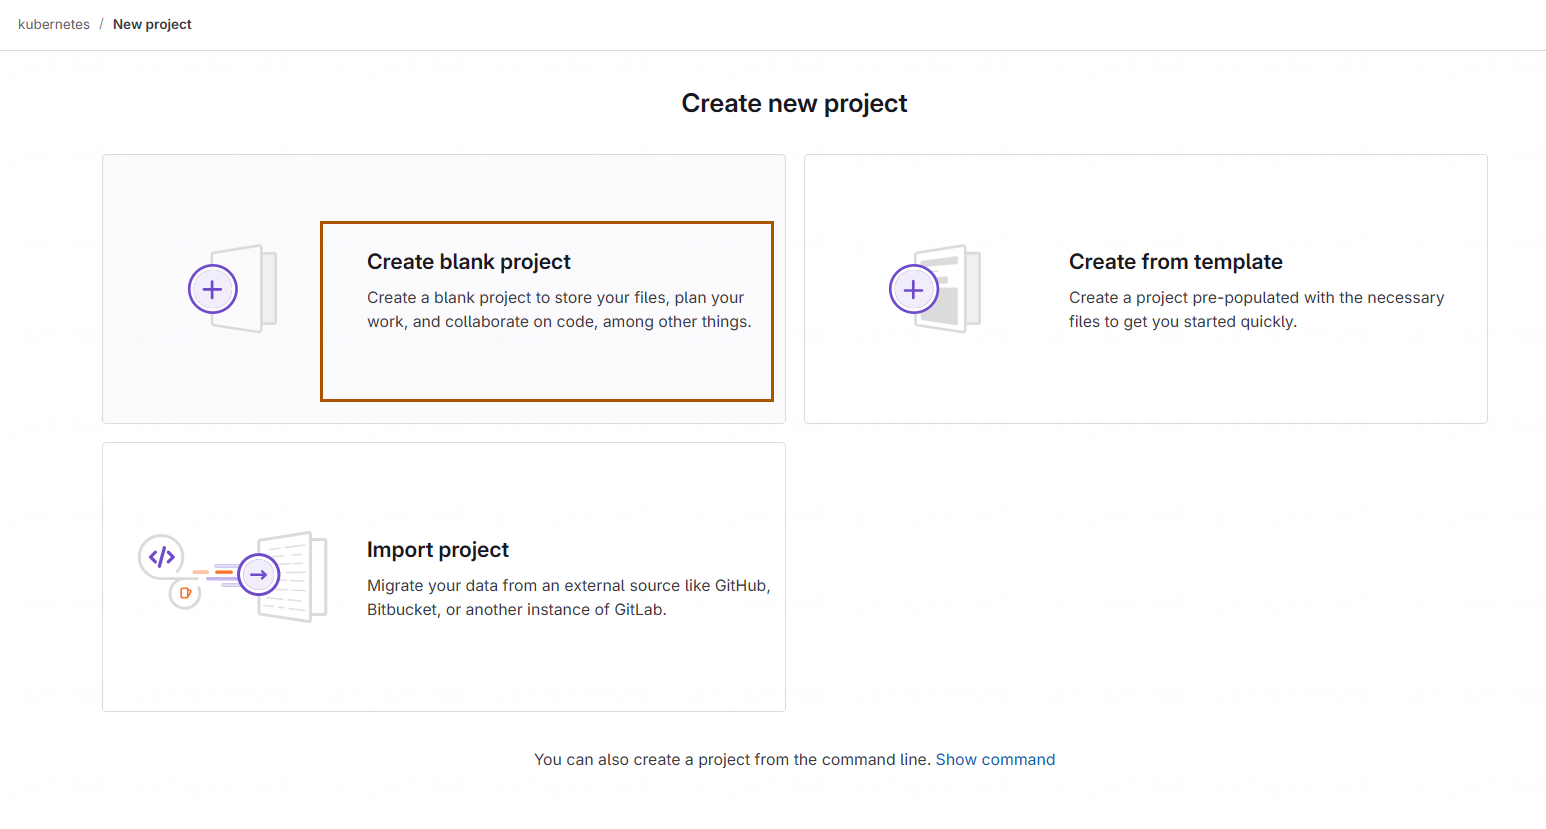
输入项目名称,然后点击 Create project 即可:
3.1.4 配置密钥
之后可以将 k8s-master 服务器(任意机器均可)的 key 导入到 GitLab
# 首先生成密钥(如有可以无需生成):
[root@k8s-master01 ~]# ssh-keygen -t rsa -C "1773464408@qq.com"

# 将公钥的内容放在 GitLab 中即可:
[root@k8s-master01 ~]# cat .ssh/id_rsa.pub
ssh-rsa AAAAB3NzaC1yc2EAAAADAQABAAABgQDJTvF8NDvX/SKxS1z7j/SdqInCB2A3kfuRsOn3c/j962H+yN/0SfRXShaSpHzvrVPNQMtiEr4gFQ4UKgpcWUyyDeaCyYRDrUxZ96IDoY2KoTser5o9dtfmnYaKeP7koewINFesPj59Ur2pATks7SYoT59o7UGKrShcedgo23dI0pvJmNaYKOlLeYocbaCY31g76SCZ44jVmv92smU9L+rVS15FT6hTjMO194vflbhLQ5p5nyaWRORYHuHxTbe5YHpMmEQquLnvMvhAr9ngzCdeMNyVtpQx2ZcbR9YmB6WiL6VsGqyPywkb2rU9G4I0qW8bg+aI1tTnjlXCEGKCNV7rxqNx3h0vRADTlYpKeeh1Ysrt+5+CibYJj3KNfY1dXLFOCCDc6YIFRX/0jFk/7RHe2r7knsqajc1ytt0BdDYb6GBeckDhIL4WGiKI3LtHI4LdXammTAf9wwIv7ZEEyuzAHd71AKx/JTKcA+jmGGy64j2i8Xzpk9UyWuhhxOwwJKc= 1773464408@qq.com
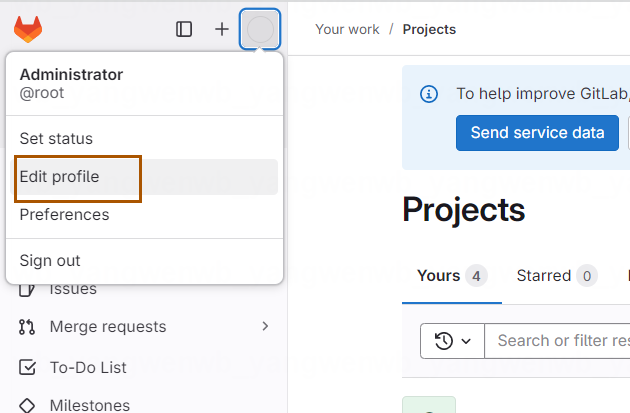
在 GitLab 找到 Profile:
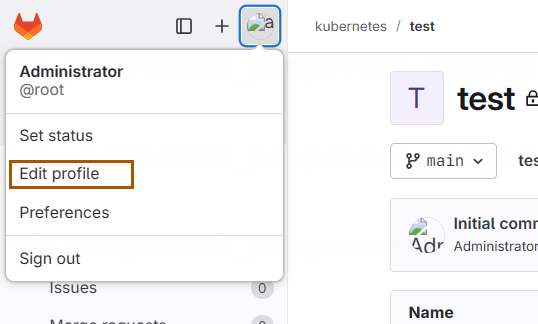
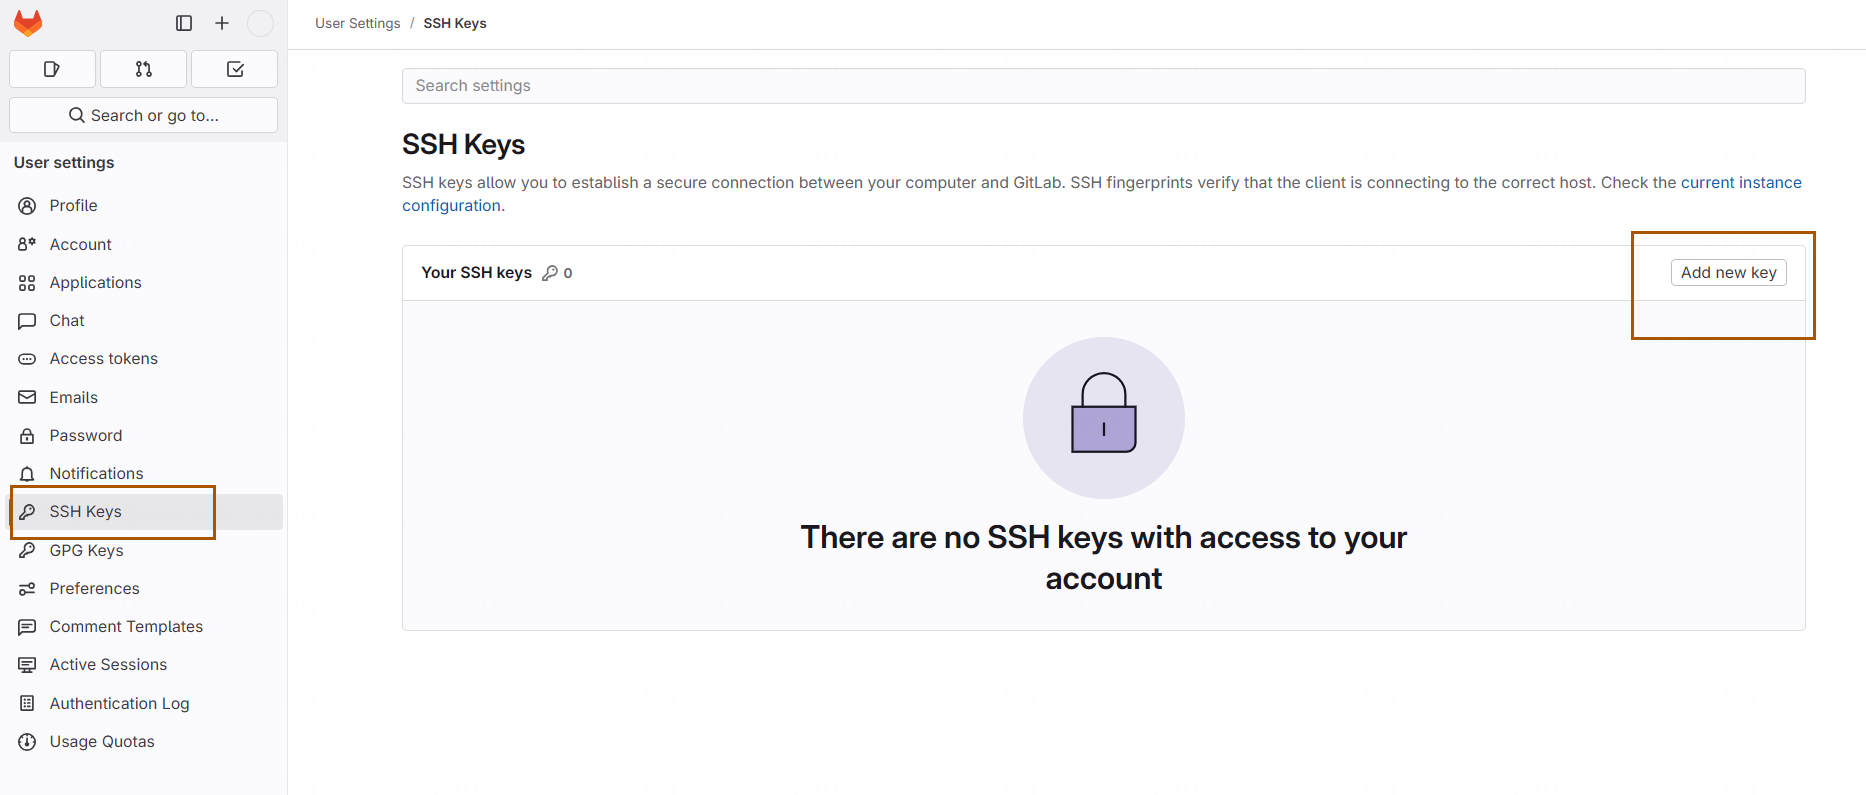
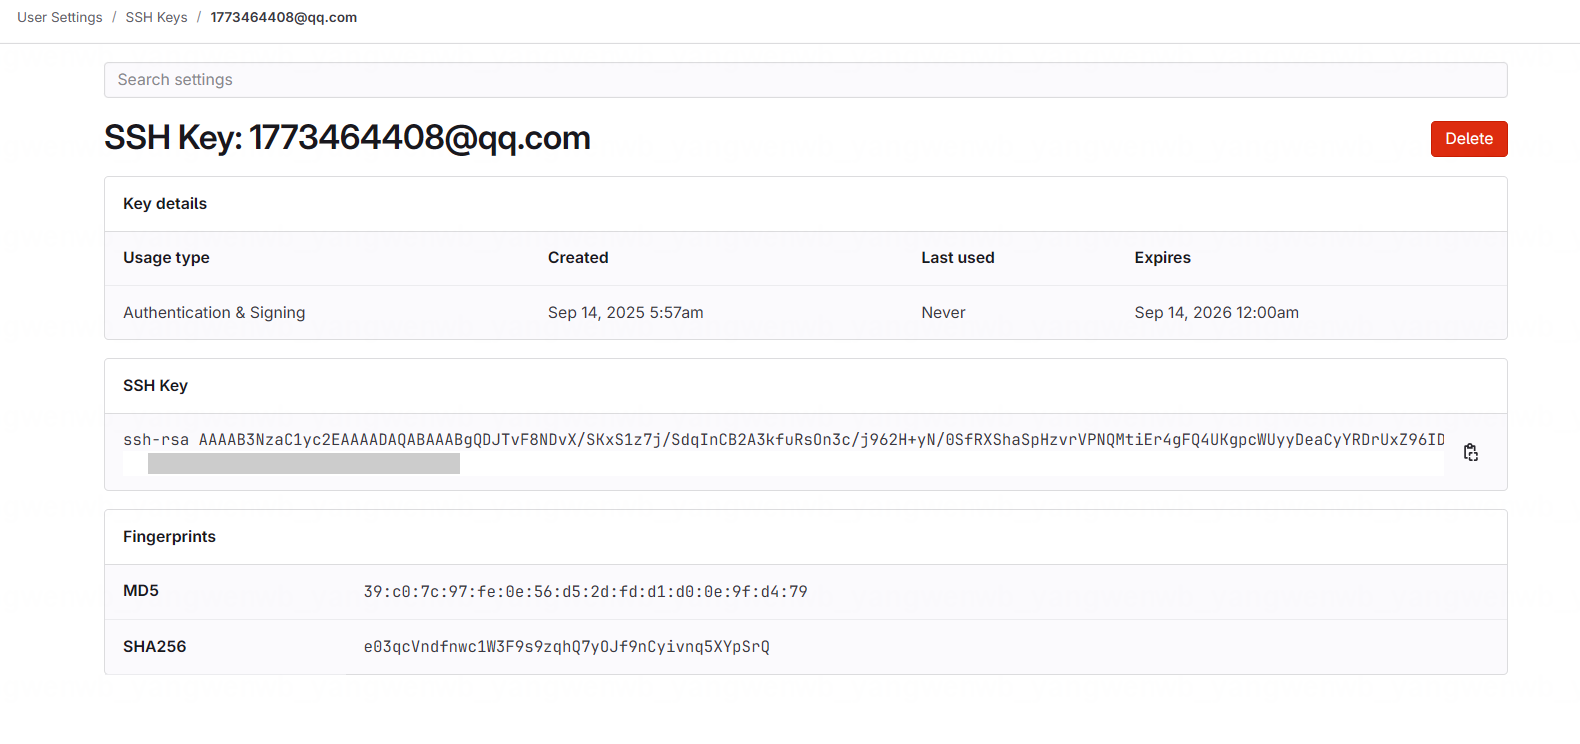
之后在 SSH Keys 添加公钥:
添加后就可以在服务器上拉取代码:
[root@k8s-master01 ~]# yum install git -y
[root@k8s-master01 ~]# git config --global user.email 1773464408@qq.com
[root@k8s-master01 ~]# git config --global user.name "yunwei"
[root@k8s-master01 ~]# git clone git@192.168.200.55:kubernetes/test.git
3.2 Harbor
3.2.1 安装docker
# 添加docker的yum源配置文件
[root@harbor ~]# yum-config-manager --add-repo https://mirrors.aliyun.com/docker-ce/linux/centos/docker-ce.repo

# 安装docker
[root@harbor ~]# yum install docker-ce docker-ce-cli -y

# 启动docker
[root@harbor ~]# systemctl daemon-reload && systemctl enable --now docker
3.2.2 配置docker-compose
# 设置软连接
[root@harbor ~]# ln -s /usr/libexec/docker/cli-plugins/docker-compose /usr/local/bin/

[root@harbor ~]# docker-compose -v
Dcurl -L https://github.com/docker C/compose version v2.36.2

# 批量停止harbor实例
docker-compose down
# 批量启动harbor实例
docker-compose up -d
3.2.3 安装 Harbor
# 下载到本地
[root@harbor ~]# wget https://github.com/goharbor/harbor/releases/download/v2.13.1/harbor-offline-installer-v2.13.1.tgz

# 解压tar包
[root@harbor ~]# tar xf harbor-offline-installer-v2.13.1.tgz
[root@harbor ~]# cd harbor

# 加载配置
[root@harbor harbor]# docker load -i harbor.v2.13.1.tar.gz

# 修改 Harbor 默认配置文件
[root@harbor harbor]# cp harbor.yml.tmpl harbor.yml
[root@harbor harbor]# vim harbor.yml

[root@harbor harbor]# sed -n "5p;10p;13,18p;47p;66p" harbor.yml
hostname: 192.168.200.53
  port: 80
# https:
  # https port for harbor, default is 443
  # port: 443
  # The path of cert and key files for nginx
  # certificate: /your/certificate/path
  # private_key: /your/private/key/path
harbor_admin_password: Harbor12345
data_volume: /data/harbor
- hostname:Harbor 的访问地址,可以是域名或者 IP,生产推荐使用域名,并且带有证书
- https:域名证书的配置,生产环境需要配置权威证书供 Harbor 使用,否则需要添加
insecure-registry配置,由于是学习环境,所以本示例未配置证书- harbor_admin_password:账号密码按需修改即可,默认为 admin:Harbor12345
- data_volume:Harbor 的数据目录
# 创建 Harbor 数据目录并进行预配置:
[root@harbor harbor]# mkdir /data/harbor -p

# 加载配置启动
[root@harbor harbor]# ./prepare

# 执行安装:
[root@harbor harbor]# ./install.sh
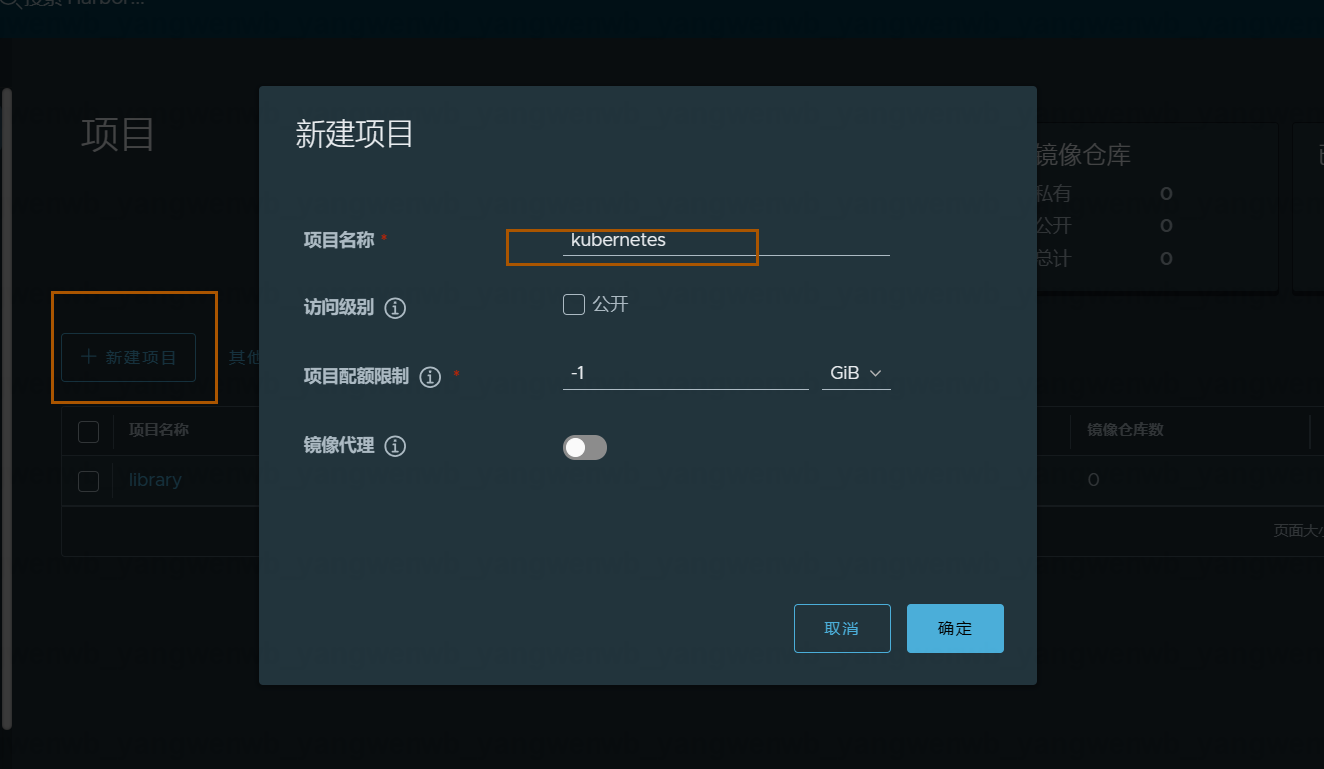
登录后,创建一个项目
3.2.4 创建开机自启动脚本
[root@harbor harbor]# vim /etc/systemd/system/harbor.service
[root@harbor harbor]# cat /etc/systemd/system/harbor.service
[Unit]
Description=Harbor Service
After=docker.service
Requires=docker.service

[Service]
Type=oneshot
RemainAfterExit=yes
WorkingDirectory=/usr/local/harbor
ExecStart=/usr/local/bin/docker-compose up -d
ExecStop=/usr/local/bin/docker-compose down
User=root

[Install]
WantedBy=multi-user.target

# 加上执行权限
[root@harbor harbor]# chmod +x /etc/systemd/system/harbor.service

# 设置开机自启动
[root@harbor harbor]# systemctl daemon-reload
[root@harbor harbor]# systemctl enable harbor
3.2.5 docker 配置 insecure registry
如果配置不是 https 协议,所有的 Kubernetes 节点的 Docker 都需要添加 insecure-registries 配置
[root@harbor harbor]# vim /etc/docker/daemon.json
[root@harbor harbor]# cat /etc/docker/daemon.json
{
     "registry-mirrors": ["https://9upbt3ho.mirror.aliyuncs.com"],
     "insecure-registries": ["192.168.200.53"]
}
[root@harbor harbor]# systemctl daemon-reload
[root@harbor harbor]# systemctl restart docker
3.2.6 Containerd 配置 insecure registry (k8s节点)
如果 Kubernetes 集群采用的是 Containerd 作为的 Runtime,那么 Containerd 也需要配置 insecure registry。
首先生成 Containerd 的配置(如果已经生成过,请勿执行):
# containerd config default > /etc/containerd/config.toml
# 修改配置(所有k8s节点都要执行)
[root@k8s-master01 ~]# vim /etc/containerd/config.toml
[root@k8s-master01 ~]# sed -n "170,172p" /etc/containerd/config.toml
      [plugins."io.containerd.grpc.v1.cri".registry.mirrors]
      		[plugins."io.containerd.grpc.v1.cri".registry.mirrors."192.168.200.53"]
			endpoint = ["http://192.168.200.53"]

# 重启服务
[root@k8s-master01 ~]# systemctl restart containerd

# 需要把K8s所有的节点都需要进行更改
# config.toml并不是直接给ctr命令去使用的
# docker拉取的镜像和containerd没有任何关系
3.3 Tekton必备资源梳理
首先清理之前的测试数据:
[root@k8s-master01 ~]# kubectl delete -f .
[root@k8s-master01 ~]# kubectl delete pr --all
[root@k8s-master01 ~]# kubectl delete tr --all
3.3.1 代码拉取Task
比如想要拉取代码,可以使用 git-clone 这个 task:https://hub.tekton.dev/tekton/task/gitclone
# 接下来创建该 Task:
[root@k8s-master01 ~]# curl -o git-clone.yaml https://raw.githubusercontent.com/tektoncd/catalog/main/task/git-clone/0.6/git-clone.yaml

[root@k8s-master01 ~]# kubectl apply -f git-clone.yaml
3.3.2 代码拉取 Secret
# 创建 Secret 保存私钥,用于 Tekton 挂载:
[root@k8s-master01 ~]# kubectl create secret generic git-ssh-auth --from-file=id_rsa=/root/.ssh/id_rsa --dry-run=client -oyaml > git-secret.yaml

# 编辑该 Secret 添加 config 字段:
[root@k8s-master01 ~]# vim git-secret.yaml
data:
  config: U3RyaWN0SG9zdEtleUNoZWNraW5nIG5vIApVc2VyS25vd25Ib3N0c0ZpbGUgL2Rldi9udWxsCg==
...

# 创建 Secret:
[root@k8s-master01 ~]# kubectl create -f git-secret.yaml
3.3.3 镜像仓库 Secret
# 首先登录 Harbor 仓库,已登录请忽略:
[root@k8s-master01 ~]# docker login 192.168.200.53

# 创建镜像仓库认证的 Secret:
[root@k8s-master01 ~]# kubectl delete secret docker-credentials
[root@k8s-master01 ~]# kubectl create secret generic docker-credentials --from-file=/root/.docker/config.json
3.3.4 资源部署 Secret
# 之后创建一个 kubeconfig 的 secret:
[root@k8s-master01 ~]# kubectl create secret generic kubeconfig --from-file=study-kubeconfig=/root/.kube/config
3.3.5 Tekton 必备资源
接下来部署必需的 Task、Pipeline、PVC 等资源:
1、创建用于缓存的 PVC:
[root@k8s-master01 ~]# vim tekton-pvc.yaml
[root@k8s-master01 ~]# cat tekton-pvc.yaml
apiVersion: v1
kind: PersistentVolumeClaim
metadata:
  name: tekton-workspace
  namespace: default
  labels: {}
  annotations: {}
spec:
  resources:
    requests:
      storage: 100Gi
  volumeMode: Filesystem
  storageClassName: nfs-csi
  accessModes:
  - ReadWriteMany
---
apiVersion: v1
kind: PersistentVolumeClaim
metadata:
  name: tekton-cache
  namespace: default
  labels: {}
  annotations: {}
spec:
  resources:
    requests:
      storage: 100Gi
  volumeMode: Filesystem
  storageClassName: nfs-csi
  accessModes:
  - ReadWriteMany
2、初始化Task
[root@k8s-master01 ~]# vim init-task.yaml
[root@k8s-master01 ~]# cat init-task.yaml
apiVersion: tekton.dev/v1
kind: Task
metadata:
  name: init
spec:
  description: "生成初始化信息"
  # 定义一个 workspace,后续需要把拉取代码的工作目录挂载到该 workspace
  workspaces:
  - name: source
  results:      # 添加tag
  - name: tag
    description: result for tag
  steps:
  - name: read
    image: crpi-q1nb2n896zwtcdts.cn-beijing.personal.cr.aliyuncs.com/ywb01/git-init:v0.29.0
    # 指定当前 task 的工作目录为 workspace 的路径
    workingDir: $(workspaces.source.path)
    script: |
      #!/usr/bin/env sh
      ls
      # 获取本次提交的 Commit 信息
      COMMIT_MESSAGE=`git log -1 --pretty=format:'%h : %an %s'`
      CUR_DATE=`date '+%Y%m%d-%H%M%S'`
      SHORT_COMMIT=`git log -n 1 --pretty=format:'%h'`
      TAG=`echo "${CUR_DATE}-${SHORT_COMMIT}"`
      echo $TAG
      # 把 TAG 的值,写入到 results 中
      # tag 是结果的变量名,可以自定义
      # results 和 path 是固定格式
      echo $TAG | tee $(results.tag.path)
3、把 Task 添加到 Pipeline 中,修改 Pipeline 添加缓存目录
[root@k8s-master01 ~]# vim pipeline-deploy.yaml
[root@k8s-master01 ~]# cat pipeline-deploy.yaml
apiVersion: tekton.dev/v1
kind: Pipeline
metadata:
  name: deploy
spec:
  description: |
    下载代码,初始化并存储数据.
  # 以下为 pipeline 可以接收的参数,使用 pipelineRun 可以进行传参
  params:
  - name: url # 用于接收代码地址
    type: string
    description: The git repo URL to clone from.
  - name: revision
    type: string
  - name: gitInitImage
    type: string
    # 配置一个默认值后续 Run 的时候就不需要再次传递
    default: crpi-q1nb2n896zwtcdts.cn-beijing.personal.cr.aliyuncs.com/ywb01/git-init:v0.29.0
  - name: BUILD_IMAGE
    type: string
    default: crpi-q1nb2n896zwtcdts.cn-beijing.personal.cr.aliyuncs.com/ywb01/alpine:3.9-tomcat
  - name: BUILD_COMMAND
    type: string
    default: ls
  # 添加用于镜像的参数
  - name: DOCKERFILE
    type: string
    default: ./Dockerfile
  - name: REGISTRY
    type: string
  - name: REPOSTORY
    type: string
  - name: IMAGE_NAME
    type: string
  - name: NAMESPACE
    type: string
    default: default
  - name: DEPLOY_NAME
    type: string
  - name: CONTAINER_NAME
    type: string
  - name: KUBECONFIG_PATH
    type: string
  - name: CACHE_DIR
    type: string
    default: /root/.m2
  # 定义 workspace
  workspaces:
  - name: share-data # 配置一个 workspace 保留共享数据
    description: |
      This workspace contains the cloned repo files, so they can be read by the next task.
  # 拉取代码 ssh 配置
  - name: ssh-directory
    description: My ssh credentials
  # 添加 docker 认证
  - name: docker-credentials
    description: docker credentials
  - name: kubeconfig
    description: kubernetes kubeconfig
  # 定义改 pipeline 指定的 task
  tasks:
  - name: fetch-source
    taskRef:
      name: git-clone
    workspaces:
    - name: output
      workspace: share-data
    # 把接收到的 ssh-directory 传递给 task 的 ssh-directory
    - name: ssh-directory
      workspace: ssh-directory
    # 传递给 task 的参数
    params:
    - name: url
      value: $(params.url) # 从 pipeline 的 params 获取参数并传递
    - name: gitInitImage
      value: $(params.gitInitImage)
    - name: revision
      value: $(params.revision)
  - name: init
    # 等代码拉取 task 结束后执行初始化
    runAfter: ["fetch-source"]
    taskRef:
      name: init
    workspaces:
    - name: source
      workspace: share-data
  - name: build
    runAfter: ["fetch-source"]
    taskRef:
      name: build
    workspaces:
    - name: source
      workspace: share-data
    params:
    - name: BUILD_COMMAND
      value: $(params.BUILD_COMMAND)
    - name: BUILD_IMAGE
      value: $(params.BUILD_IMAGE)
    - name: CACHE_DIR
      value: $(params.CACHE_DIR)
  # 添加 kaniko task
  - name: kaniko
    runAfter: ["build"]
    taskRef:
      name: kaniko
    workspaces:
    - name: source
      workspace: share-data
    - name: docker-credentials
      workspace: docker-credentials
    params:
    - name: IMAGE_URL
      value: $(params.REGISTRY)/$(params.REPOSTORY)/$(params.IMAGE_NAME):$(tasks.init.results.tag)
  # 添加 deploy task
  - name: deploy
    runAfter: ["build"]
    taskRef:
      name: deploy
    workspaces:
    - name: kubeconfig
      workspace: kubeconfig
    params:
    - name: IMAGE_URL
      value: $(params.REGISTRY)/$(params.REPOSTORY)/$(params.IMAGE_NAME):$(tasks.init.results.tag)
    - name: NAMESPACE
      value: $(params.NAMESPACE)
    - name: DEPLOY_NAME
      value: $(params.DEPLOY_NAME)
    - name: CONTAINER_NAME
      value: $(params.CONTAINER_NAME)
    - name: KUBECONFIG_PATH
      value: $(params.KUBECONFIG_PATH)
4、代码构建Task
[root@k8s-master01 ~]# vim task-build.yaml
[root@k8s-master01 ~]# cat task-build.yaml
apiVersion: tekton.dev/v1
kind: Task
metadata:
  name: build
spec:
  description: Code Build
  workspaces:
  - name: source
  params: # 参数也可以大写
  - name: BUILD_COMMAND
  - name: BUILD_IMAGE
  - name: CACHE_DIR
    default: "/root/.m2"
  steps:
  - name: build
    image: $(params.BUILD_IMAGE)
    workingDir: $(workspaces.source.path)
    volumeMounts:
    - name: cache-volume
      mountPath: $(params.CACHE_DIR)
    script: |
      #!/usr/bin/env sh
      pwd
      ls
      echo $(params.BUILD_COMMAND)
      $(params.BUILD_COMMAND)
  volumes:
  - name: cache-volume
    persistentVolumeClaim:
      claimName: tekton-cache
5、创建一个 Kaniko Task
[root@k8s-master01 ~]# vim task-kaniko.yaml
[root@k8s-master01 ~]# cat task-kaniko.yaml
apiVersion: tekton.dev/v1
kind: Task
metadata:
  name: kaniko
  labels:
    app.kubernetes.io/version: "0.6"
  annotations:
    tekton.dev/pipelines.minVersion: "0.17.0"
    tekton.dev/categories: Image Build
    tekton.dev/tags: image-build
    tekton.dev/displayName: "Build and upload container image using Kaniko"
    tekton.dev/platforms: "linux/amd64,linux/arm64,linux/ppc64le"
spec:
  description: >-
    This Task builds a simple Dockerfile with kaniko and pushes to a registry.
    This Task stores the image name and digest as results, allowing Tekton Chains to pick up that an image was built & sign it.
  params:
  - name: IMAGE_URL
    type: string
  - name: DOCKERFILE
    description: Path to the Dockerfile to build.
    default: ./Dockerfile
  - name: CONTEXT
    description: The build context used by Kaniko.
    default: ./
  - name: EXTRA_ARGS
    type: array
    default: []
  - name: BUILDER_IMAGE
    description: The image on which builds will run (default latest)
    default: crpi-q1nb2n896zwtcdts.cn-beijing.personal.cr.aliyuncs.com/ywb01/executor:v1.22.0
  workspaces:
  - name: source
    description: Holds the context and Dockerfile
  # 挂载 docker 的配置文件,用于访问镜像仓库
  - name: docker-credentials
    description: Includes a docker `config.json`
    optional: true
    mountPath: /kaniko/.docker
  results:
  - name: IMAGE_URL
    description: URL of the image just built.
  steps:
  - name: build-and-push
    workingDir: $(workspaces.source.path)
    image: crpi-q1nb2n896zwtcdts.cn-beijing.personal.cr.aliyuncs.com/ywb01/kaniko-executor:debug
    script: |
      executor -c . --insecure --skip-tls-verify -d $(params.IMAGE_URL)
    securityContext:
      runAsUser: 0
  - name: write-url
    image: crpi-q1nb2n896zwtcdts.cn-beijing.personal.cr.aliyuncs.com/ywb01/git-init:v0.29.1
    script: |
      set -e
      image="$(params.IMAGE_URL)"
      echo -n "${image}" | tee "$(results.IMAGE_URL.path)"
6、用于部署的 Task
[root@k8s-master01 ~]# vim task-deploy.yaml
[root@k8s-master01 ~]# cat task-deploy.yaml
apiVersion: tekton.dev/v1
kind: Task
metadata:
  name: deploy
spec:
  description: deploy to kubernetes by kubectl
  workspaces:
  - name: kubeconfig
    mountPath: /mnt/kubeconfig
  params:
  - name: IMAGE_URL
    type: string
  - name: NAMESPACE
    type: string
    default: default
  - name: DEPLOY_NAME
    type: string
  - name: CONTAINER_NAME
    type: string
  - name: KUBECONFIG_PATH
    type: string
  steps:
  - name: deploy
    image: crpi-q1nb2n896zwtcdts.cn-beijing.personal.cr.aliyuncs.com/ywb01/kubectl:devops
    script: |
      pwd
      ls /mnt/kubeconfig
      echo "Deploy version: $(params.IMAGE_URL)"
      echo "kubectl --kubeconfig /mnt/kubeconfig/$(params.KUBECONFIG_PATH) -n $(params.NAMESPACE) set image deploy $(params.DEPLOY_NAME) $(params.CONTAINER_NAME)=$(params.IMAGE_URL)"
      kubectl --kubeconfig /mnt/kubeconfig/$(params.KUBECONFIG_PATH) -n $(params.NAMESPACE) set image deploy $(params.DEPLOY_NAME) $(params.CONTAINER_NAME)=$(params.IMAGE_URL)
      kubectl --kubeconfig /mnt/kubeconfig/$(params.KUBECONFIG_PATH) -n $(params.NAMESPACE) get po
3.3.6 安装 Tekton 必备资源
[root@k8s-master01 ~]# kubectl create -f .

# 查看必备的 Task:
[root@k8s-master01 ~]# kubectl get task
NAME        AGE
build       13s     # 代码构建 Task
deploy      12s     # 服务部署 Task
git-clone   12s     # 代码下载 Task
init        13s     # 初始化 Task
kaniko      12s     # 镜像制作 Task

# 查看必备的 Pipeline:
[root@k8s-master01 ~]# kubectl get pipeline
NAME     AGE
deploy   25s         # 贯穿各个 Task 的统一 Pipeline
3.4 Tekton自动化部署Java应用
3.4.1 创建 Java 测试用例
示例项目可以从 https://gitee.com/dukuan/spring-boot-project.git 找到该项目(也可以使用公司的 Java 项目也是一样的)。
接下来将该项目导入到自己的 GitLab 中。首先找到之前创建的 Kubernetes 组
然后点击 New Project:
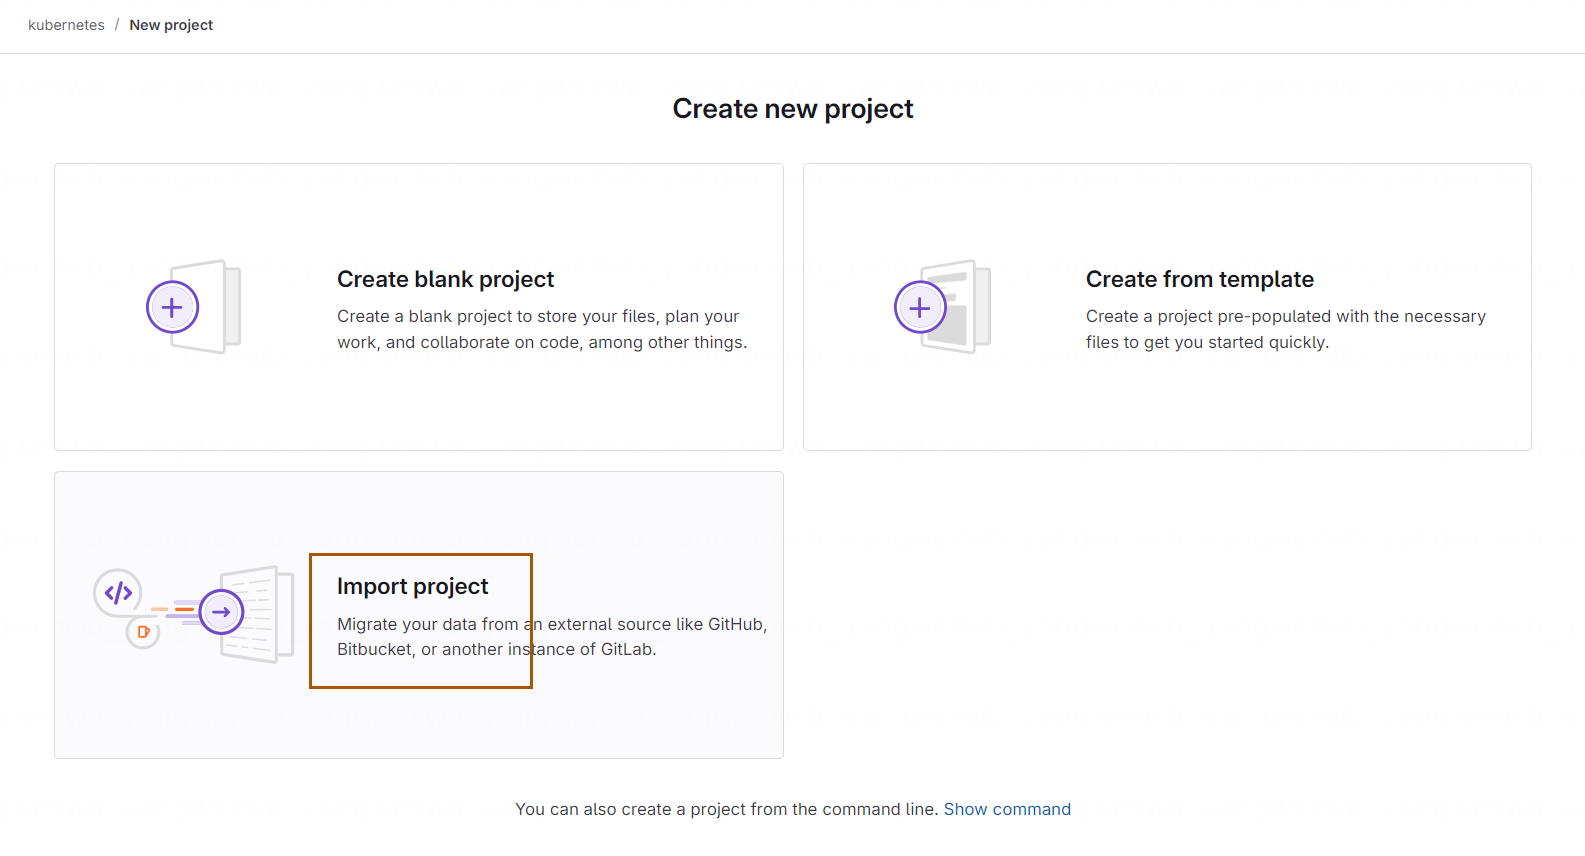
选择 Import Project:
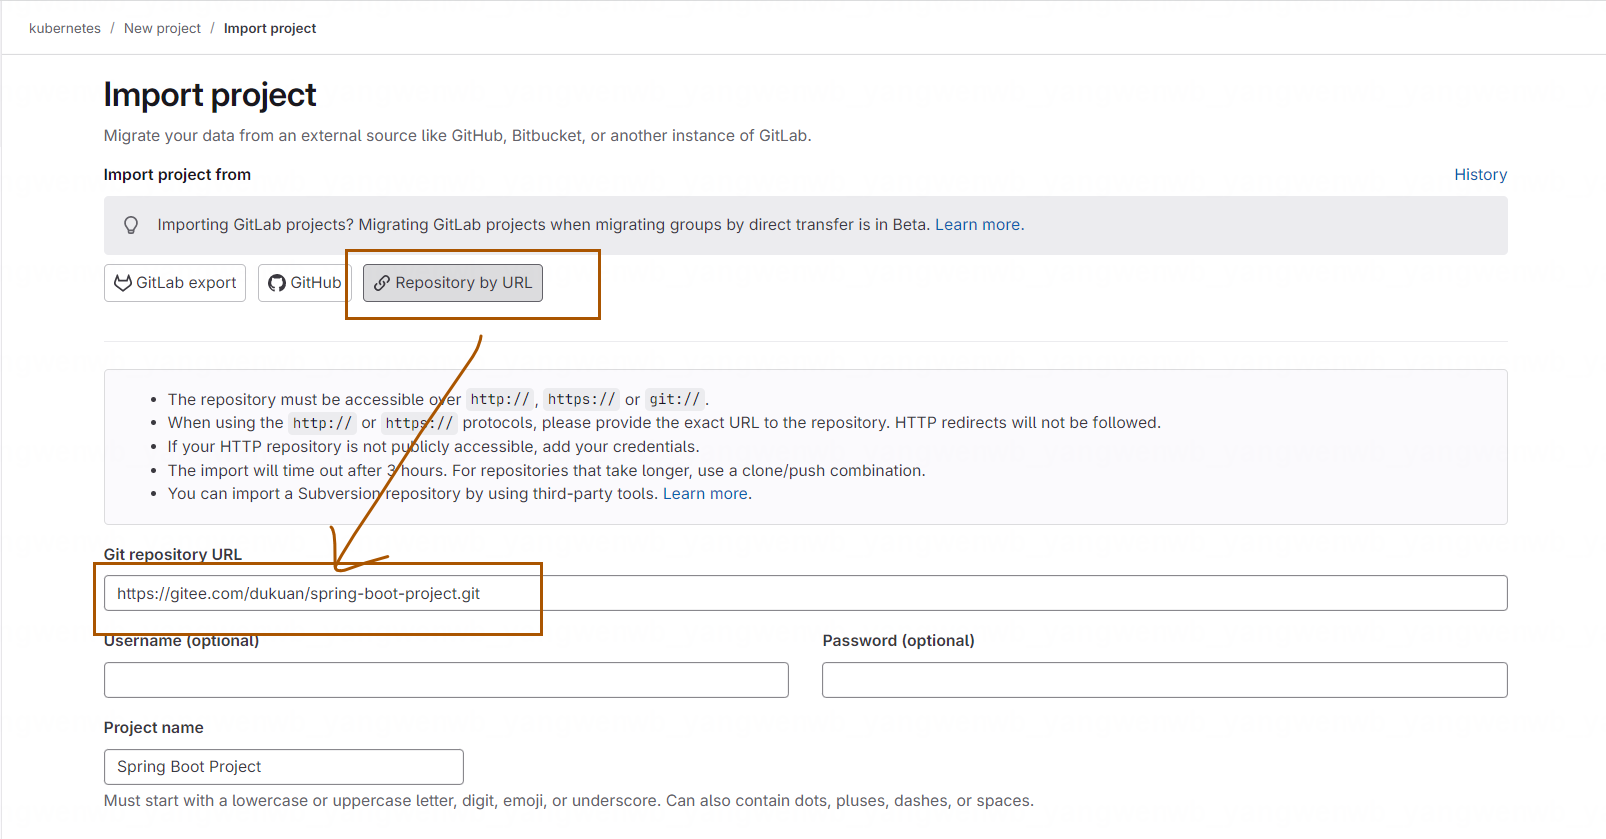
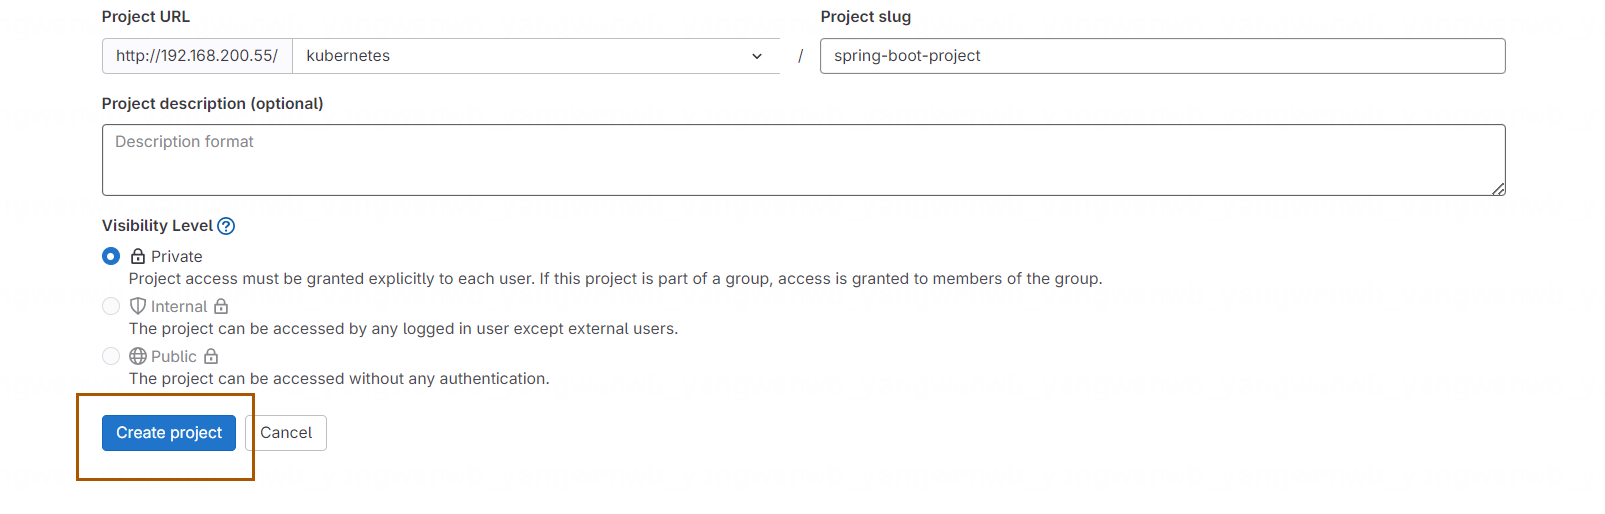
点击 Repo by URL,在 Git repository URL 输入示例地址,然后点击 Create Project 即可:
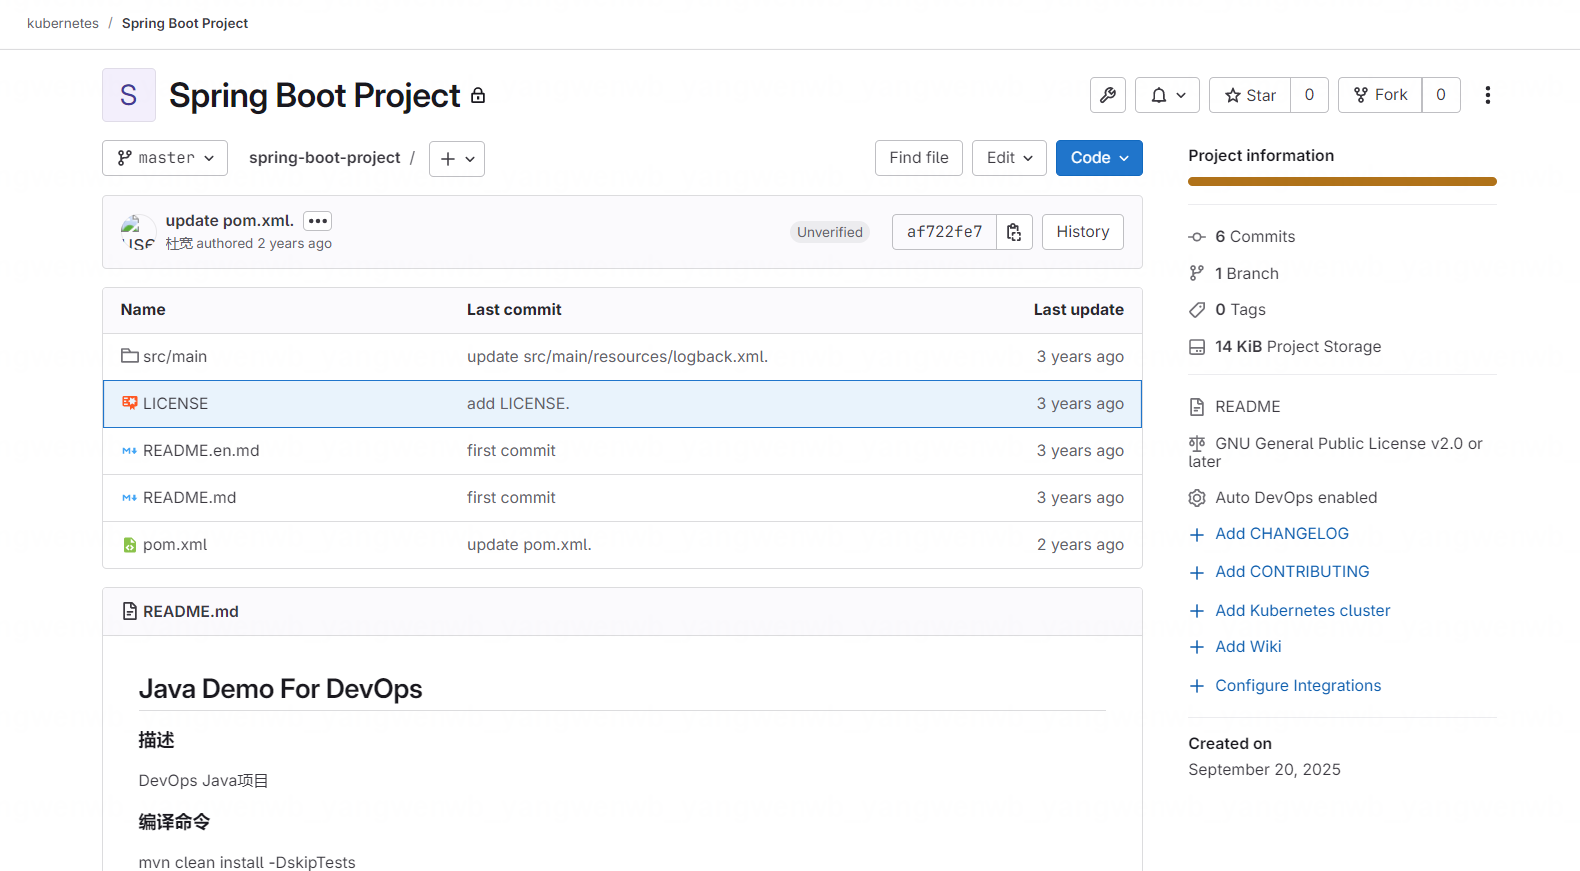
导入后,如下所示:
3.4.2 定义 Dockerfile
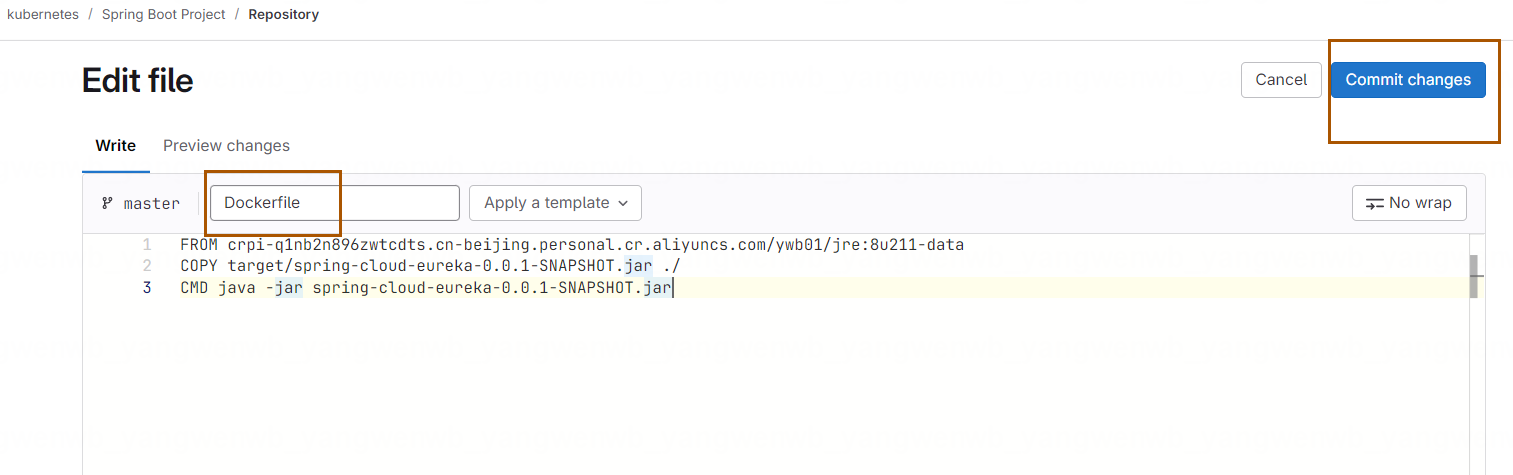
在执行流水线过程时,需要将代码的编译产物做成镜像。而本次示例是 Java 项目,只需要把 Jar 包放在有 Jre 环境的镜像中,然后启动该 Jar 包即可:
# 基础镜像可以按需修改,可以更改为公司自有镜像
FROM crpi-q1nb2n896zwtcdts.cn-beijing.personal.cr.aliyuncs.com/ywb01/jre:8u211-data
# jar 包名称改成实际的名称,本示例为 spring-cloud-eureka-0.0.1-SNAPSHOT.jar
COPY target/spring-cloud-eureka-0.0.1-SNAPSHOT.jar ./
# 启动 Jar 包
CMD java -jar spring-cloud-eureka-0.0.1-SNAPSHOT.jar
该该 Dockerfile 放置于代码的根目录即可。
3.4.3 定义 Kubernetes 资源
本示例在 GitLab 创建的 Group 为 kubernetes,可以将其认为是一个项目,同一个项目可以
部署至 Kubernetes 集群中同一个 Namespace 中,本示例为 kubernetes 命名空间。由于使用的是私有仓库,因此也需要先配置拉取私有仓库镜像的密钥:
[root@k8s-master01 ~]# kubectl create ns kubernetes

[root@k8s-master01 ~]# kubectl create secret docker-registry harborkey --docker-server=192.168.200.53 --docker-username=admin --docker-password=Harbor12345 --docker-email=1773464408@qq.com -n kubernetes
配置该应用的 Deployment:
[root@k8s-master01 ~]# vim spring-boot-project.yaml
[root@k8s-master01 ~]# cat spring-boot-project.yaml
---
apiVersion: v1
kind: Service
metadata:
  creationTimestamp: null
  labels:
    app: spring-boot-project
  name: spring-boot-project
  namespace: kubernetes
spec:
  ports:            # 端口按照实际情况进行修改
  - name: web
    port: 8761
    protocol: TCP
    targetPort: 8761
  selector:
    app: spring-boot-project
  sessionAffinity: None
  type: ClusterIP
status:
  loadBalancer: {}
---
apiVersion: networking.k8s.io/v1
kind: Ingress
metadata:
  creationTimestamp: null
  name: spring-boot-project
  namespace: kubernetes
spec:
  rules:
  - host: spring-boot-project.test.com
    http:
      paths:
      - backend:
          service:
            name: spring-boot-project
            port:
              number: 8761
        path: /
        pathType: ImplementationSpecific
status:
  loadBalancer: {}
---
apiVersion: apps/v1
kind: Deployment
metadata:
  creationTimestamp: null
  labels:
    app: spring-boot-project        # Deployment 标签,和流水线的 set -l 一致
  name: spring-boot-project         # Deployment 名称
  namespace: kubernetes
spec:
  replicas: 1
  selector:
    matchLabels:
      app: spring-boot-project      # Pod 的标签
  strategy:
    rollingUpdate:
      maxSurge: 1
      maxUnavailable: 0
    type: RollingUpdate
  template:
    metadata:
      creationTimestamp: null
      labels:
        app: spring-boot-project        # Pod 的标签
    spec:
      affinity:
        podAntiAffinity:
          preferredDuringSchedulingIgnoredDuringExecution:
          - podAffinityTerm:
              labelSelector:
                matchExpressions:
                - key: app
                  operator: In
                  values:
                  - spring-boot-project
              topologyKey: kubernetes.io/hostname
            weight: 100
      containers:
      - env:
        - name: TZ
          value: Asia/Shanghai
        - name: LANG
          value: C.UTF-8
        name: spring-boot-project   # 容器的名称,需要和流水线 set 命令的容器名称一致
        image: nginx    # 此处使用的 nginx 作为原始的镜像,通过 Jenkins 构建并发版后,变成 Java 应用的镜像
        ports:
        - containerPort: 8761   # 端口号和健康检查按照实际情况进行修改
          name: web
          protocol: TCP
        imagePullPolicy: IfNotPresent
        lifecycle: {}
        livenessProbe:
          failureThreshold: 2
          initialDelaySeconds: 30
          periodSeconds: 10
          successThreshold: 1
          tcpSocket:
            port: 8761          # 端口号和健康检查按照实际情况进行修改
          timeoutSeconds: 2
        readinessProbe:
          failureThreshold: 2
          initialDelaySeconds: 30
          periodSeconds: 10
          successThreshold: 1
          tcpSocket:
            port: 8761
          timeoutSeconds: 2
        resources:              # 资源请求按照实际情况修改
          limits:
            cpu: 994m
            memory: 1170Mi
          requests:
            cpu: 10m
            memory: 55Mi
      dnsPolicy: ClusterFirst
      imagePullSecrets:
      - name: harborkey         # Harbor 仓库密钥,需要和上述创建的 Secret 一致
      restartPolicy: Always
      securityContext: {}
      serviceAccountName: default
# 创建资源(Pod 无法启动请忽略):
[root@k8s-master01 ~]# kubectl create -f spring-boot-project.yaml
[root@k8s-master01 ~]# kubectl get po -n kubernetes
NAME                                   READY   STATUS             RESTARTS   AGE
spring-boot-project-57f695f949-wsk76   0/1     ImagePullBackOff   0          51s
3.4.4 PipelineRun 自动构建发版
接下来创建 PipelineRun 实现 Java 应用的自动发版:
[root@k8s-master01 ~]# vim java-pipelinerun.yaml
[root@k8s-master01 ~]# cat java-pipelinerun.yaml
apiVersion: tekton.dev/v1beta1
kind: PipelineRun
metadata:
  # 自动生成名字
  generateName: spring-boot-project
spec:
  pipelineRef:
    name: deploy
  # 定义 workspace
  workspaces:
  - name: share-data
    persistentVolumeClaim:
      claimName: tekton-workspace
    # 按照项目-服务名字-环境当做 workspace
    subPath: spring-boot-project-dev
  # 把 K8s 的 secret 挂载到 git-credentials workspace
  - name: ssh-directory
    secret:
      secretName: git-ssh-auth
  - name: docker-credentials
    secret:
      secretName: docker-credentials
  - name: kubeconfig
    secret:
      secretName: kubeconfig
  # 传递参数给 pipeline
  params:
  - name: url
    value: git@192.168.200.55:kubernetes/spring-boot-project.git
  - name: revision
    value: "master"
  - name: BUILD_IMAGE
    value: crpi-q1nb2n896zwtcdts.cn-beijing.personal.cr.aliyuncs.com/ywb01/maven:3.5.3
  - name: BUILD_COMMAND
    value: |-
      mvn clean install -DskipTests
      ls target/*
  - name: REGISTRY
    value: 192.168.200.53
  - name: REPOSTORY
    value: kubernetes
  - name: IMAGE_NAME
    value: spring-boot-project
  - name: NAMESPACE
    value: kubernetes
  - name: DEPLOY_NAME
    value: spring-boot-project
  - name: CONTAINER_NAME
    value: spring-boot-project
  - name: KUBECONFIG_PATH
    value: study-kubeconfig
  - name: CACHE_DIR
    value: "/root/.m2"
创建该资源:
[root@k8s-master01 ~]# kubectl create -f java-pipelinerun.yaml
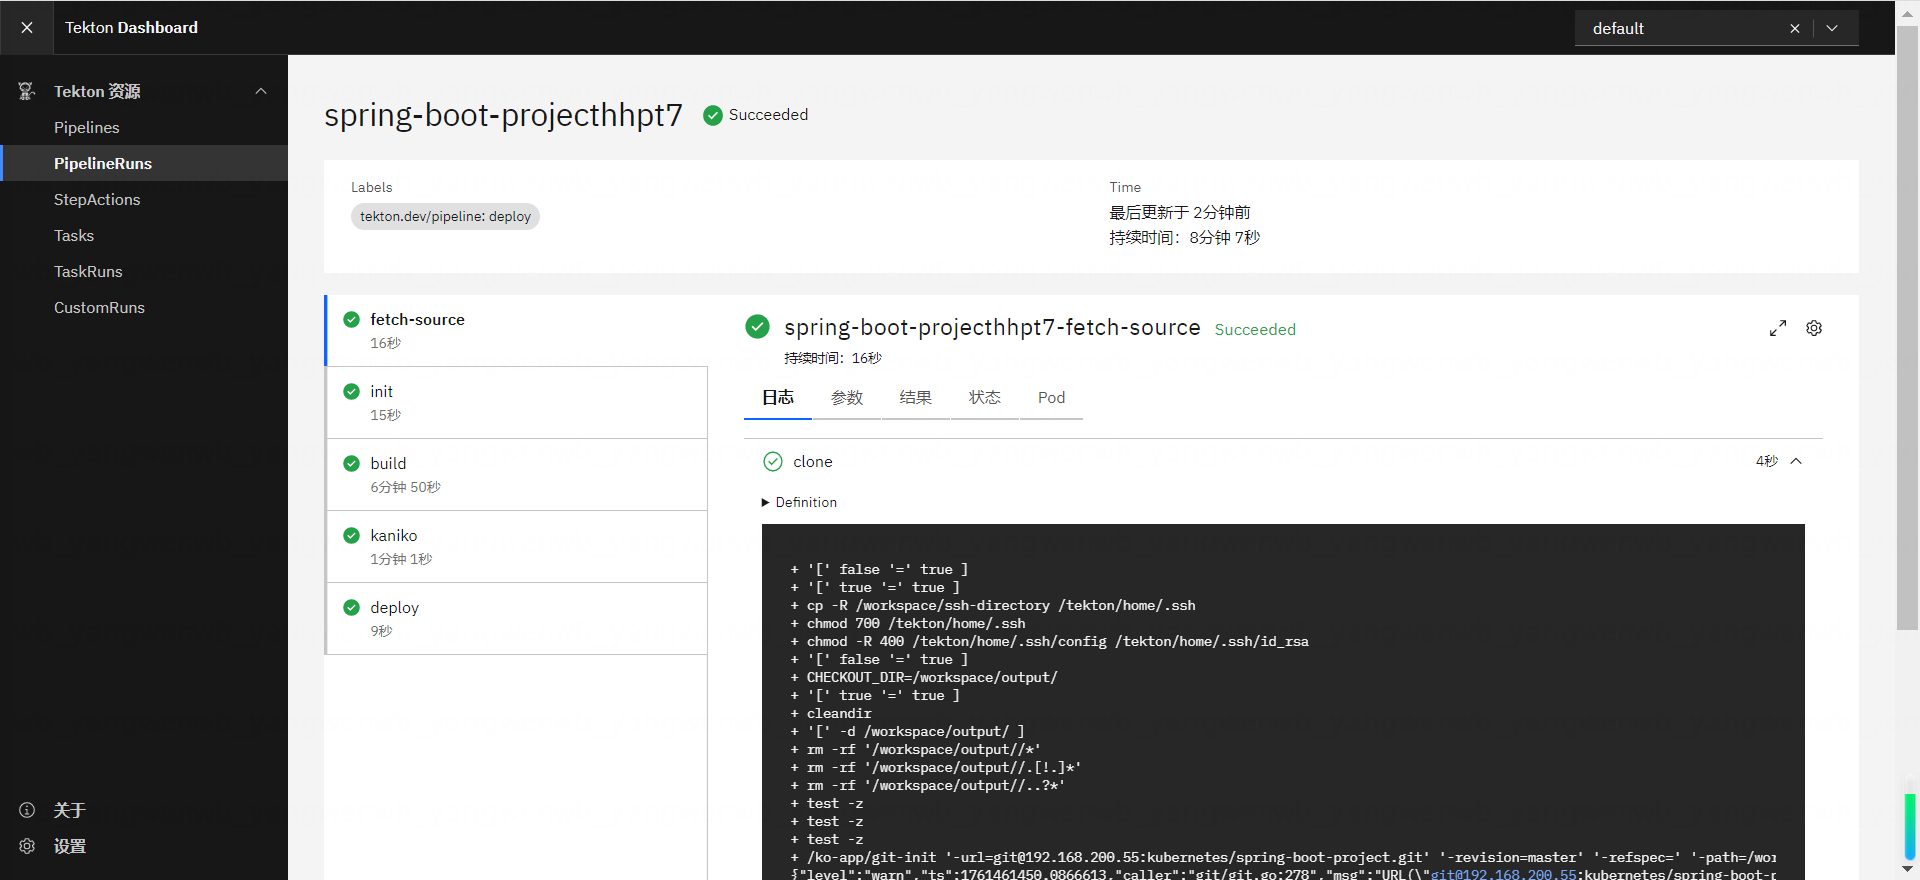
Tekton Dashboard上面可以看到执行动作
3.5 Tekton自动化构建前端Vue应用
本节介绍自动化构建 Vue/H5 应用,其构建方式和自动化构建 Java 基本相同,重点是更改 Deployment、Jenkinsfile 和 Dockerfile 即可。
前端应用测试项目地址:https://gitee.com/dukuan/vue-project.git,可以参考 Java 小节的方式,导入前端项目到 GitLab 中,当然也可以使用公司自己的项目。
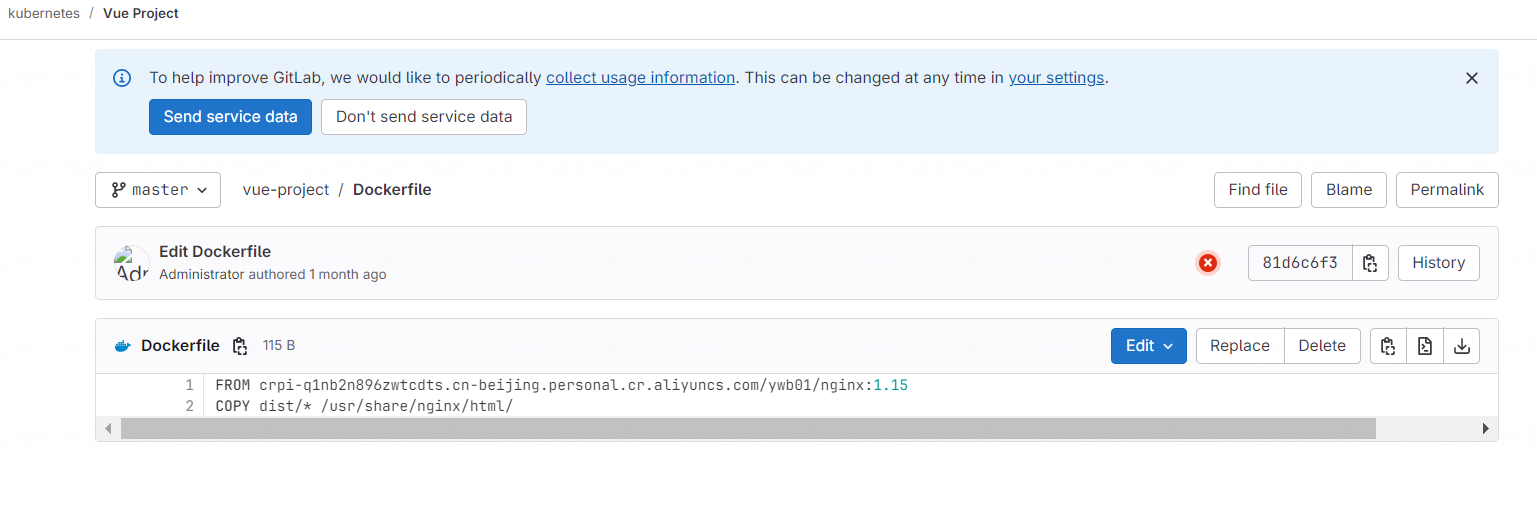
3.5.1 定义 Dockerfile
前端应用构建后一般会在 dist 文件下产生 html 文件,只需要拷贝到 nginx 的根目录下即可:
FROM crpi-q1nb2n896zwtcdts.cn-beijing.personal.cr.aliyuncs.com/ywb01/nginx:1.15
COPY dist/* /usr/share/nginx/html/

3.5.2 定义 Kubernetes 资源
[root@k8s-master01 ~]# vim vue-project.yaml
[root@k8s-master01 ~]# cat vue-project.yaml
apiVersion: v1
kind: Service
metadata:
  creationTimestamp: null
  labels:
    app: vue-project
  name: vue-project
  namespace: kubernetes
spec:
  ports:
  - name: web
    port: 80
    protocol: TCP
    targetPort: 80
  selector:
    app: vue-project
  sessionAffinity: None
  type: ClusterIP
status:
  loadBalancer: {}
---
apiVersion: networking.k8s.io/v1
kind: Ingress
metadata:
  creationTimestamp: null
  name: vue-project
  namespace: kubernetes
spec:
  ingressClassName: nginx
  rules:
  - host: vue-project.test.com
    http:
      paths:
      - backend:
          service:
            name: vue-project
            port:
              number: 80
        path: /
        pathType: ImplementationSpecific
status:
  loadBalancer: {}
---
apiVersion: apps/v1
kind: Deployment
metadata:
  creationTimestamp: null
  labels:
    app: vue-project
  name: vue-project
  namespace: kubernetes
spec:
  replicas: 1
  selector:
    matchLabels:
      app: vue-project
  strategy:
    rollingUpdate:
      maxSurge: 1
      maxUnavailable: 0
    type: RollingUpdate
  template:
    metadata:
      creationTimestamp: null
      labels:
        app: vue-project
    spec:
      affinity:
        podAntiAffinity:
          preferredDuringSchedulingIgnoredDuringExecution:
          - podAffinityTerm:
              labelSelector:
                matchExpressions:
                - key: app
                  operator: In
                  values:
                  - vue-project
              topologyKey: kubernetes.io/hostname
            weight: 100
      containers:
      - env:
        - name: TZ
          value: Asia/Shanghai
        - name: LANG
          value: C.UTF-8
        image: nginx
        imagePullPolicy: IfNotPresent
        lifecycle: {}
        livenessProbe:
          failureThreshold: 2
          initialDelaySeconds: 30
          periodSeconds: 10
          successThreshold: 1
          tcpSocket:
            port: 80
          timeoutSeconds: 2
        name: vue-project
        ports:
        - containerPort: 80
          name: web
          protocol: TCP
        readinessProbe:
          failureThreshold: 2
          initialDelaySeconds: 30
          periodSeconds: 10
          successThreshold: 1
          tcpSocket:
            port: 80
          timeoutSeconds: 2
        resources:
          limits:
            cpu: 994m
            memory: 1170Mi
          requests:
            cpu: 10m
            memory: 55Mi
      dnsPolicy: ClusterFirst
      imagePullSecrets:
      - name: harborkey
      restartPolicy: Always
      securityContext: {}
      serviceAccountName: default
# 创建资源(Pod 无法启动请忽略):
[root@k8s-master01 ~]# kubectl create -f vue-project.yaml
3.5.3 PipelineRun 自动构建发版
接下来创建 PipelineRun 实现 Java 应用的自动发版:
[root@k8s-master01 ~]# vim vue-project-pipelinerun.yaml
[root@k8s-master01 ~]# cat vue-project-pipelinerun.yaml
apiVersion: tekton.dev/v1beta1
kind: PipelineRun
metadata:
  # 自动生成名字
  generateName: vue-project
spec:
  pipelineRef:
    name: deploy
  # 定义 workspace
  workspaces:
  - name: share-data
    persistentVolumeClaim:
      claimName: tekton-workspace
    # 按照项目-服务名字-环境当做 workspace
    subPath: vue-project-dev
  # 把 K8s 的 secret 挂载到 git-credentials workspace
  - name: ssh-directory
    secret:
      secretName: git-ssh-auth
  - name: docker-credentials
    secret:
      secretName: docker-credentials
  - name: kubeconfig
    secret:
      secretName: kubeconfig
  # 传递参数给 pipeline
  params:
  - name: url
    value: git@192.168.200.55:kubernetes/vue-project.git
  - name: revision
    value: "master"
  - name: BUILD_IMAGE
    value: crpi-q1nb2n896zwtcdts.cn-beijing.personal.cr.aliyuncs.com/ywb01/node:lts
  - name: BUILD_COMMAND
    value: |-
      npm install --registry=https://registry.npmmirror.com/
      npm run build
  - name: REGISTRY
    value: 192.168.200.53
  - name: REPOSTORY
    value: kubernetes
  - name: IMAGE_NAME
    value: vue-project
  - name: NAMESPACE
    value: kubernetes
  - name: DEPLOY_NAME
    value: vue-project
  - name: CONTAINER_NAME
    value: vue-project
  - name: KUBECONFIG_PATH
    value: study-kubeconfig
  - name: CACHE_DIR
    value: "/go/pkg/"
创建该资源:
[root@k8s-master01 ~]# kubectl create -f vue-project-pipelinerun.yaml
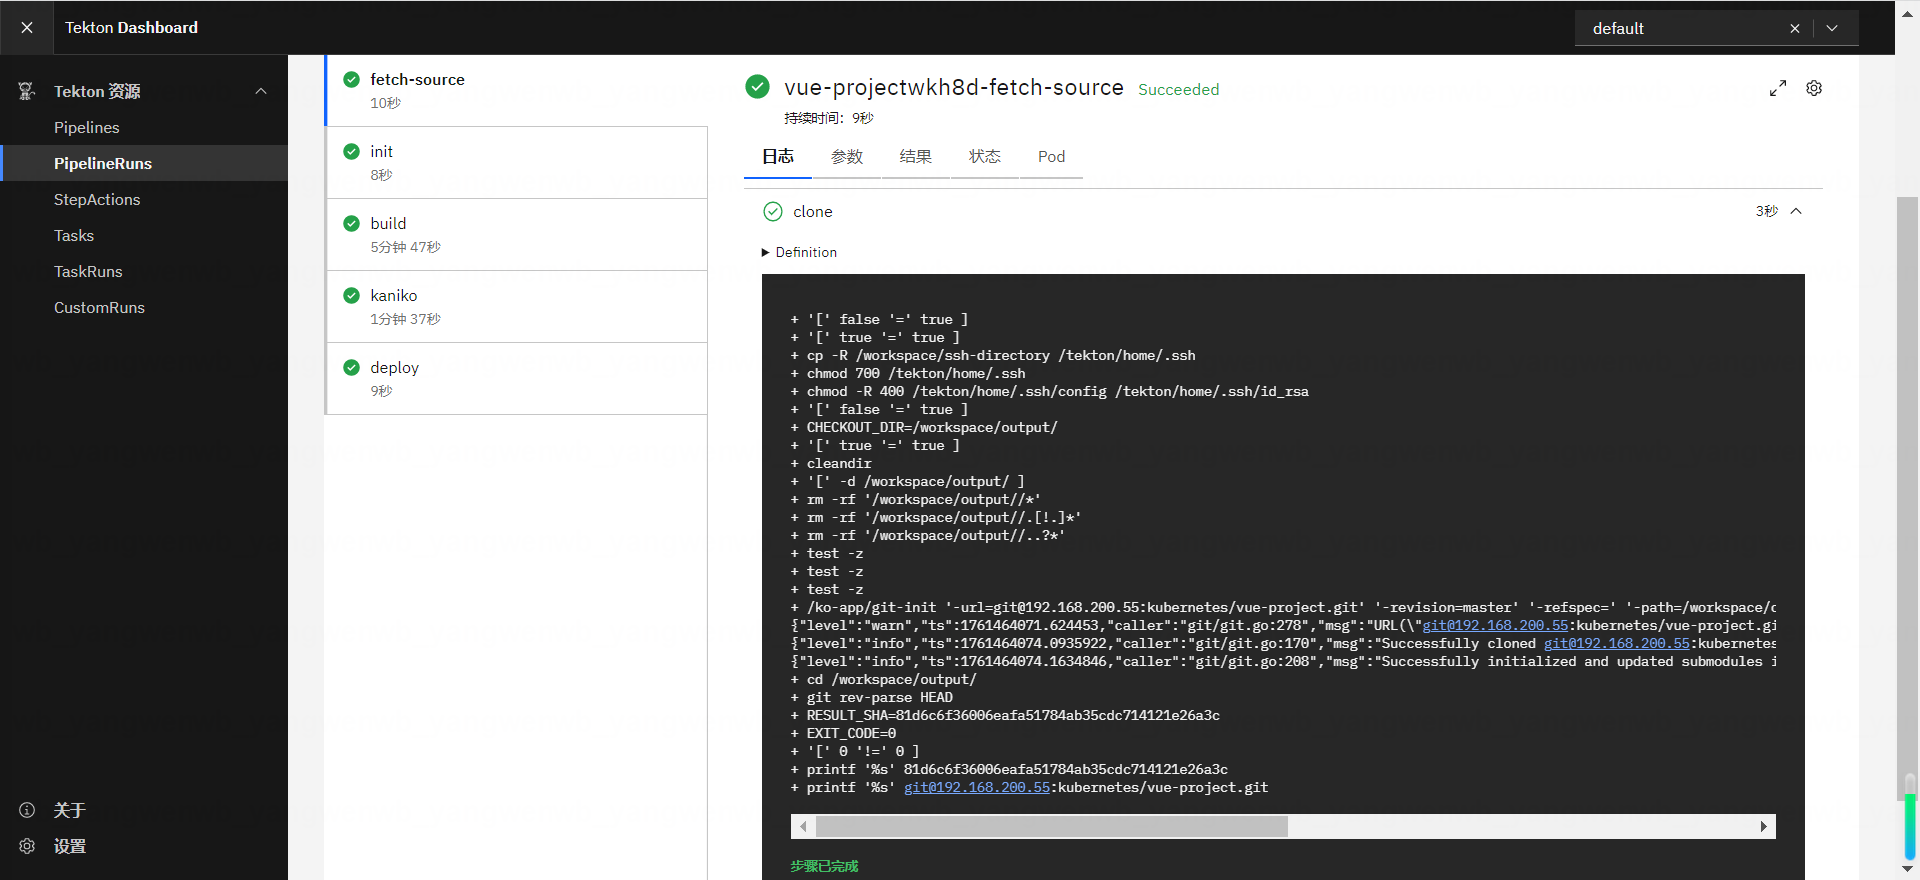
Tekton Dashboard上面可以看到执行动作
3.6 Tekton自动化构建GO应用
上述演示了 Java 和前端应用的自动化,接下来演示一下对于 Golang 的自动化构建,本次示例的代码地址:https://gitee.com/dukuan/go-project.git。
3.6.1 定义 Dockerfile
和之前不一样的地方是,Golang 编译后生成的是一个二进制文件,可以直接执行,所以底
层镜像设置为 alpine 或者其它的小镜像即可:
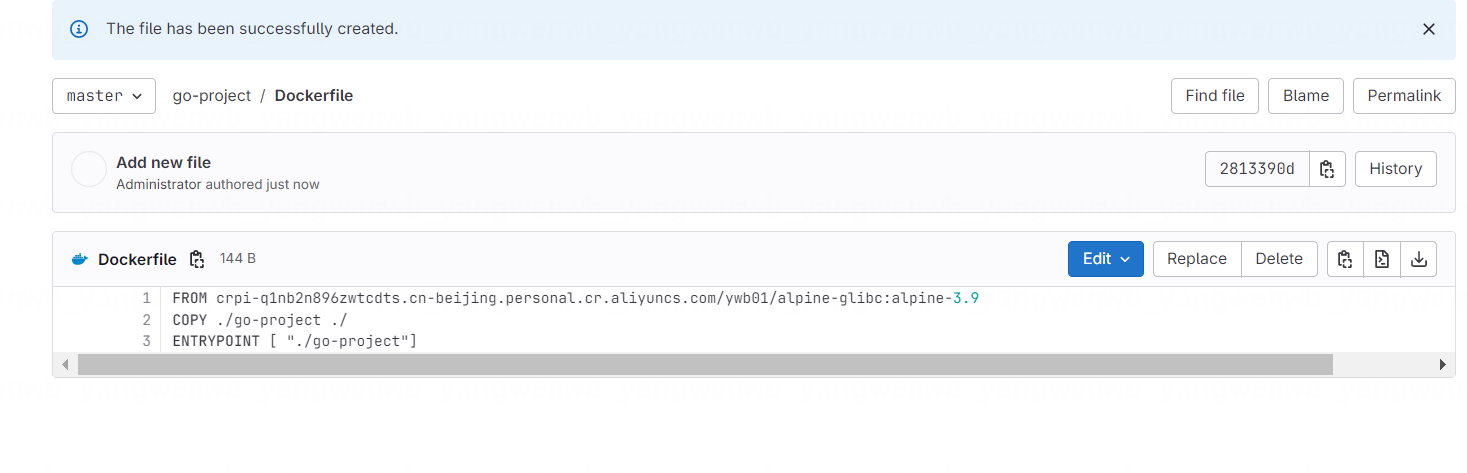
FROM crpi-q1nb2n896zwtcdts.cn-beijing.personal.cr.aliyuncs.com/ywb01/alpine-glibc:alpine-3.9
# 如果定义了单独的配置文件,可能需要拷贝到镜像中
# COPY conf/ ./conf
# 包名按照实际情况进行修改
COPY ./go-project ./
# 启动该应用
ENTRYPOINT [ "./go-project"]
3.6.2 定义 Kubernetes 资源
[root@k8s-master01 ~]# vim go-project.yaml
[root@k8s-master01 ~]# cat go-project.yaml
apiVersion: v1
kind: Service
metadata:
  creationTimestamp: null
  labels:
    app: go-project
  name: go-project
  namespace: kubernetes
spec:
  ports:
  - name: web
    port: 8080
    protocol: TCP
    targetPort: 8080
  selector:
    app: go-project
  sessionAffinity: None
  type: ClusterIP
status:
  loadBalancer: {}
---
apiVersion: networking.k8s.io/v1
kind: Ingress
metadata:
  creationTimestamp: null
  name: go-project
  namespace: kubernetes
spec:
  ingressClassName: nginx
  rules:
  - host: go-project.test.com
    http:
      paths:
      - backend:
          service:
            name: go-project
            port:
              number: 8080
        path: /
        pathType: ImplementationSpecific
status:
  loadBalancer: {}
---
apiVersion: apps/v1
kind: Deployment
metadata:
  creationTimestamp: null
  labels:
    app: go-project
  name: go-project
  namespace: kubernetes
spec:
  replicas: 1
  selector:
    matchLabels:
      app: go-project
  strategy:
    rollingUpdate:
      maxSurge: 1
      maxUnavailable: 0
    type: RollingUpdate
  template:
    metadata:
      creationTimestamp: null
      labels:
        app: go-project
    spec:
      affinity:
        podAntiAffinity:
          preferredDuringSchedulingIgnoredDuringExecution:
          - podAffinityTerm:
              labelSelector:
                matchExpressions:
                - key: app
                  operator: In
                  values:
                  - go-project
              topologyKey: kubernetes.io/hostname
            weight: 100
      containers:
      - env:
        - name: TZ
          value: Asia/Shanghai
        - name: LANG
          value: C.UTF-8
        image: nginx
        imagePullPolicy: IfNotPresent
        lifecycle: {}
        livenessProbe:
          failureThreshold: 2
          initialDelaySeconds: 30
          periodSeconds: 10
          successThreshold: 1
          tcpSocket:
            port: 8080
          timeoutSeconds: 2
        name: go-project
        ports:
        - containerPort: 8080
          name: web
          protocol: TCP
        readinessProbe:
          failureThreshold: 2
          initialDelaySeconds: 30
          periodSeconds: 10
          successThreshold: 1
          tcpSocket:
            port: 8080
          timeoutSeconds: 2
        resources:
          limits:
            cpu: 994m
            memory: 1170Mi
          requests:
            cpu: 10m
            memory: 55Mi
      dnsPolicy: ClusterFirst
      imagePullSecrets:
      - name: harborkey
      restartPolicy: Always
      securityContext: {}
      serviceAccountName: default
# 创建资源(Pod 无法启动请忽略):
[root@k8s-master01 ~]# kubectl create -f go-project.yaml
3.6.3 PipelineRun 自动构建发版
接下来创建 PipelineRun 实现 Java 应用的自动发版:
[root@k8s-master01 ~]# vim go-project-pipelinerun.yaml
[root@k8s-master01 ~]# cat go-project-pipelinerun.yaml
apiVersion: tekton.dev/v1beta1
kind: PipelineRun
metadata:
  # 自动生成名字
  generateName: go-project
spec:
  pipelineRef:
    name: deploy
  # 定义 workspace
  workspaces:
  - name: share-data
    persistentVolumeClaim:
      claimName: tekton-workspace
    # 按照项目-服务名字-环境当做 workspace
    subPath: go-project-dev
  # 把 K8s 的 secret 挂载到 git-credentials workspace
  - name: ssh-directory
    secret:
      secretName: git-ssh-auth
  - name: docker-credentials
    secret:
      secretName: docker-credentials
  - name: kubeconfig
    secret:
      secretName: kubeconfig
  # 传递参数给 pipeline
  params:
  - name: url
    value: git@192.168.200.55:kubernetes/go-project.git
  - name: revision
    value: "master"
  - name: BUILD_IMAGE
    value: crpi-q1nb2n896zwtcdts.cn-beijing.personal.cr.aliyuncs.com/ywb01/golang:1.15
  - name: BUILD_COMMAND
    value: |-
      export GO111MODULE=on
      export CGO_ENABLED=0
      go env -w GOPROXY=https://goproxy.cn,direct
      go build
  - name: REGISTRY
    value: 192.168.200.53
  - name: REPOSTORY
    value: kubernetes
  - name: IMAGE_NAME
    value: go-project
  - name: NAMESPACE
    value: kubernetes
  - name: DEPLOY_NAME
    value: go-project
  - name: CONTAINER_NAME
    value: go-project
  - name: KUBECONFIG_PATH
    value: study-kubeconfig
  - name: CACHE_DIR
    value: "/go/pkg/"
创建该资源:
[root@k8s-master01 ~]# kubectl create -f go-project-pipelinerun.yaml
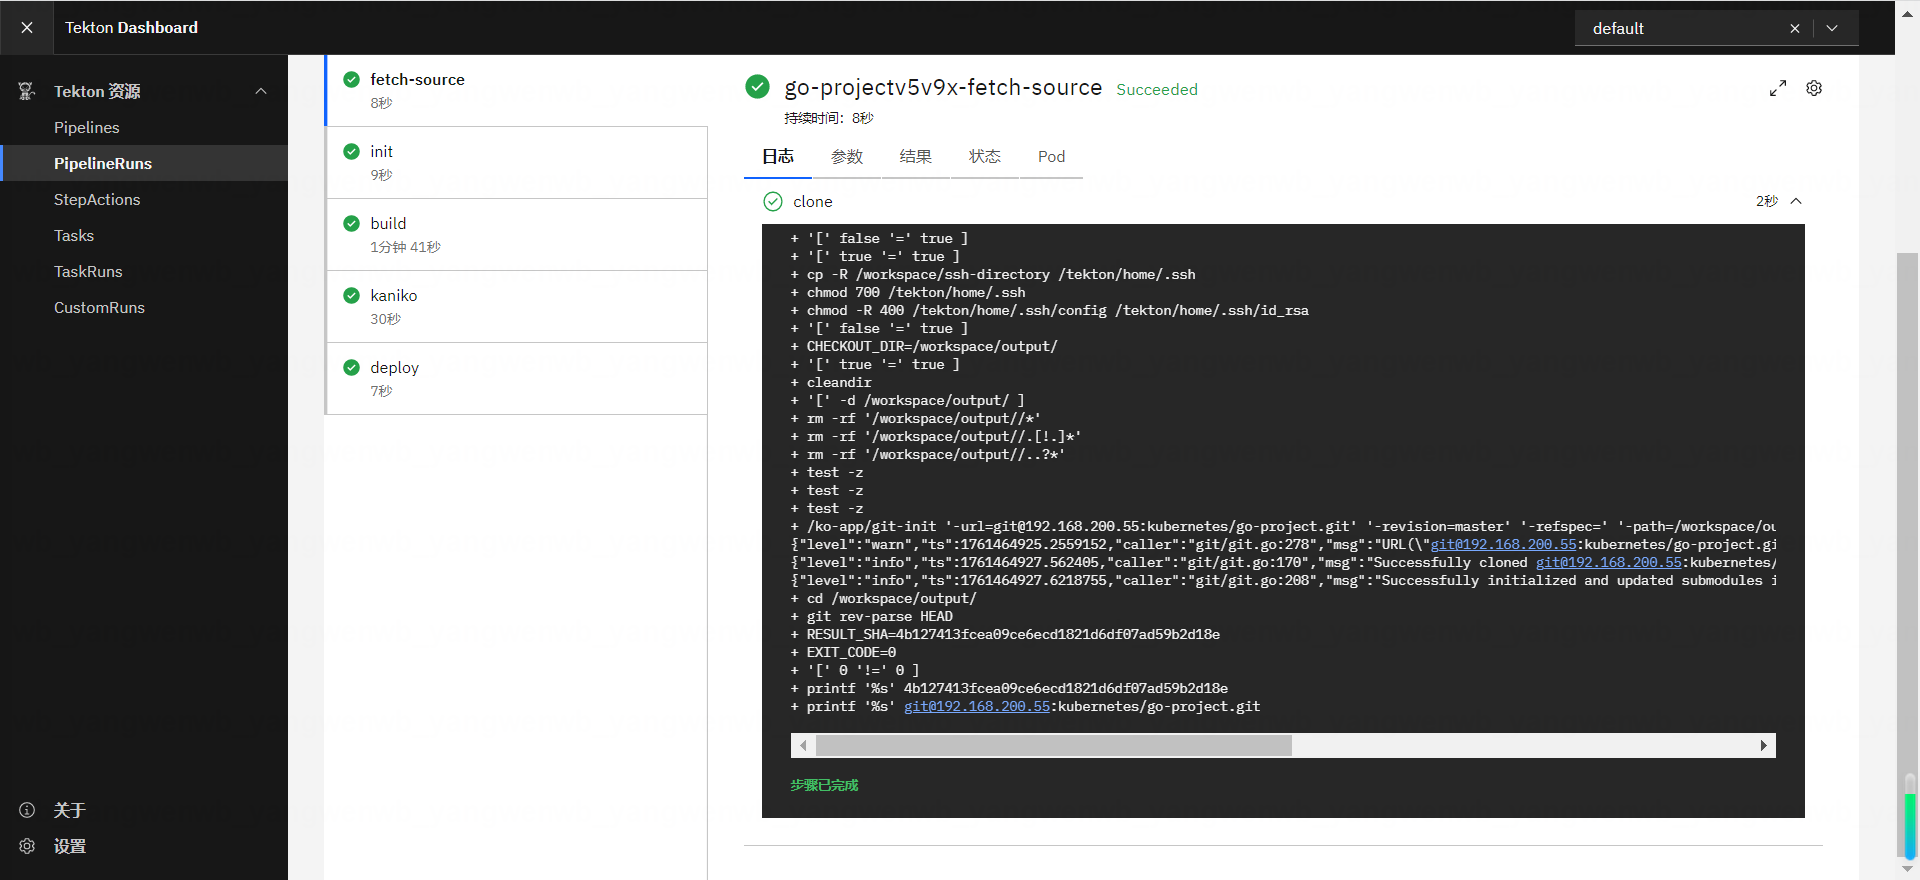
Tekton Dashboard上面可以看到执行动作

 浙公网安备 33010602011771号