JavaWeb
Tomcat服务器
apache-tomcat目录结构如下
-bin //启动关闭的脚本文件
-conf //配置
-lib //依赖的jar包
-logs //日志
-webapps //网站应用
    -Root //根目录
    -MyServer //网站的目录名
        -WEB-INF
            -classes //java程序
            -lib //web应用所依赖的jar包
            -web.xml //网站配置文件
        -index.html
        -static
            -css
            -js
            -img
bin文件夹下 startup.dat 打开 tomcat,shutdown.bat关闭 tomcat。
conf文件夹下server.xml是核心配置文件
    <Connector port="8080" protocol="HTTP/1.1"
               connectionTimeout="20000"
               redirectPort="8443" />
此处可配置启动的端口号
 <Host name="localhost"  appBase="webapps"
            unpackWARs="true" autoDeploy="true">
此处可配置主机的名称,网站应用存放的位置
Http介绍
HTTP(HyperText Transfer Protocol)超文本传输协议
文本:html,字符串...
超文本:图片,音乐,视频,定位,地图...
请求方式:GET,POST
GET:请求能够携带的参数比较少,大小有限制,会在浏览器的URL地址栏显示数据内容,不安全,但高效。
POST:请求携带的参数无限制,大小无限制,不会在浏览器的URL地址栏显示数据内容,安全。
响应状态码
200:请求响应成功
3xx:请求重定向
4xx:处理发生错误,责任在客户端,如客户端请求一个不存在的资源(404),客户端未被授权,禁止访问等。
5xx:处理发生错误,责任在服务器端,如服务器抛出异常(500),网关错误(502),HTTP版本不支持等。
Maven
环境变量配置
MAVEN_HOME C:\apache-maven-3.6.0
M2_HOME C:\apache-maven-3.6.0\bin
修改conf下settings.xml为阿里云镜像
<mirror>
      <id>nexus-aliyun</id>
      <mirrorOf>central</mirrorOf>
      <name>Nexus aliyun</name>
      <url>http://maven.aliyun.com/nexus/content/groups/public</url>
</mirror>
建立一个本地仓库 localRepository
<localRepository>
      C:\apache-maven-3.6.0\maven-repo
</localRepository>
在IDEA中创建maven项目(例如org.apache.maven.archetypes:maven-archetype-webapp),在Settings中Build Tools的Maven下进行设置。
GroupID 是项目组织唯一的标识符,实际对应JAVA的包的结构,是main目录里java的目录结构。
ArtifactID是项目的唯一的标识符,实际对应项目的名称,就是项目根目录的名称。
Version指定了项目的当前版本,SNAPSHOT意为快照,说明该项目还处于开发中,是不稳定的版本。
在Add Configuration 中配置Tomcat Server。
在pom.xml中进行配置或导入依赖。
jar:Java应用
war:Javaweb应用
maven资源导出问题,在pom.xml中添加
<build>
    .......
      <resources>
        <resource>
            <directory>src/main/resources</directory>
            <excludes>
                <exclude>**/*.properties</exclude>
                <exclude>**/*.xml</exclude>
             </excludes>
            <filtering>false</filtering>
        </resource>
        <resource>
            <directory>src/main/java</directory>
            <includes>
                <include>**/*.properties</include>
                <include>**/*.xml</include>
            </includes>
            <filtering>false</filtering>
        </resource>
    </resources>
    ......
</build>
Servlet
Servlet接口SUN公司定义了两个默认实现类,分别为:GenericServlet、HttpServlet。其中HttpServlet中重写的service()方法会判断用户的请求方式。因此自己编写的servlet程序可以继承HttpServlet,只需重写其中的doGet和doPost方法。
响应输出基本格式如下
resp.setContentType("text/html");
resp.setCharacterEncoding("utf-8");
resp.getWriter.print("...");
写好一个servlet后,在web.xml中需要进行注册映射。
<web-app>
    <servlet>
        <servlet-name>servlettest</servlet-name>  //这是servlet名称
        <servlet-class>servlet.HelloServlet</servlet-class>  //这是servlet路径
    </servlet>
        <servlet-mapping>
        <servlet-name>servlettest</servlet-name>  //这是servlet名称
        <url-pattern>/ts/*</url-pattern>
//这是浏览器路径,*是通配符。如果在<url-pattern></url-pattern>之中只放*.后缀名,则所有以该后缀名结尾的路径均访问该servlet
    </servlet-mapping>
</web-app>
注意包名全小写,类名每个单词首字母大写,变量和方法驼峰。
关于通配路径/*,它会覆盖index.html,但是已注册的映射路径不会受通配影响,只有找不到映射才会走通配处理请求。/*可用于处理404问题。
ServletContext
统筹所有servlet,可以保存一些信息,供不同的servlet使用。
ServletContext context = this.getServletContext();
获取数据
context.setAttribute("name","yuking");
String name = context.getAttribute("name");
获取初始化参数,即web.xml中的配置信息
String url = context.getInitParameter("url");
请求路径转发
context.getRequestDispatcher("请求所要转发的路径").forward(req,resp);
获取properties文件信息(java和resources目录下的properties文件都会被打包到classes路径下)
首先创建一个test.properties,在里面写入name=yuking
        InputStream i = context.getResourceAsStream("/WEB-INF/classes/test.properties");
        Properties pro = new Properties();
        pro.load(i);
        pro.getProperty("name")
关于IDEA快捷键
alt+enter 自动补全
alt+insert 添加方法,添加依赖
ctrl+b 查看源码
ctrl+o 重写方法
ctrl+/ 行注释
ctrl+shift+/ 块注释
ctrl+alt+L 自动对齐
ctrl+p 提示方法的参数
ctrl + alt + o 查看类关系图
在接收返回值时,通常采用ALT+Enter快捷键或者 .var,可以快速完成参数接收,但会出现接收参数前面有final修饰的情况,在使用快捷键产生fianl后按快捷键ALT+f,就可以了。
HttpServletResponse
ServletOutputStream getOutputStream() throws IOException;
PrintWriter getWriter() throws IOException;
void setCharacterEncoding(String var1);
void setContentType(String var1);
举个栗子 下载文件
 protected void doGet(HttpServletRequest req, HttpServletResponse resp) throws ServletException, IOException {
        //获取下载文件路径
        String realPath = this.getServletContext().getRealPath("/static/img/1.png");
        //获取下载文件文件名
        String fileName = realPath.substring(realPath.lastIndexOf("\\")+1);
        //告诉浏览器下载文件的头信息
        resp.setHeader("Content-Disposition","attachment;filename="+ URLEncoder.encode(fileName,"UTF-8"));
        //获取下载文件的输入流
        FileInputStream in = new FileInputStream(realPath);
        //创建缓冲区
        int len = 0; //缓冲区现在的长度
        byte[] buffer = new byte[1024];
        //创建servlet输出流对象
        ServletOutputStream out = resp.getOutputStream();
        while((len=in.read(buffer))>0){
            //in.read(buffer)每次至少读取(read)in中的1个字节,返回读取字节长度,文件末尾返回-1
            out.write(buffer,0,len);
            //写入(write)out,从buffer的第0个开始写,写到第len个
        }
        //关闭流
        in.close();
        out.close();
    }
验证码
protected void doGet(HttpServletRequest req, HttpServletResponse resp) throws ServletException, IOException {
        //告诉浏览器3s刷新一次
        resp.setHeader("refresh","3");
        //在内存中创建一个画板
        BufferedImage image = new BufferedImage(80,20,BufferedImage.TYPE_INT_RGB);
        //取出画笔
        Graphics2D g = (Graphics2D)image.getGraphics();
        //设置画笔颜色
        g.setColor(Color.white);
        //在此rect中涂色
        g.fillRect(0,0,80,20);

        g.setColor(Color.BLUE);
        g.setFont(new Font(null,Font.BOLD,20));
        g.drawString(makeNum(),0,20);

        //告诉浏览器,这个请求用图片的方式打开
        resp.setContentType("image/png");

        //网站存在缓存,不让浏览器缓存
        resp.setDateHeader("expires",-1);
        resp.setHeader("Cache-Control","no-cache");
        resp.setHeader("Pragma","no-cache");

        //把图片写给浏览器
        ImageIO.write(image,"jpg",resp.getOutputStream());
    }

    //生成随机数
    private String makeNum() {
        Random random = new Random();
        String num = random.nextInt(9999999) + "";
        //StringBuffer就类似于list了
        StringBuffer sb = new StringBuffer();
        for (int i = 0; i < 7 - num.length(); i++) {
            sb.append("0");
        }
        num = sb.toString() + num;
        return num;
    }
实现重定向
    protected void doGet(HttpServletRequest req, HttpServletResponse resp) throws ServletException, IOException {

        // servlet与xml中,根目录为tomcat deployment发布的application context
        // 写html时,什么都不加默认为"./"表示当前目录,"../"表示上层目录,"/"表示根目录同上
        // response重定向时,根目录为ip
        resp.setHeader("Location","/yuking/tsverification");
        resp.setStatus(302);
        resp.sendRedirect("/yuking/tsverification");

        //重定向与转发
        //相同点:页面都会实现跳转
        //不同点:请求转发时候,url不会产生变化 307
        //重定向时候,url地址栏会发生变化 302
    }
HttpServletRequest
用户通过Http协议访问服务器,Http请求中的所有信息都会封装到request中
1、获取前端传递的参数
String username = req.getParameter("username");
String password = req.getParameter("password");
String[] hobbies = req.getParameterValues("hobbies")
2、请求转发
Cookie
会话:用户打开一个浏览器,点击了很多超链接,访问多个web资源,关闭浏览器,这个过程可以称之为会话。
有状态会话:浏览器知道用户曾经来过。
cookie是把用户的数据写在用户的浏览器上。一般会保存在本地的用户目录下appdata
删除cookie 设置相同名字的cookie的有效期为0
拿到中文时
URLEncoder.encode(s1,"utf-8");
URLDecoder.decode(cookie.getValue(),"utf-8");
CookieServlet
protected void doGet(HttpServletRequest req, HttpServletResponse resp) throws ServletException, IOException {
        req.setCharacterEncoding("utf-8");
        resp.setCharacterEncoding("utf-8");
        PrintWriter out = resp.getWriter();

        //cookie key-value
        Cookie[] cookies = req.getCookies();
        if (cookies!=null){
            out.write("your last visit time:");
            for (int i = 0; i < cookies.length; i++) {
                Cookie cookie = cookies[i];
                if (cookie.getName().equals("lastLoginTime")){
                    long lastLoginTime = Long.parseLong(cookie.getValue());
                    Date date = new Date(lastLoginTime);
                    out.write(date.toLocaleString());
                }
            }
        }

        //服务器给客户端相应一个cookie;
        Cookie cookie = new Cookie("lastLoginTime",System.currentTimeMillis()+"");
        //有效期为1天
        cookie.setMaxAge(24*60*60);
        resp.addCookie(cookie);
    }
Session
服务器会给每一个用户(浏览器)创建一个Session对象,将信息写在Session中,保存在服务器端。
session是访问此服务器任何一个页面时服务器自动创建的,用cookie将session的id传给浏览器
SessionServlet
protected void doGet(HttpServletRequest req, HttpServletResponse resp) throws ServletException, IOException {
        //得到Session
        HttpSession session = req.getSession();
        //向Session中存信息,不仅可以存字符串还可以存对象
        session.setAttribute("name","yuking");
        //获取Session的ID
        String id = session.getId();
        //判断Session是不是新的
        if(session.isNew()){
            resp.getWriter().write(("1"));
        }
        else {
            resp.getWriter().write("0");
        }

        //取消
        session.removeAttribute("name");
        //手动注销
        session.invalidate();
    }
web.xml中插入session-config
  <session-config>
     <!--设定session的失效时间,以分钟为单位-->
    <session-timeout>1</session-timeout>
  </session-config>
web.xml是要遵循规范的,例如
<!DOCTYPE web-app PUBLIC
"-//Sun Microsystems, Inc.//DTD Web Application 2.3//EN"
"http://java.sun.com/dtd/web-app_2_3.dtd" >
若添加session-config报错,把开头换为
<?xml version="1.0" encoding="UTF-8"?>
<project xmlns="http://maven.apache.org/POM/4.0.0" xmlns:xsi="http://www.w3.org/2001/XMLSchema-instance"
xsi:schemaLocation="http://maven.apache.org/POM/4.0.0 http://maven.apache.org/xsd/maven-4.0.0.xsd">
<modelVersion>4.0.0</modelVersion>
JSP
<%@ page contentType="text/html;charset=UTF-8" language="java" %>
java servlet page
jsp页面中可以嵌入java代码
浏览器向服务器发送请求,不管访问什么资源,其实都是在访问servlet
jsp本质上是一个servlet
当用户访问服务器中的一个jsp页面时,服务器将jsp页面转换成java文件,然后编译成class文件。用户真正访问的是服务器处理完的class对象,即servlet
final javax.servlet.jsp.PageContext pageContext;  //页面上下文
javax.servlet.http.HttpSession session = null;  //session
final javax.servlet.ServletContext application;  //applicationContext
final javax.servlet.ServletConfig config;   //config
javax.servlet.jsp.JspWriter out = null;    //out
final java.lang.Object page = this;    //page当前页
HttpServletRequest request     //请求
HttpServletResponse response   //响应
以上这些内置对象可以在jsp中直接使用
jsp页面转换为java,java代码原封不动,html代码会用out.write()包含输出
JSP指令元素
<%-- 注释 --%>

<%=  变量或表达式  %>  用来将内容输出到客户端

<%
java代码 会被编译到_jspService方法中
%>

<%!
java代码 JSP声明 会被编译到JSP生成java的类中
%>

<!--
html注释可以在浏览器的html源码中显示,但是jsp注释不会被显示
-->

<%@ args... %>

<%for (int i = 0; i < 5; i++) {%>
<h1>hello,world <%=i%> </h1>
<%}%>
定制错误页面
<%@ page errorPage=".." %> 意思是若该页面错误,则转入errprPage页面
也可在web.xml中直接配置<error-page>,从而不必一个个在jsp页面中进行错误处理。
显式声明这是一个错误页面
<%@ page iserrorPage="true" %>
提取公共页面,会将两个页面合二为一。会出现重复定义的错误。
<%@ include file="header.jsp" %>
<%@ include file="footer.jsp" %>
JSP动作元素
jsp:include:拼接页面,本质还是三个页面。定义互相独立。
<jsp:include page="header.jsp" />
<jsp:include page="footer.jsp" />
jsp:forward:转发
jsp:param:携带参数
<jsp:forward page="hello.jsp">
    <jsp:param name="name" value="yuking"/>
</jsp:forward>

<%= request.getParameter("name")%>
JSP数据传递
pageContext.setAttribute("name1","yuking1")  //保存的数据只在一个页面中有效
request.setAttribute("name2","yuking2")  //保存的数据在一次请求中有效,请求转发会携带这个数据
session.setAttribute("name3","yuking3")  //保存的数据在一次会话中有效,从打开浏览器到关闭浏览器
application.setAttribute("name4","yuking4")  //保存的数据只在服务器中有效,从打开服务器到关闭服务器

//从pageContext取出
//从底层到高层查找数据:pageContext-->request-->session-->application
String name1 = (String)pageContext.findAttribute("name1")
String name2 = (String)pageContext.findAttribute("name2")
String name3 = (String)pageContext.findAttribute("name3")
String name4 = (String)pageContext.findAttribute("name4")

pageContext.forward("hello.jsp")

pageContext.setAttribute("name1","yuking1",SESSION_SCOPE)
与 session.setAttribute("name1","yuking1")等价
EL表达式输出 ${}
获取数据 比如变量
执行运算 加减乘除等于
获取web开发的常用对象 比如上下文
调用java方法(不常用)
<h3> ${name1} </h3>
<h3> <%=name1%> </h3>
EL表达式输出若不存在则不输出,第二种方法会输出null
JSTL标签库
jstl标签库的使用就是为了弥补html标签的不足,它自定义许多标签,可以供我们使用,标签的功能和java代码一样
核心标签,格式化标签,sql标签,xml标签
核心标签
引入对应的taglib
<%@taglib prefix="c" uri="http://java.sun.com/jsp/jstl/core"%>
c:if
<form action="hello.jsp" method="get">
     <%--EL表达式获取表单中的数据--%>
    <input type="text" name="username" value="${param.username}">
    <input type="submit" value="提交">
</form>

<%--如果判断提交的用户是管理员,则登陆成功--%>
<c:if test="${param.username=='admin'}" var="isAdmin"> <%--var用来存储test的结果--%>
    <c:out value="welcome admin" />
</c:if>

<c:out value="${isAdmin}"/>
c:set c:choose
<%--定一个变量score,值为85--%>
<c:set var="score" value="85" />
<c:choose>
    <c:when test="${score>=90}">
        你的成绩为优秀
    </c:when>
    <c:when test="${score>=80}">
        你的成绩为一般
    </c:when>
</c:choose>
c:foreach
<%
    ArrayList<String> people = new ArrayList<>();
    people.add(0,"张三");
    people.add(1,"李四");
    people.add(2,"王五");
    people.add(3,"赵六");
%>

<%--
var 每一次遍历出来的变量
items 要遍历的对象
begin 哪里开始
end 到哪里
step步长
--%>
<c:forEach var="people" items="${list}" begin="1" end="3" step="2">
    <c:out value="${people}" /> <br>
</c:forEach>
JavaBean
实体类,JavaBean有特定的写法:
必须要有一个无参构造
属性必须私有化
必须有对应的get/set方法
一般用来和数据库的字段做映射
ORM:对象关系映射
表对应类
字段对应属性
行记录对应对象
idea连接mysql数据库报java.lang.RuntimeException
大概原因:JDBC驱动程序的5.2版本与UTC时区配合使用,必须在连接字符串中明确指定serverTimezone。
解决方法:jdbc:mysql://localhost:3306/test?useUnicode=true&characterEncoding=UTF-8&useJDBCCompliantTimezoneShift=true&useLegacyDatetimeCode=false&serverTimezone=UTC
<jsp:useBean id="people" class="pojo.instructors" scope="page" />
<jsp:setProperty name="people" property="id" value="3"/>
<jsp:setProperty name="people" property="name" value="ss"/>
<jsp:setProperty name="people" property="university" value="kindergarten"/>

ID:<jsp:getProperty name="people" property="id"/>
姓名:<jsp:getProperty name="people" property="name"/>
大学:<jsp:getProperty name="people" property="university"/>
MVC三层架构
架构:没什么是加一层解决不了的
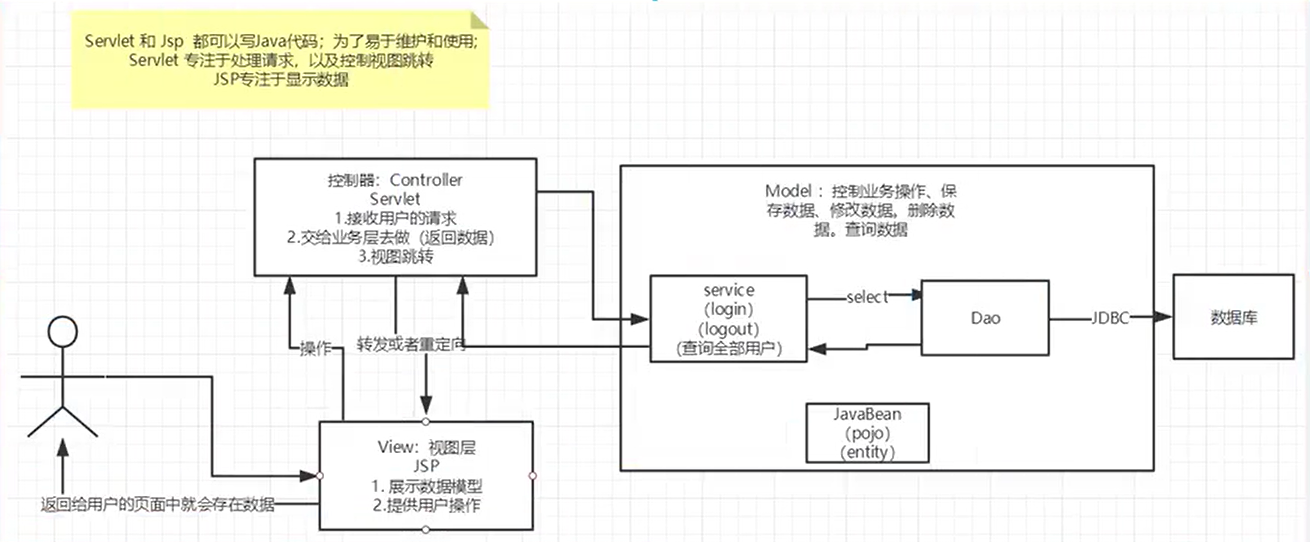
登录 $\rightarrow$ 接受用户的登录请求 $\rightarrow$ 处理用户的请求(获取用户登录的参数,username,password)$\rightarrow$ 交给业务层处理登录业务(判断用户名密码是否正确:事务)$\rightarrow$ Dao层查询用户名密码是否正确 $\rightarrow$ 数据库
Filter
Filter过滤器,用来过滤网站的数据
实现javax.servlet Filter接口,重写doFilter方法
chain 链,用于请求的转交,从而经过多个过滤器
chain.doFilter(request,response)
web.xml中注册
  <filter>
    <filter-name>CharacterEncodingFilter</filter-name>
    <filter-class>filter.CharacterEncodingFilter</filter-class>
  </filter>
  <filter-mapping>
    <filter-name>CharacterEncodingFilter</filter-name>
     <!--只要是/servlet的任何请求,都会经过这个过滤器-->
    <url-pattern>/servlet/*</url-pattern>
     <!-- <url-pattern>/*</url-pattern> -->
  </filter-mapping>
CharacterEncodingFilter.java
public class CharacterEncodingFilter implements Filter {
    //web服务器启动就初始化了,随时等待过滤对象出现
    @Override
    public void init(FilterConfig filterConfig) throws ServletException {
        System.out.println("初始化");
    }

    @Override
    public void doFilter(ServletRequest servletRequest, ServletResponse servletResponse, FilterChain filterChain) throws IOException, ServletException {

    }
    //web服务器关闭的时候,过滤器会销毁
    @Override
    public void destroy() {
        System.out.println("销毁");
    }
}
监听器
xml注册监听器
  <listener>
    <listener-class>listener.OnlineCountListener</listener-class>
  </listener>
OnlineCountListenter.java
public class OnlineCountListener implements HttpSessionListener {
    //统计在线人数,统计session
    //一旦创建session就会触发一次这个事件
    @Override
    public void sessionCreated(HttpSessionEvent httpSessionEvent) {
        ServletContext ctx = httpSessionEvent.getSession().getServletContext();
        Integer onlineCount = (Integer)ctx.getAttribute("OnlineCount");
        if(onlineCount == null){
            onlineCount = new Integer(1);
        }
        else {
            int count = onlineCount.intValue();
            onlineCount = new Integer(count+1);
        }
        ctx.setAttribute("OnlineCount",onlineCount);
    }
    //一旦销毁session就会触发一次这个事件
    //session销毁两种方式:1、invalidate手动销毁 2、web.xml配置销毁
    @Override
    public void sessionDestroyed(HttpSessionEvent httpSessionEvent) {
        ServletContext ctx = httpSessionEvent.getSession().getServletContext();
        Integer onlineCount = (Integer)ctx.getAttribute("OnlineCount");
        if(onlineCount == null){
            onlineCount = new Integer(0);
        }
        else {
            int count = onlineCount.intValue();
            onlineCount = new Integer(count-1);
        }
        ctx.setAttribute("OnlineCount",onlineCount);
    }
}

 浙公网安备 33010602011771号