单体应用的session & 分布式Session & JWT
一、单体应用的session
public class BaseController {

    public HttpServletRequest getRequest(){
        return ((ServletRequestAttributes) RequestContextHolder.getRequestAttributes()).getRequest();
    }

    public HttpServletResponse getResponse(){
        return ((ServletRequestAttributes)RequestContextHolder.getRequestAttributes()).getResponse();
    }

    public HttpSession getHttpSession(){
        return getRequest().getSession();
    }
}
(2)放入用户信息到 session 中;
getHttpSession().setAttribute("member", member);
4、只有登录后,接口才可以去访问;
@Slf4j
public class AuthInterceptorHandler implements HandlerInterceptor {
    public final static String GLOBAL_JWT_USER_INFO="jwttoken:usermember:info";

    @Override
    public boolean preHandle(HttpServletRequest request, HttpServletResponse response, Object handler) throws Exception {
        log.info("进入前置拦截器");
        if(!ObjectUtils.isEmpty(request.getSession().getAttribute("member"))){
            return true;
        }
        print(response,"您没有权限访问!请先登录.");
        return false;
    }

    protected void print(HttpServletResponse response,String message) throws Exception{
        /**
         * 设置响应头
         */
        response.setHeader("Content-Type","application/json");
        response.setCharacterEncoding("UTF-8");
        String result = new ObjectMapper().writeValueAsString(CommonResult.forbidden(message));
        response.getWriter().print(result);
    }
}
6、将拦截器加入到配置中;
(1)配置文件的配置;
#登录拦截验证
member:
  auth:
    shouldSkipUrls:
     - /sso/**
     - /home/**
(2)加载配置文件中的配置到 Set 集合中;
@Data
@ConfigurationProperties(prefix = "member.auth")
public class NoAuthUrlProperties {
    private LinkedHashSet<String> shouldSkipUrls;
}
(3)拦截器的配置;
@EnableConfigurationProperties(NoAuthUrlProperties.class)
@Configuration
public class IntercepterConfiguration implements WebMvcConfigurer {

    @Autowired
    private NoAuthUrlProperties noAuthUrlProperties;

    @Override
    public void addInterceptors(InterceptorRegistry registry) {
        //注册拦截器
        registry.addInterceptor(authInterceptorHandler())
                .addPathPatterns("/**")
                .excludePathPatterns(new ArrayList<>(noAuthUrlProperties.getShouldSkipUrls()));
    }

    @Bean
    public AuthInterceptorHandler authInterceptorHandler(){
        return new AuthInterceptorHandler();
    }
}
单体应用部署多个,上面的代码就会出现问题,每次去访问的不同实例的时候,就需要再重新登录;、
可以使用spring session 解决以上问题。
二、使用 spring session 实现分布式Session
1、引入 spring session 的 jar 包;
<dependency>
      <groupId>org.springframework.session</groupId>
      <artifactId>spring-session-data-redis</artifactId>
</dependency>
2、配置文件中配置存储类型;可以使用 redis、mongodb、mysql;
spring:
  session:
    store-type: redis
3、开启spring session的配置;(以下session的超时时间设置为 3600s)
@EnableRedisHttpSession(maxInactiveIntervalInSeconds = 3600)
public class RedisHttpSessionConfiguration {
    /**
     * 引入分布式会话体系,会话内容存储在Redis当中,原理请阅读源码
     */
}
三、Spring Session的简介
Spring Session 使用过滤器 Filter 实现了session 的共享;
(1)Spring Session 内部不是每次都去从 Redis 中获取Session,它的本地缓存中也会保留一份 session;本地缓存中的 session 过期找不到的时候才会去连接 Redis 查询;
(2)本地缓存 session 的过期时间是根据配置文件中的 spring.session.redis.cleanup-cron 的表达式配置来处理的;
(3)不是每次去调用 getSession() 或 setAttribute() 方法的时候都会将 Redis 中的超时时间重置,是在过滤器调用链走完之后,再将 Redis 中的超时时间重置(finally 语句中的 warppedRequest.commitSession() ),保证每次请求只将 Redis 中的过期时间重置一次;
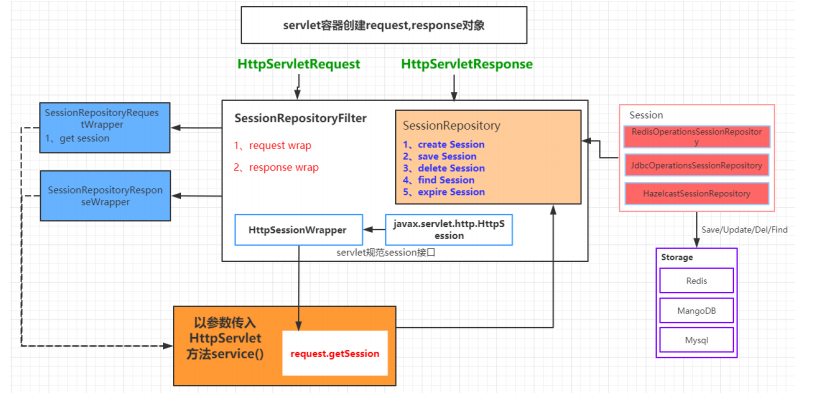
@EnableRedisHttpSession 注解通过Import,引入了RedisHttpSessionConfiguration配置类。该配置类通过@Bean注解,向Spring容器中注册了一个SessionRepositoryFilter(SessionRepositoryFilter的依赖关系:SessionRepositoryFilter --> SessionRepository --> RedisTemplate --> RedisConnectionFactory)。
Spring Session源码参考:
(1)spring-session(一)揭秘: https://www.cnblogs.com/lxyit/p/9672097.html
(2)利用spring session解决共享Session问题: https://blog.csdn.net/patrickyoung6625/article/details/45694157
四、JWT
1、JWT介绍
2、JWT数据格式(JWT = Header.Payload.Signature)
{
    alg: "HS256",
    typ: "JWT"
}
- alg属性表示签名的算法,默认算法为HS256,可以自行别的算法。
- typ属性表示这个令牌的类型,JWT令牌就为JWT。
Header = Base64(上方json数据)
(2)Payload:载荷
存放用户的信息,如创建时间、过期时间;例如:
{
    "userid":"test",
    "created":1489079981393,
    "exp":1489684781
}
Payload = Base64(data) //可以被反编码,所以不要放入敏感信息
使用头部中存储的签名算法去签名;
Signature = HMACSHA256(base64UrlEncode(header) + "." + base64UrlEncode(payload), secret)
secret为加密的密钥,密钥存在服务端;
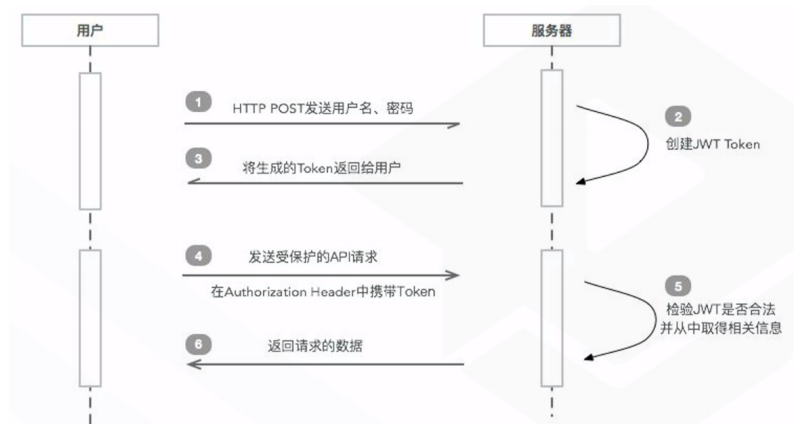
3、JWT身份认证流程
(1)用户提供用户名和密码登录;
(2)服务器校验用户是否正确,如正确,就返回token给客户端,此token可以包含用户信息;
(3)客户端存储token,可以保存在cookie或者local storage;
(4)客户端以后请求时,都要带上这个token,一般放在请求头中;
(5)服务器判断是否存在token,并且解码后就可以知道是哪个用户;
(6)服务器这样就可以返回该用户的相关信息了;
4、JWT的使用
<!-- json web token 工具 -->
<dependency>
    <groupId>io.jsonwebtoken</groupId>
    <artifactId>jjwt</artifactId>
</dependency>
a. 配置文件
#jwt config
jwt:
  tokenHeader: Authorization #JWT存储的请求头
  secret: mall-member-secret #JWT加解密使用的密钥
  expiration: 604800 #JWT的超期限时间(60*60*24)
  tokenHead: Bearer #JWT负载中拿到开头
b. 读取配置文件
@Data
@ConfigurationProperties(prefix = "jwt")
@Component
public class JwtProperties {
    private String tokenHeader;
    private String secret;
    private Long expiration;
    private String tokenHead;
}
c. JWT的生成 和 解析
public class JwtKit {
    @Autowired
    private JwtProperties jwtProperties;

    /**
     * 创建jwtToken
     * @param member
     * @return
     */
    public String generateJwtToken(UmsMember member){
        Map<String,Object> claims = new HashMap<>();

        claims.put("sub",member.getUsername());
        claims.put("createdate",new Date());
        claims.put("id",member.getId());
        claims.put("memberLevelId",member.getMemberLevelId());

        return Jwts.builder()
                .addClaims(claims)
                .setExpiration(new Date(System.currentTimeMillis() + jwtProperties.getExpiration()*1000))
                .signWith(SignatureAlgorithm.HS256,jwtProperties.getSecret())
                .compact();
    }

    /**
     * 解析jwt
     * @param jwtToken
     * @return
     * @throws BusinessException
     */
    public Claims parseJwtToken(String jwtToken) throws BusinessException {
        Claims claims = null;
        try {
            claims=Jwts.parser()
                    .setSigningKey(jwtProperties.getSecret())
                    .parseClaimsJws(jwtToken)
                    .getBody();
        } catch (ExpiredJwtException e) {
            throw new BusinessException("JWT验证失败:token已经过期");
        } catch (UnsupportedJwtException e) {
            throw new BusinessException("JWT验证失败:token格式不支持");
        } catch (MalformedJwtException e) {
            throw new BusinessException("JWT验证失败:无效的token");
        } catch (SignatureException e) {
            throw new BusinessException("JWT验证失败:无效的token");
        } catch (IllegalArgumentException e) {
            throw new BusinessException("JWT验证失败:无效的token");
        }
        return claims;
    }

}
d. 将工具类注入到容器中
@Configuration
public class SecurityConfiguration {
    @Bean
    public JwtKit jwtKit(){
        return new JwtKit();
    }
}
e. 自定义拦截器,解析对应的JWT token;
@Slf4j
public class AuthInterceptorHandler implements HandlerInterceptor {
    @Autowired
    private JwtKit jwtKit;

    @Autowired
    private JwtProperties jwtProperties;

    public final static String GLOBAL_JWT_USER_INFO="jwttoken:usermember:info";

    @Override
    public boolean preHandle(HttpServletRequest request, HttpServletResponse response, Object handler) throws Exception {
        log.info("进入前置拦截器");
        String message = null;
        String authorization = request.getHeader(jwtProperties.getTokenHeader());
        log.info("authorization:"+authorization);
        //校验token

        if(!StringUtils.isEmpty(authorization)
                && authorization.startsWith(jwtProperties.getTokenHead())){
            String authToken = authorization.substring(jwtProperties.getTokenHead().length());
            //解析jwt-token
            Claims claims = null;
            try {
                claims = jwtKit.parseJwtToken(authToken);
                if(claims != null){
                    request.setAttribute(GLOBAL_JWT_USER_INFO,claims);
                    return true;
                }
            } catch (BusinessException e) {
                log.error(message = (e.getMessage()+":"+authToken));
            }
        }
        print(response,"您没有权限访问!请先登录.");
        return false;
    }

    protected void print(HttpServletResponse response,String message) throws Exception{
        //设置响应头
        response.setHeader("Content-Type","application/json");
        response.setCharacterEncoding("UTF-8");
        String result = new ObjectMapper().writeValueAsString(CommonResult.forbidden(message));
        response.getWriter().print(result);
    }
}
f. 将自定义的拦截器加入到配置中
@Configuration
public class IntercepterConfiguration implements WebMvcConfigurer {
    @Bean
    public AuthInterceptorHandler authInterceptorHandler(){
        return new AuthInterceptorHandler();
    }
}
五、session 和 JWT 的比较
JWT
(1)用户信息存储在客户端(storage,cookie);
(2)JWT泄露之后,只要没有过期,都可以被使用;即使修改完密码后,泄露出去的JWT仍然可以使用;
(3)JWT的安全性低于Session,JWT的使用的时候先要进行数据脱敏的处理;
Session(有状态)
(1)只在 cookie 中存储一个 jSessionId,用户信息存储在服务端,根据 jSessionId 去查询对应的用户信息;
(2)安全性较高;
Session 和 JWT 可以结合一起使用;

 浙公网安备 33010602011771号