


SpringCloud详解 第六章 分布式配置中心 Config(一)
分布式配置中心: Spring Cloud Config:
spring cloud config是一个基于http协议的远程配置实现方式。通过统一的配置管理服务器进行配置管理,客户端通过https协议主动的拉取服务的的配置信息,完成配置获取。
spring cloud config的使用方式非常简单,spring cloud config server默认的实现方式是git管理配置,官方文档介绍已经详细说明有几种使用方式。下面看一下git的spring cloud config server实现方式。
boot版本:springBoot : 2.0.1.RELEASE
一、构建配置中心:
1.依赖管理(.pom)
<dependencyManagement>
        <dependencies>
            <dependency>
                <!-- SpringCloud 所有子项目 版本集中管理. 统一所有SpringCloud依赖项目的版本依赖-->
                <groupId>org.springframework.cloud</groupId>
                <artifactId>spring-cloud-dependencies</artifactId>
                <version>Finchley.SR3</version>
                <type>pom</type>
                <scope>import</scope>
            </dependency>
        </dependencies>
    </dependencyManagement>
    <dependencies>
        <dependency>
            <groupId>org.springframework.cloud</groupId>
            <artifactId>spring-cloud-starter-config</artifactId>
        </dependency>

        <dependency>
            <groupId>org.springframework.cloud</groupId>
            <artifactId>spring-cloud-config-server</artifactId>
        </dependency>
    </dependencies>
2.启动类注解(@EnableConfigServer)
@SpringBootApplication
@EnableConfigServer
public class App {
    private final static Logger log = LoggerFactory.getLogger(App.class);

    public static void main(String[] args) {
        SpringApplication.run(App.class, args);
        log.info("服务启动成功");

    }
}
3.application.properties 文件配置
server.port = 8888
spring.application.name=config# 选择的同步工具
spring.profiles.active=git
# git地址
spring.cloud.config.server.git.uri=https://github.com/wuzhenzhao/spring-cloud-config-repo.git
# 搜索目录
spring.cloud.config.server.git.search-paths=properties
# git仓库default-label默认值是master
spring.cloud.config.server.git.default-label=master
如果仓库是私有的还需要配置如下:
spring.cloud.config.server.git.username=
spring.cloud.config.server.git.password=
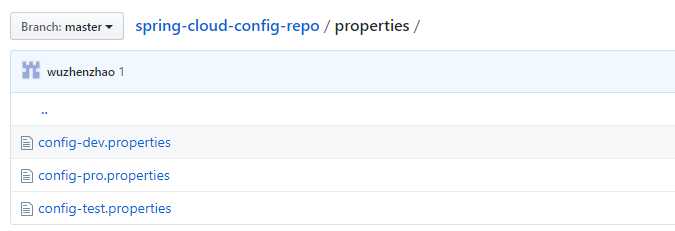
github 上有如下3个环境的配置文件,内容分别是foo=hello-dev / foo=hello-pro / foo=hello-test
就这样完成了简单的配置,启动程序,如果想获取开发配置,访问http://localhost:8888/config/dev可以读取到config-dev.properties的配置内容。请求配置的参数通过路径参数设置。
完成了这些准备工作之后,我们就可以通过浏览器、 POSTMAN或CURL等工具直接来访问我们的配置内容了。访问配置信息的URL与配置文件的映射关系如下所示:
- /{ application } / {profile} [/{label}]
- /{ application }-{profile}. yml
- /{ label }/{ application }-{profile}.yml
- /{ application }-{profile}.properties
- /{ label }/{ application }-{profile}.properties
上面的 url 会映射 {application}-{profile} .properties 对应的配置文件,其中 {label} 对应Git上不同的分支,默认为 master 。我们可以尝试构造不同的 url 来访问不同的配置内容, 例如:http://localhost:8888/{applicationName}/{profile}/{label} , label分支,不传的话默认master。并获得如下返回信息:

同时, 我们可以看到 config-server 的控制台中还输出了下面的内容,配置服务器在从 Git 中获取配置信息后, 会存储 一 份在 config-server 的文件系统中, 实质上config-server 是通过 git clone 命令将配置内容复制了一 份在本地存储, 然后读取这些内容并返回给微服务应用进行加载。config-server 通过 Git 在本地仓库暂存,可以有效防止当 Git 仓库出现故障而引起无法加载配置信息的情况。

二、构建客户端:
1.依赖管理(.pom)
<dependencyManagement>
        <dependencies>
            <dependency>
                <!-- SpringCloud 所有子项目 版本集中管理. 统一所有SpringCloud依赖项目的版本依赖-->
                <groupId>org.springframework.cloud</groupId>
                <artifactId>spring-cloud-dependencies</artifactId>
                <version>Finchley.SR3</version>
                <type>pom</type>
                <scope>import</scope>
            </dependency>
        </dependencies>
</dependencyManagement>
    <dependencies>
        <dependency>
            <groupId>org.springframework.cloud</groupId>
            <artifactId>spring-cloud-starter-config</artifactId>
        </dependency>
    </dependencies>
2.bootstrap.properties 配置
server.port = 8889
spring.application.name=config
spring.cloud.config.label=master
spring.cloud.config.profile=test
spring.cloud.config.uri=http://localhost:8888/
3.测试类
@RestController
public class TestRestController {

    @Value("${foo}")
    String foo;

    @RequestMapping(value = "/hello")
    public String hello(){
        return foo;
    }
}
4.启动类注解 @EnableConfigServer
@Target({ElementType.TYPE})
@Retention(RetentionPolicy.RUNTIME)
@Documented
@Import({ConfigServerConfiguration.class})
public @interface EnableConfigServer {
}
项目启动后访问测试类的接口,可以根据配置文件中的spring.cloud.config.profile所配置的环境获取到不同的值。
三、服务端源码详解:
注解 EnableConfigServer 可以开启应用服务对配置中心的支持。当开启之后,配置服务器就会在启动时进行自动配置。通过该注解寻找到如下配置。
@Configuration
public class ConfigServerConfiguration {
    public ConfigServerConfiguration() {
    }

    @Bean
    public ConfigServerConfiguration.Marker enableConfigServerMarker() {
        return new ConfigServerConfiguration.Marker();
    }

    class Marker {
        Marker() {
        }
    }
}
可以看到好像没有继续前进的入口了,仅仅是注入了这个Marker类嘛?通过寻找我们可以发现该类唯一被引用的地方,就是如下类。
@Configuration
@ConditionalOnBean({Marker.class})
@EnableConfigurationProperties({ConfigServerProperties.class})
@Import({EnvironmentRepositoryConfiguration.class,   CompositeConfiguration.class,   ResourceRepositoryConfiguration.class,   ConfigServerEncryptionConfiguration.class,   ConfigServerMvcConfiguration.class})
public class ConfigServerAutoConfiguration {
    public ConfigServerAutoConfiguration() {
    }
}
@ConditionalOnBean(Marker.class)表示当装配了ConfigServerConfiguration.Marker的实例时才会执行ConfigServerAutoConfiguration的处理。
这里又另外引入了5个配置类。
EnvironmentRepositoryConfiguration: 环境变量存储相关的配置类
CompositeConfiguration:组合方式的环境仓库配置类
ResourceRepositoryConfiguration:资源仓库相关的配置类
ConfigServerEncryptionConfiguration:加密断点相关的配置类
ConfigServerMvcConfiguration:对外暴露的MVC端点控制器的配置类,
对于服务端来说,其基本职责就是能够将具体存储中的配置信息先拿到,然后提供出 API 供客户端来调用。下面从ConfigServerAutoConfiguration 中 import的这些配置类来具体看下实现。
重点是 EnvironmentRepositoryConfiguration 类。
@Configuration
@EnableConfigurationProperties({  SvnKitEnvironmentProperties.class,   JdbcEnvironmentProperties.class,   NativeEnvironmentProperties.class,   VaultEnvironmentProperties.class})
@Import({CompositeRepositoryConfiguration.class,   JdbcRepositoryConfiguration.class,   VaultRepositoryConfiguration.class,   SvnRepositoryConfiguration.class,   NativeRepositoryConfiguration.class,   GitRepositoryConfiguration.class,   DefaultRepositoryConfiguration.class})
public class EnvironmentRepositoryConfiguration {
           .......
}
这里的@Import又引入了7种配置类,会发现其实刚好对应config server的几种实现方式git的实现方式使用的配置类就是GitRepositoryConfiguration。以GitRepositoryConfiguration的为例分析。
@Configuration
@Profile({"git"})
class GitRepositoryConfiguration extends DefaultRepositoryConfiguration {
    GitRepositoryConfiguration() {
    }
}
GitRepositoryConfiguration 集成了 DefaultRepositoryConfiguration,这也说明了 Spring Cloud Config 默认使用的是Git。不同的配置类实现都会被标注一个@Profile,可以通过这个来激活相应的配置类;具体做法是在配置服务端的 application.properties(application.yml) 中来指定:
spring.profile.active=git
DefaultRepositoryConfiguration 的 ConditionalOnMissingBean 可以知道,如果上下文中没有 EnvironmentRepository,那么就使用 DefaultRepositoryConfiguration。最后DefaultRepositoryConfiguration是封装了一个 MultipleJGitEnvironmentRepository 这个bean。
@Configuration
@ConditionalOnMissingBean(
    value = {EnvironmentRepository.class},
    search = SearchStrategy.CURRENT
)
class DefaultRepositoryConfiguration {
    @Autowired
    private ConfigurableEnvironment environment;
    @Autowired
    private ConfigServerProperties server;
    @Autowired(
        required = false
    )
    private TransportConfigCallback customTransportConfigCallback;

    DefaultRepositoryConfiguration() {
    }

    @Bean
    public MultipleJGitEnvironmentRepository defaultEnvironmentRepository(        MultipleJGitEnvironmentRepositoryFactory gitEnvironmentRepositoryFactory,         MultipleJGitEnvironmentProperties environmentProperties) throws Exception {
        return gitEnvironmentRepositoryFactory.build(environmentProperties);
    }
}
我们可以先来看一下 MultipleJGitEnvironmentRepository 类的类图:
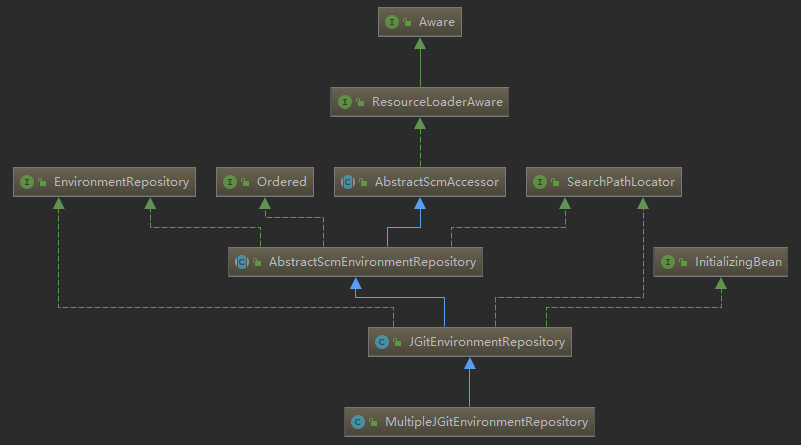
这里我们可以发现 MultipleJGitEnvironmentRepository 实现了 InitializingBean 接口,那么在配置加载完以后一定要调用 afterPropertiesSet 方法,我们来看一下具体都做了什么:
public synchronized void afterPropertiesSet() throws Exception {
        Assert.state(this.getUri() != null, "You need to configure a uri for the git repository.");
        this.initialize();
        if (this.cloneOnStart) {
            this.initClonedRepository();
        }

    }
从源码中我们看到,首先会将配置从git上clone到本地,然后再进行其他的操作。接着就本地的git仓库中获取指定的数据了。
MultipleJGitEnvironmentRepository 的顶层接口是 EnvironmentRepository ,当然其他的实现也都是实现了这个接口的。另外一个需要关注的是 SearchPathLocator。EnvironmentRepository:定义了获取指定应用服务环境信息的方法,返回一个Enviroment
SearchPathLocator 中有一个内部类 Locations ,Locdations中定义了应用服务配置存储信息。
public interface EnvironmentRepository {
    Environment findOne(String application, String profile, String label);
}
AbstractScmEnvironmentRepository 实现了 AbstractScmAccessor 和 EnvironmentRepository ,主要就是EnvironmentRepository 中 findOne 的实现:
public synchronized Environment findOne(String application, String profile, String label) {        //新建了一个本地仓库作为代理仓库来使用
        NativeEnvironmentRepository delegate = new NativeEnvironmentRepository(this.getEnvironment(), new NativeEnvironmentProperties());        //获取本地仓库中指定应用的位置
        Locations locations = this.getLocations(application, profile, label);
        delegate.setSearchLocations(locations.getLocations());        //根据这个路径搜索应用服务的配置信息
        Environment result = delegate.findOne(application, profile, "");
        result.setVersion(locations.getVersion());
        result.setLabel(label);
        return this.cleaner.clean(result, this.getWorkingDirectory().toURI().toString(), this.getUri());
    }
getLocations 是一个模板方法,Config Server中提供了三种实现:

以 git 方式为例 最后会调到 JGitEnvironmentRepository#getLocations 方法:
public synchronized Locations getLocations(String application, String profile, String label) {
        if (label == null) {
            label = this.defaultLabel;
        }
        // 获取最新的版本号
        String version = this.refresh(label);        // 根据最新的版本号返回 Locations 定位到资源的搜索路径
        return new Locations(application, profile, label, version, this.getSearchLocations(this.getWorkingDirectory(), application, profile, label));
    }
refresh 方法做的作用就是刷新本地仓库的配置状态,这样就能保证每次都能拉取到最新的配置信息。下面来分析这个方法。
public String refresh(String label) {
        Git git = null;

        String var20;
        try {            // 创建一个git客户端
            git = this.createGitClient();            // 是否需要执行 git pull
            if (this.shouldPull(git)) {
                FetchResult fetchStatus = this.fetch(git, label);
                if (this.deleteUntrackedBranches && fetchStatus != null) {
                    this.deleteUntrackedLocalBranches(fetchStatus.getTrackingRefUpdates(), git);
                }
                // 获取后checkout,这样我们就可以获得任何新的分支、tag等。
                this.checkout(git, label);
                this.tryMerge(git, label);
            } else {                // 没有什么要更新,所以只是checkout和merge。                // 合并是因为远程分支以前可能已经更新过
                this.checkout(git, label);
                this.tryMerge(git, label);
            }
            // 返回当前的版本
            var20 = git.getRepository().findRef("HEAD").getObjectId().getName();
        } catch (RefNotFoundException var15) {
            throw new NoSuchLabelException("No such label: " + label, var15);
        } catch (NoRemoteRepositoryException var16) {
            throw new NoSuchRepositoryException("No such repository: " + this.getUri(), var16);
        } catch (GitAPIException var17) {
            throw new NoSuchRepositoryException("Cannot clone or checkout repository: " + this.getUri(), var17);
        } catch (Exception var18) {
            throw new IllegalStateException("Cannot load environment", var18);
        } finally {
            try {
                if (git != null) {
                    git.close();
                }
            } catch (Exception var14) {
                this.logger.warn("Could not close git repository", var14);
            }

        }

        return var20;
    }
这个里面基本就是通过git客户端的一些操作。先是检查远程仓库的状态,然后判断本地仓库是否要执行刷新操作。如果有状态更新,比如新的提交时,Git客户端就会执行fetch,然后再进行merge,更新到本地仓库。最终是装配一个MultipleJGitEnvironmentRepository的bean,实际每种配置类的实现的最终都是装配一个EnvironmentRepository的子类,可以认为,有一个地方最终会引用到EnvironmentRepository的bean,在ConfigServerAutoConfiguration类中曾经导入了ConfigServerMvcConfiguration 类,而这个类正是向外暴露出端口供客户端访问的配置,在里面组装了两个的 Controller:
@Bean
    public EnvironmentController environmentController(EnvironmentRepository envRepository, ConfigServerProperties server) {
        EnvironmentController controller = new EnvironmentController(this.encrypted(envRepository, server), this.objectMapper);
        controller.setStripDocumentFromYaml(server.isStripDocumentFromYaml());
        controller.setAcceptEmpty(server.isAcceptEmpty());
        return controller;
    }

    @Bean
    @ConditionalOnBean({ResourceRepository.class})
    public ResourceController resourceController(ResourceRepository repository, EnvironmentRepository envRepository, ConfigServerProperties server) {
        ResourceController controller = new ResourceController(repository, this.encrypted(envRepository, server));
        return controller;
    }
而这两个应该是客户端获取服务端配置的入口,以 EnvironmentController 为例查看代码如下。
@RequestMapping({"/{name}/{profiles}/{label:.*}"})
    public Environment labelled(@PathVariable String name, @PathVariable String profiles, @PathVariable String label) {
        if (name != null && name.contains("(_)")) {
            name = name.replace("(_)", "/");
        }

        if (label != null && label.contains("(_)")) {
            label = label.replace("(_)", "/");
        }

        Environment environment = this.repository.findOne(name, profiles, label);
        if (this.acceptEmpty || environment != null && !environment.getPropertySources().isEmpty()) {
            return environment;
        } else {
            throw new EnvironmentNotFoundException("Profile Not found");
        }
    }
注意这里的EnvironmentController#repository属性就是GitRepositoryConfiguration实例化的MultipleJGitEnvironmentRepository,如果是别的实现方式就是别的EnvironmentRepository。可以看出”/{name}/{profiles}/{label:.*}”路径参数正好与我们的请求方式相对应,因此Config Server是通过建立一个RestController来接收读取配置请求的,然后使用EnvironmentRepository来进行配置查询,最后返回一个这个对象的JSON。
public class Environment {
    private String name;
    private String[] profiles;
    private String label;
    private List<PropertySource> propertySources;
    private String version;
    private String state;
    .........
}
通过访问 http://localhost:8888/config/pro/master 会得到信息如下,而这个信息正是 Environment 类
{
    "name":"config",
    "profiles":["pro"],
    "label":"master",
    "version":"e6a0ce237a9f9e05608e5c276a9365f0fdd67ed6",
    "state":null,
    "propertySources":[{
        "name":"https://github.com/wuzhenzhao/spring-cloud-config-repo.git/properties/config-pro.properties",
        "source":{"foo":"hello-pro"}
    }]

}
SVN仓库配置:
Config Server除了支持Git仓库之外, 也能 使用SYN仓库, 只需要做如下配置。 在 pom.xml中引入SYN的依赖配置,让ConfigServer拥有读取SYN内容的能力:
<dependency>
    <groupId>org.tmatesoft.svnkit</groupId>
    <artifactId>svnkit</artifactId>
    <version>1.8.10</version>
</dependency>
在application.properties中使用SVN的配置属性来指定SVN服务器的位置, 以及访问的账户名与密码:
spring.cloud.config.server.svn.uri=svn://localhost:443/wuzz/config-repo
spring.cloud.config.server.svn.username = username
spring.cloud.config.server.svn.password = password
通过上面的配置修改,ConfigServer就可以使用SVN作为仓库来存储配置文件了, 而对于客户端来说, 这个过程是透明的, 所以不需要做任何变动。
本地仓库:
在使用了Git或SVN仓库之后, 文件都会在ConfigServer的本地文件系统中存储一 份,这点上面也体现了。这 些文 件默认会被存 储于以 config-repo 为前缀的临 时 目录中, 比如名为/tmp/config-repo-<随机数>的目录。 由于其随机性以及临时目录的特性, 可能会有 一些不可预知的后果, 为了避免将来可能会出现的问题, 最好的办法就是指定一 个固定的位置来存储这些重要信息。我们只需要通过spring.cloud.config.server.git.basedir或 spring.cloud.config.server.svn.basedir来配置一 个我们准备好的目录即可。
属性覆盖:
Config Server 还有 一 个“ 属性覆盖 ”的特性, 它可以让开发人员为所有的应用提供配置属性,只需要通过 spring.cloud.config.server.overrides 属性来设置键值对的参数,这些参数会以 Map 的方式加载到客户端的配置中。 比如:
spring.cloud.config.server.overrides.name = wuzz
spring.cloud.config.server.overrides.from = hangzhou
通过该属性配置的参数,不会被 Spring Cloud 的客户端修改,并且 Spring Cloud 客户端从 Config Server 中获取配置信息时,都会取得这些配置信息。 利用该特性可以方便地为Spring Cloud 应用配置 一 些共同属性或是默认属性。 当然,这些属性并非强制的,我们可以通过改变客户端中更高优先级的配置方式(比如,配置环境变量或是系统属性),来选择是否使用 Config Server 提供的默认值。
安全保护:
由于配置中心存储的内容比较敏感,做 一 定的安全处理是必需的。 为配置中心实现安全保护的方式有很多,比如物理网络限制、 0Auth2 授权等。 不过,由于我们的微服务应用和配置中心都构建于 Spring Boot 基础上,所以与 Spring Security 结合使用会更加方便。我们只需要在配置中心的 pom.xml 中加入 spring-boot-starter-security 依赖,不需要做任何其他改动就能实现对配置中心访问的安全保护。
<dependency>
    <groupId>org.springframework.boot</groupId>
    <artifactId>spring-boot-starter-security</artifactId>
</dependency>
大多数情况下,我们并不会使用随机生成密码的机制。 我们可以在配置文件中指定用户和密码, 比如:
security.user.name=user
security.user.password=37cc5635-559b-4e6f-b633-7e932b813f73
由于我们已经为 config-server 设置了安全保护,如果这时候连接到配置中心的客户端中没有设置对应的安全信息,在获取配置信息时会返回401错误。 所以,需要通过配置的方式在客户端中加入安全信息来通过校验, 比如:
spring.cloud.config.username=user
spring.cloud.config.password=37cc5635-559b-4e6f-b633-7e932b813f73
此外,spring cloud 还提供了加解密。这里就不说明了。因为配置比较繁琐,而且实际环境中应用的比较少。
高可用配置:
当要将配置中心部署到生产环境中时, 与服务注册中心 一 样, 我们也希望它是 一 个高可用的应用。 Spring Cloud Config 实现服务端的高可用非常简单, 主要有以下两种方式。
传统模式: 不需要为这些服务端做任何额外的配置, 只需要遵守 一 个配置规则, 将所有的 Config Server 都指向同 一 个 Git 仓库, 这样所有的配置内容就通过统 一 的共享文件系统来维护。而客户端在指定 Config Server 位置时,只需要配置 Config Server上层的负载均衡设备地址即可, 就如下图所示的结构。

服务模式:除了上面这种传统的实现模式之外, 我们也可以将 Config Server 作为 一个普通的微服务应用,纳入 Eureka 的服务治理体系中。 这样我们的微服务应用就可以通过配置中心的服务名来获取配置信息, 这种方式比起传统的实现模式来说更加有利于维护, 因为对于服务端的负载均衡配置和客户端的配置中心指定都通过服务治理机制一 并解决了, 既实现了高可用, 也实现了自维护。
主要步骤是在服务端添加 Eureka依赖,启用@EnableDiscoveryClient 注解。在 application.properties 中配置参数eureka.client.serviceUrl.defaultZone以指定服务注册中心的位置。然后进行配置客户端,也是需要添加Eureka依赖,开启@EnableDiscoveryClient注解,然后添加以下配置信息
spring.application.name=wuzz-config-client
server.port=7002
#指定服务注册中心, 用于服务的注册与发现
eureka.client.serviceUrl.defaultZone = http: / /localhost: 1111/eureka/
#开启通过服务来访间 Config Server 的功能
spring.cloud.config.discovery.enabled=true
#指定 Config Server 注册的服务名
spring.cloud.config.discovery.serviceid=config-server
spring.cloud.config.profile=dev
失败快速响应与重试:
Spring Cloud Config的客户端会预先加载很多其他信息,然后再开始连接ConfigServer进行属性的注入。 当我们构建的应用较为复杂的时候, 可能在连接ConfigServer之前花费较长的启动时间, 而在 一 些特殊场景下, 我们又希望可以快速知道当前应用是否能顺利地从ConfigSe rve r获取到配置信息, 这对在初期构建调试环境时, 可以减少很多等待启动的时间。 要实现客户端优先判断ConfigSe rve r获取是否正常, 并快速响应失败内容, 只需在bootstrap.properties中配置参数spring.cloud.config.failFast= true即可。
但是, 若只是因为网络波动等其他间歇性原因导致的问题, 直接启动失败似乎代价有些高。 所以, Config 客户端还提供了自动重试的功能, 在开启重试功能前, 先确保已经配置了 spring.cloud.config.failFast=true, 再进行下面的操作。先添加以下依赖
<dependency>
    <groupId>org.springframework.retry</groupId>
    <artifactId>spring-retry</artifactId>
</dependency>

<dependency>
    <groupId>org.springframework.boot</groupId>
    <artifactId>spring-boot-starter-aop</artifactId>
</dependency>
不需要再做其他任何配置, 启动客户端应用, 在控制台中可以看到如下内容。 客户端在连接 Config Server 失败之后, 会继续尝试, 直到第 6 次失败后, 才返回错误信息。 通过这样的重试机制, 可以避免 一 些间歇性问题引起的失败导致客户端应用无法启动的情况。
若对默认的最大重试次数和重试间隔等设置不满意,还可以通过下面的参数进行调整。
- spring.cloud.config.retry.multiplier: 初始重试间隔时间(单位为毫秒),默认为 1000 毫秒。
- spring.cloud.config.retry.initail-interval: 下 一 间隔的乘数,默认为 1.1, 所以当最初间隔是 1000 毫秒时, 下 一 次失败后的间隔为 1100 毫秒。
- spring.cloud.config.retry.max-interval: 最大间隔时间,默认为 2000毫秒。
- spring.cloud.config.retry.max-attempts: 最大重试次数,默认为 6 次。
动态刷新配置:
有时候, 我们需要对配置 内容做 一 些实时更新, 那么Spring Cloud Config是否可以实现呢?
在config-client的pom.xml中新增spring-boot-starter-actuator监控模块。 其中包含了/refresh 端点的 实现,该端点将用于实现客户端应用配置信息的重新获取与刷新。
<dependency>
    <groupId>org.springframework.boot</groupId>
    <artifactId>spring-boot-starter-actuator</artifactId>
</dependency>
在修改了Git上面的配置信息之后。通过POST请求发送到http://localhost:8888/refresh .再去获取配置信息就是修改之后的,若无法访问改端口请加上配置:
#开启这个端点,便于等等我们查看配置
management.endpoints.web.exposure.include = refresh

 浙公网安备 33010602011771号