黑苹果 Hackintosh OpenCore 安装指南
全文参照此文档 dortania 黑苹果在线文档
文档版本:2020-07 OC版本:0.5.9
Ps. UEFI引导时,EFI 分区要>= 200 MB,否则安装时无法抹去磁盘(无法格式化/抹除分区)! 如果是两块硬盘,都需要有esp分区!
OpenCore 不止可用于黑苹果,还可以用于其他需要模拟EFI的场景。
原理
模拟EFI环境:注入驱动并重建 EFI 环境缓存,再缓存传给 MacOS 系统。
重建缓存可用于欺骗 MacOS 的验证(苹果的硬件内部布线不同,因此PC在不同情况下的ACPI布局不能与Mac很好地配合。 为了解决这个问题,我们使用WhateverGreen及其配套的Lilu来修补Hackintosh的不同部分,例如重命名设备,协助帧缓冲区连接,修补音频连接器,允许通过ACPI修改aty_config,aty_properties,cail_properties等。 )
例如 把 AptioMemoryFix 驱动从读取 EFI_GLOBAL_VARIABLE_GUID 变量重定向到读取 OC_VENDOR_VARIABLE_GUID 变量。
Hardware Support
硬件支持上,我准备装的机子配置是 i3-4150 + GA-H81M-DS2 Ver.3.0 + HD 7770
主板搭载 网卡 声卡
- GPU
- 其中核心显卡 HD 4400 和独立显卡 HD 7770 都是被支持的,并且记下了我显卡必须的启动参数
# AMD
 radpg=15       //Fixes initilization for HD 7730/7750/7770/R7 250/R7 250X
- Wireless
我的主板没有 WIFI 模块,我也没有 USB 网卡,跳过 - MotherBoard
更多原理解析,如不喜欢请直接跳到 Installation Guides (刻盘)部分:
So if my GPU is natively supported, why do i need Lilu and WhateverGreen?
This is a question comes up quite a bit in the Hackintosh community, and for good reason as to why in the world would these GPUs work out of the box on a mac and not a Hackintosh? Well, the reason being is that PCs and Macs have different internal wiring and so the ACPI layouts in a PC don't work well with Macs in different scenarios. To get around this, we use WhateverGreen and it's companion Lilu to patch different parts of our Hackintosh like renaming devices, assisting in framebuffer connections, patching audio connectors, allowing modifications to aty_config, aty_properties, cail_properties via ACPI and so much more. With such a large feature set and developed by someone who knows what they're doing, there's no reason not to use it
译:
即使 GPU/显卡 在硬件上原生支持安装 MACOS,也依然需要 Lilu 和 WhateverGreen
- 首先来看,Mac 的 GPU 和普通 GPU 的区别:
- 普通GPU和苹果机的GPU有不同的内部布线,所以普通机的 ACPI 布局并不能直接完美工作在 MAC 上。PCs and Macs have different internal wiring and so the ACPI layouts in a PC don't work well with Macs in different scenarios.
- 解决方案:
- 用 WhateverGreen 和 Lilu 对两者间的差异部分做一些打补丁的工作(例如 重命名设备、协助帧缓冲连接、修补音频连接器,以此允许通过 ACPI等 修改 aty_config, aty_properties, cail_properties 之类的属性)
有些事情我必须告诉你:
macOS does not support either SLI, Crossfire or GPUs will multiple main cores(like the Radeon Pro Duo). This may change with the release of the Radeon Pro Vega II Duo in the Mac Pro
Getting audio through HDMI/DisplayPort may require extra work with both AppleALC.kext and some other IO-REG edits
GPU Overclocking is limited to Vega 10 GPUs with PyVega
Running a supported GPU with an unsupported GPU can have weird consequences as unsupported GPUs run off VESA drivers which have the issue in which it can break sleep and other functions in macOS. Please refer to the Disabling unsupported GPUs Guide for more info
译:
- MacOS 不支持 SLI、交火(Crossfire), 也不支持多主核的GPU(如 Radeon Pro Duo )。
- 当然在 搭载 Radeon Pro Vega II Duo 显卡的
Mac Pro发布后,这些情况可能会有所改善。
- 当然在 搭载 Radeon Pro Vega II Duo 显卡的
- 通过 HDMI/DisplayPort 获取音频可能需要对 AppleALC.kext 和其他一些 IO-REG 参数配置进行额外的编辑
- GPU超频仅限于使用PyVega的Vega 10 GPU
- 在两个显卡 (一个受支持,一个不受支持)上运行时 可能会产生奇怪的现象
- 因为不受支持的 GPU 也会从 VESA 驱动程序中运行,从而导致 macOS 的睡眠和其他功能可能会被破坏。
有关更多信息,请参阅禁用不支持的GPU指南。
- 因为不受支持的 GPU 也会从 VESA 驱动程序中运行,从而导致 macOS 的睡眠和其他功能可能会被破坏。
Kext(Kernel Extension) 内核拓展,也就是驱动
Kext Inject
at OpenCore's method:
Takes existing prelinked kernel and kexts ready to inject
Rebuilds the cache in the EFI environment with the new kexts
Adds this new cache in
Things to note with OpenCore's method is:
OS Agnostic as the prelinked kernel format as stayed the same since 10.6, far harder to break support.
This also means proper support starts at 10.7, though 10.6 can be used as well so long as it's already installed(106's installer doesn't have a prelinked kernel)
Far better stability as far less patching
译:
Kext 注入
在 OpenCore 里是这样工作的:
- 把已有的预链接内核 和 准备用于注入的 kexts
- 利用新的 kexts 重建 EFI 环境里的缓存
- 把新缓存加进去
预链接在 10.6 开始被支持,10.7+ 被正式支持。更多见上面英文引用。
Installation Guides (刻盘)
因为我的是台式机,所以我看的是 Installation Guides 的 OpenCore Desktop Guide 部分
OpenCore 的黑苹果教程和工具都是三平台通用。详见英文原文
制作安装介质
我选择在 Windows 下制作,以 zip 方式下载:https://github.com/corpnewt/gibMacOS
初次打开会自动下载所需的小型工具
译者注:这个工具制作的是在线恢复盘,到时候安装系统的时候依然是在线下载安装。建议用完整的dmg镜像,网上下载最新的dmg镜像或者用虚拟机自己做一个dmg。
环境要求:Python 2或3
下载
- 右击 gitMacOS.bat 以管理员运行,(输入字母R回车)选择切换恢复模式即
Toggle Recovery-Only - 等程序索引完成,选择你想要的且带 FULL INSTALL 的 MACOS 版本,然后程序会帮你下载500MB左右的恢复包镜像
RecoveryHDMetaDmg.pkg到软件所在路径\gibmacos-master\macOS Downloads\publicrelease\xxx-xxxxx - 10.x.x macOS xxx
注:这是在线恢复盘,安装时必须联网,离线下载请见其他教程
刻盘
- 右击管理员打开 MakeInstall.bat,然后根据列出的U盘序号输入 数字和字母O(O代表OpenCore) 例如输入数字1和字母O
1O - 此时U盘会被格式化,
- 格式化完成后会提示你提供之前下载的 RecoveryHDMetaDMG.pkg 的完整路径(按住 SHIFT 右击文件,复制路径,再粘贴进去即可),
- 等待,完成之后,MACOS的恢复镜像就被写入到你U盘的另一个分区里了。然后脚本再自动下载 OpenCore 并安装到你 U 盘的EFI分区里了。可以看到U盘其中一个分区的卷标为
BOOT
Ps. 写镜像的过程会解压镜像到c盘用户数据文件夹的临时目录里,所以请保证c盘有大于3G的空闲空间,避免失败。
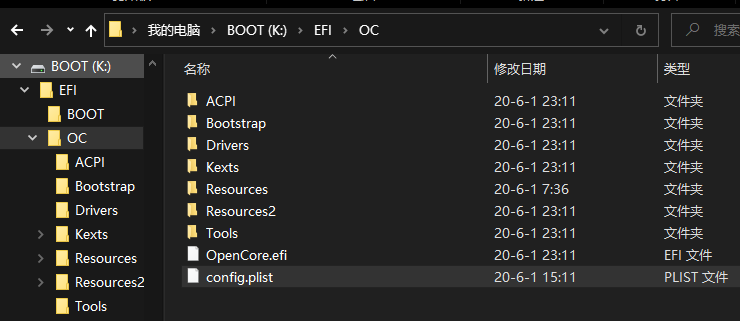
添加基本的 OpenCore 文件
下载OC并解压到u盘的 EFI 区
这里由于 Windows 版的脚本已经自动下载 OC 并解压到我们了,所以不用手动下载
其他平台的用户请结合官方教程本节自行检查。
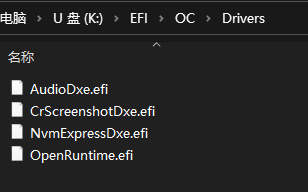
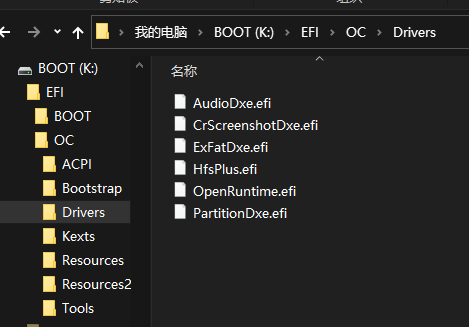
根据情况删除不适合自己机子的驱动
OC 所在的EFI区,在Drivers 和 Tools 目录中附带了一堆文件,大部分都是我们不需要的,所以进行挑选删除。以下是文件删除的相关建议:
Drivers 目录中的:
OpenUsbKbDxe.efi
用于在运行DuetPkg旧系统上的OpenCore选择器,不建议使用,在Ivy Bridge即3代u和更高版本上甚至有害UsbMouseDxe.efi
与OpenUsbKbDxe类似,仅在使用DuetPkg的旧系统上才需要NvmExpressDxe.efi
当固件未内置NVMe驱动程序时才需要,用于Haswell(4代u)及更早版本XhciDxe.efi
用于Sandy Bridge(2代u)和更早的版本,当固件未内置XHCI驱动程序时才需要这个驱动HiiDatabase.efi
用于修复GUI界面支持,如Sandy Bridge(2代u)和更早版本上的OpenShell.efiOpenCanopy.efi
这是 OC 可选的启动GUI图形操作界面,教程后面会讲到,现在请先删除他。Ps2KeyboardDxe.efi + Ps2MouseDxe.efi
如果你的鼠标键盘是PS2接口的请保留这两个驱动文件; 如果键盘鼠标都是 USB 接口的,那么你不需要这个文件。
英特尔cpu代号详见 英特尔处理器和芯片组(按平台代号分类)
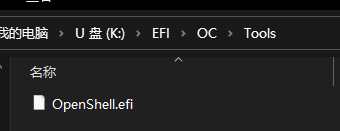
Tools 目录中的:
可以删除该目录的所有文件,但建议高级用户保留 OpenShell.efi 用于排错
我的是4代u,这是去掉不需要的驱动之后的效果图
整合驱动文件
请参阅受支持的硬件部分,以了解macOS启动需要什么,Clover和OpenCore之间的硬件支持非常相似。
现在,根据下文教程,把必要的固件驱动程序(.efi)放入Drivers目录,再把Kexts / ACPI放入其各自对应的目录里:
| 目录 | 该目录应该放置的文件 |
|---|---|
| Kexts 目录 | Kexts (.kext文件) |
| Drivers 目录 | Firmware drivers固件驱动 (.efi文件) |
| ACPI 目录 | SSDTs 和 自定义的DSDTs (.aml文件) |
注意:如果你是Clover用户那么请注意,OpenCore不支持Clover的UEFI驱动程序!(EmuVariableUEFI,AptioMemoryFix,OsxAptioFixDrv等)。 参阅Clover固件驱动程序转换,以获取有关支持的驱动程序以及已合并到OpenCore中的驱动程序的更多信息。
Firmware Drivers 固件驱动
这些是OpenCore使用的驱动程序,对于大多数系统,你只需要2个.efi驱动程序就可以启动和运行。
请根据需要挑选并放在到 EFI 的 Drivers 目录中
ApfsDriverLoader.efi
是 APFS 文件系统的相关驱动 Needed for seeing APFS volumes(ie. macOS).
从 OpenCore 0.5.8 开始已经内置, 并通过 config.plist -> UEFI -> APFS 配置;所以不用管HfsPlus.efi
是 HFS 文件系统恢复盘的相关驱动。 Needed for seeing HFS volumes(ie. macOS Installers and Recovery partitions/images).
请不要和其他HFS驱动混淆。 Do not mix other HFS driversOpenRuntime.efi
取代了 AptioMemoryFix.efi, 用作OpenCore的扩展,用于修补boot.efi以获得NVRAM修复和更好的内存管理。Replacement for AptioMemoryFix.efi, used as an extension for OpenCore to help with patching boot.efi for NVRAM fixes and better memory management.
对于老式设备的用户/For legacy users:
OpenUsbKbDxe.efi
用于在运行DuetPkg旧系统上的OpenCore选择器,不建议使用,在Ivy Bridge即3代u和更高版本上甚至有害NvmExpressDxe.efi
当固件未内置NVMe驱动程序时,且在使用 NVMe 设备(如 NVMe接口的SSD)时才需要;用于Haswell(4代u)及更早版本XhciDxe.efi
用于Sandy Bridge(2代u)和更早的版本;当固件未内置XHCI驱动程序,且你在使用 USB3 拓展卡 时才需要这个驱动。HfsPlusLegacy.efi
HfsPlus的旧版变体(Legacy variant),用于缺少RDRAND指令支持的系统。 通常在Sandy Bridge(2代u)和更老的平台看到
以上HfsPlusLegacy.efi 或 HfsPlus.efi 文件请在这里下载: https://github.com/acidanthera/OcBinaryData/
有关兼容驱动程序的完整列表,请参见OpenCorePkg Docs中的11.2属性。 这些文件将放在EFI的Drivers文件夹中
Kexts 内核驱动
kext是内核扩展(kernel extension),你可把它当作macOS的驱动程序,这些文件将放在EFI的 Kexts 目录中
Linux和Windows用户请注意:Kexts在这两个系统中可能会显示为文件夹,也就是说 xxxxx.kext 目录 就是一个 kext,所以复制时请复制整个xxxxx.kext目录
以下列到的所有 kext 文件,都可以在 Kext Repo 下载到最新编译好的文件(随commit编译)。
必须的文件
VirtualSMC
模拟白苹果 macOS 的SMC芯片,缺少这个文件,macOS将无法启动。
还有另一种选择是 FakeSMC ,它的支持可能更好也可能更差,通常只在旧版硬件上使用
Lilu
一个处理很多过程的补丁,是 AppleALC, WhateverGreen, VirtualSMC 以及其他一些 Kexts 所必须的。没有 Lilu,它们都无法正常工作。
VirtualSMC 的插件
SMCProcessor.kext
用于监测CPU温度,但不支持 AMD CPU 平台。SMCSuperIO.kext
用于检测风扇速度,但不支持 AMD CPU 平台。SMCLightSensor.kext
用于笔记本电脑上的环境光传感器,台式机请忽略。
如果你没有环境光传感器请不要用,否则会引发其他问题。SMCBatteryManager.kext
用于笔记本电脑的电池读数测量,台式机请忽略。
在正确装好电池之前,请勿使用,否则可能导致问题
显卡
WhateverGreen
用于显卡打补丁修补 DRM,boardID,帧缓冲区修复等,所有GPU均可从此 kext 中受益。
注意,仅笔记本电脑和一体机才需要附带的SSDT-PNLF.dsl文件,请参阅 下一节ACPI部分
声卡
AppleALC
用于 AppleHDA 修补,以让你使用板载音频。在 AMD 15h/16h 上可能有问题,而 Ryzen/Threadripper 系统很少有麦克风支持。
以太网网卡
IntelMausi
是 Intel NICs 必须的。但如果基于I211的芯片组则需要下面的 SmallTreeIntel82576 kext。 Required for Intel NICs, chipsets that are based off of I211 will need the SmallTreeIntel82576 kextSmallTreeIntel82576 kext
I211 网卡必需。该驱动已在SmallTree kext基础上打上I211补丁。
适用于大多数运行英特尔网卡的 AMD 主板。AtherosE2200Ethernet
适用于 Atheros 和 Killer 杀手 网卡RealtekRTL8111
适用于 Realtek 千兆网卡LucyRTL8125Ethernet
适用于 Realtek 2.5Gb 网卡
USB
用于在 ACPI 中没有定义USB端口的系统上注入 Intel USB 控制器
Skylake 6代及以上平台不需要该补丁(但AsRock很傻,确实需要这个);不支持任何 AMD CPU 平台
该补丁是非原生USB控制器(non-native USB controllers)所必须的
AMD CPU 平台不需要该补丁
一般需要该补丁的芯片组有:
H370,B360,H310,
Z390(Mojave 或更新的 macOS 版本都不需要该补丁),
X79,X99,
AsRock boards(特别是在英特尔的主板上,基本上是他们所有的主板)
WiFi 无线网络和蓝牙:
用于修补非苹果机的博通无线网卡(Broadcom),不支持 Intel, Killer, Realtek 等
用于上传固件到博通蓝牙芯片,是所有
非Apple / Fenvi Airport cards所必需的。 Used for uploading firmware on Broadcom Bluetooth chipset, required for all non-Apple/Fenvi Airport cards.
To be paired with BrcmFirmwareData.kextBrcmPatchRAM3 用于 10.14+ (必须和 BrcmBluetoothInjector 搭配使用)
BrcmPatchRAM2 用于 10.11-10.14
BrcmPatchRAM 用于 10.10或更老的版本
Kernel -> Add的顺序必须是:
BrcmBluetoothInjector
BrcmFirmwareData
BrcmPatchRAM3
AMD CPU Specific kexts
NullCPUPowerManagment
We have a much better solution known as DummyPowerManagement found under Kernel -> Quirks in your config.plist, this will be covered in a later page
XLNCUSBFIX
USB fix for AMD FX systems, not recommended for Ryzen
VoodooHDA
Audio for FX systems and front panel Mic+Audio support for Ryzen system, do not mix with AppleALC. Audio quality is noticeably worse than AppleALC on Zen CPUs
其他部分
AppleMCEReporterDisabler
Useful starting with Catalina to disable the AppleMCEReporter kext which will cause kernel panics on AMD CPUs and dual-socket systems
Affected SMBIOS: MacPro6,1 MacPro7,1 iMacPro1,1
CpuTscSync
Needed for syncing TSC on some of Intel's HEDT and server motherboards, without this macOS may be extremely slow or even unbootable. Skylake-X should use TSCAdjustReset instead
TSCAdjustReset
On Skylake-X, many firmwares including Asus and EVGA won't write the TSC to all cores. So we'll need to reset the TSC on cold boot and wake. Compiled version can be found here: TSCAdjustReset.kext. Note that you must open up the kext(ShowPackageContents in finder, Contents -> Info.plist) and change the Info.plist -> IOKitPersonalities -> IOPropertyMatch -> IOCPUNumber to the number of CPU threads you have starting from 0(i9 7980xe 18 core would be 35 as it has 36 threads total)
NVMeFix
用于修补 非Apple NVMe上的电源管理和初始化, macOS 10.14 或更新版本所必需。
笔记本特别的部分 Laptop Specifics
VoodooPS2
Required for systems with PS2 keyboards and trackpads
Trackpad users should also pair this with VoodooInput(This must come before VoodooPS2 in your config.plist)VoodooI2C
Used for fixing I2C devices, found with some fancier touchpads and touchscreen machines
To be paired with a plugin:
VoodooI2CHID - Implements the Microsoft HID device specification.
VoodooI2CElan - Implements support for Elan proprietary devices. (does not work on ELAN1200+, use the HID instead)
VoodooI2CSynaptics - Implements support for Synaptic's proprietary devices.
VoodooI2CFTE - Implements support for the FTE1001 touchpad.
VoodooI2CUPDDEngine - Implements Touchbase driver support.
To figure out what kind of keyboard and trackpad you have, check Device Manager(设备管理器) in Windows or dmesg |grep input in Linux
NoTouchID
Recommended for SMBIOS that include a TouchID sensor to fix auth issues
请参阅 Kexts.md 中受支持的kext的完整列表
SSDTs
- 你可以从 Windows/Linux 等操作系统上提取出来
- 也可以自己编译 aml 源码文件
- 下载现成的
详情请看下节 ACPI 部分
ACPI 部分
机器翻译:DSDT和SSDTs是什么?
答:
这些表出现在你的固件,概述硬件设备,如USB控制器,CPU线程,嵌入式控制器,系统时钟等。
可以将DSDT(差异化系统描述表)看作是主体,其中包含大部分信息,另外还有少量信息由SSDT(辅助系统描述表)传递。
您可以将DSDT视为建筑蓝图,而SSDTs则是列出项目额外细节的便签
名词解析:
- ACPI (Advanced Configuration & Power Interface,高级配置和电源接口) 其编程语言为ASL(ACPI Source Language),更多详见 ACPI 6.3 Manual-UEFI.org
- DSDT (Differentiated System Description Table, 区分系统描述符表) 主要的表,描述了关于PCI IRQ 映射和电源管理等信息。 例如操作系统关机时,就必须找到FADT指向的 _S5 对象
- SSDT (Secondary System Description Table,辅助系统描述表?)
当您的操作系统内核启动时,它应该解析ACPI表的内存。 然后找到DSDT(以及其他表,如SSDT),将其解码以获取已安装设备的列表。--- OSDev Wiki
macOS 对于 DSDT 中存在的设备可能会非常挑剔,因此我们的工作是纠正它。 需要更正以使 macOS 正常运行的主要设备:
-
Embedded controllers(EC 嵌入式控制器)
- 所有的半现代(semi-modern)英特尔机器都有一个EC 被记录在 DSDT 里面(EC 一般叫做 H_EC, ECDV, EC0, 等等..) , 且很多 AMD 机也有这个。这些控制器(controllers)一般都不兼容 macOS 且会导致 严重错误(panics), 所以需要隐藏它们不让 macOS 看到。 可是 macOS Catalina 需要一个叫做 EC 设备,所以我们创建了一个虚拟(dummy) EC。
- 在笔记本上, 实际上电池和快捷键仍然需要EC,而重命名EC又可能导致 Winodws 上有问题,所以我们用了比较好的方案:创建一个假的EC设备但不禁用真EC设备。(the actual embedded controller still needs to be enabled for battery and hotkeys to work, and renaming the EC can additionally cause issues with windows, so creating a fake EC without disabling the real embedded controller is preferable.)
-
Plugin type (插件类型)
- 让 XCPM 提供原生的 CPU 电源管理,仅限于 Haswell(4代u)及更高的平台,SSDT 将连接到CPU的第一线程。 但不适用于AMD
-
AWAC system clock.
- This applies to all 300 series motherboards including many Z370 boards, the specific issue is that newer boards ship with AWAC clock enabled. This is a problem because macOS cannot communicate with AWAC clocks, so this requires us to either force on the legacy RTC clock or if unavailable create a fake one for macOS to play with
-
NVRAM SSDT
- True 300 series motherboards(non-Z370) don't declare the FW chip as MMIO in ACPI and so the kernel ignores the MMIO region declared by the UEFI memory map. This SSDT brings back NVRAM support
-
Backlight SSDT
- Used for fixing backlight control support on laptops
-
GPIO SSDT
- Used for creating a stub to allow VoodooI2C to connect onto, for laptops only
-
XOSI SSDT
- Used for rerouting OSI calls to this SSDT, mainly used for tricking our hardware into thinking its booting Windows so we get better trackpad support. This is a very hacky solution known for breaking Windows boot, use the GPIO SSDT instead. Usage of XOSI will not be covered in this guide
-
IRQ SSDT and ACPI patches
- Needed for fixing IRQ conflicts within the DSDT, for laptops mainly. SSDTTime exclusive
Note Skylake and newer systems rarely have IRQ conflicts, this is mainly prevalent on Broadwell and older
- Needed for fixing IRQ conflicts within the DSDT, for laptops mainly. SSDTTime exclusive
现在进入下一页,看看您的系统需要什么 SSDTs:
选择 SSDTs
获得 SSDTs 有三种途径:
- 下载法 (Prebuilt SSDTs)
- 下载的文件当然可以用,只是不够好用 (They work but not perfect)
- 提取生成法(Automated tools)
- 主要使用 SSDTTime 自动化工具生成,虽然不能涵盖所有情况,但工作效果比第一种好得多 (Mainly seen with SSDTTime, work much better though can't cover all situations)
- 硬汉法 (Manually creating them)
- 自己写代码/修改以上获得的反编译源码,结果可能会非常好。 (Will always work, be much cleaner and get to learn about the process)
有个表 https://dortania.github.io/Getting-Started-With-ACPI/ssdt-platform.html
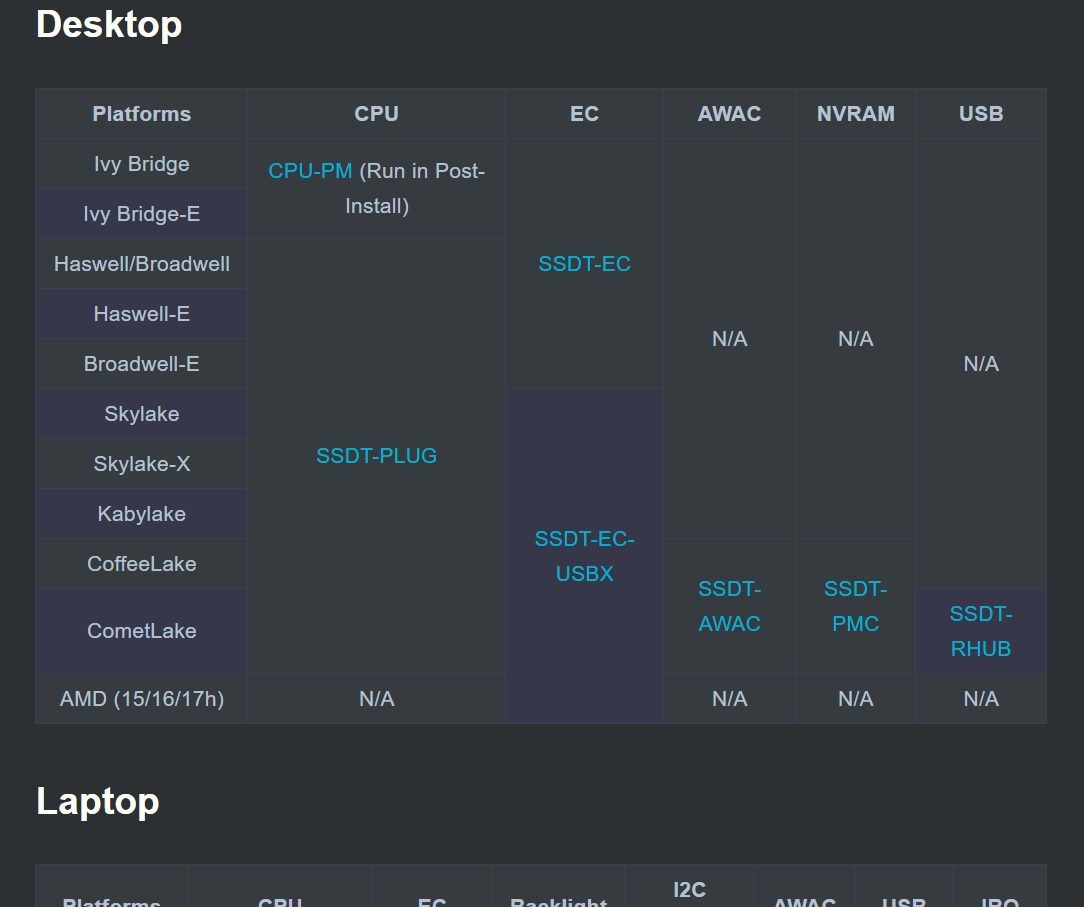
所以我i3-4150是Haswell架构,需要 CPU、 EC 相关的两个表描述文件: SSDT-PLUG SSDT-EC
当然用这种方法,很方便,但兼容性并不能得到保证。
我决定先采用第二种,提取法。以后有能力再考虑第三种。
下载解压 SSDTTime.zip
我选择用 Windows 平台提取,因为 Windows 的驱动比较好。
右击以管理员运行 SSDTTime.bat,如果报错此时不应有 <。,请看 Issues28
What are all these options?:
1. FixHPET - Patch out IRQ Conflicts- IRQ patching, mainly needed for X79, X99 and laptop users(use option
Cto omit conflicting legacy IRQs)
- IRQ patching, mainly needed for X79, X99 and laptop users(use option
2. FakeEC - OS-aware Fake EC- This is the SSDT-EC, required for Catalina users
3. PluginType - Sets plugin-type = 1 on CPU0/PR00- This is the SSDT-PLUG, for Intel only
4. Dump DSDT - Automatically dump the system DSDT- Dumps your DSDT from your firmware
先选 4 把 SSDT 提取出来,然后再提取其他的,例如我还需要 SSDT-PLUG 和 SSDT-EC ,选 3再选2
然后这些文件都生成到了 当前脚本的 Results 目录下
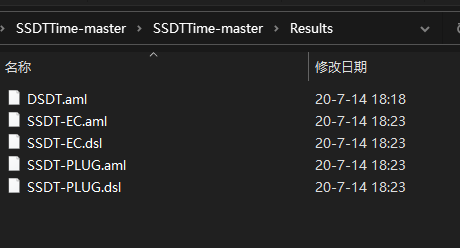
其中 .aml 是生成的二进制文件,.dsl 是反编译的源码文件
最后,记得把除了 DSDT.aml 之外的 .aml 二进制文件都丢到 U 盘 EFI 区的 ACPI 目录里(如 K:\EFI\OC\ACPI)
然后下一节,我们会开始写 配置文件
了解一下 SSDTTime 不能做的事情:
- HEDT SSDTs:
- The ACPI is odd on these platforms so manual work is required
- This includes X79, X99 and X299 systems 需要 FixHPET 的请见原文
- Prebuilt can be found here: Embedded Controller
- Laptop EC fix:
- This is because you do not want the EC powered off
- Prebuilt can be found here: Embedded Controller
- SSDT-PNLF:
- Need to be configured to your system
- SSDT-GPI0:
- Need to be configured to your system
- AWAC and RTC0 SSDTs:
- 300 series Intel boards will also need to figure this out (Z390 systems are most common for requiring this but some Gigabyte Z370 do as well)
- PMC SSDT:
- For fixing 300 series Intel NVRAM
- Prebuilt can be found here: NVRAM PMC
- USBX SSDT:
- This is included on sample SSDTs but SSDTTime only makes the SSDT-EC part, Skylake and newer users can grab a pre-built here: SSDT-USBX.aml
- RHUB SSDT:
- if you have a 10th gen CPU, you'll need to either use the prebuilt or manually create it.
For users who don't have all the options available to them in SSDTTime, you can follow the "SSDTs: The long way" section. You can still use SSDTTime for SSDTs it does support.
意味着这些可能需要我们再自己琢磨补充。
config.list 配置
检查文件
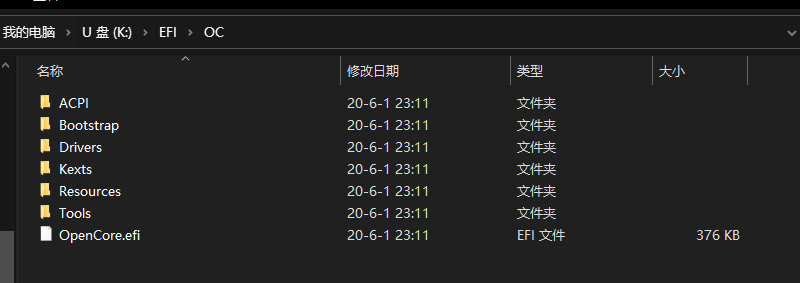
现在你的 u 盘 EFI 区已经放好 kext efi aml 三种文件,在 macOS 上看是这样的
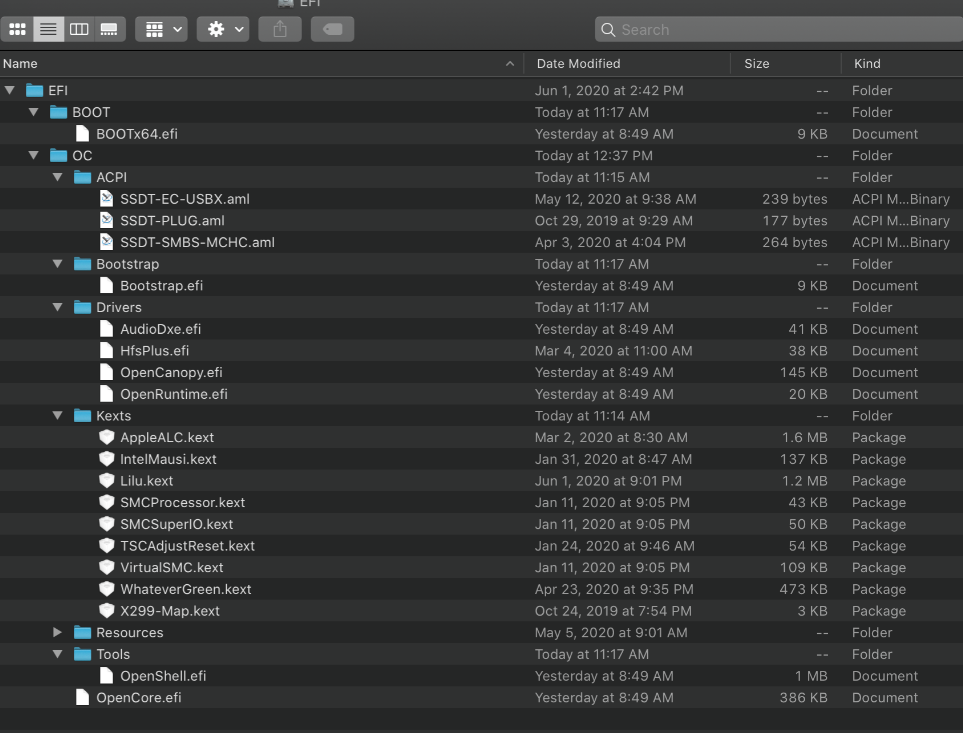
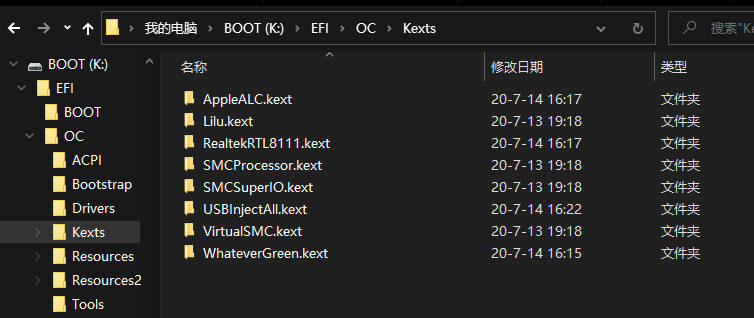
Windows 里看 kext 是这样的
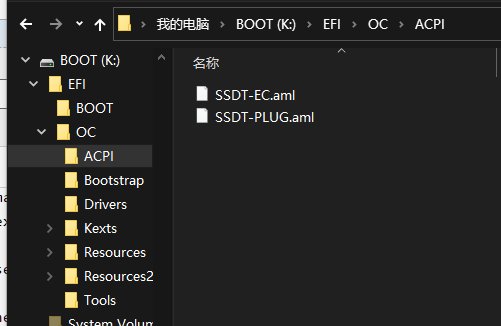
ACPI 是这样的,请不要放置 DSDT.aml 因为OC固件内置了
Driver 是这样的
由于硬件不同,所以文件有稍许差异,只要你按前面章节做了就没什么大问题。
放置 plist 文件
接下来用 config.list 配置文件指向它们的完整文件路径
把之前下载的 OC 压缩包里的 Docs 目录里的 Sample.plist
改名为 config.plist 并放到 U 盘的\EFI\OC 目录
配置
对于本指南的其余部分,您将需要某种形式的 plist 编辑。在我们的指南中,我们将使用以下工具自动完成一些繁琐的工作,请先下载解压:
- 使用 ProperTree 来编辑 plist
- 使用 GenSMBIOS 来生成 SMBIOS data
ps. plist 是一个xml文件,但不支持<!-- -->注释只支持#作为注释,因为解析器是 OC 内置的
双击打开 ProperTree.bat,然后看到界面
按 Ctrl + O 选择你 U 盘上的 config.plist,配置文件被打开后
再按 Ctrl + Shift + R(OC Clean Snapshot) 选择 你 U 盘的 /EFI/OC 目录,然后会得到这样的效果:

确保没有 DSDT.aml,即 ADD 项的第 0 项 为 false
删不删 #WARNING - 是没有任何影响的,因为它们是注释。
好,记得保存。点 File -- Save
然后根据 CPU 平台做调整,我的是 Haswell
config.plist 之 CPU 平台相关(Haswell 4代u)
前面是自动化生成,这里是根据平台相关的指南继续手动配置 config.plist。一般配置完 plist 最后再去主板按照OC说明的设置一下就可以了。
本节指南将告诉你如何配置一切,如果你有任何问题,请检查以确保你的配置正确的。
使用 OpenCore 主要的注意事项:
- 所有的属性(properties)都必须有值
- OC 没有默认配置可以回滚,除非被明确告知,否则不要删除任何属性条目。如果指南没有提到该条目选项,请将其保留为默认选项。 译注:原文虽如此,但你可以备份文件
- there are no default OpenCore will fall back on so do not delete sections unless told explicitly so. If the guide doesn't mention the option, leave it at default.
- 示例配置文件 Sample.plist 不能直接使用
- 你必须根据需要加以配置
- 不用使用 CONFIGURATORS 这个软件!
- 他们很少尊重 OpenCore 的配置,甚至会添加 Clover 的属性(如Mackie),这样会破坏 plist 的!
- these rarely respect OpenCore's configuration and even some like Mackie's will add Clover properties and corrupt plists!
由于该部分于平台息息相关的,且篇幅较大,因此我放到另一篇博文了
Haswell 用户请转到 OpenCore 的 plist 配置文件 之 Haswell 平台部分
不是 4代u 用户的,请继续看官方教程:config.plist/#selecting-your-platform
安装 MACOS
安装时macOS安装程序会默认新建一个200M的EFI分区。
单硬盘多系统请见:https://hackintosh-multiboot.gitbook.io/hackintosh-multiboot/
环境必须要求:硬盘上为GPT(GUID)分区表,有 >=200MB 的 EFI 分区;
主板以UEFI方式从U盘启动,然后开始安装 MACOS 系统。
分区格式选 APFS (但High Sierra on HDD and all Sierra users will need to use macOS Journaled(HFS+))
安装后的小处理
安装 macOS 到电脑上后,我们再做一些小处理
原文Post-install
通用部分(Universal)
This section is beneficial for all, regardless of hardware:
- Correcting Audio
- Enabling FileVault and other security features
- Booting macOS without a USB
- Updating OpenCore, kexts and macOS
- Disabling OpenCore Logging
- Fixing iServices
- Fixing DRM
- Fixing Power Management
- Setting up Bootstrap.efi
- Installing BootCamp
- Fixing USB
Intel 平台
- Used for Intel's consumer line:Fixing CFG Lock
- 我的不是 HEDT series: 不需要 Emulating NVRAM
其他平台略...译累了
其他平台用户,结合本译文->看官方英文文档即可
Good
初步完成,建议从头再快速阅读一遍。
如果还有小问题就看官方文档。
享受 macOS 吧!!!
本文来自博客园,作者:蓝天上的云℡,采用 BY-NC-SA 许可协议,转载请注明:转载自作者蓝天上的云℡ 原文链接 https://www.cnblogs.com/yucloud/p/OpenCore.html

 浙公网安备 33010602011771号