 1 # -*- coding: utf-8 -*-
 2 """
 3 Created on Thu Jun 28 17:16:19 2018
 4
 5 @author: zhen
 6 """
 7 from sklearn.model_selection import train_test_split
 8 import mglearn
 9 import matplotlib.pyplot as plt
10 x, y = mglearn.datasets.make_forge()
11 x_train, x_test, y_train, y_test = train_test_split(x, y, random_state=0)  # 生成训练和测试集数据
12
13 from sklearn.neighbors import KNeighborsClassifier
14 clf = KNeighborsClassifier(n_neighbors=3)  # 调用K近邻分类算法
15
16 clf.fit(x_train, y_train)  # 训练数据
17
18 print("Test set predictions:{}".format(clf.predict(x_test)))  # 预测
19
20 print("Test set accuracy:{:.2f}".format(clf.score(x_test, y_test)))
21
22 fig, axes = plt.subplots(1, 3, figsize=(10, 3))  # 使用matplotlib画图
23
24 for n_neighbors, ax in zip([1, 3, 9], axes):
25     # fit 方法返回对象本身,所以我们可以将实例化和拟合放在一行代码中
26     clf = KNeighborsClassifier(n_neighbors=n_neighbors).fit(x, y)
27     mglearn.plots.plot_2d_separator(clf, x, fill=True, eps=0.5, ax=ax, alpha=0.4)
28     mglearn.discrete_scatter(x[:, 0], x[:, 1], y, ax=ax)
29     ax.set_title("{} neighbor(s)".format(n_neighbors))
30     ax.set_xlabel("feature 0")
31     ax.set_ylabel("feature 1")
32 axes[0].legend(loc=3)
结果:

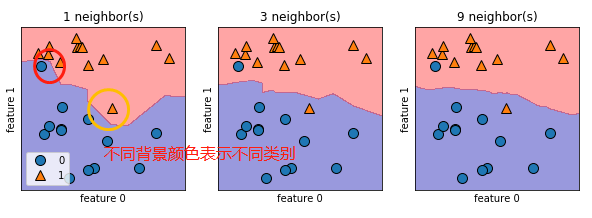
总结:从图中可以看出,使用单一邻居绘制的决策边界紧跟着训练数据,随着邻居的增多,决策边界也越来越平滑,更平滑的边界对应更简单的模型,换句话说,使用更少的邻居对应更高的模型复杂度。

 浙公网安备 33010602011771号