Day 82 VUE——基础
VUE——基础
引包、初始化、v-html、v-text
html


<div id="app">
    <h2>{{ msg }}</h2>
    <h2>{{ 123 }}</h2>
    <h2>{{ '456' }}</h2>
    <h2>{{ {id:1} }}</h2>
    <h2>{{ 1>2 ? 'True':'False' }}</h2>
    <h2>{{ txt.split('').reverse().join('') }}</h2>
    <h2>{{ fun() }}</h2>
    <!-- v-html 可识别标签 -->
    <h2 v-html='htmlStr'></h2>
    <!-- v-text 等同于 {{  }} -->
    <h2 v-text='htmlStr'></h2>
</div>
js
<!-- 引包 -->
    <script src="./vue.js"></script>
    <!-- 初始化 -->
    <script>
        const vm = new Vue({
            el: '#app',
            data: {
                msg: 'hello vue',
                txt: 'hello',
                htmlStr: '<li>这是一个标签</li>'
            },
            methods:{
                fun() {
                    return this.msg + '   ' + this.txt
                }
            }
        })
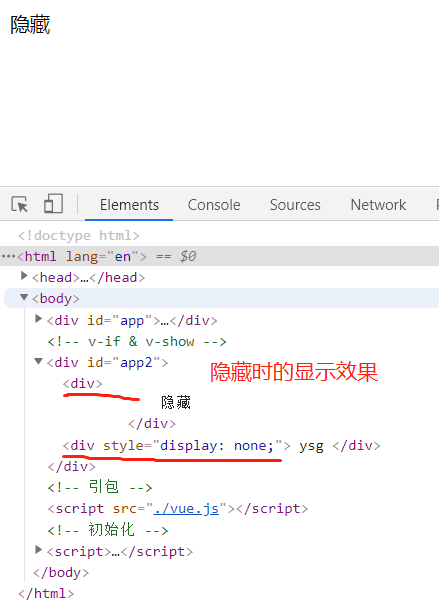
v-if v-else v-else-if,v-show
v-if 是“真正”的条件渲染,因为它会确保在切换过程中条件块内的事件监听器和子组件适当地被销毁和重建。
v-if 也是惰性的:如果在初始渲染时条件为假,则什么也不做——直到条件第一次变为真时,才会开始渲染条件块。
相比之下,v-show 就简单得多——不管初始条件是什么,元素总是会被渲染,并且只是简单地基于 CSS 进行切换。
一般来说,v-if 有更高的切换开销,而 v-show 有更高的初始渲染开销。因此,如果需要非常频繁地切换,则使用 v-show 较好;如果在运行时条件很少改变,则使用 v-if 较好。
<!-- v-if & v-show -->
<div id='app2'>
    <div v-if = "is_else">
        显示
    </div>
    <div v-else>
        隐藏
    </div>
    <div v-show = 'show'> ysg </div>
</div>


<script src="./vue.js"></script>
<!-- 初始化 -->
<script>

    new Vue({
        el: '#app2',
        data: {
            is_else: Math.random()>0.5,
            show:false
        }
    })
</script>
v-bind 绑定属性
<style>
    .color{
        color: red;
    }
</style>

<div id="app3">
    <a v-bind:href='res.url' :title='res.name'>{{ res.name }}</a>
    <h3 v-bind:class = "{color:isColor}">使用类控制颜色</h3>
</div>


new Vue({
    el:'#app3',
    data:{
        res:{
            name:'ysg',
            url:'https://fanyi.baidu.com/#en/zh/VirtualMachine_Recovery',

        },
        isColor:true
    }
})
v-on 绑定方法
绑定方法,简写:'@'
<style>
    .box{
        width: 100px;
        height: 100px;
        background-color: red;
    }
    .active{
        background-color: green;
    }
</style>
<div id="app2">
    <h2>{{ num }}</h2>
    <button v-on:click = 'handleClick'>+1</button>
    <button v-on:click = 'reduce'>-1</button>
    <hr>
    <div class="box" :class = '{active:isActive}'></div>
    <button @click = 'changs'>切换</button>
</div>


// v-on
new Vue({
    el:'#app2',
    data:{
        num:0,
        isActive:true
    },
    methods:{
        handleClick(){
            this.num += 1
        },
        reduce(){
            this.num -= 1
        },
        changs(){
            this.isActive = !this.isActive
        }

    }
})
事件修饰符
.stop
.prevent
.capture
.self
.once
.passive


<!-- 阻止单击事件继续传播 -->
<a v-on:click.stop="doThis"></a>

<!-- 提交事件不再重载页面 -->
<form v-on:submit.prevent="onSubmit"></form>

<!-- 修饰符可以串联 -->
<a v-on:click.stop.prevent="doThat"></a>

<!-- 只有修饰符 -->
<form v-on:submit.prevent></form>

<!-- 添加事件监听器时使用事件捕获模式 -->
<!-- 即内部元素触发的事件先在此处理,然后才交由内部元素进行处理 -->
<div v-on:click.capture="doThis">...</div>

<!-- 只当在 event.target 是当前元素自身时触发处理函数 -->
<!-- 即事件不是从内部元素触发的 -->
<div v-on:click.self="doThat">...</div>
v-for 列表渲染
这个默认的模式是高效的,但是只适用于不依赖子组件状态或临时 DOM 状态 (例如:表单输入值) 的列表渲染输出。
建议尽可能在使用 v-for 时提供 key attribute,除非遍历输出的 DOM 内容非常简单,或者是刻意依赖默认行为以获取性能上的提升。
<div id='app2'>
    <div>
        <ul>
            <li v-for = 'items in barbecue' :key='items.id'>
                {{ items.id }} --- {{ items.title }}
            </li>
        </ul>
        <ol>
            <li v-for = '(items,key) in per'>
                {{key}} --- {{ items }}
            </li>
        </ol>
    </div>
</div>

new Vue({
    el:'#app2',
    data:{
        barbecue:[
            {id:1,title:'烤馍片'},
            {id:2,title:'烤肉串'},
            {id:3,title:'烤茄子'}
        ],
        per:{
            title:'hello',
            author:'word'
        }
    }
})
v-model 双向数据绑定
<div id="app2">
    <p>{{ title }}</p>
    <input type="text" v-model = 'title'>
</div>


new Vue({
    el:'#app2',
    data:{
        title:'ysg'
    }
})
Vue中表单输入绑定应用
<!-- Vue中表单输入绑定应用 -->
<div id="app2">
    <!-- <p>{{ title }}</p>
    <input type="text" v-model = 'title'> -->
    <p>复选框的单选</p>
    <label for="checkbox">{{ check }}</label>
    <input type="checkbox" id='checkbox' v-model='check'>

    <p>复选框的多选</p>
    <div id='box'>
        <label for="a">鸡蛋</label>
        <input type="checkbox" id='a' value="鸡蛋" v-model='checkName'>
        <label for="b">黄瓜</label>
        <input type="checkbox" id='b' value="黄瓜" v-model='checkName'>
        <label for="c">鳄梨</label>
        <input type="checkbox" id='c' value="鳄梨" v-model='checkName'>
        <br>
        <span>{{ checkName }}</span>
    </div>

    <p>单选框</p>
    <div id='box2'>
        <select v-model='selected'>
            <option disabled value="">请选择</option>
            <option>A</option>
            <option>B</option>
            <option>C</option>
        </select>
        <span>{{ selected }}</span>
    </div>
</div>


new Vue({
    el:'#app2',
    data:{
        title:'ysg',
        check:false,
        checkName:[],
        selected:''
    }
})
修饰符
.lazy
在默认情况下,v-model 在每次 input 事件触发后将输入框的值与数据进行同步 (除了上述输入法组合文字时)。你可以添加 lazy 修饰符,从而转为在 change 事件_之后_进行同步:
<!-- 在“change”时而非“input”时更新 -->
<input v-model.lazy="msg">
.number
如果想自动将用户的输入值转为数值类型,可以给 v-model 添加 number 修饰符:
<input v-model.number="age" type="number">
这通常很有用,因为即使在 type="number" 时,HTML 输入元素的值也总会返回字符串。如果这个值无法被 parseFloat() 解析,则会返回原始的值。
.trim
如果要自动过滤用户输入的首尾空白字符,可以给 v-model 添加 trim 修饰符:
<input v-model.trim="msg">
侦听器 watch 的用法
key是属于 data 的属性名,value 是监听后的行为,newV 是新值,oldV 是旧值。
基本数据类型可以使用 watch直接侦听
<div id='app2'>
    <span>{{ msg }}</span>
    <input type="text" v-model='msg'>
</div>


// wacth 侦听器的使用
new Vue({
    el:'#app2',
    data:{
        msg:''
    },
    watch:{
        'msg':function(newV,oldV){
            if(newV === '100'){
                console.log('hello')
            }
        }
    }
})
复杂数据类型:Object、Array,要使用深度侦听
<div id='app2'>
    <p>{{ lis[0].name }}</p>
    <button @click='lis[0].name = "ysging"'>改变</button>
</div>

// wacth 侦听器的使用
new Vue({
    el:'#app2',
    data:{
        lis:[{name:'ysg'}]
    },
    watch:{
        'lis':{
            deep:'true',
            handler:function(newV,oldV){
                console.log(newV[0].name)
            }
        }
    }
})
计算属性 - computed
<div id='app2'>
    <h2>{{ reverseMsg }}</h2>
    <h2>{{ connect }}</h2>
    <button @click='handChick'>改变</button>
</div>


// 计算属性 - computed
// computed 默认只有 getter 方法
// 计算属性最大的优点:产生缓存,如果数据没有发生变化,直接从缓存中取值;如果发生变化,则重新渲染。
new Vue({
    el:'#app2',
    data:{
        msg:'ysg',
        one:'亦',
        two:"双弓"
    },
    methods:{
        handChick(){
            this.msg = 'this is computed'
            this.two = '双弓ing'
        }
    },
    computed:{
        reverseMsg:function(){
            return this.msg.split('').reverse().join('')
        },
        connect:function(){
            return this.one + this.two
        }
    }
})
setter 方法
<div id='app2'>
    <label>{{ content }}</label>
    <input type="text" v-model='content'>
    <button @click = 'handGet'>获取</button>
</div>


new Vue({
    el:'#app2',
    data:{
        title:''
    },
    methods:{
        handInput:function(event){
            const{value} = event.target;
        },
        handGet:function(){
            if(this.title){
                console.log(this.title)
            }
        }
    },
    computed:{
        content:{
            set:function(newV){
                this.title = newV
            },
            get:function(){
                return this.title.split('').reverse().join('')
            }
        }
    }
})
filters - 过滤器
<div id='app2'>
    <!-- 局部过滤器 -->
    <h2>{{ msg | myPrice('¥') }}</h2>
    <!-- 全局过滤器 -->
    <h2>{{ msg | all }}</h2>
</div>


// 过滤器
// 全局过滤器
Vue.filter('all',(val)=>{
    return val.split('').reverse().join('')
})

new Vue({
    el:'#app2',
    data:{
        msg:'100'
    },
    // 局部过滤器
    filters:{
        myPrice:function(msg,a){
            return a + msg
        }
    }
})

 浙公网安备 33010602011771号