Spring_MVC
使用注解开发Spring MVC
配置web.xml文件
点击查看代码
<!DOCTYPE web-app PUBLIC
 "-//Sun Microsystems, Inc.//DTD Web Application 2.3//EN"
 "http://java.sun.com/dtd/web-app_2_3.dtd" >

<web-app>
  <display-name>Archetype Created Web Application</display-name>


  <!--1.注册DispatcherServlet,请求分发器-->
  <servlet>
    <servlet-name>DispatcherServlet</servlet-name>
    <servlet-class>org.springframework.web.servlet.DispatcherServlet</servlet-class>
    <!--通过初始化参数指定SpringMVC配置文件的位置,进行关联-->
    <init-param>
      <param-name>contextConfigLocation</param-name>
      <param-value>classpath:spring-mvc.xml</param-value>
    </init-param>
    <!-- 启动顺序,数字越小,启动越早 -->
    <load-on-startup>1</load-on-startup>
  </servlet>


  <!--所有请求都会被springmvc拦截 -->
  <servlet-mapping>
    <servlet-name>DispatcherServlet</servlet-name>
    <url-pattern>/</url-pattern>
  </servlet-mapping>


</web-app>
配置springmvc-servlet.xml
点击查看代码
<?xml version="1.0" encoding="UTF-8"?>
<beans xmlns="http://www.springframework.org/schema/beans"
       xmlns:xsi="http://www.w3.org/2001/XMLSchema-instance"
       xmlns:context="http://www.springframework.org/schema/context" xmlns:mvc="http://www.alibaba.com/schema/stat"
       xsi:schemaLocation="http://www.springframework.org/schema/beans http://www.springframework.org/schema/beans/spring-beans.xsd
                        http://www.springframework.org/schema/context http://www.springframework.org/schema/context/spring-context.xsd http://www.alibaba.com/schema/stat http://www.alibaba.com/schema/stat.xsd">

    <!--Controller的组件扫描-->
    <context:component-scan base-package="com.cn.controller">
        <context:include-filter type="annotation" expression="org.springframework.stereotype.Controller"/>
    </context:component-scan>


    <!--配置内部资源视图解析器-->
    <bean id="viewResolver" class="org.springframework.web.servlet.view.InternalResourceViewResolver">
        <!--  /jsp/success.jsp  -->
        <property name="prefix" value="/jsp/"></property>
        <property name="suffix" value=".jsp"></property>
    </bean>

    <!--默认设置,不需要配置映射器,和处理器了-->
    <mvc:annotation-driven />


</beans>
控制层+视图层::
点击查看代码
package com.cn.controller;
import org.springframework.stereotype.Controller;
import org.springframework.ui.Model;
import org.springframework.web.bind.annotation.RequestMapping;
@Controller
public class UserController {
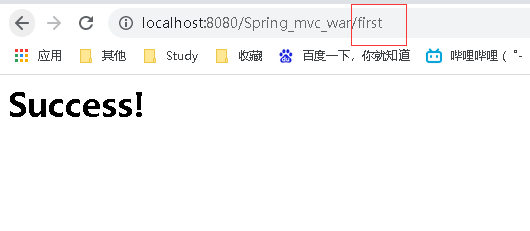
@RequestMapping("/first")
public String save(){
System.out.println(" controller is running!" );
return "success";
}
/*可以配置多个访问路径请求
* 这就大大的减少了大量的servlet
* 简化了开发*/
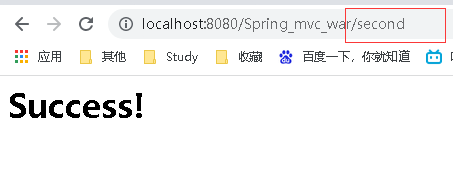
@RequestMapping("/second")
public String second(Model model){
//业务层,调用service层得到数据
String msg = "欢迎你!";
model.addAttribute("msg",msg);
return "success";//交给视图解析器解析地址(相应路径)
}
}
结果截图:
Spring_MVC知识要点

 浙公网安备 33010602011771号