


SpringBoot实战(五)之Thymeleaf
Thymeleaf同jsp、volocity、freemarker等共同的职能是MVC模式中的视图展示层,即View。
当然了,SpringBoot中也可以用jsp,不过不推荐这种用法,比较推崇的就是使用Thymeleaf。
关于Thymeleaf学习,建议参考官方文档:https://www.thymeleaf.org/documentation.html
官方文档例子,应有尽有。
之前接触过Thymeleaf是因为公司项目初建期间用过它搭建过测试环境,后来根据领导的指示,需要快速开发,而且当时对于Thymeleaf不是十分了解,当时对于它的了解认识只是展示前端数据的,同jsp职能一样,当然这也是它们的共性。比较详细的深入了解和使用,是帮助一位学妹解决毕业论文的项目问题。那时帮助她写了好十几个类代码和对应的十几个html代码。当时感触比较深的是,Thymeleaf是如此的好用,比jsp还好用,jsp要遍历之类,要么加<%%>,或者引用jstl标签库进行数据遍历等。而Thymeleat就不需要。简洁直观,我比较推崇Thymeleaf,特别是在前后端分离的项目,有的时候不用jsp,光纯html+js的确有点吃力,即便使用了vue.js或者angular.js、react.js等虽然增加了便利性,但是了,如果一个项目前端语言不是十分统一的话,对于将来维护成本方面会大大提高,不易维护。
Thymeleaf对于前后端分离,我认为还是不错的。
下面进入demo例子讲解:
一、导入maven依赖
<?xml version="1.0" encoding="UTF-8"?>
<project xmlns="http://maven.apache.org/POM/4.0.0" xmlns:xsi="http://www.w3.org/2001/XMLSchema-instance"
         xsi:schemaLocation="http://maven.apache.org/POM/4.0.0 http://maven.apache.org/xsd/maven-4.0.0.xsd">
    <modelVersion>4.0.0</modelVersion>

    <groupId>org.springframework</groupId>
    <artifactId>gs-uploading-files</artifactId>
    <version>0.1.0</version>

    <parent>
        <groupId>org.springframework.boot</groupId>
        <artifactId>spring-boot-starter-parent</artifactId>
        <version>1.5.8.RELEASE</version>
    </parent>

    <properties>
        <java.version>1.8</java.version>
    </properties>


    <dependencies>
        <dependency>
            <groupId>org.springframework.boot</groupId>
            <artifactId>spring-boot-starter-web</artifactId>
        </dependency>
        <dependency>
            <groupId>org.springframework.boot</groupId>
            <artifactId>spring-boot-starter-thymeleaf</artifactId>
        </dependency>

        <dependency>
            <groupId>org.springframework.boot</groupId>
            <artifactId>spring-boot-starter-test</artifactId>
            <scope>test</scope>
        </dependency>
    </dependencies>

    <build>
        <plugins>
            <plugin>
                <groupId>org.springframework.boot</groupId>
                <artifactId>spring-boot-maven-plugin</artifactId>
            </plugin>
        </plugins>
    </build>

</project>
二、编写实体
package hello;

public class User {
    private Integer id;
    private String name;
    public Integer getId() {
        return id;
    }
    public void setId(Integer id) {
        this.id = id;
    }
    public String getName() {
        return name;
    }
    public void setName(String name) {
        this.name = name;
    }

}
三、编写Controller
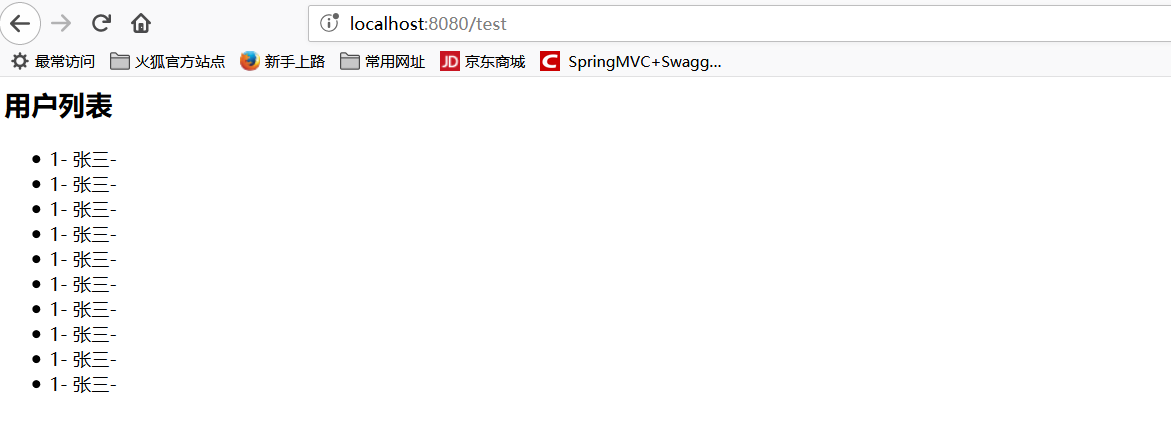
package hello;

import java.util.ArrayList;
import java.util.List;

import org.springframework.stereotype.Controller;
import org.springframework.ui.Model;
import org.springframework.web.bind.annotation.GetMapping;

@Controller
public class TestController {


    @GetMapping(value="/test")
    public String test(Model model) {

          List<User> userList = new ArrayList<User>();
            for (int i = 0; i <10; i++) {
                User user =new User();
                user.setId(1);
                user.setName("张三");
                userList.add(user);
            }

            model.addAttribute("users", userList);
        return "test";
    }
}
四、编写配置文件,将其放置在/src/main/resources下
application.properties
server.port=8080
spring.thymeleaf.cache=false
spring.thymeleaf.prefix=classpath:/templates/
spring.thymeleaf.check-template-location=true
spring.thymeleaf.suffix=.html
spring.thymeleaf.encoding=UTF-8
spring.thymeleaf.content-type=text/html
spring.thymeleaf.mode=HTML5
五、在src/main/resources目录下新建templates目录并新建html文件
test.htm
<html xmlns:th="http://www.thymeleaf.org">
<body>

<h2>用户列表</h2>
  <div>
     <ul>
         <li  th:each="user:${users}">
              <span th:text="${user.id}"></span>-
             <span th:text="${user.name}"></span>-
         </li>
     </ul>
   </div>
</body>
</html>
六、编写启动类
package hello;

import org.springframework.boot.SpringApplication;
import org.springframework.boot.autoconfigure.SpringBootApplication;

@SpringBootApplication
public class Application {

    public static void main(String[] args) {
        SpringApplication.run(Application.class, args);
    }

}
最后结果如下图所示:
这里没有加入mysql或者其他数据相关的,如果要引用数据库,引用对应数据库的依赖和配置对应的数据库连接池即可。
这里可以参考我的关于Springboot+MyBatis+Thymeleaf
示例地址为:https://github.com/youcong1996/springboot-mybatis-demo

 浙公网安备 33010602011771号