opencv 取得红色箭头所指示区域的图像信息
- 问题
根据图片中红色标签的指示,取得箭头前方小范围区域的图像信息
- 思路与优化:
1.图片转HSV格式,应用高斯模糊,去除部分噪音
2.给出HSV颜色范围,通过inRange(),去除非目标颜色(目标颜色保留,其他均置0,黑色),得到mask
3.对mask进行二值化操作得到二值图像,此时二值图的白色区域是目标对象,黑色区域是背景
4.因红色标签内部常常有点状黑色噪音,对二值图像应用形态变换-扩张,扩张(膨胀):内核下至少一个像素为1,则像素元素为1,它增加了图像中的白色区域或前景对象的大小
5.获取图像轮廓,去除轮廓面积小于预设值(这里用了300)的轮廓,为合格的轮廓计算边界旋转矩形,即定位框
6.绘制定位框
- 单个处理的代码


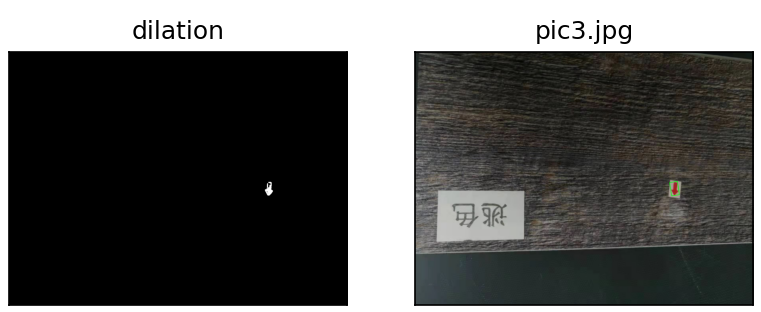
import numpy as np
import cv2 as cv
from matplotlib import pyplot as plt
def RGB_inv(image):
    #反转BR颜色通道
    b = image[:,:,0].copy()
    r = image[:,:,2].copy()
    image[:,:,0] = r
    image[:,:,2] = b
#读取图像
img = cv.imread("Pic\pic3.jpg")
img = cv.GaussianBlur (img,(5,5),0)
#将图像转化为HSV格式
hsv = cv.cvtColor(img, cv.COLOR_BGR2HSV)
#设定颜色HSV范围,设为红色
low_red= np.array([0,100,100])
upper_red = np.array([10,255,255])
 #去除颜色范围外的其余颜色
mask = cv.inRange(hsv, low_red, upper_red)
# 二值化操作
ret, binary = cv.threshold(mask, 0, 255, cv.THRESH_BINARY)
#形态变换-扩张
kernel = np.ones((5, 5), np.uint8)
dilation = cv.dilate(binary,kernel,iterations = 1)
plt.subplot(121)
plt.imshow(dilation,'gray')
plt.title('dilation')
plt.xticks([]),plt.yticks([])
#获取图像轮廓坐标,其中contours为坐标值,此处只检测外形轮廓
contours, hierarchy = cv.findContours(dilation, cv.RETR_EXTERNAL, cv.CHAIN_APPROX_SIMPLE)
print(len(contours))
if len(contours) > 0:
    rects = [cv.minAreaRect (c) for c in contours if cv.contourArea(c) >300]
    boxs = [np.int0(cv.boxPoints (rect) )for rect in rects]
    cv.drawContours (img,boxs,-1,(0,255,0),2)
    #将绘制的图像保存并展示
    RGB_inv(img)
    plt.subplot(122)
    plt.imshow(img,'gray')
    plt.title('pic3.jpg')
    plt.xticks([]),plt.yticks([])
    plt.show()
    k = cv.waitKey(0)
    if k == ord("s"):
        cv.imwrite("x.jpg", img)#图像另存为
- 批量处理的代码
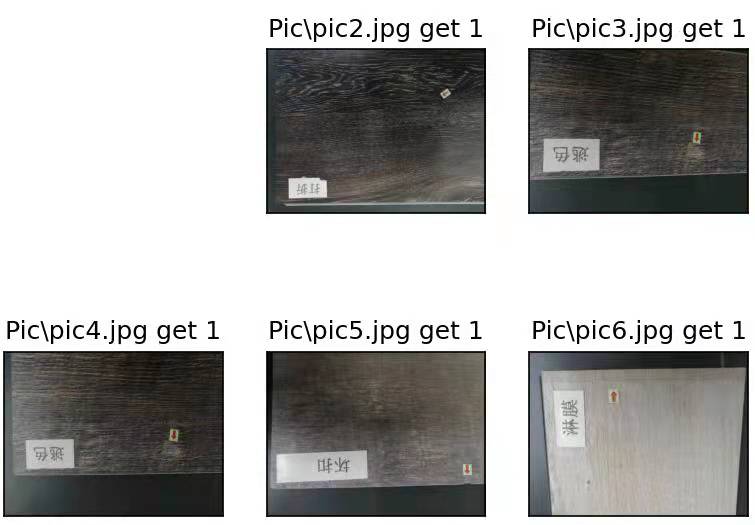
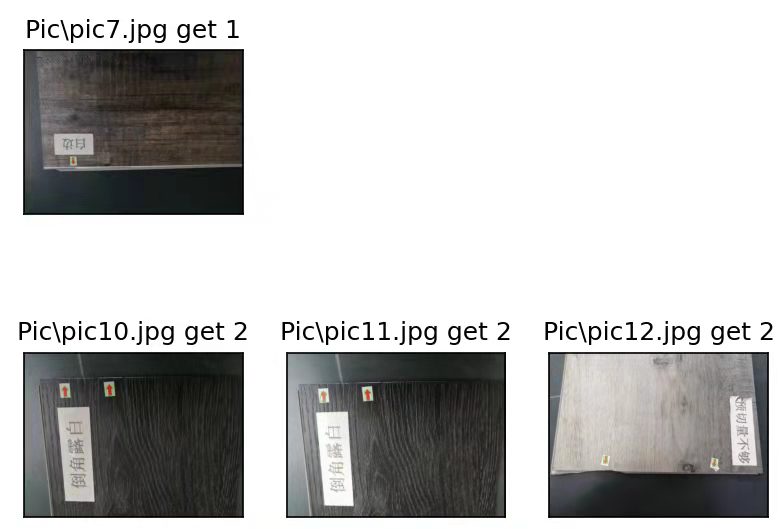
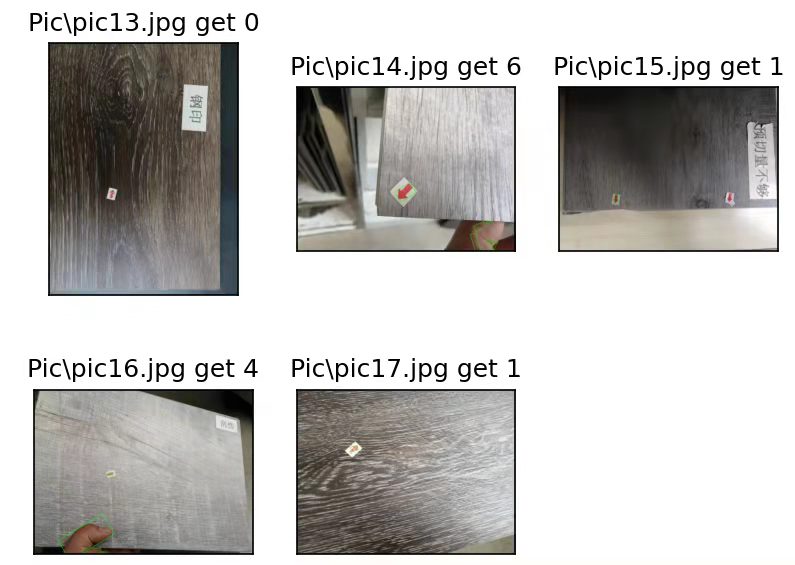
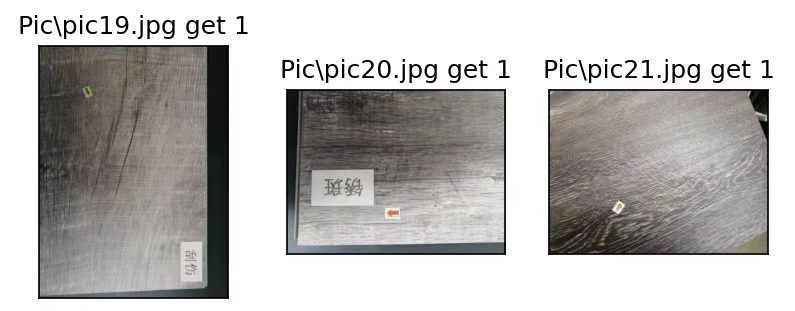
import numpy as np
import cv2 as cv
from matplotlib import pyplot as plt
def RGB_inv(image):
    b = image[:,:,0].copy()
    r = image[:,:,2].copy()
    image[:,:,0] = r
    image[:,:,2] = b
def handle(img_path,i):
    img = cv.imread(img_path)
    img = cv.GaussianBlur (img,(5,5),0)
    #将图像转化为HSV格式
    hsv = cv.cvtColor(img, cv.COLOR_BGR2HSV)
    #设定颜色HSV范围,设为红色
    low_red= np.array([0,100,100])
    upper_red = np.array([10,255,255])
     #去除颜色范围外的其余颜色
    mask = cv.inRange(hsv, low_red, upper_red)
    # 二值化操作
    ret, binary = cv.threshold(mask, 0, 255, cv.THRESH_BINARY)
    #形态变换
    kernel = np.ones((5, 5), np.uint8)
    dilation = cv.dilate(binary,kernel,iterations = 1)
    #获取图像轮廓坐标,其中contours为坐标值,此处只检测外形轮廓
    contours, hierarchy = cv.findContours(dilation, cv.RETR_EXTERNAL, cv.CHAIN_APPROX_SIMPLE)
    print(img_path+" get "+str(len(contours))+" cnt")
    if len(contours) > 0:
        rects = [cv.minAreaRect (c) for c in contours if  cv.contourArea(c) >300]
        print(img_path+" remain "+str(len(rects))+" cnt")
        boxs = [np.int0(cv.boxPoints (rect) )for rect in rects]
        cv.drawContours (img,boxs,-1,(0,255,0),2)
        #将绘制的图像保存并展示
        RGB_inv(img)
        plt.subplot(2,3,i)
        plt.imshow(img,'gray')
        plt.title(img_path+" get "+str(len(rects)))
        plt.xticks([]),plt.yticks([])
#读取图像
n = 1
for i in range(19,23):
    handle("Pic\pic"+str(i)+".jpg",n)
    n += 1
plt.show()
批量处理的效果
- 待解决的问题
1.目前针对红色划定的HSV颜色范围,不适用于所有的图片,部分图片通过当前参数的inRange()过滤后,仅留下黑色
目前的颜色范围还会留下误拍摄进的手掌区域
2.定位框不能全部都准确地框住红色箭头标签本身,有的只框住了部分,有的不能与箭头长边平行,倾斜放置,
但我们的最终目标是找到箭头指示的区域,所以定位框的问题不是非解决不可
3.确定箭头轮廓的中心,根据箭头轮廓的凸起,确定向量;
对箭头轮廓做一条拟合线,
从中心出发,依照向量,沿拟合线前进一定距离作为圆心,取设定半径画圆,取得图像信息

 浙公网安备 33010602011771号