


- This file was automatically generated by the /lib/udev/write_net_rules
- program, run by the persistent-net-generator.rules rules file.
- null
- You can modify it, as long as you keep each rule on a single
- line, and change only the value of the NAME= key.
- PCI device 0x8086:0x100f (e1000)
- PCI device 0x8086:0x100f (e1000)
一、问题描述
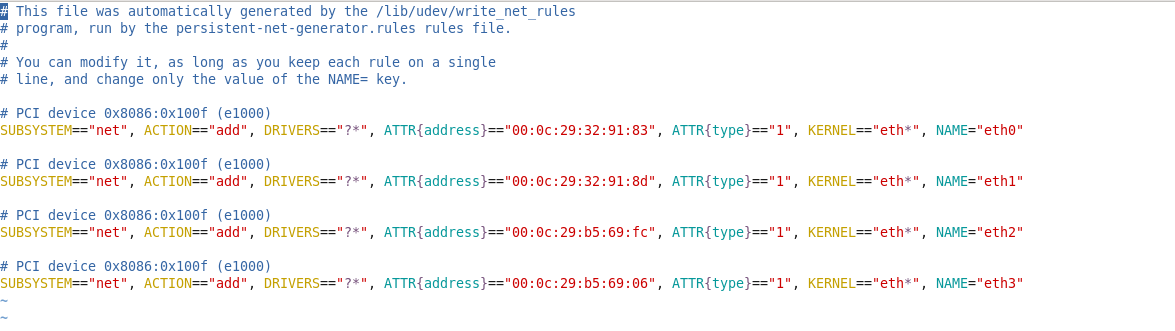
样本虚拟机配置有两张网卡,eth0、eth1,使用vmvare克隆虚拟机后,复制的虚拟机,没有网卡eth0,eth1,而是有eth2、eth3,如下所示:

二、原因分析
复制系统中网卡的mac地址已经变了,但是/etc/udev/rules.d/70-persistent-net.rules中仍然保留了老网卡的信息,新网卡则会从eht1网上增加,被识别为eth2,eth3
三、解决办法:
概括步骤:
1.检查并修改 /etc/udev/rules.d/70-persistent-net.rules 文件中网卡名并重启系统
2.modprobe -r e1000 卸载网卡模块
3.modprobe e1000 重新加载网卡模块
4.修改/etc/sysconfig/network-scrcipts中网卡的配置文件(使其格式为ifcfg-网卡名)
5.重启网卡服务service network restart
具体步骤如下:
1、检查并修改 /etc/udev/rules.d/70-persistent-net.rules 文件中网卡名
删除原来错误的eth0和eth1配置信息,并修改NAME="eth2" 为 NAME="eth0",NAME="eth3"为NAME="eth1",如下所示
[root@localhost Desktop]# vim /etc/udev/rules.d/70-persistent-net.rulesThis file was automatically generated by the /lib/udev/write_net_rules
program, run by the persistent-net-generator.rules rules file.
You can modify it, as long as you keep each rule on a single
line, and change only the value of the NAME= key.
PCI device 0x8086:0x100f (e1000)
SUBSYSTEM"net", ACTION"add", DRIVERS"?*", ATTR{address}"00:0c:29:b5:69:fc", ATTR{type}"1", KERNEL"eth*", NAME="eth0"
PCI device 0x8086:0x100f (e1000)
SUBSYSTEM"net", ACTION"add", DRIVERS"?*", ATTR{address}"00:0c:29:b5:69:06", ATTR{type}"1", KERNEL"eth*", NAME="eth1"
reboot重启系统,使配置文件生效
2、modprobe -r e1000卸载网卡模块
[root@localhost Desktop]# modprobe -r e1000
3、modprobe e1000重新加载网卡模块
[root@localhost Desktop]# modprobe e1000
4、修改/etc/sysconfig/network-scrcipts中网卡的配置文件
修改eth0、eth1配置文件与70-persistent-net.rules中的mac地址相对应:
[root@localhost Desktop]# vim /etc/sysconfig/network-scripts/ifcfg-eth0 DEVICE=eth0 HWADDR=00:0c:29:b5:69:fc #修改为正确的mac地址 TYPE=Ethernet UUID=9dcce425-39a0-477e-afa2-bf1a2d5615af ONBOOT=yes # 修改为开机启动 NM_CONTROLLED=yes BOOTPROTO=dhcp[root@localhost Desktop]# vim /etc/sysconfig/network-scripts/ifcfg-eth1
DEVICE=eth1
HWADDR=00:0c:29:b5:69:06
TYPE=Ethernet
UUID=99037241-ffe5-4de7-8ca0-64ae19f30bd5
ONBOOT=yes
NM_CONTROLLED=yes
BOOTPROTO=dhcp
5、重启网络服务
[root@localhost Desktop]# service network restart # 重启网络服务
Shutting down interface eth0:                              [  OK  ]
Shutting down interface eth1:                              [  OK  ]
Shutting down loopback interface:                          [  OK  ]
Bringing up loopback interface:                            [  OK  ]
Bringing up interface eth0:  Active connection state: activating
Active connection path: /org/freedesktop/NetworkManager/ActiveConnection/9
state: activated
Connection activated
                                                           [  OK  ]
查看网络信息
[root@localhost Desktop]# ifconfig -a eth0 Link encap:Ethernet HWaddr 00:0C:29:B5:69:FC inet addr:192.168.57.129 Bcast:192.168.57.255 Mask:255.255.255.0 inet6 addr: fe80::20c:29ff:feb5:69fc/64 Scope:Link UP BROADCAST RUNNING MULTICAST MTU:1500 Metric:1 RX packets:272 errors:0 dropped:0 overruns:0 frame:0 TX packets:178 errors:0 dropped:0 overruns:0 carrier:0 collisions:0 txqueuelen:1000 RX bytes:17170 (16.7 KiB) TX bytes:14884 (14.5 KiB)eth1 Link encap:Ethernet HWaddr 00:0C:29:B5:69:06
inet6 addr: fe80::20c:29ff:feb5:6906/64 Scope:Link
UP BROADCAST RUNNING MULTICAST MTU:1500 Metric:1
RX packets:0 errors:0 dropped:0 overruns:0 frame:0
TX packets:54 errors:0 dropped:0 overruns:0 carrier:0
collisions:0 txqueuelen:1000
RX bytes:0 (0.0 b) TX bytes:17700 (17.2 KiB)lo Link encap:Local Loopback
inet addr:127.0.0.1 Mask:255.0.0.0
inet6 addr: ::1/128 Scope:Host
UP LOOPBACK RUNNING MTU:65536 Metric:1
RX packets:16 errors:0 dropped:0 overruns:0 frame:0
TX packets:16 errors:0 dropped:0 overruns:0 carrier:0
collisions:0 txqueuelen:0
RX bytes:960 (960.0 b) TX bytes:960 (960.0 b)
发现修改成功,完毕
2019-10-23 00:01:32

 浙公网安备 33010602011771号