

Traefik基础应用极速入门实战
作者:尹正杰
版权声明:原创作品,谢绝转载!否则将追究法律责任。
目录
一.Traefik创建理由规则实战
1.Traefik创建路由规则的方法
Traefik提供了三种创建路由规则的方法:
	- 原生Ingress
		K8S原生支持的资源。

	- CRD IngressRoute
		部署Traefik时安装的自定义资源。

	- Gateway API
		基于Gateway的API来实现暴露。

本案例主要通过原生Ingress和CRD IngressRoute的方式来进行暴露。
2.实战案例
2.1 基于Ingress暴露dashboard

	1.查看Traefik对应的svc,很明显,我使用的是'jiege-traefik-dashboard'这个svc来暴露的
[root@master241 traefik]# kubectl get svc -n kube-public
NAME                      TYPE           CLUSTER-IP       EXTERNAL-IP   PORT(S)                      AGE
jiege-traefik             LoadBalancer   10.207.103.168   10.0.0.150    80:30493/TCP,443:32342/TCP   80m
jiege-traefik-dashboard   LoadBalancer   10.205.166.47    10.0.0.151    8080:30989/TCP               35m
[root@master241 traefik]#


	2.编写资源清单
[root@master241 ingress]# cat 01-ingress-traefik-dashboard.yaml
apiVersion: networking.k8s.io/v1
kind: Ingress
metadata:
  name: ingress-traefik
  namespace: kube-public
spec:
  rules:
  - host: traefik.yinzhengjie.com
    http:
      paths:
      - backend:
          service:
            name: jiege-traefik-dashboard
            port:
              number: 8080
        path: /
        pathType: Prefix
[root@master241 ingress]#

	3.创建Ingress资源
[root@master241 ingress]# kubectl apply -f  01-ingress-traefik-dashboard.yaml
ingress.networking.k8s.io/ingress-traefik created
[root@master241 ingress]#
[root@master241 ingress]# kubectl get ingress -n kube-public
NAME              CLASS           HOSTS                     ADDRESS      PORTS   AGE
ingress-traefik   jiege-traefik   traefik.yinzhengjie.com   10.0.0.150   80      6s
[root@master241 ingress]#

	4.查看Ingress是否关联后端的svc
[root@master241 ingress]# kubectl describe ingress -n kube-public
Name:             ingress-traefik
Labels:           <none>
Namespace:        kube-public
Address:          10.0.0.150
Ingress Class:    jiege-traefik
Default backend:  <default>
Rules:
  Host                     Path  Backends
  ----                     ----  --------
  traefik.yinzhengjie.com
                           /   jiege-traefik-dashboard:8080 (10.100.207.18:8080)
Annotations:               <none>
Events:                    <none>
[root@master241 ingress]#


	5.windows基于webUI访问测试(windows需要添加hosts解析哟,效果如上图所示)
http://traefik.yinzhengjie.com/dashboard/#/


	6.基于curl工具测试
[root@master241 ingress]# curl -H "HOST: traefik.yinzhengjie.com" 10.0.0.150/dashboard/;echo
<!DOCTYPE html><html><head><script>window.APIURL = "/api/"</script><title>Traefik</title><meta charset=utf-8><meta name=description content="Traefik UI"><meta name=format-detection content="telephone=no"><meta name=msapplication-tap-highlight content=no><meta name=viewport content="user-scalable=no,initial-scale=1,maximum-scale=1,minimum-scale=1,width=device-width"><link rel=icon type=image/png href=./app-logo-128x128.png><link rel=icon type=image/png sizes=16x16 href=./icons/favicon-16x16.png><link rel=icon type=image/png sizes=32x32 href=./icons/favicon-32x32.png><link rel=icon type=image/png sizes=96x96 href=./icons/favicon-96x96.png><link rel=icon type=image/ico href=./icons/favicon.ico><link rel=apple-touch-icon href=./icons/apple-icon-152x152.png><link rel=apple-touch-icon sizes=152x152 href=./icons/apple-icon-152x152.png><link rel=apple-touch-icon sizes=167x167 href=./icons/apple-icon-167x167.png><link rel=apple-touch-icon sizes=180x180 href=./icons/apple-icon-180x180.png>  <script type="module" crossorigin src="./assets/index-Dq0RjujM.js"></script>
  <link rel="stylesheet" crossorigin href="./assets/index-jjiyEA_O.css">
</head><body><div id=q-app></div></body></html>
[root@master241 ingress]#
2.2 基于IngressRoute暴露dashboard

	1.编写资源清单
[root@master241 ingressroutes]# cat 01-ingressroutes-traefik-dashboard.yaml
apiVersion: traefik.io/v1alpha1
kind: IngressRoute
metadata:
  name: ingressroute-traefik
  namespace: kube-public
spec:
  entryPoints:
  - web
  routes:
  - match: Host(`www.yinzhengjie.com`) && PathPrefix(`/`)
    kind: Rule
    services:
    - name: jiege-traefik-dashboard
      port: 8080
[root@master241 ingressroutes]#


	2.创建资源
[root@master241 ingressroutes]# kubectl apply -f 01-ingressroutes-traefik-dashboard.yaml
ingressroute.traefik.io/ingressroute-traefik created
[root@master241 ingressroutes]#
[root@master241 ingressroutes]# kubectl get -f 01-ingressroutes-traefik-dashboard.yaml
NAME                   AGE
ingressroute-traefik   3s
[root@master241 ingressroutes]#
[root@master241 ingressroutes]# kubectl describe -f 01-ingressroutes-traefik-dashboard.yaml
Name:         ingressroute-traefik
Namespace:    kube-public
Labels:       <none>
Annotations:  <none>
API Version:  traefik.io/v1alpha1
Kind:         IngressRoute
Metadata:
  Creation Timestamp:  2025-06-03T07:01:44Z
  Generation:          1
  Resource Version:    1650314
  UID:                 8b5c5c2b-87e3-468e-b3b5-d3fe92ac894b
Spec:
  Entry Points:
    web
  Routes:
    Kind:   Rule
    Match:  Host(`www.yinzhengjie.com`) && PathPrefix(`/`)
    Services:
      Name:  jiege-traefik-dashboard
      Port:  8080
Events:      <none>
[root@master241 ingressroutes]#


	3.访问测试(注意哈,需要在windows的hosts文件中添加解析记录哟~如上图所示)
http://www.yinzhengjie.com/dashboard/#/


温馨提示:
	也可以使用curl工具进行测试,操作如下:
[root@master241 ~]# curl -H 'HOST: www.yinzhengjie.com' 10.0.0.150/dashboard/;echo
<!DOCTYPE html><html><head><script>window.APIURL = "/api/"</script><title>Traefik</title><meta charset=utf-8><meta name=description content="Traefik UI"><meta name=format-detection content="telephone=no"><meta name=msapplication-tap-highlight content=no><meta name=viewport content="user-scalable=no,initial-scale=1,maximum-scale=1,minimum-scale=1,width=device-width"><link rel=icon type=image/png href=./app-logo-128x128.png><link rel=icon type=image/png sizes=16x16 href=./icons/favicon-16x16.png><link rel=icon type=image/png sizes=32x32 href=./icons/favicon-32x32.png><link rel=icon type=image/png sizes=96x96 href=./icons/favicon-96x96.png><link rel=icon type=image/ico href=./icons/favicon.ico><link rel=apple-touch-icon href=./icons/apple-icon-152x152.png><link rel=apple-touch-icon sizes=152x152 href=./icons/apple-icon-152x152.png><link rel=apple-touch-icon sizes=167x167 href=./icons/apple-icon-167x167.png><link rel=apple-touch-icon sizes=180x180 href=./icons/apple-icon-180x180.png>  <script type="module" crossorigin src="./assets/index-Dq0RjujM.js"></script>
  <link rel="stylesheet" crossorigin href="./assets/index-jjiyEA_O.css">
</head><body><div id=q-app></div></body></html>
[root@master241 ~]#
二.Traefik基础应用实战案例
1.创建测试服务
1.1 编写资源清单
[root@master241 ingressroutes]# cat 03-traefik-whoami.yaml
apiVersion: apps/v1
kind: Deployment
metadata:
  name: deploy-whoami
spec:
  replicas: 2
  selector:
    matchLabels:
      apps: whoami
  template:
    metadata:
      labels:
        apps: whoami
    spec:
      containers:
      - name: whoami
        image: docker.io/traefik/whoami:v1.11
        ports:
        - containerPort: 80

---

apiVersion: apps/v1
kind: Deployment
metadata:
  name: deploy-whoamitcp
spec:
  replicas: 2
  selector:
    matchLabels:
      apps: whoamitcp
  template:
    metadata:
      labels:
        apps: whoamitcp
    spec:
      containers:
      - name: whoamitcp
        image: docker.io/traefik/whoamitcp:v0.3
        ports:
        - containerPort: 8080

---

apiVersion: apps/v1
kind: Deployment
metadata:
  name: deploy-whoamiudp
spec:
  replicas: 2
  selector:
    matchLabels:
      apps: whoamiudp
  template:
    metadata:
      labels:
        apps: whoamiudp
    spec:
      containers:
      - name: whoamiudp
        image: docker.io/traefik/whoamiudp:v0.2
        ports:
        - containerPort: 8080
          protocol: UDP

---

apiVersion: v1
kind: Service
metadata:
  name: svc-whoami
spec:
  ports:
  - name: http
    port: 80
  selector:
    apps: whoami

---

apiVersion: v1
kind: Service
metadata:
  name: svc-whoamitcp
spec:
  ports:
  - name: tcp
    port: 8080
  selector:
    apps: whoamitcp

---

apiVersion: v1
kind: Service
metadata:
  name: svc-whoamiudp
spec:
  ports:
  - name: udp
    port: 8080
    protocol: UDP
  selector:
    apps: whoamiudp

[root@master241 ingressroutes]#
1.2 创建资源
	1.创建资源
[root@master241 ingressroutes]# kubectl apply -f  03-traefik-whoami.yaml
deployment.apps/deploy-whoami created
deployment.apps/deploy-whoamitcp created
deployment.apps/deploy-whoamiudp created
service/svc-whoami created
service/svc-whoamitcp created
service/svc-whoamiudp created
[root@master241 ingressroutes]#

	2查看资源状态
[root@master241 ingressroutes]# kubectl get deploy,svc,po
NAME                               READY   UP-TO-DATE   AVAILABLE   AGE
deployment.apps/deploy-whoami      2/2     2            2           3s
deployment.apps/deploy-whoamitcp   2/2     2            2           3s
deployment.apps/deploy-whoamiudp   2/2     2            2           3s

NAME                    TYPE        CLUSTER-IP       EXTERNAL-IP   PORT(S)    AGE
service/kubernetes      ClusterIP   10.192.0.1       <none>        443/TCP    18d
service/svc-whoami      ClusterIP   10.193.205.180   <none>        80/TCP     3s
service/svc-whoamitcp   ClusterIP   10.197.124.114   <none>        8080/TCP   3s
service/svc-whoamiudp   ClusterIP   10.192.173.146   <none>        8080/UDP   3s

NAME                                    READY   STATUS    RESTARTS   AGE
pod/deploy-whoami-6d7f9cf787-qvwqd      1/1     Running   0          3s
pod/deploy-whoami-6d7f9cf787-wzv7k      1/1     Running   0          3s
pod/deploy-whoamitcp-687ff54946-vkj7c   1/1     Running   0          3s
pod/deploy-whoamitcp-687ff54946-zlcfv   1/1     Running   0          3s
pod/deploy-whoamiudp-54d669f96c-5h4wt   1/1     Running   0          3s
pod/deploy-whoamiudp-54d669f96c-nd9wd   1/1     Running   0          3s
[root@master241 ingressroutes]#
2. 配置http路由规则之whoami案例
2.1 编写资源清单
[root@master241 ingressroutes]# cat 04-ingressroutes-whoami.yaml
apiVersion: traefik.io/v1alpha1
kind: IngressRoute
metadata:
  name: ingressroute-whoami
  namespace: default
spec:
  entryPoints:
  - web
  routes:
  - match: Host(`whoami.yinzhengjie.com`) && PathPrefix(`/`)
    kind: Rule
    services:
    - name: svc-whoami
      port: 80
[root@master241 ingressroutes]#
2.2 创建ingressroute资源
[root@master241 ingressroutes]# kubectl apply -f  04-ingressroutes-whoami.yaml
ingressroute.traefik.io/ingressroute-whoami created
[root@master241 ingressroutes]#
[root@master241 ingressroutes]# kubectl describe -f 04-ingressroutes-whoami.yaml
Name:         ingressroute-whoami
Namespace:    default
Labels:       <none>
Annotations:  <none>
API Version:  traefik.io/v1alpha1
Kind:         IngressRoute
Metadata:
  Creation Timestamp:  2025-06-04T07:07:22Z
  Generation:          1
  Resource Version:    1829176
  UID:                 18f95e42-4c99-452e-bcdf-73bedd612a55
Spec:
  Entry Points:
    web
  Routes:
    Kind:   Rule
    Match:  Host(`whoami.yinzhengjie.com`) && PathPrefix(`/`)
    Services:
      Name:  svc-whoami
      Port:  80
Events:      <none>
[root@master241 ingressroutes]#
2.3 访问测试
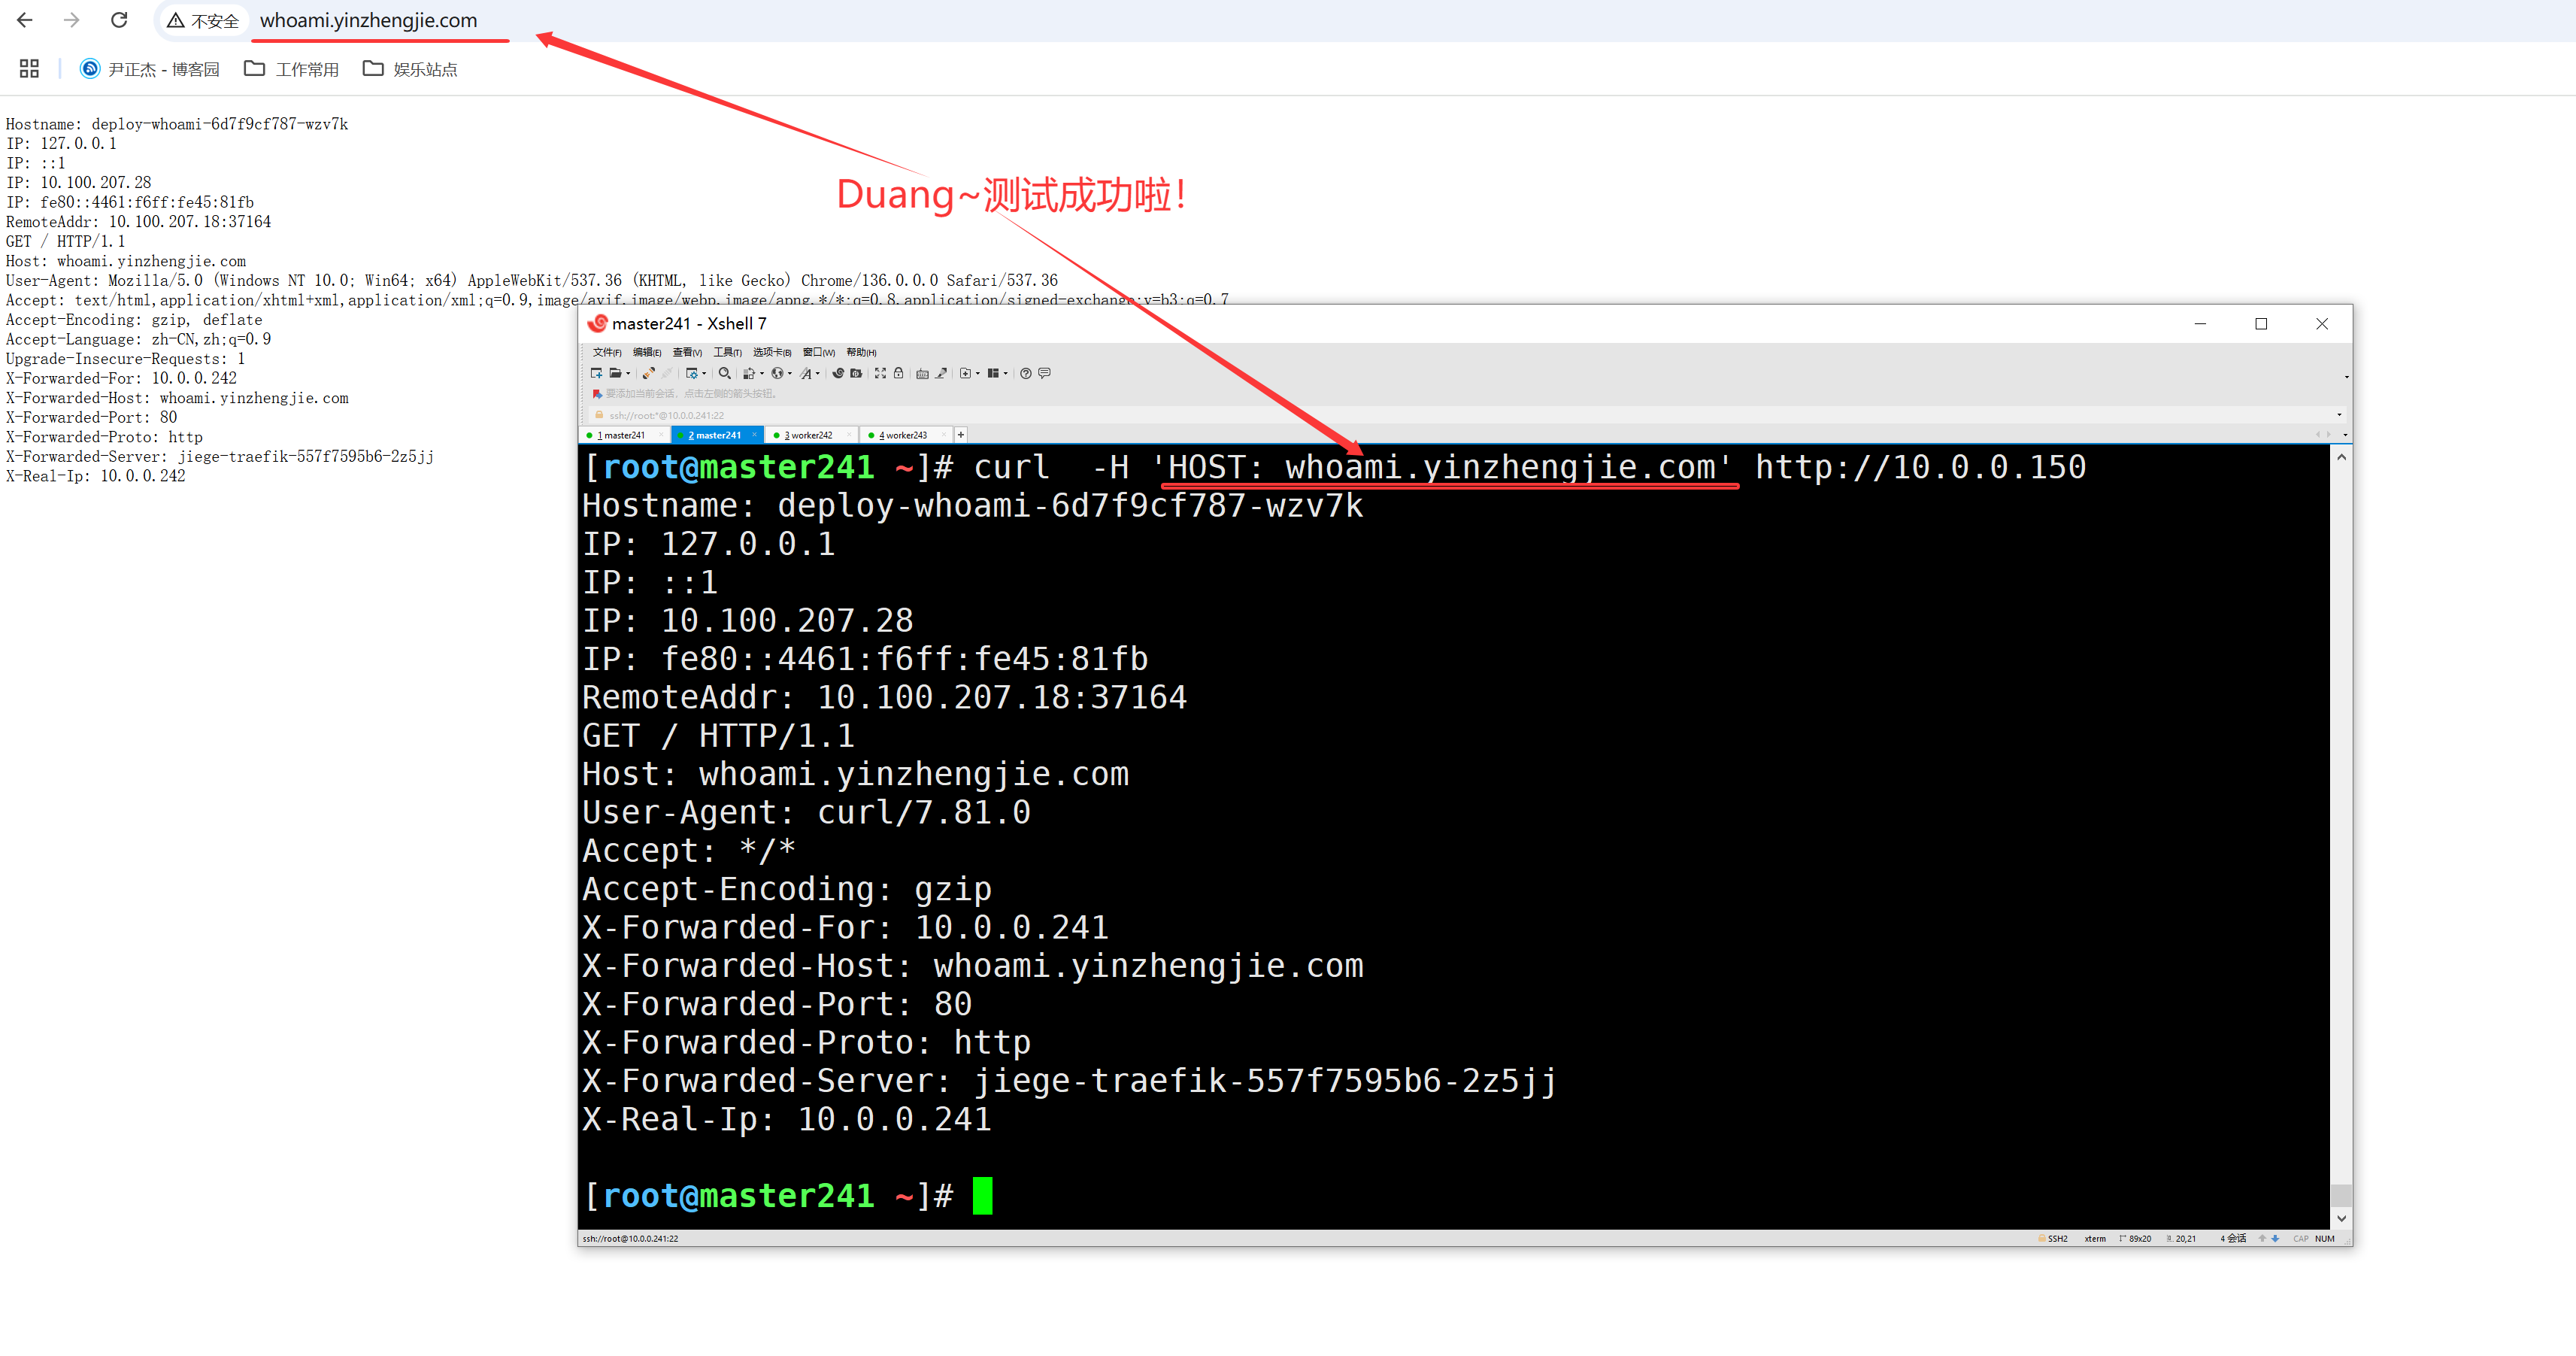
[root@master241 ~]# curl  -H 'HOST: whoami.yinzhengjie.com' http://10.0.0.150
Hostname: deploy-whoami-6d7f9cf787-qvwqd
IP: 127.0.0.1
IP: ::1
IP: 10.100.165.143
IP: fe80::34ac:efff:fe22:357d
RemoteAddr: 10.100.207.18:60884
GET / HTTP/1.1
Host: whoami.yinzhengjie.com
User-Agent: curl/7.81.0
Accept: */*
Accept-Encoding: gzip
X-Forwarded-For: 10.0.0.241
X-Forwarded-Host: whoami.yinzhengjie.com
X-Forwarded-Port: 80
X-Forwarded-Proto: http
X-Forwarded-Server: jiege-traefik-557f7595b6-2z5jj
X-Real-Ip: 10.0.0.241

[root@master241 ~]#
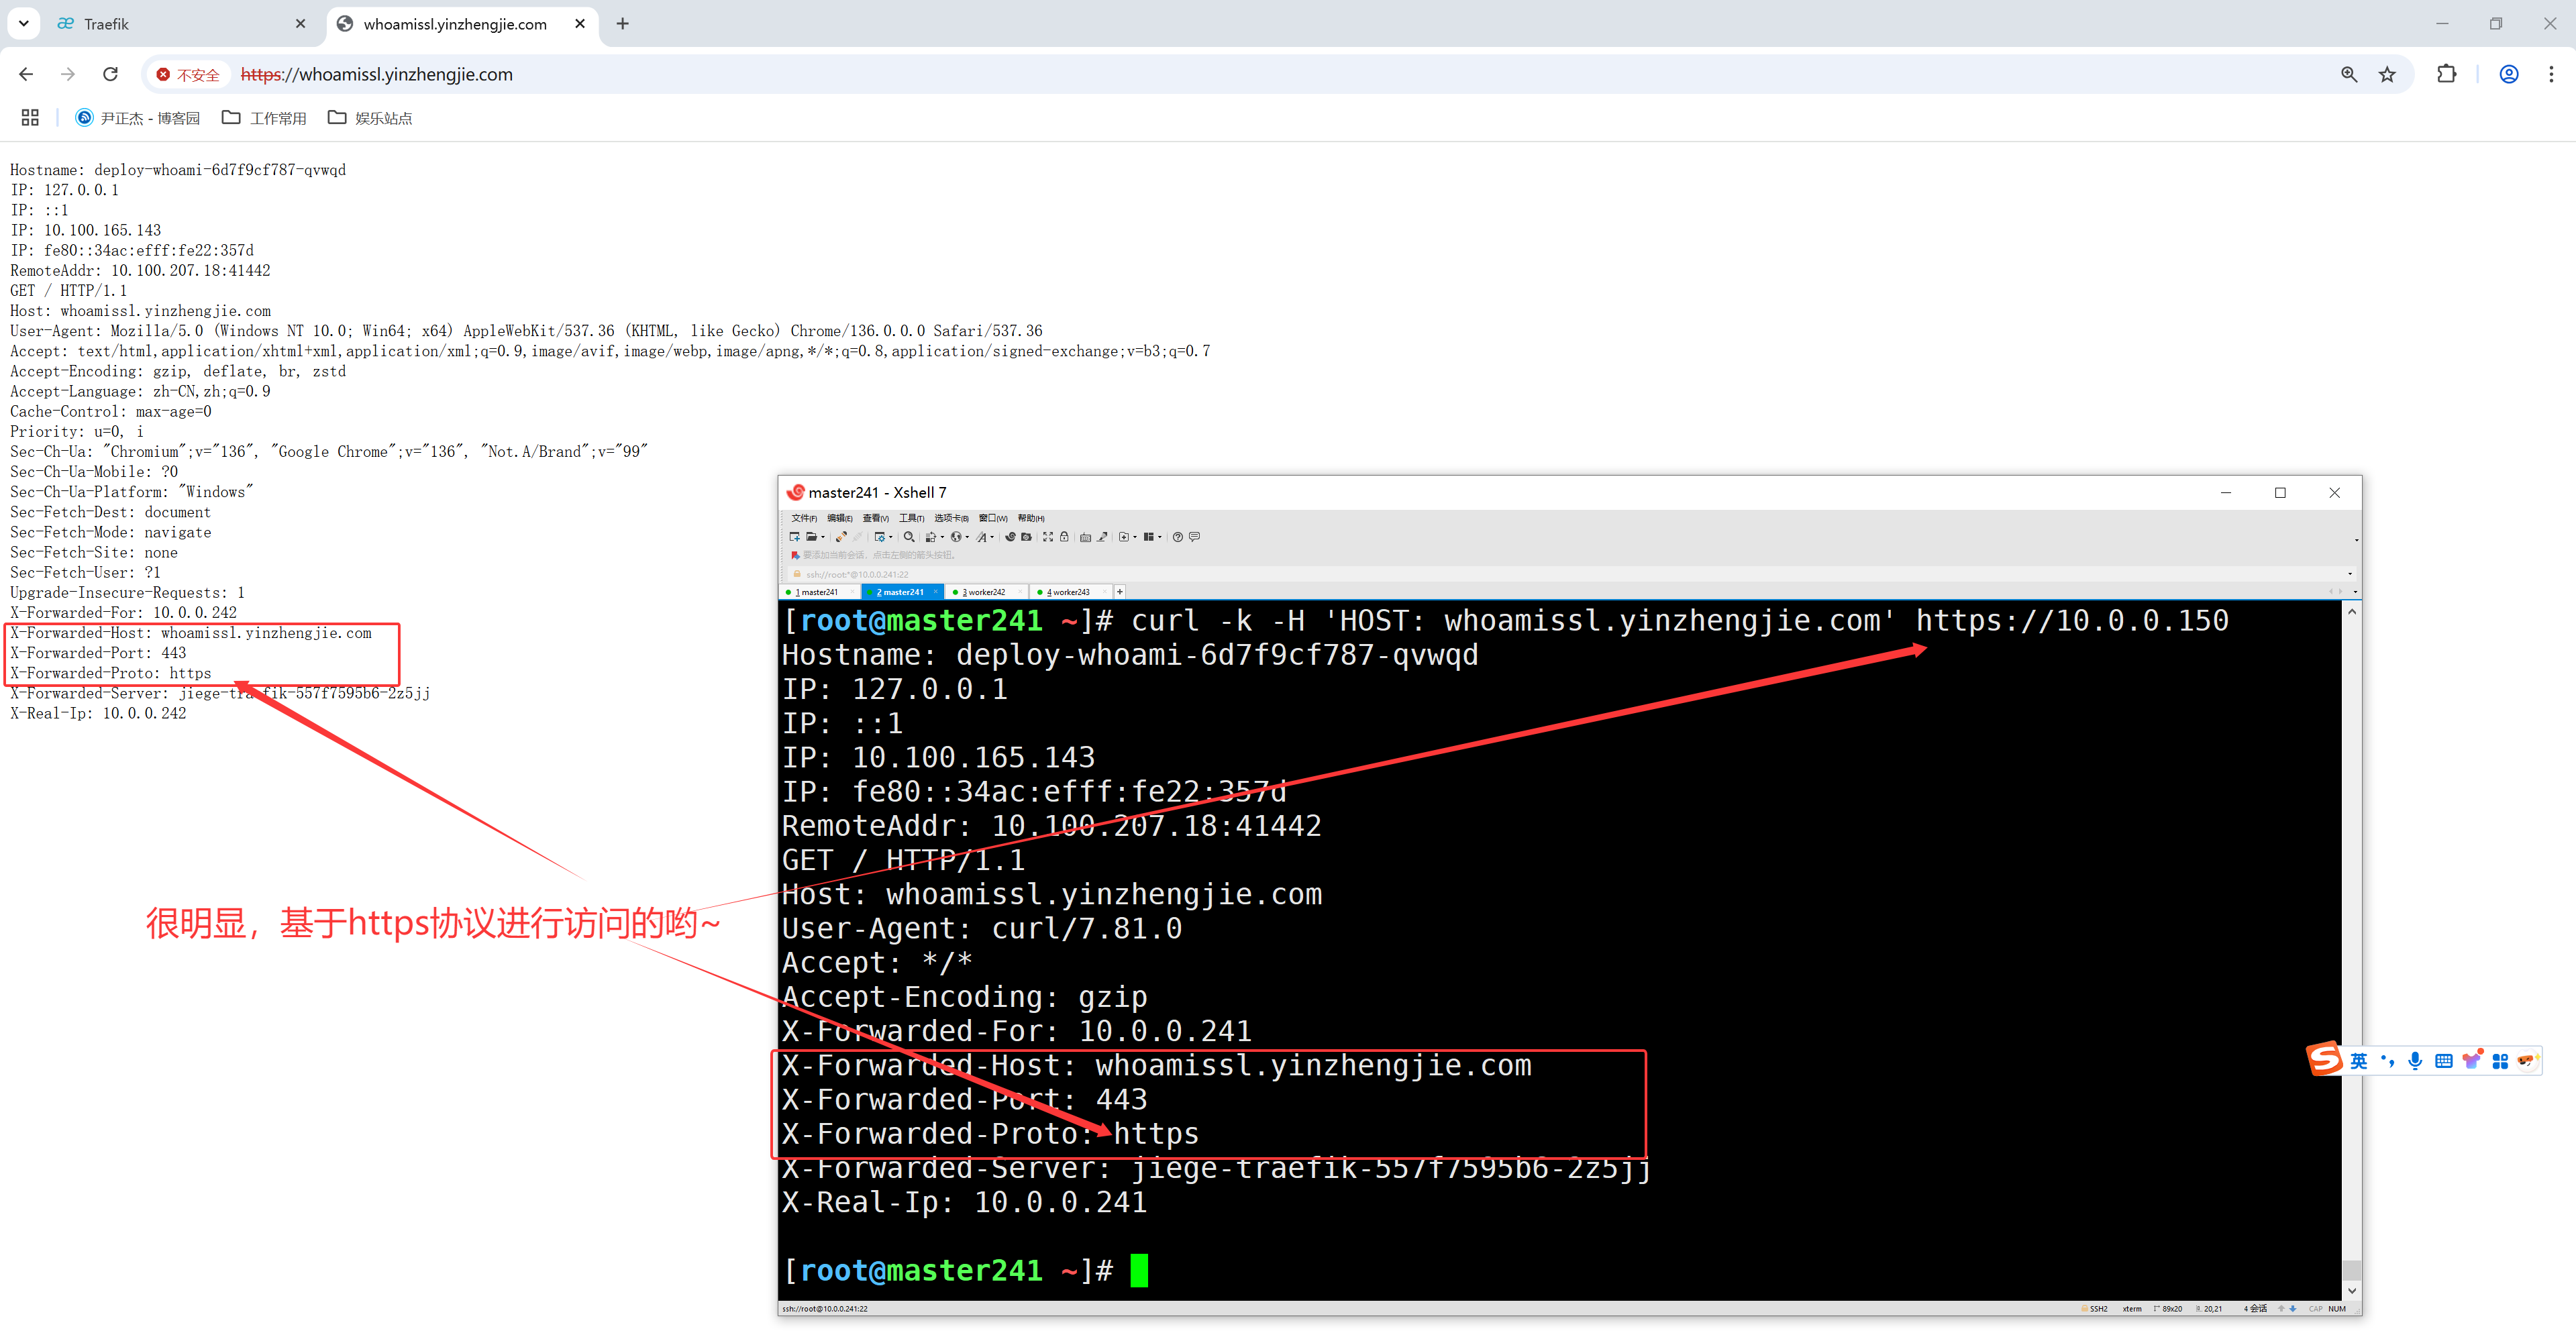
3.配置https路由规则之whoami案例
3.1 配置https路由规则注意事项
如果我们需要使用https来访问我们这个应用的话,就需要监听websecure这个入口点,也就是通过443端口来访问。

用HTTPS访问应用必然就需要证书,这个证书可以是自签证书,也可以是权威机构颁发的证书。
3.2 创建证书并封装为secret资源
	1.使用openssl自建证书
[root@master241 ingressroutes]# openssl req -x509 -nodes -days 365 --newkey rsa:2048 -keyout tls.key -out tls.crt -subj "/CN=whoamissl.yinzhengjie.com"


	2.查看生成的证书文件
[root@master241 ingressroutes]# ll tls.*
-rw-r--r-- 1 root root 1155 Jun  4 15:15 tls.crt
-rw------- 1 root root 1704 Jun  4 15:15 tls.key
[root@master241 ingressroutes]#


	3.将证书封装为secrets资源
[root@master241 ingressroutes]# kubectl create secret tls whoami-tls --cert=tls.crt --key=tls.key
secret/whoami-tls created
[root@master241 ingressroutes]#
[root@master241 ingressroutes]# kubectl get secrets whoami-tls
NAME         TYPE                DATA   AGE
whoami-tls   kubernetes.io/tls   2      5s
[root@master241 ingressroutes]#
3.3 创建https应用路由规则并访问测试
[root@master241 ingressroutes]# cat 05-ingressroutes-whoami-https.yaml
apiVersion: traefik.io/v1alpha1
kind: IngressRoute
metadata:
  name: ingressroute-whoami-https
  namespace: default
spec:
  tls:
    secretName: whoami-tls
  entryPoints:
  - websecure
  routes:
  - match: Host(`whoamissl.yinzhengjie.com`)
    kind: Rule
    services:
    - name: svc-whoami
      port: 80
[root@master241 ingressroutes]#
[root@master241 ingressroutes]# kubectl apply -f  05-ingressroutes-whoami-https.yaml
ingressroute.traefik.io/ingressroute-whoami-https created
[root@master241 ingressroutes]#
[root@master241 ingressroutes]# kubectl describe -f 05-ingressroutes-whoami-https.yaml
Name:         ingressroute-whoami-https
Namespace:    default
Labels:       <none>
Annotations:  <none>
API Version:  traefik.io/v1alpha1
Kind:         IngressRoute
Metadata:
  Creation Timestamp:  2025-06-04T07:37:37Z
  Generation:          1
  Resource Version:    1832902
  UID:                 527197a1-e3a1-4408-a5e2-17627b0d4e52
Spec:
  Entry Points:
    websecure
  Routes:
    Kind:   Rule
    Match:  Host(`whoamissl.yinzhengjie.com`)
    Services:
      Name:  svc-whoami
      Port:  80
  Tls:
    Secret Name:  whoami-tls
Events:           <none>
[root@master241 ingressroutes]#
4.配置tcp路由规则之MySQL案例
4.1 配置tcp路由规则注意事项
SNI为服务名称标识,是TLS协议的扩展,因此,只有TLS路由才能使用该规则指定域名。

但是,非TLS路由必须带有"*"(所有域)的规则来声明每个非TLS请求都将由路由进行处理。
4.2 重新部署Traefik
	1.修改values.yaml配置文件【目的是为了添加'entryPoints'】
[root@master241 traefik]# vim  traefik/values.yaml
...
ports:
  mysql:
    port: 3306


    2.卸载Traefik服务
[root@master241 traefik]# helm -n kube-public uninstall jiege-traefik


    3.安装Traefik服务
[root@master241 traefik]# helm install jiege-traefik traefik -n kube-public
4.3 部署MySQL
[root@master241 ingressroutes]# cat 06-deploy-mysql.yaml
apiVersion: apps/v1
kind: Deployment
metadata:
  name: deploy-mysql
spec:
  replicas: 1
  selector:
    matchLabels:
      apps: mysql
  template:
    metadata:
      labels:
        apps: mysql
    spec:
      containers:
      - image: docker.io/library/mysql:8.0.36-oracle
        name: db
        ports:
        - containerPort: 3306
        env:
        - name: MYSQL_DATABASE
          value: wordpress
        - name: MYSQL_ALLOW_EMPTY_PASSWORD
          value: "yes"
        - name: MYSQL_USER
          value: admin
        - name: MYSQL_PASSWORD
          value: yinzhengjie
        args:
        - --character-set-server=utf8
        - --collation-server=utf8_bin
        - --default-authentication-plugin=mysql_native_password

---

apiVersion: v1
kind: Service
metadata:
  name: svc-mysql
spec:
  ports:
  - port: 3306
  selector:
    apps: mysql
[root@master241 ingressroutes]#
[root@master241 ingressroutes]# kubectl apply -f  06-deploy-mysql.yaml
deployment.apps/deploy-mysql created
service/svc-mysql created
[root@master241 ingressroutes]#
4.4 创建路由规则
1.编写路由规则
[root@master241 ingressroutes]# cat 07-IngressRouteTCP-mysql.yaml
apiVersion: traefik.io/v1alpha1
kind: IngressRouteTCP
metadata:
name: ingressroutetcp-mysql
namespace: default
spec:
# 使用自己定义的entryPoint。
entryPoints:
- mysql
routes:
- match: HostSNI(`*`)
services:
- name: svc-mysql
port: 3306
[root@master241 ingressroutes]#
2.创建路由规则
[root@master241 ingressroutes]# kubectl apply -f 07-IngressRouteTCP-mysql.yaml
ingressroutetcp.traefik.io/ingressroutetcp-mysql created
[root@master241 ingressroutes]#
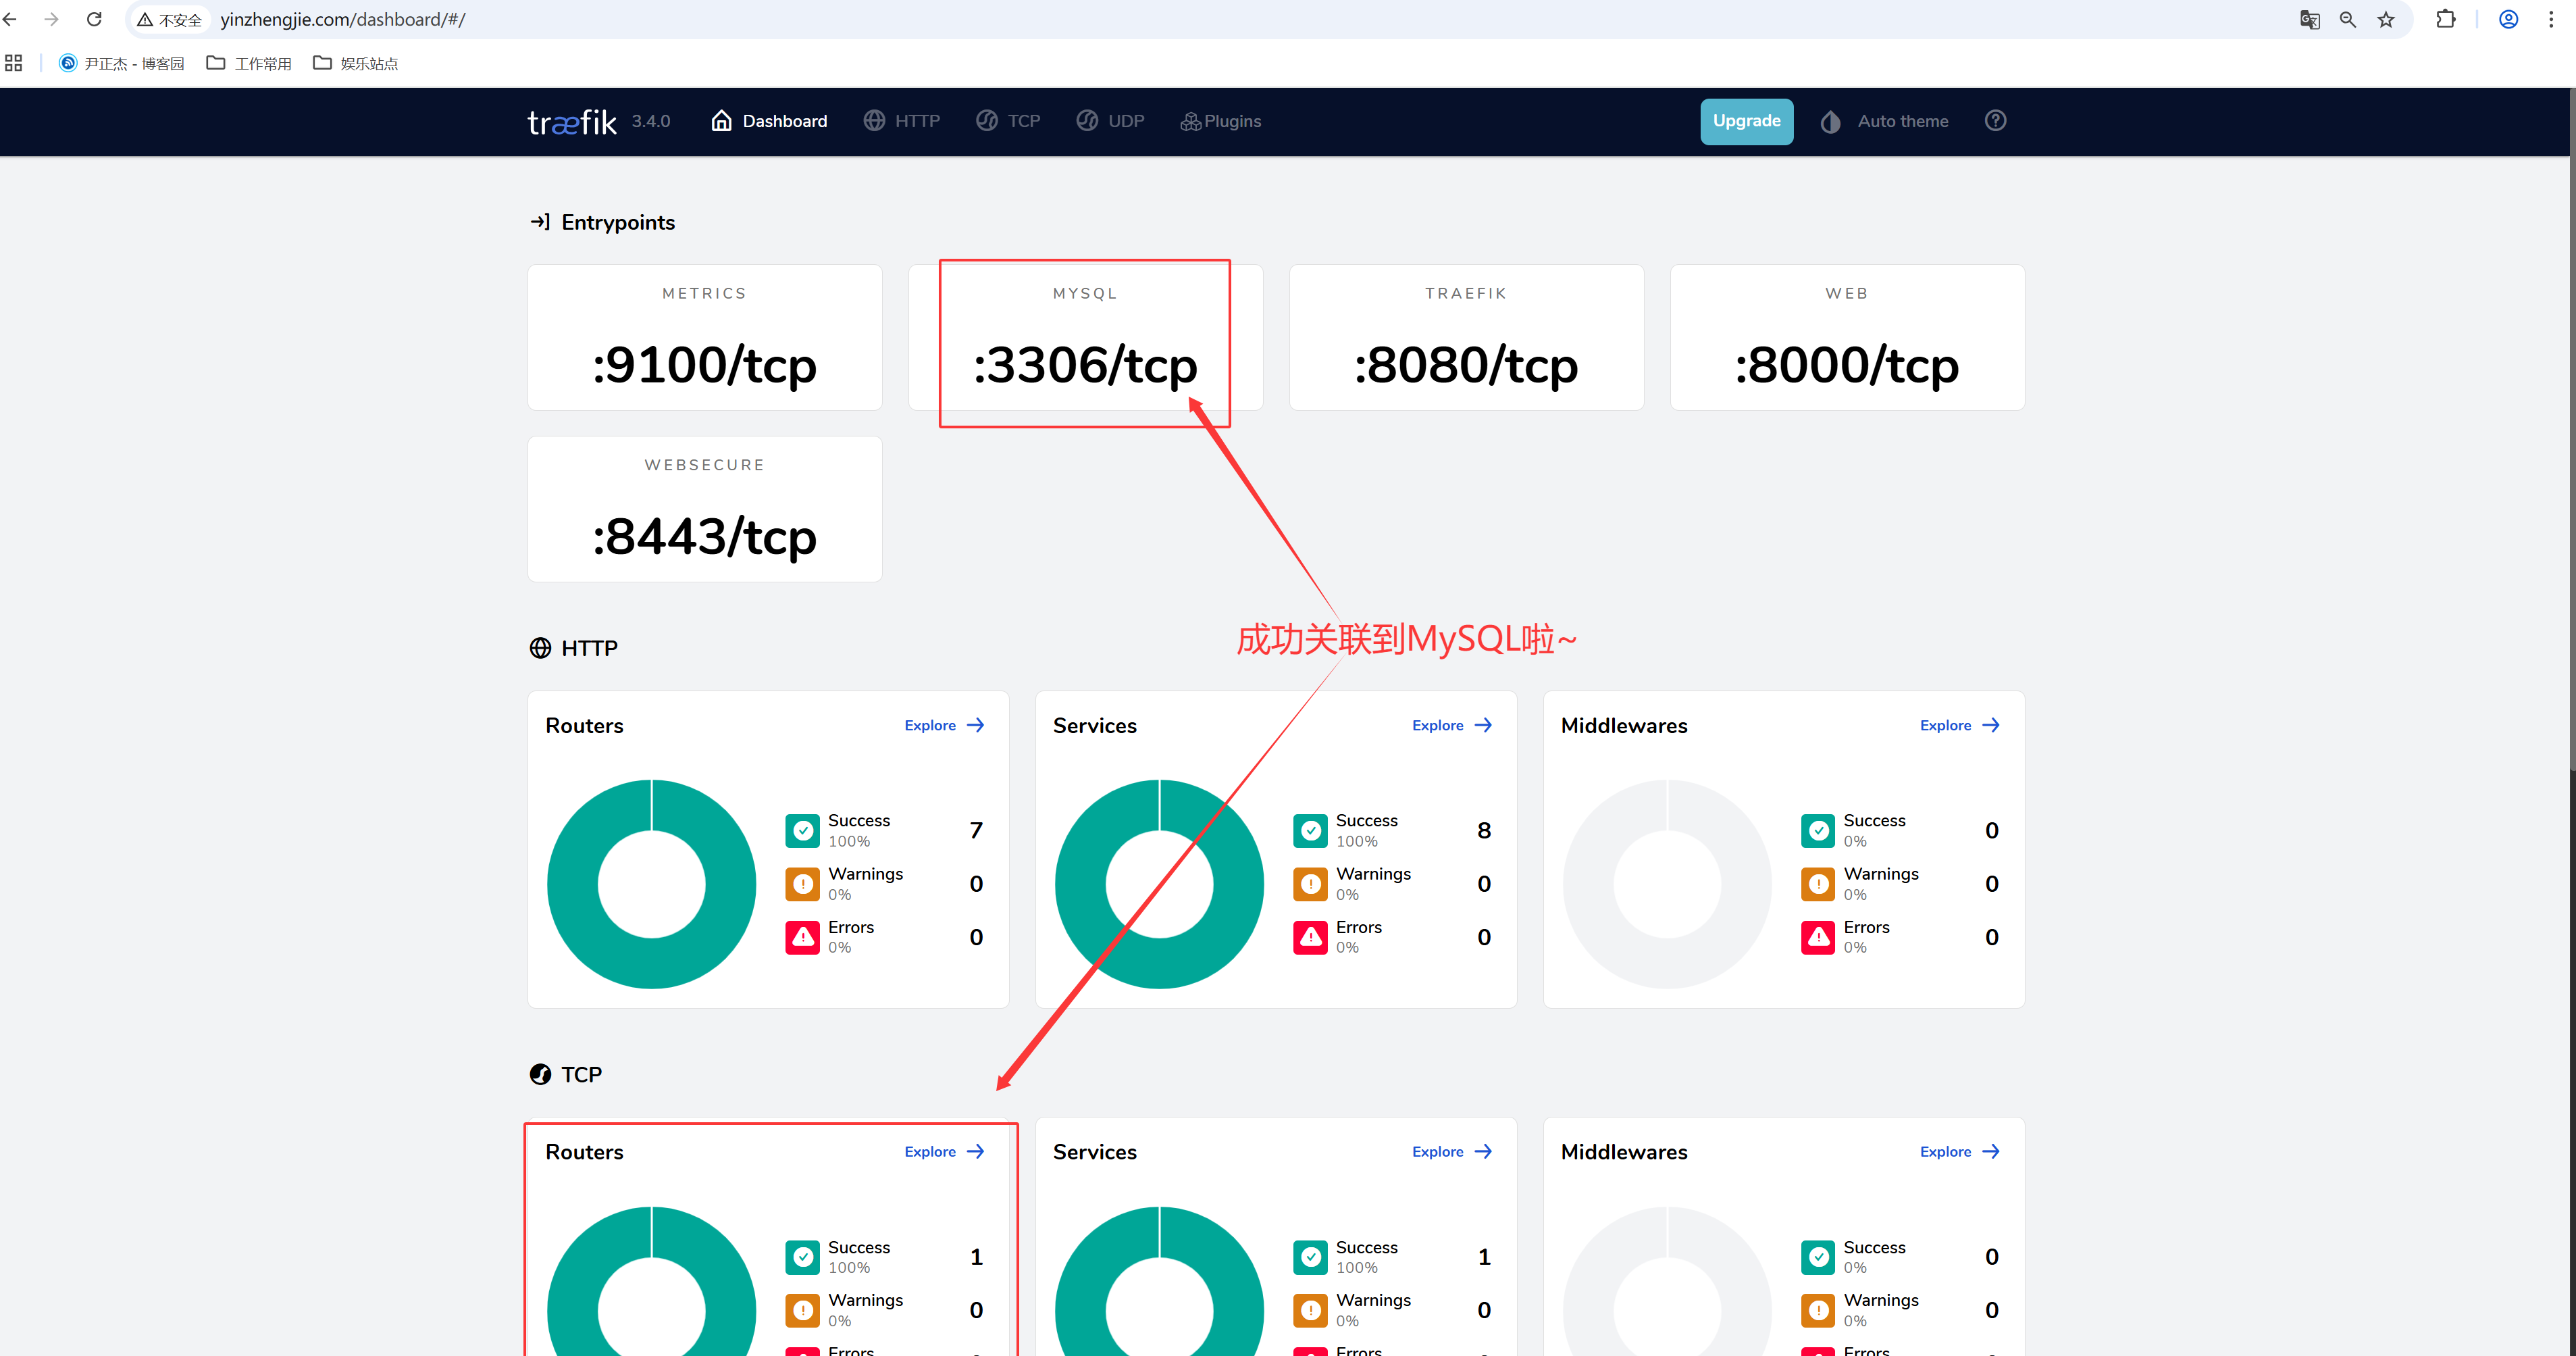
3.查看路由规则(如上图所示)
[root@master241 ingressroutes]# kubectl describe -f 07-IngressRouteTCP-mysql.yaml
Name: ingressroutetcp-mysql
Namespace: default
Labels: <none>
Annotations: <none>
API Version: traefik.io/v1alpha1
Kind: IngressRouteTCP
Metadata:
Creation Timestamp: 2025-06-04T10:51:10Z
Generation: 1
Resource Version: 1857200
UID: 5f5a6895-e0b3-473c-8a51-cbef7cc44dbf
Spec:
Entry Points:
mysql
Routes:
Match: HostSNI(`*`)
Services:
Name: svc-mysql
Port: 3306
Events: <none>
[root@master241 ingressroutes]#
4.5 访问测试
	1.添加hosts解析到Traefik的svc
[root@worker242 ~]# echo 10.0.0.150 mysql.yinzhengjie.com >> /etc/hosts
[root@worker242 ~]# tail -1 /etc/hosts
10.0.0.150 mysql.yinzhengjie.com
[root@worker242 ~]#


	2.修改svc
[root@master241 ingressroutes]# kubectl -n kube-public edit svc  jiege-traefik
...
spec:
  ...
  ports:
  - name: mysql
    port: 3306


	3.使用telnet测试【发现无法联通】
[root@worker242 ~]# telnet mysql.yinzhengjie.com 3306
Trying 10.0.0.150...
Connected to mysql.yinzhengjie.com.
Escape character is '^]'.
J
8.0.3<3pfdqLÿS V=X/2HK]uFmysql_native_password


	4.安装MySQL
[root@worker242 ~]# apt -y install mysql-client-core-8.0

	5.写入测试数据
[root@worker242 ~]# mysql -h mysql.yinzhengjie.com -u admin -pyinzhengjie -P3306
mysql: [Warning] Using a password on the command line interface can be insecure.
Welcome to the MySQL monitor.  Commands end with ; or \g.
Your MySQL connection id is 9
Server version: 8.0.36 MySQL Community Server - GPL

Copyright (c) 2000, 2025, Oracle and/or its affiliates.

Oracle is a registered trademark of Oracle Corporation and/or its
affiliates. Other names may be trademarks of their respective
owners.

Type 'help;' or '\h' for help. Type '\c' to clear the current input statement.

mysql> SHOW DATABASES;
+--------------------+
| Database           |
+--------------------+
| information_schema |
| performance_schema |
| wordpress          |
+--------------------+
3 rows in set (0.00 sec)

mysql> USE wordpreess;
ERROR 1044 (42000): Access denied for user 'admin'@'%' to database 'wordpreess'
mysql>
mysql> use wordpress
Database changed
mysql> CREATE TABLE teacher(id INT PRIMARY KEY AUTO_INCREMENT,name VARCHAR(255) NOT NULL,hobby VARCHAR(255) NOT NULL);
Query OK, 0 rows affected (0.02 sec)

mysql> INSERT INTO teacher(name,hobby) VALUES ('JasonYin','https://www.cnblogs.com/yinzhengjie');
Query OK, 1 row affected (0.02 sec)

mysql>
mysql> SHOW TABLES;
+---------------------+
| Tables_in_wordpress |
+---------------------+
| teacher             |
+---------------------+
1 row in set (0.01 sec)

mysql> SELECT * FROM teacher;
+----+----------+-------------------------------------+
| id | name     | hobby                               |
+----+----------+-------------------------------------+
|  1 | JasonYin | https://www.cnblogs.com/yinzhengjie |
+----+----------+-------------------------------------+
1 row in set (0.01 sec)

mysql>


	6.服务端测试
[root@master241 ingressroutes]# kubectl get pods -o wide -l apps=mysql
NAME                            READY   STATUS    RESTARTS   AGE   IP              NODE        NOMINATED NODE   READINESS GATES
deploy-mysql-54bd4b775f-5nns7   1/1     Running   0          12m   10.100.207.37   worker243   <none>           <none>
[root@master241 ingressroutes]#
[root@master241 ingressroutes]# kubectl exec -it deploy-mysql-54bd4b775f-5nns7 -- mysql wordpress
Reading table information for completion of table and column names
You can turn off this feature to get a quicker startup with -A

Welcome to the MySQL monitor.  Commands end with ; or \g.
Your MySQL connection id is 11
Server version: 8.0.36 MySQL Community Server - GPL

Copyright (c) 2000, 2024, Oracle and/or its affiliates.

Oracle is a registered trademark of Oracle Corporation and/or its
affiliates. Other names may be trademarks of their respective
owners.

Type 'help;' or '\h' for help. Type '\c' to clear the current input statement.

mysql> SHOW TABLES;
+---------------------+
| Tables_in_wordpress |
+---------------------+
| teacher             |
+---------------------+
1 row in set (0.01 sec)

mysql> SELECT * FROM teacher;
+----+----------+-------------------------------------+
| id | name     | hobby                               |
+----+----------+-------------------------------------+
|  1 | JasonYin | https://www.cnblogs.com/yinzhengjie |
+----+----------+-------------------------------------+
1 row in set (0.00 sec)

mysql>
5.配置tcp路由规则之Redis案例
5.1 部署Redis
	1.编写资源清单
[root@master241 ingressroutes]# cat 08-deploy-redis.yaml
apiVersion: apps/v1
kind: Deployment
metadata:
  name: deploy-redis
spec:
  replicas: 1
  selector:
    matchLabels:
      apps: redis
  template:
    metadata:
      labels:
        apps: redis
    spec:
      containers:
      - image: docker.io/library/redis:7.2.8-alpine3.21
        name: db
        ports:
        - containerPort: 6379

---

apiVersion: v1
kind: Service
metadata:
  name: svc-redis
spec:
  ports:
  - port: 6379
  selector:
    apps: redis
[root@master241 ingressroutes]#

	2.创建redis
[root@master241 ingressroutes]# kubectl apply -f  08-deploy-redis.yaml
deployment.apps/deploy-redis created
service/svc-redis created
[root@master241 ingressroutes]#
[root@master241 ingressroutes]# kubectl get pods -l apps==redis
NAME                           READY   STATUS    RESTARTS   AGE
deploy-redis-898d9d6dd-5dvll   1/1     Running   0          7s
[root@master241 ingressroutes]#
[root@master241 ingressroutes]# kubectl get pods -l apps=redis -o wide
NAME                           READY   STATUS    RESTARTS   AGE   IP              NODE        NOMINATED NODE   READINESS GATES
deploy-redis-898d9d6dd-5dvll   1/1     Running   0          16s   10.100.207.34   worker243   <none>           <none>
[root@master241 ingressroutes]#
5.2 重新部署Traefik
	1.修改values.yaml配置文件【目的是为了添加'entryPoints'】
[root@master241 traefik]# vim  traefik/values.yaml
...
ports:
  redis:
    port: 6379

service:
  spec:
    ports:
    - name: redis
      port: 6379


    2.卸载Traefik服务
[root@master241 traefik]# helm -n kube-public uninstall jiege-traefik


    3.安装Traefik服务
[root@master241 traefik]# helm install jiege-traefik traefik -n kube-public
5.3 创建路由规则

	1.编写路由规则
[root@master241 ingressroutes]# cat 09-IngressRouteTCP-redis.yaml
apiVersion: traefik.io/v1alpha1
kind: IngressRouteTCP
metadata:
  name: ingressroutetcp-redis
  namespace: default
spec:
  # 使用自己定义的entryPoint。
  entryPoints:
  - redis
  routes:
  - match: HostSNI(`*`)
    services:
    - name: svc-redis
      port: 6379
[root@master241 ingressroutes]#

	2.创建资源
[root@master241 ingressroutes]# kubectl apply -f 09-IngressRouteTCP-redis.yaml
ingressroutetcp.traefik.io/ingressroutetcp-redis created
[root@master241 ingressroutes]#
[root@master241 ingressroutes]# kubectl describe -f 09-IngressRouteTCP-redis.yaml
Name:         ingressroutetcp-redis
Namespace:    default
Labels:       <none>
Annotations:  <none>
API Version:  traefik.io/v1alpha1
Kind:         IngressRouteTCP
Metadata:
  Creation Timestamp:  2025-06-04T10:21:44Z
  Generation:          1
  Resource Version:    1853452
  UID:                 4ffd6093-1d3e-4e6c-b154-c145380262e3
Spec:
  Entry Points:
    redis
  Routes:
    Match:  HostSNI(`*`)
    Services:
      Name:  svc-redis
      Port:  6379
Events:      <none>
[root@master241 ingressroutes]#


	3.访问WebUI
如上图所示,可以查看到我们写的路由关联到对应的Pod啦~
5.4 客户端访问测试
	1.k8s修改Traefik的svc解析记录
[root@master241 ingressroutes]# kubectl -n kube-public edit svc  jiege-traefik
...
spec:
  ...
  ports:
  - name: mysql
    nodePort: 31791
    port: 3306
    protocol: TCP
    targetPort: 3306
  - name: redis
    port: 6379
    ...
[root@master241 ingressroutes]# kubectl -n kube-public get svc  jiege-traefik
NAME            TYPE           CLUSTER-IP      EXTERNAL-IP   PORT(S)                                                    AGE
jiege-traefik   LoadBalancer   10.198.123.18   10.0.0.150    3306:31791/TCP,6379:31392/TCP,80:31292/TCP,443:31121/TCP   31m
[root@master241 ingressroutes]#


	2.安装redis客户端
[root@worker243 ~]# apt -y install redis

	3.添加hosts解析
[root@worker243 ~]# tail -1 /etc/hosts
10.0.0.150 redis.yinzhengjie.com
[root@worker243 ~]#

	4.连通性测试
[root@worker243 ~]# telnet redis.yinzhengjie.com 6379
Trying 10.0.0.150...
Connected to redis.yinzhengjie.com.
Escape character is '^]'.

	5.使用redis链接测试
[root@worker243 ~]# redis-cli -h redis.yinzhengjie.com
redis.yinzhengjie.com:6379> KEYS *
(empty array)
redis.yinzhengjie.com:6379> SET blog https://www.cnblogs.com/yinzhengjie
OK
redis.yinzhengjie.com:6379> set auther yinzhengjie
OK
redis.yinzhengjie.com:6379> KEYS *
1) "auther"
2) "blog"
redis.yinzhengjie.com:6379>
5.5 服务端测试验证
	1.查看pod列表
[root@master241 ingressroutes]# kubectl get pods -o wide -l apps=redis
NAME                           READY   STATUS    RESTARTS   AGE   IP              NODE        NOMINATED NODE   READINESS GATES
deploy-redis-898d9d6dd-5dvll   1/1     Running   0          47m   10.100.207.34   worker243   <none>           <none>
[root@master241 ingressroutes]#

	2.链接redis测试【发现服务端数据正常写入】
[root@master241 ingressroutes]# kubectl exec -it deploy-redis-898d9d6dd-5dvll -- redis-cli
127.0.0.1:6379> KEYS *
1) "auther"
2) "blog"
127.0.0.1:6379> get auther
"yinzhengjie"
127.0.0.1:6379>
127.0.0.1:6379> get blog
"https://www.cnblogs.com/yinzhengjie"
127.0.0.1:6379>
127.0.0.1:6379>
6.配置TCP路由规则之whoamitcp
6.1 重新部署Traefik
	1.修改values.yaml配置文件【目的是为了添加'entryPoints'】
[root@master241 traefik]# vim  traefik/values.yaml
...
ports:
 tcpcase:
   port: 8082  # 注意哈,端口不能和其他的entryPoints端口重复,否则会启动失败。
   protocol: TCP
...

    2.卸载Traefik服务
[root@master241 traefik]# helm -n kube-public uninstall jiege-traefik


    3.安装Traefik服务
[root@master241 traefik]# helm install jiege-traefik traefik -n kube-public
6.2 创建路由规则
	1.编写资源年轻的
[root@master241 ingressroutes]# cat 10-IngressRouteTCP-whoamitcp.yaml
apiVersion: traefik.io/v1alpha1
kind: IngressRouteTCP
metadata:
  name: ingressroutetcp-whoamitcp
  namespace: default
spec:
  entryPoints:
  - tcpcase
  routes:
  - match: HostSNI(`*`)
    services:
    - name: svc-whoamitcp
      port: 8080
[root@master241 ingressroutes]#


	2.创建资源
[root@master241 ingressroutes]# kubectl apply -f  10-IngressRouteTCP-whoamitcp.yaml
ingressroutetcp.traefik.io/ingressroutetcp-whoamitcp created
[root@master241 ingressroutes]#
[root@master241 ingressroutes]# kubectl describe -f 10-IngressRouteTCP-whoamitcp.yaml
Name:         ingressroutetcp-whoamitcp
Namespace:    default
Labels:       <none>
Annotations:  <none>
API Version:  traefik.io/v1alpha1
Kind:         IngressRouteTCP
Metadata:
  Creation Timestamp:  2025-06-05T02:37:45Z
  Generation:          1
  Resource Version:    1974232
  UID:                 4016a8f9-9968-4701-aa30-f3f34a9aa795
Spec:
  Entry Points:
    tcpcase
  Routes:
    Match:  HostSNI(`*`)
    Services:
      Name:  svc-whoamitcp
      Port:  8080
Events:      <none>
[root@master241 ingressroutes]#
6.3 测试验证
	1.查看whoamitcp的svc的ClusterIP
[root@master241 ingressroutes]# kubectl get svc svc-whoamitcp
NAME            TYPE        CLUSTER-IP       EXTERNAL-IP   PORT(S)    AGE
svc-whoamitcp   ClusterIP   10.197.124.114   <none>        8080/TCP   19h
[root@master241 ingressroutes]#


	2.安装socat测试工具
[root@worker243 ~]# apt -y install socat


	3.访问测试
[root@worker243 ~]# echo "WHO" | nc 10.197.124.114 8080
Hostname: deploy-whoamitcp-687ff54946-vkj7c
IP: 127.0.0.1
IP: ::1
IP: 10.100.207.30
IP: fe80::90f4:bdff:fe8c:9ccc
^C
[root@worker243 ~]#
[root@worker243 ~]# echo "https://www.cnblogs.com/yinzhengjie" | nc 10.197.124.114 8080
Received: https://www.cnblogs.com/yinzhengjie
^C
[root@worker243 ~]#
7.配置UDP路由规则之whoamiudp
7.1 重新部署Traefik
	1.修改values.yaml配置文件【目的是为了添加'entryPoints'】
[root@master241 traefik]# vim  traefik/values.yaml
...
ports:
 udpcase:
   port: 8081
   protocol: UDP
...

    2.卸载Traefik服务
[root@master241 traefik]# helm -n kube-public uninstall jiege-traefik


    3.安装Traefik服务
[root@master241 traefik]# helm install jiege-traefik traefik -n kube-public
7.2 创建路由规则
	1.编写资源清单
[root@master241 ingressroutes]# cat 11-IngressRouteUDP-whoamiudp.yaml
apiVersion: traefik.io/v1alpha1
kind: IngressRouteUDP
metadata:
  name: ingressroutetcp-whoamiudp
  namespace: default
spec:
  entryPoints:
  - udpcase
  routes:
  - services:
    - name: svc-whoamiudp
      port: 8080
[root@master241 ingressroutes]#


	2.创建UDP路由规则
[root@master241 ingressroutes]# kubectl apply -f  11-IngressRouteUDP-whoamiudp.yaml
ingressrouteudp.traefik.io/ingressroutetcp-whoamiudp created
[root@master241 ingressroutes]#
[root@master241 ingressroutes]# kubectl describe -f 11-IngressRouteUDP-whoamiudp.yaml
Name:         ingressroutetcp-whoamiudp
Namespace:    default
Labels:       <none>
Annotations:  <none>
API Version:  traefik.io/v1alpha1
Kind:         IngressRouteUDP
Metadata:
  Creation Timestamp:  2025-06-05T02:25:03Z
  Generation:          1
  Resource Version:    1972587
  UID:                 5c11d4a4-355e-4250-a5cd-7147d06f59ac
Spec:
  Entry Points:
    udpcase
  Routes:
    Services:
      Name:  svc-whoamiudp
      Port:  8080
Events:      <none>
[root@master241 ingressroutes]#
7.3 测试验证
	1.查看whoamiudp的svc的ClusterIP
[root@master241 ingressroutes]# kubectl get svc svc-whoamiudp
NAME            TYPE        CLUSTER-IP       EXTERNAL-IP   PORT(S)    AGE
svc-whoamiudp   ClusterIP   10.192.173.146   <none>        8080/UDP   19h
[root@master241 ingressroutes]#


	2.安装socat测试工具
[root@worker242 ~]# apt -y install socat


	3.访问测试
[root@worker242 ~]# echo "WHO" | socat - udp4-datagram:10.192.173.146:8080
Hostname: deploy-whoamiudp-54d669f96c-nd9wd
IP: 127.0.0.1
IP: ::1
IP: 10.100.207.29
IP: fe80::d0e9:5fff:fe03:73c8
[root@worker242 ~]#
[root@worker242 ~]# echo "https://www.cnblogs.com/yinzhengjie" | socat - udp4-datagram:10.192.173.146:8080
Received: https://www.cnblogs.com/yinzhengjie
[root@worker242 ~]#
三.配置权威机构证书之K8S dashboard路由规则[TODO]
1.部署dashboard
1.添加远程仓库
helm repo add kubernetes-dashboard https://kubernetes.github.io/dashboard/
2.更新仓库
[root@master241 ~]# helm repo update
Hang tight while we grab the latest from your chart repositories...
...Successfully got an update from the "kubernetes-dashboard" chart repository
...Successfully got an update from the "traefik" chart repository
Update Complete. ⎈Happy Helming!⎈
[root@master241 ~]#
3.搜索
[root@master241 ~]# helm search repo dashboard -l | head
NAME CHART VERSION APP VERSION DESCRIPTION
kubernetes-dashboard/kubernetes-dashboard 7.13.0 General-purpose web UI for Kubernetes clusters
kubernetes-dashboard/kubernetes-dashboard 7.12.0 General-purpose web UI for Kubernetes clusters
kubernetes-dashboard/kubernetes-dashboard 7.11.1 General-purpose web UI for Kubernetes clusters
kubernetes-dashboard/kubernetes-dashboard 7.11.0 General-purpose web UI for Kubernetes clusters
kubernetes-dashboard/kubernetes-dashboard 7.10.5 General-purpose web UI for Kubernetes clusters
kubernetes-dashboard/kubernetes-dashboard 7.10.4 General-purpose web UI for Kubernetes clusters
kubernetes-dashboard/kubernetes-dashboard 7.10.3 General-purpose web UI for Kubernetes clusters
kubernetes-dashboard/kubernetes-dashboard 7.10.2 General-purpose web UI for Kubernetes clusters
kubernetes-dashboard/kubernetes-dashboard 7.10.1 General-purpose web UI for Kubernetes clusters
[root@master241 ~]#
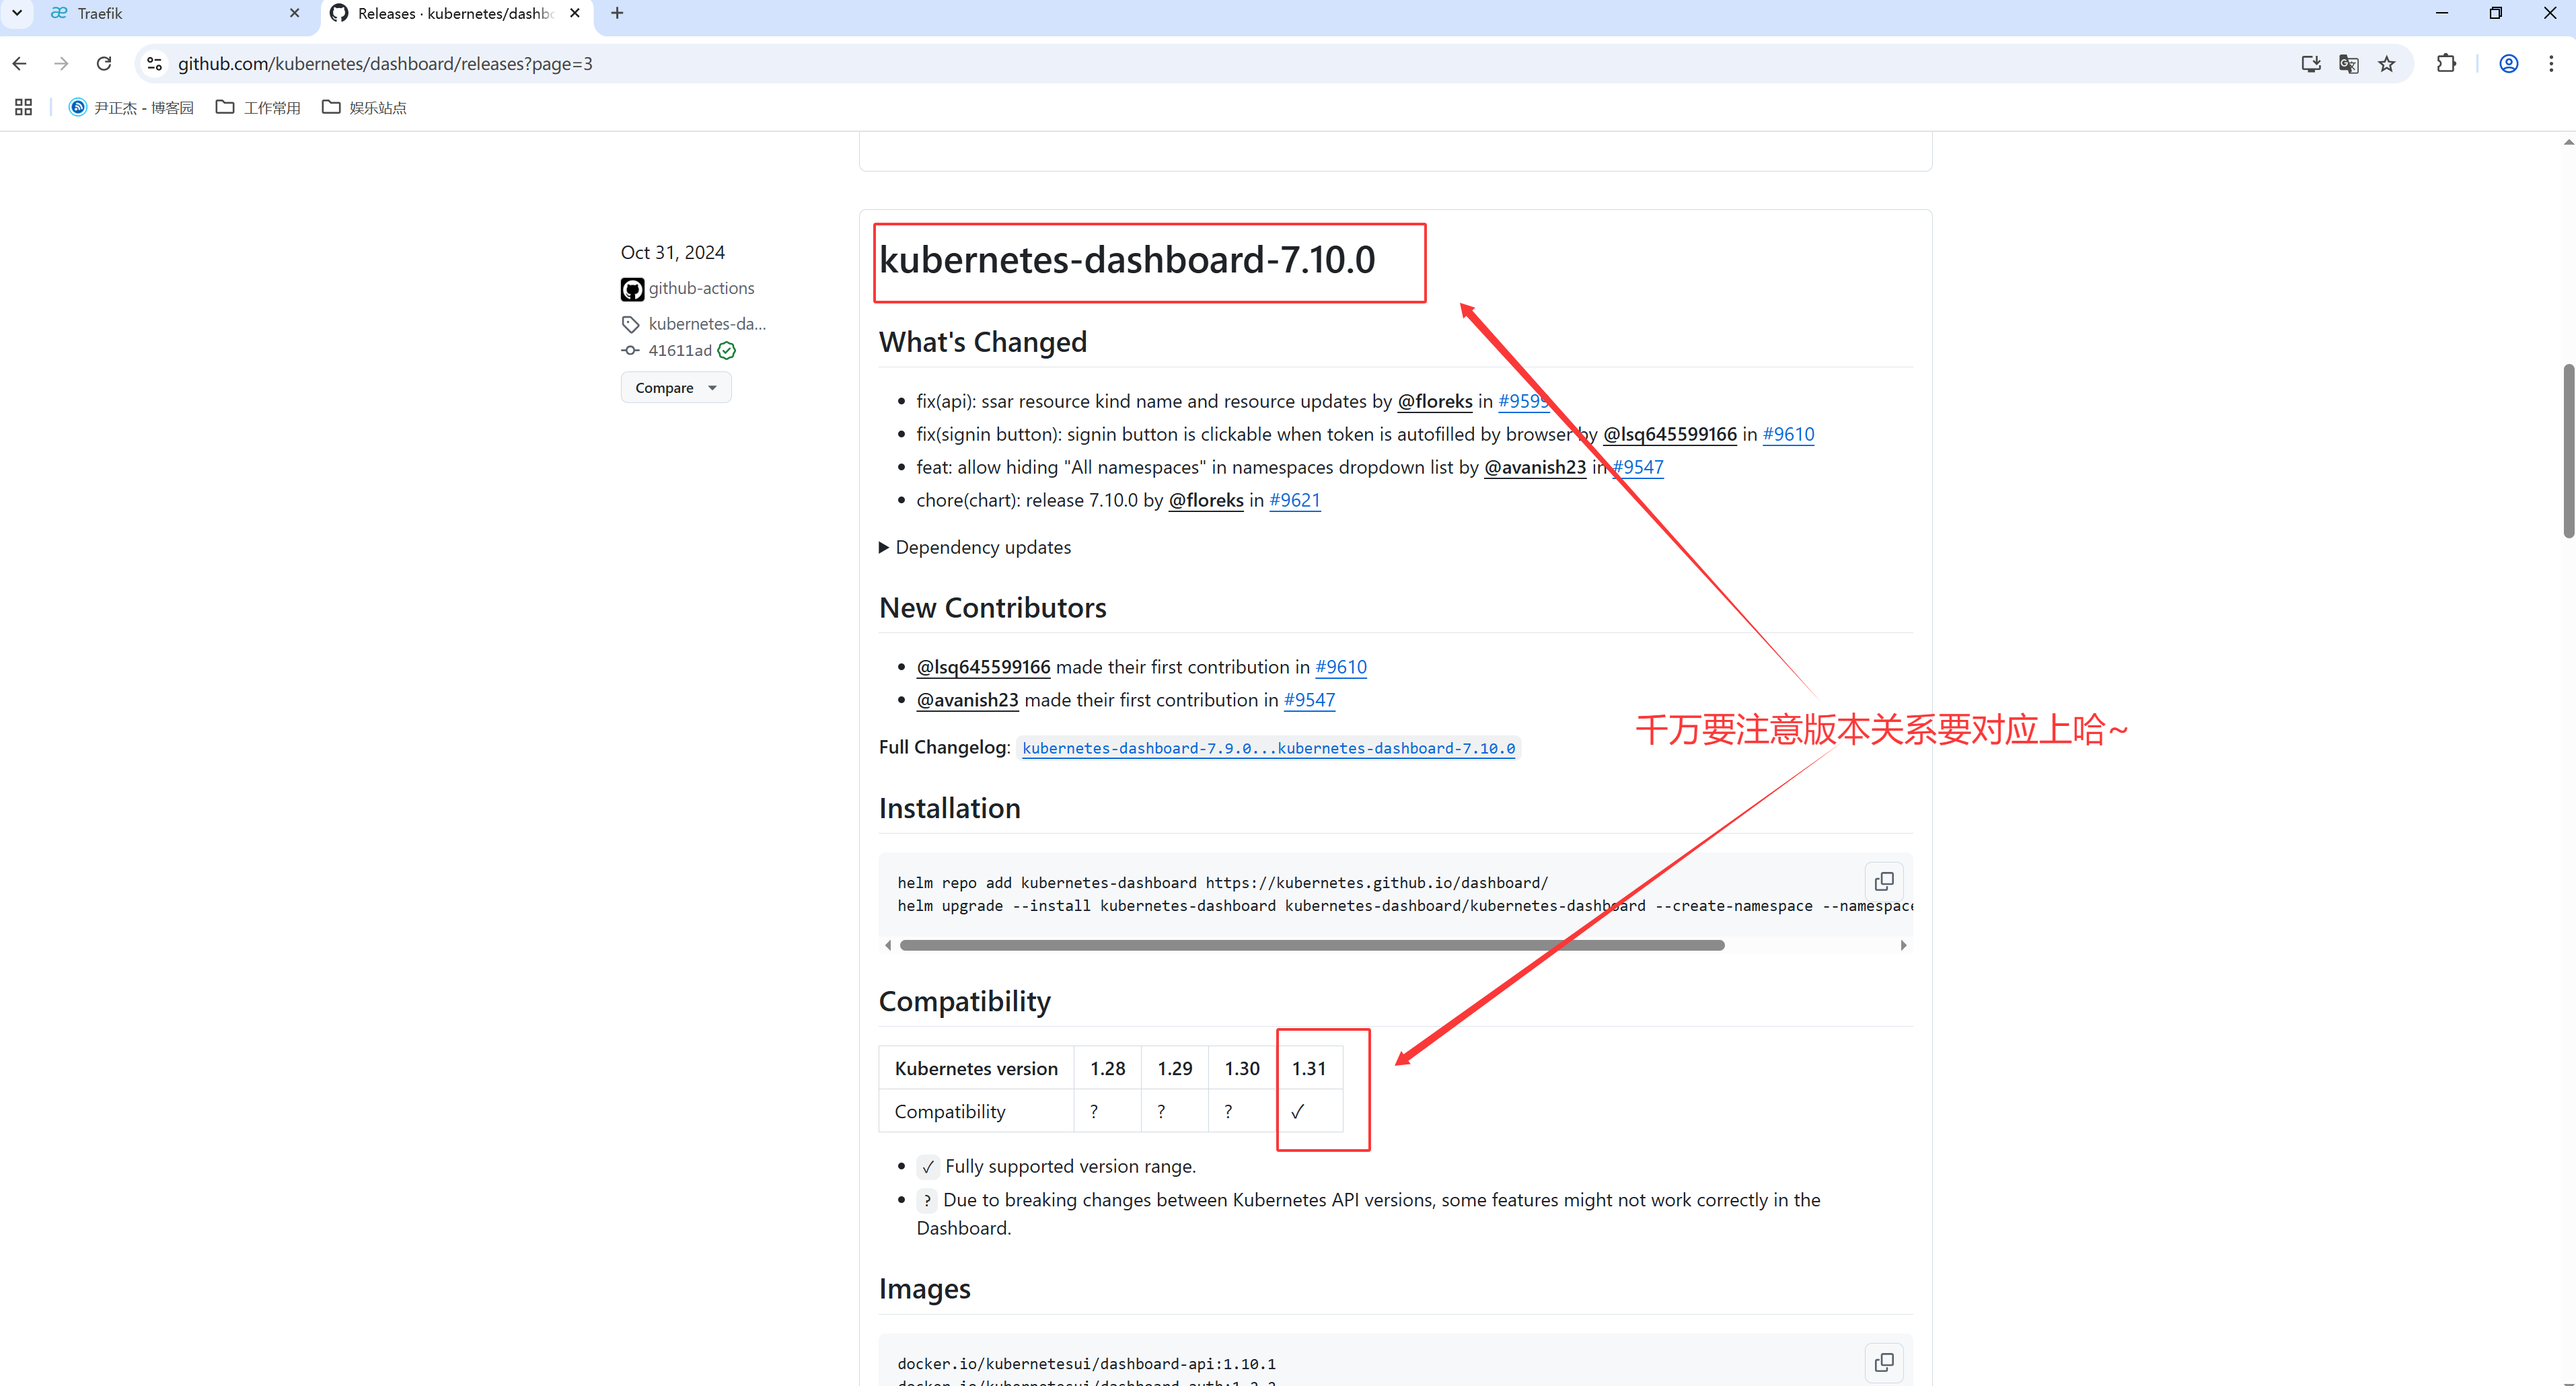
4.下载指定的Chart(如上图所示,注意版本对应)
[root@master241 dashboard]# helm pull kubernetes-dashboard/kubernetes-dashboard --version v7.10.0
[root@master241 dashboard]# tar xf kubernetes-dashboard-7.10.0.tgz
[root@master241 dashboard]# ll
total 376
drwxr-xr-x 3 root root 4096 Jun 3 18:21 ./
drwxr-xr-x 4 root root 4096 Jun 3 18:16 ../
drwxr-xr-x 4 root root 4096 Jun 3 18:21 kubernetes-dashboard/
-rw-r--r-- 1 root root 371223 Jun 3 18:21 kubernetes-dashboard-7.10.0.tgz
[root@master241 dashboard]#
5.并安装dashboard
[root@master241 dashboard]# helm install jiege-dashboard kubernetes-dashboard --create-namespace --namespace kubernetes-dashboard
NAME: jiege-dashboard
LAST DEPLOYED: Tue Jun 3 18:22:38 2025
NAMESPACE: kubernetes-dashboard
STATUS: deployed
REVISION: 1
TEST SUITE: None
NOTES:
*************************************************************************************************
*** PLEASE BE PATIENT: Kubernetes Dashboard may need a few minutes to get up and become ready ***
*************************************************************************************************
Congratulations! You have just installed Kubernetes Dashboard in your cluster.
To access Dashboard run:
kubectl -n kubernetes-dashboard port-forward svc/jiege-dashboard-kong-proxy 8443:443
NOTE: In case port-forward command does not work, make sure that kong service name is correct.
Check the services in Kubernetes Dashboard namespace using:
kubectl -n kubernetes-dashboard get svc
Dashboard will be available at:
https://localhost:8443
[root@master241 dashboard]#
6.修改svc的类型
[root@master241 dashboard]# kubectl get svc -n kubernetes-dashboard jiege-dashboard-kong-proxy
NAME TYPE CLUSTER-IP EXTERNAL-IP PORT(S) AGE
jiege-dashboard-kong-proxy ClusterIP 10.198.105.98 <none> 443/TCP 19m
[root@master241 dashboard]#
[root@master241 dashboard]# kubectl edit svc -n kubernetes-dashboard jiege-dashboard-kong-proxy
service/jiege-dashboard-kong-proxy edited
[root@master241 dashboard]#
[root@master241 dashboard]# kubectl get svc -n kubernetes-dashboard jiege-dashboard-kong-proxy
NAME TYPE CLUSTER-IP EXTERNAL-IP PORT(S) AGE
jiege-dashboard-kong-proxy NodePort 10.198.105.98 <none> 443:32526/TCP 19m
[root@master241 dashboard]#
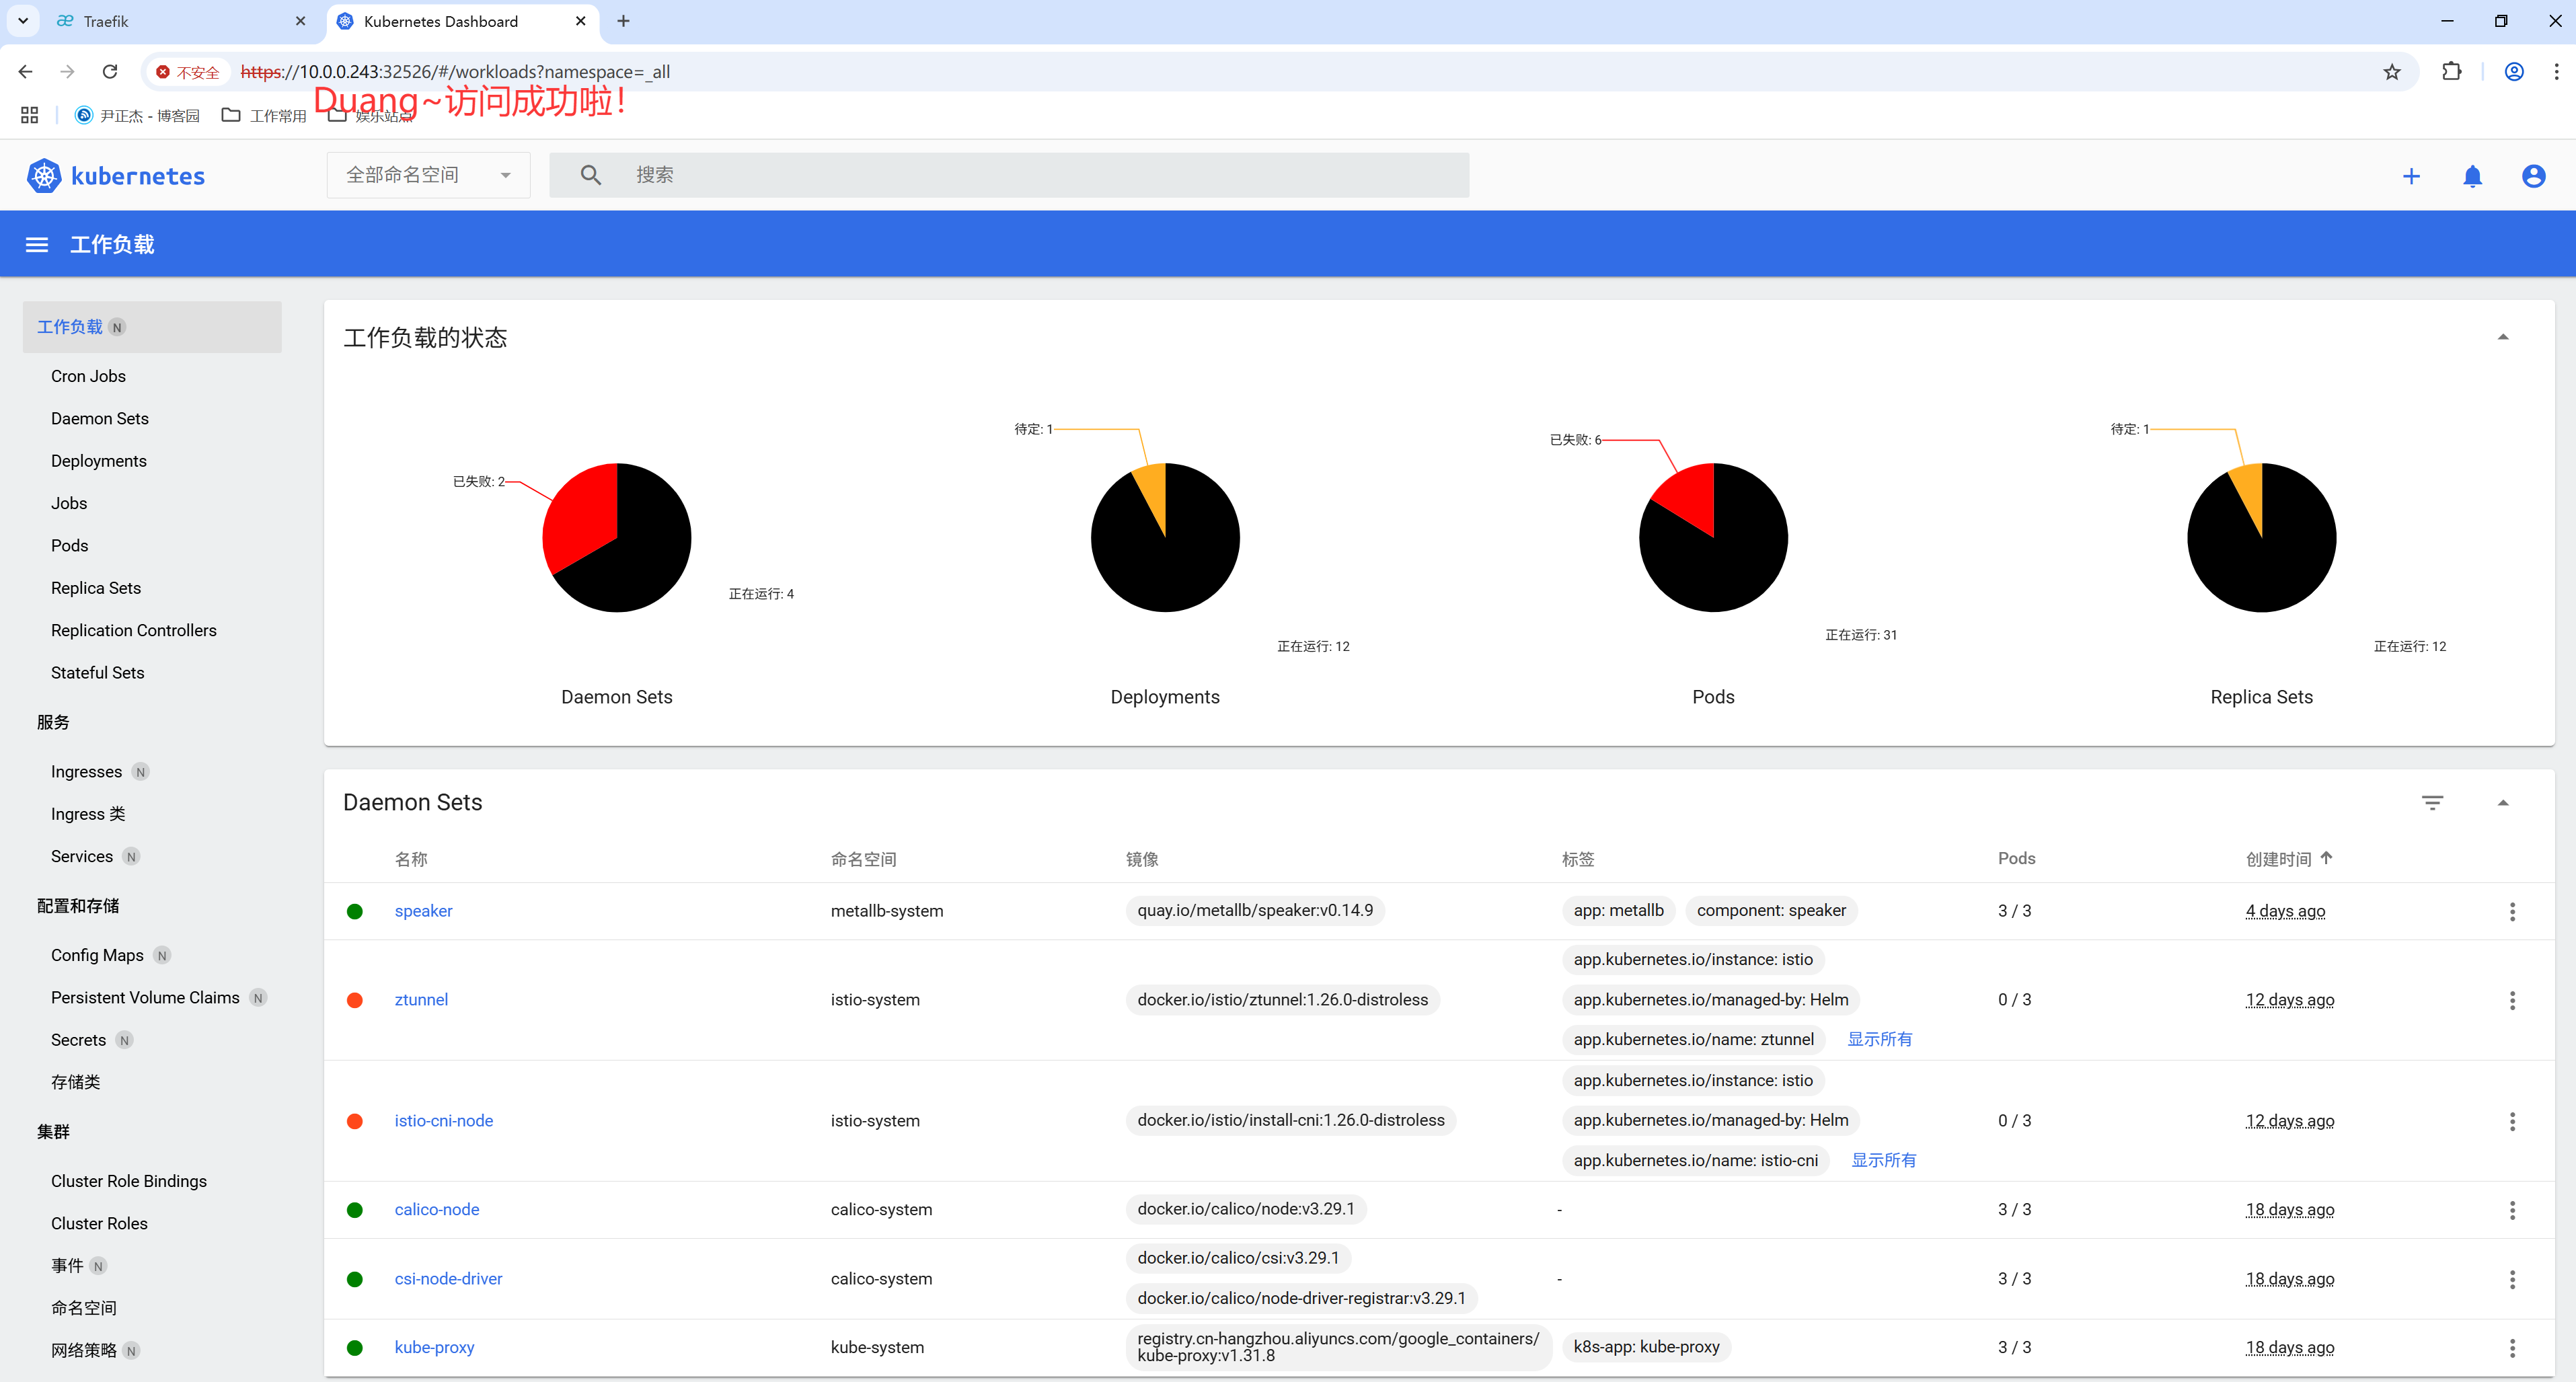
7.访问dashboard的WebUI
https://10.0.0.243:32526/#/login
8.创建登录账号(登录测试,如下图所示)
[root@master241 dashboard]# kubectl create serviceaccount yinzhengjie
serviceaccount/yinzhengjie created
[root@master241 dashboard]#
[root@master241 dashboard]# kubectl create clusterrolebinding dashboard-admin --serviceaccount=default:yinzhengjie --clusterrole=cluster-admin
clusterrolebinding.rbac.authorization.k8s.io/dashboard-admin created
[root@master241 dashboard]#
[root@master241 dashboard]# kubectl create token yinzhengjie
eyJhbGciOiJSUzI1NiIsImtpZCI6InZCenRpT3Iyeml1d2FUT3BBWWtBRXc0YkxKV0kwNEtDOVpvZ3NXUU5XUlEifQ.eyJhdWQiOlsiaHR0cHM6Ly9rdWJlcm5ldGVzLmRlZmF1bHQuc3ZjLmNsdXN0ZXIubG9jYWwiXSwiZXhwIjoxNzQ4OTUxMTI1LCJpYXQiOjE3NDg5NDc1MjUsImlzcyI6Imh0dHBzOi8va3ViZXJuZXRlcy5kZWZhdWx0LnN2Yy5jbHVzdGVyLmxvY2FsIiwianRpIjoiMmE5Mzc4NmYtYjdjOC00NzJlLThhN2ItMmQzMGIyNmFlYzFjIiwia3ViZXJuZXRlcy5pbyI6eyJuYW1lc3BhY2UiOiJkZWZhdWx0Iiwic2VydmljZWFjY291bnQiOnsibmFtZSI6InlpbnpoZW5namllIiwidWlkIjoiMmUxMTVkZWMtNjAyNS00ZWJkLTg3NTUtNjk4YzQ4NDlhZDZlIn19LCJuYmYiOjE3NDg5NDc1MjUsInN1YiI6InN5c3RlbTpzZXJ2aWNlYWNjb3VudDpkZWZhdWx0OnlpbnpoZW5namllIn0.Fl9AuxepLJS6aRf2m7MFNViOQN3N1rSJE4razURiPQuyPoF2SROnv_M8un6iEIwC_JWgfggvFbZQ9KKvGsuavT2pWB8IiSGz8a6-5qaya6HnWyS09EqBqqjD7SIkKIOLvqBGgwdB6X-bnzot6px65t1apoiaDtD_p9kao_sTsBOgboezmqPtNamBZel_qvHQAqJJWDTdH-i1eXhG0gLPzQS0aQv-ubJmj4CaZirCTimuOnmykJrvmSNF2LbnugqCSramY55bDa4tjMkL5QwsAl05pgRqXDBwaSXrwp1JqmyIlcWRuCR4l-hhfJVQO2oLWnWoWm_Z9pGpRnah9vxMng
[root@master241 dashboard]#
2.将权威机构证书并封装为secrets
	1.下载证书(你可以在互联网下载能够申请到的权威机构证书哟~)
[root@master241 ingressroutes]# wget http://192.168.14.253/Resources/Certs/harbor.yinzhengjie.com_nginx.zip

	2.解压证书文件
[root@master241 ingressroutes]# unzip harbor.yinzhengjie.com_nginx.zip
Archive:  harbor.yinzhengjie.com_nginx.zip
   creating: harbor.yinzhengjie.com_nginx/
  inflating: harbor.yinzhengjie.com_nginx/harbor.yinzhengjie.com.csr
  inflating: harbor.yinzhengjie.com_nginx/harbor.yinzhengjie.com_bundle.crt
  inflating: harbor.yinzhengjie.com_nginx/harbor.yinzhengjie.com_bundle.pem
  inflating: harbor.yinzhengjie.com_nginx/harbor.yinzhengjie.com.key
[root@master241 ingressroutes]#


	3.将证书创建为secret资源
[root@master241 ingressroutes]# cd harbor.yinzhengjie.com_nginx
[root@master241 harbor.yinzhengjie.com_nginx]#
[root@master241 harbor.yinzhengjie.com_nginx]# ll
total 32
drwxrwxrwx 2 root root 4096 Jun  4 09:42 ./
drwxr-xr-x 3 root root 4096 Jun  4 09:45 ../
-rw-rw-rw- 1 root root 4502 Jun  4 09:42 harbor.yinzhengjie.com_bundle.crt
-rw-rw-rw- 1 root root 4502 Jun  4 09:42 harbor.yinzhengjie.com_bundle.pem
-rw-rw-rw- 1 root root 1152 Jun  4 09:42 harbor.yinzhengjie.com.csr
-rw-rw-rw- 1 root root 1700 Jun  4 09:42 harbor.yinzhengjie.com.key
[root@master241 harbor.yinzhengjie.com_nginx]#
[root@master241 harbor.yinzhengjie.com_nginx]# kubectl create secret tls yinzhengjie-tls --cert=harbor.yinzhengjie.com_bundle.pem --key=harbor.yinzhengjie.com.key -n kubernetes-dashboard
secret/yinzhengjie-tls created
[root@master241 harbor.yinzhengjie.com_nginx]#
[root@master241 harbor.yinzhengjie.com_nginx]# kubectl -n kubernetes-dashboard get secrets  yinzhengjie-tls
NAME              TYPE                DATA   AGE
yinzhengjie-tls   kubernetes.io/tls   2      5s
[root@master241 harbor.yinzhengjie.com_nginx]#


	4.查看证书信息
[root@master241 harbor.yinzhengjie.com_nginx]# openssl x509 -in harbor.yinzhengjie.com_bundle.crt -text
Certificate:
    Data:
        Version: 3 (0x2)
        Serial Number:
            05:7e:4b:07:16:70:2a:21:38:72:e1:01:20:10:c5:f7
        Signature Algorithm: sha256WithRSAEncryption
        Issuer: C = CN, O = "TrustAsia Technologies, Inc.", CN = TrustAsia DV TLS RSA CA 2025
        Validity
            Not Before: Mar 25 00:00:00 2025 GMT
            Not After : Jun 23 23:59:59 2025 GMT
        Subject: CN = harbor.yinzhengjie.com  # 注意哈,这个是我的证书信息。
...
3.配置k8s dashboard路由规则【存在问题】
	1.检查svc资源
[root@master241 ingressroutes]# kubectl get svc -n kubernetes-dashboard -l app.kubernetes.io/name=kong
NAME                         TYPE       CLUSTER-IP      EXTERNAL-IP   PORT(S)         AGE
jiege-dashboard-kong-proxy   NodePort   10.198.105.98   <none>        443:32526/TCP   15h
[root@master241 ingressroutes]#


	2.查看secrets信息
[root@master241 ingressroutes]# kubectl -n kubernetes-dashboard get secrets  yinzhengjie-tls
NAME              TYPE                DATA   AGE
yinzhengjie-tls   kubernetes.io/tls   2      81s
[root@master241 ingressroutes]#


	3.编写资源清单
[root@master241 ingressroutes]# cat 02-ingressroutes-k8s-dashboard.yaml
apiVersion: traefik.io/v1alpha1
kind: IngressRoute
metadata:
  name: ingressroute-k8s-dashboard
  namespace: kubernetes-dashboard
spec:
  tls:
    secretName: yinzhengjie-tls
  entryPoints:
  - websecure
  routes:
  - match: Host(`harbor.yinzhengjie.com`)
    kind: Rule
    services:
    - name: jiege-dashboard-kong-proxy
      port: 443
[root@master241 ingressroutes]#


	4.查看Ingressroute
[root@master241 ingressroutes]# kubectl apply -f 02-ingressroutes-k8s-dashboard.yaml
ingressroute.traefik.io/ingressroute-k8s-dashboard created
[root@master241 ingressroutes]#
[root@master241 ingressroutes]# kubectl get ingressroute -n kubernetes-dashboard
NAME                         AGE
ingressroute-k8s-dashboard   36s
[root@master241 ingressroutes]#
[root@master241 ingressroutes]# kubectl describe   ingressroute -n kubernetes-dashboard
Name:         ingressroute-k8s-dashboard
Namespace:    kubernetes-dashboard
Labels:       <none>
Annotations:  <none>
API Version:  traefik.io/v1alpha1
Kind:         IngressRoute
Metadata:
  Creation Timestamp:  2025-06-04T03:12:49Z
  Generation:          1
  Resource Version:    1799868
  UID:                 91e49abf-1ccf-4f39-97c1-597b501ede5f
Spec:
  Entry Points:
    websecure
  Routes:
    Kind:   Rule
    Match:  Host(`harbor.yinzhengjie.com`)
    Services:
      Name:  jiege-dashboard-kong-proxy
      Port:  443
  Tls:
    Secret Name:  yinzhengjie-tls
Events:           <none>
[root@master241 ingressroutes]#


	5.访问测试(存在问题需要进一步调研)
[root@worker243 ~]# curl -H "HOST: harbor.yinzhengjie.com" -k https://10.0.0.150 ;echo
Internal Server Error
[root@worker243 ~]#


报错后查看日志报错如下:
[root@master241 ~]# kubectl get pods -n kube-public
NAME                             READY   STATUS    RESTARTS   AGE
jiege-traefik-557f7595b6-2z5jj   1/1     Running   0          24h
[root@master241 ~]#
[root@master241 ~]# kubectl -n kube-public logs -f jiege-traefik-557f7595b6-2z5jj
...
2025-06-04T03:08:47Z ERR 500 Internal Server Error error="tls: failed to verify certificate: x509: cannot validate certificate for 10.100.207.19 because it doesn't contain any IP SANs"
...


后记:
	先记录这个错误,后期有时间了在排查,欢迎各位道友指正错误哈~
本文来自博客园,作者:尹正杰,转载请注明原文链接:https://www.cnblogs.com/yinzhengjie/p/18911351,个人微信: "JasonYin2020"(添加时请备注来源及意图备注,有偿付费)
当你的才华还撑不起你的野心的时候,你就应该静下心来学习。当你的能力还驾驭不了你的目标的时候,你就应该沉下心来历练。问问自己,想要怎样的人生。

 浙公网安备 33010602011771号