

GitOps项目上篇之K8S 1.23.17版本Argo CD环境准备
作者:尹正杰
版权声明:原创作品,谢绝转载!否则将追究法律责任。
目录
一.GitOps概述
1.什么是GitOps
GitOps是DevOps的一种特有的持续交付方式,GitOps核心思想是将应用系统的声明性基础架构和应用程序放在Git版本库中。

将Git作为交付流水线的核心,每个开发人员都可以提交拉取请求(Pull Request)并使用Git来加速和简化应用程序部署和运维任务,通过使用Git,开发人员可以更高效地将注意力集中在创新功能而不是运维相关任务上,例如系统安装,配置,迁移等。

在GitOps中可以自由地为流水线(Pipeline)的不同部分选择最佳工具,可以从开源生态系统重选择一组工具,也可以从闭源中选择一组工具,或者根据使用情况,甚至可以将它们组合在一起。
2.基于Argo实现GitOps方案架构
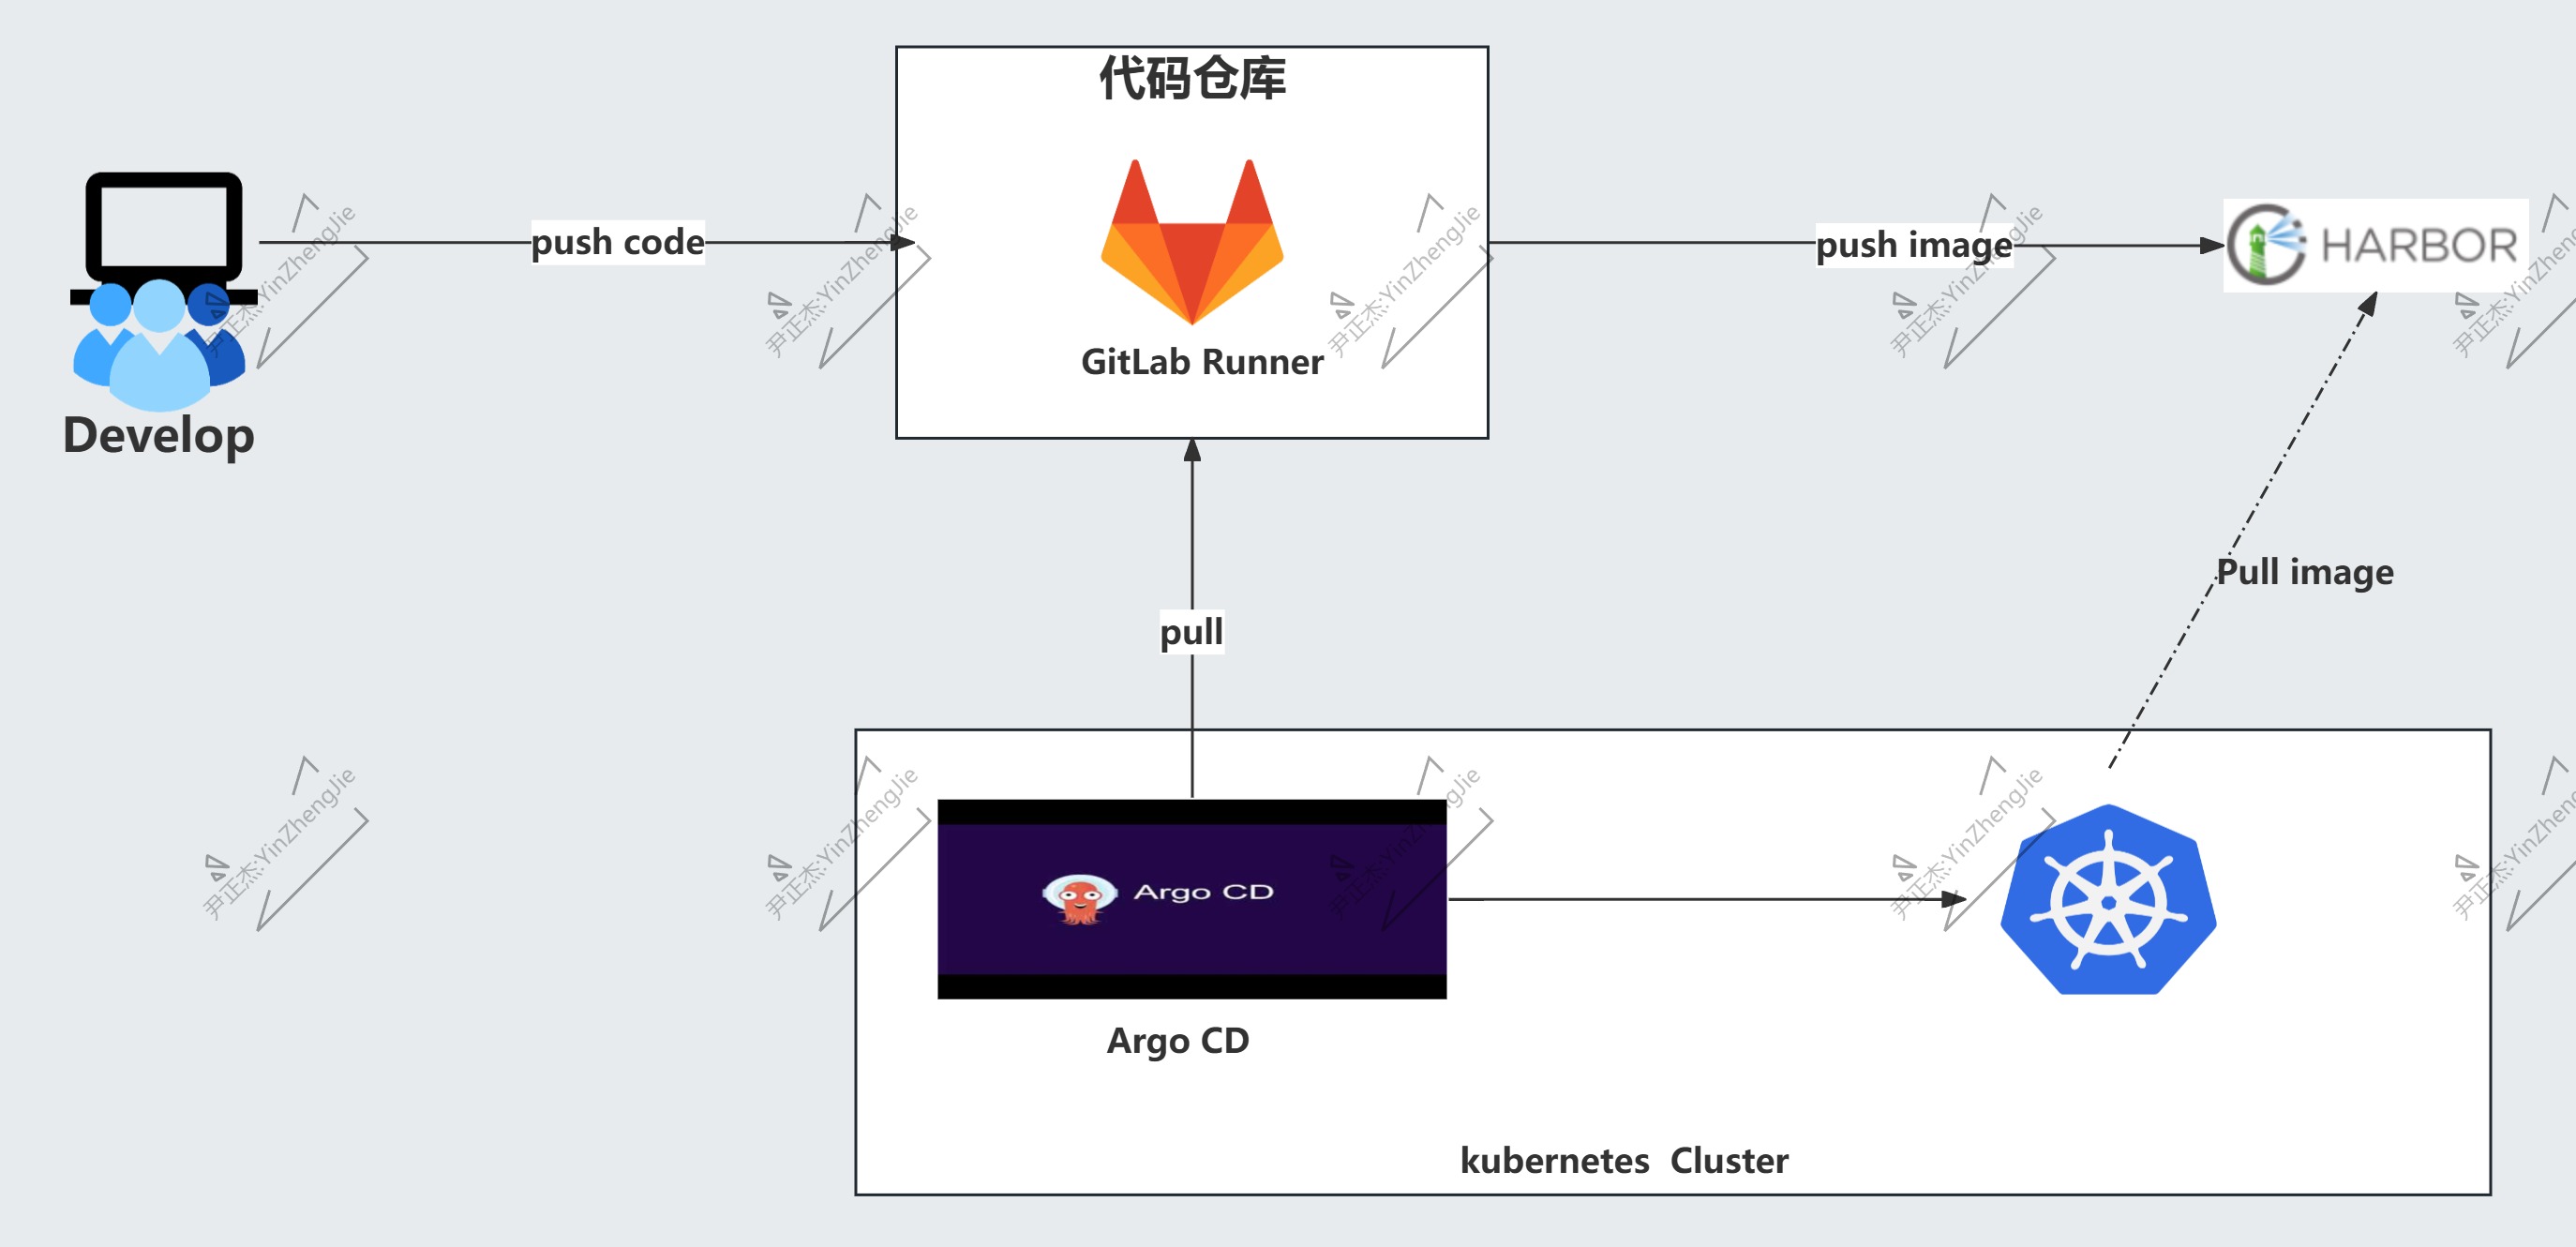
如上图所示,通过gitlab实现CI流程,将CD部分使用Argo CD来完成,以实现应用部署,回滚的可控性。

Argo CD是Kubernetes的一个声明性GitOps持续交付工具。

Github地址:
	https://github.com/argoproj/argo-cd
二.GitOps项目环境准备实战案例
1.主机角色规划
| 主机名 | IP地址 | 角色 | 部署软件 |
|---|---|---|---|
| dev130 | 10.0.0.130 | 开发者,项目代码 | golang |
| gitlab131 | 10.0.0.131 | 代码仓库,持续集成(CI)代码 | git-lab,git,golang,docker,gitlab-runner |
| harbor250 | 10.0.0.250 | 镜像仓库 | docker,docker-compose,harbor |
| master231 | 10.0.0.231 | K8S control plane | Kubernetes,ArgoCD |
| worker232 | 10.0.0.232 | k8s worker node | Kubernetes,ArgoCD |
| worker233 | 10.0.0.233 | k8s worker node | Kubernetes,ArgoCD |
2.部署gitlab相关环境
	1.部署gitlab服务器
推荐阅读:
	https://www.cnblogs.com/yinzhengjie/p/18571224


	2.部署go环境
课程测试样例采用Golng语言编写,gitlab-runner在编译项目源码时,需要使用go命令。

[root@gitlab131 ~]# wget https://studygolang.com/dl/golang/go1.23.3.linux-amd64.tar.gz
[root@gitlab131 ~]#
[root@gitlab131 ~]# mkdir -pv /yinzhengjie/softwares/gopath/{src,bin,pkg}
[root@gitlab131 ~]#
[root@gitlab131 ~]# tar xf go1.23.3.linux-amd64.tar.gz -C /yinzhengjie/softwares/
[root@gitlab131 ~]#
[root@gitlab131 ~]# tail -7 .bashrc
# Add by yinzhengjie for Golang env
export GOROOT=/yinzhengjie/softwares/go
export GOPATH=/yinzhengjie/softwares/gopath
export GOPROXY=https://goproxy.cn,direct
export GOBIN=${GOROOT}/bin
export GO111MODULE=on
export PATH=$PATH:$GOBIN
[root@gitlab131 ~]#
[root@gitlab131 ~]# source .bashrc
[root@gitlab131 ~]#
[root@gitlab131 ~]# go version
go version go1.23.3 linux/amd64
[root@gitlab131 ~]#


go环境搭建视频教程:
	https://www.bilibili.com/video/BV1bwhve7EPJ


	3.部署docker环境
gitlab-runner在执行流水线时需要将源码编译后的可执行文件制成容器镜像,所以需要安装docker。

至于docker安装可以直接使用我给的一件部署脚本即可,秒级安装。

[root@gitlab131 ~]# tar  xf yinzhengjie-scripts-docker-docker-compose.tar.gz
[root@gitlab131 ~]#
[root@gitlab131 ~]# ./install-docker.sh i


	4.安装git
CentOS需要手动后安装git,而Ubuntu 22.04LTS版本默认就按照好了,可以跳过此步骤。

推荐阅读:
	https://www.cnblogs.com/yinzhengjie/p/12215821.html
3.部署k8s相关环境
	1.搭建K8S集群
推荐阅读:
	https://www.cnblogs.com/yinzhengjie/p/18353027


	2.部署metallb
推荐阅读:
	https://www.cnblogs.com/yinzhengjie/p/17811466.html


	3.部署ingress-nginx
推荐阅读:
	https://www.cnblogs.com/yinzhengjie/p/17975829
4.部署ArgoCD默认启用tls环境基于NodePort暴露
4.1 Argo概述
Argo CD是Kubernetes的一个声明性GitOps持续交付工具。

官方链接:
	https://argo-cd.readthedocs.io/en/stable/

github地址:
	https://github.com/argoproj/argo-cd
4.2 为什么选择Argo CD

应用程序定义、配置和环境应该是声明性的和版本控制的。

应用程序部署和生命周期管理应该是自动化的、可审计的、易于理解的。

Argo CD被实现为Kubernetes控制器,它持续监控运行中的应用程序,并将当前的实时状态与所需的目标状态(如Git仓库中指定的)进行比较。活动状态偏离目标状态的已部署应用程序被视为OutOfSync。

Argo CD报告并可视化差异,同时提供自动或手动将实时状态同步回所需目标状态的设施。在Git仓库中对所需目标状态所做的任何修改都可以自动应用并反映在指定的目标环境中。
4.3 Argo CD和K8S版本对应关系
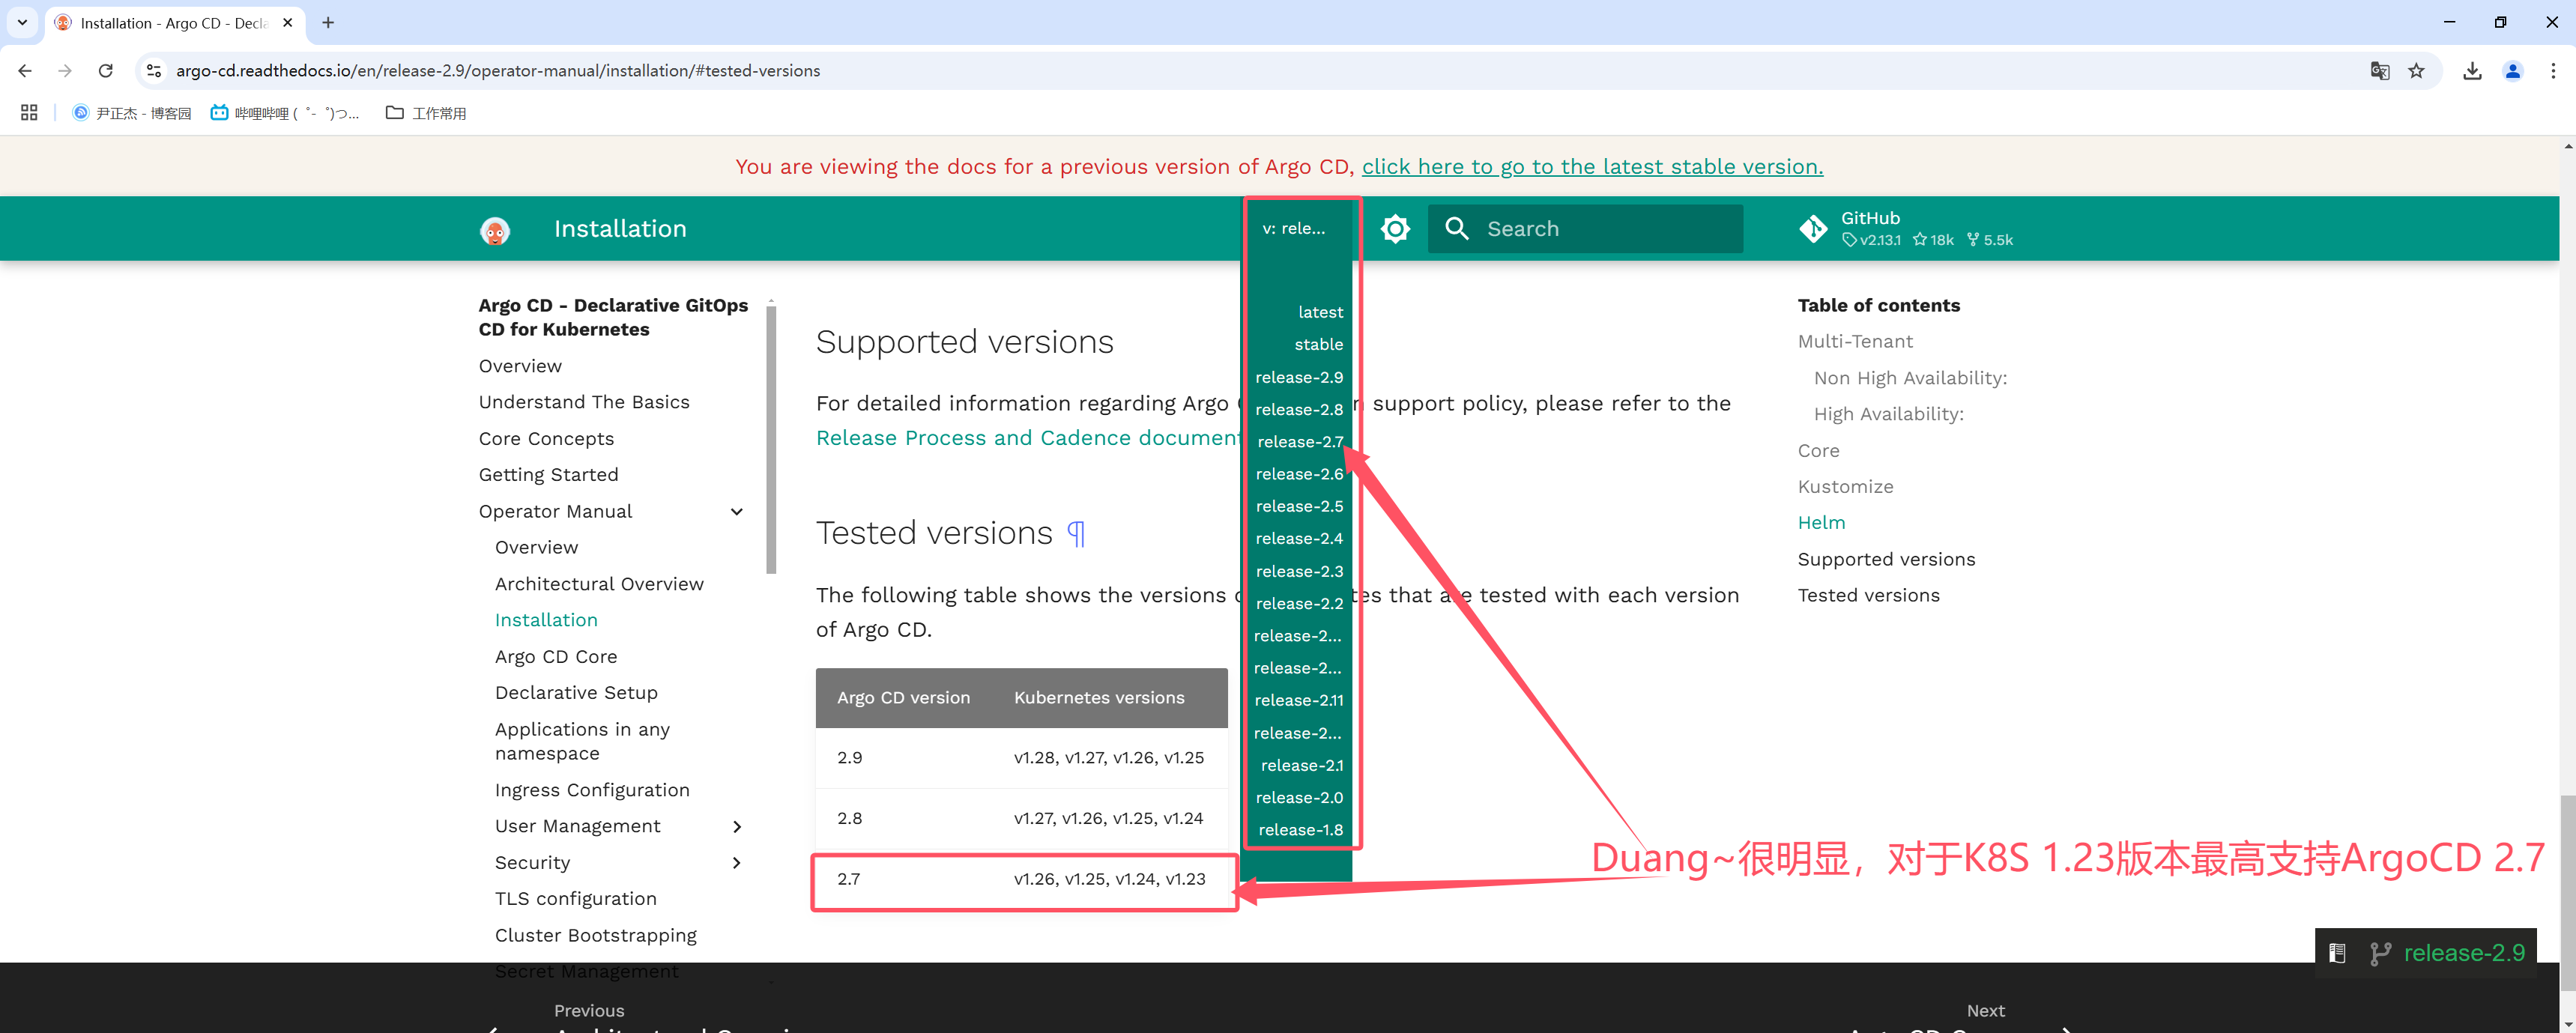
如上图所示,咱们课堂环境基于K8S 1.23.17部署,则考虑的般般范围有限,目前能兼容的版本是Argo 2.7版本。

推荐阅读:
	https://argo-cd.readthedocs.io/en/release-2.7/operator-manual/installation/#supported-versions
	https://argo-cd.readthedocs.io/en/release-2.9/operator-manual/installation/#tested-versions
4.4 部署Argo CD
1.创建名称空间
[root@master231 ~]# kubectl create namespace argocd
namespace/argocd created
[root@master231 ~]#
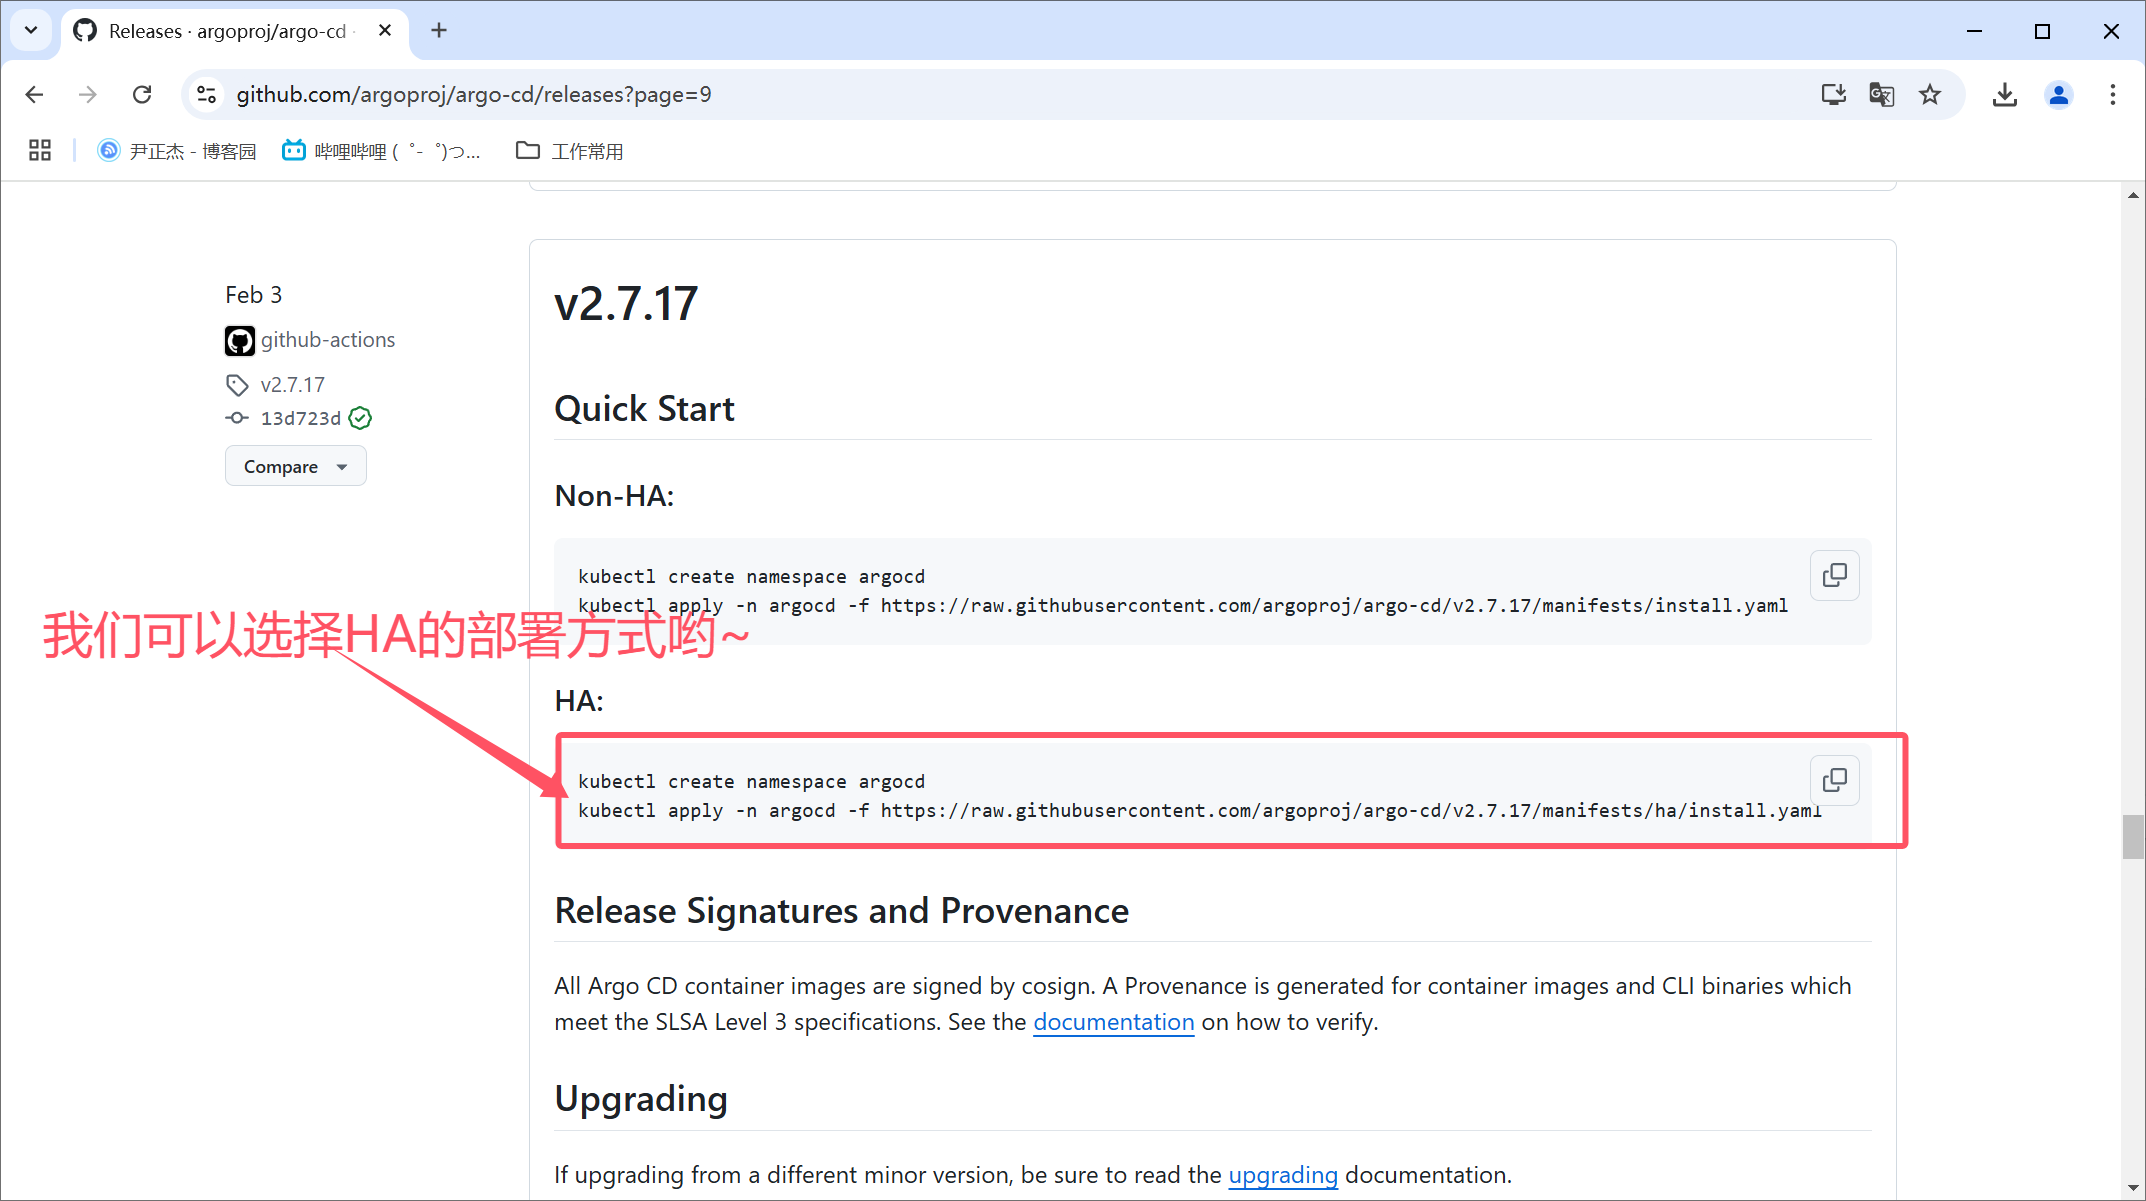
2.下载资源清单
[root@master231 ~]# wget https://raw.githubusercontent.com/argoproj/argo-cd/v2.7.17/manifests/ha/install.yaml
3.部署应用
[root@master231 ~]# kubectl apply -n argocd -f install.yaml
4.检查pod的运行状态
[root@master231 yinzhengjie]# kubectl get pods -n argocd -o wide
NAME READY STATUS RESTARTS AGE IP NODE NOMINATED NODE READINESS GATES
argocd-application-controller-0 1/1 Running 0 2m25s 10.100.2.98 worker233 <none> <none>
argocd-applicationset-controller-65c4cff6bd-d4l2f 1/1 Running 0 2m26s 10.100.1.105 worker232 <none> <none>
argocd-dex-server-bbbcd9879-mg8p8 1/1 Running 0 2m26s 10.100.2.93 worker233 <none> <none>
argocd-notifications-controller-5db4658cf6-v24zx 1/1 Running 0 2m26s 10.100.1.107 worker232 <none> <none>
argocd-redis-ha-haproxy-6477549f8f-2bzqx 1/1 Running 0 2m25s 10.100.2.95 worker233 <none> <none>
argocd-redis-ha-haproxy-6477549f8f-4l49g 0/1 Pending 0 2m25s <none> <none> <none> <none>
argocd-redis-ha-haproxy-6477549f8f-t6jrs 1/1 Running 0 2m25s 10.100.1.106 worker232 <none> <none>
argocd-redis-ha-server-0 3/3 Running 0 2m25s 10.100.2.96 worker233 <none> <none>
argocd-redis-ha-server-1 3/3 Running 0 68s 10.100.1.110 worker232 <none> <none>
argocd-redis-ha-server-2 0/3 Pending 0 8s <none> <none> <none> <none>
argocd-repo-server-59d464d86b-4bjtk 1/1 Running 0 2m25s 10.100.2.94 worker233 <none> <none>
argocd-repo-server-59d464d86b-8khvp 1/1 Running 0 2m25s 10.100.1.109 worker232 <none> <none>
argocd-server-6b5654899d-6vk8m 1/1 Running 0 2m25s 10.100.2.97 worker233 <none> <none>
argocd-server-6b5654899d-pq9nd 1/1 Running 0 2m25s 10.100.1.108 worker232 <none> <none>
[root@master231 yinzhengjie]#
5.修改svc的类型
[root@master231 yinzhengjie]# kubectl -n argocd get svc argocd-server
NAME TYPE CLUSTER-IP EXTERNAL-IP PORT(S) AGE
argocd-server ClusterIP 10.200.228.98 <none> 80/TCP,443/TCP 12m
[root@master231 yinzhengjie]#
[root@master231 yinzhengjie]#
[root@master231 yinzhengjie]# kubectl -n argocd edit svc argocd-server
...
ports:
...
type: NodePort
...
[root@master231 ~]# kubectl -n argocd get svc argocd-server
NAME TYPE CLUSTER-IP EXTERNAL-IP PORT(S) AGE
argocd-server NodePort 10.200.206.212 <none> 80:31988/TCP,443:31823/TCP 12m
[root@master231 ~]#
4.5 登录Argo CD的WebUI
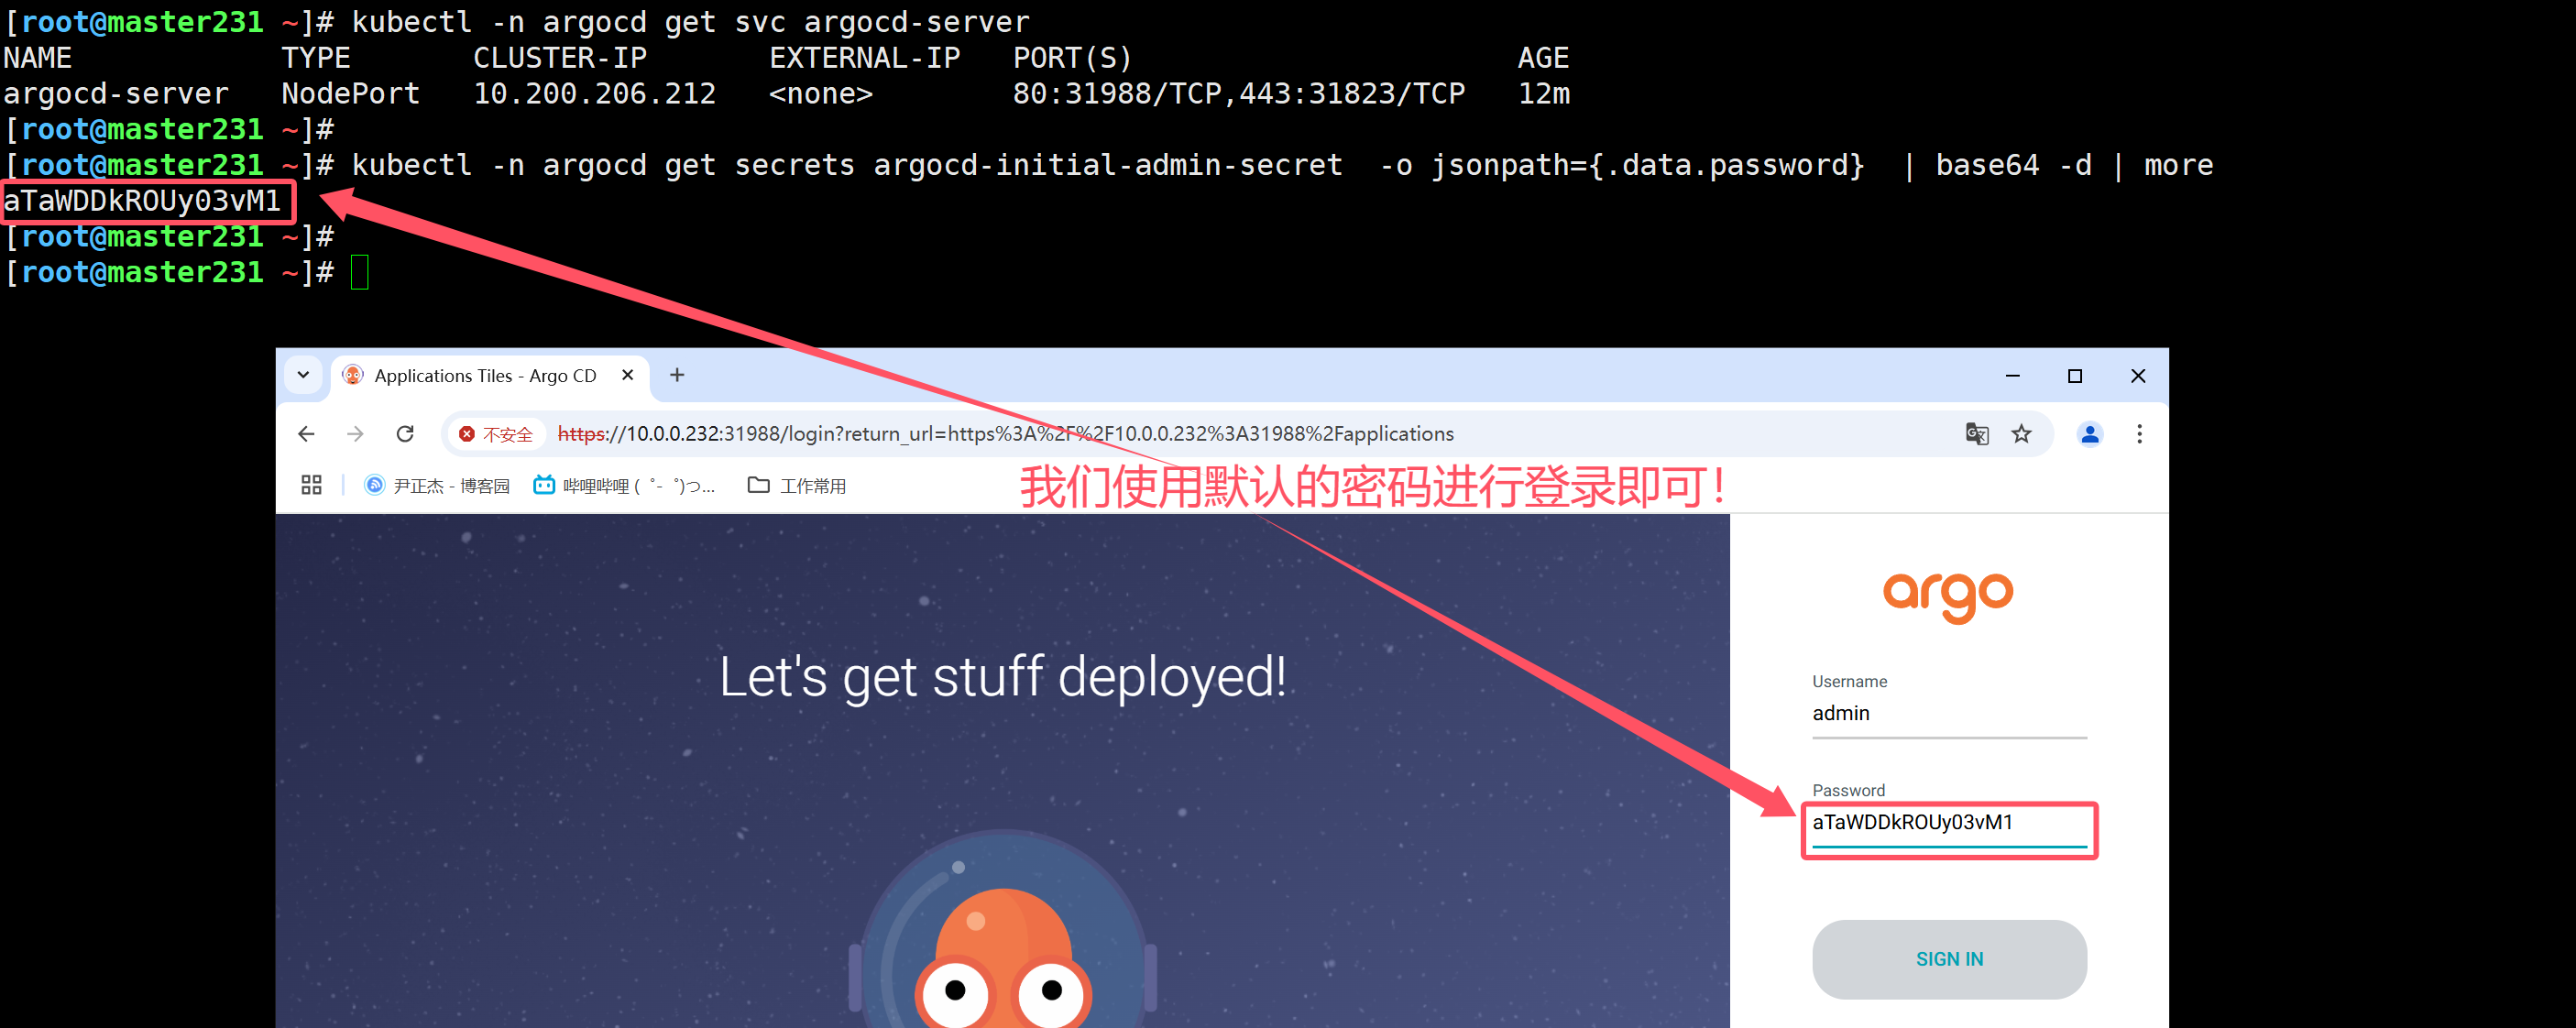
1.查看ArgoCD默认的密码
[root@master231 yinzhengjie]# kubectl -n argocd get secrets argocd-initial-admin-secret -o jsonpath={.data.password} | base64 -d | more
pzMRCHAGnO39GVJC
[root@master231 yinzhengjie]#
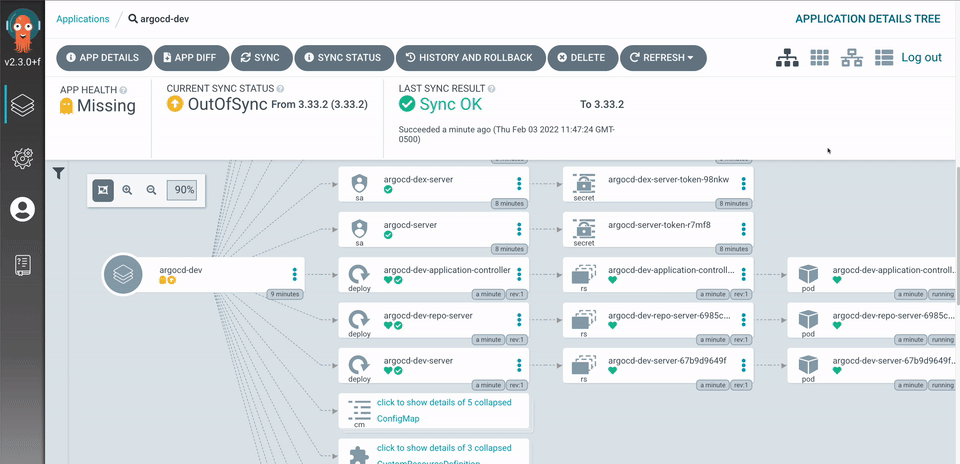
2.登录ArgoCD
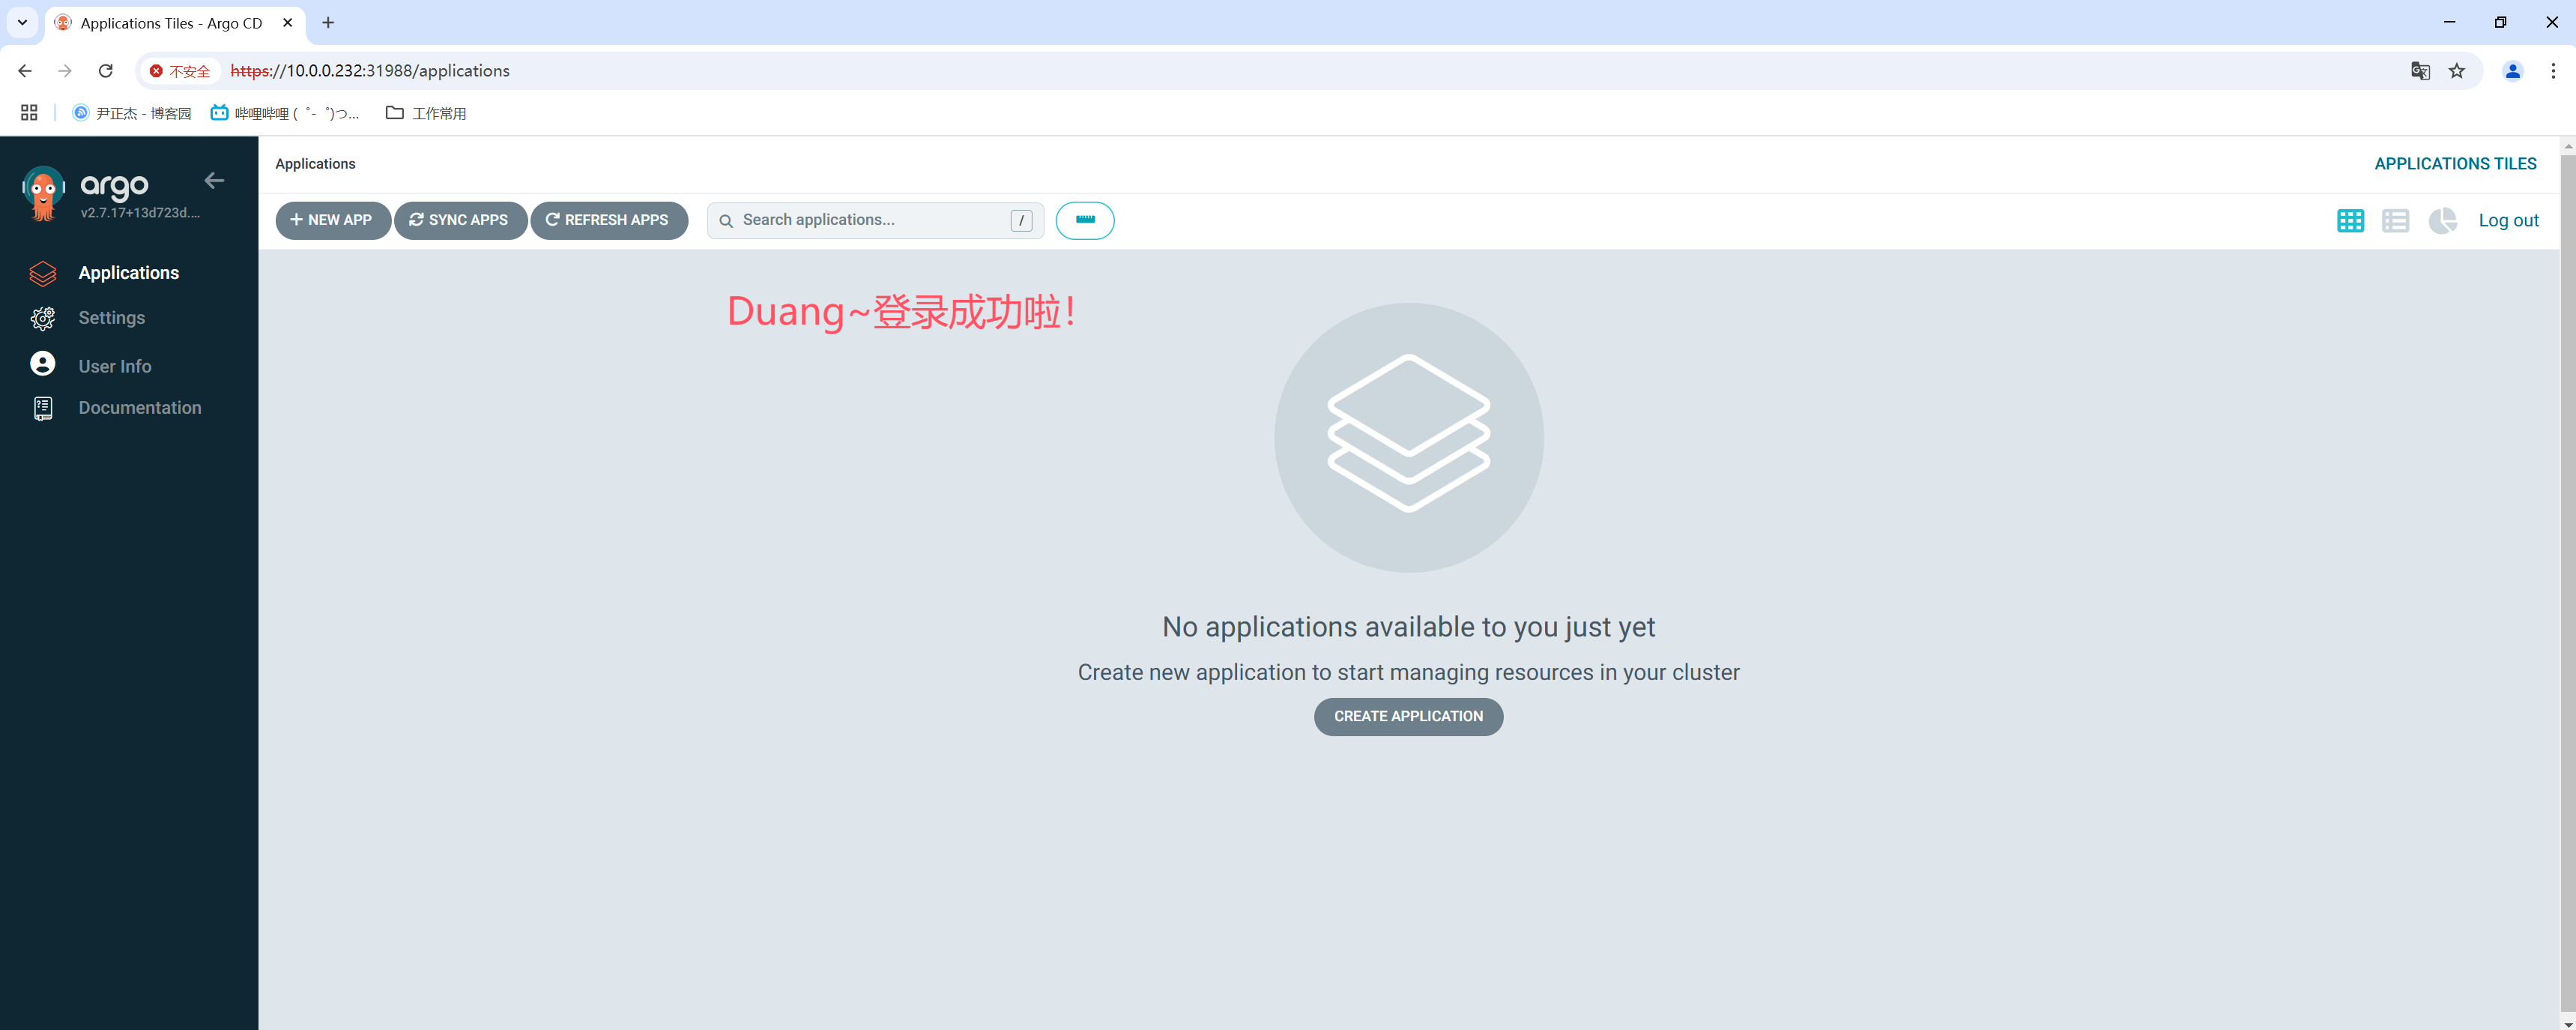
如上图所示,使用默认的用户名admin进行登录,登录成功后就看到下图的情况。
5 部署ArgoCD禁用tls环境基于ingrees暴露服务
5.1 修改资源清单,禁用TLS证书
[root@master231 ~]# vim install.yaml
...
apiVersion: apps/v1
kind: Deployment
metadata:
  ...
  name: argocd-server
spec:
  template:
    ...
    spec:
      containers:
      - args:
        - /usr/local/bin/argocd-server
        # 大概在18555行左右,添加"--insecure"启动参数
        - --insecure
...
5.2 创建资源并查看pod列表
[root@master231 ~]# kubectl get pods -n argocd  -o wide
NAME                                                READY   STATUS    RESTARTS   AGE     IP            NODE        NOMINATED NODE   READINESS GATES
argocd-application-controller-0                     1/1     Running   0          3m30s   10.100.1.61   worker232   <none>           <none>
argocd-applicationset-controller-8648648c94-hh6ff   1/1     Running   0          3m32s   10.100.1.59   worker232   <none>           <none>
argocd-dex-server-5cb7988f75-vfp7z                  1/1     Running   0          3m32s   10.100.1.60   worker232   <none>           <none>
argocd-notifications-controller-5877877c7d-r5pcf    1/1     Running   0          3m32s   10.100.1.58   worker232   <none>           <none>
argocd-redis-ha-haproxy-6477549f8f-42gqj            1/1     Running   0          3m32s   10.100.2.57   worker233   <none>           <none>
argocd-redis-ha-haproxy-6477549f8f-jb7f7            1/1     Running   0          3m32s   10.100.1.64   worker232   <none>           <none>
argocd-redis-ha-server-0                            3/3     Running   0          2m30s   10.100.2.58   worker233   <none>           <none>
argocd-redis-ha-server-1                            3/3     Running   0          73s     10.100.1.65   worker232   <none>           <none>
argocd-repo-server-5d6464ffd4-4p9p5                 1/1     Running   0          3m32s   10.100.2.55   worker233   <none>           <none>
argocd-repo-server-5d6464ffd4-xv4gj                 1/1     Running   0          3m32s   10.100.1.63   worker232   <none>           <none>
argocd-server-56cb88fd6b-t8msh                      1/1     Running   0          3m31s   10.100.2.56   worker233   <none>           <none>
argocd-server-56cb88fd6b-tthx6                      1/1     Running   0          3m31s   10.100.1.62   worker232   <none>           <none>
[root@master231 ~]#
5.3 创建ingress资源
	1.编写资源清单
[root@master231 ~]# cat ingress-argocd.yaml
apiVersion: networking.k8s.io/v1
kind: Ingress
metadata:
  name: ingress-argocd
  namespace: argocd
spec:
  ingressClassName: nginx
  rules:
  - host: argocd.yinzhengjie.com
    http:
      paths:
      - backend:
          service:
            name: argocd-server
            port:
              number: 80
        path: /
        pathType: Prefix
[root@master231 ~]#


	2.创建资源
[root@master231 ~]# kubectl apply -f ingress-argocd.yaml
ingress.networking.k8s.io/ingress-argocd created
[root@master231 ~]#


	3.查看ingress资源的详细信息
[root@master231 ~]# kubectl describe -f ingress-argocd.yaml
Name:             ingress-argocd
Labels:           <none>
Namespace:        argocd
Address:
Default backend:  default-http-backend:80 (<error: endpoints "default-http-backend" not found>)
Rules:
  Host                    Path  Backends
  ----                    ----  --------
  argocd.yinzhengjie.com
                          /   argocd-server:80 (10.100.1.62:8080,10.100.2.56:8080)
Annotations:              <none>
Events:
  Type    Reason  Age   From                      Message
  ----    ------  ----  ----                      -------
  Normal  Sync    6s    nginx-ingress-controller  Scheduled for sync
  Normal  Sync    6s    nginx-ingress-controller  Scheduled for sync
[root@master231 ~]#
5.4 基于ingress访问ArgoCD

	1.查看ingress的地址
[root@master231 ~]# kubectl -n argocd get svc argocd-server
NAME            TYPE        CLUSTER-IP      EXTERNAL-IP   PORT(S)          AGE
argocd-server   ClusterIP   10.200.232.95   <none>        80/TCP,443/TCP   13m
[root@master231 ~]#
[root@master231 ~]# kubectl -n yinzhengjie-ingress get svc myingress-ingress-nginx-controller
NAME                                 TYPE           CLUSTER-IP       EXTERNAL-IP   PORT(S)                      AGE
myingress-ingress-nginx-controller   LoadBalancer   10.200.246.193   10.0.0.150    80:31655/TCP,443:30261/TCP   2d14h
[root@master231 ~]#

	2.基于ingress访问ArgoCD
[root@master231 ~]# kubectl -n argocd get secrets argocd-initial-admin-secret  -o jsonpath={.data.password}  | base64 -d | more
k532uV1KCkK-4Fs0
[root@master231 ~]#


如上图所示,基于最新的密码进行访问。
6 ArgoCD客户端工具修改初始化密码
6.1 安装ArgoCD客户端工具
可通过客户端登录ArgoCD命令行或者直接修改admin登录密码登录。

官网地址:
	https://github.com/argoproj/argo-cd

实操案例:
	1.下载ArgoCD客户端工具
[root@master231 ~]# wget https://github.com/argoproj/argo-cd/releases/download/v2.7.17/argocd-linux-amd64


	2.将ArgoCD客户端软件添加到PATH变量
[root@master231 ~]# mv argocd-linux-amd64 /usr/local/bin/argocd
[root@master231 ~]#
[root@master231 ~]# chmod +x /usr/local/bin/argocd
[root@master231 ~]#
[root@master231 ~]# ll /usr/local/bin/argocd
-rwxr-xr-x 1 root root 142333400 Dec  4 11:32 /usr/local/bin/argocd*
[root@master231 ~]#


	3.查看Argo的版本信息
[root@master231 ~]# kubectl -n argocd get svc argocd-server
NAME            TYPE        CLUSTER-IP      EXTERNAL-IP   PORT(S)          AGE
argocd-server   ClusterIP   10.200.232.95   <none>        80/TCP,443/TCP   40m
[root@master231 ~]#
[root@master231 ~]# argocd version --server 10.200.232.95 --plaintext
argocd: v2.7.17+13d723d
  BuildDate: 2024-02-02T18:47:02Z
  GitCommit: 13d723df9cd59b3a49ee54ab7c38f759dbc56179
  GitTreeState: clean
  GoVersion: go1.20.13
  Compiler: gc
  Platform: linux/amd64
argocd-server: v2.7.17+13d723d.dirty
[root@master231 ~]#


相关参数说明:
	--server:
		表示指定Argo服务器的地址。

	--plaintext:
		表示Argo服务器禁用tls加密。
6.2 使用ArgoCD客户端工具登录
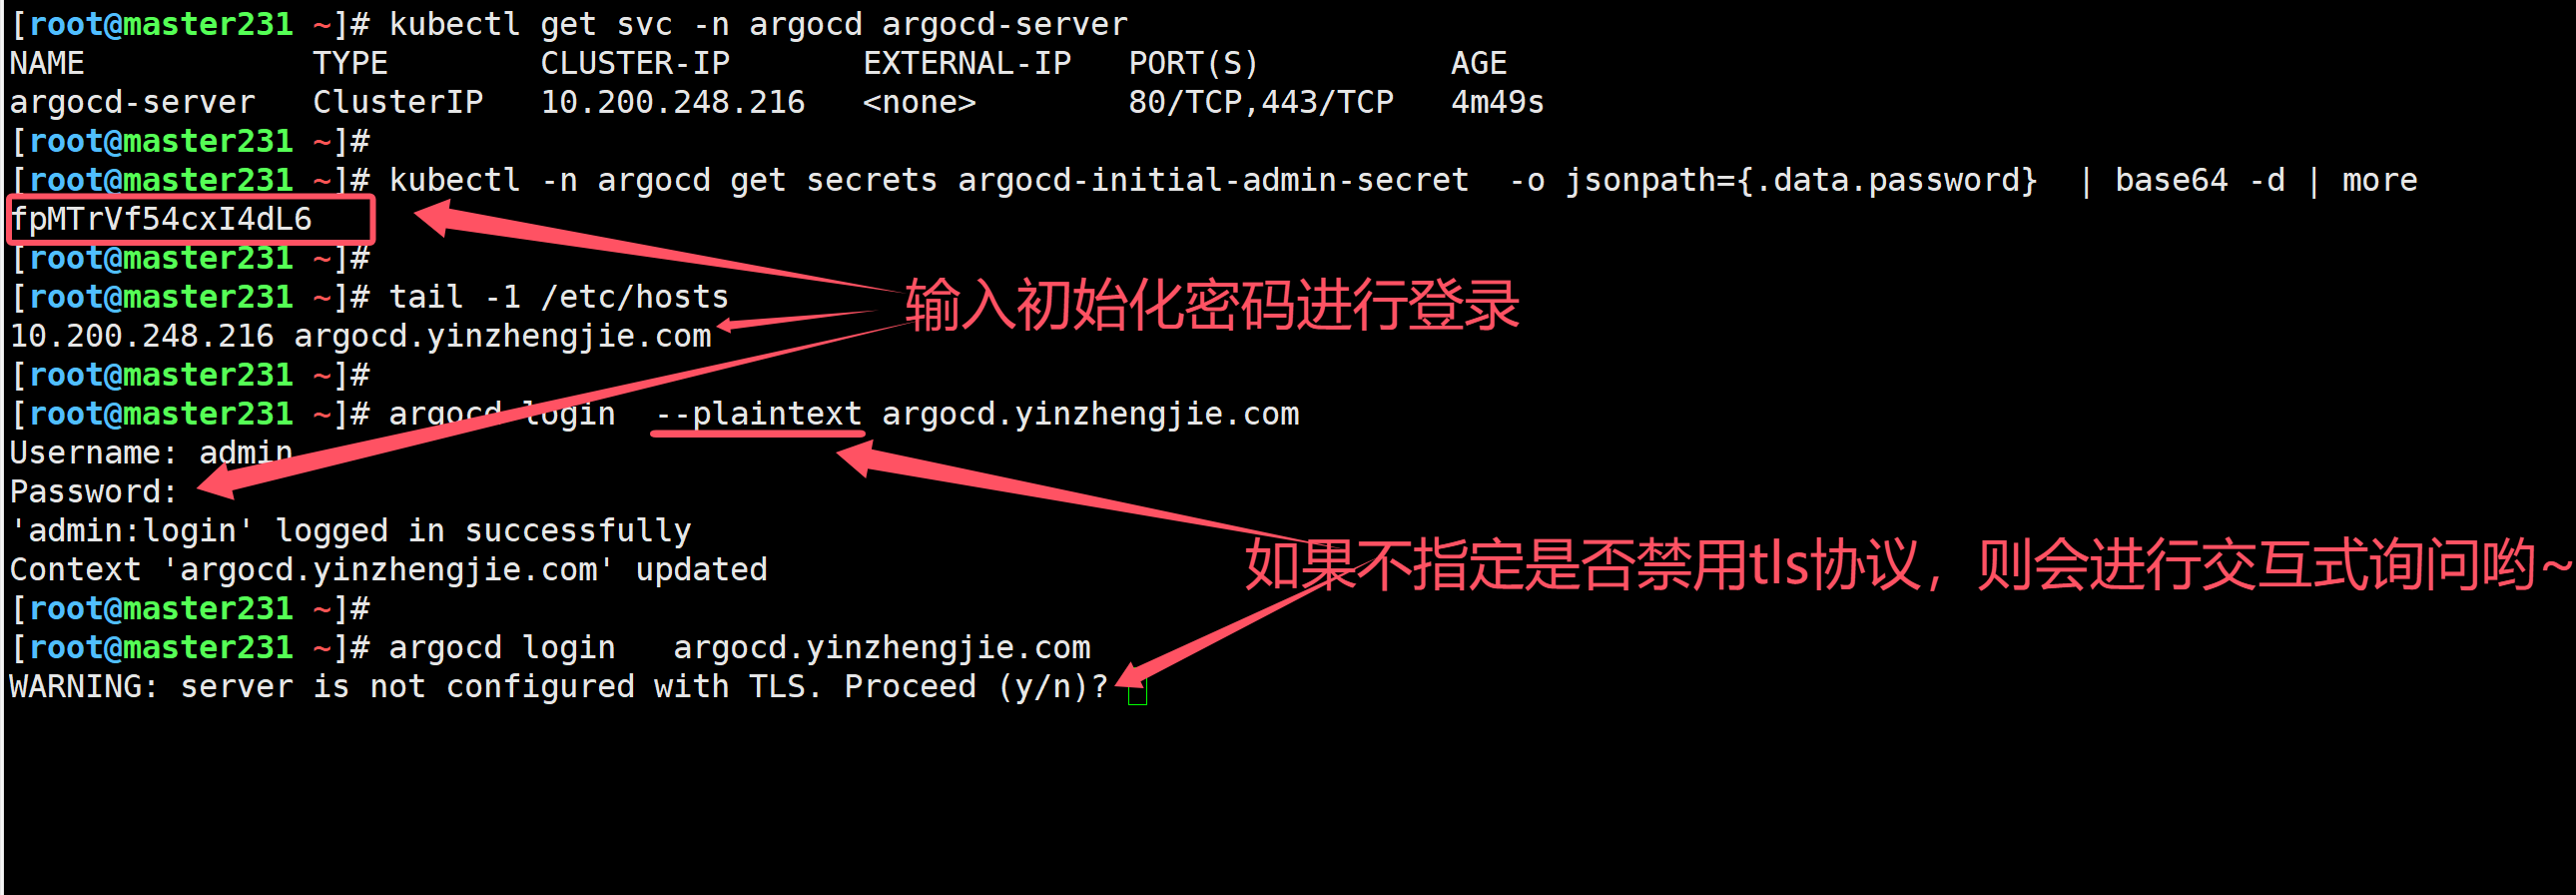
	1.查看默认的初始化密码
[root@master231 ~]# kubectl get svc -n argocd argocd-server
NAME            TYPE        CLUSTER-IP       EXTERNAL-IP   PORT(S)          AGE
argocd-server   ClusterIP   10.200.248.216   <none>        80/TCP,443/TCP   2m33s
[root@master231 ~]#
[root@master231 ~]# kubectl -n argocd get secrets argocd-initial-admin-secret  -o jsonpath={.data.password}  | base64 -d | more
fpMTrVf54cxI4dL6
[root@master231 ~]#


	2.添加svc的IP地址到host文件解析
[root@master231 ~]# tail -1 /etc/hosts
10.200.248.216 argocd.yinzhengjie.com
[root@master231 ~]#

	3.登录argocd,如上图所示
[root@master231 ~]# argocd login  --plaintext argocd.yinzhengjie.com
Username: admin
Password:  # 注意哈,此处输入上面我们的密码即可。
'admin:login' logged in successfully
Context 'argocd.yinzhengjie.com' updated
[root@master231 ~]#

	4.退出登录
[root@master231 ~]# argocd logout   argocd.yinzhengjie.com
Logged out from 'argocd.yinzhengjie.com'
[root@master231 ~]#


	5.基于命令行免交互登录
[root@master231 ~]# argocd login  --plaintext argocd.yinzhengjie.com  --username admin --password fpMTrVf54cxI4dL6
'admin:login' logged in successfully
Context 'argocd.yinzhengjie.com' updated
[root@master231 ~]#
6.3 使用ArgoCD工具修改初始化密码
1.先登录
[root@master231 ~]# argocd login --plaintext argocd.yinzhengjie.com --username admin --password fpMTrVf54cxI4dL6
'admin:login' logged in successfully
Context 'argocd.yinzhengjie.com' updated
[root@master231 ~]#
2.后修改密码
[root@master231 ~]# argocd account update-password --account admin --current-password fpMTrVf54cxI4dL6 --new-password yinzhengjie
Password updated
Context 'argocd.yinzhengjie.com' updated
[root@master231 ~]#
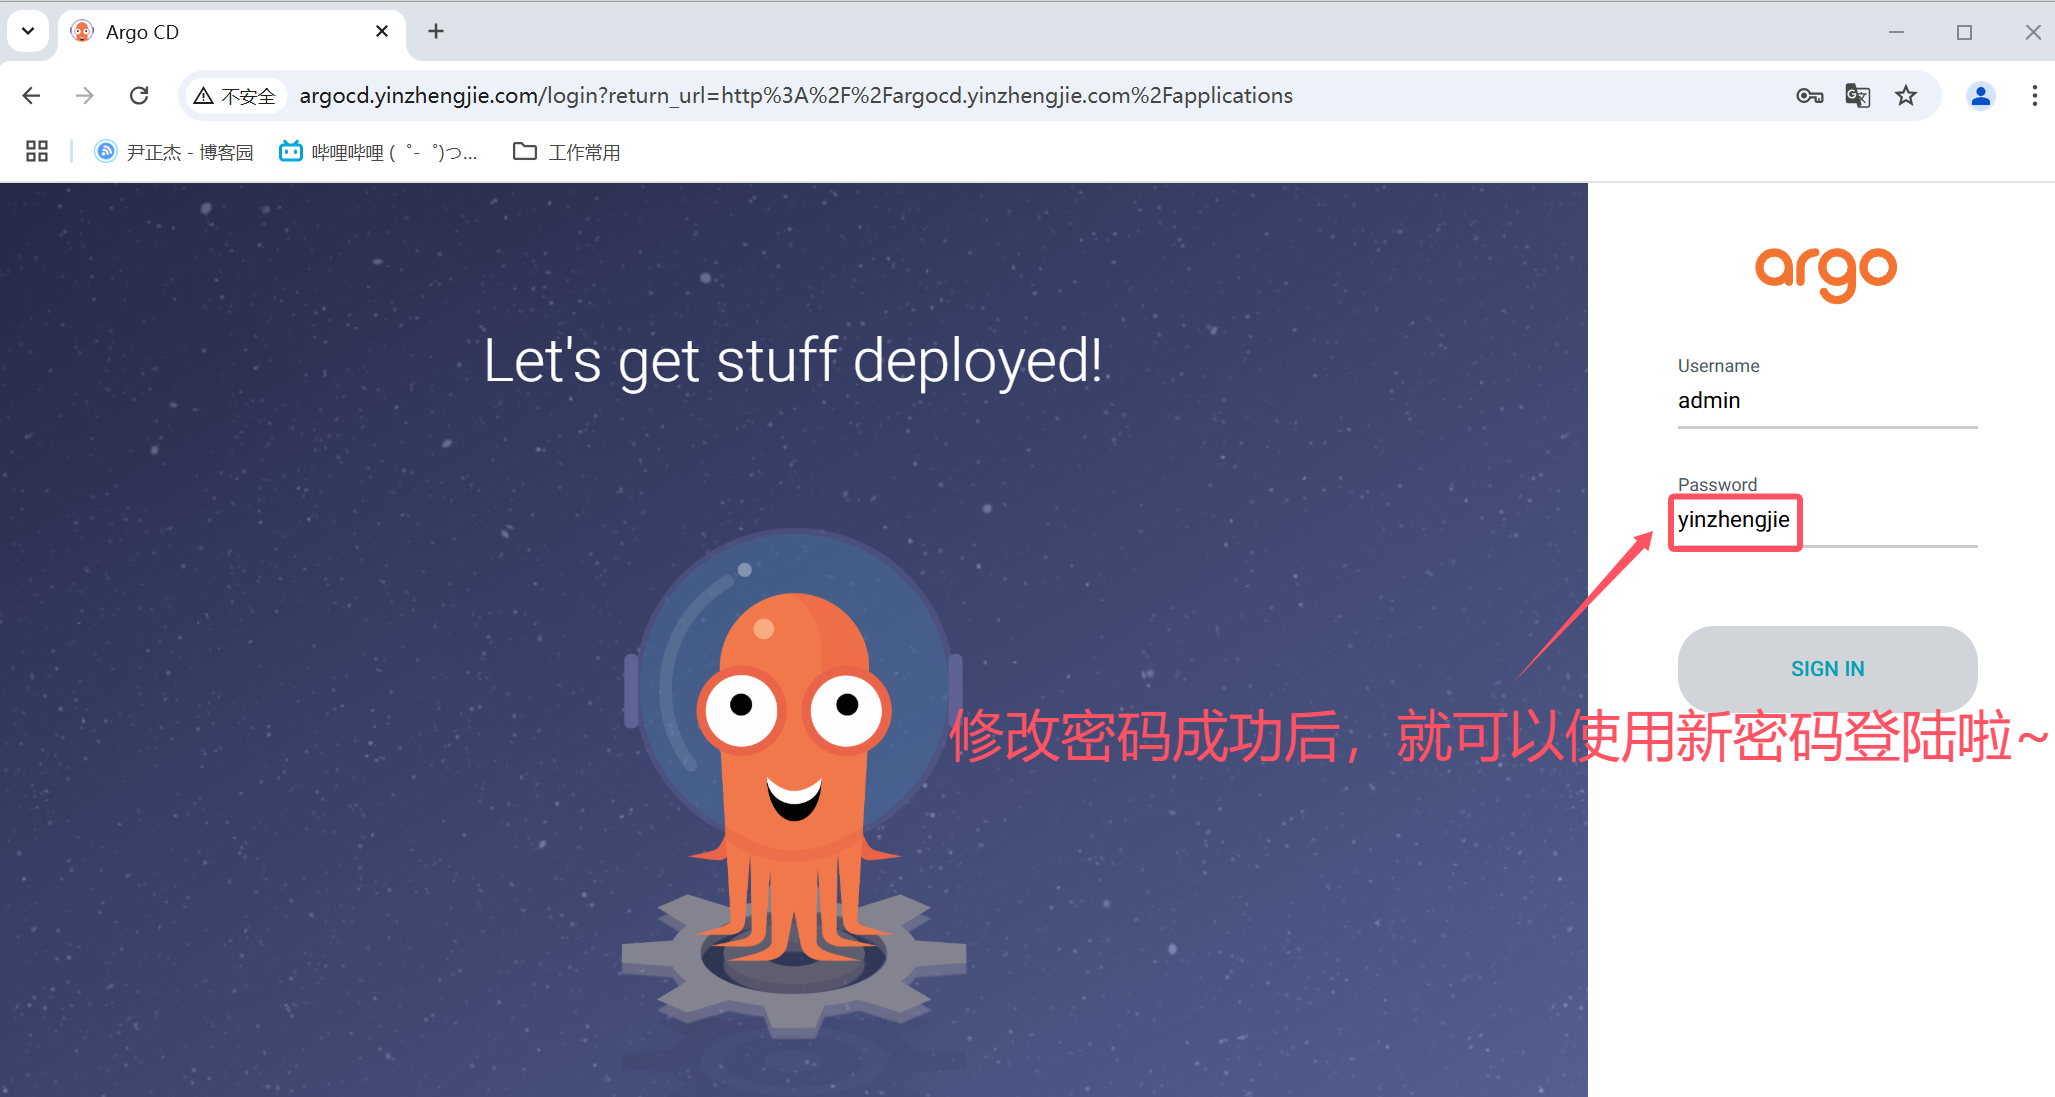
3.使用新密码登录
如上图所示。
本文来自博客园,作者:尹正杰,转载请注明原文链接:https://www.cnblogs.com/yinzhengjie/p/18731690,个人微信: "JasonYin2020"(添加时请备注来源及意图备注,有偿付费)
当你的才华还撑不起你的野心的时候,你就应该静下心来学习。当你的能力还驾驭不了你的目标的时候,你就应该沉下心来历练。问问自己,想要怎样的人生。

 浙公网安备 33010602011771号