

Istio 1.17.8(适配K8S 1.23.17版本)安装及Bookinfo环境部署
作者:尹正杰
版权声明:原创作品,谢绝转载!否则将追究法律责任。
一.Service Mesh服务网格
1.服务代理模式

身为架构师要考虑微服务的几个要点:
	- 服务注册与发现;
	- 负载均衡;

主流的三种服务模式:
	- 集中式代理:
		负载均衡器,典型代表为: nginx,haproxy,lvs

	- 嵌入式代理:
		需要借助一个中间件,然后调用其他组件,典型代表就是dubbo应用的provider和consumer。

	- 主机独立进程代理
		将嵌入式代理功能封装到底层组件,让开发者仅关心业务实现,典型的代表为"Envoy"。
2.什么是Service Mesh
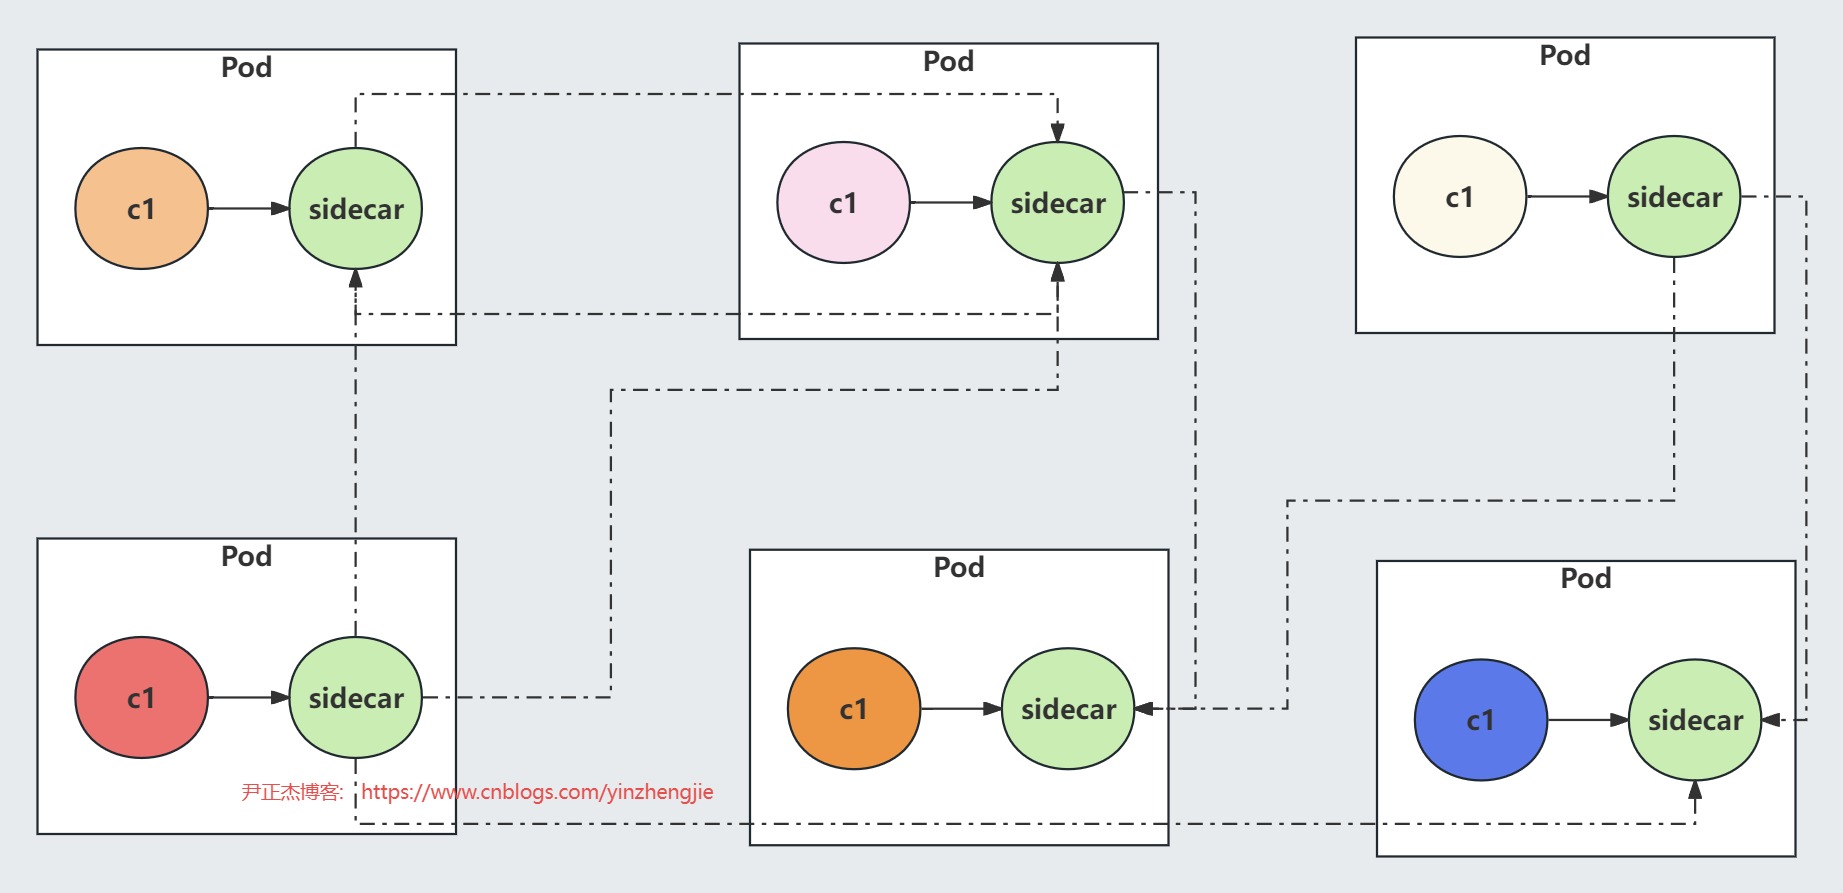
所谓的Service Mesh就是一堆主机独立进程代理相互调用,形成类似服务网格的效果。

国内蚂蚁金服的mson,网易的轻舟都是Server Mesh的实现。我们即将学习的Istio就是Service Mesh的一种实现。

有网友曾打比方:
	第一代微服务代表: Spring  Cloud,Dubbo,...
	第二代微服务代表: Service Mesh,....

虽然这样打比方不太准确,但足以说明Service Mesh的重要程度。
二.部署Istio
1.Istio概述
Istio是Google、IBM和Lyft联合开源的微服务Service Mesh框架,旨在解决大量微服务的发现、连接、管理、监控以及安全等问题。

Istio的主要特性包括:
	- HTTP、gRPC和TCP网络流量的自动负载均衡
	- 丰富的路由规则,细粒度的网络流量行为控制
	- 流量加密、服务间认证,以及强身份声明
	- 全范围(Fleet-wide)策略执行
	- 深度遥测和报告

Istio是2017年5月发布的第一个的0.1版本,目的是为了抢占市场。

但是在2018年7月才发布了1.0版本,而在2020年的3月发布了1.5版本。2022年的2月份发布了1.13版本。2023年2月份发布了1.17版本。2023年9月份发布了1.20版本。

参考链接:
  https://istio.io/latest/zh/docs/releases/supported-releases/#support-status-of-istio-releases
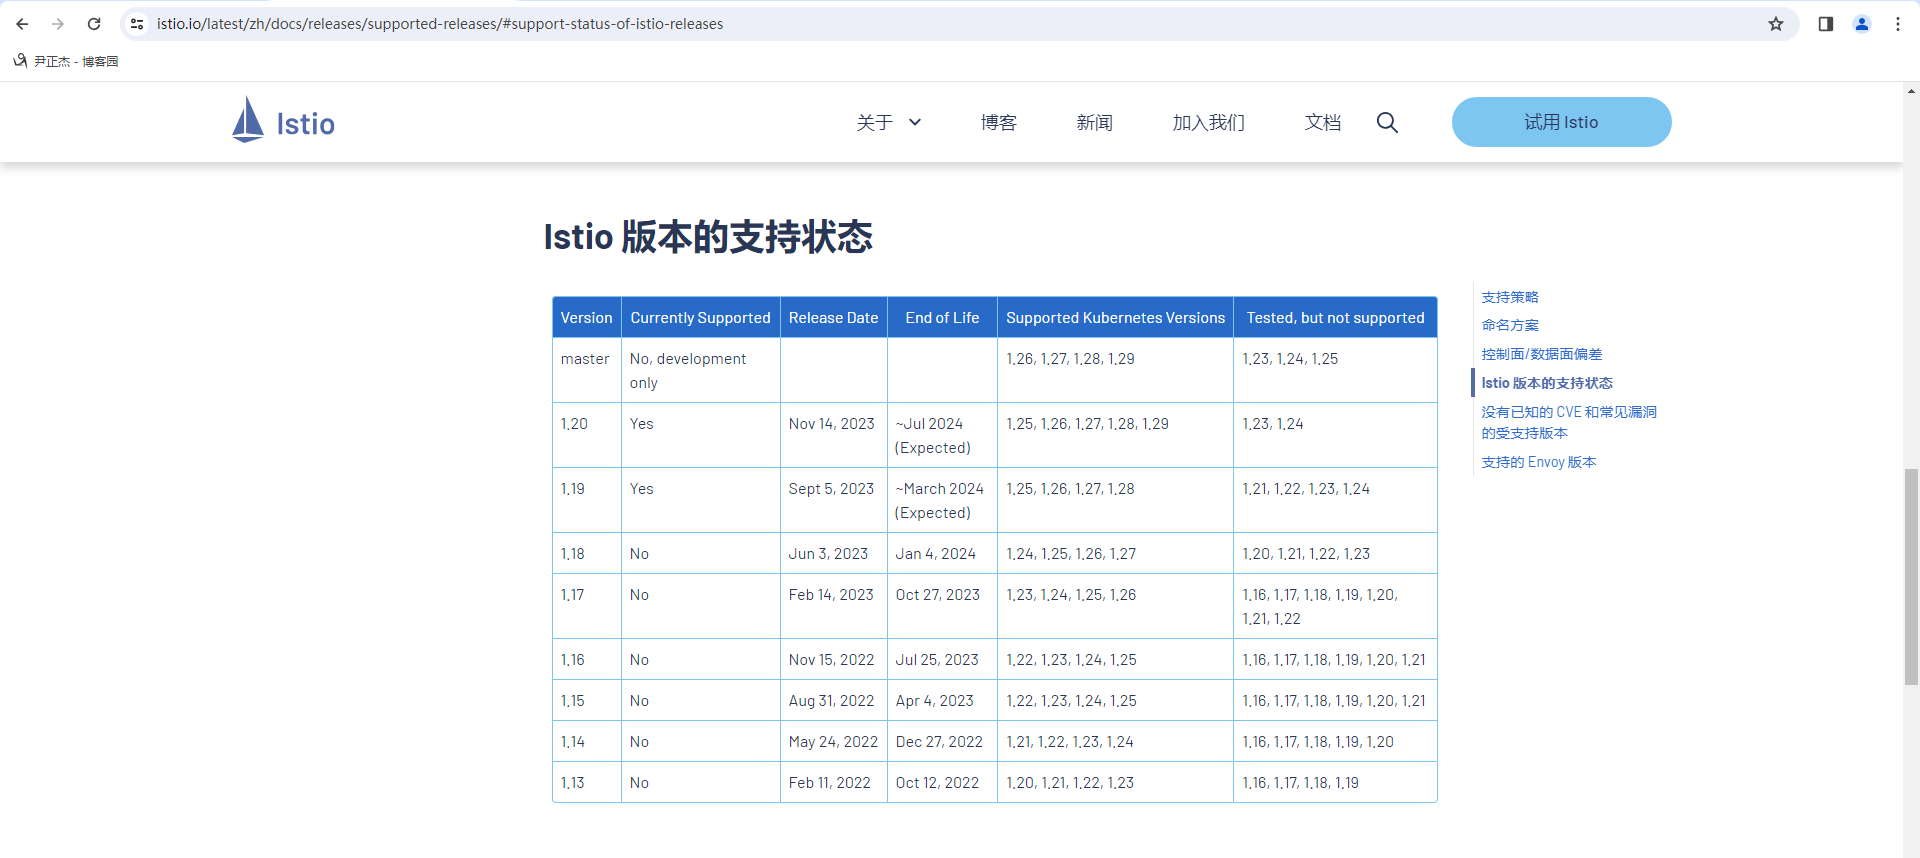
2.Istio各版本支持的K8S版本
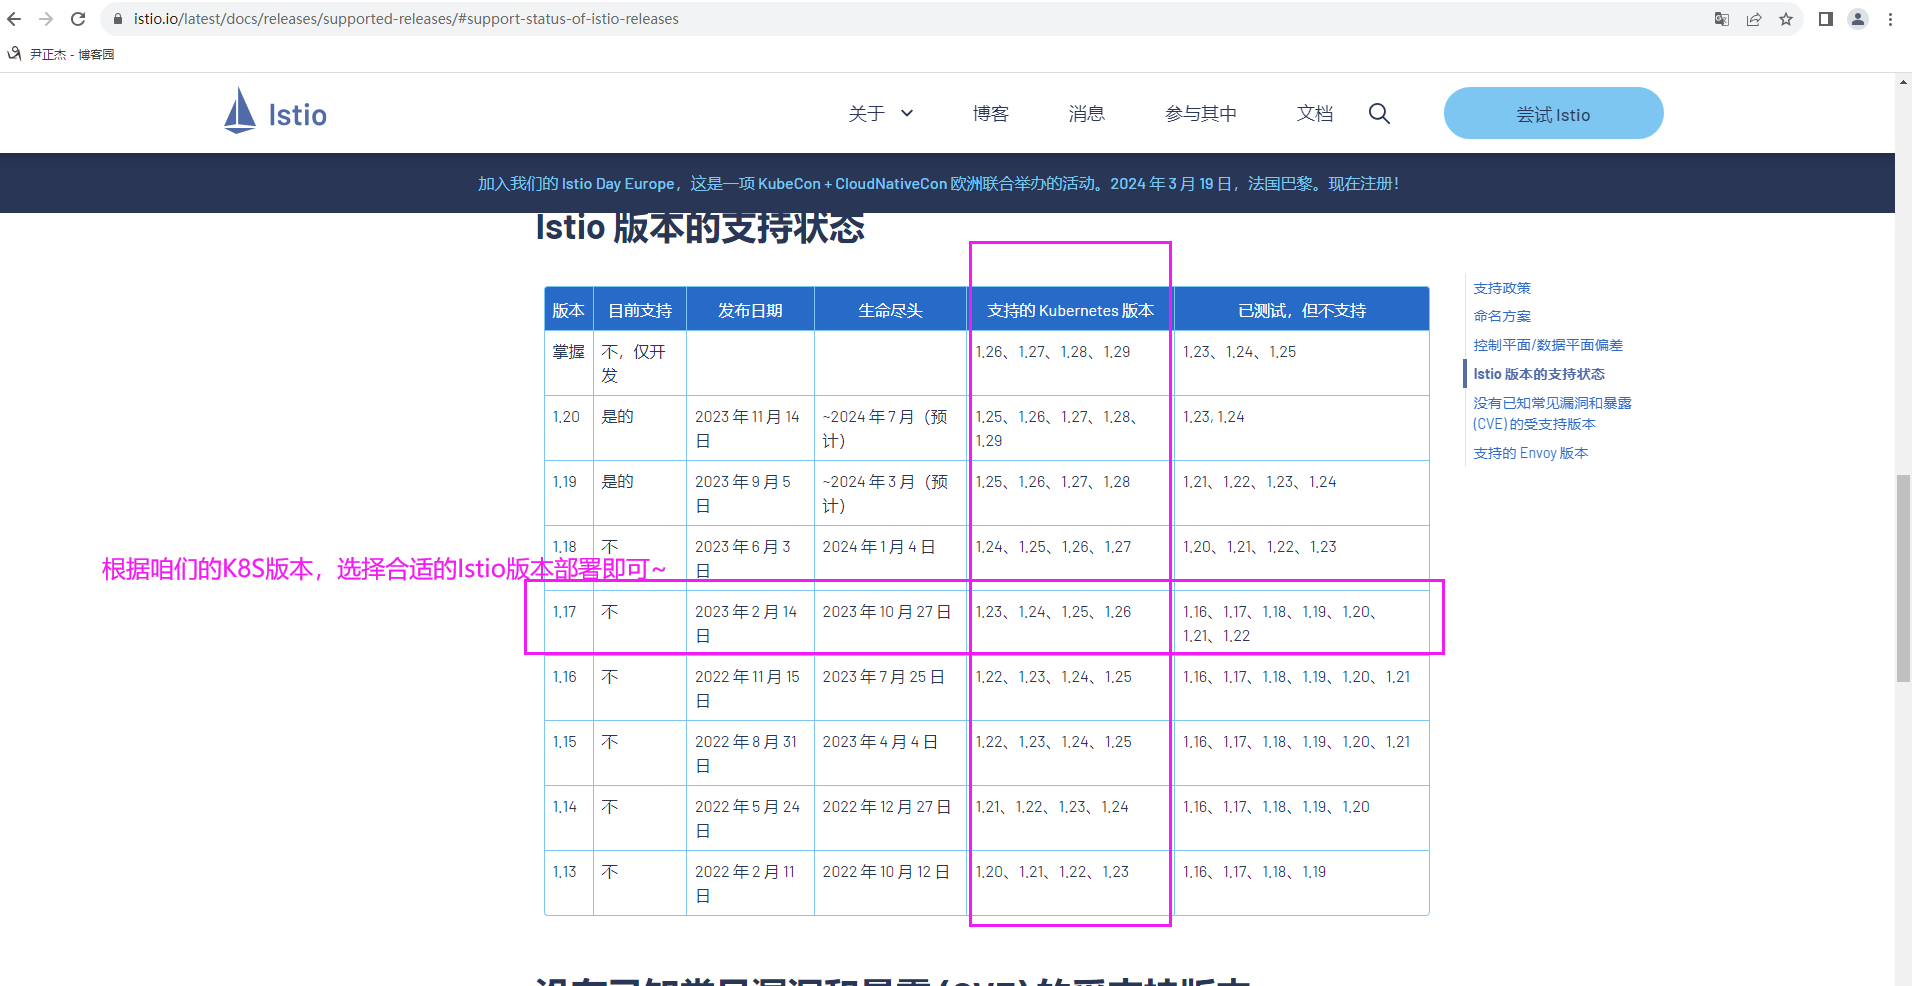
如上图所示,我们要选择合适咱们K8S集群的Istio版本进行部署。

参考地址:
	https://istio.io/latest/docs/releases/supported-releases/#support-status-of-istio-releases
3.下载指定版本的Istio
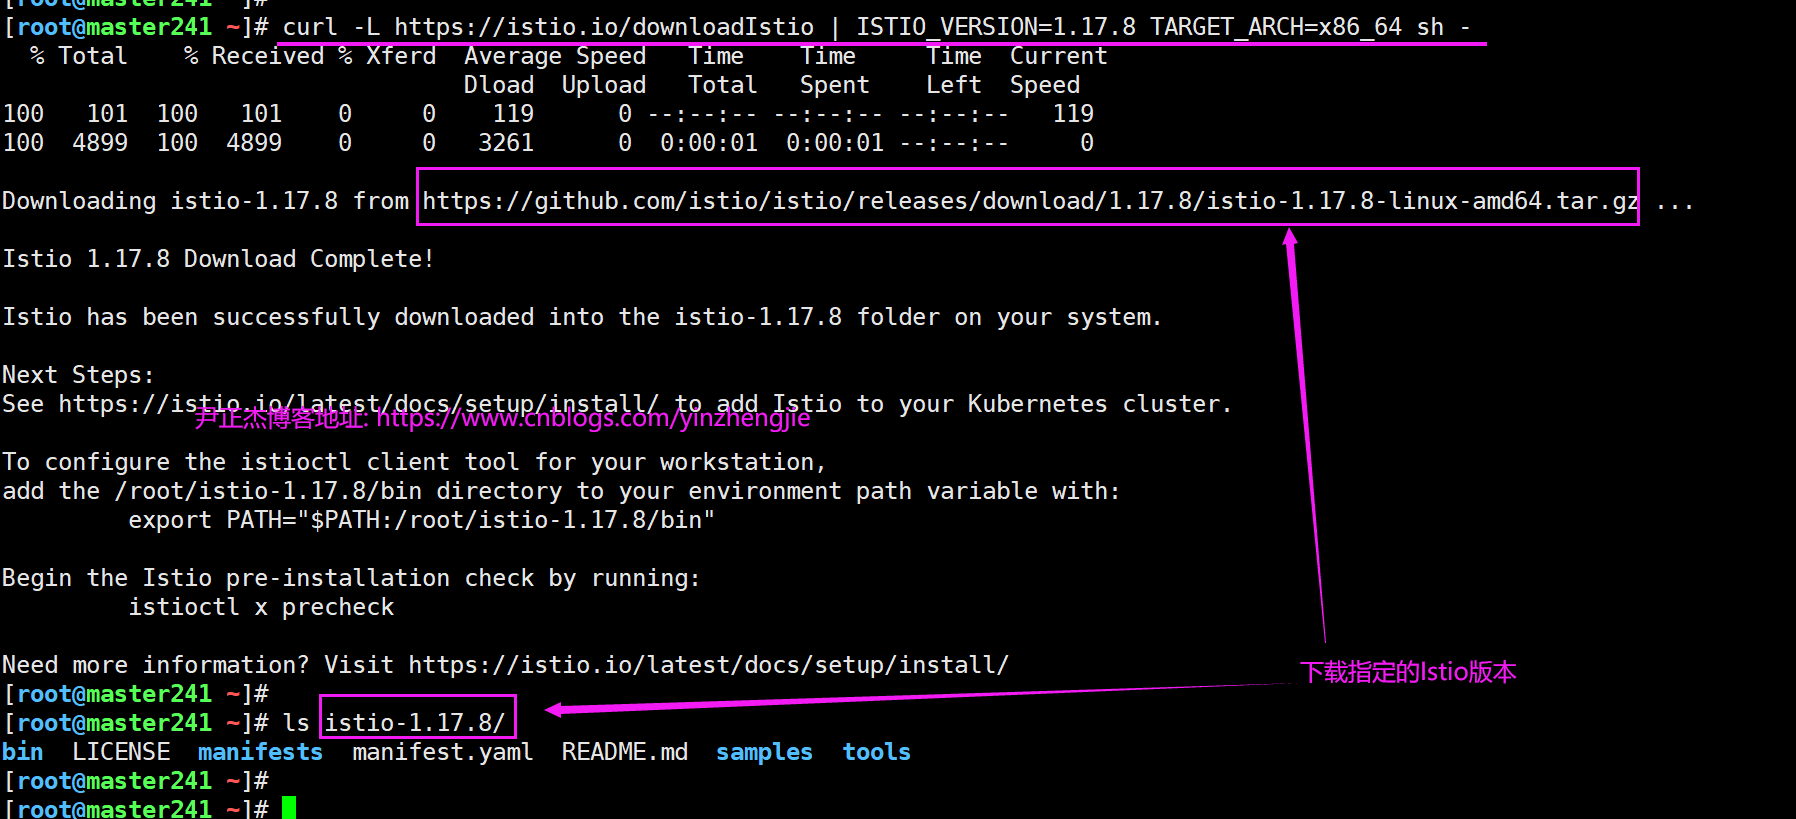
[root@master241 ~]# curl -L https://istio.io/downloadIstio | ISTIO_VERSION=1.17.8 TARGET_ARCH=x86_64 sh -


参考链接:
	https://istio.io/v1.17/zh/docs/setup/getting-started/#download
4.配置Istioctl工具的环境变量

[root@master241 ~]# echo 'export PATH="$PATH:/root/istio-1.17.8/bin"' > /etc/profile.d/istio.sh
[root@master241 ~]#
[root@master241 ~]# source /etc/profile.d/istio.sh
[root@master241 ~]#
[root@master241 ~]# istioctl --help
Istio configuration command line utility for service operators to
debug and diagnose their Istio mesh.

Usage:
  istioctl [command]

Available Commands:
  admin                Manage control plane (istiod) configuration
  analyze              Analyze Istio configuration and print validation messages
  authz                (authz is experimental. Use `istioctl experimental authz`)
  bug-report           Cluster information and log capture support tool.
  completion           Generate the autocompletion script for the specified shell
  create-remote-secret Create a secret with credentials to allow Istio to access remote Kubernetes apiservers
  dashboard            Access to Istio web UIs
  experimental         Experimental commands that may be modified or deprecated
  help                 Help about any command
  install              Applies an Istio manifest, installing or reconfiguring Istio on a cluster.
  kube-inject          Inject Istio sidecar into Kubernetes pod resources
  manifest             Commands related to Istio manifests
  operator             Commands related to Istio operator controller.
  profile              Commands related to Istio configuration profiles
  proxy-config         Retrieve information about proxy configuration from Envoy [kube only]
  proxy-status         Retrieves the synchronization status of each Envoy in the mesh [kube only]
  remote-clusters      Lists the remote clusters each istiod instance is connected to.
  tag                  Command group used to interact with revision tags
  uninstall            Uninstall Istio from a cluster
  upgrade              Upgrade Istio control plane in-place
  validate             Validate Istio policy and rules files
  verify-install       Verifies Istio Installation Status
  version              Prints out build version information

Flags:
      --context string          The name of the kubeconfig context to use
  -h, --help                    help for istioctl
  -i, --istioNamespace string   Istio system namespace (default "istio-system")
  -c, --kubeconfig string       Kubernetes configuration file
  -n, --namespace string        Config namespace
      --vklog Level             number for the log level verbosity. Like -v flag. ex: --vklog=9

Additional help topics:
  istioctl options                           Displays istioctl global options

Use "istioctl [command] --help" for more information about a command.
[root@master241 ~]#
5.安装Istio

[root@master241 ~]# istioctl install --set profile=demo -y # 安装demo的配置
[root@master241 ~]#
[root@master241 ~]# istioctl profile dump demo|default|minimal|... # 查看你想要查看的配置即可。
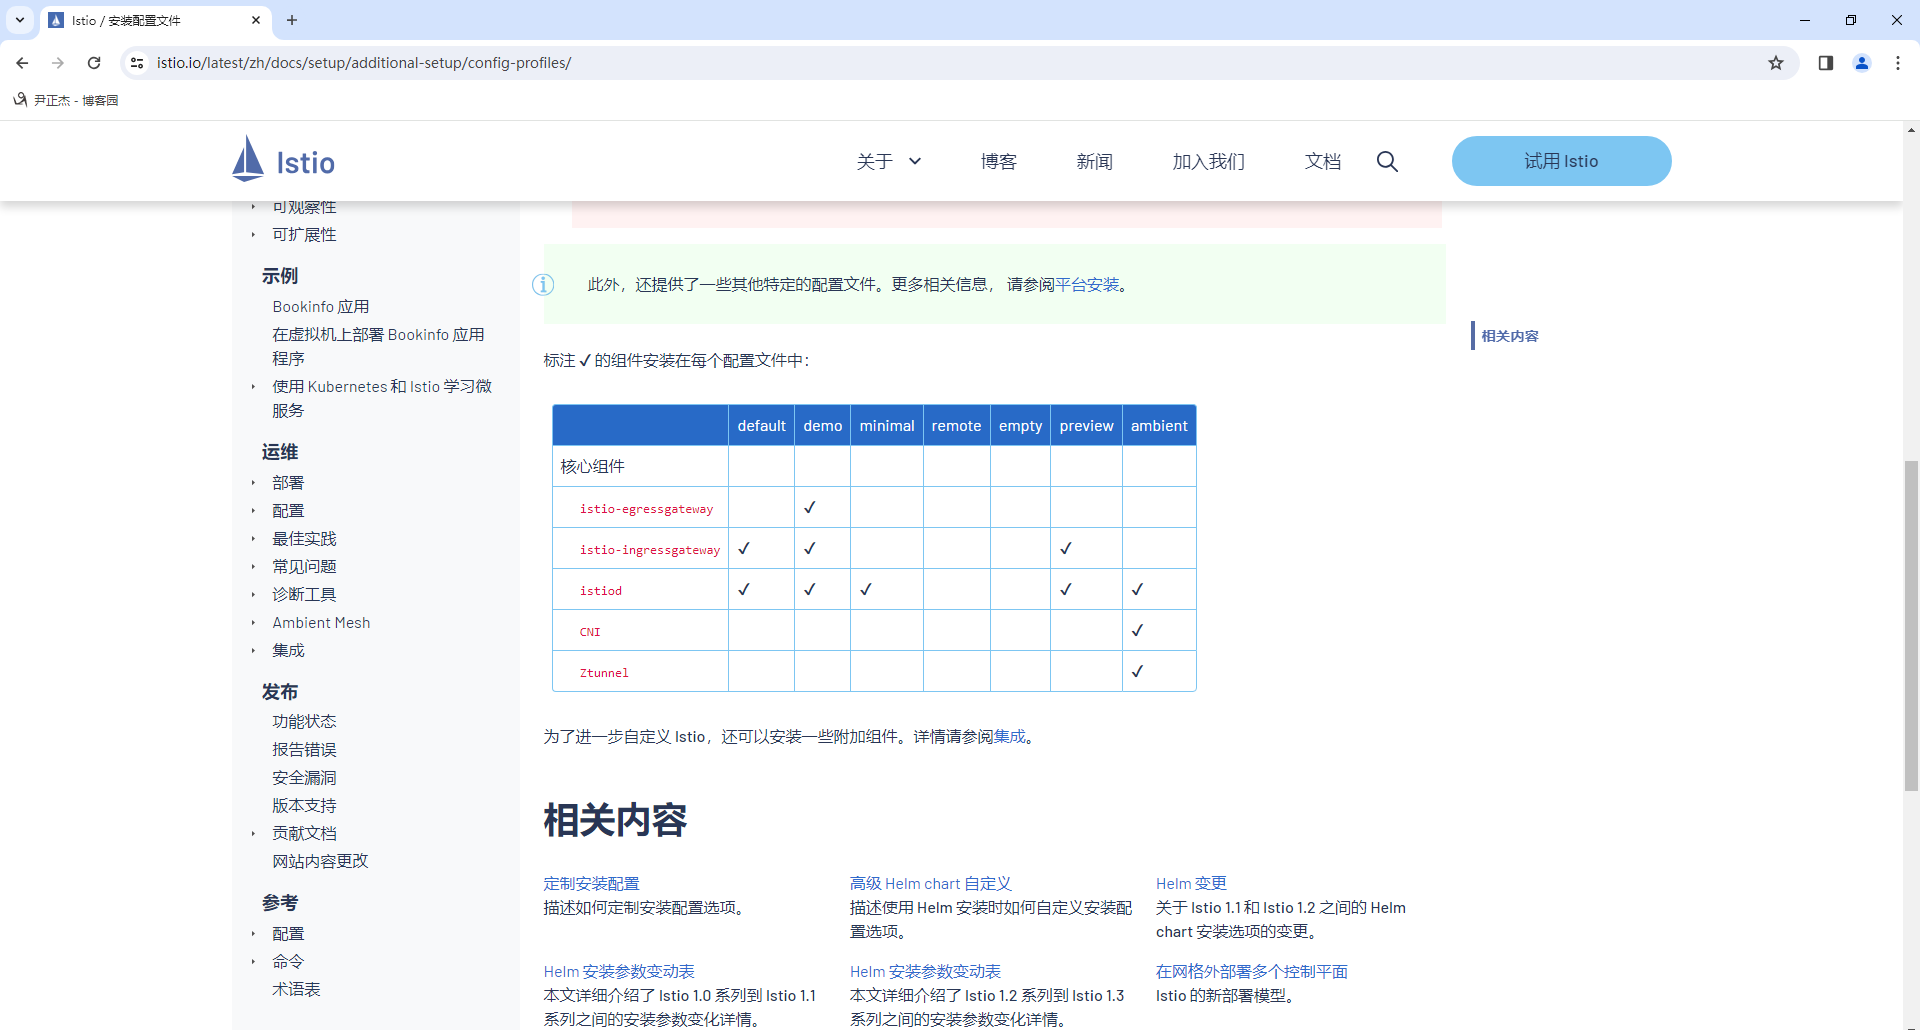
在安装 Istio 时所能够使用的内置配置文件。这些配置文件提供了对Istio控制平面和Istio数据平面Sidecar的定制内容。
您可以从Istio内置配置文件的其中一个开始入手,然后根据您的特定需求进一步自定义配置文件。当前提供以下几种内置配置文件:
- default:
根据 IstioOperator API 的默认设置启动组件。
建议用于生产部署和 Multicluster Mesh 中的 Primary Cluster。
您可以运行 istioctl profile dump 命令来查看默认设置。
- demo:
这一配置具有适度的资源需求,旨在展示 Istio 的功能。
它适合运行 Bookinfo 应用程序和相关任务。 这是通过快速开始指导安装的配置。
此配置文件启用了高级别的追踪和访问日志,因此不适合进行性能测试。
- minimal:
与默认配置文件相同,但只安装了控制平面组件。
它允许您使用 Separate Profile 配置控制平面和数据平面组件(例如 Gateway)。
- remote:
配置 Multicluster Mesh 的 Remote Cluster。
- empty:
不部署任何东西。可以作为自定义配置的基本配置文件。
- preview:
预览文件包含的功能都是实验性。这是为了探索 Istio 的新功能。不确保稳定性、安全性和性能(使用风险需自负)。
参考链接:
https://istio.io/v1.17/zh/docs/setup/additional-setup/config-profiles/
https://istio.io/v1.17/zh/docs/setup/getting-started/#download
6.给命名空间添加标签
kubectl label namespace default istio-injection=enabled


温馨提示:
	打上标签后,以后但凡是在default名称空间部署应用时,都会同时自动部署一个sidecar容器用于代理网络相关的工作。
	换句话说,一个Pod内处理有应用容器外,还会自动注入一个"istio-proxy"的容器用户做网络的相关代理。
7.添加Istioctl客户端工具的自动补全功能
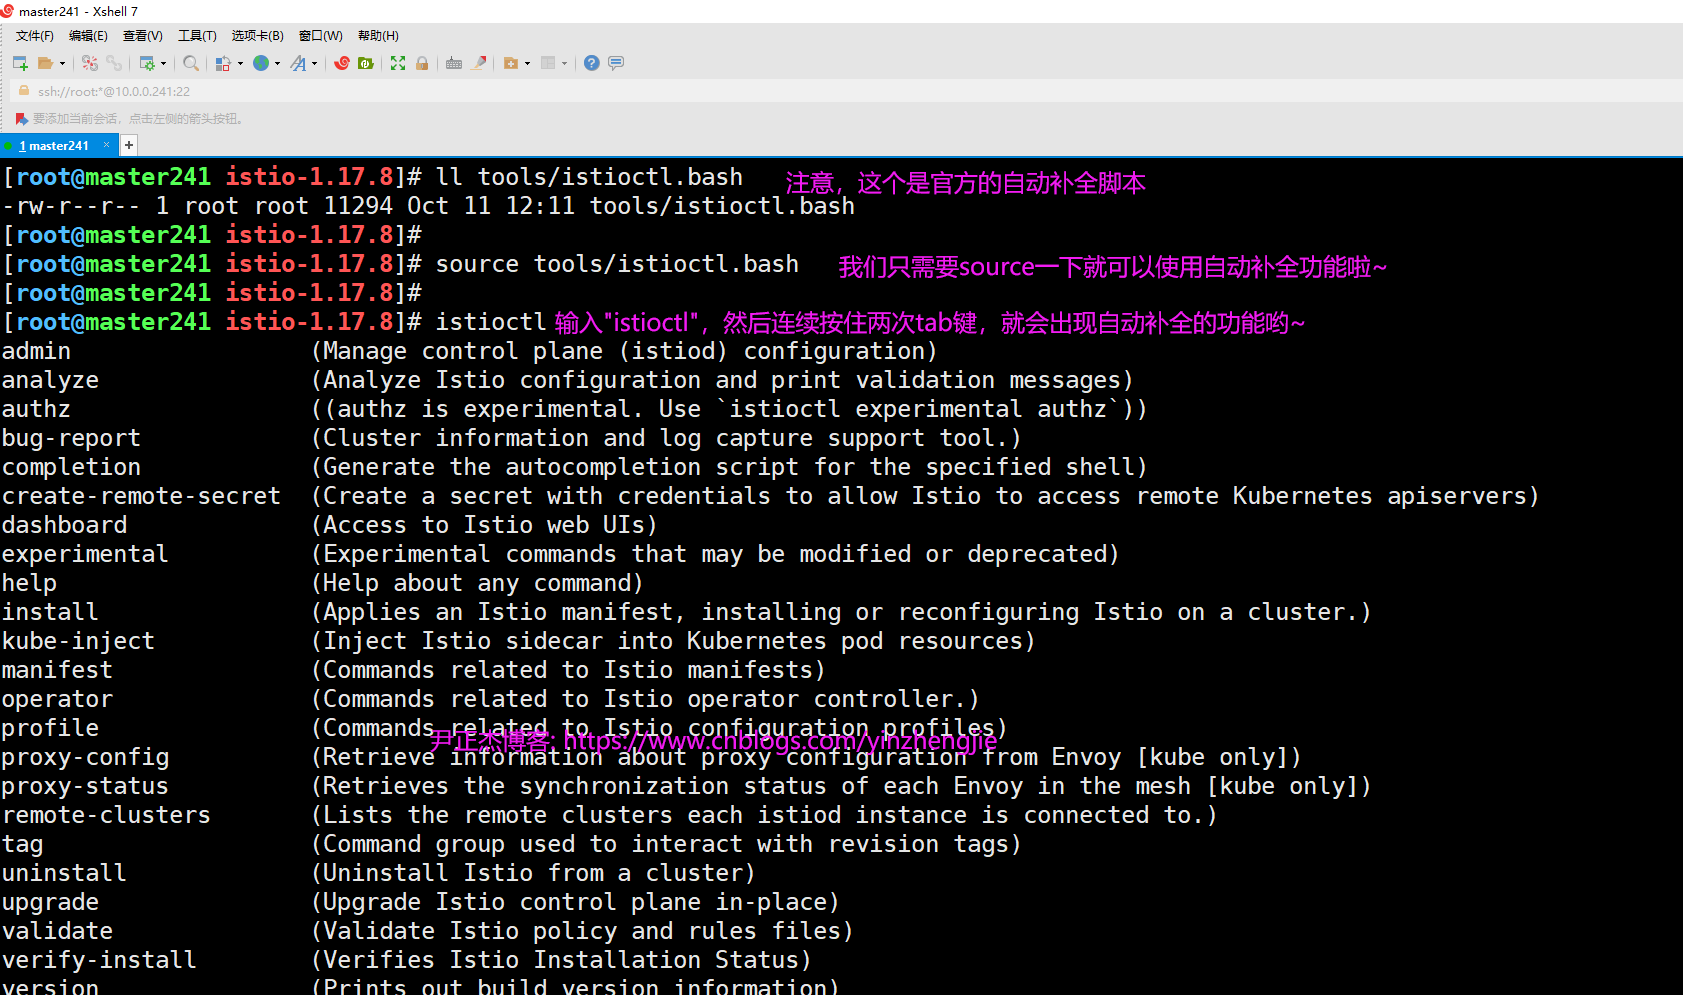
[root@master241 istio-1.17.8]# ll tools/istioctl.bash
-rw-r--r-- 1 root root 11294 Oct 11 12:11 tools/istioctl.bash
[root@master241 istio-1.17.8]#
[root@master241 istio-1.17.8]# source tools/istioctl.bash
[root@master241 istio-1.17.8]#
[root@master241 istio-1.17.8]# istioctl
admin                 (Manage control plane (istiod) configuration)
analyze               (Analyze Istio configuration and print validation messages)
authz                 ((authz is experimental. Use `istioctl experimental authz`))
bug-report            (Cluster information and log capture support tool.)
completion            (Generate the autocompletion script for the specified shell)
create-remote-secret  (Create a secret with credentials to allow Istio to access remote Kubernetes apiservers)
dashboard             (Access to Istio web UIs)
experimental          (Experimental commands that may be modified or deprecated)
help                  (Help about any command)
install               (Applies an Istio manifest, installing or reconfiguring Istio on a cluster.)
kube-inject           (Inject Istio sidecar into Kubernetes pod resources)
manifest              (Commands related to Istio manifests)
operator              (Commands related to Istio operator controller.)
profile               (Commands related to Istio configuration profiles)
proxy-config          (Retrieve information about proxy configuration from Envoy [kube only])
proxy-status          (Retrieves the synchronization status of each Envoy in the mesh [kube only])
remote-clusters       (Lists the remote clusters each istiod instance is connected to.)
tag                   (Command group used to interact with revision tags)
uninstall             (Uninstall Istio from a cluster)
upgrade               (Upgrade Istio control plane in-place)
validate              (Validate Istio policy and rules files)
verify-install        (Verifies Istio Installation Status)
version               (Prints out build version information)
[root@master241 istio-1.17.8]#


温馨提示:
	如果想要永久生效,可以将这些命令放在Linux系统环境加载上执行,效果更佳哟~
7.查看Istio的版本
[root@master241 istio-1.17.8]# istioctl version
client version: 1.17.8
control plane version: 1.17.8
data plane version: 1.17.8 (8 proxies)
[root@master241 istio-1.17.8]#
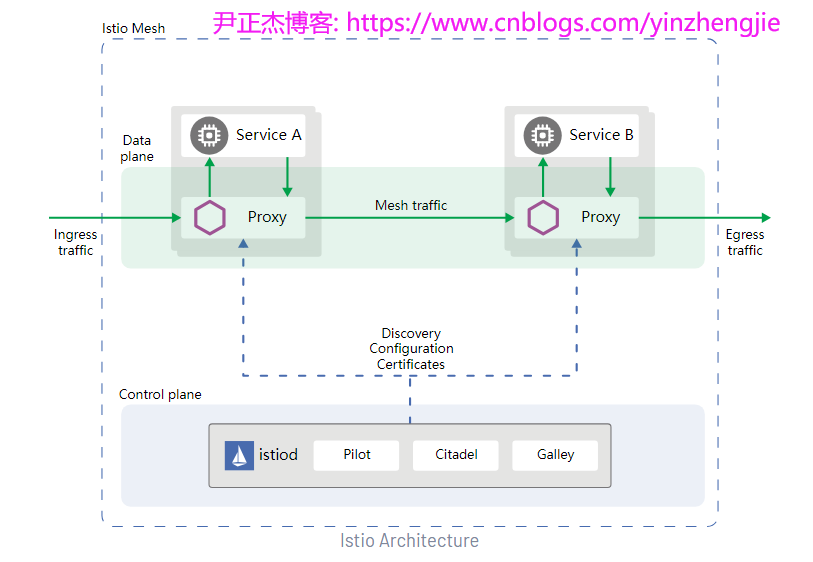
参考链接:
https://istio.io/latest/zh/docs/ops/deployment/architecture/
三.部署示例应用
1.部署Bookinfo示例应用
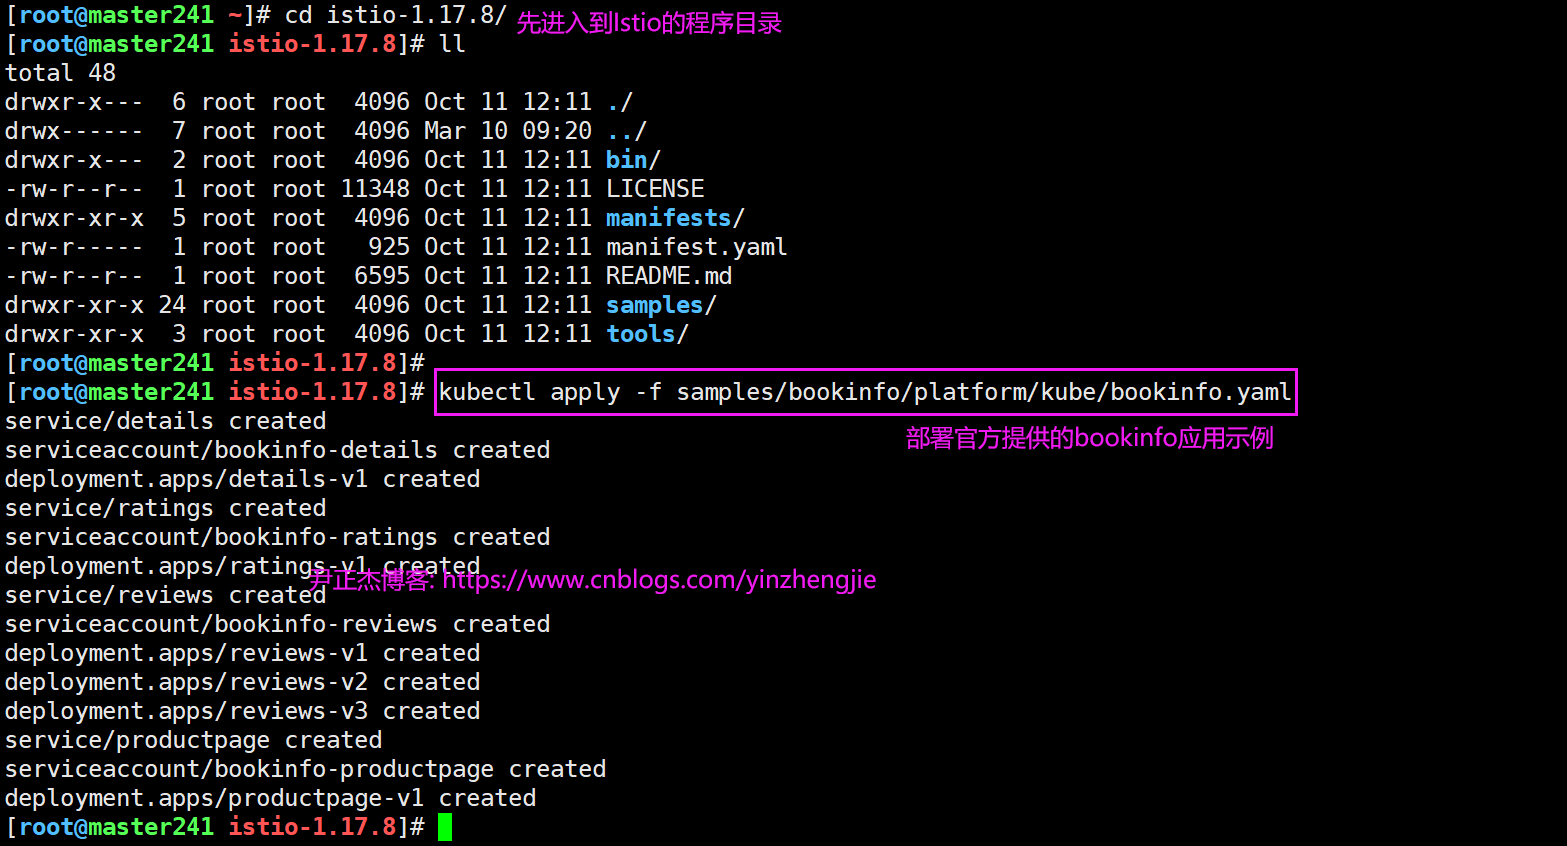
[root@master241 ~]# cd istio-1.17.8/
[root@master241 istio-1.17.8]#
[root@master241 istio-1.17.8]# kubectl apply -f samples/bookinfo/platform/kube/bookinfo.yaml
service/details created
serviceaccount/bookinfo-details created
deployment.apps/details-v1 created
service/ratings created
serviceaccount/bookinfo-ratings created
deployment.apps/ratings-v1 created
service/reviews created
serviceaccount/bookinfo-reviews created
deployment.apps/reviews-v1 created
deployment.apps/reviews-v2 created
deployment.apps/reviews-v3 created
service/productpage created
serviceaccount/bookinfo-productpage created
deployment.apps/productpage-v1 created
[root@master241 istio-1.17.8]#
2.查看部署结果
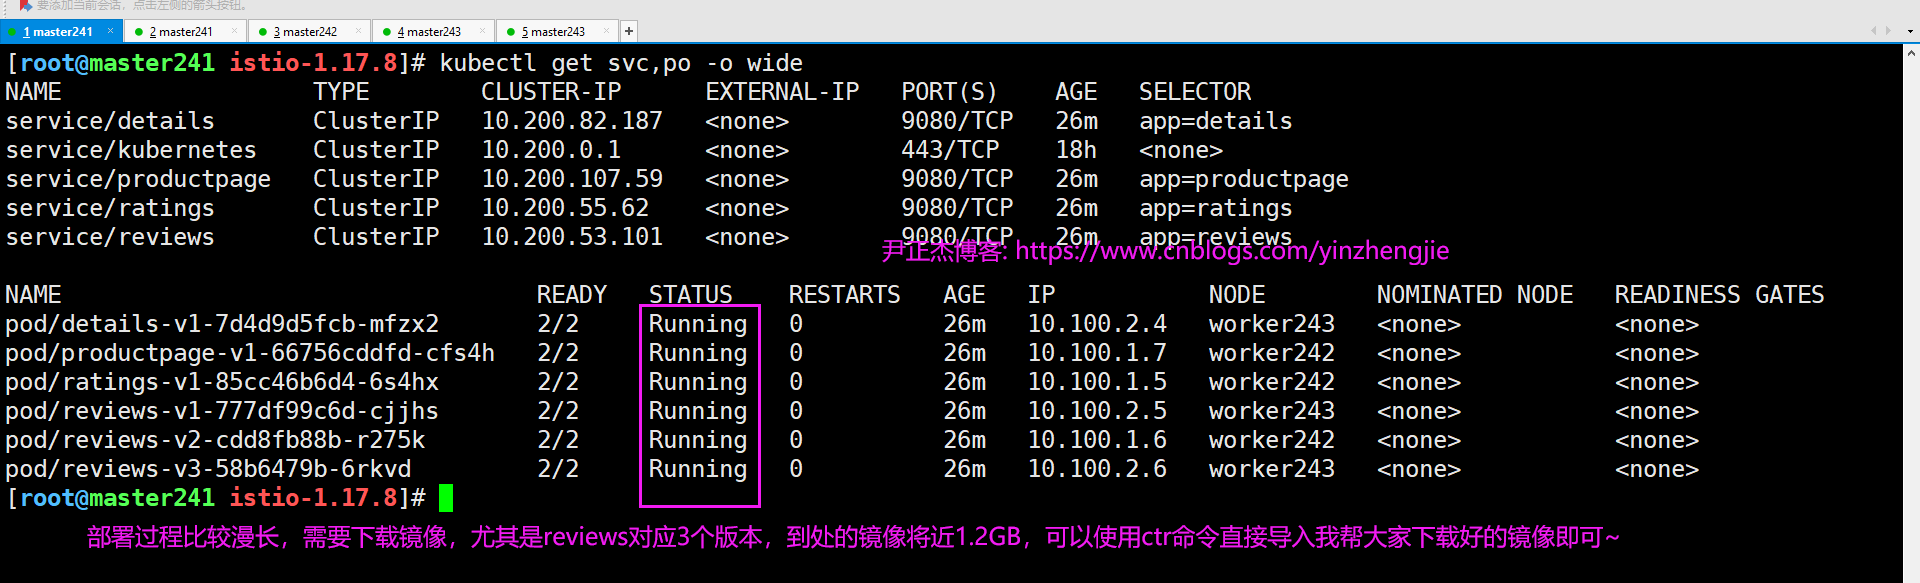
[root@master241 istio-1.17.8]# kubectl get svc,po -o wide
NAME                  TYPE        CLUSTER-IP       EXTERNAL-IP   PORT(S)    AGE   SELECTOR
service/details       ClusterIP   10.200.133.132   <none>        9080/TCP   16s   app=details
service/kubernetes    ClusterIP   10.200.0.1       <none>        443/TCP    19h   <none>
service/productpage   ClusterIP   10.200.92.185    <none>        9080/TCP   15s   app=productpage
service/ratings       ClusterIP   10.200.51.82     <none>        9080/TCP   16s   app=ratings
service/reviews       ClusterIP   10.200.249.45    <none>        9080/TCP   16s   app=reviews

NAME                                  READY   STATUS    RESTARTS   AGE   IP            NODE        NOMINATED NODE   READINESS GATES
pod/details-v1-7d4d9d5fcb-dqzbp       2/2     Running   0          16s   10.100.2.10   worker243   <none>           <none>
pod/productpage-v1-66756cddfd-lrv2b   2/2     Running   0          15s   10.100.1.11   worker242   <none>           <none>
pod/ratings-v1-85cc46b6d4-tlvt5       2/2     Running   0          16s   10.100.1.9    worker242   <none>           <none>
pod/reviews-v1-777df99c6d-mxhrt       2/2     Running   0          15s   10.100.2.11   worker243   <none>           <none>
pod/reviews-v2-cdd8fb88b-mkzwv        2/2     Running   0          15s   10.100.1.10   worker242   <none>           <none>
pod/reviews-v3-58b6479b-t89wd         2/2     Running   0          15s   10.100.2.12   worker243   <none>           <none>
[root@master241 istio-1.17.8]#


温馨提示:
	当每个Pod准备就绪时,Istio边车将伴随应用一起部署。
3.验证服务是否部署成功

[root@master241 istio-1.17.8]# kubectl exec "$(kubectl get pod -l app=ratings -o jsonpath='{.items[0].metadata.name}')" -c ratings -- curl -sS productpage:9080/productpage | grep -o "<title>.*</title>"
四.对外开放应用程序
1.部署metallb以提供LoadBalancer类型

参考链接:
	https://www.cnblogs.com/yinzhengjie/p/17811466.html
2.把应用关联到 Istio 网关
此时,BookInfo应用已经部署,但还不能被外界访问。 要开放访问,您需要创建Istio入站网关(Ingress Gateway), 它会在网格边缘把一个路径映射到路由。
	1.把应用关联到Istio网关
[root@master241 istio-1.17.8]# kubectl apply -f samples/bookinfo/networking/bookinfo-gateway.yaml
gateway.networking.istio.io/bookinfo-gateway created
virtualservice.networking.istio.io/bookinfo created
[root@master241 istio-1.17.8]#

	2.确保配置文件没有问题
[root@master241 istio-1.17.8]# istioctl analyze

✔ No validation issues found when analyzing namespace: default.
[root@master241 istio-1.17.8]#


参考链接:
	https://istio.io/v1.17/zh/docs/concepts/traffic-management/#gateways
3.验证当前集群是否支持外部的负载均衡器

[root@master241 istio-1.17.8]# kubectl get svc istio-ingressgateway -n istio-system
NAME                   TYPE           CLUSTER-IP       EXTERNAL-IP   PORT(S)                                                                      AGE
istio-ingressgateway   LoadBalancer   10.200.138.202   10.0.0.150    15021:30531/TCP,80:31930/TCP,443:32114/TCP,31400:31345/TCP,15443:30249/TCP   2m10s
[root@master241 istio-1.17.8]#


设置EXTERNAL-IP的值之后, 您的环境就有了一个外部的负载均衡器,可以将其用作入站网关。

但如果"EXTERNAL-IP"的值为"<none> (或者一直是 <pending> 状态)", 则您的环境则没有提供可作为入站流量网关的外部负载均衡器。

在这个情况下,您还可以用服务(Service)的节点端口(也就是NodePort类型)访问网关。


推荐阅读:
	https://istio.io/v1.17/zh/docs/setup/getting-started/#determining-the-ingress-ip-and-ports
	https://kubernetes.io/zh-cn/docs/concepts/services-networking/service/#type-nodeport
4.设置入站 IP 地址和端口
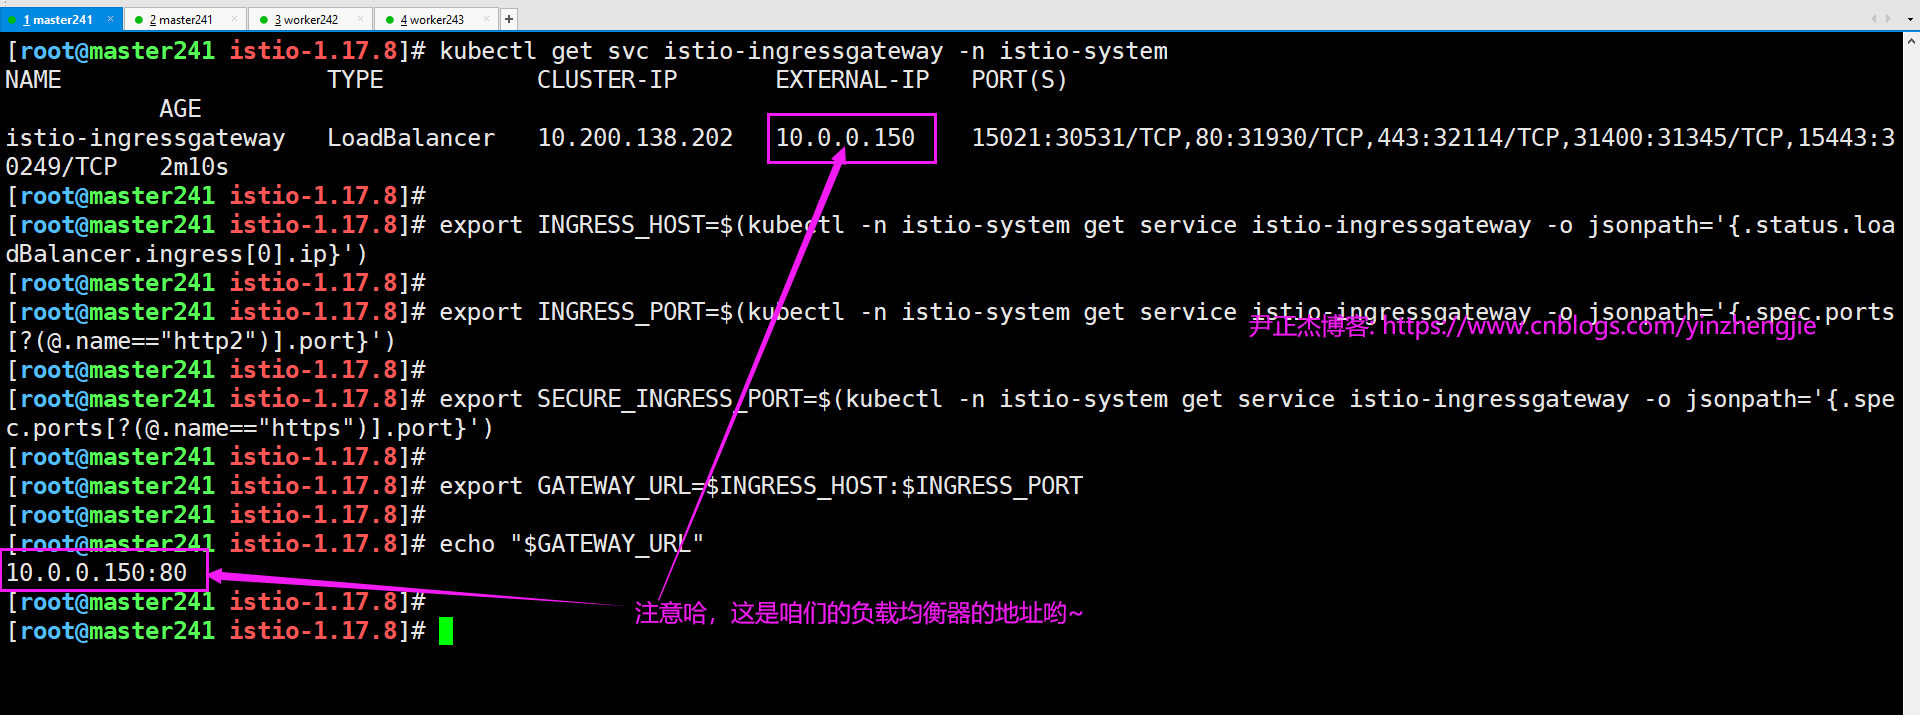
export INGRESS_HOST=$(kubectl -n istio-system get service istio-ingressgateway -o jsonpath='{.status.loadBalancer.ingress[0].ip}')

export INGRESS_PORT=$(kubectl -n istio-system get service istio-ingressgateway -o jsonpath='{.spec.ports[?(@.name=="http2")].port}')

export SECURE_INGRESS_PORT=$(kubectl -n istio-system get service istio-ingressgateway -o jsonpath='{.spec.ports[?(@.name=="https")].port}')

export GATEWAY_URL=$INGRESS_HOST:$INGRESS_PORT

echo "$GATEWAY_URL"
5.验证外部访问
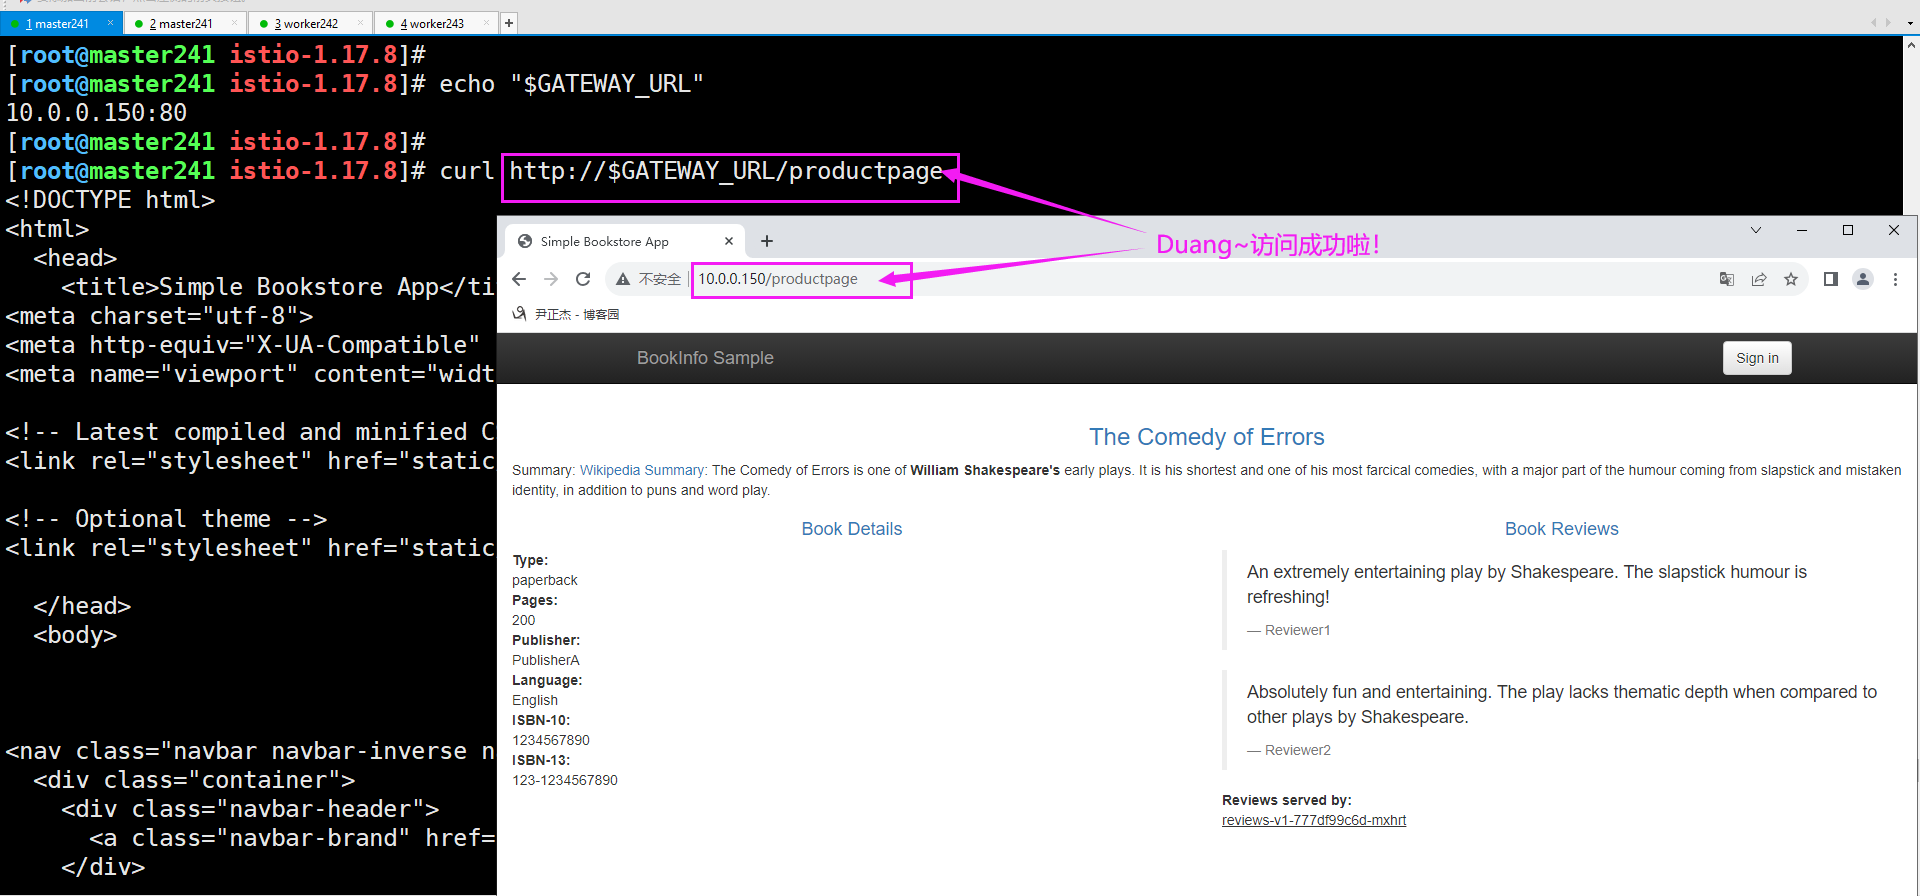
http://10.0.0.150/productpage
五.查看仪表盘
1.安装Kiali和其他插件
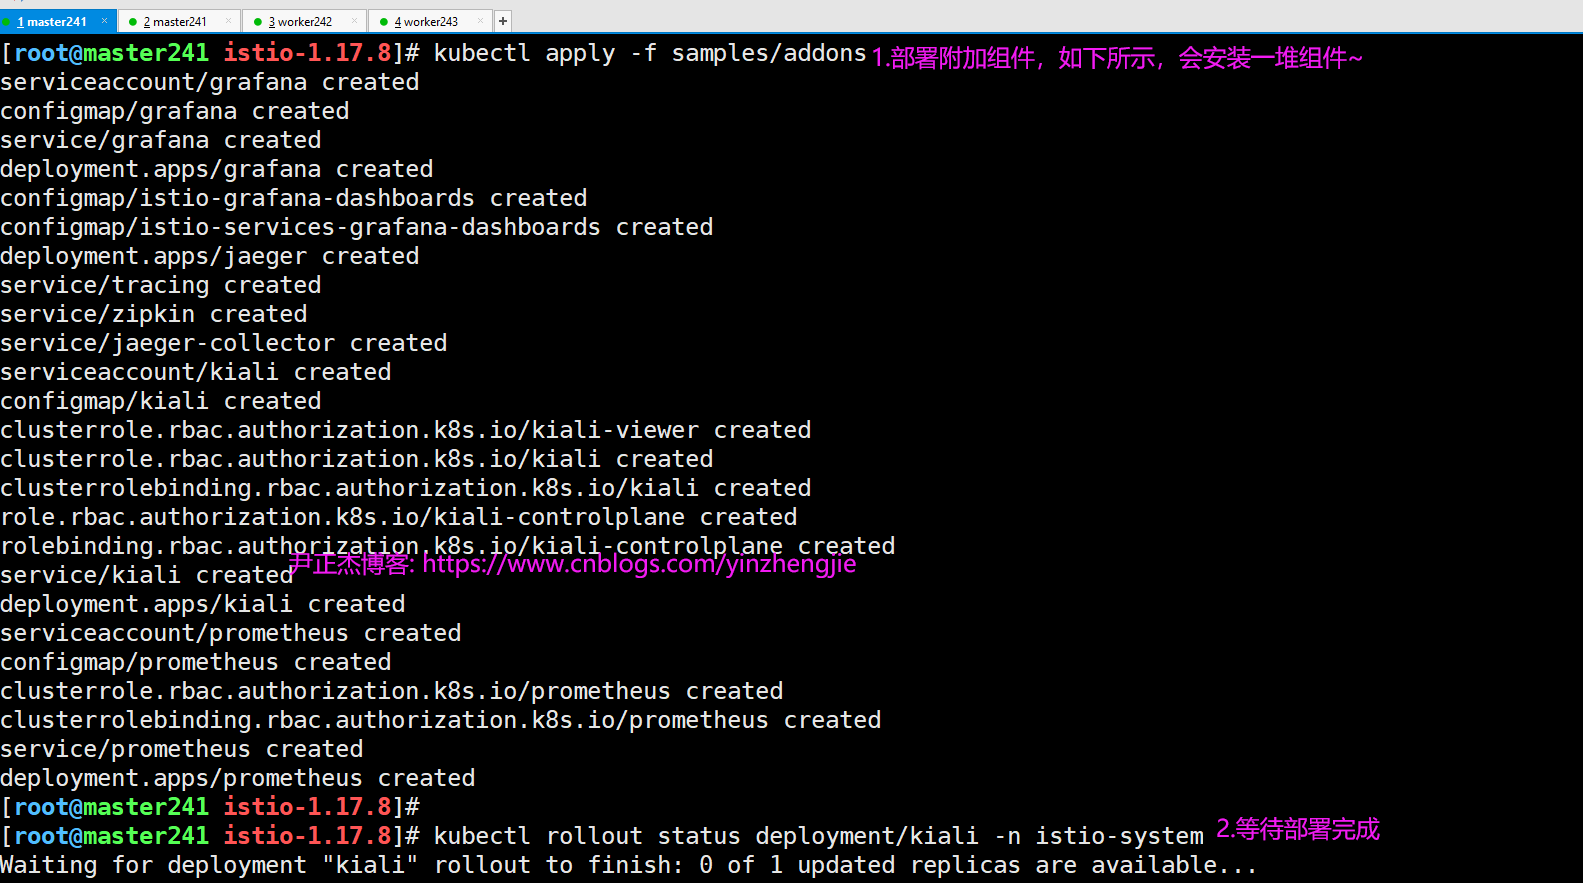
[root@master241 istio-1.17.8]# kubectl apply -f samples/addons
serviceaccount/grafana created
configmap/grafana created
service/grafana created
deployment.apps/grafana created
configmap/istio-grafana-dashboards created
configmap/istio-services-grafana-dashboards created
deployment.apps/jaeger created
service/tracing created
service/zipkin created
service/jaeger-collector created
serviceaccount/kiali created
configmap/kiali created
clusterrole.rbac.authorization.k8s.io/kiali-viewer created
clusterrole.rbac.authorization.k8s.io/kiali created
clusterrolebinding.rbac.authorization.k8s.io/kiali created
role.rbac.authorization.k8s.io/kiali-controlplane created
rolebinding.rbac.authorization.k8s.io/kiali-controlplane created
service/kiali created
deployment.apps/kiali created
serviceaccount/prometheus created
configmap/prometheus created
clusterrole.rbac.authorization.k8s.io/prometheus created
clusterrolebinding.rbac.authorization.k8s.io/prometheus created
service/prometheus created
deployment.apps/prometheus created
[root@master241 istio-1.17.8]#
[root@master241 istio-1.17.8]# kubectl rollout status deployment/kiali -n istio-system
Waiting for deployment "kiali" rollout to finish: 0 of 1 updated replicas are available...
deployment "kiali" successfully rolled out
[root@master241 istio-1.17.8]#


温馨提示:
	尽管上面步骤执行成功后会提示"deployment "kiali" successfully rolled out",但我建议大家还是手动检查下Pod是否部署成功。
	如下图所示,尤其是Prometheus服务,必须是运行状态,否则在Kiali仪表盘查看数据会发现访问不到数据哟。

2.访问Kiali仪表板

[root@master241 istio-1.17.8]# istioctl dashboard kiali --address 10.0.0.241


温馨提示:
	如上图所示,我们可以访问Kiali的仪表盘,说明是成功的。
3.查看追踪数据
[root@master241 ~]# for i in `seq 1 100`; do curl -s -o /dev/null http://$GATEWAY_URL/productpage; done
温馨提示:
1.要查看追踪数据,必须向服务发送请求。请求的数量取决于Istio的采样率。
2.采样率在安装Istio时设置,默认采样速率为1%。在第一个跟踪可见之前,您需要发送至少100 请求。
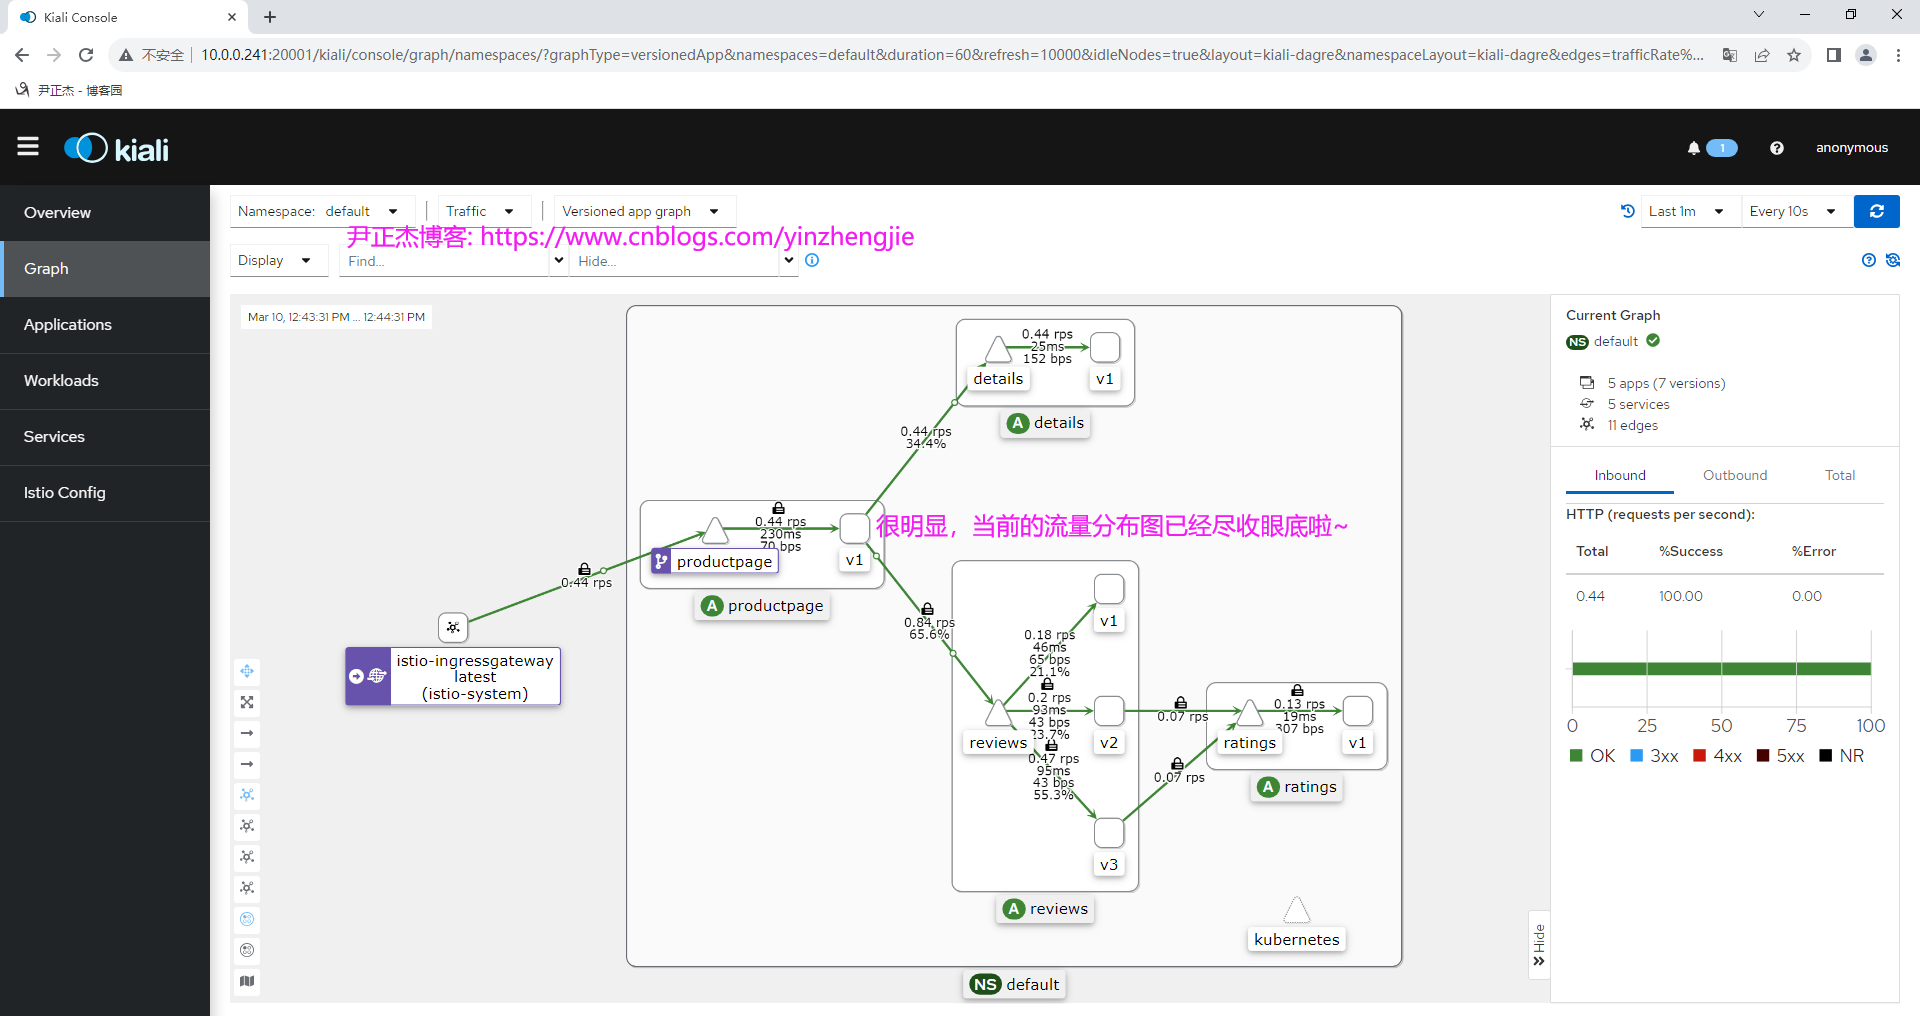
3.如上图所示,访问kiali的WebUI就可以看到追踪数据啦,而bookInfo的架构图我们也一目了然啦;
六.后续进阶步骤
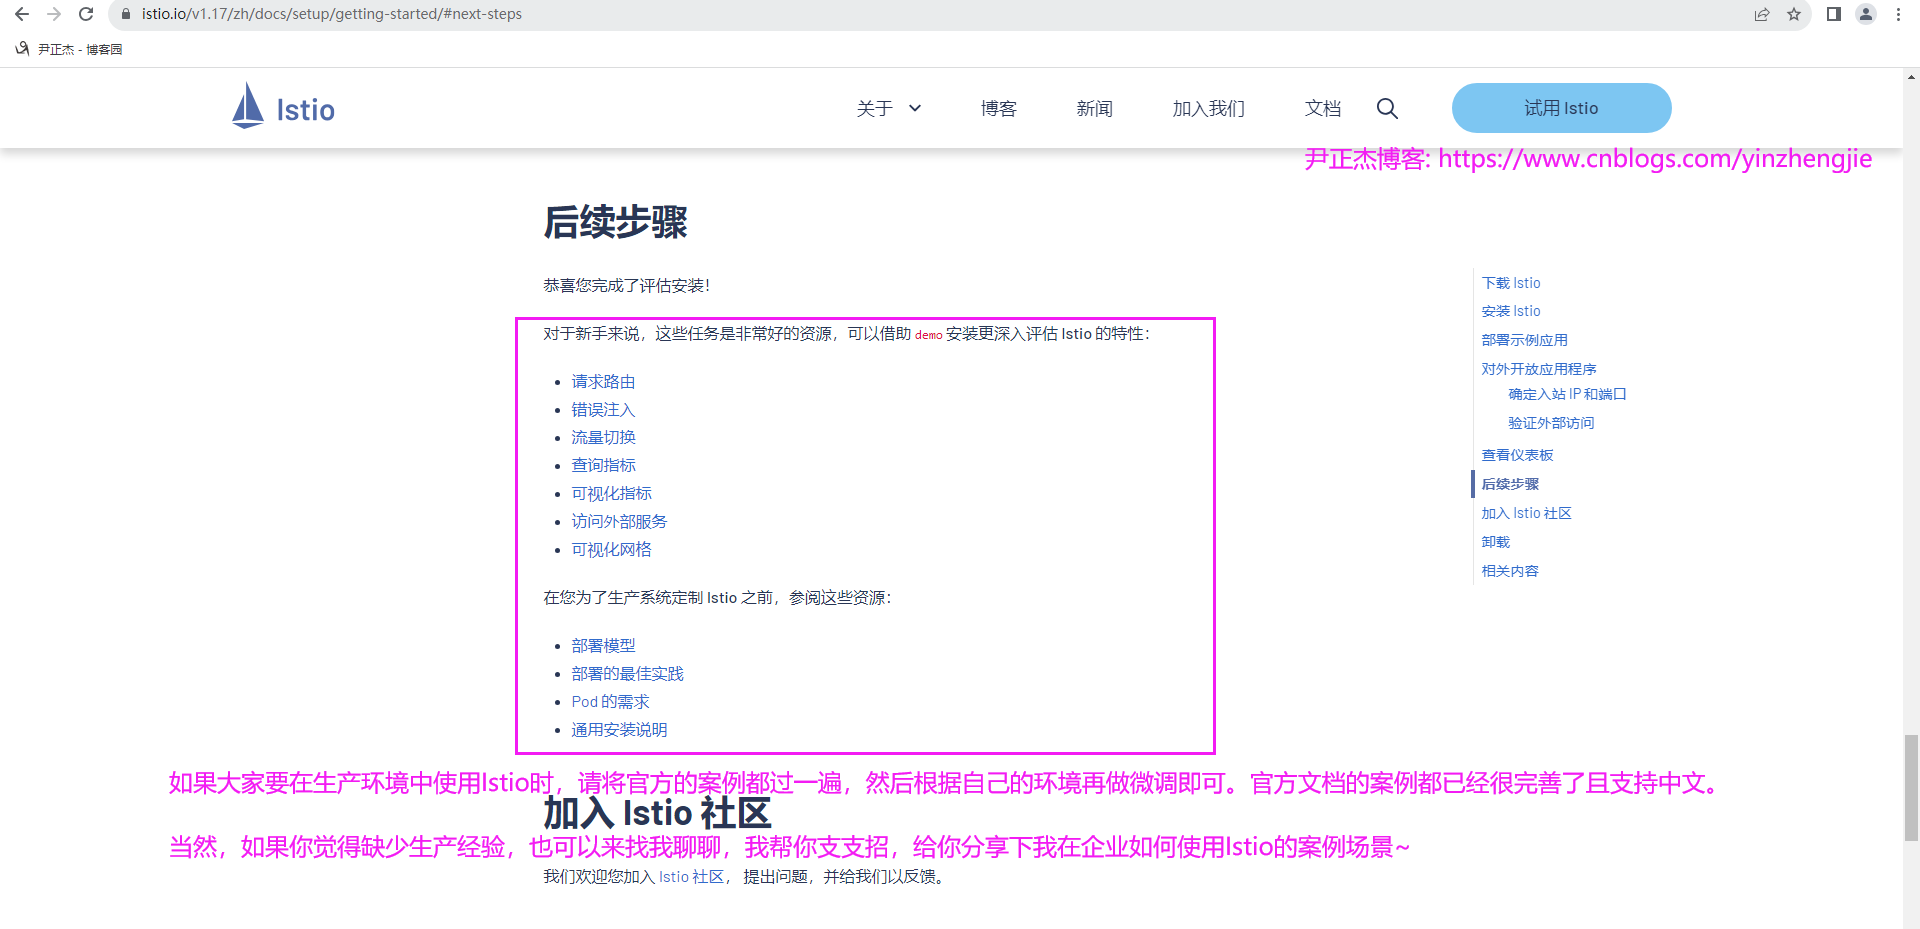
如上图所示,正如官方文档所说,对于新手来说,这些任务是非常好的资源,可以借助 demo 安装更深入评估 Istio 的特性。
	- 配置请求路由:
		https://istio.io/v1.17/zh/docs/tasks/traffic-management/request-routing/

	- 故障注入:
		https://istio.io/v1.17/zh/docs/tasks/traffic-management/fault-injection/

	- 流量转移:
		https://istio.io/v1.17/zh/docs/tasks/traffic-management/traffic-shifting/

	- 通过Prometheus查询度量指标:
		https://istio.io/v1.17/zh/docs/tasks/observability/metrics/querying-metrics/

	- 使用 Grafana 可视化指标:
		https://istio.io/v1.17/zh/docs/tasks/observability/metrics/using-istio-dashboard/

	- 访问外部服务:
		https://istio.io/v1.17/zh/docs/tasks/traffic-management/egress/egress-control/

	- 网格可视化:
		https://istio.io/v1.17/zh/docs/tasks/observability/kiali/

	- 部署模型:
		https://istio.io/v1.17/zh/docs/ops/deployment/deployment-models/

	- Deployment最佳实践:
		https://istio.io/v1.17/zh/docs/ops/best-practices/deployment/

	- 应用程序要求:
		https://istio.io/v1.17/zh/docs/ops/deployment/requirements/

	- 安装说明:
		https://istio.io/v1.17/zh/docs/setup/

	- Istio社区:
		https://istio.io/v1.17/zh/get-involved/

推荐阅读:
	https://istio.io/v1.17/zh/docs/setup/getting-started/#next-steps
七.卸载Istio
1.卸载Istio
kubectl delete -f samples/addons
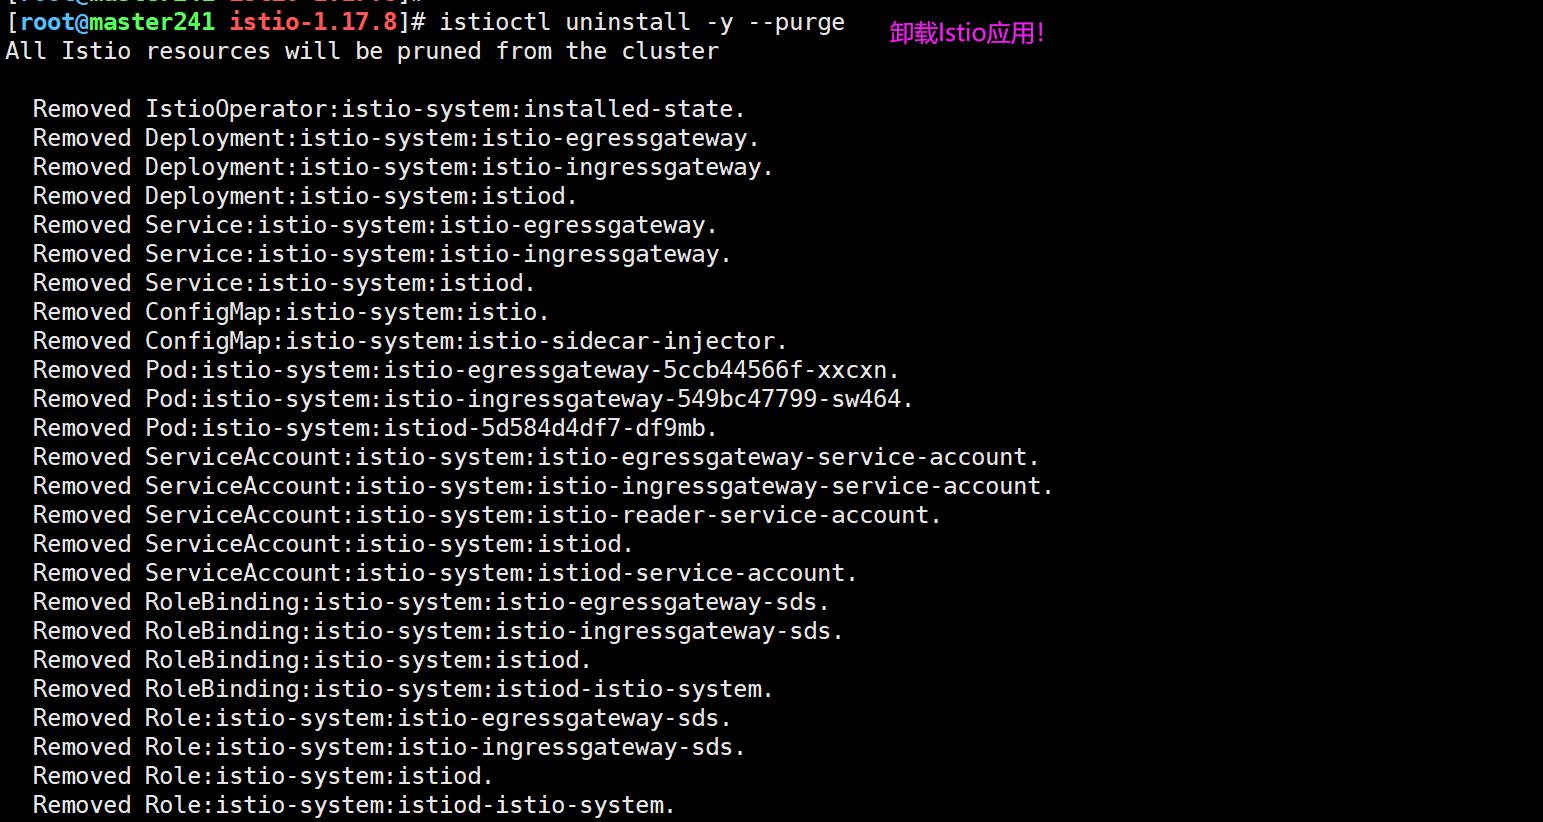
istioctl uninstall -y --purge
温馨提示:
Istio卸载程序按照层次结构逐级的从"istio-system"命令空间中删除RBAC权限和所有资源。
对于不存在的资源报错,可以安全的忽略掉,毕竟它们已经被分层地删除了。
2.移除istio-system命名空间
kubectl delete namespace istio-system
3.移除Istio自动注入Envoy边车代理的标签
kubectl label namespace default istio-injection-
本文来自博客园,作者:尹正杰,转载请注明原文链接:https://www.cnblogs.com/yinzhengjie/p/18064053,个人微信: "JasonYin2020"(添加时请备注来源及意图备注,有偿付费)
当你的才华还撑不起你的野心的时候,你就应该静下心来学习。当你的能力还驾驭不了你的目标的时候,你就应该沉下心来历练。问问自己,想要怎样的人生。

 浙公网安备 33010602011771号