
3.17 Spring002
今天学的是Spring框架里的控制反转和依赖注入。
一、控制反转
IOC: Inversion of Control控制反转不是什么技术,而是一种设计思想,其作用是实例化具体的bean,动态装配bean。
- 类的一些属性: (例如UserService中的userDao成员属性)是由当前类(UserService)自己控制其实例化,现在不是由当前类(UserService)自己控制。现在Spring是利用接口来控制的。由原来控制实现转为spring现在来控制接口(向上反转).
- 我们可以使用xml或者注解来进行相关配置,spring会根据配置和约定,对对象进行实例化和属性装配。
DI:Dependency Injection依赖注入:一些成员属性(例如UserService中的userDao成员属性) 依赖Spring容器来注入,组件之间依赖关系由容器在运行期决定,形象的说,即由容器动态的将某个依赖关系注入到组件之中。
好处:是spring的核心机制,可以使Spring的bean以配置文件组织在一起,而不是硬编码方式耦合,耦合性相对来降低了;另外,注入是使用配置文件来实现,这样修改来非常的方便。
依赖注入和控制反转是对同一件事情的不同描述,从某个方面讲,就是它们描述的角度不同。IOC是说不需要程序员管理和控制bean,是解耦的目的,DI是手段。IOC是指让生成类的方式由传统方式(new)反过来,既程序员不调用new,需要类的时候由Spring等框架注入(DI)。
相关代码:
Spring中可以使用beanFactory的方法getBean获取指定对象的时候,常见的方法有几种?有什么不同?
1.Object getBean(String name) 根据名称返回一个Bean,客户端需要自己进行类型转换;
参数name可以是bean的属性id的值或者是name的值。

2.T getBean(String name, Class<T> requiredType) 根据名称和指定的类型返回一个Bean,客户端无需自己进行类型转换,如果类型转换失败,容器抛出异常;
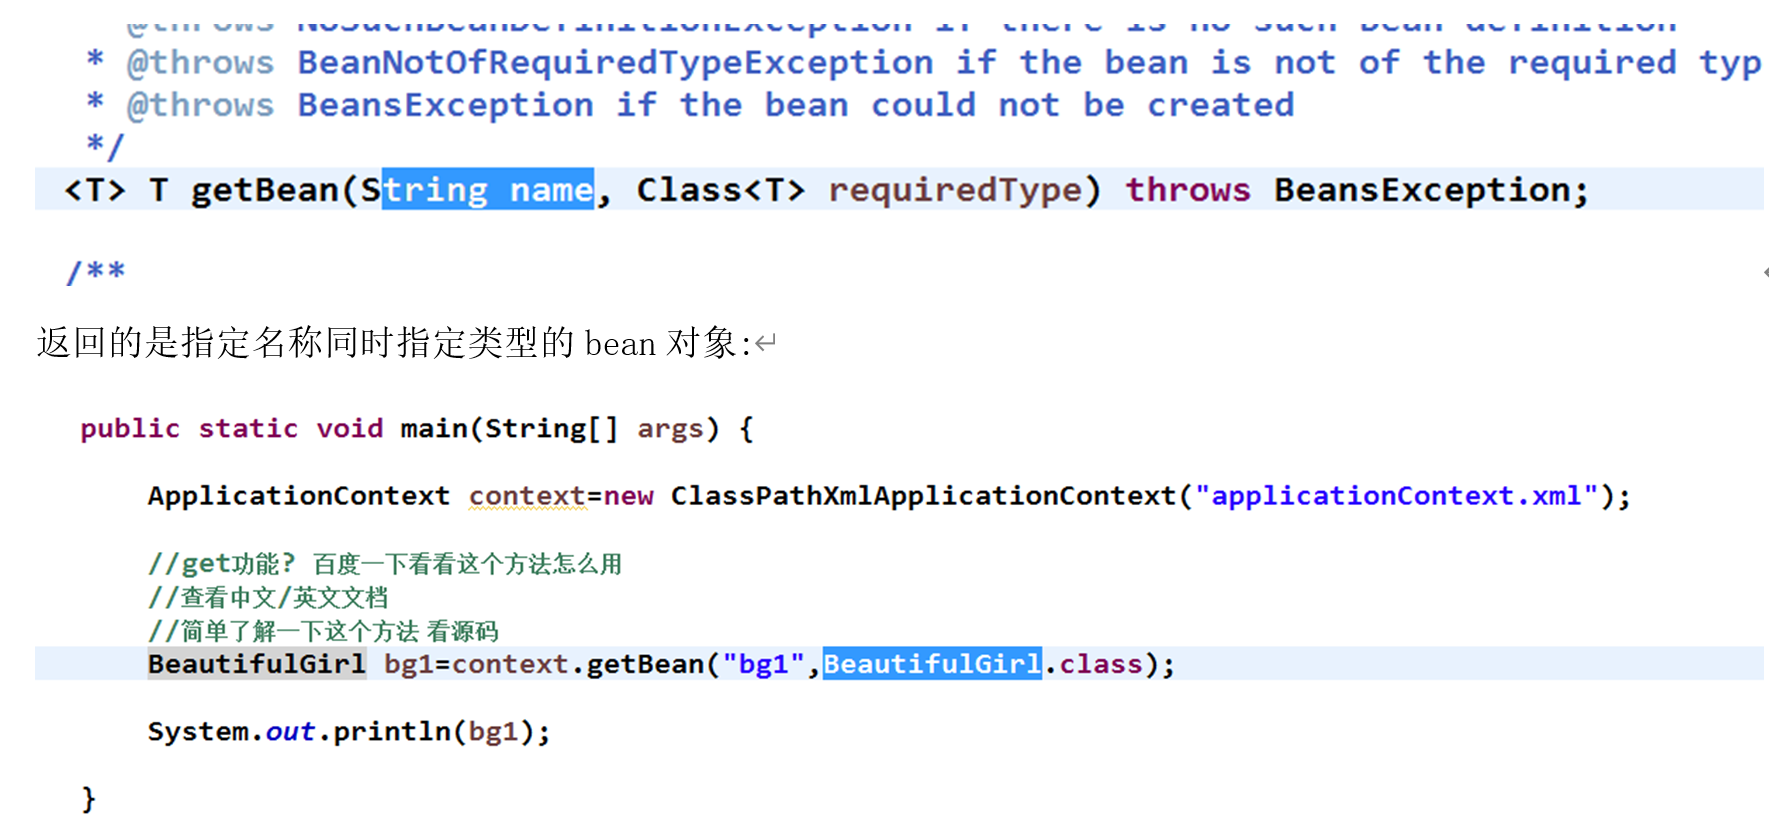
3.T getBean(Class<T> requiredType) 根据指定的类型返回一个Bean,客户端无需自己进行类型转换,如果没有或有多于一个Bean存在容器将抛出异常;

二、bean的标识以及声明
1.一般配置文件结构如下:
<beans>
    <!--引用外部的配置文件,<import>标签可以放在<beans>下的任何位置,没有顺序关系 -->
    <import resource=”resource1.xml”/>
    <!-- class相同的情况下,context.getBean(bean里的id,类名.class)通过id来区分所初始化的对象 -->
    <bean id=”bean1” class=””></bean>
    <bean id=”bean2” class=””></bean>
    <!--<bean>标签主要用来进行Bean定义 -->
    <!--
标签中的属性id与name作用是一样,区别在于id中不可以含有特殊字符,
而name中可以有特殊字符;
id是确定该bean的唯一属性,而name可以指定一个或者多个名称,各个名称之间用逗号或分号分开。后面的为bean的别名。
-->
<bean name=”bean2” class=””></bean>
    <!-- alias用于定义Bean别名的,如果添加了别名,可以用别名,也可以用之前的名字获取到这个对象-->
    <alias alias="bean3" name="bean2"/>
    <import resource=“resource2.xml”/>
</beans>2.Bean命名约定:Bean的命名遵循XML命名规范,但最好符合Java命名规范,由“字母、数字、下划线组成”,而且应该养成一个良好的命名习惯, 比如采用“驼峰式”,即第一个单词首字母开始,从第二个单词开始首字母大写开始,这样可以增加可读性。
3.Bean的加载
默认情况下,我们使用:
ApplicationContext context=new ClassPathXmlApplicationContext("ApplicationContext.xml");
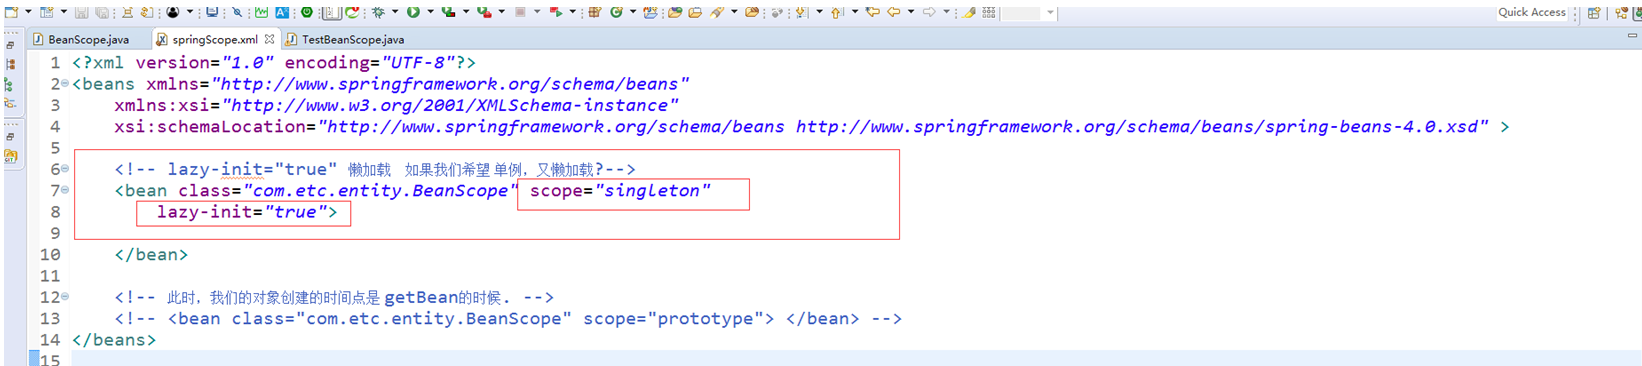
Spring容器就会自动初始化所有的单例(bean scope="singleton")的bean;但是如果是<bean scope="prototype">则不会自动初始化,而是等使用(context.getBean)的时候才实例化;
我们对单例的对象,可以手动设置其 <bean lazy-init="true">来设置其延迟初始化。当然,前提是这个对象没有被其他的bean引用。
三、注入方法(setter,constructor,接口注入等)
1.setter注入类型
简言之,就是在bean中使用setXX方法进行注入。
点击name的赋值发现 其其对应的是public void setXxxx方法。
package com.etc.entity;
/**
 * @author hyy
 * @ClassName:类名
 * @Description:描述
 * @date 2022年3月15日 上午11:15:56
 * @parameter 参数及其意义
 * @return 返回值
 */
public class Users {
	private int userid;
	private String username;
	private String userpass;

	public Users() {
		// TODO Auto-generated constructor stub
		System.out.println("无参数构造");
	}

	public int getUserid() {
		return userid;
	}

	public void setUserid(int userid) {
		this.userid = userid;
	}

	public String getUsername() {
		return username;
	}

	public void setUsername(String username) {
		this.username = username;
	}

	public String getUserpass() {
		return userpass;
	}

	public void setUserpass(String userpass) {
		this.userpass = userpass;
	}

	public Users(int userid, String username, String userpass) {
		super();
		this.userid = userid;
		this.username = username;
		this.userpass = userpass;
		System.out.println("带参数构造");
	}

	@Override
	public String toString() {
		return "Users [userid=" + userid + ", username=" + username + ", userpass=" + userpass + "]";
	}
}
配置文件代码:
<?xml version="1.0" encoding="UTF-8"?>
<beans xmlns="http://www.springframework.org/schema/beans"
xmlns:xsi="http://www.w3.org/2001/XMLSchema-instance"
xmlns:aop="http://www.springframework.org/schema/aop"
xmlns:cache="http://www.springframework.org/schema/cache"
xsi:schemaLocation="http://www.springframework.org/schema/beans http://www.springframework.org/schema/beans/spring-beans.xsd
http://www.springframework.org/schema/aop http://www.springframework.org/schema/aop/spring-aop-4.3.xsd
http://www.springframework.org/schema/cache http://www.springframework.org/schema/cache/spring-cache-4.3.xsd">
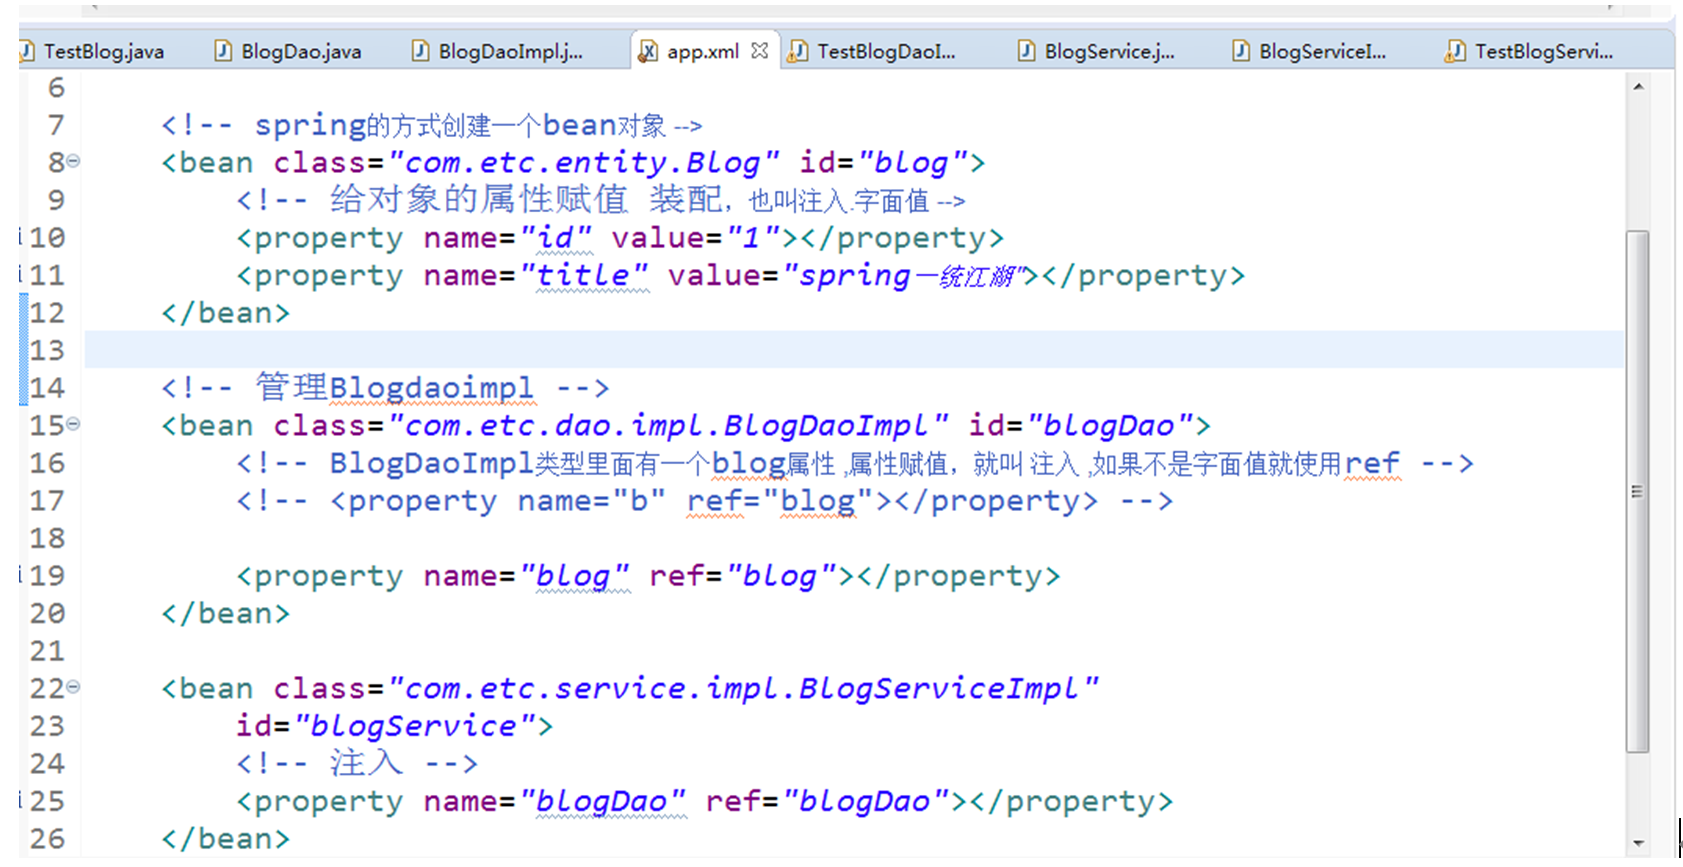
<bean class="com.etc.entity.Blog" id="blog"></bean>
<!-- 点击name的赋值发现 其其对应的是public void setXxxx方法 -->
<bean id="users1" class="com.etc.entity.Users">
<property name="userid" value="1"></property>
<property name="username" value="张三"></property>
<property name="userpass" value="123456"></property>
</bean>
<bean id="users2" class="com.etc.entity.Users">
<property name="userid" value="2"></property>
<property name="username" value="李四"></property>
<property name="userpass" value="789"></property>
</bean>
<bean id="usersdao" class="com.etc.dao.UsersDao">
<!-- 给users对象赋值 注入 -->
<property name="users" ref="users2"></property>
</bean>
<!-- 创建UsersService的bean -->
<bean name="us1" class="com.etc.service.UsersService">
<property name="usersdao" ref="usersdao"></property>
</bean>
<bean name="us2" class="com.etc.service.UsersService">
<property name="usersdao" ref="usersdao"></property>
</bean>
<!-- 引用外部的配置文件 -->
<import resource="application1.xml"/>
</beans>2.构造方法注入
bean类中需要有成员属性作为参数的构造方法
Spring配置文件:
<?xml version="1.0" encoding="UTF-8"?>
<beans xmlns="http://www.springframework.org/schema/beans"
	xmlns:xsi="http://www.w3.org/2001/XMLSchema-instance"
	xmlns:context="http://www.springframework.org/schema/context"
	xsi:schemaLocation="http://www.springframework.org/schema/beans http://www.springframework.org/schema/beans/spring-beans.xsd
		http://www.springframework.org/schema/context http://www.springframework.org/schema/context/spring-context-4.3.xsd">

<bean id="u" name="u" class="com.etc.entity.Users" scope="prototype">
<!-- 第一种形式:给属性赋值 value注入字面值 -->
<property name="userid" value="1"></property>
<property name="username" value="admin"></property>
<property name="userpass" value="123456"></property>
</bean>


	<bean id="u1" name="u1" class="com.etc.entity.Users" scope="prototype">
		<!-- 通过构造来做注入,可以通过下方的beans按钮创建 -->
		<constructor-arg value="2"></constructor-arg>
		<constructor-arg value="adam"></constructor-arg>
		<constructor-arg value="999666"></constructor-arg>
	</bean>

	<bean id="u2" name="u2" class="com.etc.entity.Users" scope="prototype">
		<constructor-arg name="userid" value="3"></constructor-arg>
		<constructor-arg name="username" value="john"></constructor-arg>
		<constructor-arg name="userpass" value="666999"></constructor-arg>
	</bean>
</beans>
测试类:
package com.etc.test;

import org.springframework.context.ApplicationContext;
import org.springframework.context.support.ClassPathXmlApplicationContext;

import com.etc.entity.Users;

/**
 * @author hyy
 * @ClassName:类名
 * @Description:描述
 * @date 2022年3月15日 上午11:15:56
 * @parameter 参数及其意义
 * @return 返回值
 */
public class TestUsers {

	public static void main(String[] args) {
		ApplicationContext context=new ClassPathXmlApplicationContext("beans.xml");
		Users u=context.getBean("u",Users.class);
		System.out.println(u);

		Users u1=context.getBean("u1", Users.class);
		System.out.println(u1);
		Users u2=context.getBean("u2", Users.class);
		System.out.println(u2);
	}
}
四、注入类型
1. 简单属性的注入
当bean中存在简单属性时的注入方式:
<bean id="u" class="com.hyy.entity.Users">
		<property name="name" value="小白" />
		<property name="id">
		   <value>123</value>
		</property>
	</bean>
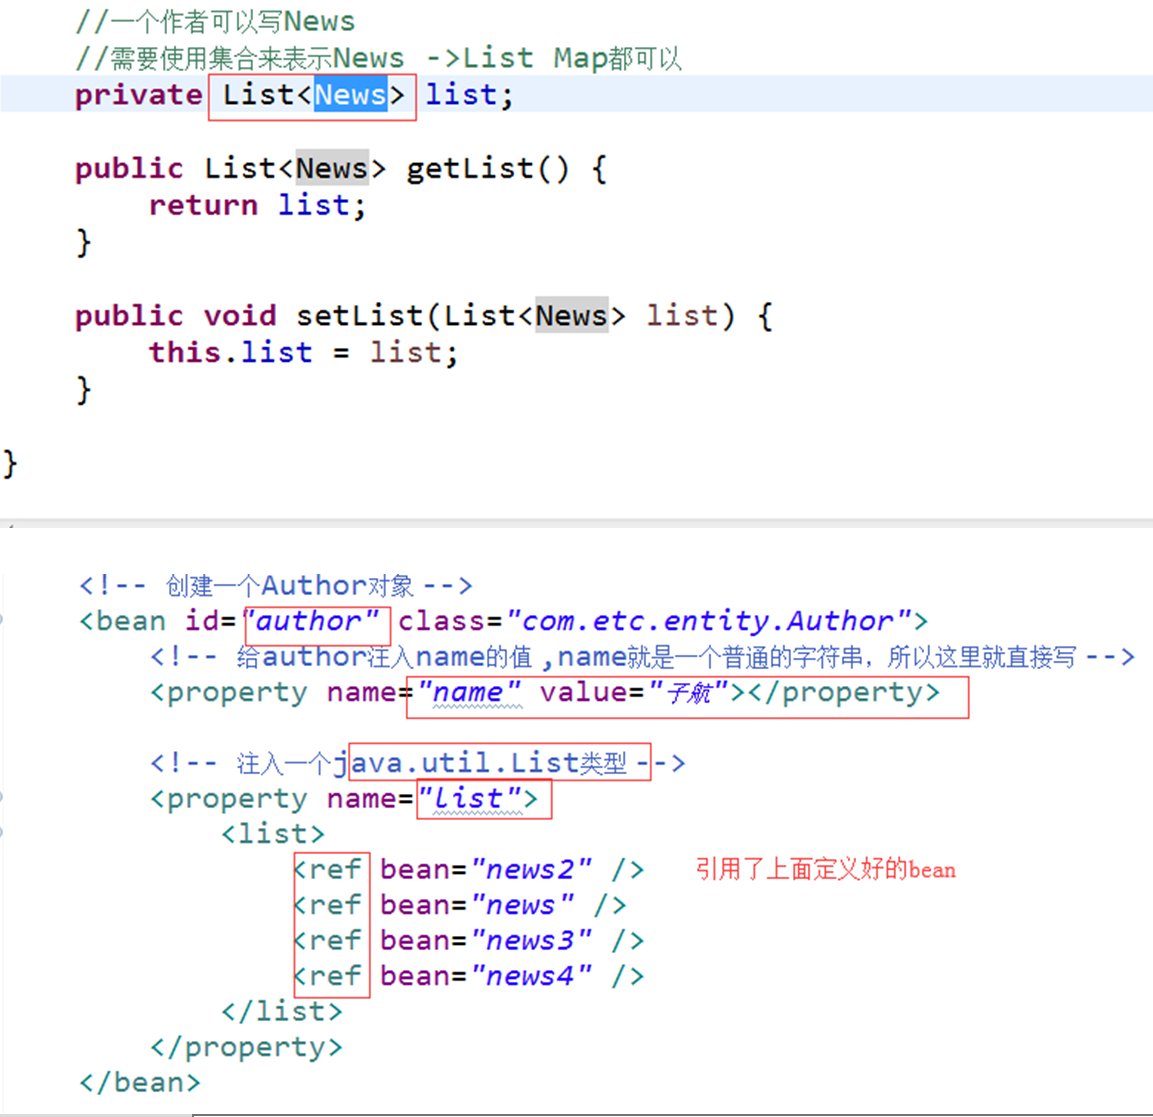
2.Spring不仅能注入简单类型数据,还能注入集合(Collection、无序集合Set、有序集合List)类型、数组(Array)类型、字典(Map)类型数据、Properties类型数据。
<!-- 是定义一个bean -->
<bean id="le" class="com.hyy.entity.ListEntity">
<!-- 属性注入方式 list set... -->
<property name="list">
<list>
<value>1</value>
<value>hyy</value>
<value>23.45</value>
</list>
</property>
<!-- map方式 -->
<property name="map">
<map>
<entry key="1" value="老华"></entry>
<entry key="2" value="小华"></entry>
<entry key="3" value="代你飞"></entry>
</map>
</property>
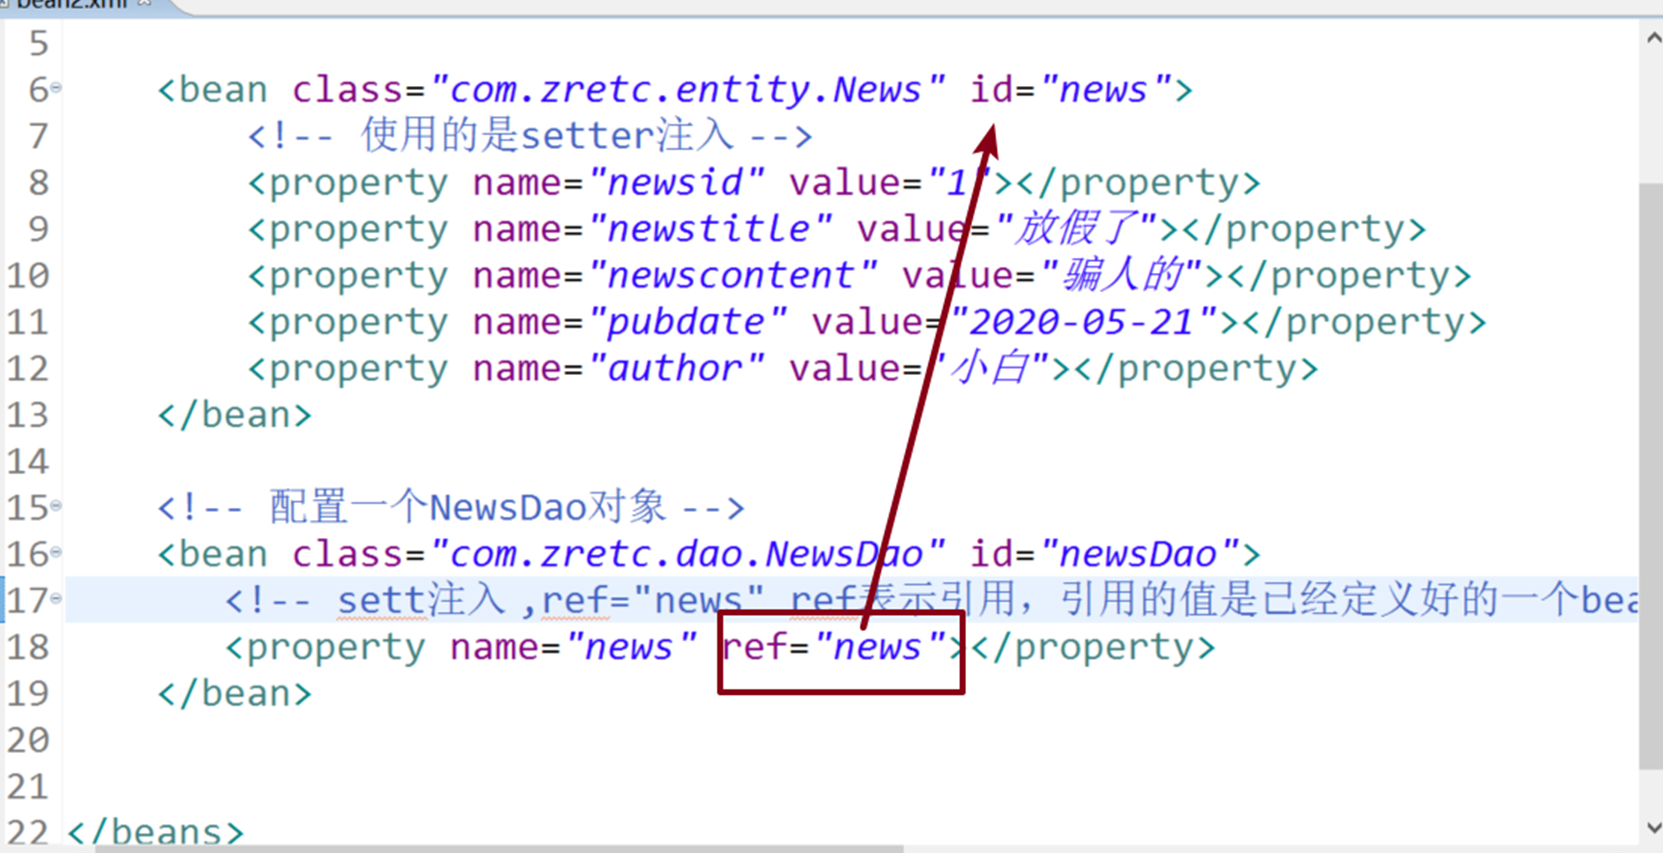
</bean>如果是引用类型(对象的实例),用ref:
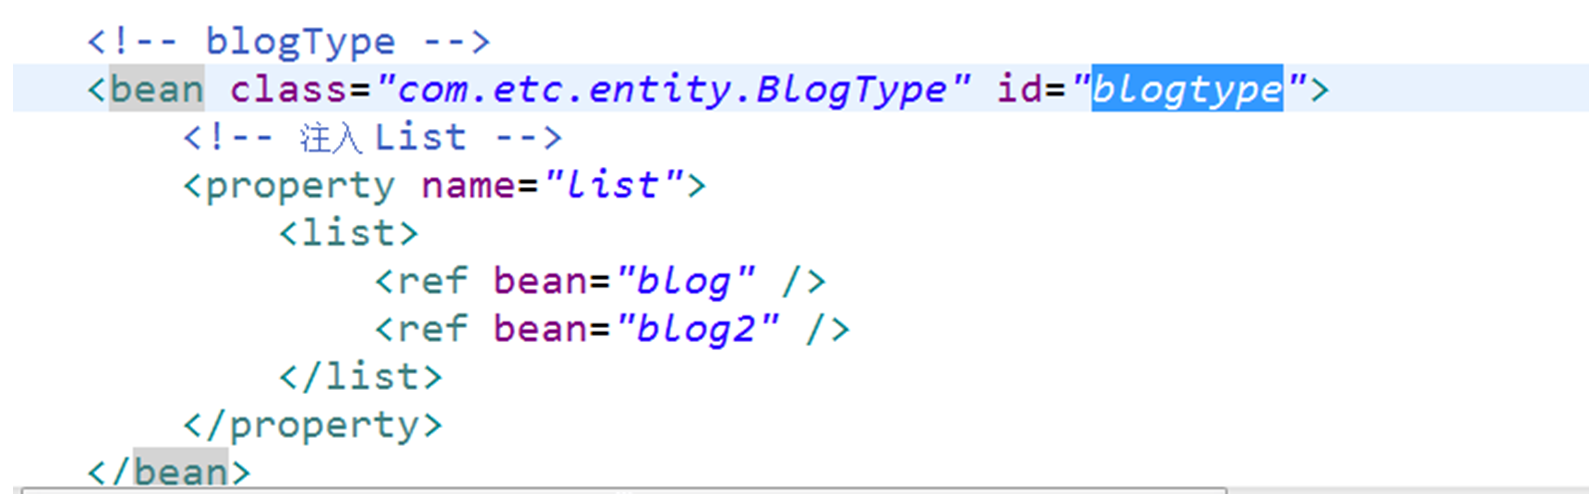
Map的写法(key为基本数据类型,value为对象,用value-ref引用):

注入自定义类型对象:
注入小结:
注入方法:
1、构造方法注入:
1)常量值
简写:<constructor-arg index="0" value="常量"/>
全写:<constructor-arg index="0"><value>常量</value></constructor-arg>
2)引用
简写:<constructor-arg index="0" ref="引用"/>
全写:<constructor-arg index="0"><ref bean="引用"/></constructor-arg>
2、setter注入:
1)常量值
简写:<property name="message" value="常量"/>
全写:<property name="message"><value>常量</value></ property>
2)引用
简写:<property name="message" ref="引用"/>
全写:<property name="message"><ref bean="引用"/></ property>
注入类型:
1)数组:<array> 了解
2)列表:<list> 了解
3)集合:<set> 了解
4)字典 了解
简写:<map>
<entry key="键常量" value="值常量"/>
<entry key-ref="键引用" value-ref="值引用"/>
</map>
全写: <map>
<entry><key><value>键常量</value></key><value>值常量</value></entry>
<entry><key><ref bean="键引用"/></key><ref bean="值引用"/></entry>
</map>
5)自定义类型的注入:引用定义好的bean
五、Bean的作用域
在面向对象程序设计中一般指对象或变量之间的可见范围。而在Spring容器中是指其创建的Bean对象相对于其他Bean对象的请求可见范围。
Spring提供“singleton”和“prototype”两种基本作用域,另外提供“request”、“session”、“global session”三种web作用域;Spring还允许用户定制自己的作用域。
利用<bean>标签中的scope属性来指定
scope值:
- singleton单例:每次取出的bean都是同一个bean。默认就是这个。
- prototype原型:每次取的bean时,都会重新创建一个新的bean ,是懒加载。
- request:一次请求一个bean定义对应一个实例(web相关)
- session:一个session定义对应一个实例(web相关)
- globalsession类似于session作用域,只是其用于portlet环境的web应用。如果在非portlet环境将视为session作用域(web相关)
六、自动装配autowire(由Spring来自动地注入依赖对象)
自动装配就是指由Spring来自动地注入依赖对象。
Spring的装配支持“no”、“byName ”、“byType”、“constructor”四种自动装配,默认是“no”指不支持自动装配的。
自动装配的好处是减少构造器注入和setter注入配置,减少配置文件的长度。自动装配通过配置<bean>标签的“autowire”属性来改变自动装配方式。
1、default:表示使用默认的自动装配,默认的自动装配需要在<beans>标签中使用default-autowire属性指定,其支持“no”、“byName ”、“byType”、“constructor”四种自动装配,如果需要覆盖默认自动装配,请继续往下看;
2、no:意思是不支持自动装配,必须明确指定依赖。
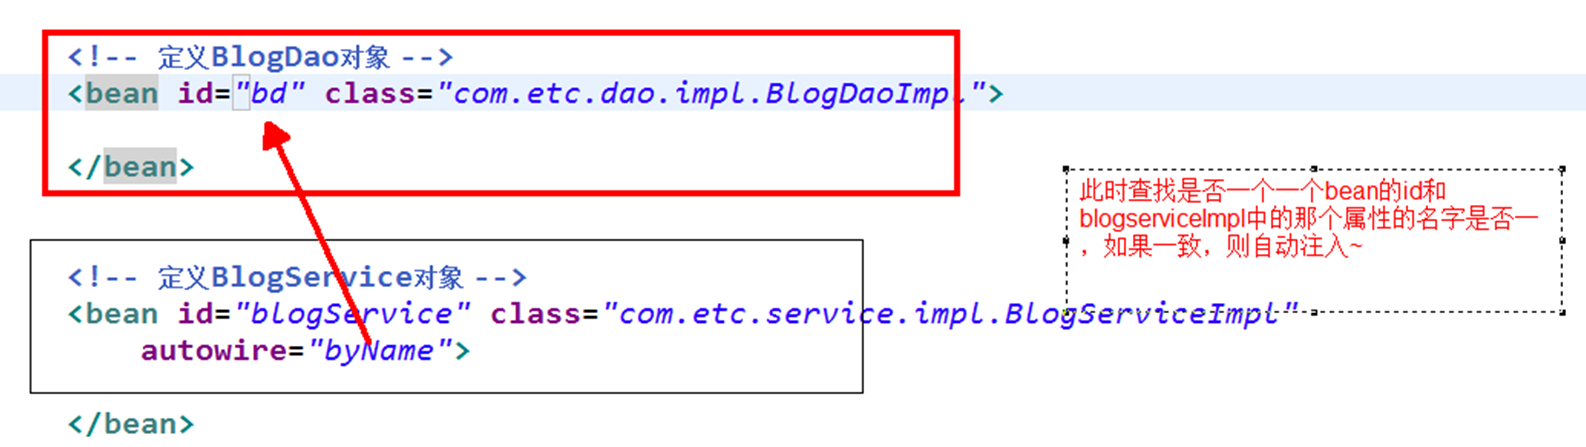
3、byType:按照类型来进行装配,但是要求同一个类型的bean在xml中只能有一个,调用setter方法。
4、byName:通过设置Bean定义属性autowire="byName",意思是根据名字进行自动装配,只能用于setter注入。
七、Junit单元测试(主要分为Junit4和Junit5)
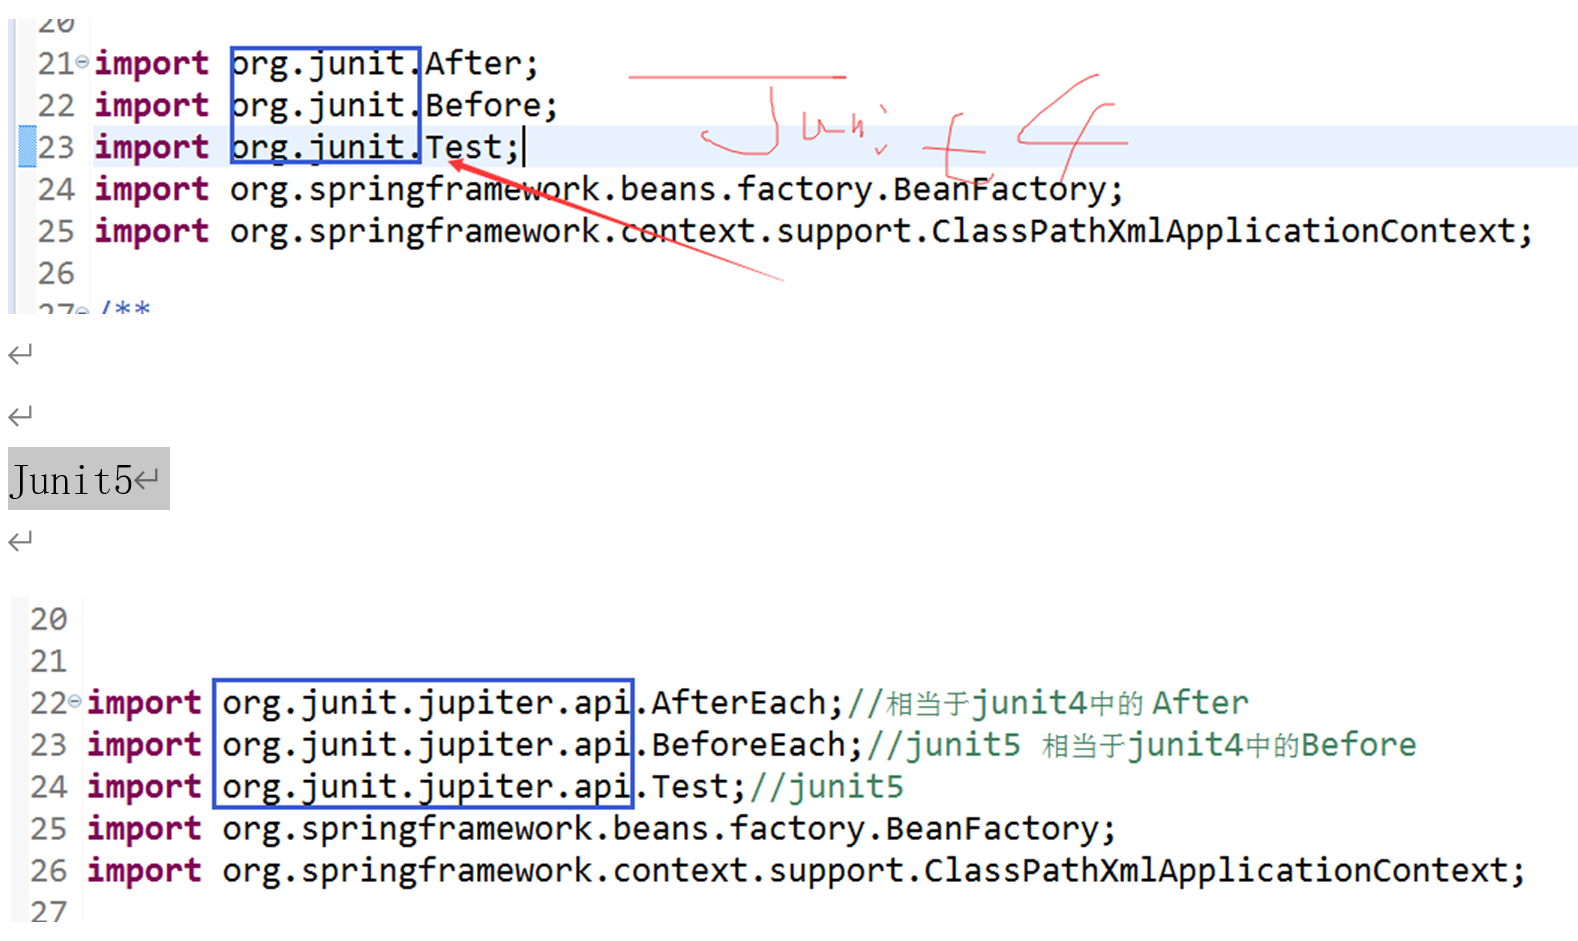
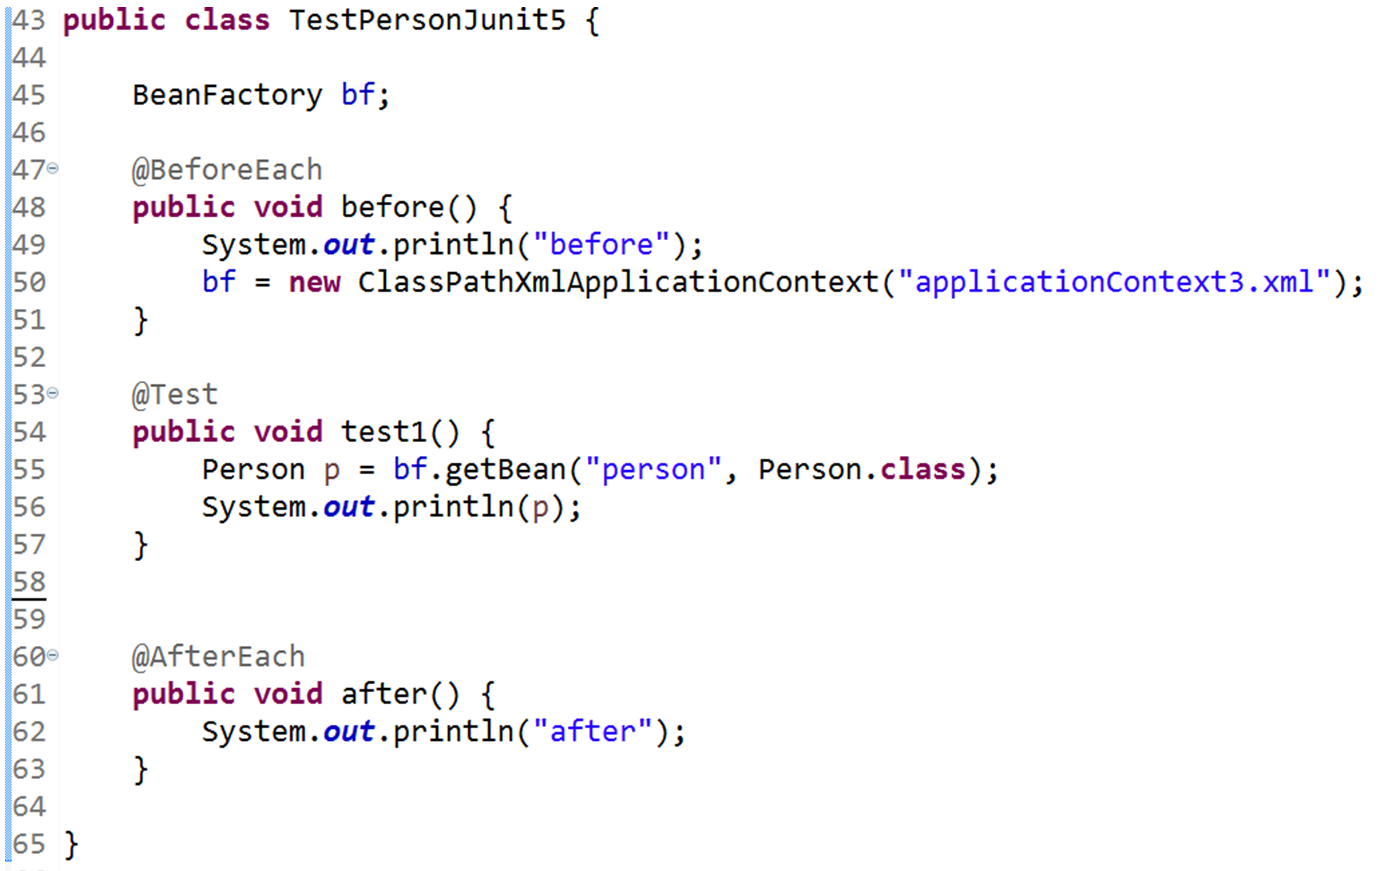
使用Junit完成简单的单元测试,在一个方法上增加一个注解:
@Test 注意大小写,同时要将junit5.jar添加到构建路径中来,再运行这个方法的时候,Run as Junt test,如果出现了绿色,表示单元测试成功,代码没有问题。
相关代码:
package com.etc.junit;
import org.junit.Before;
import org.junit.Test;
import org.springframework.context.ApplicationContext;
import org.springframework.context.support.ClassPathXmlApplicationContext;
import com.etc.entity.ListEntity;
/**
* @author hyy
* @ClassName:类名
* @Description:加入了junit的测试代码
* @date 2022年3月15日 上午11:15:56
* @parameter 参数及其意义
* @return 返回值
*/
public class ListBean {
ApplicationContext context;
@Before
public void before() {
context = new ClassPathXmlApplicationContext("ListEntity.xml");
}
@Test
public void test1() {
ListEntity entity = context.getBean("le1", ListEntity.class);
entity.getList().forEach(System.out::println);
}
@Test
public void test2() {
ListEntity entity2 = context.getBean("le2",ListEntity.class);
entity2.getList().forEach(System.out::println);
}
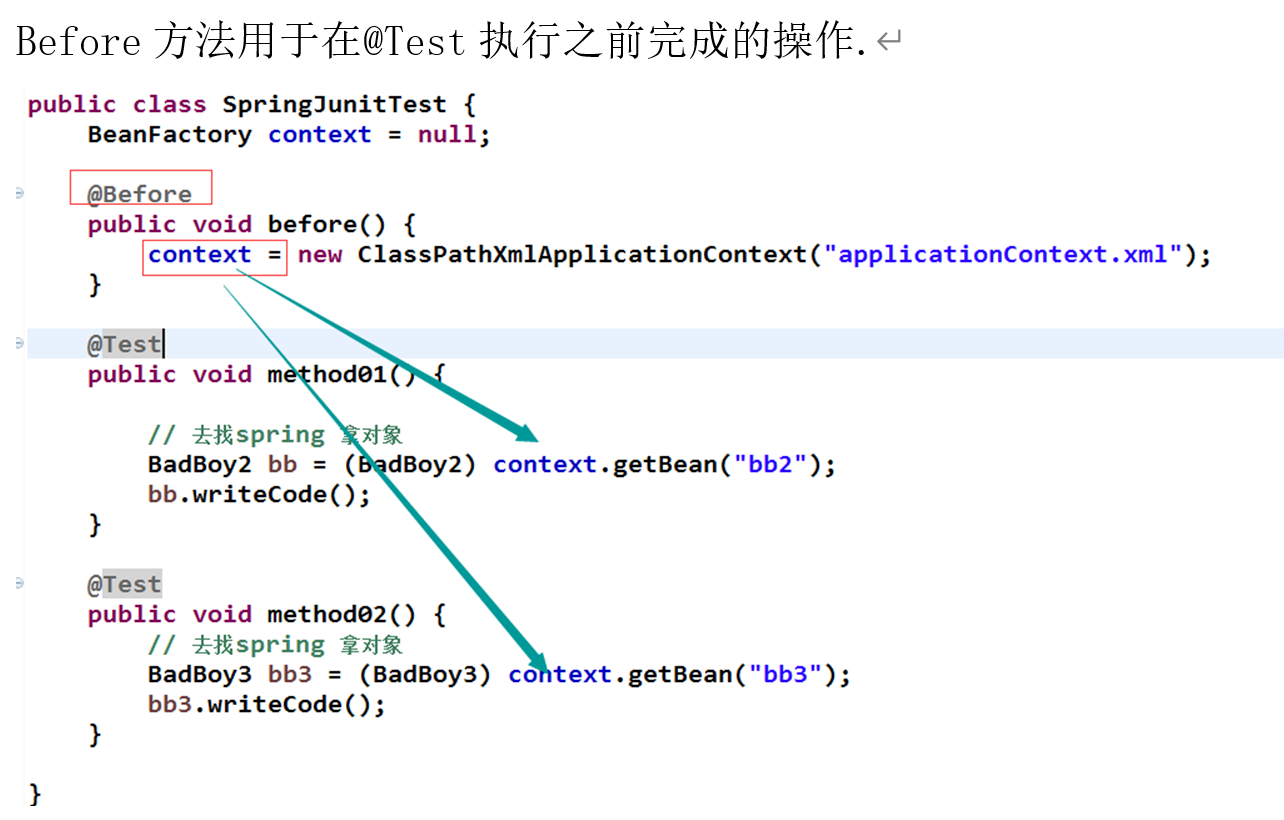
}Spring+Junit test
首先,要添加spring-test.jar到构建路径;
编写测试类,使用注解来配合Junit4代码;
相关代码如下(Junit4两个注解:
@RunWith(SpringJUnit4ClassRunner.class)
@ContextConfiguration(locations = {"/ListEntity.xml"})
Junit5一个注解:
@SpringJUnitConfig(locations = "classpath:xxxxx.xml")
)
Junit4 测试代码
package com.etc.junit;

import org.junit.Test;
import org.junit.runner.RunWith;
import org.springframework.beans.factory.annotation.Autowired;
import org.springframework.beans.factory.annotation.Qualifier;
import org.springframework.test.context.ContextConfiguration;
import org.springframework.test.context.junit4.SpringJUnit4ClassRunner;

import com.etc.entity.ListEntity;

/**
 * @author hyy
 * @ClassName:类名
 * @Description:描述
 * @date 2022年3月15日 上午11:15:56
 * @parameter 参数及其意义
 * @return 返回值
 */

@RunWith(SpringJUnit4ClassRunner.class)
@ContextConfiguration(locations = {"/ListEntity.xml"})
public class ListBean2 {
	//自动装配
	@Autowired
	//如果有多个bean,需要通过@Qualifier来指定bean的id或者名称
	@Qualifier(value = "le1")
	ListEntity entity;

	//自动装配
	@Autowired
	//如果有多个bean,需要通过@Qualifier来指定bean的id或者名称
	@Qualifier(value = "le2")
	ListEntity entity2;

	@Test
	public void test1() {
		entity.getList().forEach(System.out::println);
	}

	@Test
	public void test2() {
		entity2.getList1().forEach(System.out::println);
	}
}
Junit5 测试代码
package com.etc.junit;

import javax.annotation.Resource;

import org.junit.jupiter.api.Test;
import org.springframework.beans.factory.annotation.Autowired;
import org.springframework.beans.factory.annotation.Qualifier;
import org.springframework.test.context.junit.jupiter.SpringJUnitConfig;

import com.etc.entity.ListEntity;

/**
 * @author hyy
 * @ClassName:类名
 * @Description:描述
 * @date 2022年3月15日 上午11:15:56
 * @parameter 参数及其意义
 * @return 返回值
 */
@SpringJUnitConfig(locations = "classpath:ListEntity.xml")
public class TestListBean3 {
	//自动装配但是通过名字来装配
	@Resource(name = "le1")
	ListEntity entity;

	//自动装配
	@Autowired
	//如果有多个bean,需要通过@Qualifier来指定bean的id或者名称
	@Qualifier(value = "le2")
	ListEntity entity2;

	@Test
	public void test1() {
		entity.getList().forEach(System.out::println);
	}

	@Test
	public void test2() {
		entity2.getList1().forEach(System.out::println);
	}
}
posted on 2022-03-18 13:22 heyiyang1312 阅读(8) 评论(0) 收藏 举报

 浙公网安备 33010602011771号