4.Swagger
Swagger集成及介绍
- 简介
- 号称世界上最流行的API框架(世界上最流行的语言java)
- Restful API:文档在线自动生成工具=>Api文档与Api定义同步更新
- 直接运行,可以在线测试API接口
- 支持多种语言,java,PHP等
- 官网:https://swagger.io/
- Springboot集成Swagger (2.9)
1.导入依赖
        <dependency>
            <groupId>io.springfox</groupId>
            <artifactId>springfox-swagger2</artifactId>
            <version>2.9.2</version>
        </dependency>

        <dependency>
            <groupId>io.springfox</groupId>
            <artifactId>springfox-swagger-ui</artifactId>
            <version>2.9.2</version>
        </dependency>
2.编写配置文件
@EnableSwagger2 //开启swagger
@Configuration
public class SwaggerConfig {

}
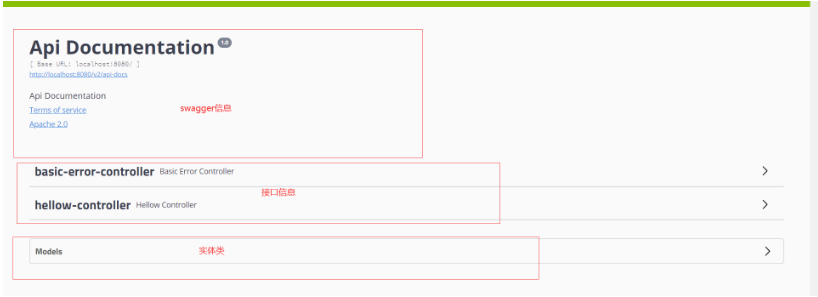
3.直接访问:http://localhost:8080/swagger-ui.html
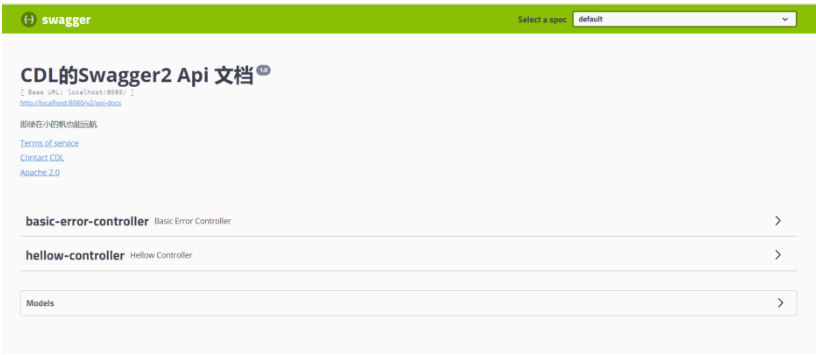
- 配置Swagger
Swagger的bean的实例:Docket
@EnableSwagger2 //开启swagger
@Configuration
public class SwaggerConfig {

    @Bean
    public Docket docket(){

        return new Docket(DocumentationType.SWAGGER_2).apiInfo(apiInfo());
    }

    public ApiInfo apiInfo(){
        return new ApiInfo("CDL的Swagger2 Api 文档",
                "即使在小的帆也能远航",
                "1.0",
                "urn:tos",
                new Contact("CDL", "", "1419533877@qq.com"),
                "Apache 2.0",
                "http://www.apache.org/licenses/LICENSE-2.0",
                new ArrayList());
    }
}
直接访问
- 配置扫描接口及开关
@Bean
    public Docket docket(){

        return new Docket(DocumentationType.SWAGGER_2)
                .apiInfo(apiInfo())
                .select()
                //RequestHandlerSelectors 配置要扫描接口的方式
                //basePackage 指定要扫描的包
                //RequestHandlerSelectors.any 扫描全部
                //RequestHandlerSelectors.none 不扫描
                //RequestHandlerSelectors.withClassAnnotation(.class) 扫描类上注解
                //RequestHandlerSelectors.withMethodAnnotation(.class) 扫描类上注解
                .apis(RequestHandlerSelectors.basePackage("com.cdl.controller"))
                //过滤什么路径,意思是只扫描路径上带有user的接口
                .paths(PathSelectors.ant("/user/**"))
                .build();
    }
- 配置是否启动swagger
 @Bean
    public Docket docket(){

        return new Docket(DocumentationType.SWAGGER_2)
                .apiInfo(apiInfo())
                .enable(false)
                .select()
                //RequestHandlerSelectors 配置要扫描接口的方式
                //basePackage 指定要扫描的包
                //RequestHandlerSelectors.any 扫描全部
                //RequestHandlerSelectors.none 不扫描
                //RequestHandlerSelectors.withClassAnnotation(.class) 扫描类上注解
                //RequestHandlerSelectors.withMethodAnnotation(.class) 扫描类上注解
                .apis(RequestHandlerSelectors.basePackage("com.cdl.controller"))
                //过滤什么路径,意思是只扫描路径上带有user的接口
                .paths(PathSelectors.ant("/user/**"))
                .build();
    }
- 在生产环境中使用swagger,在发布的时候不使用
- 判断是不是生产环境 flag = false
- enable(flag)
application.properties
spring.profiles.active = dev
application-dev.properties
server.port=8081
application-pro.properties
server.port=8082
@Bean
    public Docket docket(Environment environment){

        Profiles profiles = Profiles.of("dev","test");

        /**
         * 通过environment.acceptsProfiles判断项目处在什么环境中,是否启用Swagger
         */
        boolean b = environment.acceptsProfiles(profiles);

        return new Docket(DocumentationType.SWAGGER_2)
                .apiInfo(apiInfo())
                .enable(b)
                .select()
                //RequestHandlerSelectors 配置要扫描接口的方式
                //basePackage 指定要扫描的包
                //RequestHandlerSelectors.any 扫描全部
                //RequestHandlerSelectors.none 不扫描
                //RequestHandlerSelectors.withClassAnnotation(.class) 扫描类上注解
                //RequestHandlerSelectors.withMethodAnnotation(.class) 扫描类上注解
                .apis(RequestHandlerSelectors.basePackage("com.cdl.controller"))
                //过滤什么路径,意思是只扫描路径上带有user的接口
                .paths(PathSelectors.ant("/user/**"))
                .build();
    }
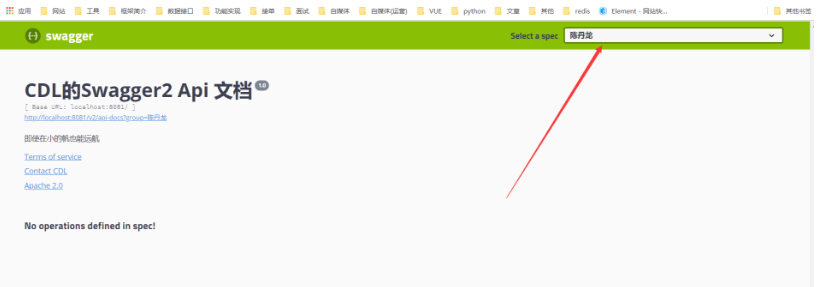
- 配置API文档的分组
.groupName("陈丹龙")
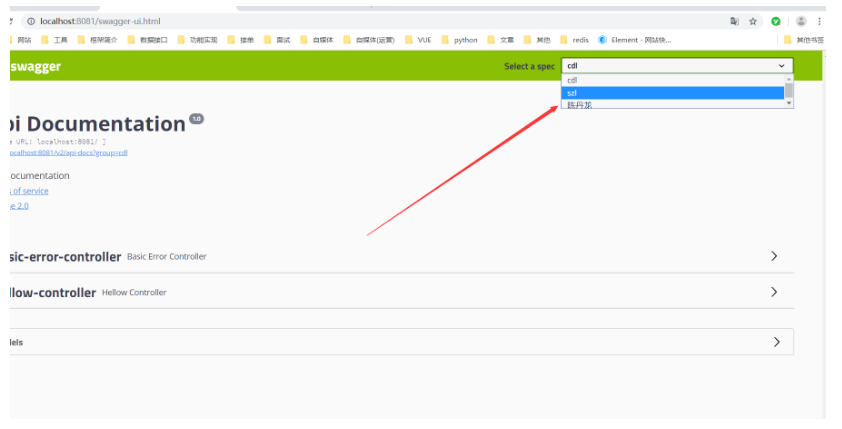
- 如何配置多个分组
配置多个Docket即可生成多个组
@Bean
    public Docket docket1(){
        return new Docket(DocumentationType.SWAGGER_2).groupName("cdl");
    }
    @Bean
    public Docket docket2(){
     return new Docket(DocumentationType.SWAGGER_2).groupName("szl");
    }
- 实体类配置
@ApiModel("用户")
public class User {

    @ApiModelProperty("用户名")
    private String name;
    @ApiModelProperty("密码")
    private String pwd;
}
注意:关于注释不显示的问题
第一步,在实体类中@ApiModel(description= “表名描述”)
第二步,在字段属性中@ApiModelProperty(value = “字段备注”)
第三步,在controller中必须增加泛型属性,否则不会显示备注,例如:
@RequestMapping(value = “/getAllPosition”, method = RequestMethod.GET)
@ResponseBody
public PageInfo<Base_position> getAllPosition
Swagger3.0相比这个,做过很大改动
呀,是丹龙呀!

 浙公网安备 33010602011771号