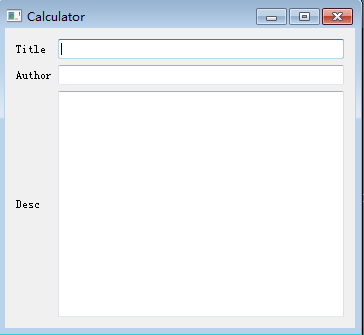
 1 #demo_12:网格布局
 2 import sys
 3 from PyQt5.QtWidgets import  QApplication,QWidget,QGridLayout,QPushButton,QLineEdit,QTextEdit,QLabel
 4
 5 class Example(QWidget):
 6     def __init__(self):
 7         super().__init__()
 8         self.initUI()
 9     def initUI(self):
10         layout=QGridLayout()
11         title_label=QLabel('Title')
12
13         layout.addWidget(title_label,0,0)#将label组件加入到布局layout中,后面参数标示行下标,列下标
14         text_titleEdit=QLineEdit()   #单行输入文本
15         layout.addWidget(text_titleEdit,0,1)
16
17         author_label = QLabel('Author')
18         layout.addWidget(author_label, 1, 0)
19         text_authorEdit = QLineEdit() #单行输入文本
20         layout.addWidget(text_authorEdit, 1, 1)
21
22         desc_label=QLabel('Desc')
23
24         layout.addWidget(desc_label,2,0)
25         text_descEdit=QTextEdit()    #多行输入文本
26         layout.addWidget(text_descEdit,2,1)
27
28         self.setLayout(layout)
29
30         self.setGeometry(500, 250, 350, 300)
31         self.setWindowTitle('Calculator')
32         self.show()
33 if __name__=='__main__':
34     app=QApplication(sys.argv)
35     e=Example()
36     sys.exit(app.exec())
37
38 # names = ['Cls', 'Bck', '', 'Close',
39 #              '7', '8', '9', '/',
40 #              '4', '5', '6', '*',
41 #              '1', '2', '3', '-',
42 #              '0', '.', '=', '+']
43 # options = [(i, j) for j in range(5) for i in range(4)]
44 # for position, name in zip(options, names):
45 #     print(str(position)+"》》"+str(name))
![]()


 浙公网安备 33010602011771号