


Unity Shader编程进阶:掌握高阶渲染强大的技术 C# 实战案例
Unity Shader编程完全入门指南:从零到实战 C#
本文将深入探讨Unity Shader编程的高级技术,包括自定义光照模型、后处理效果、GPU实例化、表面着色器深度应用等,帮助开发者提升渲染效果与性能优化能力。提示:内容纯个人编写,欢迎评论点赞。
文章目录
1. 高级光照模型
1.1 光照模型理论基础
光照模型描述了光与物体表面相互作用的数学表示:
- Phong模型:环境光+漫反射+高光反射
I = I_ambient + I_diffuse + I_specular
- BRDF(双向反射分布函数):更精确的物理模型
1.2 实现PBR光照
基于物理的渲染(PBR)核心公式:
// Unity Standard BRDF
half4 BRDF_Unity_PBS(
half3 diffColor, half3 specColor, half oneMinusReflectivity, half smoothness,
float3 normal, float3 viewDir,
Light light, InputData data
) {
// ... PBR计算过程
}
完整PBR表面着色器示例:
Shader "Custom/PBRShader"
{
Properties {
_Color ("Color", Color) = (1,1,1,1)
_Metallic ("Metallic", Range(0,1)) = 0.0
_Smoothness ("Smoothness", Range(0,1)) = 0.5
_NormalMap ("Normal Map", 2D) = "bump" {
}
}
SubShader {
Tags {
"RenderType"="Opaque"
}
CGPROGRAM
#pragma surface surf Standard fullforwardshadows
struct Input {
float2 uv_NormalMap;
};
half _Metallic;
half _Smoothness;
half4 _Color;
sampler2D _NormalMap;
void surf (Input IN, inout SurfaceOutputStandard o) {
o.Albedo = _Color.rgb;
o.Metallic = _Metallic;
o.Smoothness = _Smoothness;
o.Normal = UnpackNormal(tex2D(_NormalMap, IN.uv_NormalMap));
}
ENDCG
}
FallBack "Diffuse"
}
1.3 自定义卡通光照
// 卡通光照函数
void LightingRamp_GI (
SurfaceOutput s,
UnityGIInput data,
inout UnityGI gi
) {
// ... 全局光照设置
}
void LightingRamp_CS (
SurfaceOutput s,
half3 viewDir,
UnityGI gi,
out half4 finalColor
) {
// 离散化处理
half NdotL = dot(s.Normal, gi.light.dir);
half ramp = ceil(NdotL * _RampSteps) / _RampSteps;
// 最终颜色
finalColor.rgb = s.Albedo * gi.light.color * ramp;
finalColor.a = s.Alpha;
}
2. 后处理效果处理
2.1 后处理原理
后处理在渲染完成后对屏幕图像进行处理:
渲染场景 -> 获取屏幕图像 -> 应用后处理Shader -> 输出最终图像2.2 Bloom效果实现
// Bloom效果Shader核心
half4 frag_bloom (v2f i) : SV_Target
{
// 1. 亮度提取
half4 col = tex2D(_MainTex, i.uv);
half brightness = dot(col.rgb, float3(0.2126, 0.7152, 0.0722));
if(brightness < _BloomThreshold)
return 0;
// 2. 高斯模糊
half4 blur = 0;
for(int i = 0; i < KERNEL_SIZE; i++) {
blur += _BloomKernel[i] * tex2D(_MainTex, i.uv + _BloomOffsets[i]);
}
// 3. 混合原始图像与模糊图像
return col + blur * _BloomIntensity;
}
2.3 屏幕空间环境光遮蔽(SSAO)
// SSAO核心计算
float ComputeAO(float2 uv, float3 viewNormal)
{
float ao = 0.0;
for(int i = 0; i < SAMPLE_COUNT; i++) {
float3 samplePos = GetSamplePosition(uv, i);
float sample = depthCompare(samplePos);
ao += ComputeAOContribution(viewNormal, samplePos, sample);
}
return 1.0 - (ao / SAMPLE_COUNT) * _AOIntensity;
}
3. 表面着色器深度应用
3.1 表面函数高级用法
void surf (Input IN, inout SurfaceOutputStandard o)
{
// 世界坐标计算
float3 worldPos = IN.worldPos;
// 三平面贴图混合
float3 triblend = pow(abs(IN.worldNormal), _BlendSharpness);
triblend /= dot(triblend, float3(1,1,1));
half4 colX = tex2D(_MainTex, IN.worldPos.yz);
half4 colY = tex2D(_MainTex, IN.worldPos.xz);
half4 colZ = tex2D(_MainTex, IN.worldPos.xy);
o.Albedo = colX * triblend.x + colY * triblend.y + colZ * triblend.z;
}
3.2 自定义顶点修改
#pragma surface surf Lambert vertex:vert
void vert (inout appdata_full v, out Input o)
{
UNITY_INITIALIZE_OUTPUT(Input, o);
// 顶点波浪动画
float wave = sin(_Time.y + v.vertex.x * _WaveFreq);
v.vertex.y += wave * _WaveAmp;
// 传递世界坐标
o.worldPos = mul(unity_ObjectToWorld, v.vertex).xyz;
}
3.3 多光源支持
#pragma surface surf Standard fullforwardshadows
#pragma multi_compile_fwdadd
void surf (Input IN, inout SurfaceOutputStandard o)
{
// 表面函数
}
// 额外光源处理
#ifdef _ADDITIONAL_LIGHTS
uint pixelLightCount = GetAdditionalLightsCount();
for (uint lightIndex = 0; lightIndex < pixelLightCount; lightIndex++) {
Light light = GetAdditionalLight(lightIndex, IN.worldPos);
// 光源贡献计算
}
#endif
4. GPU实例化优化
4.1 实例化原理
GPU实例化允许一次性绘制多个相同网格,减少Draw Call:
常规绘制: Draw Call 1 -> 网格1
Draw Call 2 -> 网格1
...
实例化: Draw Call 1 -> 网格1 (实例1, 实例2, ...)
4.2 静态批处理 vs GPU实例化
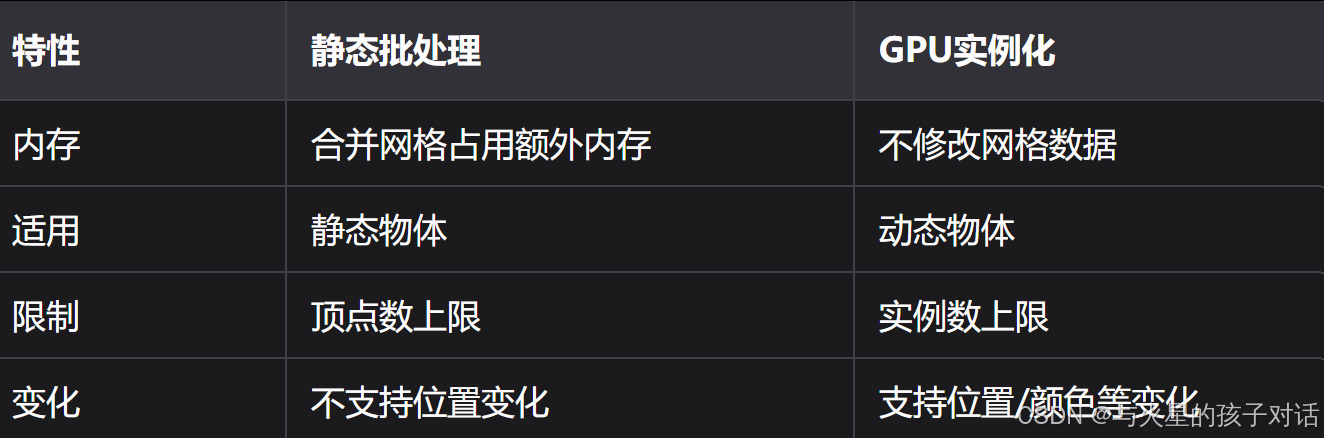
4.3 实例化实战:草地渲染
Shader "Custom/InstancedGrass"
{
Properties {
/* 属性 */
}
SubShader
{
Pass
{
Tags {
"LightMode"="ForwardBase"
}
CGPROGRAM
#pragma vertex vert
#pragma fragment frag
#pragma multi_compile_instancing
UNITY_INSTANCING_BUFFER_START(Props)
UNITY_DEFINE_INSTANCED_PROP(float4, _Color)
UNITY_DEFINE_INSTANCED_PROP(float, _Height)
UNITY_INSTANCING_BUFFER_END(Props)
struct appdata
{
float4 vertex : POSITION;
UNITY_VERTEX_INPUT_INSTANCE_ID
};
struct v2f
{
float4 pos : SV_POSITION;
UNITY_VERTEX_INPUT_INSTANCE_ID
};
v2f vert (appdata v)
{
v2f o;
UNITY_SETUP_INSTANCE_ID(v);
UNITY_TRANSFER_INSTANCE_ID(v, o);
float height = UNITY_ACCESS_INSTANCED_PROP(Props, _Height);
v.vertex.y += height;
o.pos = UnityObjectToClipPos(v.vertex);
return o;
}
fixed4 frag (v2f i) : SV_Target
{
UNITY_SETUP_INSTANCE_ID(i);
return UNITY_ACCESS_INSTANCED_PROP(Props, _Color);
}
ENDCG
}
}
}
5. Shader变体管理
5.1 变体概念
Shader变体由预编译指令组合生成:
#pragma multi_compile _ A B
#pragma multi_compile C D
5.2 变体控制技巧
- 精确控制:
#pragma shader_feature _ENABLE_FEATURE- 跳过变体:
#pragma skip_variants POINT SPOT5.3 变体优化策略
- 避免不必要的multi_compile
- 使用shader_feature替代multi_compile
- 拆分变体过多的Shader
- 使用变体集合(Variant Collections)
6. 计算着色器入门
6.1 计算着色器基础
#pragma kernel CSMain
RWTexture2D<float4> Result;
  [numthreads(8,8,1)]
  void CSMain (uint3 id : SV_DispatchThreadID)
  {
  // 并行计算
  Result[id.xy] = float4(id.x & id.y, (id.x &
  15)/15.0, (id.y &
  15)/15.0, 0.0);
  }
6.2 粒子系统优化
// 粒子更新计算着色器
RWStructuredBuffer<Particle> ParticleBuffer;
  [numthreads(64,1,1)]
  void UpdateParticles (uint id : SV_DispatchThreadID)
  {
  Particle p = ParticleBuffer[id];
  // 更新位置
  p.velocity += float3(0, -9.8, 0) * dt;
  p.position += p.velocity * dt;
  // 碰撞检测
  if(p.position.y <
  0) {
  p.position.y = 0;
  p.velocity.y *= -0.8;
  }
  ParticleBuffer[id] = p;
  }
6.3 通用计算应用
- 网格变形
- 物理模拟
- 纹理生成
- 光线追踪
7. 实战案例:天气系统
7.1 雨滴效果
// 雨滴表面着色器
void surf (Input IN, inout SurfaceOutput o)
{
// 雨滴法线贴图
float2 rainUV = IN.worldPos.xz * _RainScale + float2 _Time.y * _RainSpeed;
half3 rainNormal = UnpackNormal(tex2D(_RainNormalMap, rainUV));
// 混合基础法线
o.Normal = BlendNormals(o.Normal, rainNormal);
// 湿润效果
half wetFactor = saturate(_RainAmount * 2 - 1);
o.Albedo = lerp(_DryColor, _WetColor, wetFactor);
}
7.2 雪地脚印
// 脚印渲染
float3 worldPos = IN.worldPos;
float2 footprintUV = worldPos.xz - _PlayerPos.xz;
half footprint = tex2D(_FootprintMask, footprintUV).r;
// 混合雪地材质
o.Albedo = lerp(_SnowColor, _GroundColor, footprint);
o.Smoothness = lerp = lerp(_SnowSmoothness, 0.2, footprint);
7.3 动态潮湿效果
// 潮湿贴图随时间变化
float2 wetUV = IN.worldPos.xz * _WetScale;
half wetPattern = tex2D(_WetPatternMap, wetUV).r;
// 随时间增加的潮湿程度
half wetFactor = saturate(_Wetness * 2 - wetPattern);
o.Metallic = lerp(0.0, 0.8, wetFactor);
o.Smoothness = lerp(0.1, 0.9, wetFactor);
8. 性能调优与调试
8.1 Shader性能分析
GPU性能分析:
- Unity Frame Debugger
- RenderDoc
- XCode GPU Debugger
关键指标:
- Fill Rate(填充率)
- Overdraw(过度绘制)
- Shader复杂度
8.2 带宽优化
- 压缩纹理格式(ASTC, ETC2)
- Mipmap优化
- 减少纹理采样次数
- 使用纹理图集
8.3 跨平台适配
// 平台相关宏
#if defined(SHADER_API_MOBILE)
// 移动端简化版
#elif defined(SHADER_API_D3D11)
// PC高级版
#endif
// 精度调整
#if defined(SHADER_API_GLES)
precision mediump float;
#else
precision highp float;
#endif
9. 总结与资源
核心进阶技术:
- 物理光照模型实现
- 后处理特效开发
- GPU实例化优化
- 计算着色器应用
继续学习资源:
- 希望本文能帮助你在Unity开发中更加得心应手!如果有任何问题,请在评论区留言讨论。
- 点赞收藏加关注哦~ 蟹蟹

 浙公网安备 33010602011771号