python——模块
一、导入模块
Python之所以应用越来越广泛,在一定程度上也依赖于其为程序员提供了大量的模块以供使用,如果想要使用模块,则需要导入。导入模块有一下几种方法:
1 import module
2 from module.xx.xx import xx
3 from module.xx.xx import xx as rename
4 from module.xx.xx import *
导入模块其实就是告诉Python解释器去解释那个py文件
- 导入一个py文件,解释器解释该py文件
- 导入一个包,解释器解释该包下的 __init__.py 文件 【py2.7】
那么问题来了,导入模块时是根据那个路径作为基准来进行的呢?即:sys.path
如果sys.path路径列表没有你想要的路径,可以通过 sys.path.append('路径') 添加。
import sys
import os
project_path = os.path.dirname(os.path.dirname(os.path.abspath(__file__)))
sys.path.append(project_path)
二、安装第三方模块
方法一:软件安装(pip)
1. python2自带pip,python3自带pip3,可以在python安装目录下找到。
2. 添加环境变量。
3. 打开终端,输入 pip3 install [模块名]自动下载安装。
方法二:源码安装
1. 下载模块的源码安装包到本地,解压。
2. 在解压出来的文件中找到setup.py 文件,使用命令行进入此文件目录
3. 执行 python setup.py install 完成源码安装
三、常用模块
1. sys
用于提供对Python解释器相关的操作:
 常用操作 实例:进度百分比
2. os
常用操作3. 序列化
Python中用于序列化的两个模块
- json 用于【字符串】和 【python基本数据类型】 间进行转换
- pickle 用于【python特有的类型】 和 【python基本数据类型】间进行转换
Json模块提供了四个功能:dumps、dump、loads、load(常用带s的方法)
pickle模块提供了四个功能:dumps、dump、loads、load(常用带s的方法)

# json

json.loads() # 将字符串转换成python基本数据类型

注意:字符串里数据类型里的字符串必须使用双引号,因为在其他语言中,单引号不一定代表字符串

特殊:元组不能转换,因为不属于通用数据类型
import json
n = '(11,22,33,"alex")'
s = json.loads(n)
print(s)

json.dumps() # 将python的基本数据类型(包括元组)转换成字符串
4. XML
XML是实现不同语言或程序之间进行数据交换的协议,XML文件格式如下:
<data>
    <country name="Liechtenstein">
        <rank updated="yes">2</rank>
        <year>2023</year>
        <gdppc>141100</gdppc>
        <neighbor direction="E" name="Austria" />
        <neighbor direction="W" name="Switzerland" />
    </country>
    <country name="Singapore">
        <rank updated="yes">5</rank>
        <year>2026</year>
        <gdppc>59900</gdppc>
        <neighbor direction="N" name="Malaysia" />
    </country>
    <country name="Panama">
        <rank updated="yes">69</rank>
        <year>2026</year>
        <gdppc>13600</gdppc>
        <neighbor direction="W" name="Costa Rica" />
        <neighbor direction="E" name="Colombia" />
    </country>
</data>
A. 解析XML
方法一:利用ElementTree.XML将字符串解析成xml对象

from xml.etree import ElementTree as ET

# 打开文件,读取XML内容
str_xml = open('xo.xml', 'r').read()

# 将字符串解析成xml特殊对象,root代指xml文件的根节点
root = ET.XML(str_xml)


方法二:利用ElementTree.parse将文件直接解析成xml对象

from xml.etree import ElementTree as ET

# 直接解析xml文件
tree = ET.parse("xo.xml")

# 获取xml文件的根节点
root = tree.getroot()
B. 操作XML
节点功能一览由于 每个节点 都具有以上的方法,并且在上一步骤中解析时均得到了root(xml文件的根节点),so 可以利用以上方法进行操作xml文件。
a. 遍历XML文档的所有内容
# 顶层标签
print(root.tag)

# 遍历XML文档的第二层
for child in root:
    # 第二层节点的标签名称和标签属性
    print(child.tag, child.attrib)
    # 遍历XML文档的第三层
    for i in child:
        # 第三层节点的标签名称和内容
        print(i.tag,i.text)
b、遍历XML中指定的节点
# 顶层标签
print(root.tag)


# 遍历XML中所有的year节点
for node in root.iter('year'):
    # 节点的标签名称和内容
    print(node.tag, node.text)
c、修改节点内容
由于修改的节点时,均是在内存中进行,其不会影响文件中的内容。所以,如果想要修改,则需要重新将内存中的内容写到文件。
from xml.etree import ElementTree as ET

############ 解析方式一 ############

# 打开文件,读取XML内容
str_xml = open('xo.xml', 'r').read()

# 将字符串解析成xml特殊对象,root代指xml文件的根节点
root = ET.XML(str_xml)

############ 操作 ############

# 顶层标签
print(root.tag)

# 循环所有的year节点
for node in root.iter('year'):
    # 将year节点中的内容自增一
    new_year = int(node.text) + 1
    node.text = str(new_year)

    # 设置属性
    node.set('name', 'alex')
    node.set('age', '18')
    # 删除属性
    del node.attrib['name']


############ 保存文件 ############
tree = ET.ElementTree(root)
tree.write("newnew.xml", encoding='utf-8')

解析字符串方式,修改,保存
from xml.etree import ElementTree as ET

############ 解析方式二 ############

# 直接解析xml文件
tree = ET.parse("xo.xml")

# 获取xml文件的根节点
root = tree.getroot()

############ 操作 ############

# 顶层标签
print(root.tag)

# 循环所有的year节点
for node in root.iter('year'):
    # 将year节点中的内容自增一
    new_year = int(node.text) + 1
    node.text = str(new_year)

    # 设置属性
    node.set('name', 'alex')
    node.set('age', '18')
    # 删除属性
    del node.attrib['name']


############ 保存文件 ############
tree.write("newnew.xml", encoding='utf-8')

解析文件方式,修改,保存
d、删除节点
解析字符串方式打开,删除,保存 解析文件方式打开,删除,保存C. 创建XML文档
创建方式(一) 创建方式(二) 创建方式(三)由于原生保存的XML时默认无缩进,如果想要设置缩进的话, 需要修改保存方式:
from xml.etree import ElementTree as ET
from xml.dom import minidom


def prettify(elem):
    """将节点转换成字符串,并添加缩进。
    """
    rough_string = ET.tostring(elem, 'utf-8')
    reparsed = minidom.parseString(rough_string)
    return reparsed.toprettyxml(indent="\t")

# 创建根节点
root = ET.Element("famliy")


# 创建大儿子
# son1 = ET.Element('son', {'name': '儿1'})
son1 = root.makeelement('son', {'name': '儿1'})
# 创建小儿子
# son2 = ET.Element('son', {"name": '儿2'})
son2 = root.makeelement('son', {"name": '儿2'})

# 在大儿子中创建两个孙子
# grandson1 = ET.Element('grandson', {'name': '儿11'})
grandson1 = son1.makeelement('grandson', {'name': '儿11'})
# grandson2 = ET.Element('grandson', {'name': '儿12'})
grandson2 = son1.makeelement('grandson', {'name': '儿12'})

son1.append(grandson1)
son1.append(grandson2)


# 把儿子添加到根节点中
root.append(son1)
root.append(son1)


raw_str = prettify(root)

f = open("xxxoo.xml",'w',encoding='utf-8')
f.write(raw_str)
f.close()
D. 命名空间
View Code详细介绍,猛击这里
5. requests
使用模块
GET请求 POST请求 其他请求更多requests模块相关的文档见:http://cn.python-requests.org/zh_CN/latest/
http://blog.csdn.net/shanzhizi/article/details/50903748
Http请求和XML实例
实例:检测QQ账号是否在线 实例:查看火车停靠信息6、random
import random

print(random.random())
print(random.randint(1, 2))
print(random.randrange(1, 10))
import random
checkcode = ''
for i in range(4):
    current = random.randrange(0,4)
    if current != i:
        temp = chr(random.randint(65,90))
    else:
        temp = random.randint(0,9)
    checkcode += str(temp)
print checkcode

随机验证码
7、configparser
configparser用于处理特定格式的文件,其本质上是利用open来操作文件。
指定格式1、获取所有节点
|
1
2
3
4
5
6
|
import configparserconfig = configparser.ConfigParser()config.read('xxxooo', encoding='utf-8')ret = config.sections()print(ret) |
2、获取指定节点下所有的键值对
|
1
2
3
4
5
6
|
import configparserconfig = configparser.ConfigParser()config.read('xxxooo', encoding='utf-8')ret = config.items('section1')print(ret) |
3、获取指定节点下所有的建
|
1
2
3
4
5
6
|
import configparserconfig = configparser.ConfigParser()config.read('xxxooo', encoding='utf-8')ret = config.options('section1')print(ret) |
4、获取指定节点下指定key的值
|
1
2
3
4
5
6
7
8
9
10
11
12
|
import configparserconfig = configparser.ConfigParser()config.read('xxxooo', encoding='utf-8')v = config.get('section1', 'k1')# v = config.getint('section1', 'k1')# v = config.getfloat('section1', 'k1')# v = config.getboolean('section1', 'k1')print(v) |
5、检查、删除、添加节点
|
1
2
3
4
5
6
7
8
9
10
11
12
13
14
15
16
17
|
import configparserconfig = configparser.ConfigParser()config.read('xxxooo', encoding='utf-8')# 检查has_sec = config.has_section('section1')print(has_sec)# 添加节点config.add_section("SEC_1")config.write(open('xxxooo', 'w'))# 删除节点config.remove_section("SEC_1")config.write(open('xxxooo', 'w')) |
6、检查、删除、设置指定组内的键值对
|
1
2
3
4
5
6
7
8
9
10
11
12
13
14
15
16
|
import configparserconfig = configparser.ConfigParser()config.read('xxxooo', encoding='utf-8')# 检查has_opt = config.has_option('section1', 'k1')print(has_opt)# 删除config.remove_option('section1', 'k1')config.write(open('xxxooo', 'w'))# 设置config.set('section1', 'k10', "123")config.write(open('xxxooo', 'w')) |
8、logging(日志)
import logging


logging.basicConfig(filename='log.log',
                    format='%(asctime)s - %(name)s - %(levelname)s -%(module)s:  %(message)s',
                    datefmt='%Y-%m-%d %H:%M:%S %p',
                    level=10)

logging.debug('debug')
logging.info('info')
logging.warning('warning')
logging.error('error')
logging.critical('critical')
logging.log(10,'log')
日志等级:
CRITICAL = 50
FATAL = CRITICAL
ERROR = 40
WARNING = 30
WARN = WARNING
INFO = 20
DEBUG = 10
NOTSET = 0
注:只有【当前写等级】大于【日志等级】时,日志文件才被记录。
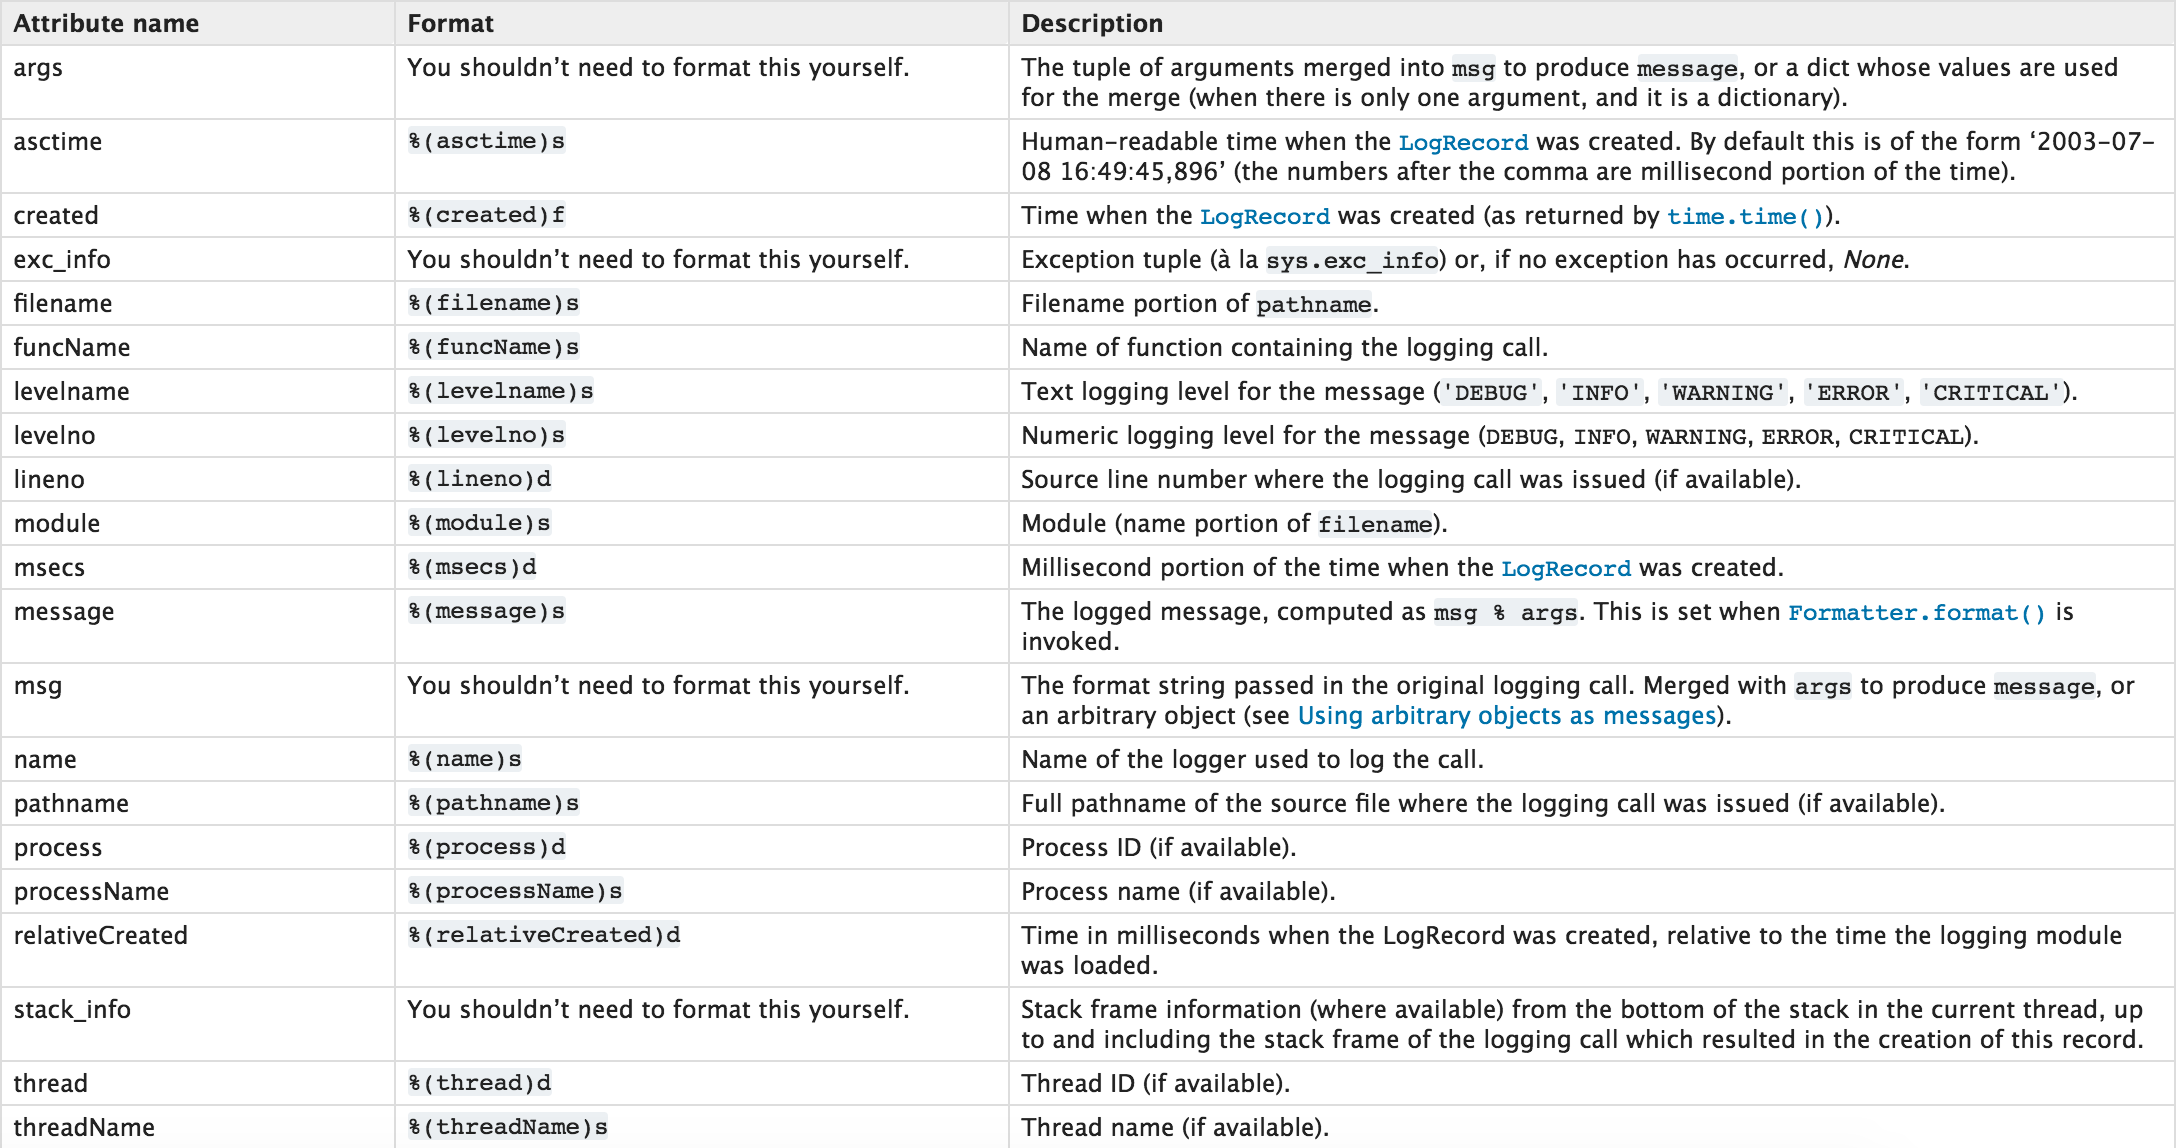
日志记录格式:
2、多文件日志
对于上述记录日志的功能,只能将日志记录在单文件中,如果想要设置多个日志文件,logging.basicConfig将无法完成,需要自定义文件和日志操作对象。
日志一 日志(二)如上述创建的两个日志对象
- 当使用【logger1】写日志时,会将相应的内容写入 l1_1.log 和 l1_2.log 文件中
- 当使用【logger2】写日志时,会将相应的内容写入 l2_1.log 文件中
9、系统命令(subprocess)
call
执行命令,返回状态码
|
1
2
|
ret = subprocess.call(["ls", "-l"], shell=False)ret = subprocess.call("ls -l", shell=True) |
check_call
执行命令,如果执行状态码是 0 ,则返回0,否则抛异常
|
1
2
|
subprocess.check_call(["ls", "-l"])subprocess.check_call("exit 1", shell=True) |
check_output
执行命令,如果状态码是 0 ,则返回执行结果,否则抛异常
|
1
2
|
subprocess.check_output(["echo", "Hello World!"])subprocess.check_output("exit 1", shell=True) |
subprocess.Popen(...)
用于执行复杂的系统命令
参数:
- args:shell命令,可以是字符串或者序列类型(如:list,元组)
- bufsize:指定缓冲。0 无缓冲,1 行缓冲,其他 缓冲区大小,负值 系统缓冲
- stdin, stdout, stderr:分别表示程序的标准输入、输出、错误句柄
- preexec_fn:只在Unix平台下有效,用于指定一个可执行对象(callable object),它将在子进程运行之前被调用
- close_sfs:在windows平台下,如果close_fds被设置为True,则新创建的子进程将不会继承父进程的输入、输出、错误管道。
所以不能将close_fds设置为True同时重定向子进程的标准输入、输出与错误(stdin, stdout, stderr)。 - shell:同上
- cwd:用于设置子进程的当前目录
- env:用于指定子进程的环境变量。如果env = None,子进程的环境变量将从父进程中继承。
- universal_newlines:不同系统的换行符不同,True -> 同意使用 \n
- startupinfo与createionflags只在windows下有效
将被传递给底层的CreateProcess()函数,用于设置子进程的一些属性,如:主窗口的外观,进程的优先级等等
普通命令终端输入的命令分为两种:
- 输入即可得到输出,如:ifconfig
- 输入进行某环境,依赖再输入,如:python
import subprocess

obj = subprocess.Popen(["python"], stdin=subprocess.PIPE, stdout=subprocess.PIPE, stderr=subprocess.PIPE, universal_newlines=True)
obj.stdin.write("print(1)\n")
obj.stdin.write("print(2)")
obj.stdin.close()

cmd_out = obj.stdout.read()
obj.stdout.close()
cmd_error = obj.stderr.read()
obj.stderr.close()

print(cmd_out)
print(cmd_error)
View Code View Code10、shutil(文件处理、解压缩)
高级的 文件、文件夹、压缩包 处理模块
shutil.copyfileobj(fsrc, fdst[, length])
将文件内容拷贝到另一个文件中
|
1
2
3
|
import shutilshutil.copyfileobj(open('old.xml','r'), open('new.xml', 'w')) |
shutil.copyfile(src, dst)
拷贝文件
| 1 | shutil.copyfile('f1.log', 'f2.log') |
shutil.copymode(src, dst)
仅拷贝权限。内容、组、用户均不变
| 1 | shutil.copymode('f1.log', 'f2.log') |
shutil.copystat(src, dst)
仅拷贝状态的信息,包括:mode bits, atime, mtime, flags
| 1 | shutil.copystat('f1.log', 'f2.log') |
shutil.copy(src, dst)
拷贝文件和权限
|
1
2
3
|
import shutilshutil.copy('f1.log', 'f2.log') |
shutil.copy2(src, dst)
拷贝文件和状态信息
|
1
2
3
|
import shutilshutil.copy2('f1.log', 'f2.log') |
shutil.ignore_patterns(*patterns)
shutil.copytree(src, dst, symlinks=False, ignore=None)
递归的去拷贝文件夹
|
1
2
3
|
import shutilshutil.copytree('folder1', 'folder2', ignore=shutil.ignore_patterns('*.pyc', 'tmp*')) |
View Codeshutil.rmtree(path[, ignore_errors[, onerror]])
递归的去删除文件
|
1
2
3
|
import shutilshutil.rmtree('folder1') |
shutil.move(src, dst)
递归的去移动文件,它类似mv命令,其实就是重命名。
|
1
2
3
|
import shutilshutil.move('folder1', 'folder3') |
shutil.make_archive(base_name, format,...)
创建压缩包并返回文件路径,例如:zip、tar
创建压缩包并返回文件路径,例如:zip、tar
- base_name: 压缩包的文件名,也可以是压缩包的路径。只是文件名时,则保存至当前目录,否则保存至指定路径,
如:www =>保存至当前路径
如:/Users/wupeiqi/www =>保存至/Users/wupeiqi/ - format: 压缩包种类,“zip”, “tar”, “bztar”,“gztar”
- root_dir: 要压缩的文件夹路径(默认当前目录)
- owner: 用户,默认当前用户
- group: 组,默认当前组
- logger: 用于记录日志,通常是logging.Logger对象
#将 /Users/wupeiqi/Downloads/test 下的文件打包放置当前程序目录
import shutil
ret = shutil.make_archive("wwwwwwwwww", 'gztar', root_dir='/Users/wupeiqi/Downloads/test')


#将 /Users/wupeiqi/Downloads/test 下的文件打包放置 /Users/wupeiqi/目录
import shutil
ret = shutil.make_archive("/Users/wupeiqi/wwwwwwwwww", 'gztar', root_dir='/Users/wupeiqi/Downloads/test')
shutil 对压缩包的处理是调用 ZipFile 和 TarFile 两个模块来进行的,详细:
zipfile解压缩 tarfile解压缩11、time
时间相关的操作,时间有三种表示方式:
- 时间戳 1970年1月1日之后的秒,即:time.time()
- 格式化的字符串 2014-11-11 11:11, 即:time.strftime('%Y-%m-%d')
- 结构化时间 元组包含了:年、日、星期等... time.struct_time 即:time.localtime()
print time.time()
print time.mktime(time.localtime())

print time.gmtime()    #可加时间戳参数
print time.localtime() #可加时间戳参数
print time.strptime('2014-11-11', '%Y-%m-%d')

print time.strftime('%Y-%m-%d') #默认当前时间
print time.strftime('%Y-%m-%d',time.localtime()) #默认当前时间
print time.asctime()
print time.asctime(time.localtime())
print time.ctime(time.time())

import datetime
'''
datetime.date:表示日期的类。常用的属性有year, month, day
datetime.time:表示时间的类。常用的属性有hour, minute, second, microsecond
datetime.datetime:表示日期时间
datetime.timedelta:表示时间间隔,即两个时间点之间的长度
timedelta([days[, seconds[, microseconds[, milliseconds[, minutes[, hours[, weeks]]]]]]])
strftime("%Y-%m-%d")
'''
import datetime
print datetime.datetime.now()
print datetime.datetime.now() - datetime.timedelta(days=5)

 浙公网安备 33010602011771号