Java NIO 缓冲区
Java NIO 在JDK1.4的时候引入,主要解决传统IO的一些性能问题。NIO 主要内容包含 Buffer 、Channel、Selector等内容,本文主要讲解Buffer相关的内容。
Buffer的继承体系

Buffer的子类比较多,但是继承关系比较简单。8种基本类型,除了布尔类型,其余的类型都有对应的Buffer实现,名字也十分好记:基本数据类型首字母大写+Buffer。其中ByteBuffer最为常用,因为字节是操作系统及其I/O设备使用的基本数据类型,后面演示的时候也主要使用字节缓冲区。除此之外MappedByteBuffer也十分重要,主要和内存映射有该,后面会详细介绍。
重要属性方法
在Buffer抽象类中,主要有如下几个属性,这些属性十分重要。
// Invariants: mark <= position <= limit <= capacity
    private int mark = -1;
    private int position = 0;
    private int limit;
    private int capacity;
| mark | 位置标记。调用mark( )来设定mark = position。调用reset( )设定position = mark。 |
| position | 下一个要被读或写的元素索引,索引会被get 和 put 函数更新。 |
| limit | 缓冲区的第一个不能被读或写的元素,或者说可供读写的最大位置。 |
| capacity | 缓冲区能够容纳的数据元素的最大数量。这一容量在缓冲区创建时被设定,并且永远不能被改变。 |
下面的方法是Buffer抽象类所定义的方法。但是它没有定义两个最重要的方法:put 和 get 。因为每一个Buffer子类它们所采用的参数类型,以及它们返回的数据类型都是唯一的,所以它们不能在顶层Buffer类中被抽象地声明。它们的定义必须被特定类型的子类所遵从。
int capacity()
int position()
Buffer position(int)
int limit()
Buffer limit(int)
Buffer mark()
Buffer reset()
Buffer clear()
Buffer flip()
Buffer rewind()
int remaining()
boolean hasRemaining()
boolean isReadOnly()
boolean hasArray()
Object array()
int arrayOffset()
boolean isDirect()
创建缓冲区
allocate、allocateDirect 和 wrap可以新建一个缓冲区,这几个方法含义各不相同。
-
allocate 用于创建普通的缓冲区,该缓冲区建立在JVM内存之上。
-
allocateDirect 用于创建直接缓冲区,该缓冲区建立在操作系统之中的内存,非JVM占用的那一部分。
-
wrap 使用自己的数组用做缓冲区的备份存储器,。这意味着通过调用put()函数造成的对缓冲区的改动会直接影响这个数组,而且对这个数组的任何改动也会对这个缓冲区对象可见。
下面我们使用 allocate 创建一个缓冲区。
    public static void main(String[] args) {
        ByteBuffer buffer = ByteBuffer.allocate(10);
    }
查看 allocate 方法源码:
    public static ByteBuffer allocate(int capacity) {
        if (capacity < 0)
            throw new IllegalArgumentException();
        return new HeapByteBuffer(capacity, capacity);
    }
再看 HeapByteBuffer 构造函数源码:
   HeapByteBuffer(int cap, int lim) {            // package-private

        super(-1, 0, lim, cap, new byte[cap], 0);
        /*
        hb = new byte[cap];
        offset = 0;
        */

    }
上面super其实调用ByteBuffer的构造函数:
ByteBuffer(int mark, int pos, int lim, int cap,   // package-private
                 byte[] hb, int offset)
    {
        super(mark, pos, lim, cap);
        this.hb = hb;
        this.offset = offset;
    }
在往上其实就是调用Buffer的构造函数:
Buffer(int mark, int pos, int lim, int cap) {       // package-private
        if (cap < 0)
            throw new IllegalArgumentException("Negative capacity: " + cap);
        this.capacity = cap;
        limit(lim);
        position(pos);
        if (mark >= 0) {
            if (mark > pos)
                throw new IllegalArgumentException("mark > position: ("
                                                   + mark + " > " + pos + ")");
            this.mark = mark;
        }
    }
这里其实就是给Buffer的四大属性赋值。注意下面的 10 是我们创建的时候传入的。

put方法
我们使用put方法给缓冲区存入数据:
    public static void main(String[] args) {
        ByteBuffer buffer = ByteBuffer.allocate(10);
        buffer.put("Hello".getBytes());
    }
这里我们调用了put方法:
    public final ByteBuffer put(byte[] src) {
        return put(src, 0, src.length);
    }
可以看出 put 方法还有重载方法,对于给定的字符数组,可以指定从哪一个位置起,插入几个的功能。
   public ByteBuffer put(byte[] src, int offset, int length) {
        checkBounds(offset, length, src.length);
        if (length > remaining())
            throw new BufferOverflowException();
        int end = offset + length;
        for (int i = offset; i < end; i++)
            this.put(src[i]);
        return this;
    }
上面两个方法都是ByteBuffer的方法,ByteBuffer又是抽象类,this.put(src[i]); 这句其实是子类 HeapByteBuffer 所实现:
    public ByteBuffer put(byte x) {
        hb[ix(nextPutIndex())] = x;
        return this;
    }
其中nextPutIndex方法正是将position返回之后再自加1,这样的话将空闲的位置赋值并指向下一个空闲的位置。
   final int nextPutIndex() {                          // package-private
        if (position >= limit)
            throw new BufferOverflowException();
        return position++;
    }
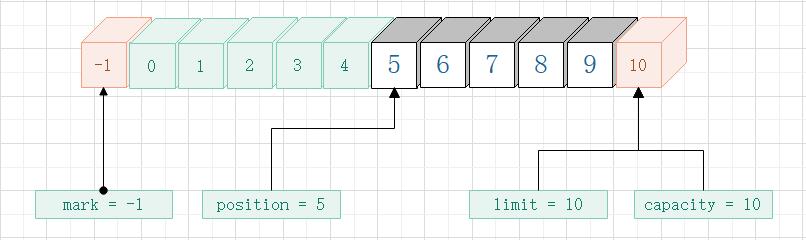
其中 0 - 4 这5个索引位置存放 Hello 这5个字节。
特别注意:put 以及下面的get方法,如果指定位置进行存取时将不影响 Buffer 类的属性值。
flip方法
我们刚刚在缓冲区中写入了5个字节,上面也已经讲了 put 负责写,get 负责读数据,那么现在可不可以使用 get 方法进行读数据呢?答案是否定的。因为我们从 Buffer 的四个属性可知,position 表示读写的起始位置,目前处于索引下标为 5 的位置,继续写是可以的,但是要从这个位置开始读取数据,那么就是读取到空数据。
从Buffer的重要方法可以看出,有一个方法可以修改 position 的索引。
Buffer position(int)
因此我们想把 position 的索引置为 0 不就可以了吗?稍等,还有一点,limit 是读写的最后一个位置,现在索引指向10,也就是前面 10个元素可以读取,但是这10个元素的后5个还没有写入数据呢,因此也要把limit 索引置为写入的最后一个位置 5。代码如下:
buffer.limit(buffer.position()).position(0);
这样完美解决了我们的问题,但是感觉比较繁琐,java NIO已经提供了一个方法 flip 实现了同样的功能。
    public final Buffer flip() {
        limit = position;
        position = 0;
        mark = -1;
        return this;
    }
这里 mark 为什么置为 -1 ,因为以前做的标记已经无效。
    public static void main(String[] args) {
        ByteBuffer buffer = ByteBuffer.allocate(10);
        buffer.put("Hello".getBytes());
        buffer.flip();
    }
通过flip方法使得缓冲区已经从写模式转换为读模式。

get方法
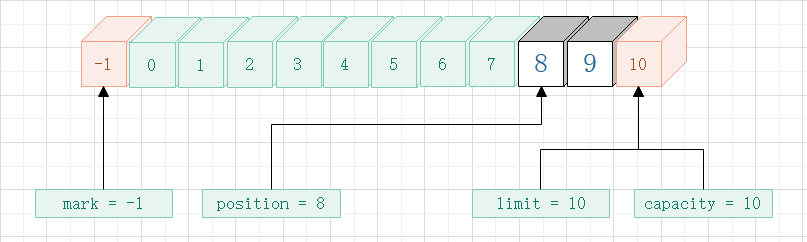
get方法主要从缓冲区中获取元素,每次获取一个元素,索引位置加一,它有几个重载方法,先使用下面的方法进行演示:
    public static void main(String[] args) {
        ByteBuffer buffer = ByteBuffer.allocate(10);
        buffer.put("Hello".getBytes());
        buffer.flip();
        byte[] bytes = new byte[buffer.limit()];
        buffer.get(bytes);
        System.out.println(new String(bytes, 0, bytes.length));
    }
上面代码中,一次性读取5(buffer.limit())个元素,此时position的索引变为5。分析一下源码:
    public ByteBuffer get(byte[] dst) {
        return get(dst, 0, dst.length);
    }
上面的代码说明 get 的重载方法也可以指定接收数组的起始位置和长度:
    public ByteBuffer get(byte[] dst, int offset, int length) {
        checkBounds(offset, length, dst.length);
        if (length > remaining())
            throw new BufferUnderflowException();
        int end = offset + length;
        for (int i = offset; i < end; i++)
            dst[i] = get();
        return this;
    }
这和上面的 put 方法极为类似。
    public byte get() {
        return hb[ix(nextGetIndex())];
    }
这个 get 方法也是 HeapByteBuffer 中的,返回数组中的一个元素的值,其中nextGetIndex方法实现和 put 方法里面的一样:
    final int nextGetIndex() {                          // package-private
        if (position >= limit)
            throw new BufferUnderflowException();
        return position++;
    }

此外:
布尔函数hasRemaining()会返回position否已经达到缓冲区的上界。以下是一种将数据元素从缓冲区释放到一个数组的方法。
for (int i = 0; buffer.hasRemaining( ), i++){
      myByteArray [i] = buffer.get( );
}
remaining()函数作用是返回当前位置到上界还剩余的元素数目。上面代码可以改写为:
int count = buffer.remaining( );
for (int i = 0; i < count, i++) {
      myByteArray [i] = buffer.get( );
}
如果对缓冲区有专门的控制,这种方法会更高效,因为上界不会在每次循环重复时都被检查,但上文中的第一个例子允许多线程同时从缓冲区读取元素。
rewind 方法
上面我们使用get方法读取了数据,那么我们想再重复读取一次该怎么办?此时也就是想把 position 置为0,limit保持不变。rewind 则派上用场了。
rewind()与flip()相似,但不影响 limit 属性。它只是将 position 设回0。可以使用rewind()后退,重读已经被翻转的缓冲区中的数据。
    public static void main(String[] args) {
        ByteBuffer buffer = ByteBuffer.allocate(10);
        buffer.put("Hello".getBytes());
        buffer.flip();
        //第一次读取
        byte[] bytes = new byte[buffer.limit()];
        buffer.get(bytes);
        System.out.println(new String(bytes, 0, bytes.length));
        //使用rewind将 position 置为0
        buffer.rewind();
        //第二次读取
        byte[] desc = new byte[buffer.limit()];
        buffer.get(desc);
        System.out.println(new String(desc, 0, bytes.length));
    }
源码如下:
    public final Buffer rewind() {
        position = 0;
        mark = -1;
        return this;
    }
下面是执行 rewind 方法后的 Buffer 类的属性值变化情况,注意此图还没有执行到第二次执行get的时候,仅表示rewind 方法执行完成那一刻的 属性 变化情况。

clear 方法
clear() 将缓冲区重置为空状态。它并不改变缓冲区中的任何数据元素,而是仅仅将limit设为容量的值,并把position 设回0,这使得缓冲区可以被重新填入。
    public static void main(String[] args) {
        ByteBuffer buffer = ByteBuffer.allocate(10);
        buffer.put("Hello".getBytes());
        //清空缓冲区
        buffer.clear();
    }
源码如下:
    public final Buffer clear() {
        position = 0;
        limit = capacity;
        mark = -1;
        return this;
    }

这和刚刚创建好缓冲区属性的情况一致。
mark 和 reset 方法
上面 rewind 可以重复读数据,但是有一个限制,每次都是从头开始读取。现在有个需求,可以从不同的索引位置开始读取。

假如缓冲区有 HelloTom 8个字节,首先读取 Hello 5个字节,再把 Tom 这三个字节 读取 2次,显然 rewind 无法实现。使用 mark 和 reset 组合即可实现。
mark源码:
    public final Buffer mark() {
        mark = position;
        return this;
    }
reset源码:
    public final Buffer reset() {
        int m = mark;
        if (m < 0)
            throw new InvalidMarkException();
        position = m;
        return this;
    }
测试代码:
    public static void main(String[] args) {
        ByteBuffer buffer = ByteBuffer.allocate(10);
        buffer.put("HelloTom".getBytes());
        buffer.flip();

        //读取 Hello
        byte[] dest1 = new byte[5];
        buffer.get(dest1);
        System.out.println(new String(dest1, 0, 5));

        //做好标记
        buffer.mark();

        //读取 Tom
        byte[] dest2 = new byte[3];
        buffer.get(dest2);
        System.out.println(new String(dest2, 0, 3));

        //回到标记位置
        buffer.reset();

        //读取 Tom
        byte[] dest3 = new byte[3];
        buffer.get(dest3);
        System.out.println(new String(dest3, 0, 3));
    }
- allocate

- put
- flip

- 第一次 get

- mark

- 第二次 get

- reset

- 第三次 get

其它方法
int capacity()  //获取缓冲区总容量
int position()  //获取缓冲区当前位置
int limit()  //获取缓冲区允许读写的最后一个位置
Buffer limit(int) //设置
int remaining() //从当前位置到limit还剩余的元素数目
boolean hasRemaining() //是否已经达到缓冲区的上界
boolean isReadOnly() //所有的缓冲区都是可读的,但并非所有都可写。每个具体的缓冲区类都通过执行isReadOnly()来标示其是否允许该缓存区的内容被修改。
boolean hasArray()
Object array()
int arrayOffset()
boolean isDirect()
有些比较简单,有些暂时还没研究。以后用到再查阅资料。

 浙公网安备 33010602011771号