Vue学习笔记
引言
jQuery要操作DOM元素当元素比较复杂时,操作DOM元素将变得非常不友好,使用Vue框架可以不用操作DOM元素(使用了React虚拟DOM),Vue只关系视图展示,如果要想更好的展示数据可以使用UI框架
Vue是一套用于构建用户界面的渐进式框架、自底向上逐层应用、MVVM框架。
- 渐进式框架:你不想用的部分功能可以先不用,vue不强求你一次性接受并使它的全部功能
- 自底向上逐层应用:有基层开始做起,吧基础的东西写好,在逐层往上添加效果
- MVVM框架:Model-View-ViewModel,模型指的是后端传递的数据。视图指的是所看到的页面、ViewMdel它是连接view和model的桥梁。Model:模型层,表示Javascript。View:视图层,表示HTM中的(DOM)元素。ViewMdel:连接视图和数据的中间件。
Vue是纯粹的视图框架,严格遵循SoC关注度分离原则,不包括Ajax之类的通信功能,因此我们需要是使用Axios框架做异步通信
UI框架:Vue是连接视图和数据桥梁,而UI就是把传递后的数据更好的展示
- Ant-Design:阿里巴巴出品,基于React的UI框架
- ElementUI:饿了么出品,基于Vue的UI框架
- Bootstrap:Twiter推出的一个用于前端开发的开源工具包
- AmazeUI:又叫"妹子UI",一款HTML5跨屏前端框架
Vue开发都是要基于Node.js,实际开发采用vue-cli脚手架开发,vue-router路由,vuex做状态管理;Vue UI界面我们一般使用ElementUI(饿了么),或者ICE(阿里巴巴)来快速搭建前端项目;
使用Vue需要前端的一些知识可参考链接:https://www.cnblogs.com/w-eye/p/14658750.html
Vue语法
创建一个简单的Vue程序
在html中使用简单使用Vue开发实现view-viewModel-model之间的数据传递
- 创建一个html页面
- 导入vue.js
- 编写代码、运行
<head>
    <meta charset="UTF-8">
    <title>Title</title>
    <!-- 导入vue.js -->
    <script src="https://cdn.jsdelivr.net/npm/vue@2.5.21/dist/vue.min.js"></script>
</head>
<body>
    <!-- view层,模板 -->
    <div id="app">
        {{e}}{{message}}
    </div>
    <script>
        var vue = new Vue({			//ViewModel: 连接视图和数据
            el:"#app",
            data:{					//Model:数据
                e:"梅西",
                message:"hello,vue!"
            }
        });
    </script>
</body>
</html>
Vue中7个基本指令
vue中指令以v-开头
v-if、v-else-if、v-show、v-for、v-bind、v-no、v-model
-
v-if:条件指令
-
v-else:必须跟在v-if | v-show指令后面
-
v-else-if:条件指令
<body> <div id="app"> <h1 v-if="type==='A'">yes</h1> <h1 v-else-if="type==='B'">No</h1> <h1 v-else>C</h1> </div> <script> let vue = new Vue({ el:"#app", data:{ type:"A", } }); </script> </body> -
v-show:与v-if类似,只是会渲染其身后表达式为false的元素,而且会给这样的元素添加css代码style="display:none"
<div id="app"> <h1 v-show="ok">Hello!</h1> </div> <script> new Vue({ el: '#app', data: { ok:true } }) </script> -
v-for:遍历,v-for="item in items"
<div id="app"> <li v-for="(item,index) in items" > {{item.message}}---{{index}} </li> </div> <script> let vue = new Vue({ el:"#app", data:{ items:[ {message:"天生我才必有用"}, {message:"千金散尽还复来"}, {message:"-李白"}, ] } }); </script> -
v-bind:单向数据绑定
<body> <div id="app"> <span v-bind:title="message"> 鼠标悬停几秒钟查看动态绑定提示信息 </span> </div> <script> var vue = new Vue({ el:"#app", data:{ e:"梅西", message:"hello,vue!" } }); </script> -
v-no:事件监听
<div id="app"> <button v-on:click="say">点击我</button> </div> <script> let vue = new Vue({ el:"#app", data:{ message:"李白" }, methods:{ //方法必须定义再vue的method对象中 say:function (){ alert(this.message); } } }); </script> -
v-model:用于表单元素,进行双向数据绑定
<div id="app"> <p>{{ message }}</p> <input v-model="message"> </div> <script> new Vue({ el: '#app', data: { message: 'Runoob!' } }) </script>v-model指令用来在input、select、textarea、checkbox、radio等表单控件元素上创建双向数据绑定,根据表单上的值,自动更新绑定元素的值。按钮事件我们可以使用
v-on监听事件,并对用户的输入进行响应
v-html :将内容解释为html
v-text:将内容解释为文本
v-bind与v-model的区别:https://blog.csdn.net/weixin_45849072/article/details/105428298
缩写:v-bind缩写<a v-bind:href="url" />=<a :href="url" />
v-on缩写<a v-on:click="one" /><a @click="one" />
Vue中7个基本属性
- el属性:挂载元素
- data属性:实现数据邦定
- template属性:用来设置模板,会替换页面元素,包括占位符
- methods属性:放置页面中的业务逻辑,js方法一般都放置在methods中
- render属性:创建真正的Virtual Dom
- computed属性:计算属性
- watch属性:
- watch:function(new,old){}
- 监听data中数据的变化
- 两个参数,一个返回新值,一个返回旧值
钩子函数
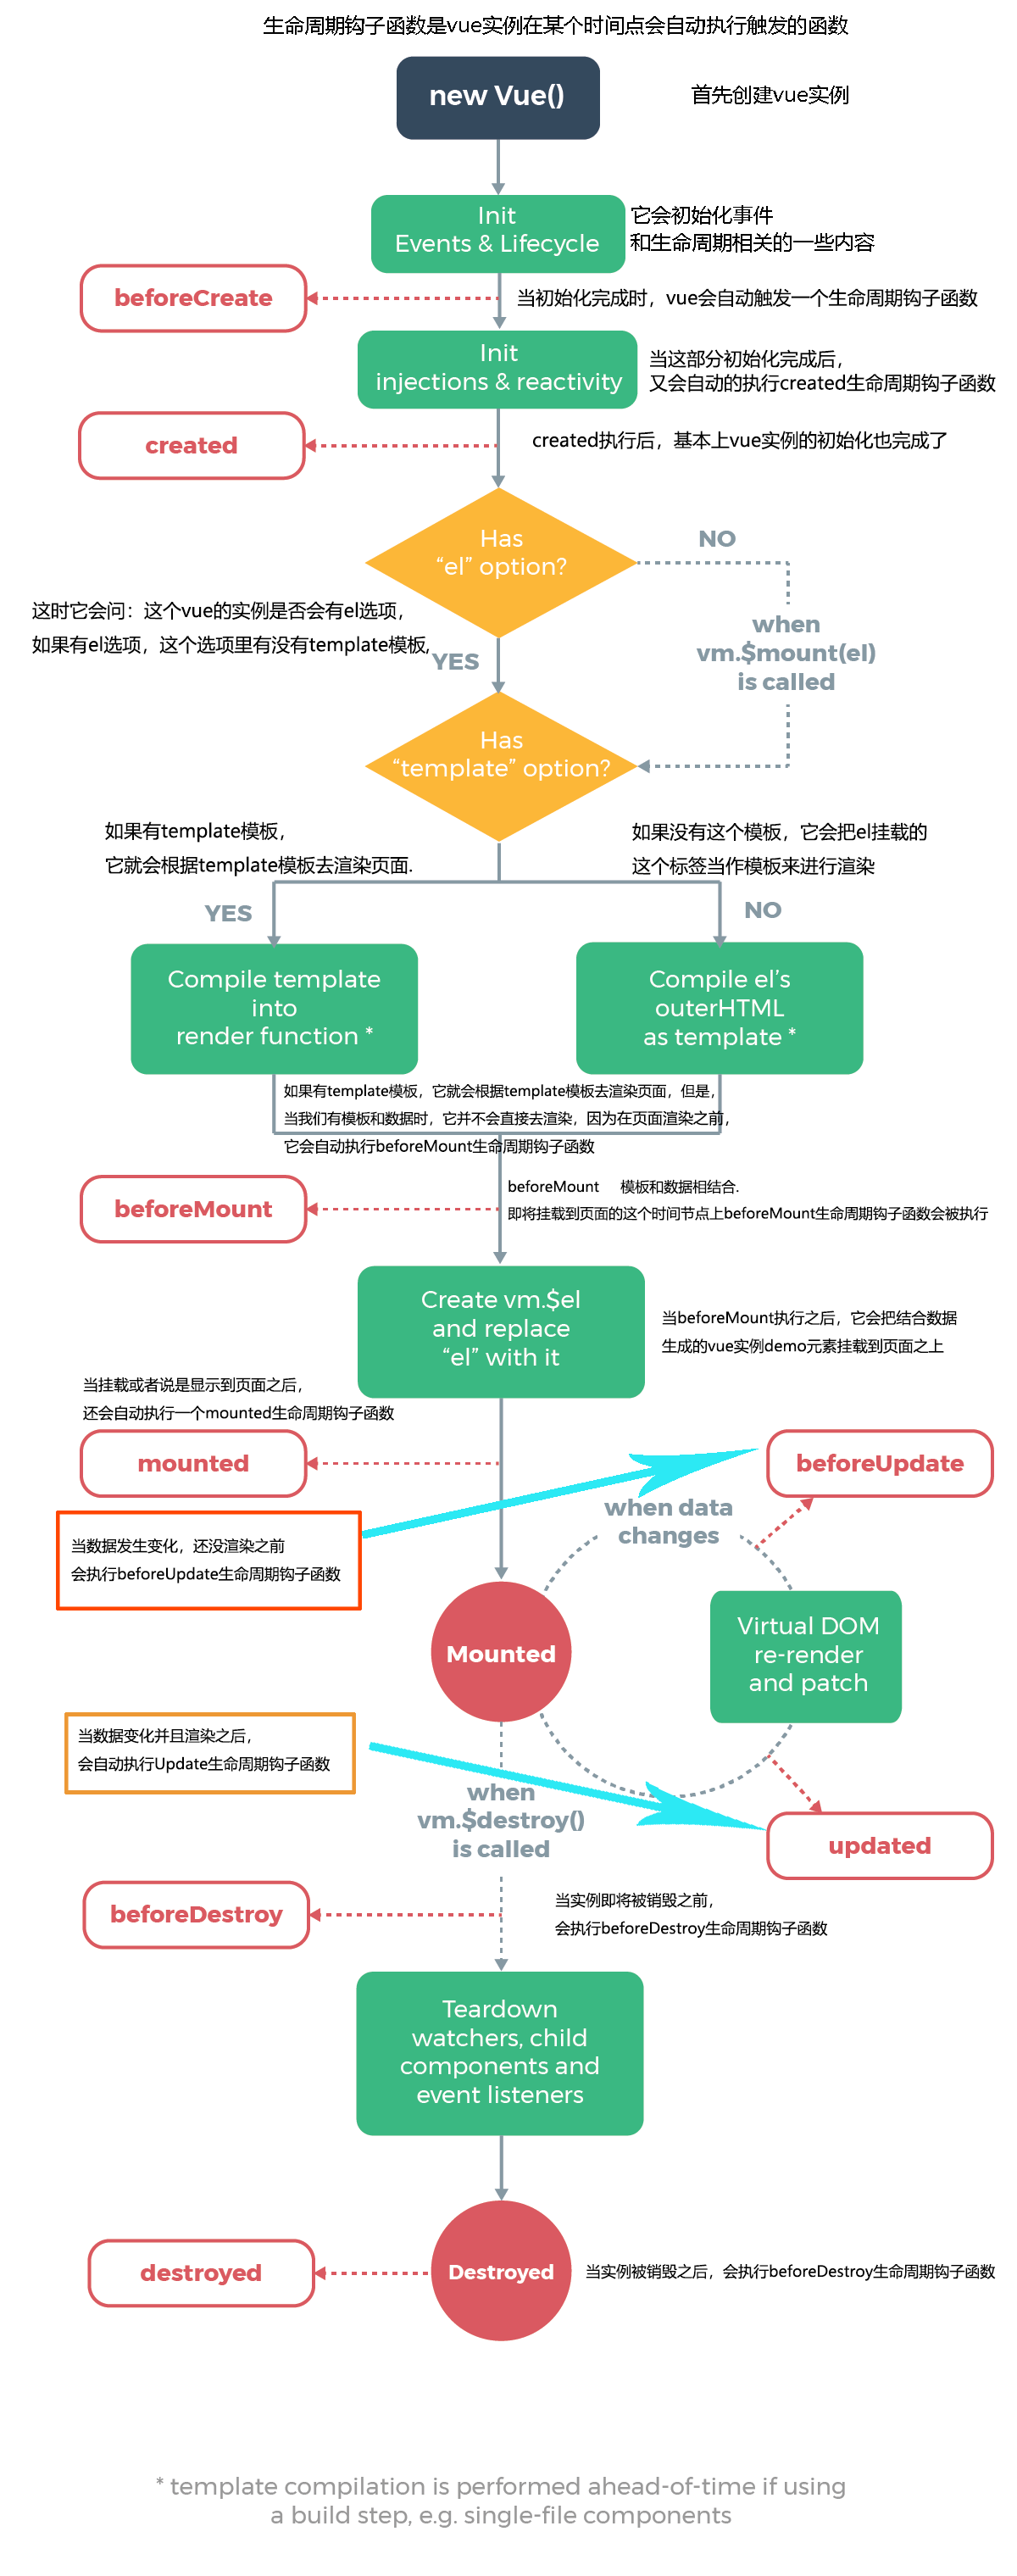
钩子函数贯穿于Vue的生命周期:在vue的生命周期中特定的时刻可以插入钩子函数相当于java中的AOP
初始化显示
- beforeCreate(初始化前)
- created(初始化后)
- beforeMount(挂载前,也就是数据和模型相结合前)
- mounted(挂载后,数据模型结合后)
更新状态:this.xxx=value
- beforeUpdata(更新前,当数据发生变化还没渲染到页面之前)
- updated(更新后,数据渲染到页面后,会自动执行updated钩子函数)
销毁vue实例:vm.$destory()
- beforeDestory(Vue实例销毁前)
- destoryed(Vue实例销毁后)
Axios异步通信
Axios是一个 开源的可以用在浏览器和Node.js的异步通信框架,它的主要作用是实现AJAX异步通信,通俗的讲就是将后台的将数据传递到页面。
主要功能:
- 从浏览器中创建XMLHttpRequset
- 从node.js创建Http请求
- 拦截请求和响应
- 转换请求数据和响应数据
- 取消请求
- 自动转换JSON数据
- 客服端支持防御XSRF(跨站请求伪造)
创建一个Axios异步通信:
1、导入Axios
<script src="https://unpkg.com/axios/dist/axios.min.js"></script>
cnpm install axios	<!-- 安装插件包 -->
2、创建JSON数据
{
	"name":"博客园",
	"url":"https://www.cnblogs.com/w-eye/",
	"page":1,
	"isNonProfit":"",
	"address":{
		"street":"海淀区",
		"city":"北京市",
		"country":"中国"
	},
	"links":[
		{
			"name":"baitu",
			"url":"https://www.cnblogs.com/w-eye/"
		},{
			"name":"baitu2",
			"url":"https://www.cnblogs.com/w-eye/"
		},{
			"name":"baitu3",
			"url":"https://www.cnblogs.com/w-eye/"
		}
	]
}
3、创建html页面模拟数据传递在客服端拿到数据展示在页面
<body>
	<div id="app3">
		<div>
			名称:{{info.name}}
		</div>
		<div>
			URL:{{info.url}}
		</div>
	</div>
	<script>
		let app = new Vue({
			el:"#app3",
			data(){
				return{
					info:{
						name:'',
						url:''
					}
				}
			},
			mounted() {
				axios
					.get("../index.json")
					.then(response=>this.info=response.index)
			}
		});
	</script>
</body>
el:挂载元素
data():数据绑定的另一种写法
mounted(){ Vue生命周期中的一个钩子函数,表示挂载后,数据模型显示在页面后
axios:类似于$("vue").ajax方法
.get 获取json数据
.then 将json数据传递给data方法中的info(注意:在info方法中要渲染的数据名要和json中的变量名一样)
}
计算属性
当模板中的数据绑定到一个计算属性上时;计算属性会把结果缓存起来。
计算属性的主要特性就是为了将不经常变化的计算结果进行缓存,以节约我们的系统开销;
<body>
	<div id="b">
		<p>currentTime1:{{currentTime1()}}</p>
		<p>currentTime2:{{currentTime2}}</p>
	</div>
	<script>
		new Vue({
			el:'#b',
			data:{
			},
			methods:{
				currentTime1: function(){
					return Date.now();
				}
			},
			computed: {
				currentTime2: function(){
					return Date.now();
				}
			}
		})
	</script>
</body>
methods:存放js逻辑代码
computed:计算属性方法
自定义组件
自定义事件就是自己定义标签
<body>
	<div id="a">
		<ul>
			<wy v-for="item in items" v-bind:item="item"></wy>
		</ul>
	</div>
<script>
	Vue.component("wy",{
		props:["item"],
		template:'<li>{{item}}</li>'
	})
	new Vue({
		el:"#a",
		data:{
			items:['古力娜扎','迪丽热巴','玛尔扎哈']
		},
	})
</script>
插槽slot
我们在构建页面过程中一般会把用的比较多的公共的部分抽取出来作为一个单独的组件,把单独的组件定义为插槽,让用户可以拓展组件,去更好地复用组件和对其做定制化处理。
<body>
		<!--  view层,模板 -->
		<!-- <div>
			<p></p>
			<ul>
				<li></li>
				<li></li>
				<li></li>
			</ul>
		</div> -->
    	<!-- view层,模板转换成插槽后 -->
		<div id="slot">
			<todo>
				<todo-title slot="todo-title" v-bind:title="title"></todo-title>
				<todo-items slot="todo-items" v-for="item in todoItems" v-bind:item="item"></todo-items>
			</todo>
		</div>
		<script>
			Vue.component("todo",{		//定义插槽模板(最外层插槽的父节点)
				template:"<div>\
								 <slot name='todo-title'></slot>\
							  <ul>\
							      <slot name='todo-items'></slot>\
						   	  </ul>\
						  </div>"
			});
			Vue.component("todo-title",{//定义子插槽
				props:["title"], 		//绑定属性
				template:"<p>{{title}}</p>"
			});
			Vue.component("todo-items",{//定义子插槽
				props:["item"], 		//绑定属性
				template:"<li>{{item}}</li>"
			});
			new Vue({
				el:"#slot",
				data:{
					title:"MySQL",
					todoItems:['mybatis plus','springboot','Linux']
				}
			})
		</script>
	</body>
父级模板里的所有内容都是在父级作用域中编译的;子模板里的所有内容都是在子作用域中编译的。
自定义事件分发
this.$emit('remove');自定义事件分发
在某些情况下组件中的事件要访问或者调用Vue实例中的属性或者方法时不能直接调用或者访问;可以通过前端页面来间接调用或者访问

<body>
	<div id="slot">
		<todo>
			<todo-title slot="todo-title" v-bind:title="title"></todo-title>
			<todo-items slot="todo-items" v-for="(item,index) in todoItems" v-bind:item="item" @remove="removeItems"></todo-items>
			<!-- 3.@remove="removeItems"自定义点击事件remove绑定removeItems方法 -->
			<!-- 4.v-for="(item,index) in todoItems"在v-for标签中添加index数组下标(vue会自动将下标@remove="removeItems(index)中) -->
		</todo>
	</div>
	<script>
		Vue.component("todo",{
			template:"<div>\
							<slot name='todo-title'></slot>\
							<ul>\
								<slot name='todo-items'></slot>\
							</ul>\
						</div>"
		});
		Vue.component("todo-title",{
			props:["title"],
			template:"<p>{{title}}</p>"
		});
		Vue.component("todo-items",{
			props:["item"],
			template:"<li>{{item}}<button @click='remove'>delete</button></li>",//1.为按钮注册点击事件
			methods:{
				remove:function(){					//5.定义删除方法,绑定自定义remove事件
					this.$emit('remove');			//通过$emit绑定remove自定义事件
				}
			}
		});
		let v = new Vue({
			el:"#slot",
			data:{
				title:"MySQL",
				todoItems:['mybatis plus','springboot','Linux']
			},
			methods:{
				removeItems:function(index){	   //2.定义点击删除数组中的数据方法
					this.todoItems.splice(index,1) //javascript中操作数组的万能方法index:下标,1:步长
				}
			}
		})
	</script>
</body>
使用脚手架vue-cli创建程序
vue-cli官方提供的一个脚手架,可以快速生成vue的项目模板
主要功能:统一目录结构、本地调试、热部署、单元参数、集成打包上线
使用脚手架创建vue项目:https://www.cnblogs.com/w-eye/p/14673973.html
vue-router路由
在Vue中要实现页面跳转,可以使用Vue Router是Vue.js官方的路由管理器。他和Vue.js的核心深度集成。
vue-router路由包含的功能有:、嵌套的路由/视图表、模块化的、基于组件的路由配置、路由参数、查询、通配符、基于Vue.js过度系统的视图过渡效果、细粒度的导航控制、带有自动激活CSS class 的链接、HTML5历史模式或hash模式,在IE9中自动降级、自定义的滚动条行为
实现第一个vue-router路由步骤:
- 使用脚手架搭建vue项目
- 下载vue-router插件包
- 创建页面
- 运行测试
-
使用脚手架搭建vue项目
-
下载vue-router插件包
cnpm install vue-router --save-dev -
创建页面
创建主页App.vue
<template>
  <div id="app">
    <h1>Vue-Router</h1>
    <router-link to="/main">首页</router-link>
    <router-link to="/content">内容页</router-link>
    <router-view></router-view>
  </div>
</template>

<script>
export default {
  name: 'App',
}
</script>

<style>
#app {
  font-family: Avenir, Helvetica, Arial, sans-serif;
  -webkit-font-smoothing: antialiased;
  -moz-osx-font-smoothing: grayscale;
  text-align: center;
  color: #2c3e50;
  margin-top: 60px;
}
</style>
创建入口页mian.js
import Vue from 'vue'
import App from './App'
import router from './router' //自动扫描router包中路由配置

Vue.config.productionTip = false

new Vue({
  el:'#app',
  //配置路由
  router,
  commpoents:{ App },
  template: '<App/>',
  render: h => h(App)
}).$mount("#app");
创建路由index.js
 import Vue from 'vue'
 import VueRouter from 'vue-router'
 import Content from '../components/Content66'
 import Main from '../components/Main66'

 //安装路由
Vue.use(VueRouter);

//配置导出路由
export default new VueRouter({
    router:[
        {
        //路由路径
        path:'/content',
        name:'content',
        //跳转的组件
        component:Content
        },
        {
          //路由路径
        path:'/main',
        name:'main',
        //跳转的组件
        component:Main
        }
            ]
});
创建路由跳转页面1:Content.vue
<template>
    <h1>内容页</h1>
</template>
<script>
export default {
  name: "Content",
}
</script>
<style scoped>
</style>
创建路由跳转页面2:Main.vue
<template> <h1>首页</h1> </template> <script> export default { name: "", } </script> <style scoped> </style> -
运行测试
npm run serve	# cli3
npm run dev 	# cli2
vue+elementUI
ElementUI:饿了么出品,基于Vue的UI框架
vue-elementUI环境搭建:
- 使用脚手架创建项目
- 安装路由(vue-router)
cnpm install vue-router --save-dev - 安装Element -ui
cnpm i element -ui -S - 安装依赖
cnpm install - 安装SASS加载器(css样式转换器)
cnpm install sass-loader node-sass --save-dev - 启动测试cli2:
npm run devcli3:npm runserve
Npm命令解释
npm insatll moduleName:表示安装模块到项目目录下npm install -g moduleName:-g表示安装模块到全局;具体安装到那个位置,要看npm config prefix的位置npm install -save moduelName:--save表示将模块安装到项目目录下,并在package文件的dependencies节点写入依赖,-S为该命令的缩写npm install -save-dev moduelName:-save-dev表示将模块安装的项目目录下,并且在package文件的devDependencies节点写入依赖,-D为该命令的缩写
路由嵌套
嵌套路由指的就是在一个路由里面嵌套另一个路由了;使用场景:在页面点击不同的选项卡切换不同的路由来展示不同的内容;
export default new Router({
    model:history,
    routes:[
        {
            path:'/loain',
            component:Login
        },
        {
            path:'/main',
            component:Main,
            children:[
                {path:'/main/profile'},		//路由嵌套
                {path:'/main/list'}
            ]
        }
    ]
})
参数传递及重定向
可参考博客:https://blog.csdn.net/lisa2017_/article/details/115277009
404和路由钩子
路由的两种模式
- hash:路径 # 符号,如 http://localhost/#/login
- history:路径不带 # 符号,如http://localhost/login
404处理
创建一个NotFound.vue组件
<template>
  <div>
      <h1>404,你的页面走丢了</h1>
  </div>
</template>
<script>
export default {
  data () {
    return {
    }
  }
}
</script>
<style  scoped>
</style>
在路由页面添加路由
import Vue from 'vue'
import Router from 'vue-router'

import Main from '../views/Main'
import Login from '../views/Login'
import NotFound from '../views/NotFound'

Vue.use(Router)

export default new Router({
    model:history,
    routes:[
        {
            path:'/loain',
            component:Login
        },
        {
            path:'/main',
            component:Main,
            children:[
                //路由嵌套
                {path:'/main/profile'},
                {path:'/main/list'}
            ]
        },
        {
            //添加路由'*'表示请求地址如果不是以上url则配置该NotFound
            path:'*',
            component:NotFound
        }
    ]
})
路由钩子与异步请求
beforeRouteEnter钩子函数:在进入路由前执行
beforeRouteLeave钩子函数:在离开路由前执行

 浙公网安备 33010602011771号