第三节:千万级流量下商品详情页的解决方案剖析和分模块实操
一. 方案整体剖析
1. 中小公司的方案
很多中小型 电商的商品详情页 可能一分钟都没有一个访问,这种的话,就谈不上并发设计,一个tomcat 就能搞定
还有一种中小型公司呢?虽然说公司不大,但是也是有几十万日活,然后几百万用户,他们的商品详情用,采取的方案可能是全局的一个静态页面这样子
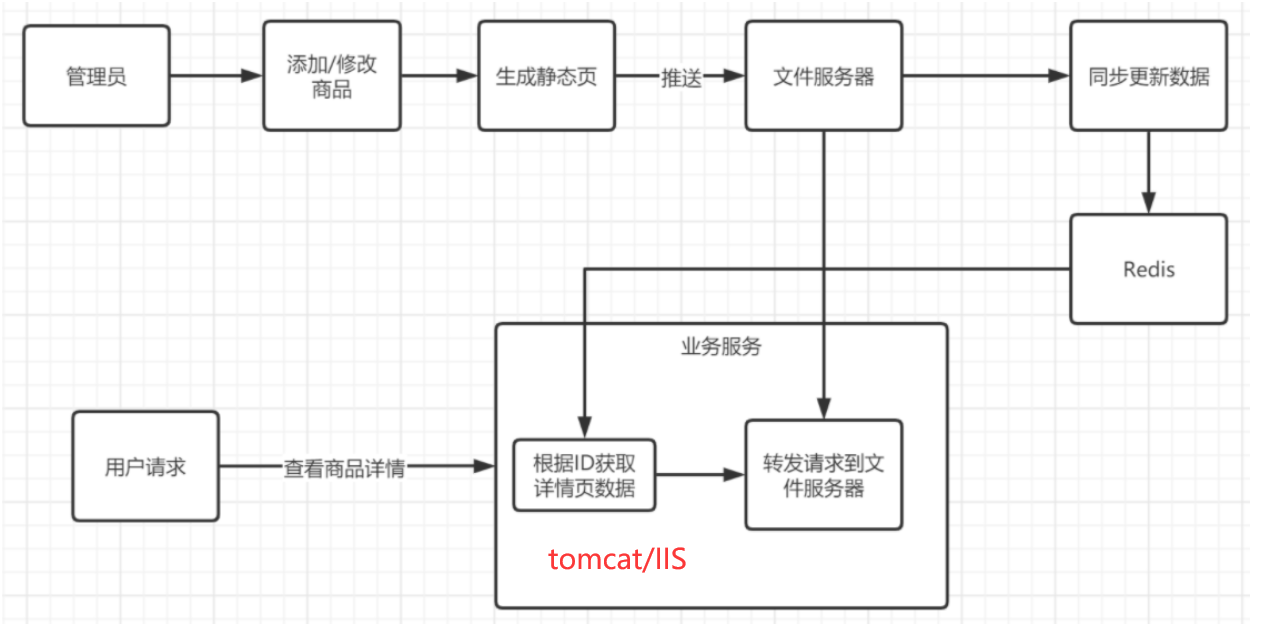
就是我们有把商品详情页直接做成一个静态页面,然后这样子每次全量的更新,把数据全部静态放到redis里面,每次数据变化的时候,我们就通过一个后台服务去渲染这个数据,然后把这个静态页面推送到到文件服务器。
缺点
- 这种方案的缺点,如果商品很多,那么渲染的时间会很长,达不到实时的效果
- 文件服务器性能高,tomcat/IIS性能差,压力都在tomcat/IIS服务器了
- 只能处理一些静态的东西,如果动态数据很多,比如有库存的,你不可能说每次去渲染,然后推送到文件服务器,那不是更加慢?
2. 大型公司的方案
(更详细的说明详见:https://www.cnblogs.com/yaopengfei/p/17599861.html)
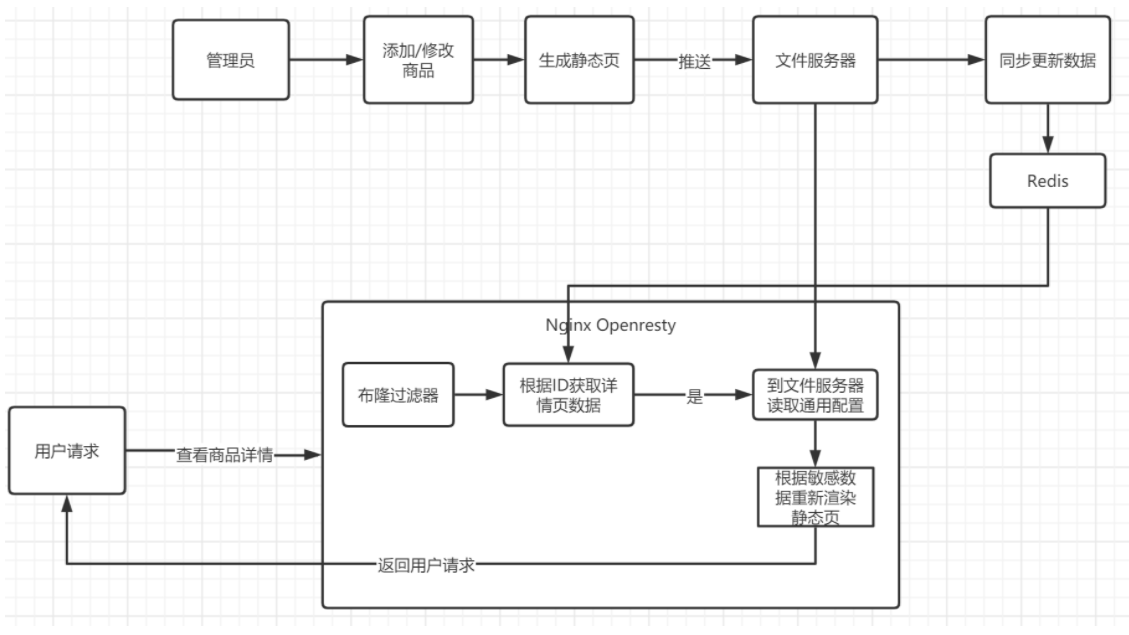
上图展示了核心思想主要有以下五步来完成
(1) 生成静态页
添加修改页面的时候生成静态页,这个地方生成的是一个通用的静态页,敏感数据比如 价格,商品名称等,通过占位符来替换,然后将生成的静态页的链接,以及敏感数据同步到redis中,如果只修改价格不需要重新生成静态页,只需要修改redis敏感数据即可。
(2). 推送到文件服务器
这个的文件服务器泛指能够提供静态文件处理的文件服务器,nginx代理静态文件,tomcat,以及OSS等都算静态文件服务器,生成完静态文件后将文件推送到文件服务器,并将请求连接存放进redis中
(3). 布隆过滤器过滤请求
redis和nginx的速度很快,但是如果有人恶意请求不存在的请求会造成redis很大的开销,那么可以采用布隆过滤器将不存在的请求过滤出去。
(4). lua直连Redis读取数据
因为java/C#连接Reids进行操作并发性能很弱,相对于OpenResty来说性能差距很大,这里使用OpenResty,读取Redis中存放的URL以及敏感数据。
(5). OpenResty 渲染数据
从Redis获取到URL后lua脚本抓取模板页面内容,然后通过redis里面的敏感数据进行渲染然后返回前端,因为都是lua脚本操作性能会很高
二. 分模块实操
1. 文件服务器配置
我们将模板文件部署在 【8.130.111.111】这台服务器的8095和8096,即访问 http://8.130.111.111:8095 和 http://8.130.111.111:8096,就可以访问该静态页面,但是我们通常他们是内容,用nginx做一层反向代理 和 负载均衡,监听 http://test1.hi-whales.com,即访问 http://test1.hi-whales.com 就可以查看静态页面。
代码分享:
http {
    include       mime.types;
    default_type  application/octet-stream;
    sendfile        on;
    keepalive_timeout  65;

    upstream dynamicserver {
      server 8.130.111.111:8095 fail_timeout=60s max_fails=3;
      server 8.130.111.111:8096 fail_timeout=60s max_fails=3;
      keepalive 256;
    }

    #1.资源服务器
    server {
        listen       80;
        server_name test1.hi-whales.com;
        default_type text/html;
        charset   utf-8;
        location / {
            index index.html;
            proxy_pass http://dynamicserver;
            # 表示重试超时时间是3s
            proxy_connect_timeout      30;
            proxy_send_timeout         10;
            proxy_read_timeout         10;
            #表示在 6 秒内允许重试 3 次,只要超过其中任意一个设置,Nginx 会结束重试并返回客户端响应
            proxy_next_upstream_timeout 60s;
            proxy_next_upstream_tries 3;
       }
    }

}
2. 请求参数封装
(1). 首先需要在nginx的配置文件中配置lua脚本的路径,如下图:
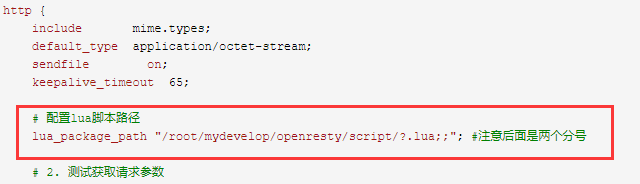
(2). 然后在openresty的安装目录新建script文件夹,封装 requestUtils.lua 文件,用来获取请求参数
--定义一个对象
local lreqparm={}
-- 获取请求参数的方法
function lreqparm.getRequestParam()
-- 获取请求方法 get或post
local request_method = ngx.var.request_method
-- 定义参数变量
local args = nil
if "GET" == request_method then
args = ngx.req.get_uri_args()
elseif "POST" == request_method then
ngx.req.read_body()
args = ngx.req.get_post_args()
end
return args
end
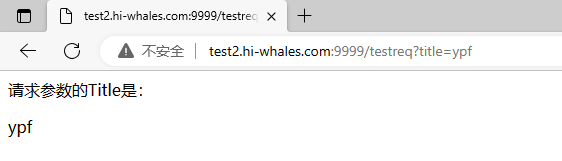
return lreqparm(3). 配置nginx代码,如下:访问的地址【 http://test2.hi-whales.com:9999/testreq?title=ypf 】 即可获取参数
http {
    include       mime.types;
    default_type  application/octet-stream;
    sendfile        on;
    keepalive_timeout  65;

    # 配置lua脚本路径
    lua_package_path "/root/mydevelop/openresty/script/?.lua;;"; #注意后面是两个分号

    # 2. 测试获取请求参数
	server {
        listen 9999;
        server_name test2.hi-whales.com;
        charset utf-8;
        location /testreq {
            default_type text/html;
            content_by_lua '
              local lreqparm = require("requestUtils")
              local params = lreqparm.getRequestParam()
              local title = params["title"]
              if title ~= nil then
                  ngx.say("<p>请求参数的Title是:</p>"..title)
                return
              end
              ngx.say("<P>没有输入title请求参数<P>")
            ';
         }
      }
}
3. 抓取模板内容
(1). 首先需要在nginx的配置文件中配置lua脚本的路径 【同上】
(2). 下载安装lua-resty-http,下载地址 https://github.com/ledgetech/lua-resty-http
将lua-resty-http-master\lib\resty下的所有文件复制到openresty安装目录的openresty/lualib/resty中,总共就两个文件http.lua,http_headers.lua
(3). 封装 requestHtml.lua 文件,用来抓取网页文件,放到openresty下的script文件夹中。
-- 引入Http库
local http = require "resty.http"
--定义一个对象
local lgethtml={}

function lgethtml.gethtml(requesturl)

    --创建客户端
    local httpc = http:new()
    local resp,err = httpc:request_uri(requesturl,
        {
                method = "GET",
                headers = {["User-Agent"]="Mozilla/5.0 (Windows NT 6.1; WOW64) AppleWebKit/537.36 (KHTML, like Gecko) Chrome/40.0.2214.111 Safari/537.36"}
        })
    --关闭连接
    httpc:close()
    if not resp then
        ngx.say("request error:",err)
        return
    end
    local result = {}
    --获取状态码
    result.status = resp.status
    result.body  = resp.body
    return result

end

return lgethtml
(4) . 配置nginx代码
A. 需要将图片、css等样式文件的引入路径重写为 资源服务器的地址,否则不好用。
B. lua抓取网页的代码中的url需要写ip地址,不要写域名,否则会报错,没有解析域名的模块。(这里的ip地址即nginx服务器所在的ip地址)
C. 访问的地址【 http://test2.hi-whales.com:9998/testgetHtml 】, 来抓取网页。
# 3. 测试页面抓取
    server {
        listen 9998;
        charset utf-8;
	   server_name test2.hi-whales.com;
        # 配置路径重写
        location ~* \.(gif|jpg|jpeg|png|css|js|ico)$ {
           rewrite ^/(.*) http://test1.hi-whales.com/$1 permanent;
        }

        location /testgetHtml {
            default_type text/html;
            content_by_lua '
           	    local lgethtml = require("requestHtml")
                local url = "http://8.130.72.40/index.html"
                local result = lgethtml.gethtml(url);
                ngx.log(ngx.INFO, "状态是",result.status)
                ngx.log(ngx.INFO, "body是",result.body)
                ngx.say(result.body)
            ';
        }
    }
4. 模板引擎配置
(1). 首先需要在nginx的配置文件中配置lua脚本的路径 【同上】
(2). 下载安装lua-resty-template,
wget https://github.com/bungle/lua-resty-template/archive/v1.9.tar.gz
tar -xvzf v1.9.tar.gz解压后可以看到lib/resty下面有一个template.lua,这个就是我们所需要的,然后在template目录中还有两个lua文件,将这三个文件 都 复制到/openResty/lualib/resty中即可。

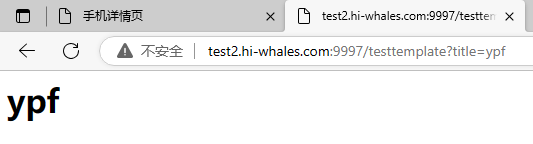
(3). 配置nginx中的lua代码,结合获取请求参数来测试,代码如下, 访问的地址【 http://test2.hi-whales.com:9997/testtemplate?title=ypf 】
    # 4. 测试模板引擎配置
    server {
        listen 9997;
        charset utf-8;
        server_name test2.hi-whales.com;
        location /testtemplate {
            default_type text/html;
            content_by_lua '
              local lreqparm = require("requestUtils")
              local template = require "resty.template"
              local params = lreqparm.getRequestParam()
               -- Using template.new
               local html=[[<html>
                             <body>
                                <h1>{{message}}</h1>
                             </body>
                         </html>
                                ]]
                template.render(html, { message = params["title"] })
            ';
        }

    }
三. 分模块实操-redis相关
1. redisbloom安装(布隆过滤器)
(1). 前置:先要有通过redis源代码编译的模式安装的redis (详见:https://www.cnblogs.com/yaopengfei/p/13766324.html)
(2). 通过git指令下载redisbloom,然后运行make指令,进行编译
如下图,找到编译后的redisbloom.so 文件
详见 :https://github.com/RedisBloom/RedisBloom
yum install -y git

git clone --recursive https://github.com/RedisBloom/RedisBloom.git
cd RedisBloom

make
make后的指令

(3). 将redisbloom.so 文件复制到redis的安装目录下
【 cp redisbloom.so /root/mydevelop/redis/bin/】
(4). 修改redis的配置文件,redis.conf , 配置redisbloom的路径
# 配置redisbloom
loadmodule /root/mydevelop/redis/bin/redisbloom.so
(5). 重新启动
【 redis-server /root/mydevelop/redis/bin/redis.conf 】
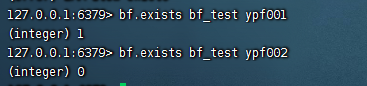
(6). 测试
【redis-cli】 连接redis
【BF.RESERVE bf_test 0.01 10000 NONSCALING】 # 在redis中添加一个名字为“bf_test”布隆过滤器 错误率是0.01 数量是1万个
【bf.add bf_test ypf001】
【bf.exists bf_test ypf001】 【bf.exists bf_test ypf002】

PS. 也可以不在redis.conf配置文件中添加redisbloom的路径,而是通过指令的形式配置启动
redis-server redis.conf --loadmodule /usr/rebloom/rebloom.so INITIAL_SIZE 1000000   ERROR_RATE 0.0001
#容量100万, 容错率万分之一, 占用空间是4m
2. 配置redis集群
配置:6379、6380、6381、6382、6383、6384 六个节点的集群
安装步骤详见: https://www.cnblogs.com/yaopengfei/p/13856347.html
需要注意的是:每个redis节点对应的配置文件中都需要添加如下代码,用于加载布隆过滤器
# 配置redisbloom
loadmodule /root/mydevelop/redis/bin/redisbloom.so
3. openresty连接redis集群
【ps:下面的连接方式只能连接redis集群,不能连接redis单体】
(1). 首先需要在nginx的配置文件中配置lua脚本的路径 【同上】
(2). 下载resty-redis-cluster(https://github.com/steve0511/resty-redis-cluster),将resty-redis-cluster/lib/resty/下面的文件 拷贝到openresty安装目录下的 openresty/lualib/resty总共两个文件rediscluster.lua,xmodem.lua
(3). 封装 redisUtils.lua 文件,用来操作redis集群,放到openresty下的script文件夹中。
代码如下:
查看代码
 --操作Redis集群,封装成一个模块
--引入依赖库
local redis_cluster = require "resty.rediscluster"


--配置Redis集群链接信息
local config = {
    name = "testCluster",                   --rediscluster name (随便起了个名字,没什么用处)
    serv_list = {                           --redis cluster node list(host and port),
                   {ip="127.0.0.1", port = 6379},
                   {ip="127.0.0.1", port = 6380},
                   {ip="127.0.0.1", port = 6381},
                   {ip="127.0.0.1", port = 6382},
                   {ip="127.0.0.1", port = 6383},
                   {ip="127.0.0.1", port = 6384},
    },
    keepalive_timeout = 60000,              --redis connection pool idle timeout
    keepalive_cons = 1000,                  --redis connection pool size
    connection_timout = 1000,               --timeout while connecting
    max_redirection = 5,
    auth = "123456"                           --集群的密码
}


--定义一个对象
local lredis = {}

--创建查询数据get()
function lredis.get(key)
        local red = redis_cluster:new(config)
        local res, err = red:get(key)
        if err then
            ngx.log(ngx.ERR,"执行get错误:",err)
            return false
        end
        return res
end

-- 执行hgetall方法并封装成table
function lredis.hgetall(hash_key)
    local red = redis_cluster:new(config)
    local flat_map, err = red:hgetall(hash_key)
    if err then
        ngx.log(ngx.ERR,"执行hgetall错误:",err)
        return false
    end
    local result = {}
    for i = 1, #flat_map, 2 do
        result[flat_map[i]] = flat_map[i + 1]
    end
    return result
end

-- 判断key中的item是否在布隆过滤器中
function lredis.bfexists(key,item)
             local red = redis_cluster:new(config)
             -- 通过eval执行脚本
             local res,err = red:eval([[
             local  key=KEYS[1]
             local  val= ARGV[1]
             local  res,err=redis.call('bf.exists',key,val)
             return res
                ]],1,key,item)
     if  err then
        ngx.log(ngx.ERR,"过滤错误:",err)
        return false
     end
     return res
end

return lredis
(4). 配置nginx脚本,分别测试从获取string、hash类型的数据 和 布隆过滤器的使用
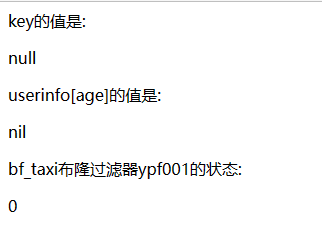
# 5. 测试连接redis集群+布隆过滤器
    server {
        listen 9996;
        charset utf-8;
        server_name test2.hi-whales.com;
        location /test {
            default_type text/html;
            content_by_lua '
                local lrredis = require("redisUtils")

                -- 尝试读取redis中key的值 (string 类型)
                local value = lrredis.get("myname")
                ngx.say("<p>key的值是:</p>",value)
                -- hash 类型
                local htest = lrredis.hgetall("userinfo")
                ngx.say("<p>userinfo[age]的值是:</p>",htest["age"])

                --判断ypf001是否在bf_taxi的布隆过滤器中
                local bfexist = lrredis.bfexists("bf_taxi","ypf001")
                ngx.say("<p>bf_taxi布隆过滤器ypf001的状态:</p>",bfexist)

            ';
        }
    }
(5). 访问的地址【 http://test2.hi-whales.com:9996/test 】,结果如图
运行下面的redis指令,再次访问
【redis-cli -c -h 127.0.0.1 -p 6380 -a 123456】
【set myname lmr】
【hset userinfo age 18】
【BF.RESERVE bf_taxi 0.01 10000 NONSCALING】 创建名为 bf_taxi的布隆过滤器
【BF.ADD bf_taxi ypf001】 向bf_taxi过滤器中添加ypf001

!
- 作 者 : Yaopengfei(姚鹏飞)
- 博客地址 : http://www.cnblogs.com/yaopengfei/
- 声 明1 : 如有错误,欢迎讨论,请勿谩骂^_^。
- 声 明2 : 原创博客请在转载时保留原文链接或在文章开头加上本人博客地址,否则保留追究法律责任的权利。

 浙公网安备 33010602011771号