

第十八节:响应式原理推导过程和Vue3、Vue2响应式原理分析
一. 响应式原理推导
1. 什么是响应式?
比如:m有一个初始化的值,有一段代码使用了这个值;那么在m有一个新的值时,这段代码可以自动重新执行;
上面的这样一种可以自动响应数据变量的代码机制,我们就称之为是响应式的
代码分享:


{
    let m = 10;
    // 与m相关的
    console.log(m);
    console.log(m * 2);
    console.log(m ** 2);
    // 修改m的值,想让与m相关的业务重新执行
    m = 100;
}

// 对象的响应式
{
    let obj = {
        name: "ypf",
        age: 20,
    };
    //与obj相关的
    console.log(obj.name);
    console.log(obj.age);
    // 修改name值,想让与name相关的业务重新执行
}
二. 响应式函数设计
1. 分析
(1). 执行的代码中可能不止一行代码,所以我们可以将这些代码放到一个函数中,那么我们的问题就变成了,当数据发生变化时, 自动去执行某一个函数;
(2). 以对象的响应式为例,把相关业务封装到一个函数中,然后我们再封装一个新的响应式函数
2. 如何区分一个函数需要响应式,还是不需要响应式呢?
(1).这个时候我们封装一个新的函数watchFn;
(2).凡是传入到watchFn的函数,就是需要响应式的;响应式函数都添加到一个数组中reactiveFns
(3).其他默认定义的函数都是不需要响应式的;
代码分享:
{
    // 1. 封装1个响应式函数 和 存放函数的数组
    let reactiveFns = [];
    function watchFn(fn) {
        reactiveFns.push(fn);
        fn(); //执行一下
    }

    // 2. 对象响应式
    const obj = {
        name: "ypf",
        age: 18,
    };

    // 3. 需要响应式的函数存放到watchFn中
    watchFn(() => {
        console.log("hello word1");
        console.log(obj.name);
    });
    watchFn(() => {
        console.log("hello word2");
        console.log(obj.age);
    });
    // 不需要响应式的函数
    function bar() {
        console.log("我是不同函数,不需要响应式哦");
    }

    // 4. 修改对象属性
    obj.name = "lmr";
    // 5. 从新执行一下需要响应式的函数,从而实现了响应式
    reactiveFns.forEach(fn => {
        fn();
    });

    /*
    输出结果:
    hello word1 ypf
    hello word2 18
    hello word1 lmr
    hello word2 18
    */
}
三. 响应式依赖收集
1. 分析
目前我们收集的依赖是放到一个数组中来保存的,但是这里会存在数据管理的问题:
(1). 我们在实际开发中需要监听很多对象的响应式;
(2). 这些对象需要监听的不只是一个属性,它们很多属性的变化,都会有对应的响应式函数;
(3). 我们不可能在全局维护一大堆的数组来保存这些响应函数;
2. 解决方案
我们要设计一个类,这个类用于管理某一个对象的某一个属性的所有响应式函数 相当于替代了原来的简单 reactiveFns 的数组
(1). Depend类构造函数中声明 reactiveFns数组
(2). addDepend方法用于将响应式函数添加到数组中
(3). notify方法用于执行响应式函数
代码分享:
{
    // 1. 封装1个响应式函数 和 Depend类
    class Depend {
        constructor() {
            this.reactiveFns = [];
        }
        addDepend(fn) {
            this.reactiveFns.push(fn);
        }
        notify() {
            this.reactiveFns.forEach(fn => fn());
        }
    }
    const depend = new Depend();
    function watchFn(fn) {
        depend.addDepend(fn);
        fn(); //执行一下
    }

    // 2. 对象响应式
    const obj = {
        name: "ypf",
        age: 18,
    };

    // 3. 需要响应式的函数存放到watchFn中
    watchFn(() => {
        console.log("hello word1", obj.name);
    });
    watchFn(() => {
        console.log("hello word2", obj.age);
    });
    // 不需要响应式的函数
    function bar() {
        console.log("我是不同函数,不需要响应式哦");
    }

    // 4. 修改对象属性
    obj.name = "lmr";
    // 5. 从新执行一下需要响应式的函数,从而实现了响应式
    depend.notify();

    /*
    输出结果:
    hello word1 ypf
    hello word2 18
    hello word1 lmr
    hello word2 18
    */
}
四. 自动监听对象的变化
1. 分析
前面每次修改obj的属性,都需要手动调用一下 notify方法,现在我们想自动执行该方法,那么就需要监控属性的变化。
2. 解决方案
通常有两种方式,A.通过 Object.defineProperty的方式(vue2采用的方式)
B. 通过new Proxy的方式(vue3采用的方式);
这里采用代理的方式进行编写, 核心是使用get set捕获器,然后在set捕获器中调用notify方法
代码分享:
{
    // 1. 封装1个响应式函数 和 Depend类
    class Depend {
        constructor() {
            this.reactiveFns = [];
        }
        addDepend(fn) {
            this.reactiveFns.push(fn);
        }
        notify() {
            this.reactiveFns.forEach(fn => fn());
        }
    }
    const depend = new Depend();
    function watchFn(fn) {
        depend.addDepend(fn);
        fn(); //执行一下
    }

    // 2. 对象响应式
    const obj = {
        name: "ypf",
        age: 18,
    };

    // 3. 创建代理对象
    const objProxy = new Proxy(obj, {
        get(target, key, receiver) {
            return Reflect.get(target, key, receiver);
        },
        set(target, key, newValue, receiver) {
            Reflect.set(target, key, newValue, receiver);
            // 调用notify方法,执行响应式函数
            depend.notify();
        },
    });

    // 4. 需要响应式的函数存放到watchFn中
    watchFn(() => {
        console.log("hello word1", objProxy.name);
    });
    watchFn(() => {
        console.log("hello word2", objProxy.age);
    });
    // 不需要响应式的函数
    function bar() {
        console.log("我是不同函数,不需要响应式哦");
    }

    // 5. 修改对象属性--(自动响应式)
    objProxy.name = "lmr";

    /*
    输出结果:
    hello word1 ypf
    hello word2 18
    hello word1 lmr
    hello word2 18
    */
}
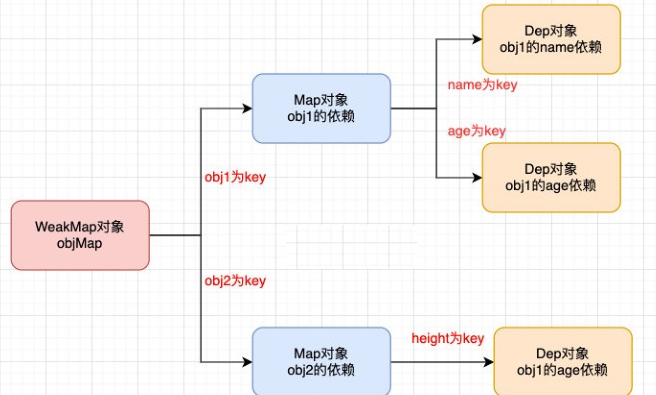
五. 对象的依赖管理(存储结构)
1. 分析
之前,所有响应式函数都是添加在一个Depend里的,而实际情况,我们会有很多对象需要进行响应式管理,
另外不同的属性也需要响应式管理,我们想达到一个对象中每个属性对应一个depend,那么我们采用什么样的数据结构进行存储呢?
代码分享:
{
    // 两个对象
    const obj = {
        name: "ypf",
        age: 19,
    };
    const info = {
        address: "QingDao",
    };
    // Depend类
    class Depend {}

    // obj对象的存储
    const objMap = new Map();
    objMap.set("name", new Depend());
    objMap.set("age", new Depend());
    // info对象的存储
    const infoMap = new Map();
    infoMap.set("address", new Depend());

    // 最终把两个对象存放到WeakMap中
    const targetWeakMap = new WeakMap();
    targetWeakMap.set(obj, objMap);
    targetWeakMap.set(info, infoMap);

    // 获取对象下属性对应depend
    const nameDepend = targetWeakMap.get(obj).get("name");
    console.log(nameDepend);
}
2. 解决方案
我们采用WeakMap+Map来实现对不同对象中的每一个属性实现准确的响应式管理。(详见上面的图)
(补充: WeakMap和Map都是key-value的对象,但是WeakMap的key必须是对象,不能是其它类型)
(1). 封装一个getDepend方法, 用于获取或者创建对应的数据结构【重点】
(2). 在set捕获器中获取对应属性的depend, 然后调用notify方法即可
注意:进行到此处,是有bug的,修改了属性后,并没有触发响应式函数,原因下节分析
代码分享:
{
    // 1. 封装1个响应式函数 和 Depend类
    class Depend {
        constructor() {
            this.reactiveFns = [];
        }
        addDepend(fn) {
            this.reactiveFns.push(fn);
        }
        notify() {
            this.reactiveFns.forEach(fn => fn());
        }
    }
    let depend = new Depend();
    function watchFn(fn) {
        depend.addDepend(fn);
        fn(); //执行一下
    }
    // 2. 封装一个获取depend的函数
    const targetWeakMap = new WeakMap();
    /**
     * 封装一个获取depend的函数
     * @param {Object} target map对象
     * @param {string} key  属性名称
     * @returns 属性对应的depend
     */
    const getDepend = (target, key) => {
        // 2.1 根据target对象获取map过程
        let map = targetWeakMap.get(target);
        if (!map) {
            map = new Map();
            targetWeakMap.set(target, map);
        }
        // 2.2 根据key获取属性的depend对象
        let depend = map.get(key);
        if (!depend) {
            depend = new Depend();
            map.set(key, depend);
        }
        // 2.3 返回属性对应的depend
        return depend;
    };

    // 2. 对象响应式
    const obj = {
        name: "ypf",
        age: 18,
    };

    // 3. 创建代理对象
    const objProxy = new Proxy(obj, {
        get(target, key, receiver) {
            return Reflect.get(target, key, receiver);
        },
        set(target, key, newValue, receiver) {
            Reflect.set(target, key, newValue, receiver);
            // 获取属性对应的depend
            depend = getDepend(target, key);
            // 调用notify方法,执行响应式函数
            depend.notify();
        },
    });

    // 4. 需要响应式的函数存放到watchFn中
    watchFn(() => {
        console.log("hello word1", objProxy.name);
    });
    watchFn(() => {
        console.log("hello word2", objProxy.age);
    });
    // 不需要响应式的函数
    function bar() {
        console.log("我是不同函数,不需要响应式哦");
    }

    // 5. 修改对象属性--(自动响应式)
    objProxy.name = "lmr";

    /*
    输出结果:(响应式并没有触发,原因下节分析)
    hello word1 ypf
    hello word2 18
    */
}
六. 正确的依赖收集
1. 分析
前面一节是有bug的,修改了属性后,并没有触发响应式函数.
原因是:一开始声明了个const depend = new Depend(),然后把所有的响应式函数都添加在这个里面,没有进行 一 一对应( 即: 属性的depend 对应 属性的响应式方法)
那么如何实现 对应属性的响应式方法添加到对应的depend中呢?
2. 解决方案【重点】
(1). 改造一下监听响应式函数watchFn,将监听的函数 赋值给 activeReactiveFn,然后执行完,然后再去置空
(2). 在get捕获器中获取对应的depend,然后调用 addDepend方法,将activeReactiveFn添加进去。
总结流程:执行watchFn函数 → activeReactiveFn赋值 → 执行响应式函数中 fn() → 进入get捕获器 → 获取对应的 depend → 将activeReactiveFn添加进去→ activeReactiveFn清空
代码分享:
{
    // 1. Depend类
    class Depend {
        constructor() {
            this.reactiveFns = [];
        }
        addDepend(fn) {
            this.reactiveFns.push(fn);
        }
        notify() {
            this.reactiveFns.forEach(fn => fn());
        }
    }
    //2. 改造监听响应式函数(精髓!!)
    let activeReactiveFn = null;
    function watchFn(fn) {
        activeReactiveFn = fn; //赋值
        fn(); //执行一下
        activeReactiveFn = null; //置空
    }
    // 3. 封装一个获取depend的函数
    const targetWeakMap = new WeakMap();
    /**
     * 封装一个获取depend的函数
     * @param {Object} target map对象
     * @param {string} key  属性名称
     * @returns 属性对应的depend
     */
    const getDepend = (target, key) => {
        // 2.1 根据target对象获取map过程
        let map = targetWeakMap.get(target);
        if (!map) {
            map = new Map();
            targetWeakMap.set(target, map);
        }
        // 2.2 根据key获取属性的depend对象
        let depend = map.get(key);
        if (!depend) {
            depend = new Depend();
            map.set(key, depend);
        }
        // 2.3 返回属性对应的depend
        return depend;
    };

    // 4. 对象响应式
    const obj = {
        name: "ypf",
        age: 18,
    };

    // 5. 创建代理对象
    const objProxy = new Proxy(obj, {
        get(target, key, receiver) {
            // 获取对应属性的depend
            const depend = getDepend(target, key);
            // 给对应的depend对象中添加对应的响应式函数
            depend.addDepend(activeReactiveFn);

            return Reflect.get(target, key, receiver);
        },
        set(target, key, newValue, receiver) {
            Reflect.set(target, key, newValue, receiver);
            // 获取属性对应的depend
            const depend = getDepend(target, key);
            // 调用notify方法,执行响应式函数
            depend.notify();
        },
    });

    // 6. 需要响应式的函数存放到watchFn中
    watchFn(() => {
        console.log("hello word1", objProxy.name);
    });
    watchFn(() => {
        console.log("hello word2", objProxy.age);
    });
    // 不需要响应式的函数
    function bar() {
        console.log("我是不同函数,不需要响应式哦");
    }

    // 7. 修改对象属性--(自动响应式)
    objProxy.name = "lmr";

    /*
    输出结果:
    hello word1 ypf
    hello word2 18
    hello word1 lmr
    */
}
七. Depend类的优化
1. 分析
(1). 如果响应式函数中用一个key用到两次key,比如name,那么这个函数会被收集两次, 当name属性被修改的后,该响应式函数会被调用两次.
(2). 调用notify方法的时候,再次执行这个响应式函数,比如objProxy.name,还是会进到get捕获器,但这个时候activeReactiveFn就是null,此时也被添加到集合里, 这是不对的,不应该被加入
(3). 之前都是在get捕获器中通过depend.addDepend(activeReactiveFn);进行收集,我们并不希望将添加reactiveFn放到get中,以为它是属于Dep的行为
改造前的代码分享:
{
    // 1. Depend类
    class Depend {
        constructor() {
            this.reactiveFns = [];
        }
        addDepend(fn) {
            this.reactiveFns.push(fn);
        }
        notify() {
            this.reactiveFns.forEach(fn => fn());
        }
    }
    //2. 改造监听响应式函数(精髓!!)
    let activeReactiveFn = null;
    function watchFn(fn) {
        activeReactiveFn = fn; //赋值
        fn(); //执行一下
        activeReactiveFn = null; //置空
    }
    // 3. 封装一个获取depend的函数
    const targetWeakMap = new WeakMap();
    /**
     * 封装一个获取depend的函数
     * @param {Object} target map对象
     * @param {string} key  属性名称
     * @returns 属性对应的depend
     */
    const getDepend = (target, key) => {
        // 2.1 根据target对象获取map过程
        let map = targetWeakMap.get(target);
        if (!map) {
            map = new Map();
            targetWeakMap.set(target, map);
        }
        // 2.2 根据key获取属性的depend对象
        let depend = map.get(key);
        if (!depend) {
            depend = new Depend();
            map.set(key, depend);
        }
        // 2.3 返回属性对应的depend
        return depend;
    };

    // 4. 对象响应式
    const obj = {
        name: "ypf",
        age: 18,
    };

    // 5. 创建代理对象
    const objProxy = new Proxy(obj, {
        get(target, key, receiver) {
            // 获取对应属性的depend
            const depend = getDepend(target, key);
            // 给对应的depend对象中添加对应的响应式函数
            depend.addDepend(activeReactiveFn);

            return Reflect.get(target, key, receiver);
        },
        set(target, key, newValue, receiver) {
            Reflect.set(target, key, newValue, receiver);
            // 获取属性对应的depend
            const depend = getDepend(target, key);
            // 调用notify方法,执行响应式函数
            depend.notify();
        },
    });

    // 6. 需要响应式的函数存放到watchFn中
    watchFn(() => {
        console.log("hello word1", objProxy.name);
        console.log("hello QingDao", objProxy.name);
    });
    watchFn(() => {
        console.log("hello word2", objProxy.age);
    });
    // 不需要响应式的函数
    function bar() {
        console.log("我是不同函数,不需要响应式哦");
    }

    // 7. 修改对象属性--(自动响应式)
    objProxy.name = "lmr";

    /*
    输出结果:
   hello word1 ypf
   hello QingDao ypf
   hello word2 18

   hello word1 lmr
   hello QingDao lmr
   hello word1 lmr
   hello QingDao lmr
    */
}
2. 优化
(1). Depend类中不使用数组存储,改用Set存储,这样即使收集两次,也自动去重了
(2). addDepend方法中需要判断一下,if (fn) this.reactiveFns.add(fn); 这样就避免了null的加入了
(3). 新增一个depend方法,在该方法中实现响应式函数的收集
优化后的代码分享: 【重点】
{
    // 0. 保存当前需要收集的响应式函数
    let activeReactiveFn = null;
    // 1. Depend类
    class Depend {
        constructor() {
            this.reactiveFns = new Set();
        }
        addDepend(fn) {
            if (fn) this.reactiveFns.add(fn);
        }
        // 新增一个方法,
        depend() {
            if (activeReactiveFn) {
                this.reactiveFns.add(activeReactiveFn);
            }
        }
        notify() {
            this.reactiveFns.forEach(fn => {
                fn();
            });
        }
    }
    //2. 改造监听响应式函数(精髓!!)

    function watchFn(fn) {
        activeReactiveFn = fn; //赋值
        fn(); //执行一下
        activeReactiveFn = null; //置空
    }
    // 3. 封装一个获取depend的函数
    const targetWeakMap = new WeakMap();
    /**
     * 封装一个获取depend的函数
     * @param {Object} target map对象
     * @param {string} key  属性名称
     * @returns 属性对应的depend
     */
    const getDepend = (target, key) => {
        // 2.1 根据target对象获取map过程
        let map = targetWeakMap.get(target);
        if (!map) {
            map = new Map();
            targetWeakMap.set(target, map);
        }
        // 2.2 根据key获取属性的depend对象
        let depend = map.get(key);
        if (!depend) {
            depend = new Depend();
            map.set(key, depend);
        }
        // 2.3 返回属性对应的depend
        return depend;
    };

    // 4. 对象响应式
    const obj = {
        name: "ypf",
        age: 18,
    };

    // 5. 创建代理对象
    const objProxy = new Proxy(obj, {
        get(target, key, receiver) {
            // 获取对应属性的depend
            const dep = getDepend(target, key);
            // 给对应的depend对象中添加对应的响应式函数
            // dep.addDepend(activeReactiveFn);
            // 调用depend方法进行收集
            dep.depend();
            return Reflect.get(target, key, receiver);
        },
        set(target, key, newValue, receiver) {
            Reflect.set(target, key, newValue, receiver);
            // 获取属性对应的depend
            const dep = getDepend(target, key);
            // 调用notify方法,执行响应式函数
            dep.notify();
        },
    });

    // 6. 需要响应式的函数存放到watchFn中
    watchFn(() => {
        console.log("hello word1", objProxy.name);
        console.log("hello QingDao", objProxy.name);
    });
    watchFn(() => {
        console.log("hello word2", objProxy.age);
    });
    // 不需要响应式的函数
    function bar() {
        console.log("我是不同函数,不需要响应式哦");
    }

    // 7. 修改对象属性--(自动响应式)
    objProxy.name = "lmr";

    /*
    输出结果:
    hello word1 ypf
    hello QingDao ypf
    hello word2 18

    hello word1 lmr
    hello QingDao lmr
    */
}
八. Vue3响应式原理
1. 分析
之前,每写一个响应式对象,就需要写一堆Proxy的代码进行监听,很冗余。
2. 解决方案
(1). 封装一个reactive方法,在该方法中通过proxy进行对象的代理,然后返回代理对象
(2). 将需要响应式的对象传入该方法中,返回该对象的代理对象。
(3). 响应式函数中使用的都是代理对象
(4). 修改后响应式对象的属性,自动调用对应的响应式函数
这就是Vue3中的响应式原理!!!!!!!!!!!!
代码分享:
{
    // 0. 保存当前需要收集的响应式函数
    let activeReactiveFn = null;
    // 1. Depend类
    class Depend {
        constructor() {
            this.reactiveFns = new Set();
        }
        // 新增一个方法,
        depend() {
            if (activeReactiveFn) {
                this.reactiveFns.add(activeReactiveFn);
            }
        }
        notify() {
            this.reactiveFns.forEach(fn => {
                fn();
            });
        }
    }
    //2. 改造监听响应式函数(精髓!!)

    function watchFn(fn) {
        activeReactiveFn = fn; //赋值
        fn(); //执行一下
        activeReactiveFn = null; //置空
    }
    // 3. 封装一个获取depend的函数
    const targetWeakMap = new WeakMap();
    /**
     * 封装一个获取depend的函数
     * @param {Object} target map对象
     * @param {string} key  属性名称
     * @returns 属性对应的depend
     */
    const getDepend = (target, key) => {
        // 2.1 根据target对象获取map过程
        let map = targetWeakMap.get(target);
        if (!map) {
            map = new Map();
            targetWeakMap.set(target, map);
        }
        // 2.2 根据key获取属性的depend对象
        let depend = map.get(key);
        if (!depend) {
            depend = new Depend();
            map.set(key, depend);
        }
        // 2.3 返回属性对应的depend
        return depend;
    };

    // 4. 封装代理方法, 返回代理对象
    function reactive(obj) {
        return new Proxy(obj, {
            get(target, key, receiver) {
                // 获取对应属性的depend
                const dep = getDepend(target, key);
                // 调用depend方法进行收集
                dep.depend();
                return Reflect.get(target, key, receiver);
            },
            set(target, key, newValue, receiver) {
                Reflect.set(target, key, newValue, receiver);
                // 获取属性对应的depend
                const dep = getDepend(target, key);
                // 调用notify方法,执行响应式函数
                dep.notify();
            },
        });
    }

    // 5. 对象响应式
    const objProxy = reactive({
        name: "ypf",
        age: 18,
    });
    const infoProxy = reactive({
        address: "北京",
    });

    // 6. 需要响应式的函数存放到watchFn中
    watchFn(() => {
        console.log("hello word1", objProxy.name);
        console.log("hello QingDao", objProxy.name);
    });
    watchFn(() => {
        console.log("hello word2", objProxy.age);
    });
    watchFn(() => {
        console.log("hello word3", infoProxy.address);
    });

    // 7. 修改对象属性--(自动响应式)
    objProxy.name = "lmr";
    console.log("---------------------------------------------------");
    infoProxy.address = "青岛";

    /*
    输出结果:
    hello word1 ypf
    hello QingDao ypf
    hello word2 18
    hello word3 北京

    hello word1 lmr
    hello QingDao lmr
    ---------------------------------------------------
    hello word3 青岛
    */
}
九. Vue2响应式原理
1. 分析
与Vue3相比,Vue中使用的是Object.defineProperty进行监听属性的读写操作,其它流程类似
代码分享:
//  实操
{
    // 0. 保存当前需要收集的响应式函数
    let activeReactiveFn = null;
    // 1. Depend类
    class Depend {
        constructor() {
            this.reactiveFns = new Set();
        }
        // 新增一个方法,
        depend() {
            if (activeReactiveFn) {
                this.reactiveFns.add(activeReactiveFn);
            }
        }
        notify() {
            this.reactiveFns.forEach(fn => {
                fn();
            });
        }
    }
    //2. 改造监听响应式函数(精髓!!)

    function watchFn(fn) {
        activeReactiveFn = fn; //赋值
        fn(); //执行一下
        activeReactiveFn = null; //置空
    }
    // 3. 封装一个获取depend的函数
    const targetWeakMap = new WeakMap();
    /**
     * 封装一个获取depend的函数
     * @param {Object} target map对象
     * @param {string} key  属性名称
     * @returns 属性对应的depend
     */
    const getDepend = (target, key) => {
        // 2.1 根据target对象获取map过程
        let map = targetWeakMap.get(target);
        if (!map) {
            map = new Map();
            targetWeakMap.set(target, map);
        }
        // 2.2 根据key获取属性的depend对象
        let depend = map.get(key);
        if (!depend) {
            depend = new Depend();
            map.set(key, depend);
        }
        // 2.3 返回属性对应的depend
        return depend;
    };

    // 4. 封装代理方法, 返回代理对象
    function reactive(obj) {
        Object.keys(obj).forEach(key => {
            let value = obj[key];
            Object.defineProperty(obj, key, {
                get() {
                    // 获取对应属性的depend
                    const dep = getDepend(obj, key);
                    // 调用depend方法进行收集
                    dep.depend();
                    return value;
                },
                set(newValue) {
                    value = newValue;
                    // 获取属性对应的depend
                    const dep = getDepend(obj, key);
                    // 调用notify方法,执行响应式函数
                    dep.notify();
                },
            });
        });
        return obj;
    }

    // 5. 对象响应式
    const obj = reactive({
        name: "ypf",
        age: 18,
    });
    const info = reactive({
        address: "北京",
    });

    // 6. 需要响应式的函数存放到watchFn中
    watchFn(() => {
        console.log("hello word1", obj.name);
        console.log("hello QingDao", obj.name);
    });
    watchFn(() => {
        console.log("hello word2", obj.age);
    });
    watchFn(() => {
        console.log("hello word3", info.address);
    });

    // 7. 修改对象属性--(自动响应式)
    obj.name = "lmr";
    console.log("---------------------------------------------------");
    info.address = "青岛";

    /*
    输出结果:
    hello word1 ypf
    hello QingDao ypf
    hello word2 18
    hello word3 北京

    hello word1 lmr
    hello QingDao lmr
    ---------------------------------------------------
    hello word3 青岛
    */
}
!
- 作 者 : Yaopengfei(姚鹏飞)
- 博客地址 : http://www.cnblogs.com/yaopengfei/
- 声 明1 : 如有错误,欢迎讨论,请勿谩骂^_^。
- 声 明2 : 原创博客请在转载时保留原文链接或在文章开头加上本人博客地址,否则保留追究法律责任的权利。

 浙公网安备 33010602011771号