
第十三节:Vue3高级之 render/h函数、jsx、自定义指令、teleport、插件
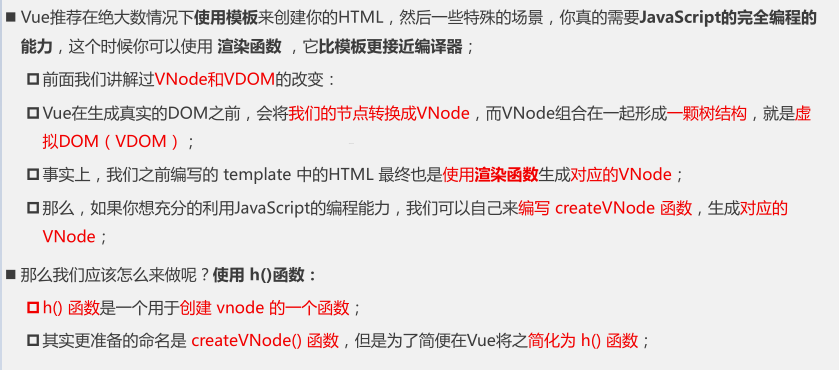
一. render/h函数(了解)
详见:https://v3.cn.vuejs.org/guide/render-function.html#dom-树
二. jsx(了解)
Vue3.x版本创建的项目使用jsx已经不需要配置babel了。
代码分享:


<script>
  import HelloWorld from './HelloWorld.vue';
  export default {
    data() {
      return {
        counter: 0
      }
    },
    render() {
      const increment = () => this.counter++;
      const decrement = () => this.counter--;
      return (
        <div>
          <h2>当前计数: {this.counter}</h2>
          <button onClick={increment}>+1</button>
          <button onClick={decrement}>-1</button>
          <HelloWorld>
          </HelloWorld>
        </div>
      )
    }
  }
</script>
组件代码:
<script>
  export default {
    render() {
      return (
        <div>
          <h2>HelloWorld</h2>
          {this.$slots.default ? this.$slots.default(): <span>哈哈哈</span>}
        </div>
      )
    }
  }
</script>
三. 自定义指令
(https://v3.cn.vuejs.org/guide/custom-directive.html#简介)
1. 说明
(1). 在Vue的模板语法中我们学习过各种各样的指令:v-show、v-for、v-model等等,除了使用这些指令之外,Vue也允许我们来自定义自己的指令(directive)。
注意:在Vue中,代码的复用和抽象主要还是通过组件;
通常在某些情况下,你需要对DOM元素进行底层操作,这个时候就会用到自定义指令;
(2). 自定义指令分为两种:
局部指令:组件中通过 directives 选项,只能在当前组件中使用;
全局指令:app的 directive 方法,可以在任意组件中被使用;
补充1个例子:input标签自动聚焦,原始写法。
<template>
    <div>
        <input type="text" ref="myInput">
    </div>
</template>

<script>
    import { ref, onMounted } from 'vue';

    export default {
        setup() {
            var myInput = ref(null);

            // 挂载完成后
            onMounted(()=>{
                myInput.value.focus();
            })

            return {
                myInput
            }
        }
    }
</script>
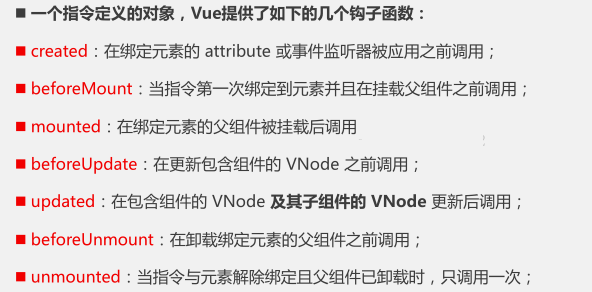
(3). 指令的生命周期
import { createApp } from 'vue'
const app = createApp({})

// 注册
app.directive('my-directive', {
  // 指令是具有一组生命周期的钩子:
  // 在绑定元素的 attribute 或事件监听器被应用之前调用
  created() {},
  // 在绑定元素的父组件挂载之前调用
  beforeMount() {},
  // 绑定元素的父组件被挂载时调用
  mounted() {},
  // 在包含组件的 VNode 更新之前调用
  beforeUpdate() {},
  // 在包含组件的 VNode 及其子组件的 VNode 更新之后调用
  updated() {},
  // 在绑定元素的父组件卸载之前调用
  beforeUnmount() {},
  // 卸载绑定元素的父组件时调用
  unmounted() {}
})
(4). 生命周期钩子函数传递的参数
directives: {
            focus: {
                mounted(el, bindings, vnode, preVnode) {
                    el.focus();
                }
            }
}
A. el
指令绑定到的元素。这可用于直接操作 DOM。
B. bindings
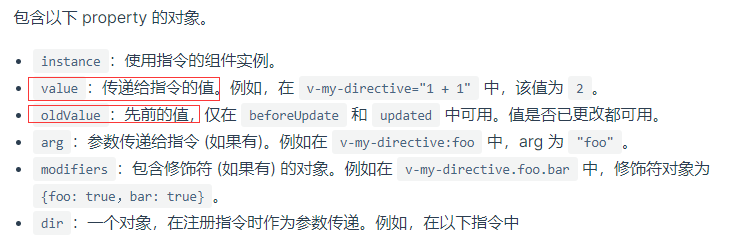
C. vnode
上面作为 el 参数收到的真实 DOM 元素的蓝图
D. preVnode
上一个虚拟节点,仅在 beforeUpdate 和 updated 钩子中可用。
2. 局部指令
自定义一个 v-focus 的局部指令
(1). 这个自定义指令实现非常简单,我们只需要在组件选项中使用 directives 即可;它是一个对象,在对象中编写我们自定义指令的名称(注意:这里不需要加v-);
(2). 自定义指令有一个生命周期,是在组件挂载后调用的 mounted,我们可以在其中完成操作;
代码分享:
<template>
    <div>
        <input type="text" v-focus>
    </div>
</template>

<script>
    export default {
        // 局部指令
        directives: {
            focus: {
                mounted(el, bindings, vnode, preVnode) {
                    el.focus();
                }
            }
        },
    }
</script>
3. 全局指令
一个全局的v-focus指令可以让我们在任何地方直接使用,在main.js中编写。
var app =createApp(App);

// 全局自定义指令
app.directive('focus',{
    mounted(el) {
        el.focus();
    }
})

app.mount('#app')
4. 指令参数、修饰符
通过 bindings 获取到对应的内容
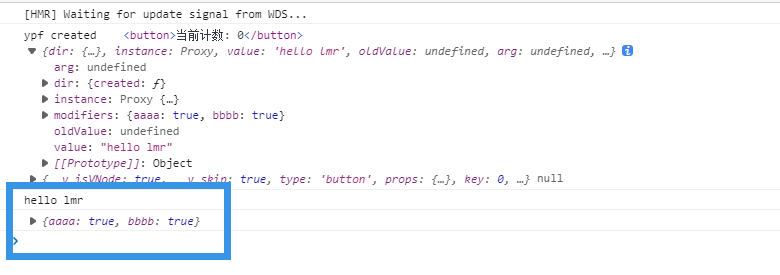
<template>
    <div>
        <button v-if="counter < 2" v-ypf.aaaa.bbbb="'hello lmr'" @click="increment">当前计数: {{counter}}</button>
    </div>
</template>

<script>
    import { ref } from "vue";

    export default {
        // 局部指令
        directives: {
            ypf: {
                created(el, bindings, vnode, preVnode) {
                    console.log("ypf created", el, bindings, vnode, preVnode);
                    console.log(bindings.value);
                    console.log(bindings.modifiers);
                },
            }
        },
        setup() {
            const counter = ref(0);
            const increment = () => counter.value++;
            return {
                counter,
                increment
            }
        }
    }
</script>
5. 案例-时间格式化指令
(1). 说明
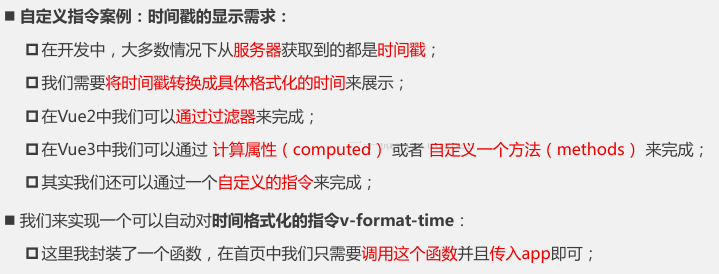
(2). 实操
需要安装dayjs包
import dayjs from 'dayjs';

export default function(app) {
  app.directive("format-time", {
    created(el, bindings) {
      bindings.formatString = "YYYY-MM-DD HH:mm:ss";
      if (bindings.value) {
        bindings.formatString = bindings.value;
      }
    },
    mounted(el, bindings) {
      const textContent = el.textContent;
      let timestamp = parseInt(textContent);
      if (textContent.length === 10) {
        timestamp = timestamp * 1000
      }
      el.textContent = dayjs(timestamp).format(bindings.formatString);
    }
  })
}
四. 内置组件teleport
参考官网:https://v3.cn.vuejs.org/guide/teleport.html#与-vue-components-一起使用
五. 插件
1. 说明
(1). 通常我们向Vue全局添加一些功能时,会采用插件的模式,它有两种编写方式:
对象类型:一个对象,但是必须包含一个 install 的函数,该函数会在安装插件时执行;
函数类型:一个function,这个函数会在安装插件时自动执行;
(2). 插件可以完成的功能没有限制,比如下面的几种都是可以的:
A. 添加全局方法或者 property,通过把它们添加到 config.globalProperties 上实现;
B. 添加全局资源:指令/过滤器/过渡等;
C. 通过全局 mixin 来添加一些组件选项;
D. 一个库,提供自己的 API,同时提供上面提到的一个或多个功能;
2. 实战
(1). 插件代码
plugins_function.js
// 函数形式
export default function(app) {
  console.log(app);
}
plugins_object.js
// 对象形式
export default {
    name: 'test1',
    install(app) {
        app.config.globalProperties.$name = "ypf"
    }
}
(2). 使用
import { createApp } from 'vue'

var app =createApp(App);
// 插件的调用
import pluginsfunction from './components/05_插件/plugins_function.js';
import pluginsobject from './components/05_插件/plugins_object.js';
app.use(pluginsfunction);
app.use(pluginsobject);

app.mount('#app')
!
- 作 者 : Yaopengfei(姚鹏飞)
- 博客地址 : http://www.cnblogs.com/yaopengfei/
- 声 明1 : 如有错误,欢迎讨论,请勿谩骂^_^。
- 声 明2 : 原创博客请在转载时保留原文链接或在文章开头加上本人博客地址,否则保留追究法律责任的权利。

 浙公网安备 33010602011771号