
第九节:Vuex简介、基本使用、核心功能(State、Mutation、Action、Getter) 和 案例实战演练
一. Vuex简介/基本使用
1. 背景
传统的组件见的交互模式如下: (可参考:https://www.cnblogs.com/yaopengfei/p/12326466.html)
(1). 父向子传值:v-bind 属性绑定
(2). 子向父传值:v-on 事件绑定
(3). 兄弟组件之间共享数据: EventBus
$on 接收数据的那个组件
$emit 发送数据的那个组件
2. 简介
(官方网站:https://vuex.vuejs.org/zh/)
(1). 定义
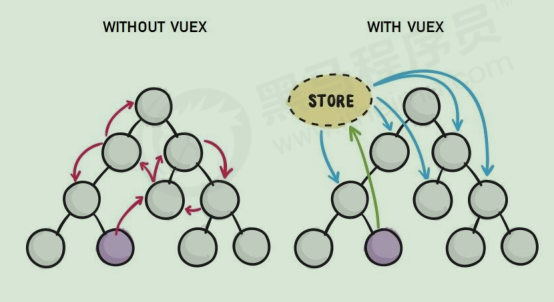
Vuex 是实现组件全局状态(数据)管理的一种机制,可以方便的实现组件之间数据的共享。下图是没有vuex和有vuex时的处理模式。
(2). 好处
① 能够在 vuex 中集中管理共享的数据,易于开发和后期维护
② 能够高效地实现组件之间的数据共享,提高开发效率
③ 存储在 vuex 中的数据都是响应式的,能够实时保持数据与页面的同步
(3). 什么情况下采用Vuex
一般情况下,只有组件之间共享的数据,才有必要存储到 vuex 中;对于组件中的私有数据,依旧存储在组件自身的 data 中即可。
3. 基本使用
(1). 已经存在的项目中引入Vuex
A. 安装Vuex组件包
npm install vuex --save
B. 在main.js中导入Vuex
import Vuex from 'vuex'
Vue.use(Vuex)
C. 创建Vuex对象store
const store = new Vuex.Store({
  // state 中存放的就是全局共享的数据
  state: { count: 0 }
})
PS:通常将Vuex单独封装到一个store.js文件中,然后在main.js中进行导入即可,然后挂载即可
main.js导入代码,挂载见步骤D
import store from './store'
store.js代码如下
import Vue from 'vue'
import Vuex from 'vuex'

Vue.use(Vuex)

export default new Vuex.Store({
  state: {
    count: 0
  }
})
D. 将 store 对象挂载到 vue 实例中
new Vue({
  store,
  render: h => h(App)
}).$mount('#app')
(2). 新建项目时引入Vuex
使用图形化界面进行创建项目,选择插件的时候,要勾选Vuex,如下图:

其它详细步骤可参考:https://www.cnblogs.com/yaopengfei/p/14506321.html
创建后的项目:
src根目录下,创建了一个Store文件夹,下面有index.js文件,用来处理vuex
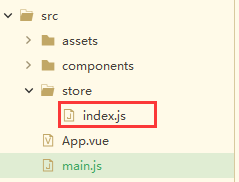
index.js代码如下:


import Vue from 'vue'
import Vuex from 'vuex'

Vue.use(Vuex)

export default new Vuex.Store({
  state: {
  },
  mutations: {
  },
  actions: {
  },
  modules: {
  }
})
main.js代码如下:
import Vue from 'vue'
import App from './App.vue'
import store from './store'

Vue.config.productionTip = false

new Vue({
  store,
  render: h => h(App)
}).$mount('#app')
二. 核心功能
1. State
(1). 用途
State 提供唯一的公共数据源,所有共享的数据都要统一放到 Store 的 State 中进行存储。
// 创建store数据源,提供唯一公共数据
const store = new Vuex.Store({
  state: { count: 0 }
})
(2). 组件两种访问方式
A. 直接 this.$store.state.全局数据名称 访问
this.$store.state.count
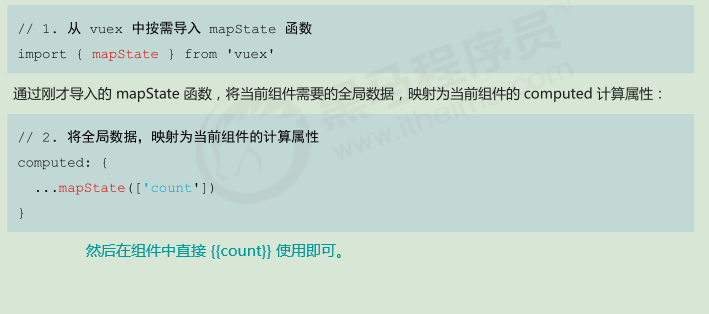
B. 借助mapState
2. Mutation
(1). 用途
Mutation 用于变更State中 的数据。
① 只能通过 mutation 变更 State中 数据,不可以直接操作 Store 中的数据。(禁止 通过 this.$store.state.count 获取后直接修改)
② 通过这种方式虽然操作起来稍微繁琐一些,但是可以集中监控所有数据的变化。
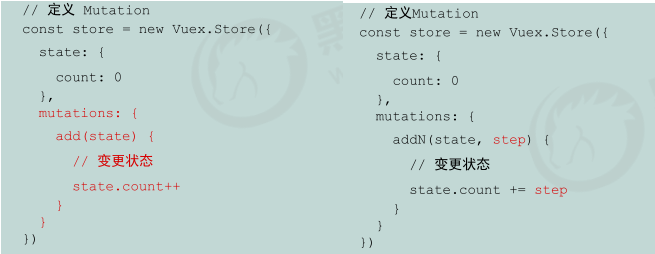
注:Mutation中声明方法,方法的第一个参数为state,可以获取State中属性,其它参数可以自定义。
(2). 组件两种访问方式
A. 通过 this.$store.commit() 调用,下面分别是无参 和 有参的调用。
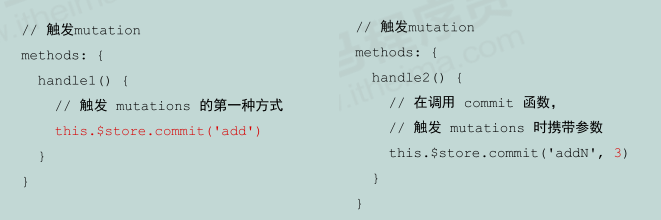
B. 通过mapMutations导入。
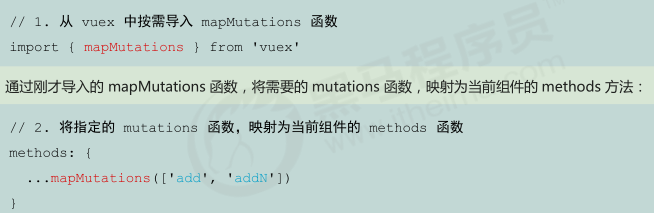
使用:
3. Action
(1). 用途
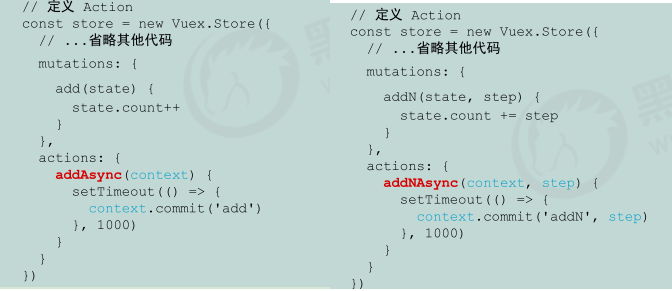
Action 用于处理异步任务。
如果通过异步操作变更数据,必须通过 Action,而不能使用 Mutation,但是在 Action 中还是要通过触发Mutation 的方式间接变更数据。
注:Action中声明的是方法,方法的第一个参数为context,可以通过context.commit 调用 Mutation中的方法。其它参数可以自定义
(2). 组件两种访问方式
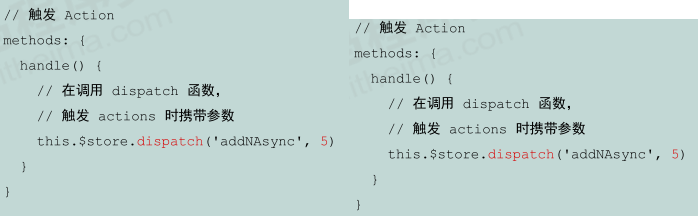
A. 通过this.$store.dispatch()进行调用,下面分别是有参 和 无参的调用。
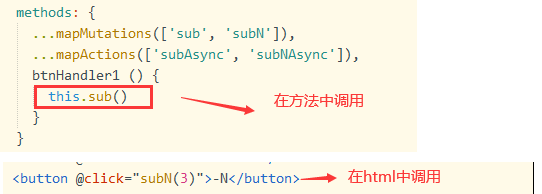
B. 通过导入mapActions调用。
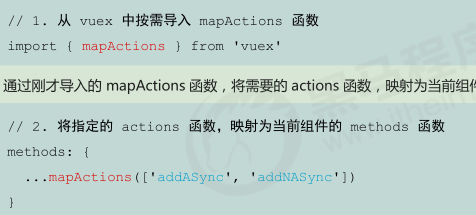
调用:

4. Getter
(1). 用途
Getter 用于对 State 中的数据进行加工处理形成新的数据。
① Getter 可以对 State 中已有的数据加工处理之后形成新的数据,类似 Vue 的计算属性。
② State 中数据发生变化,Getter 的数据也会跟着变化。
注意:Getter中声明的是方法,方法的第一个参数为state,可以获取State中属性。
// 定义 Getter
const store = new Vuex.Store({
 state: {
  count: 0
 },
 getters: {
  showNum (state) {
      return '当前最新的数量是【' + state.count + '】'
    }
 }
})
(2). 组件两种访问方式
A. 通过this.$store.getters.名称调用
<h3>{{$store.getters.showNum}}</h3>
B. 借助mapGetters调用
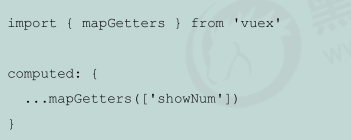
<h3>{{showNum}}</h3>
三. 案例演练
1. 要求
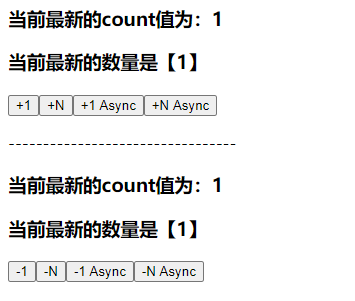
全局维护1个count变量,分别实现用两种模式实现: 自增1、自增N、异步自增1、异步自增N;自减1、自减N、异步自减1、异步自减N;
2. 实现思路
(1). 声明1个Add组件 和 Sub组件,分别用来处理自增 和 自减效果。导入App.vue中。
(2). 在Vuex对应的index文件中的
state:声明count变量
getter:修饰count变量
mutation:声明自增、自减的同步方法
Action:声明自增、自减的异步方法
(3). 在Add组件中通过 this.$store.state 、this.$store.getter、 this.$store.commit、this.$store.dispatch的方式调用。
在Sub组件中通过 import { mapState, mapMutations, mapActions, mapGetters } from 'vuex' 的方式进行调用。
3. 代码分享
Vuex对应
import Vue from 'vue'
import Vuex from 'vuex'

Vue.use(Vuex)

export default new Vuex.Store({
  state: {
    count: 0
  },
  // 只有 mutations 中定义的函数,才有权利修改 state 中的数据
  // 里面声明的方法,第一个参数为固定值state,用于获取state中的值
  mutations: {
    add (state) {
      // 不要在 mutations 函数中,执行异步操作!!!
      // setTimeout(() => {
      //   state.count++
      // }, 1000)
      state.count++
    },
    addN (state, step) {
      state.count += step
    },
    sub (state) {
      state.count--
    },
    subN (state, step) {
      state.count -= step
    }
  },
  actions: {
    addAsync (context) {
      setTimeout(() => {
        // 在 actions 中,不能直接修改 state 中的数据;
        // 必须通过 context.commit() 触发某个 mutation 才行
        context.commit('add')
      }, 1000)
    },
    addNAsync (context, step) {
      setTimeout(() => {
        context.commit('addN', step)
      }, 1000)
    },
    subAsync (context) {
      setTimeout(() => {
        context.commit('sub')
      }, 1000)
    },
    subNAsync (context, step) {
      setTimeout(() => {
        context.commit('subN', step)
      }, 1000)
    }
  },
  getters: {
    showNum (state) {
      return '当前最新的数量是【' + state.count + '】'
    }
  }
})
Add组件
<template>
  <div>
    <h3>当前最新的count值为:{{$store.state.count}}</h3>
    <h3>{{$store.getters.showNum}}</h3>
    <button @click="btnHandler1">+1</button>
    <button @click="btnHandler2">+N</button>
    <button @click="btnHandler3">+1 Async</button>
    <button @click="btnHandler4">+N Async</button>
  </div>
</template>

<script>
export default {
  data () {
    return {}
  },
  methods: {
    btnHandler1 () {
      this.$store.commit('add')
    },
    btnHandler2 () {
      // commit 的作用,就是调用 某个 mutation 函数
      this.$store.commit('addN', 3)
    },
    // 异步地让 count 自增 +1
    btnHandler3 () {
      // 这里的 dispatch 函数,专门用来触发 action
      this.$store.dispatch('addAsync')
    },
    btnHandler4 () {
      this.$store.dispatch('addNAsync', 5)
    }
  }
}
</script>

<style>
</style>
Sub组件
<template>
  <div>
    <h3>当前最新的count值为:{{count}}</h3>
    <h3>{{showNum}}</h3>
    <button @click="btnHandler1">-1</button>
    <button @click="subN(3)">-N</button>
    <button @click="subAsync">-1 Async</button>
    <button @click="subNAsync(5)">-N Async</button>
  </div>
</template>

<script>
import { mapState, mapMutations, mapActions, mapGetters } from 'vuex'

export default {
  data () {
    return {}
  },
  computed: {
    ...mapState(['count']),
    ...mapGetters(['showNum'])
  },
  methods: {
    ...mapMutations(['sub', 'subN']),
    ...mapActions(['subAsync', 'subNAsync']),
    btnHandler1 () {
      this.sub()
    }
  }
}
</script>

<style>
</style>
App.vue
<template>
  <div id="app">
    <my-add></my-add>

    <p>---------------------------------</p>

    <my-sub></my-sub>
  </div>
</template>

<script>
import Add from './components/Add.vue'
import Sub from './components/Sub.vue'

export default {
  name: 'App',
  components: {
    'my-add': Add,
    'my-sub': Sub
  }
}
</script>

<style>

</style>
!
- 作 者 : Yaopengfei(姚鹏飞)
- 博客地址 : http://www.cnblogs.com/yaopengfei/
- 声 明1 : 如有错误,欢迎讨论,请勿谩骂^_^。
- 声 明2 : 原创博客请在转载时保留原文链接或在文章开头加上本人博客地址,否则保留追究法律责任的权利。

 浙公网安备 33010602011771号