第六节:IdentityServer4设备流授权模式和扫码登录(应用于IOT)
一. 模式探究
1.背景
在一些输入受限的设备上,要完成用户名和口令的输入是非常困难的,设备授权模式,可让用户登录到智能电视、 IoT 物联网设备或打印机等输入受限的设备。 若要启用此流,设备会让用户在另一台设备上的浏览器中访问一个网页,以进行登录。 用户登录后,设备可以获取所需的访问令牌和刷新令牌。
2.运行流程
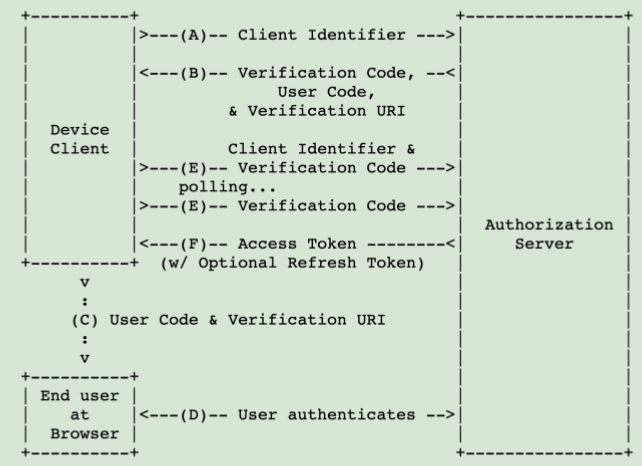
图一:
图二:
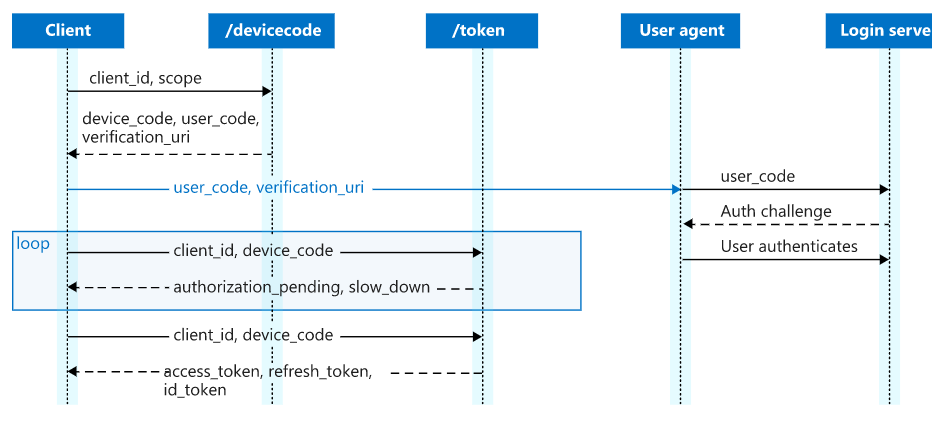
大致流程:
1. 客户端通过携带ClientId、ClientSecret,请求IDS4服务器,请求成功,返回:DeviceCode、VerificationUriComplete
2. 客户端将url写入二维码,或者用浏览器直接打开,进入授权页面。这期间,客户端携带ClientId、ClientSecret、DeviceCode不断轮询请求IDS4服务器,看是否已经授权。
3. 上面的授权页面,用户输入账号、密码,确认授权。
4. 客户端通过轮询得知已经授权,且拿到返回值 accessToken。
5. 客户端携带accessToken,请求资源服务器。
参考:
微软OAuth 2.0 设备代码流:https://docs.microsoft.com/zh-cn/azure/active-directory/develop/v2-oauth2-device-code
百度Device授权模式:https://developer.baidu.com/wiki/index.php?title=docs/oauth/device
IDS4代码参考:https://damienbod.com/2019/02/20/asp-net-core-oauth-device-flow-client-with-identityserver4/
二. 代码实操与剖析
1. 项目准备
(1). IDS4_Server2: 授权认证服务器
(2). ResourceServer: 资源服务器
(3). WinformClient1:基于winform的客户端 (.Net下的,非Core下)
2.搭建步骤
(一).IDS4_Server2
(1).通过Nuget安装【IdentityServer4 4.0.2】程序集
(2).集成IDS4官方的UI页面
进入ID4_Server2的根目录,cdm模式下依次输入下面指令,集成IDS4相关的UI页面,发现新增或改变了【Quickstart】【Views】【wwwroot】三个文件夹
A.【dotnet new -i identityserver4.templates】
B.【dotnet new is4ui --force】 其中--force代表覆盖的意思, 空项目可以直接输入:【dotnet new is4ui】,不需要覆盖。
PS. 有时候正值版本更新期间,上述指令下载下来的文件可能不是最新的,这个时候只需要手动去下载,然后把上述三个文件夹copy到项目里即可
(下载地址:https://github.com/IdentityServer/IdentityServer4.Quickstart.UI)
(3).创建配置类 Config1
A.配置api的范围集合:ApiScope, 在4.x版本中必须配置
B.配置需要保护Api资源:ApiResource,每个resource后面都需要配置对应的Scope
C.配置可以访问的客户端资源:Client。重点配置设备流模式:GrantTypes.DeviceFlow。
D.配置可以访问的用户资源:TestUser
代码分享:

 public class Config1
    {

        /// <summary>
        /// 声明api的Scope(范围)集合
        /// IDS4 4.x版本必须写的
        /// </summary>
        /// <returns></returns>
        public static IEnumerable<ApiScope> GetApiScopes()
        {
            List<ApiScope> scopeList = new List<ApiScope>();
            scopeList.Add(new ApiScope("ResourceServer"));
            return scopeList;
        }

        /// <summary>
        /// 定义需要保护的Api资源
        /// </summary>
        /// <returns></returns>
        public static IEnumerable<ApiResource> GetApiResources()
        {
            List<ApiResource> resources = new List<ApiResource>();
            //ApiResource第一个参数是ServiceName,第二个参数是描述
            resources.Add(new ApiResource("ResourceServer", "ResourceServer服务需要保护哦") { Scopes = { "ResourceServer" } });
            return resources;
        }

        /// <summary>
        /// 定义可以使用ID4 Server 客户端资源
        /// </summary>
        /// <returns></returns>
        public static IEnumerable<Client> GetClients()
        {
            List<Client> clients = new List<Client>() {
                new Client
                {
                    ClientId = "client1",//客户端ID
                    AllowedGrantTypes = GrantTypes.DeviceFlow, //验证类型:设备流模式
                    RequireConsent = true,          //手动确认授权
                    ClientSecrets ={ new Secret("0001".Sha256())},    //密钥和加密方式
                    AllowedScopes = { "ResourceServer" },        //允许访问的api服务
                    AlwaysIncludeUserClaimsInIdToken=true
                }
            };
            return clients;
        }

        /// <summary>
        /// 定义可以使用ID4的用户资源
        /// </summary>
        /// <returns></returns>
        public static List<TestUser> GetUsers()
        {
            var address = new
            {
                street_address = "One Hacker Way",
                locality = "Heidelberg",
                postal_code = 69118,
                country = "Germany"
            };
            return new List<TestUser>()
            {
                new TestUser
                {
                        SubjectId = "001",
                        Username = "ypf1",    //账号
                        Password = "123456",  //密码
                        Claims =
                        {
                            new Claim(JwtClaimTypes.Name, "Alice Smith"),
                            new Claim(JwtClaimTypes.GivenName, "Alice"),
                            new Claim(JwtClaimTypes.FamilyName, "Smith"),
                            new Claim(JwtClaimTypes.Email, "AliceSmith@email.com"),
                            new Claim(JwtClaimTypes.EmailVerified, "true", ClaimValueTypes.Boolean),
                            new Claim(JwtClaimTypes.WebSite, "http://alice.com"),
                            new Claim(JwtClaimTypes.Address, JsonSerializer.Serialize(address), IdentityServerConstants.ClaimValueTypes.Json)
                        }
                 },
                 new TestUser
                 {
                        SubjectId = "002",
                        Username = "ypf2",
                        Password = "123456",
                        Claims =
                        {
                            new Claim(JwtClaimTypes.Name, "Bob Smith"),
                            new Claim(JwtClaimTypes.GivenName, "Bob"),
                            new Claim(JwtClaimTypes.FamilyName, "Smith"),
                            new Claim(JwtClaimTypes.Email, "BobSmith@email.com"),
                            new Claim(JwtClaimTypes.EmailVerified, "true", ClaimValueTypes.Boolean),
                            new Claim(JwtClaimTypes.WebSite, "http://bob.com"),
                            //这是新的序列化模式哦
                            new Claim(JwtClaimTypes.Address, JsonSerializer.Serialize(address), IdentityServerConstants.ClaimValueTypes.Json)
                        }
                  }
            };
        }

    }
(4).在Startup类中注册、启用、修改路由
A.在ConfigureService中进行IDS4的注册.
B.在Configure中启用IDS4 app.UseIdentityServer();
C.路由,这里需要注意,不要和原Controllers里冲突即可,该项目中没有Controllers文件夹,不要特别配置。
代码分享:

 public class Startup
    {
        public Startup(IConfiguration configuration)
        {
            Configuration = configuration;
        }

        public IConfiguration Configuration { get; }

        // This method gets called by the runtime. Use this method to add services to the container.
        public void ConfigureServices(IServiceCollection services)
        {
            services.AddControllersWithViews();
            services.AddIdentityServer()
               .AddDeveloperSigningCredential()    //生成Token签名需要的公钥和私钥,存储在bin下tempkey.rsa(生产场景要用真实证书,此处改为AddSigningCredential)
               .AddInMemoryApiScopes(Config1.GetApiScopes())       //存储所有的scopes
               .AddInMemoryApiResources(Config1.GetApiResources())  //存储需要保护api资源
                .AddTestUsers(Config1.GetUsers())          //存储用户信息
               .AddInMemoryClients(Config1.GetClients()); //存储客户端模式(即哪些客户端可以用)
        }

        // This method gets called by the runtime. Use this method to configure the HTTP request pipeline.
        public void Configure(IApplicationBuilder app, IWebHostEnvironment env)
        {
            if (env.IsDevelopment())
            {
                app.UseDeveloperExceptionPage();
            }
            else
            {
                app.UseExceptionHandler("/Home/Error");
            }
            app.UseStaticFiles();
            app.UseRouting();


            //启用IDS4
            app.UseIdentityServer();
            app.UseAuthorization();
            app.UseEndpoints(endpoints =>
            {
                endpoints.MapControllerRoute(
                    name: "default",
                    pattern: "{controller=Home}/{action=Index}/{id?}");
            });
        }
    }
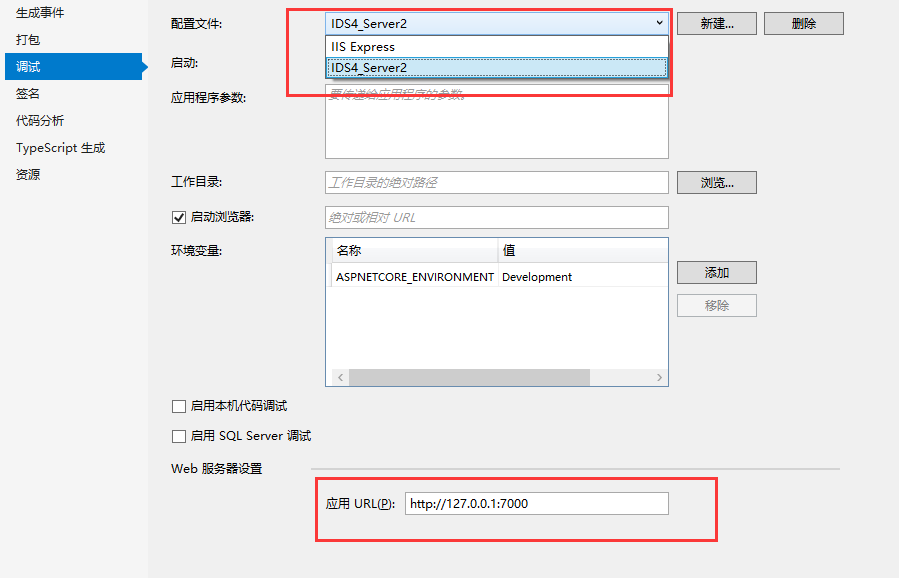
(5).配置启动端口,直接设置默认值: webBuilder.UseStartup<Startup>().UseUrls("http://127.0.0.1:7000");
(6).修改属性方便调试:项目属性→ 调试→应用URL(p),改为:http://127.0.0.1:7000 (把IISExpress和控制台启动的方式都改了,方便调试)
图:
(二).ResourceServer
(1).通过Nuget安装 【IdentityServer4.AccessTokenValidation 3.0.1】
(2).在ConfigureService通过AddIdentityServerAuthentication连接ID4服务器,进行校验,使用的是Bear认证方式。这里ApiName中的“ResourceServer”必须是ID4中GetApiResources中添加的。
特别注意:这个Authority要用127.0.0.1, 不用Localhost,因为我们获取token的时候,使用的地址也是127.0.0.1,必须对应起来.
(3).在Config中添加认证中间件 app.UseAuthentication();
代码分享:

  public class Startup
    {
        public Startup(IConfiguration configuration)
        {
            Configuration = configuration;
        }

        public IConfiguration Configuration { get; }

        // This method gets called by the runtime. Use this method to add services to the container.
        public void ConfigureServices(IServiceCollection services)
        {
            services.AddControllers();

            //校验AccessToken,从身份校验中心(IDS4_Server2)进行校验
            services.AddAuthentication(IdentityServerAuthenticationDefaults.AuthenticationScheme)  //Bear模式
                    .AddIdentityServerAuthentication(options =>
                    {
                        options.Authority = "http://127.0.0.1:7000"; // 1、授权中心地址
                        options.ApiName = "ResourceServer"; // 2、api名称(项目具体名称)
                        options.RequireHttpsMetadata = false; // 3、https元数据,不需要
                    });
        }

        // This method gets called by the runtime. Use this method to configure the HTTP request pipeline.
        public void Configure(IApplicationBuilder app, IWebHostEnvironment env)
        {
            if (env.IsDevelopment())
            {
                app.UseDeveloperExceptionPage();
            }
            app.UseRouting();

            //认证中间件(服务于上ID4校验,一定要放在UseAuthorization之前)
            app.UseAuthentication();
            app.UseAuthorization();

            app.UseEndpoints(endpoints =>
            {
                endpoints.MapControllers();
            });
        }
    }
(4).新建一个GetMsg接口,并加上特性[Authorize]。
代码分享:

 [Route("api/[controller]/[action]")]
    [ApiController]
    public class HomeController : ControllerBase
    {

        /// <summary>
        /// 资源服务器的api
        /// </summary>
        /// <returns></returns>
        [Authorize]
        [HttpGet]
        public string GetMsg()
        {
            //快速获取token的方式
            string token = HttpContext.GetTokenAsync("access_token").Result;

            return $"ypf";
        }
    }
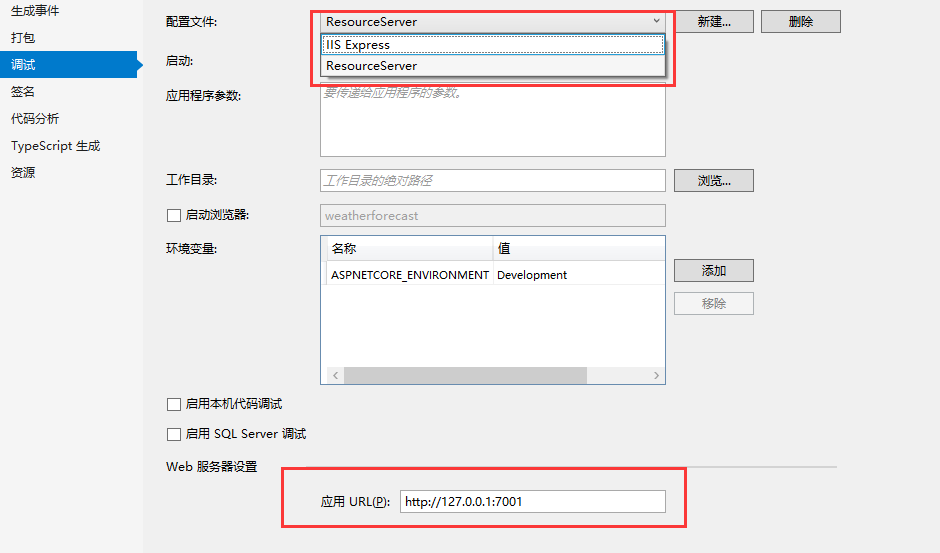
(5).配置启动端口,直接设置默认值: webBuilder.UseStartup<Startup>().UseUrls("http://127.0.0.1:7001");
(6).修改属性方便调试:项目属性→ 调试→应用URL(p),改为:http://127.0.0.1:7001 (把IISExpress和控制台启动的方式都改了,方便调试)
图:
(三).WinformClient1
(1).通过Nuget安装【QRCoder 1.3.9】 【IdentityModel 4.3.0】
(2).请求IDS4服务器,拿到一个url,写入二维码,并显示二维码;客户端此时在轮询请求IDS4,看是否已经授权成功。
(3).正常应该用手机扫描二维码,进行授权,这里为了方便演示, 用浏览器直接打开这个地址,代替手机扫描
eg:Process.Start(new ProcessStartInfo(deviceResponse.VerificationUriComplete) { UseShellExecute = true });
(4).授权成功后,客户端拿着返回的accessToken,继续请求api资源服务器,请求成功
代码分享:

   }
        private async void Form1_Load(object sender, EventArgs e)
        {
            var client = new HttpClient();
            var disco = await client.GetDiscoveryDocumentAsync("http://127.0.0.1:7000");    //IDS4服务器
            var deviceResponse = await client.RequestDeviceAuthorizationAsync(new DeviceAuthorizationRequest
            {
                Address = disco.DeviceAuthorizationEndpoint,
                ClientId = "client1",
                ClientSecret = "0001"
            });
            //生成二维码
            CreateQrCode(deviceResponse.VerificationUriComplete);
            //通过浏览器打开地址
            Process.Start(new ProcessStartInfo(deviceResponse.VerificationUriComplete) { UseShellExecute = true });
            //轮询请求
            string accessToken;
            while (true)
            {
                // request token
                var tokenResponse = await client.RequestDeviceTokenAsync(new DeviceTokenRequest
                {
                    Address = disco.TokenEndpoint,
                    ClientId = "client1",
                    ClientSecret = "0001",
                    DeviceCode = deviceResponse.DeviceCode
                });
                if (!tokenResponse.IsError)
                {
                    accessToken = tokenResponse.AccessToken;
                    break;
                }
                await Task.Delay(TimeSpan.FromSeconds(deviceResponse.Interval));
                //await Task.Delay(TimeSpan.FromSeconds());
            }
            await CallApiAsync(accessToken);
        }


        /// <summary>
        /// 请求api资源
        /// </summary>
        /// <param name="token"></param>
        /// <returns></returns>
        private async Task CallApiAsync(string token)
        {
            // call api
            var apiClient = new HttpClient();
            apiClient.SetBearerToken(token);
            var response = await apiClient.GetAsync("http://127.0.0.1:7001/api/Home/GetMsg");
            if (!response.IsSuccessStatusCode)
            {
                var msg= response.Content.ReadAsStringAsync().Result;
                this.pictureBox1.Visible = false;   //隐藏二维码
                this.label2.Text = msg;  //显示返回结果
                //MessageBox.Show($"api返回值为:{msg}");
            }
            else
            {
                var msg = response.Content.ReadAsStringAsync().Result;
                this.pictureBox1.Visible = false;   //隐藏二维码
                this.label2.Text = msg;   //显示返回结果
                //MessageBox.Show($"api返回值为:{msg}");
            }
        }


        /// <summary>
        /// 生成二维码
        /// </summary>
        /// <param name="verificationUriComplete"></param>
        public void CreateQrCode(string verificationUriComplete)
        {
            QRCodeGenerator qrGenerator = new QRCodeGenerator();
            QRCodeData qrCodeData = qrGenerator.CreateQrCode(verificationUriComplete, QRCodeGenerator.ECCLevel.Q);
            QRCode qrCode = new QRCode(qrCodeData);
            Bitmap qrCodeImage = qrCode.GetGraphic(6);
            this.pictureBox1.Image = Image.FromHbitmap(qrCodeImage.GetHbitmap());
        }
窗体:
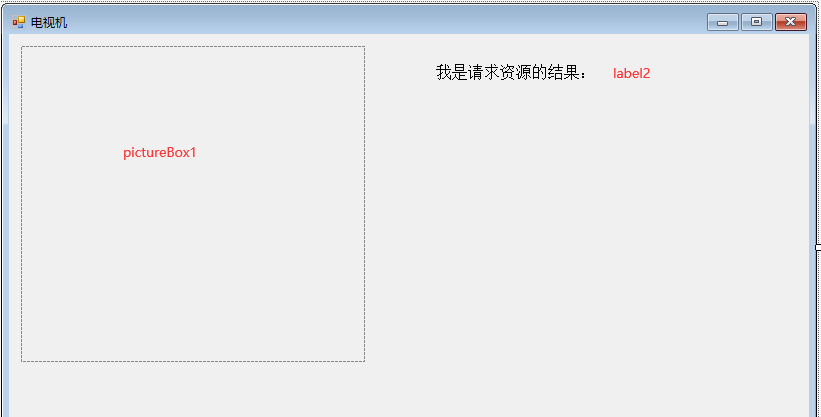
PS:详细的流程剖析详见下面的剖析测试
3.剖析测试
测试过程如下:
(PS:不知为啥fiddler捕捉不到winfrom发送的http请求,这里只能通过截图来说明了)

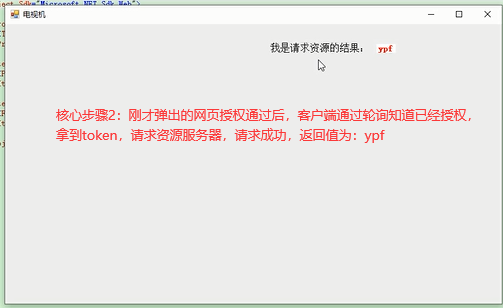
!
- 作 者 : Yaopengfei(姚鹏飞)
- 博客地址 : http://www.cnblogs.com/yaopengfei/
- 声 明1 : 如有错误,欢迎讨论,请勿谩骂^_^。
- 声 明2 : 原创博客请在转载时保留原文链接或在文章开头加上本人博客地址,否则保留追究法律责任的权利。


 浙公网安备 33010602011771号