

Junit4学习使用和总结
Junit4学习使用和总结
部分资料来源于网络
编辑于:20190710
一、Junit注解理解
1、@RunWith 首先要分清几个概念:测试方法、测试类、测试集、测试运行器。其中测试方法就是用@Test注解的一些函数。测试类是包含一个或多个测试方法的一个**Test.java文件,测试集是一个suite,可能包含多个测试类。测试运行器则决定了用什么方式偏好去运行这些测试集/类/方法。当类被@RunWith注解修饰(放在测试类上使用),或者类继承了一个被该注解修饰的类,JUnit将会使用这个注解所指明的运行器(runner)来运行测试,而不使用JUnit默认的运行器。
2、@Before 当编写测试方法时,经常会发现一些方法在执行前需要创建(初始化)相同的对象,使用@Before注解一个public void 方法会使该方法在@Test注解方法被执行前执行,就可以为@Test注解方法初始化对象数据,注:父类的@Before注解方法会在子类的@Before注解方法执行前执行。
3、@After 如果在@Before注解方法中分配了额外的资源,那么在测试执行完后,需要释放分配的资源。使用@After注解一个public void方法,该方法会在@Test注解方法执行后被执行。即使在@Before注解方法、和@Test注解方法中抛出了异常,所有的@After注解方法依然会被执行。注:父类中的@After注解方法会在子类@After注解方法执行后被执行
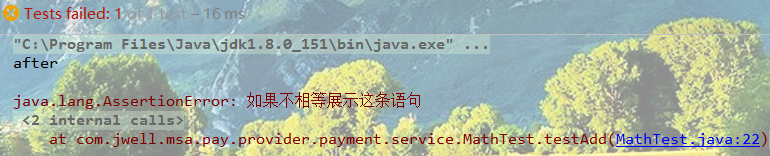
public class MathTest {

    @Before
    public void setUp() throws Exception {
        throw new Exception();
    }

    @Test
    public void testAdd() {
        /*
         * Junit中assertTrue(String message,boolean condition)的使用
         * condition为true则运行成功,condition为false则运行失败并打印出message信息。
         * 断言:assert 断言assert的好多方法可以直接使用,主要是使用了静态导入:import static org.junit.Assert.*;
         */
        assertTrue("如果不相等展示这条语句", Math.addExact(1, 1) == 3);
    }

    @After
    public void tearDown() throws Exception {
        System.out.println("after");
    }
}
测试结果:

4、@BeforeClass 一些测试需要共享代价高昂的步骤(如数据库登录),这会破坏测试独立性,通常是需要优化的,使用@BeforeClass注解一个public static void 方法,并且该方法不带任何参数,会使该方法在所有测试方法被执行前执行一次,并且只执行一次。注:父类的@BeforeClass注解方法会在子类的@BeforeClass注解方法执行前执行
5、@AfterClass 如果在@BeforeClass注解方法中分配了代价高昂的额外的资源,那么在测试类中的所有测试方法执行完后,需要释放分配的资源。使用@AfterClass注解一个public static void方法会使该方法在测试类中的所有测试方法执行完后被执行,即使在@BeforeClass注解方法中抛出了异常,所有的@AfterClass注解方法依然会被执行。注:父类中的@AfterClass注解方法会在子类@AfterClass注解方法执行后被执行。
关于@BeforeClass、@AfterClass、@Before 和 @After 总结和对比:
(1)@BeforeClass 和 @AfterClass 只会在类中被执行一次,对于那些比较“昂贵”的资源的分配或者释放来说是很有效的。相比之下对于那些需要在每次运行之前都要初始化或者在运行之后都需要被清理的资源来说使用@Before和@After同样是一个比较明智的选择。
(2)@Before 和 @After 会在每次运行前后都要执行,如果每次运行前后都需要清理资源的话,@Before和@After是一个比较明智的选择。其中@BeforeClass 和 @AfterClass必须声明为public static,而@Before和@After必须声明为public 并且非static。
6、@Ignore 对包含测试类的类或@Test注解方法使用@Ignore注解将使被注解的类或方法不会被当做测试执行(即不测试被@Ignore注解的类或方法)。JUnit执行结果中会报告被忽略的测试数。
7、@Test @Test注解的public void方法(并且不带任何参数)将会被当做测试用例。JUnit每次都会创建一个新的测试实例,然后调用@Test注解方法,任何异常的抛出都会认为测试失败。
@Test注解提供2个参数:
(1)“expected” 定义测试方法应该抛出的异常,如果测试方法没有抛出异常或者抛出了一个不同的异常,则 JUnit 会认为这个测试没有通过。这为验证被测试方法在错误的情况下是否会抛出预定的异常提供了便利。举例来说,方法 supportDBChecker 用于检查用户使用的数据库版本是否在系统的支持的范围之内,如果用户使用了不被支持的数据库版本,则会抛出运行时异常 UnsupportedDBVersionException。
(2)“timeout” 指定被测试方法被允许运行的最长时间应该是多少,如果测试方法运行时间超过了指定的毫秒数,则JUnit认为测试失败。这个参数对于性能测试有一定的帮助。例如,如果解析一份自定义的 XML 文档花费了多于 1 秒的时间,就需要重新考虑 XML 结构的设计。
public class ExpectedTest {

    @Test(expected = Exception.class)
    public void testAdd() throws Exception {
        throw new Exception();
    }

}
测试结果:

public class TimeoutTest {

    @Test(timeout = 5000)
    public void testAdd() {
        for (; ; ) {}
    }

}
测试结果:

8、@Parameters 用于使用参数化功能。
下面是综合上面几个常用的注解的测试方法
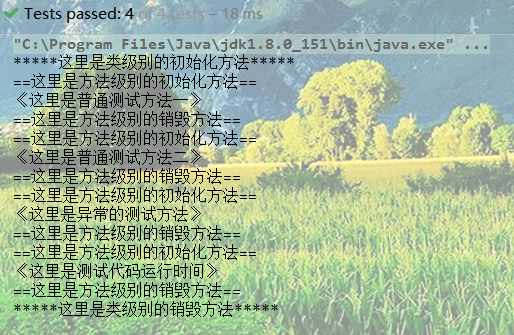
public class LinkinTest {

    @BeforeClass
    public static void init() {
        System.out.println("*****这里是类级别的初始化方法*****");
    }

    @AfterClass
    public static void destroy() {
        System.out.println("*****这里是类级别的销毁方法*****");
    }

    @Before
    public void setUp() {
        System.out.println("==这里是方法级别的初始化方法==");
    }

    @After
    public void tearDown() {
        System.out.println("==这里是方法级别的销毁方法==");
    }

    @Test
    public void testLinkin1() {
        assertTrue(true);
        System.out.println("《这里是普通测试方法一》");
    }

    @Test
    public void testLinkin2() {
        assertTrue(true);
        System.out.println("《这里是普通测试方法二》");
    }

    @Test(expected = NullPointerException.class)
    public void testLinkin3() {
        System.out.println("《这里是异常的测试方法》");
        String linkin = null;
        System.out.println(linkin.toString());
    }

    @Test(timeout = 1000)
    public void testLinkin4() {
        try {
            Thread.sleep(2);
        } catch (Exception e) {
            e.printStackTrace();
            //Assert 断言中的方法fail(String message)
            fail("时间测试不通过。。。");
        } finally {
            System.out.println("《这里是测试代码运行时间》");
        }
    }

}
运行结果:
二、Parameterized参数化和自动注解一起使用
JUnit参数化测试的五个步骤:
(1)为准备使用参数化测试的测试类指定特殊的运行器 org.junit.runners.Parameterized。
(2)为测试类声明几个变量,分别用于存放期望值和测试所用数据。
(3)为测试类声明一个带有参数的公共构造函数,并在其中为第二个环节中声明的几个变量赋值。
(4)为测试类声明一个使用注解 org.junit.runners.Parameterized.Parameters 修饰的,返回值为 java.util.Collection 的公共静态方法,并在此方法中初始化所有需要测试的参数对。
(5)编写测试方法,使用定义的变量作为参数进行测试。
下面通过Junit测试几种jar包数据拷贝的性能:
@FunctionalInterface
public interface PropertiesCopier {
    void copyProperties(Object source, Object target) throws Exception;
}

// 全局静态 BeanCopier,避免每次都生成新的对象
class StaticCglibBeanCopierPropertiesCopier implements PropertiesCopier {
    private static BeanCopier copier = BeanCopier.create(String.class, String.class, false);

    @Override
    public void copyProperties(Object source, Object target) throws Exception {
        copier.copy(source, target, null);
    }
}

/**
 * 使用cglib方法实现bean的拷贝
 */
class CglibBeanCopierPropertiesCopier implements PropertiesCopier {
    @Override
    public void copyProperties(Object source, Object target) throws Exception {
        BeanCopier copier = BeanCopier.create(source.getClass(), target.getClass(), false);
        copier.copy(source, target, null);
    }
}

/**
 * 使用spring实现bean的拷贝
 */
class SpringBeanUtilsPropertiesCopier implements PropertiesCopier {
    @Override
    public void copyProperties
            (Object source, Object target) throws Exception {
        org.springframework.beans.BeanUtils.copyProperties(source, target);
    }
}

/**
 * 使用Apache实现bean的拷贝
 */
class CommonsPropertyUtilsPropertiesCopier implements PropertiesCopier {
    @Override
    public void copyProperties(Object source, Object target) throws Exception {
        org.apache.commons.beanutils.PropertyUtils.copyProperties(target, source);
    }
}

class CommonsBeanUtilsPropertiesCopier implements PropertiesCopier {
    @Override
    public void copyProperties
            (Object source, Object target) throws Exception {
        org.apache.commons.beanutils.BeanUtils.copyProperties(target, source);
    }
}
/**
 * 使用参数化运行器进行执行
 */
@RunWith(Parameterized.class)
public class PropertiesCopierTest {

    @Parameterized.Parameter(0)
    public PropertiesCopier propertiesCopier;

    // 测试次数
    private static List<Integer> testTimes = Arrays.asList(100, 1000, 10_000, 100_000, 1_000_000);

    // 测试结果以表格的形式输出
    private static StringBuilder resultBuilder = new StringBuilder("|    实现方法|         100|       1,000|      10,000|     100,000|   1,000,000|\n").
        append("|------------|------------|------------|------------|------------|------------|\n");

    /*
     * 初始化需要使用的参数
     */
    @Parameterized.Parameters
    public static Collection<Object[]> data() {
        Collection<Object[]> params = new ArrayList<>();
        params.add(new Object[]{new StaticCglibBeanCopierPropertiesCopier()});
        params.add(new Object[]{new CglibBeanCopierPropertiesCopier()});
        params.add(new Object[]{new SpringBeanUtilsPropertiesCopier()});
        params.add(new Object[]{new CommonsPropertyUtilsPropertiesCopier()});
        params.add(new Object[]{new CommonsBeanUtilsPropertiesCopier()});
        return params;
    }

    /*
     * 每一次运行前的初始化处理
     */
    @Before
    public void setUp() throws Exception {
        String name = propertiesCopier.getClass().getSimpleName().replace("PropertiesCopier", "");
        resultBuilder.append("|").append(name).
                append("|");
    }

    @Test
    public void copyProperties() throws Exception {
        String source = "小红";
        String target = new String();
        propertiesCopier.copyProperties(source, target);
        // 按照数组中的次数进行拷贝次数执行
        for (Integer time : testTimes) {
            long start = System.nanoTime();
            for (int i = 0; i < time; i++) {
                propertiesCopier.copyProperties(source, target);
            }
            // 每完成规定次数的拷贝,算出当前规定次数拷贝的用时多少毫秒,并且加入resultBuilder尾部
            // 注nanoTime():1纳秒=0.000001 毫秒 1纳秒=0.000000001秒
            resultBuilder.append((System.nanoTime() - start) / 1_000_000D).append("|");
        }
        resultBuilder.append("\n");
    }

    @AfterClass
    public static void tearDown() throws Exception {
        System.out.println("测试结果:");
        System.out.println(resultBuilder);
    }
}
测试结果:
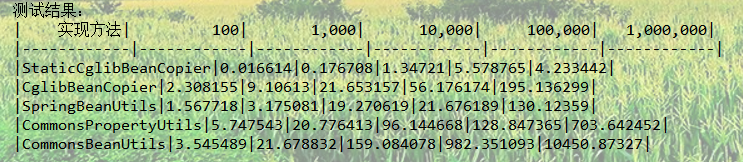
从测试结果来看:结果表明,Cglib 的 BeanCopier 的拷贝速度是最快的,全局静态 BeanCopier即使是百万次的拷贝也只需要 4 毫秒! 相比而言,最差的是 Commons 包的 BeanUtils.copyProperties 方法,100 次拷贝测试与表现最好的 Cglib 相差 200 倍之多。百万次拷贝更是出现了 2400 倍的性能差异!

 浙公网安备 33010602011771号