linux运维、架构之路-HAProxy反向代理

一、HAProxy介绍
专业反向代理,支持双机热备支持虚拟主机,配置简单,拥有非常不错的服务器健康检查功能,当其代理的后端节点出现故障, HAProxy会自动将该服务器摘除,故障恢复后再自动将该服务器加入,基于TCP和HTTP应用的代理软件,开源免费、快速并且可靠的一种方案。
二、HAProxy优点
1、专业做反向代理负载均衡的软件
2、负载均衡算法多,大概8种
3、性能优于nginx
4、支持动态管理、通过和haproxy的sock进行通信管理
5、有比较丰富的dashboard页面
6、强大的七层功能
三、HAProxy应用场景
1、"tcp"即4层代理(大多用于邮件服务器、内部协议通信服务器等)
2、HAProxy可以作为MySQL、邮件或其它的非web的负载均衡,我们常用于它作为MySQL(读)负载均衡
3、特别适用于负载特大的web站点,这些站点通常又需要会话保持或者七层处理
四、HAProxy服务部署
1、环境
#haproxy01
[root@haproxy01 ~]# cat /etc/redhat-release
CentOS release 6.9 (Final)
[root@haproxy01 ~]# uname -r
2.6.32-696.el6.x86_64
[root@haproxy01 ~]# getenforce
Disabled
[root@haproxy01 ~]# /etc/init.d/iptables status
iptables: Firewall is not running.
[root@haproxy01 ~]# hostname -I
172.19.5.3 172.16.1.3
#haproxy02
[root@haproxy02 ~]# cat /etc/redhat-release
CentOS release 6.9 (Final)
[root@haproxy02 ~]# uname -r
2.6.32-696.el6.x86_64
[root@haproxy02 ~]# getenforce
Disabled
[root@haproxy02 ~]# /etc/init.d/iptables status
iptables: Firewall is not running.
[root@haproxy02 ~]# hostname -I
172.19.5.4 172.16.1.4
2、编译安装HAProxy
##打开IP转发
echo "net.ipv4.ip_forward = 1" >> /etc/sysctl.conf && sysctl -p
yum -y install gcc systemd-devel #安装依赖
tar xf haproxy-1.8.7.tar.gz #解压
cd haproxy-1.8.7/
make TARGET=linux2628 PREFIX=/usr/local/haproxy
make install PREFIX=/usr/local/haproxy
cp /usr/local/haproxy/sbin/haproxy /usr/sbin/
cp ./examples/haproxy.init /etc/init.d/haproxy
chmod 755 /etc/init.d/haproxy
useradd -r haproxy
mkdir /etc/haproxy
3、设置HAProxy日志(/etc/rsyslog.conf)
$ModLoad imudp
$UDPServerRun 514
local3.*                                                /var/log/haproxy.log
systemctl restart rsyslog
4、创建配置文件
/etc/haproxy/haproxy.cfg
#---------------------------------------------------------------------
global #全局配置
 log 127.0.0.1 local3 info #指定服务器的日志级别
 chroot /usr/local/haproxy #改变工作目录
 user haproxy #用户组和用户
 group haproxy
 daemon #以守护进程的方式运行
 maxconn 4000 #最大连接数
defaults #默认配置
 log global
 mode http #7层http;4层tcp 如果要让haproxy支持虚拟主机,mode 必须设为http
 option httplog #http日志格式
 timeout connect 5000 #连接超时(毫秒)
        timeout client 50000 #客户端超时(毫秒)
        timeout server 50000 #服务器超时(毫秒)
 listen stats
 mode http
 bind 192.168.56.11:1080
 stats enable
 stats hide-version
 stats uri /stats
 stats admin if TRUE
frontend web_front #前端配置 web_front名称可自定义
 bind 192.168.56.11:80 #发起的http请求到80端口,会转发到设置的ip及端口
 mode http
 log global
 option httplog # 启用http日志
        default_backend http_back
backend http_back #后端配置,http_back名称可自定义
 option httpchk GET /index.jsp #设置健康检查页面
 option forwardfor header X-Forwarded-For #传递客户端真实IP
 balance roundrobin #roundrobin 轮询方式
# 需要转发的ip及端口
 server web01 192.168.56.12:8080 check inter 2000 rise 3 fall 3 weight 30
 server web02 192.168.56.13:8080 check inter 2000 rise 3 fall 3 weight 30
5、实现HAProxy负载均衡
#分别在haproxy01和haproxy02上面装了http服务,修改默监听端口为8080
#测试负载均衡数据
[root@haproxy01 ~]# curl 172.19.5.3
http01
[root@haproxy01 ~]# curl 172.19.5.3
http02
[root@haproxy01 ~]# curl 172.19.5.3
http01
[root@haproxy01 ~]# curl 172.19.5.3
http02
[root@haproxy01 ~]# curl 172.19.5.3
http01
[root@haproxy01 ~]# curl 172.19.5.3
[root@haproxy02 ~]# curl 172.19.5.4
http01
[root@haproxy02 ~]# curl 172.19.5.4
http02
[root@haproxy02 ~]# curl 172.19.5.4
http01
[root@haproxy02 ~]# curl 172.19.5.4
http02
[root@haproxy02 ~]# curl 172.19.5.4
http01
[root@haproxy02 ~]# curl 172.19.5.4
http02
五、HAProxy动态管理
1、安装socat命令
yum install -y socat
2、使用方法
[root@haproxy01 ~]# echo "help"|socat stdio /var/lib/haproxy/haproxy.sock
Unknown command. Please enter one of the following commands only :
  help           : this message
  prompt         : toggle interactive mode with prompt
  quit           : disconnect
  set maxconn global : change the per-process maxconn setting
  set rate-limit : change a rate limiting value
  set timeout    : change a timeout setting
  show env [var] : dump environment variables known to the process
  show stat resolvers [id]: dumps counters from all resolvers section and
                          associated name servers
  add acl        : add acl entry
  clear acl <id> : clear the content of this acl
  del acl        : delete acl entry
  get acl        : report the patterns matching a sample for an ACL
  show acl [id]  : report available acls or dump an acl's contents
  add map        : add map entry
  clear map <id> : clear the content of this map
  del map        : delete map entry
  get map        : report the keys and values matching a sample for a map
  set map        : modify map entry
  show map [id]  : report available maps or dump a map's contents
  show pools     : report information about the memory pools usage
  show sess [id] : report the list of current sessions or dump this session
  shutdown session : kill a specific session
  shutdown sessions server : kill sessions on a server
  clear counters : clear max statistics counters (add 'all' for all counters)
  show info      : report information about the running process
  show stat      : report counters for each proxy and server
  show errors    : report last request and response errors for each proxy
  clear table    : remove an entry from a table
  set table [id] : update or create a table entry's data
  show table [id]: report table usage stats or dump this table's contents
  disable frontend : temporarily disable specific frontend
  enable frontend : re-enable specific frontend
  set maxconn frontend : change a frontend's maxconn setting
  show servers state [id]: dump volatile server information (for backend <id>)
  show backend   : list backends in the current running config
  shutdown frontend : stop a specific frontend
  disable agent  : disable agent checks (use 'set server' instead)
  disable health : disable health checks (use 'set server' instead)
  disable server : disable a server for maintenance (use 'set server' instead)
  enable agent   : enable agent checks (use 'set server' instead)
  enable health  : enable health checks (use 'set server' instead)
  enable server  : enable a disabled server (use 'set server' instead)
  set maxconn server : change a server's maxconn setting
  set server     : change a server's state, weight or address
  get weight     : report a server's current weight
  set weight     : change a server's weight (deprecated)
3、监控数据
[root@haproxy01 ~]# echo "show info"|socat stdio /var/lib/haproxy/haproxy.sock
Name: HAProxy
Version: 1.7.9
Release_date: 2017/08/18
Nbproc: 1
Process_num: 1
Pid: 3897
Uptime: 0d 2h57m54s
Uptime_sec: 10674
Memmax_MB: 0
PoolAlloc_MB: 0
PoolUsed_MB: 0
PoolFailed: 0
Ulimit-n: 4031
Maxsock: 4031
Maxconn: 2000
Hard_maxconn: 2000
CurrConns: 0
CumConns: 3563
CumReq: 3575
Maxpipes: 0
PipesUsed: 0
PipesFree: 0
ConnRate: 1
ConnRateLimit: 0
MaxConnRate: 2
SessRate: 1
SessRateLimit: 0
MaxSessRate: 2
CompressBpsIn: 0
CompressBpsOut: 0
CompressBpsRateLim: 0
Tasks: 5
Run_queue: 1
Idle_pct: 100
node: haproxy01
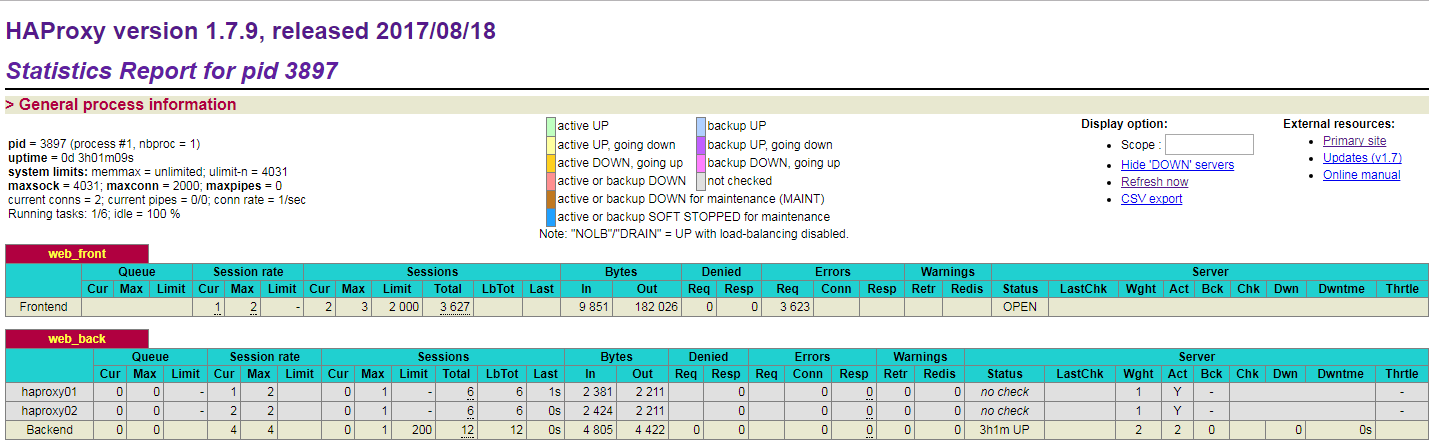
4、管理后端节点
①后端节点正常状态
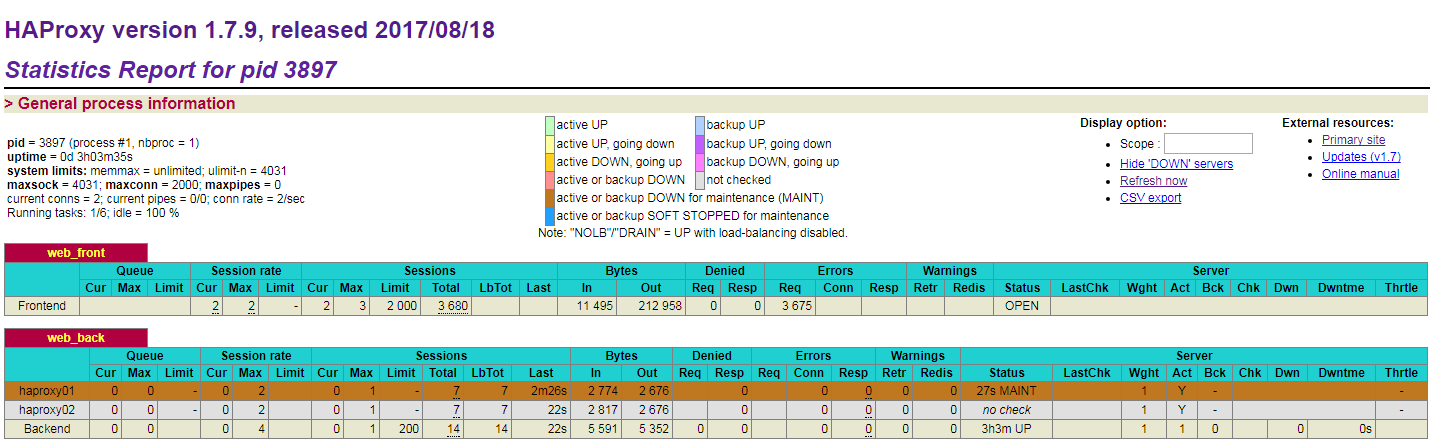
②关闭后端节点haproxy01
echo "disable server web_back/haproxy01"|socat stdio /var/lib/haproxy/haproxy.sock
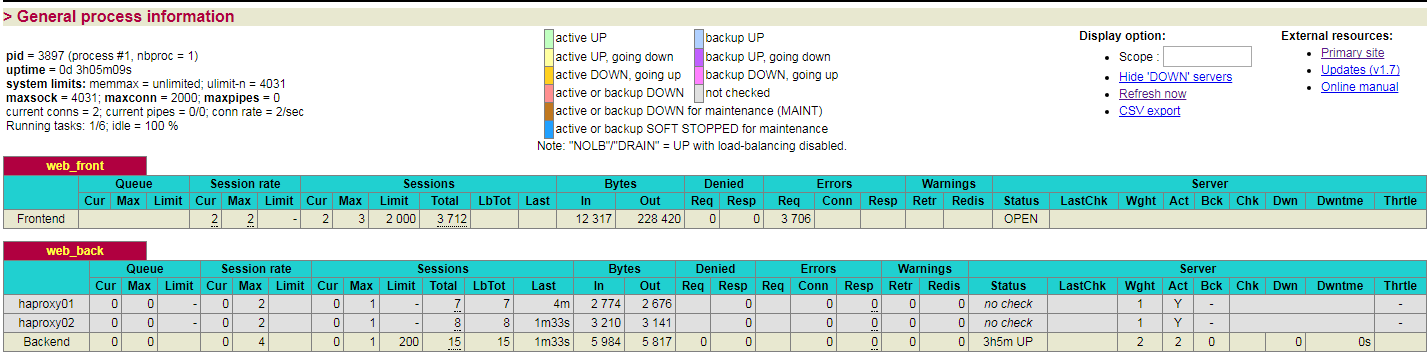
③打开后端节点haproxy01又恢复正常
[root@haproxy01 ~]# echo "enable server web_back/haproxy01"|socat stdio /var/lib/haproxy/haproxy.sock
六、HAProxy结合Keepalived实现高可用
1、安装keepalived
yum install keepalived -y
2、keepalived配置文件
|
#HAProxy01-keepalived配置# global_defs { router_id HAProxy-HA01 }
vrrp_instance HAProxy_1 { state MASTER interface eth0 virtual_router_id 55 priority 150 advert_int 1 authentication { auth_type PASS auth_pass 1111 } virtual_ipaddress { 172.19.5.16/24 172.19.5.17/24 } } |
#HAProxy02-keepalived配置# global_defs { router_id HAProxy-HA02 }
vrrp_instance HAProxy_1 { state BACKUP interface eth0 virtual_router_id 55 priority 100 advert_int 1 authentication { auth_type PASS auth_pass 1111 } virtual_ipaddress { 172.19.5.16/24 172.19.5.17/24 } } |
3、使用tcpdump检测主发包
[root@haproxy01 ~]# tcpdump -n 'host 224.0.0.18'
tcpdump: verbose output suppressed, use -v or -vv for full protocol decode
listening on eth0, link-type EN10MB (Ethernet), capture size 65535 bytes
16:22:52.240031 IP 172.19.5.3 > 224.0.0.18: VRRPv2, Advertisement, vrid 55, prio 150, authtype simple, intvl 1s, length 24
16:22:53.241106 IP 172.19.5.3 > 224.0.0.18: VRRPv2, Advertisement, vrid 55, prio 150, authtype simple, intvl 1s, length 24
16:22:54.242203 IP 172.19.5.3 > 224.0.0.18: VRRPv2, Advertisement, vrid 55, prio 150, authtype simple, intvl 1s, length 24
16:22:55.243301 IP 172.19.5.3 > 224.0.0.18: VRRPv2, Advertisement, vrid 55, prio 150, authtype simple, intvl 1s, length 24
16:22:56.244382 IP 172.19.5.3 > 224.0.0.18: VRRPv2, Advertisement, vrid 55, prio 150, authtype simple, intvl 1s, length 24
16:22:57.245453 IP 172.19.5.3 > 224.0.0.18: VRRPv2, Advertisement, vrid 55, prio 150, authtype simple, intvl 1s, length 24
16:22:58.245809 IP 172.19.5.3 > 224.0.0.18: VRRPv2, Advertisement, vrid 55, prio 150, authtype simple, intvl 1s, length 24
16:22:59.246893 IP 172.19.5.3 > 224.0.0.18: VRRPv2, Advertisement, vrid 55, prio 150, authtype simple, intvl 1s, length 24
16:23:00.247984 IP 172.19.5.3 > 224.0.0.18: VRRPv2, Advertisement, vrid 55, prio 150, authtype simple, intvl 1s, length 24
16:23:01.249098 IP 172.19.5.3 > 224.0.0.18: VRRPv2, Advertisement, vrid 55, prio 150, authtype simple, intvl 1s, length 24
4、测试keepalived的高可用,故障切换
①使用vip访问测试
[root@m01 ~]# curl 172.19.5.16
http01
[root@m01 ~]# curl 172.19.5.16
http02
[root@m01 ~]# curl 172.19.5.17
http01
[root@m01 ~]# curl 172.19.5.17
http02
②haproxy01上查看vip
[root@haproxy01 ~]# ip a s eth0
2: eth0: <BROADCAST,MULTICAST,UP,LOWER_UP> mtu 1500 qdisc pfifo_fast state UP qlen 1000
    link/ether 02:63:31:57:80:01 brd ff:ff:ff:ff:ff:ff
    inet 172.19.5.3/24 brd 172.19.5.255 scope global eth0
    inet 172.19.5.16/24 scope global secondary eth0
    inet 172.19.5.17/24 scope global secondary eth0
    inet6 fe80::63:31ff:fe57:8001/64 scope link
       valid_lft forever preferred_lft forever
③停掉haproxy01的keepalived服务
[root@haproxy01 ~]# /etc/init.d/keepalived stop
Stopping keepalived:                                       [  OK  ]
④haproxy02上查看vip
[root@haproxy02 ~]# ip a s eth0
2: eth0: <BROADCAST,MULTICAST,UP,LOWER_UP> mtu 1500 qdisc pfifo_fast state UP qlen 1000
    link/ether f6:4f:56:db:f5:d8 brd ff:ff:ff:ff:ff:ff
    inet 172.19.5.4/24 brd 172.19.5.255 scope global eth0
    inet 172.19.5.16/24 scope global secondary eth0
    inet 172.19.5.17/24 scope global secondary eth0
    inet6 fe80::f44f:56ff:fedb:f5d8/64 scope link
       valid_lft forever preferred_lft forever

 浙公网安备 33010602011771号