tomcat
Tomcat支持三种接收请求的处理方式:BIO、NIO、APR。
本文分析的是NIO,也就是tomcat8版本的默认模式。
什么是APR?
BIO:同步阻塞
NIO:同步非阻塞
APR:异步非阻塞
版本:tomcat8
Lifecycle
Lifecycle是生命周期接口
public interface Lifecycle {

    // 添加监听器
    public void addLifecycleListener(LifecycleListener listener);
    // 获取所以监听器
    public LifecycleListener[] findLifecycleListeners();
    // 移除某个监听器
    public void removeLifecycleListener(LifecycleListener listener);
    // 初始化方法
    public void init() throws LifecycleException;
    // 启动方法
    public void start() throws LifecycleException;
    // 停止方法,和start对应
    public void stop() throws LifecycleException;
    // 销毁方法,和init对应
    public void destroy() throws LifecycleException;
    // 获取生命周期状态
    public LifecycleState getState();
    // 获取字符串类型的生命周期状态
    public String getStateName();
}
Lifecycle的状态
public enum LifecycleState {
    NEW(false, (String) null),
    INITIALIZING(false, "before_init"),
    INITIALIZED(false, "after_init"),
    STARTING_PREP(false, "before_start"),
    STARTING(true, "start"),
    STARTED(true, "after_start"),
    STOPPING_PREP(true, "before_stop"),
    STOPPING(false, "stop"),
    STOPPED(false, "after_stop"),
    DESTROYING(false, "before_destroy"),
    DESTROYED(false, "after_destroy"),
    FAILED(false, (String) null);
}
LifecycleBase是Lifecycle的实现类:
public abstract class LifecycleBase implements Lifecycle {
    private static final StringManager sm = StringManager.getManager(org.apache.catalina.util.LifecycleBase.class);
    //监听器集合
    private final List<LifecycleListener> lifecycleListeners = new CopyOnWriteArrayList();
    //生命周期状态
    private volatile LifecycleState state;
}
LifecycleBase.init:更新生命周期状态、触发监听事件
//LifecycleBase
@Override
public final synchronized void init() throws LifecycleException {
    // 非NEW状态,不允许调用init()方法
    if (!state.equals(LifecycleState.NEW)) {
        invalidTransition(Lifecycle.BEFORE_INIT_EVENT);
    }

    try {
        // 初始化逻辑之前,先将状态变更为`INITIALIZING`
        setStateInternal(LifecycleState.INITIALIZING, null, false);//入口
        // 初始化,该方法为一个abstract方法,需要组件自行实现
        initInternal();//入口
        // 初始化完成之后,状态变更为`INITIALIZED`
        setStateInternal(LifecycleState.INITIALIZED, null, false);//入口
    } catch (Throwable t) {
        ExceptionUtils.handleThrowable(t);
        setStateInternal(LifecycleState.FAILED, null, false);
        throw new LifecycleException(
                sm.getString("lifecycleBase.initFail",toString()), t);
    }
}


    private synchronized void setStateInternal(LifecycleState state,
                                               Object data, boolean check) throws LifecycleException {
        // 设置状态
        this.state = state;
        // 触发事件
        String lifecycleEvent = state.getLifecycleEvent();
        if (lifecycleEvent != null) {
            fireLifecycleEvent(lifecycleEvent, data);//入口
        }
    }

    public void fireLifecycleEvent(String type, Object data) {
        LifecycleEvent event = new LifecycleEvent(lifecycle, type, data);
        LifecycleListener interested[] = listeners;
        for (int i = 0; i < interested.length; i++)
            interested[i].lifecycleEvent(event);
    }
生命周期的start方法:由子类自己实现
@Override
    public final synchronized void start() throws LifecycleException {
        if (LifecycleState.STARTING_PREP.equals(state) || LifecycleState.STARTING.equals(state) ||
                LifecycleState.STARTED.equals(state)) {

            if (log.isDebugEnabled()) {
                Exception e = new LifecycleException();
                log.debug(sm.getString("lifecycleBase.alreadyStarted", toString()), e);
            } else if (log.isInfoEnabled()) {
                log.info(sm.getString("lifecycleBase.alreadyStarted", toString()));
            }

            return;
        }

        if (state.equals(LifecycleState.NEW)) {
            init();
        }

        else if (state.equals(LifecycleState.FAILED)) {
            stop();
        }

        else if (!state.equals(LifecycleState.INITIALIZED) &&
                !state.equals(LifecycleState.STOPPED)) {
            invalidTransition(Lifecycle.BEFORE_START_EVENT);
        }

        try {
            setStateInternal(LifecycleState.STARTING_PREP, null, false);
            // start逻辑,抽象方法,由组件自行实现
            startInternal();
            if (state.equals(LifecycleState.FAILED)) {
                stop();
            } else if (!state.equals(LifecycleState.STARTING)) {
                invalidTransition(Lifecycle.AFTER_START_EVENT);
            } else {
                setStateInternal(LifecycleState.STARTED, null, false);
            }
        } catch (Throwable t) {
            ExceptionUtils.handleThrowable(t);
            setStateInternal(LifecycleState.FAILED, null, false);
            throw new LifecycleException(sm.getString("lifecycleBase.startFail", toString()), t);
        }
    }
Digester


tomcat组件关系图:一个server组件可以有多个service组件,一个service组件包含多个连接器组件和一个Engine,一个Engine包含多个host、一个host含多个context、一个context含多个wrap。
这种组件之间关联关系是通过Digester来实现的。
tomcat启动过程中,在实例化StandardServer之前,先封装了一个Digester对象。
Catalina.createStartDigester()
 protected Digester createStartDigester() {

        Digester digester = new Digester();
        digester.setClassLoader(StandardServer.class.getClassLoader());
        digester.setValidating(false);
        enableDigesterSubstitutor(digester);

        digester.addObjectCreate("Server",
                "org.apache.catalina.core.StandardServer",
                "className");
        digester.addSetProperties("Server");
        digester.addSetNext("Server",
                "setServer",
                "org.apache.catalina.Server");

        digester.addObjectCreate("Server/GlobalNamingResources",
                "org.apache.catalina.deploy.NamingResources");
        digester.addSetProperties("Server/GlobalNamingResources");
        digester.addSetNext("Server/GlobalNamingResources",
                "setGlobalNamingResources",
                "org.apache.catalina.deploy.NamingResources");

        digester.addObjectCreate("Server/Listener",
                null, // MUST be specified in the element
                "className");
        digester.addSetProperties("Server/Listener");
        digester.addSetNext("Server/Listener",
                "addLifecycleListener",
                "org.apache.catalina.LifecycleListener");

        digester.addObjectCreate("Server/Service",
                "org.apache.catalina.core.StandardService",
                "className");
        digester.addSetProperties("Server/Service");
        digester.addSetNext("Server/Service",
                "addService",
                "org.apache.catalina.Service");

        digester.addObjectCreate("Server/Service/Listener",
                null, // MUST be specified in the element
                "className");
        digester.addSetProperties("Server/Service/Listener");
        digester.addSetNext("Server/Service/Listener",
                "addLifecycleListener",
                "org.apache.catalina.LifecycleListener");

        digester.addRule("Server/Service/Connector", new ConnectorCreateRule());
        digester.addRule("Server/Service/Connector",
                new SetAllPropertiesRule());
        digester.addSetNext("Server/Service/Connector",
                "addConnector",
                "org.apache.catalina.Connector");

        digester.addObjectCreate("Server/Service/Connector/Factory",
                "org.apache.catalina.net.DefaultServerSocketFactory",
                "className");
        digester.addSetProperties("Server/Service/Connector/Factory");
        digester.addSetNext("Server/Service/Connector/Factory",
                "setFactory",
                "org.apache.catalina.net.ServerSocketFactory");

        digester.addObjectCreate("Server/Service/Connector/Listener",
                null, // MUST be specified in the element
                "className");
        digester.addSetProperties("Server/Service/Connector/Listener");
        digester.addSetNext("Server/Service/Connector/Listener",
                "addLifecycleListener",
                "org.apache.catalina.LifecycleListener");

        // Add RuleSets for nested elements
        digester.addRuleSet(new NamingRuleSet("Server/GlobalNamingResources/"));
        digester.addRuleSet(new EngineRuleSet("Server/Service/"));
        digester.addRuleSet(new HostRuleSet("Server/Service/Engine/"));
        digester.addRuleSet(new ContextRuleSet("Server/Service/Engine/Default"));
        digester.addRuleSet(new NamingRuleSet("Server/Service/Engine/DefaultContext/"));
        digester.addRuleSet(new ContextRuleSet("Server/Service/Engine/Host/Default"));
        digester.addRuleSet(new NamingRuleSet("Server/Service/Engine/Host/DefaultContext/"));
        digester.addRuleSet(new ContextRuleSet("Server/Service/Engine/Host/"));
        digester.addRuleSet(new NamingRuleSet("Server/Service/Engine/Host/Context/"));

        digester.addRule("Server/Service/Engine",
                new SetParentClassLoaderRule(digester,
                        parentClassLoader));


        return (digester);

    }
该方法就是预设了各个组件的关系。
拆分StandardService是如何关联到StandardServer的
// 添加一个模式“Server/Service”,当在xml文件(这里是server.xml)里遇到“Server”标签下的Service标签的时候,根据标签Service的属性“className”为类名实例化一个对象,默认类名是"org.apache.catalina.core.StandardServer"
digester.addSetProperties("Server/Service");
 //设置对象StandardService的属性,有些什么属性由xml里的Service标签指定是
digester.addObjectCreate("Server/Service",
            "org.apache.catalina.core.StandardService",
            "className");
 //调用Service标签的上一级标签Server的对象(即StandardServer)的addService方法,把Service添加进Server,设置它们的关系,最后一个参数表示addService方法的参数类型
        digester.addSetNext("Server/Service",
                "addService",
 public void addService(Service service) {

        service.setServer(this);

        synchronized (services) {
            Service results[] = new Service[services.length + 1];//读取出xml中server标签下的service标签
            System.arraycopy(services, 0, results, 0, services.length);
            results[services.length] = service;
            services = results;

            if (initialized) {
                try {
                    service.initialize();
                } catch (LifecycleException e) {
                    e.printStackTrace(System.err);
                }
            }

            if (started && (service instanceof Lifecycle)) {
                try {
                    ((Lifecycle) service).start();
                } catch (LifecycleException e) {
                    ;
                }
            }

            // Report this property change to interested listeners
            support.firePropertyChange("service", null, service);
        }

    }
到现在预设阶段将StandardService关联到StandardServer完毕,接下来在实例化StandardServer的时候,会根据这个预设,读取server.xml文件,就将相应的StandardServer和StandardService关联起来了。
同理StandardService关联HttpConnector,StandardService关联engine也是完全一样的逻辑。
HttpConnector关联engine就是把所有的HttpConnector和engine关联起来。
启动流程
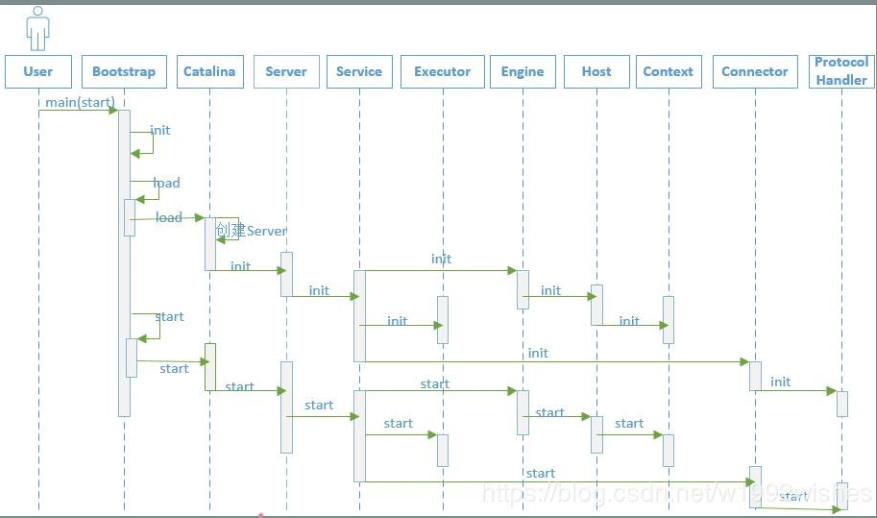
启动Tomcat是运行startup.bat或startup.sh文件,实际上这两个文件最后会调用org.apache.catalina.startup.Bootstrap类的main方法。
tomcat会以链的方式逐级调用各个模块的init()方法进行初始化, 待各个模块都初始化后, 又会逐级调用各个模块的start()方法启动各个模块。
Bootstrap.main:
    public static void main(String args[]) {
        System.err.println("Have fun and Enjoy! cxs");

        if (daemon == null) {
            Bootstrap bootstrap = new Bootstrap();
            try {
                bootstrap.init();//入口
            } catch (Throwable t) {
                handleThrowable(t);
                t.printStackTrace();
                return;
            }
            daemon = bootstrap;
        } else {
            Thread.currentThread().setContextClassLoader(daemon.catalinaLoader);
        }
        try {
            String command = "start";
            if (args.length > 0) {
                command = args[args.length - 1];
            }
            if (command.equals("startd")) {
                args[args.length - 1] = "start";
                daemon.load(args);
                daemon.start();
            }
            else if (command.equals("stopd")) {
                args[args.length - 1] = "stop";
                daemon.stop();
            }
            else if (command.equals("start")) {
                daemon.setAwait(true);
                daemon.load(args);//入口
                daemon.start();//入口
            } else if (command.equals("stop")) {
                daemon.stopServer(args);
            } else if (command.equals("configtest")) {
                daemon.load(args);
                if (null==daemon.getServer()) {
                    System.exit(1);
                }
                System.exit(0);
            } else {
                log.warn("Bootstrap: command \"" + command + "\" does not exist.");
            }
        } catch (Throwable t) {
            if (t instanceof InvocationTargetException &&
                    t.getCause() != null) {
                t = t.getCause();
            }
            handleThrowable(t);
            t.printStackTrace();
            System.exit(1);
        }
    }
该方法先后调用了init、load、start方法。
先总结下这三个方法都干了什么事情:
init:通过反射创建了Catalina实例
load:通过digester和conf/server.xml实例化各个组件。初始化StandardServer、StandardService、引擎、Executor线程池、Connector连接器
start:启动server、启动service、启动Executor、启动Connector、启动引擎、启动引擎下的所有子组件(host、context、wrap)、启动pipeline
接下来分别看下这三个方法。
Bootstrap.init
init方法就是通过反射创建了Catalina实例。
public void init() throws Exception {

        // 设置类加载器
        initClassLoaders();

        Thread.currentThread().setContextClassLoader(catalinaLoader);
        SecurityClassLoad.securityClassLoad(catalinaLoader);

        // 反射方法实例化Catalina
        Class<?> startupClass = catalinaLoader.loadClass("org.apache.catalina.startup.Catalina");
        Object startupInstance = startupClass.getConstructor().newInstance();


        String methodName = "setParentClassLoader";
        Class<?> paramTypes[] = new Class[1];
        paramTypes[0] = Class.forName("java.lang.ClassLoader");
        Object paramValues[] = new Object[1];
        paramValues[0] = sharedLoader;
        Method method =
                startupInstance.getClass().getMethod(methodName, paramTypes);
        method.invoke(startupInstance, paramValues);

        // 引用Catalina实例
        catalinaDaemon = startupInstance;
    }
Bootstrap.load
private void load(String[] arguments)
    throws Exception {

    // Call the load() method
    String methodName = "load";
    Object param[];
    Class<?> paramTypes[];
    if (arguments==null || arguments.length==0) {
        paramTypes = null;
        param = null;
    } else {
        paramTypes = new Class[1];
        paramTypes[0] = arguments.getClass();
        param = new Object[1];
        param[0] = arguments;
    }
    Method method =
        catalinaDaemon.getClass().getMethod(methodName, paramTypes);
    if (log.isDebugEnabled())
        log.debug("Calling startup class " + method);
    //通过反射调用Catalina的load()方法
    method.invoke(catalinaDaemon, param);

}
通过反射调用了Catalina的load()方法。
Catalina.load:
 public void load() {

        // 创建Digester
        Digester digester = createStartDigester();

        InputSource inputSource = null;
        InputStream inputStream = null;
        File file = null;
        try {

            try {
                inputSource.setByteStream(inputStream);

                digester.push(this);

                // 结合digester和conf/server.xml 实例化各个组件,比如Server、Container、Connector等
                digester.parse(inputSource);
            } catch (SAXParseException spe) {
            }
        } finally {
        }

        getServer().setCatalina(this);
        getServer().setCatalinaHome(Bootstrap.getCatalinaHomeFile());
        getServer().setCatalinaBase(Bootstrap.getCatalinaBaseFile());
        initStreams();

        //调用Lifecycle的init阶段:这里触发StandardServer初始化
        try {
            getServer().init();
        } catch (LifecycleException e) {
        }

    }
    public final synchronized void init() throws LifecycleException {
        this.setStateInternal(LifecycleState.INITIALIZING, (Object)null, false);
        this.initInternal();//此方法LifecycleBase没有实现,由其子类实现
        this.setStateInternal(LifecycleState.INITIALIZED, (Object)null, false);
    }
//StandardServer
@Override
protected void initInternal() throws LifecycleException {
    super.initInternal();
    for (int i = 0; i < services.length; i++) {
        services[i].init();
    }
}
- 通过conf/server.xml和Digester来实例化各个组件。然后调用getServer().init()
- 通过模板方法调用到StandardServer.initInternal:
- getServer()获取到的是StandardServer,StandardServer继承LifecycleBase。
- StandardServer没有覆盖父类的init方法,所以init方法执行的是LifecycleBase的init方法。
- LifecycleBase的init方法是个模板方法,真正的逻辑还是由其子类实现,即StandardServer的initInternal方法。
- StandardServer的init方法中又遍历所有service,循环启动
同理进入StandardService.initInternal():
protected void initInternal() throws LifecycleException {

    super.initInternal();
    //初始化引擎
    if (engine != null) {
        engine.init();
    }

    // 初始化Executor线程池
    for (Executor executor : findExecutors()) {
        if (executor instanceof JmxEnabled) {
            ((JmxEnabled) executor).setDomain(getDomain());
        }
        executor.init();
    }

    mapperListener.init();

    // 初始化Connector
    synchronized (connectorsLock) {
        for (Connector connector : connectors) {//这个循环不会进来
            try {
                connector.init();
            } catch (Exception e) {
            }
        }
    }
}


    //service中线程池容量可在配置文件中配置
    protected final ArrayList<Executor> executors = new ArrayList();
    public Executor[] findExecutors() {
        synchronized(this.executors) {
            Executor[] arr = new Executor[this.executors.size()];
            this.executors.toArray(arr);
            return arr;
        }
    }

- 初始化引擎
- 初始化Executor线程池
- 初始化Connector连接器
StandardEngine.initInternal:
//StandardEngine
@Override
protected void initInternal() throws LifecycleException {
    getRealm();
    super.initInternal();
}
     //ContainerBase
    // 线程池默认默认数量是1
    private int startStopThreads = 1;
    protected ThreadPoolExecutor startStopExecutor;

    @Override
    protected void initInternal() throws LifecycleException {
        BlockingQueue<Runnable> startStopQueue = new LinkedBlockingQueue<>();
        startStopExecutor = new ThreadPoolExecutor(
                getStartStopThreadsInternal(),
                getStartStopThreadsInternal(), 10, TimeUnit.SECONDS,
                startStopQueue,
                new StartStopThreadFactory(getName() + "-startStop-"));
        startStopExecutor.allowCoreThreadTimeOut(true);
        super.initInternal();
    }
- 发现初始化引擎方法里边并没有直接初始化后续的host、context、wrap。而是初始化了一个线程池startStopExecutor。
因为Host、Context、Wrapper这些容器和具体的webapp应用相关联了,初始化过程会更加耗时,因此在start阶段用多线程完成初始化以及start生命周期
Bootstrap.start
Bootstrap.start:
public void start()
    throws Exception {
    if( catalinaDaemon==null ) init();

    Method method = catalinaDaemon.getClass().getMethod("start", (Class [] )null);
    method.invoke(catalinaDaemon, (Object [])null);
}
该方法也是通过反射调用的Catalina的start方法
Catalina.start:
     public void start() {

        try {
            //调用Server的start方法,启动Server组件
            getServer().start();
        } catch (LifecycleException e) {
        }
    }
//StandardServer
protected void startInternal() throws LifecycleException {

    fireLifecycleEvent(CONFIGURE_START_EVENT, null);
    setState(LifecycleState.STARTING);

    globalNamingResources.start();

    // Start our defined Services
    synchronized (servicesLock) {
        for (int i = 0; i < services.length; i++) {
            services[i].start();//循环启动子server
        }
    }
}
//StandardService
protected void startInternal() throws LifecycleException {

    setState(LifecycleState.STARTING);

    // 启动Engine
    if (engine != null) {
        synchronized (engine) {
            engine.start();
        }
    }

    // 启动Executor线程池
    synchronized (executors) {
        for (Executor executor: executors) {
            executor.start();
        }
    }

    // 启动MapperListener
    mapperListener.start();

    // 启动Connector
    synchronized (connectorsLock) {
        for (Connector connector: connectors) {
            try {
                // If it has already failed, don't try and start it
                if (connector.getState() != LifecycleState.FAILED) {
                    connector.start();
                }
            } catch (Exception e) {
                // logger......
            }
        }
    }
}
    public StandardEngine() {
        super();
        pipeline.setBasic(new StandardEngineValve());//在构造器设置基础阀
    }
- 和初始化是一样的方式,通过生命周期的模板方式启动server,循环启动service
- 在启动service中,启动Engine、启动Executor、启动Connector
- 引擎是在构造器中设置其基础阀,后续的host、context、wrap等都一样。
接下来看下引擎的启动。
//StandardEngine
    protected synchronized void startInternal() throws LifecycleException {

        super.startInternal();
    }
//ContainerBase
     protected synchronized void startInternal() throws LifecycleException {

        // 把子容器的启动步骤放在线程中处理,默认情况下线程池只有一个线程处理任务队列
        Container children[] = findChildren();
        List<Future<Void>> results = new ArrayList<>();
        for (int i = 0; i < children.length; i++) {
            results.add(startStopExecutor.submit(new StartChild(children[i])));
        }

        // 阻塞当前线程,直到子容器start完成
        boolean fail = false;
        for (Future<Void> result : results) {
            try {
                result.get();
            } catch (Exception e) {
                log.error(sm.getString("containerBase.threadedStartFailed"), e);
                fail = true;
            }
        }

        // 启用Pipeline
        if (pipeline instanceof Lifecycle)
            ((Lifecycle) pipeline).start();
        setState(LifecycleState.STARTING);

        threadStart();

}
StandardEngine、StandardHost、StandardContext、StandardWrapper都是继承至ContainerBase,各个容器的启动,都是由父容器调用子容器的start方法,也就是说由StandardEngine启动StandardHost,再StandardHost启动StandardContext,以此类推。
由于它们都是继续至ContainerBase,当调用 start 启动Container容器时,首先会执行 ContainerBase 的 start 方法,它会寻找子容器,并且在线程池中启动子容器,StandardEngine也不例外。
把子容器的启动步骤放在线程池中处理,通过Future获取返回结果,并且阻塞住主线程。
当子容器全部启动完毕,主线程继续,最后启动Pipeline。
也就是StandardEngine的启动包含下面内容:启动子host、启动StandardEngine的Pipeline。
host、context、wrap过程一样,略过。
连接器

ProtocolHandler包含三个部件:Endpoint、Processor、Adapter。
Endpoint用来处理底层Socket的网络连接,
Processor用于将Endpoint接收到的Socket封装成Request,
Adapter用于将Request交给Container进行具体的处理。
public class Connector extends LifecycleMBeanBase {
    private static final Log log = LogFactory.getLog(org.apache.catalina.connector.Connector.class);
    public static final boolean RECYCLE_FACADES = Boolean.parseBoolean(System.getProperty("org.apache.catalina.connector.RECYCLE_FACADES", "false"));
    protected Service service;
    protected boolean allowTrace;
    protected long asyncTimeout;
    protected boolean enableLookups;
    protected boolean xpoweredBy;
    protected int port;
    protected String proxyName;
    protected int proxyPort;
    protected int redirectPort;
    protected String scheme;
    protected boolean secure;
    protected static final StringManager sm = StringManager.getManager(org.apache.catalina.connector.Connector.class);
    private int maxCookieCount;
    protected int maxParameterCount;
    protected int maxPostSize;
    protected int maxSavePostSize;
    protected String parseBodyMethods;
    protected HashSet<String> parseBodyMethodsSet;
    protected boolean useIPVHosts;
    protected String protocolHandlerClassName;
    /**
     * 不同的协议使用不同的protocolHandler
     * HTTP/1.1或null,protocolHandler使用org.apache.coyote.http11.Http11NioProtocol
     * AJP/1.3,protocolHandler使用org.apache.coyote.ajp.AjpNioProtocol
     *
     */
    protected final ProtocolHandler protocolHandler;
    protected Adapter adapter;
    protected static final HashMap<String, String> replacements = new HashMap();
}
     public Connector() {
        this(null); // 无参构造方法,传入参数为空协议,会默认使用`HTTP/1.1`
    }
    public Connector(String protocol) {
        setProtocol(protocol);
        ProtocolHandler p = null;
        try {
            Class<?> clazz = Class.forName(protocolHandlerClassName);
            p = (ProtocolHandler) clazz.getConstructor().newInstance();
        } catch (Exception e) {
            log.error(sm.getString(
                    "coyoteConnector.protocolHandlerInstantiationFailed"), e);
        } finally {
            this.protocolHandler = p;
        }

        if (Globals.STRICT_SERVLET_COMPLIANCE) {
            uriCharset = StandardCharsets.ISO_8859_1;
        } else {
            uriCharset = StandardCharsets.UTF_8;
        }
    }
    @Deprecated
    public void setProtocol(String protocol) {
        boolean aprConnector = AprLifecycleListener.isAprAvailable() &&
                AprLifecycleListener.getUseAprConnector();

        // 2. `HTTP/1.1`或`null`,protocolHandler使用`org.apache.coyote.http11.Http11NioProtocol`,不考虑apr
        if ("HTTP/1.1".equals(protocol) || protocol == null) {
            if (aprConnector) {
                setProtocolHandlerClassName("org.apache.coyote.http11.Http11AprProtocol");
            } else {
                setProtocolHandlerClassName("org.apache.coyote.http11.Http11NioProtocol");
            }
        }
        // 3. `AJP/1.3`,protocolHandler使用`org.apache.coyote.ajp.AjpNioProtocol`,不考虑apr
        else if ("AJP/1.3".equals(protocol)) {
            if (aprConnector) {
                setProtocolHandlerClassName("org.apache.coyote.ajp.AjpAprProtocol");
            } else {
                setProtocolHandlerClassName("org.apache.coyote.ajp.AjpNioProtocol");
            }
        }
        // 4. 其他情况,使用传入的protocol作为protocolHandler的类名
        else {
            setProtocolHandlerClassName(protocol);
        }
    }
- 根据不同的协议为Connector设置不同的ProtocolHandler
- HTTP/1.1或null,protocolHandler使用org.apache.coyote.http11.Http11NioProtocol
- AJP/1.3,protocolHandler使用org.apache.coyote.ajp.AjpNioProtocol
连接器初始化
//Connector
    @Override
    protected void initInternal() throws LifecycleException {
        super.initInternal();

        // 初始化adapter
        adapter = new CoyoteAdapter(this);
        protocolHandler.setAdapter(adapter);

        //初始化protocolHandler
        try {
            protocolHandler.init();//入口
        } catch (Exception e) {
            throw new LifecycleException(
                    sm.getString("coyoteConnector.protocolHandlerInitializationFailed"), e);
        }
    }
//AbstractProtocol
@Override
public void init() throws Exception {

    // 1. 设置endpoint的名字,默认为:http-nio-{port}
    String endpointName = getName();
    endpoint.setName(endpointName.substring(1, endpointName.length()-1));
    endpoint.setDomain(domain);

    // 2. 初始化endpoint
    endpoint.init();//入口
}
//Endpoint
public abstract void bind() throws Exception;
public abstract void unbind() throws Exception;
public abstract void startInternal() throws Exception;
public abstract void stopInternal() throws Exception;

public void init() throws Exception {
    if (bindOnInit) {
        bind();//由子类实现,绑定socker到ip端口
        bindState = BindState.BOUND_ON_INIT;
    }
}
- 创建adapter、endpoint、protocolHandler
- 绑定ServerSocket到指定的IP和端口。
启动连接器
//Connector
@Override
protected void startInternal() throws LifecycleException {

    if (getPort() < 0) {
        throw new LifecycleException(sm.getString(
                "coyoteConnector.invalidPort", Integer.valueOf(getPort())));
    }

    setState(LifecycleState.STARTING);

    try {
        protocolHandler.start();
    } catch (Exception e) {
        throw new LifecycleException(
                sm.getString("coyoteConnector.protocolHandlerStartFailed"), e);
    }
}
//AbstractProtocol
@Override
public void start() throws Exception {
    if (getLog().isInfoEnabled()) {
        getLog().info(sm.getString("abstractProtocolHandler.start", getName()));
    }

    // 1. 调用`Endpoint.start()`方法
    endpoint.start();

    // Start async timeout thread
    // 2. 开启异步超时线程,线程执行单元为`Asynctimeout`
    asyncTimeout = new AsyncTimeout();
    Thread timeoutThread = new Thread(asyncTimeout, getNameInternal() + "-AsyncTimeout");
    int priority = endpoint.getThreadPriority();
    if (priority < Thread.MIN_PRIORITY || priority > Thread.MAX_PRIORITY) {
        priority = Thread.NORM_PRIORITY;
    }
    timeoutThread.setPriority(priority);
    timeoutThread.setDaemon(true);
    timeoutThread.start();
}
- 调用了Endpoint启动方法
启动Endpoint
先认识一下Endpoint
//AbstractEndpoint
public abstract class AbstractEndpoint<S> {
    protected static final StringManager sm = StringManager.getManager(org.apache.tomcat.util.net.AbstractEndpoint.class);
    private static final int INITIAL_ERROR_DELAY = 50;
    private static final int MAX_ERROR_DELAY = 1600;
    protected volatile boolean running = false;
    protected volatile boolean paused = false;
    protected volatile boolean internalExecutor = true;
    //用来限制客户端并发数量
    private volatile LimitLatch connectionLimitLatch = null;
    protected SocketProperties socketProperties = new SocketProperties();
    //Acceptor集合
    protected org.apache.tomcat.util.net.AbstractEndpoint.Acceptor[] acceptors;
    //里边的元素用来处理Selector出来的请求
    protected SynchronizedStack<SocketProcessorBase<S>> processorCache;
    private String defaultSSLHostConfigName = "_default_";
    protected ConcurrentMap<String, SSLHostConfig> sslHostConfigs = new ConcurrentHashMap();
    private boolean useSendfile = true;
    private long executorTerminationTimeoutMillis = 5000L;
    protected int acceptorThreadCount = 1;
    protected int acceptorThreadPriority = 5;
    private int maxConnections = 10000;
    //工作者线程池
    private Executor executor = null;
    private int port;
    private InetAddress address;
    private int acceptCount = 100;
    private boolean bindOnInit = true;
    private volatile org.apache.tomcat.util.net.AbstractEndpoint.BindState bindState;
    private Integer keepAliveTimeout;
    private boolean SSLEnabled;
    private int minSpareThreads;
    private int maxThreads;
    protected int threadPriority;
    private int maxKeepAliveRequests;
    private int maxHeaderCount;
    private String name;
    private boolean daemon;
    protected final List<String> negotiableProtocols;
    private org.apache.tomcat.util.net.AbstractEndpoint.Handler<S> handler;
    protected HashMap<String, Object> attributes;
}
public class NioEndpoint extends AbstractJsseEndpoint<NioChannel> {
    private static final Log log = LogFactory.getLog(org.apache.tomcat.util.net.NioEndpoint.class);
    public static final int OP_REGISTER = 256;
    private NioSelectorPool selectorPool = new NioSelectorPool();
    private ServerSocketChannel serverSock = null;
    private volatile CountDownLatch stopLatch = null;
    private SynchronizedStack<org.apache.tomcat.util.net.NioEndpoint.PollerEvent> eventCache;
    //NioChannel对象集合,NioChannel用来封装套接字,从acceptor传递到poller
    private SynchronizedStack<NioChannel> nioChannels;
    private int pollerThreadPriority = 5;
    private int pollerThreadCount = Math.min(2, Runtime.getRuntime().availableProcessors());
    private long selectorTimeout = 1000L;
    //pollers集合
    private org.apache.tomcat.util.net.NioEndpoint.Poller[] pollers = null;
    private AtomicInteger pollerRotater = new AtomicInteger(0);

}
//NioEndpoint.Poller
public class Poller implements Runnable {
    private Selector selector = Selector.open();
    //每个poller有一个PollerEvent队列,每个套接字会生成一个PollerEvent
    private final SynchronizedQueue<NioEndpoint.PollerEvent> events = new SynchronizedQueue();
    private volatile boolean close = false;
    private long nextExpiration = 0L;
    private AtomicLong wakeupCounter = new AtomicLong(0L);
    private volatile int keyCount = 0;
}
//AbstractEndpoint.Acceptor
public abstract static class Acceptor implements Runnable {
    protected volatile org.apache.tomcat.util.net.AbstractEndpoint.Acceptor.AcceptorState state;
    private String threadName;

    public static enum AcceptorState {
        NEW,
        RUNNING,
        PAUSED,
        ENDED;

        private AcceptorState() {
        }
    }
}
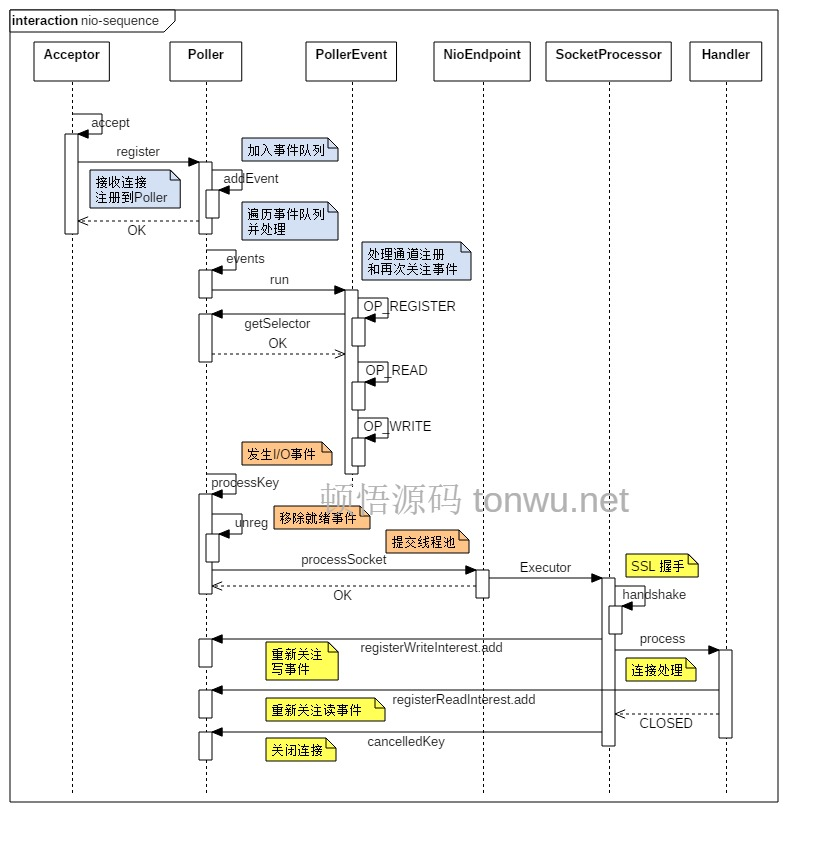
- Endpoint有两个实现类AbstractEndpoint和NioEndpoint,他们两个共同实现了Endpoint的功能
- Endpoint是负责和客户端套接字打交道的部分,也是由它实现了多路复用器
接下来继续看Endpoint的启动。
//AbstractEndpoint
public final void start() throws Exception {
    if (bindState == BindState.UNBOUND) {
        bind();
        bindState = BindState.BOUND_ON_START;
    }
    startInternal();
}
//NioEndpoint
@Override
public void startInternal() throws Exception {
    if (!running) {
        running = true;
        paused = false;

        processorCache = new SynchronizedStack<>(SynchronizedStack.DEFAULT_SIZE,
                socketProperties.getProcessorCache());
        eventCache = new SynchronizedStack<>(SynchronizedStack.DEFAULT_SIZE,
                        socketProperties.getEventCache());
        nioChannels = new SynchronizedStack<>(SynchronizedStack.DEFAULT_SIZE,
                socketProperties.getBufferPool());

        // Create worker collection
        // 2. 创建工作者线程池
        if ( getExecutor() == null ) {
            createExecutor();
        }

        // 3. 初始化连接latch,用于限制请求的并发量
        initializeConnectionLatch();

        // Start poller threads
        // 4. 开启poller线程。poller用于对接受者线程生产的消息(或事件)进行处理,poller最终调用的是Handler的代码
        pollers = new Poller[getPollerThreadCount()];
        for (int i=0; i<pollers.length; i++) {
            pollers[i] = new Poller();
            Thread pollerThread = new Thread(pollers[i], getName() + "-ClientPoller-"+i);
            pollerThread.setPriority(threadPriority);
            pollerThread.setDaemon(true);
            pollerThread.start();
        }
        // 5. 开启acceptor线程
        startAcceptorThreads();
    }
}
protected final void startAcceptorThreads() {
    int count = getAcceptorThreadCount();
    acceptors = new Acceptor[count];

    for (int i = 0; i < count; i++) {
        acceptors[i] = createAcceptor();
        String threadName = getName() + "-Acceptor-" + i;
        acceptors[i].setThreadName(threadName);
        Thread t = new Thread(acceptors[i], threadName);
        t.setPriority(getAcceptorThreadPriority());
        t.setDaemon(getDaemon());
        t.start();
    }
}
- 创建工作者线程池
- 初始化连接latch,用于限制请求的并发量
- 初始化pollers集合,并且启动所有poller
- 初始化acceptors集合,并且启动所有acceptor(默认只有一个acceptor),acceptor启动后就可以监听客户端套接字
Connector处理请求
NioEndpoint.Acceptor.run:
protected class Acceptor extends AbstractEndpoint.Acceptor {
    @Override
    public void run() {
        int errorDelay = 0;

        while (running) {//开启循环,监听客户端套接字

            // 1. 运行过程中,如果`Endpoint`暂停了,则`Acceptor`进行自旋(间隔50毫秒) `
            while (paused && running) {
                state = AcceptorState.PAUSED;
                try {
                    Thread.sleep(50);
                } catch (InterruptedException e) {
                }
            }
            // 2. 如果`Endpoint`终止运行了,则`Acceptor`也会终止
            if (!running) {
                break;
            }
            state = AcceptorState.RUNNING;

            try {
                // 3. 如果请求达到了最大连接数,则wait直到连接数降下来
                countUpOrAwaitConnection();

                SocketChannel socket = null;
                try {
                    // 4. 接受下一次连接的socket
                    socket = serverSock.accept();
                } catch (IOException ioe) {
                    countDownConnection();
                    if (running) {
                        errorDelay = handleExceptionWithDelay(errorDelay);
                        throw ioe;
                    } else {
                        break;
                    }
                }
                errorDelay = 0;

                if (running && !paused) {
                    //入口
                    // 5. `setSocketOptions()`这儿是关键,会将socket以事件的方式传递给poller
                    if (!setSocketOptions(socket)) {
                        closeSocket(socket);
                    }
                } else {
                    closeSocket(socket);
                }
            } catch (Throwable t) {
                ExceptionUtils.handleThrowable(t);
                log.error(sm.getString("endpoint.accept.fail"), t);
            }
        }
        state = AcceptorState.ENDED;
    }
}
//NioEndpoint
    protected boolean setSocketOptions(SocketChannel socket) {
        try {
            socket.configureBlocking(false);
            Socket sock = socket.socket();
            socketProperties.setProperties(sock);

            NioChannel channel = nioChannels.pop();
            if (channel == null) {
                SocketBufferHandler bufhandler = new SocketBufferHandler(
                        socketProperties.getAppReadBufSize(),
                        socketProperties.getAppWriteBufSize(),
                        socketProperties.getDirectBuffer());
                if (isSSLEnabled()) {
                    channel = new SecureNioChannel(socket, bufhandler, selectorPool, this);
                } else {
                    channel = new NioChannel(socket, bufhandler);
                }
            } else {
                channel.setIOChannel(socket);
                channel.reset();
            }
            // 将channel注册到poller,注意关键的两个方法,`getPoller0()`和`Poller.register()`
            getPoller0().register(channel);
        } catch (Throwable t) {
            ExceptionUtils.handleThrowable(t);
            try {
                log.error("",t);
            } catch (Throwable tt) {
                ExceptionUtils.handleThrowable(tt);
            }
            // Tell to close the socket
            return false;
        }
        return true;
    }


public class Poller implements Runnable {

    private final SynchronizedQueue<PollerEvent> events = new SynchronizedQueue<>();

    public void register(final NioChannel socket) {
        socket.setPoller(this);
        NioSocketWrapper ka = new NioSocketWrapper(socket, NioEndpoint.this);
        socket.setSocketWrapper(ka);
        ka.setPoller(this);
        ka.setReadTimeout(getSocketProperties().getSoTimeout());
        ka.setWriteTimeout(getSocketProperties().getSoTimeout());
        ka.setKeepAliveLeft(NioEndpoint.this.getMaxKeepAliveRequests());
        ka.setSecure(isSSLEnabled());
        ka.setReadTimeout(getConnectionTimeout());
        ka.setWriteTimeout(getConnectionTimeout());
        PollerEvent r = eventCache.pop();
        ka.interestOps(SelectionKey.OP_READ);//this is what OP_REGISTER turns into.
        if ( r==null) r = new PollerEvent(socket,ka,OP_REGISTER);
        else r.reset(socket,ka,OP_REGISTER);
        addEvent(r);
    }

    private void addEvent(PollerEvent event) {
        events.offer(event);
        if ( wakeupCounter.incrementAndGet() == 0 ) selector.wakeup();
    }
}
//NioEndpoint.Poller
 @Override
    public void run() {
        while (true) {
            boolean hasEvents = false;

            try {
                if (!close) {
                    hasEvents = events();//这个方法里边调用了PollerEvent的run方法
                    if (wakeupCounter.getAndSet(-1) > 0) {
                        keyCount = selector.selectNow();
                    } else {
                        keyCount = selector.select(selectorTimeout);
                    }
                    wakeupCounter.set(0);
                }
                if (close) {
                    events();
                    timeout(0, false);
                    try {
                        selector.close();
                    } catch (IOException ioe) {
                        log.error(sm.getString("endpoint.nio.selectorCloseFail"), ioe);
                    }
                    break;
                }
            } catch (Throwable x) {
                ExceptionUtils.handleThrowable(x);
                log.error("",x);
                continue;
            }
            if ( keyCount == 0 ) hasEvents = (hasEvents | events());

            Iterator<SelectionKey> iterator =
                    keyCount > 0 ? selector.selectedKeys().iterator() : null;
            while (iterator != null && iterator.hasNext()) {
                SelectionKey sk = iterator.next();
                NioSocketWrapper attachment = (NioSocketWrapper)sk.attachment();
                if (attachment == null) {
                    iterator.remove();
                } else {
                    iterator.remove();
                    //真正处理请求逻辑
                    processKey(sk, attachment);
                }
            }//while

            timeout(keyCount,hasEvents);
        }

        getStopLatch().countDown();
    }
//EndPoint.PollerEvent
     @Override
    public void run() {
        if (interestOps == OP_REGISTER) {
            try {
                //取出队列中新增的PollerEvent并注册到Selector
                socket.getIOChannel().register(
                        socket.getPoller().getSelector(), SelectionKey.OP_READ, socketWrapper);
            } catch (Exception x) {
                log.error(sm.getString("endpoint.nio.registerFail"), x);
            }
        }
    }
       protected void processKey(SelectionKey sk, NioSocketWrapper attachment) {
        try {
            if ( close ) {
                cancelledKey(sk);
            } else if ( sk.isValid() && attachment != null ) {
                if (sk.isReadable() || sk.isWritable() ) {
                    if ( attachment.getSendfileData() != null ) {
                        processSendfile(sk,attachment, false);
                    } else {
                        unreg(sk, attachment, sk.readyOps());
                        boolean closeSocket = false;
                        // 1. 处理读事件,比如生成Request对象
                        if (sk.isReadable()) {
                            if (!processSocket(attachment, SocketEvent.OPEN_READ, true)) {
                                closeSocket = true;
                            }
                        }
                        // 2. 处理写事件,比如将生成的Response对象通过socket写回客户端
                        if (!closeSocket && sk.isWritable()) {
                            if (!processSocket(attachment, SocketEvent.OPEN_WRITE, true)) {//入口
                                closeSocket = true;
                            }
                        }
                        if (closeSocket) {
                            cancelledKey(sk);
                        }
                    }
                }
            } else {
                cancelledKey(sk);
            }
        }
    }
//AbstractEndpoint
public boolean processSocket(SocketWrapperBase<S> socketWrapper,
        SocketEvent event, boolean dispatch) {
    try {
        if (socketWrapper == null) {
            return false;
        }
        // 1. 从`processorCache`里面拿一个`Processor`来处理socket,`Processor`的实现为`SocketProcessor`
        SocketProcessorBase<S> sc = processorCache.pop();
        if (sc == null) {
            sc = createSocketProcessor(socketWrapper, event);
        } else {
            sc.reset(socketWrapper, event);
        }
        // 2. 将`Processor`放到工作线程池中执行
        Executor executor = getExecutor();
        if (dispatch && executor != null) {
            executor.execute(sc);
        } else {
            sc.run();
        }
    } catch (RejectedExecutionException ree) {
        getLog().warn(sm.getString("endpoint.executor.fail", socketWrapper) , ree);
        return false;
    } catch (Throwable t) {
        ExceptionUtils.handleThrowable(t);
        // This means we got an OOM or similar creating a thread, or that
        // the pool and its queue are full
        getLog().error(sm.getString("endpoint.process.fail"), t);
        return false;
    }
    return true;
}
//NioEndPoint.SocketProcessor
protected class SocketProcessor extends SocketProcessorBase<NioChannel> {

    public SocketProcessor(SocketWrapperBase<NioChannel> socketWrapper, SocketEvent event) {
        super(socketWrapper, event);
    }

    @Override
    protected void doRun() {
        NioChannel socket = socketWrapper.getSocket();
        SelectionKey key = socket.getIOChannel().keyFor(socket.getPoller().getSelector());

        SocketState state = SocketState.OPEN;
        if (event == null) {
            state = getHandler().process(socketWrapper, SocketEvent.OPEN_READ);
        } else {
            // 将处理逻辑交给`Handler`处理,当event为null时
            state = getHandler().process(socketWrapper, event);
        }

    }
}
- Acceptor线程开启循环获取客户端连接
- 运行过程中,如果
Endpoint暂停了,则Acceptor进行自旋(间隔50毫秒) - 如果
Endpoint终止运行了,则Acceptor也会终止 - 如果请求达到了最大连接数,则wait直到连接数降下来
- 运行过程中,如果
- 当客户端请求过来后,从NioChannel队列中pop一个NioChannel,将socket封装到NioChannel中。
- 从poller线程池获取一个poller,并且将NioChannel注册到poller,具体如何注册的:
- 创建一个PollerEvent,将NioChannel封装进去,然后将PollerEvent添加到PollerEvent队列(每个poller有一个PollerEvent队列)
- 总结一下上面的过程:从Endpoint的poller线程池获取一个poller,将socket封装成一个PollerEvent,然后添加到该poller的PollerEvent队列。
- poller线程内部是一个循环,
- 首先poller线程可以监听到它的PollerEvent队列有PollerEvent进入,就会调用PollerEvent的run方法,将PollerEvent注册到selector多路复用器上。
- 然后poller线程还会检查一下selector是否监听到了客户端的读或写的请求,如果监听到就通过线程池进行处理
- selector的作用是提高poller线程的利用率,当非读非写请求过来的时候,poller线程不用阻塞,直接注册给selector去监听即可。然后poller以非阻塞方式循环的询问selector是否有读写请求过来
- 最后看一下poller线程真正处理请求的逻辑
- 获取一个processor交给工作线程池处理
- processor是对httpRequest的封装,最终交给Adapter的service方法
到现在为止整个connect处理请求部分已经完毕,接下来是通过pipeline进入容器,最后到达真正的servlet部分。
StandardWrapper
Adapter用于连接Connector和Container,起到承上启下的作用。Processor会调用Adapter.service()方法。
CoyoteAdapter.service:
    @Override
    public void service(org.apache.coyote.Request req, org.apache.coyote.Response res)
            throws Exception {

        // 1. 根据coyote框架的request和response对象,生成connector的request和response对象
        // (是HttpServletRequest和HttpServletResponse的封装)
        Request request = (Request) req.getNote(ADAPTER_NOTES);
        Response response = (Response) res.getNote(ADAPTER_NOTES);

        if (request == null) {
            request = connector.createRequest();
            request.setCoyoteRequest(req);
            response = connector.createResponse();
            response.setCoyoteResponse(res);

            request.setResponse(response);
            response.setRequest(request);

            req.setNote(ADAPTER_NOTES, request);
            res.setNote(ADAPTER_NOTES, response);

            req.getParameters().setQueryStringCharset(connector.getURICharset());
        }

        // 2. 补充header
        if (connector.getXpoweredBy()) {
            response.addHeader("X-Powered-By", POWERED_BY);
        }

        boolean async = false;
        boolean postParseSuccess = false;

        req.getRequestProcessor().setWorkerThreadName(THREAD_NAME.get());

        try {
            // 3. 解析请求,该方法会出现代理服务器、设置必要的header等操作
            // 用来处理请求映射 (获取 host, context, wrapper, URI 后面的参数的解析, sessionId )
            postParseSuccess = postParseRequest(req, request, res, response);
            if (postParseSuccess) {
                request.setAsyncSupported(
                        connector.getService().getContainer().getPipeline().isAsyncSupported());
                // 4. 真正进入容器的地方,调用Engine容器下pipeline的阀门
                //入口
                connector.getService().getContainer().getPipeline().getFirst().invoke(
                        request, response);
            }
            if (request.isAsync()) {
                async = true;
                ReadListener readListener = req.getReadListener();
                if (readListener != null && request.isFinished()) {
                    ClassLoader oldCL = null;
                    try {
                        oldCL = request.getContext().bind(false, null);
                        if (req.sendAllDataReadEvent()) {
                            req.getReadListener().onAllDataRead();
                        }
                    } finally {
                        request.getContext().unbind(false, oldCL);
                    }
                }

                Throwable throwable =
                        (Throwable) request.getAttribute(RequestDispatcher.ERROR_EXCEPTION);

                if (!request.isAsyncCompleting() && throwable != null) {
                    request.getAsyncContextInternal().setErrorState(throwable, true);
                }
            } else {
                //5. 通过request.finishRequest 与 response.finishResponse(刷OutputBuffer中的数据到浏览器) 来完成整个请求
                request.finishRequest();
                //将 org.apache.catalina.connector.Response对应的 OutputBuffer 中的数据
                // 刷到 org.apache.coyote.Response 对应的 InternalOutputBuffer 中,
                // 并且最终调用 socket对应的 outputStream 将数据刷出去
                // ( 这里会组装 Http Response 中的 header 与 body 里面的数据, 并且刷到远端 )
                response.finishResponse();
            }

        } catch (IOException e) {
        } finally {
            AtomicBoolean error = new AtomicBoolean(false);
            res.action(ActionCode.IS_ERROR, error);

            if (request.isAsyncCompleting() && error.get()) {
                res.action(ActionCode.ASYNC_POST_PROCESS,  null);
                async = false;
            }

            // Access log
            if (!async && postParseSuccess) {
                Context context = request.getContext();
                if (context != null) {
                    context.logAccess(request, response,
                            System.currentTimeMillis() - req.getStartTime(), false);
                }
            }

            req.getRequestProcessor().setWorkerThreadName(null);

            // Recycle the wrapper request and response
            if (!async) {
                request.recycle();
                response.recycle();
            }
        }
    }
上面获取到的pipeline是引擎的,然后执行引擎pipeline,通过基础阀在执行host、context的pipeline,最后达到Wrapper的pipeline。
Wrapper的pipeline的基础阀是StandardWrapperValve,直接看invoke方法。
    @Override
    public final void invoke(Request request, Response response)
            throws IOException, ServletException {

        boolean unavailable = false;
        Throwable throwable = null;
        long t1=System.currentTimeMillis();
        requestCount.incrementAndGet();
        StandardWrapper wrapper = (StandardWrapper) getContainer();
        Servlet servlet = null;
        Context context = (Context) wrapper.getParent();

        try {
            // 关键点1:这儿调用Wrapper的allocate()方法分配一个Servlet实例
            if (!unavailable) {
                servlet = wrapper.allocate();
            }
        }

        MessageBytes requestPathMB = request.getRequestPathMB();
        DispatcherType dispatcherType = DispatcherType.REQUEST;
        if (request.getDispatcherType()==DispatcherType.ASYNC) dispatcherType = DispatcherType.ASYNC;
        request.setAttribute(Globals.DISPATCHER_TYPE_ATTR,dispatcherType);
        request.setAttribute(Globals.DISPATCHER_REQUEST_PATH_ATTR,
                requestPathMB);
        // 关键点2,创建过滤器链,类似于Pipeline的功能
        ApplicationFilterChain filterChain =
                ApplicationFilterFactory.createFilterChain(request, wrapper, servlet);

        try {
            if ((servlet != null) && (filterChain != null)) {
                if (context.getSwallowOutput()) {
                    try {
                        SystemLogHandler.startCapture();
                        if (request.isAsyncDispatching()) {
                            request.getAsyncContextInternal().doInternalDispatch();
                        } else {
                            // 关键点3,调用过滤器链的doFilter,最终会调用到Servlet的service方法
                            filterChain.doFilter(request.getRequest(),
                                    response.getResponse());
                        }
                    } finally {
                        String log = SystemLogHandler.stopCapture();
                        if (log != null && log.length() > 0) {
                            context.getLogger().info(log);
                        }
                    }
                } else {
                    if (request.isAsyncDispatching()) {
                        request.getAsyncContextInternal().doInternalDispatch();
                    } else {
                        filterChain.doFilter
                                (request.getRequest(), response.getResponse());
                    }
                }

            }
        }

        // 关键点4,释放掉过滤器链及其相关资源
        if (filterChain != null) {
            filterChain.release();
        }

        // 关键点5,释放掉Servlet及相关资源
        try {
            if (servlet != null) {
                wrapper.deallocate(servlet);
            }
        }

        // 关键点6,如果servlet被标记为永远不可达,则需要卸载掉它,并释放这个servlet实例
        try {
            if ((servlet != null) &&
                    (wrapper.getAvailable() == Long.MAX_VALUE)) {
                wrapper.unload();
            }
        }
    }
     @Override
    public Servlet allocate() throws ServletException {

        // 卸载过程中,不能分配Servlet
        if (unloading) {
            throw new ServletException(sm.getString("standardWrapper.unloading", getName()));
        }

        boolean newInstance = false;

        // 如果Wrapper没有实现SingleThreadedModel,则每次都会返回同一个Servlet
        if (!singleThreadModel) {
            // 实例为null或者实例还未初始化,使用synchronized来保证并发时的原子性
            if (instance == null || !instanceInitialized) {
                synchronized (this) {
                    if (instance == null) {
                        try {
                            // 加载Servlet
                            instance = loadServlet();//入口
                            newInstance = true;
                            if (!singleThreadModel) {
                                // #3
                                countAllocated.incrementAndGet();
                            }
                        } catch (ServletException e) {
                            throw e;
                        } catch (Throwable e) {
                            ExceptionUtils.handleThrowable(e);
                            throw new ServletException(sm.getString("standardWrapper.allocate"), e);
                        }
                    }
                    // 初始化Servlet
                    if (!instanceInitialized) {
                        initServlet(instance);
                    }
                }
            }

            // 非单线程模型,直接返回已经创建的Servlet,也就是说,这种情况下只会创建一个Servlet
            else {
                if (!newInstance) {
                    countAllocated.incrementAndGet();
                }
                return instance;
            }
        }

        // 如果是单线程模式,则使用servlet对象池技术来加载多个Servlet
        synchronized (instancePool) {
            while (countAllocated.get() >= nInstances) {
                if (nInstances < maxInstances) {
                    try {
                        instancePool.push(loadServlet());
                        nInstances++;
                    } catch (ServletException e) {
                        throw e;
                    } catch (Throwable e) {
                        ExceptionUtils.handleThrowable(e);
                        throw new ServletException(sm.getString("standardWrapper.allocate"), e);
                    }
                } else {
                    try {
                        instancePool.wait();
                    } catch (InterruptedException e) {
                    }
                }
            }
            countAllocated.incrementAndGet();
            return instancePool.pop();
        }
    }


    public synchronized Servlet loadServlet() throws ServletException {

        if (!singleThreadModel && (instance != null))
            return instance;

        PrintStream out = System.out;
        if (swallowOutput) {
            SystemLogHandler.startCapture();
        }

        Servlet servlet;
        try {
            long t1=System.currentTimeMillis();
            if (servletClass == null) {
                unavailable(null);
                throw new ServletException
                        (sm.getString("standardWrapper.notClass", getName()));
            }

            // 关键的地方,就是通过实例管理器,创建Servlet实例,而实例管理器是通过特殊的类加载器来加载给定的类
            InstanceManager instanceManager = ((StandardContext)getParent()).getInstanceManager();
            try {
                servlet = (Servlet) instanceManager.newInstance(servletClass);
            } catch (ClassCastException e) {
                unavailable(null);
                throw new ServletException
                        (sm.getString("standardWrapper.notServlet", servletClass), e);
            }

            // 调用Servlet的init方法
            initServlet(servlet);

            fireContainerEvent("load", this);

            loadTime=System.currentTimeMillis() -t1;
        }
        return servlet;
    }
//ApplicationFilterFactory
     public static ApplicationFilterChain createFilterChain(ServletRequest request,
                                                           Wrapper wrapper, Servlet servlet) {

        // 1. 如果加密打开了,则可能会多次调用这个方法
        // 2. 为了避免重复生成filterChain对象,所以会将filterChain对象放在Request里面进行缓存
        ApplicationFilterChain filterChain = null;
        if (request instanceof Request) {
            Request req = (Request) request;
            if (Globals.IS_SECURITY_ENABLED) {
                filterChain = new ApplicationFilterChain();
            } else {
                filterChain = (ApplicationFilterChain) req.getFilterChain();
                if (filterChain == null) {
                    filterChain = new ApplicationFilterChain();
                    req.setFilterChain(filterChain);
                }
            }
        } else {
            filterChain = new ApplicationFilterChain();
        }

        filterChain.setServlet(servlet);
        filterChain.setServletSupportsAsync(wrapper.isAsyncSupported());

        StandardContext context = (StandardContext) wrapper.getParent();
        // 从这儿看出过滤器链对象里面的元素是根据Context里面的filterMaps来生成的
        FilterMap filterMaps[] = context.findFilterMaps();

        if ((filterMaps == null) || (filterMaps.length == 0))
            return (filterChain);

        DispatcherType dispatcher =
                (DispatcherType) request.getAttribute(Globals.DISPATCHER_TYPE_ATTR);

        String requestPath = null;
        Object attribute = request.getAttribute(Globals.DISPATCHER_REQUEST_PATH_ATTR);
        if (attribute != null){
            requestPath = attribute.toString();
        }

        String servletName = wrapper.getName();

        // 类型和路径都匹配的情况下,将context.filterConfig放到过滤器链里面
        for (int i = 0; i < filterMaps.length; i++) {
            if (!matchDispatcher(filterMaps[i] ,dispatcher)) {
                continue;
            }
            if (!matchFiltersURL(filterMaps[i], requestPath))
                continue;
            ApplicationFilterConfig filterConfig = (ApplicationFilterConfig)
                    context.findFilterConfig(filterMaps[i].getFilterName());
            if (filterConfig == null) {
                continue;
            }
            filterChain.addFilter(filterConfig);
        }

        // 类型和servlet名称都匹配的情况下,将context.filterConfig放到过滤器链里面
        for (int i = 0; i < filterMaps.length; i++) {
            if (!matchDispatcher(filterMaps[i] ,dispatcher)) {
                continue;
            }
            if (!matchFiltersServlet(filterMaps[i], servletName))
                continue;
            ApplicationFilterConfig filterConfig = (ApplicationFilterConfig)
                    context.findFilterConfig(filterMaps[i].getFilterName());
            if (filterConfig == null) {
                continue;
            }
            filterChain.addFilter(filterConfig);
        }

        return filterChain;
    }
@WebFilter(urlPatterns = "/*", filterName = "myfilter")
public class FileterController implements Filter {

    @Override
    public void init(FilterConfig filterConfig) throws ServletException {
        System.out.println("Filter初始化中");
    }

    @Override
    public void doFilter(ServletRequest servletRequest, ServletResponse servletResponse, FilterChain filterChain) throws IOException, ServletException {

        System.out.println("登录逻辑");
        if("登录失败"){
            response.getWriter().write("登录失败");
            //后面的拦截器和servlet都不会执行了
            return;
        }
        //登录成功,执行下一个过滤器
        filterChain.doFilter(servletRequest, servletResponse);
    }

    @Override
    public void destroy() {
        System.out.println("Filter销毁中");
    }
}
//ApplicationFilterChain
    @Override
    public void doFilter(ServletRequest request, ServletResponse response)
            throws IOException, ServletException {

        if( Globals.IS_SECURITY_ENABLED ) {
            final ServletRequest req = request;
            final ServletResponse res = response;
            try {
                java.security.AccessController.doPrivileged(
                        new java.security.PrivilegedExceptionAction<Void>() {
                            @Override
                            public Void run()
                                    throws ServletException, IOException {
                                internalDoFilter(req,res);
                                return null;
                            }
                        }
                );
            }
        } else {
            internalDoFilter(request,response);
        }
    }

    // 1. `internalDoFilter`方法通过pos和n来调用过滤器链里面的每个过滤器。
    // pos表示当前的过滤器下标,n表示总的过滤器数量
// 2. `internalDoFilter`方法最终会调用servlet.service()方法
    private void internalDoFilter(ServletRequest request,
                                  ServletResponse response)
            throws IOException, ServletException {

        // 1. 当pos小于n时, 则执行Filter
        if (pos < n) {
            // 2. 得到 过滤器 Filter,执行一次post++
            ApplicationFilterConfig filterConfig = filters[pos++];
            try {
                Filter filter = filterConfig.getFilter();

                if (request.isAsyncSupported() && "false".equalsIgnoreCase(
                        filterConfig.getFilterDef().getAsyncSupported())) {
                    request.setAttribute(Globals.ASYNC_SUPPORTED_ATTR, Boolean.FALSE);
                }
                if( Globals.IS_SECURITY_ENABLED ) {
                    final ServletRequest req = request;
                    final ServletResponse res = response;
                    Principal principal =
                            ((HttpServletRequest) req).getUserPrincipal();

                    Object[] args = new Object[]{req, res, this};
                    SecurityUtil.doAsPrivilege ("doFilter", filter, classType, args, principal);
                } else {
                    // 4. 这里的 filter 的执行 有点递归的感觉, 通过 pos 来控制从 filterChain 里面拿出那个
                    // filter 来进行操作
                    // 这里把this(filterChain)传到自定义filter里面,我们自定义的filter,会重写doFilter,
                    // 在这里会被调用,doFilter里面会执行业务逻辑,如果执行业务逻辑成功,
                    // 则会调用 filterChain.doFilter(servletRequest, servletResponse); ,
                    // filterChain就是这里传过去的this;如果业务逻辑执行失败,则return,filterChain终止,
                    // 后面的servlet.service(request, response)也不会执行了
                    // 所以在 Filter 里面所调用 return, 则会终止 Filter 的调用, 而下面的 Servlet.service
                    // 更本就没有调用到
                    filter.doFilter(request, response, this);
                }
            }
            return;
        }

        try {
            if ((request instanceof HttpServletRequest) &&
                    (response instanceof HttpServletResponse) &&
                    Globals.IS_SECURITY_ENABLED ) {
            } else {
                //当pos等于n时,过滤器都执行完毕,终于执行了熟悉的servlet.service(request, response)方法。
                servlet.service(request, response);
            }
        }
    }
singleThreadModel:如果一个servlet实现了SingleThreadModel接口,那么当多线程访问的路径对应到同一个servlet时会创建多个servlet实例,也就是一个线程一个servlet实例,这样就没有多线程安全问题,但也有数量限制,在tomcat7中是20个,如果这20个在用,再有线程访问时会停住,直到其他线程用完释放。如果没实现SingleThreadModel,多线程只能访问同一个servlet实例,这就会有多线程安全问题
- 创建Servlet实例
- 首先判断servlet是否实现singleThreadModel:如果没有实现,即servlet为单例模式,如果实现了就通过池技术创建servlet
- 通过InstanceManager加载servlet、调用servlet init方法
- 创建过滤器链,类似于Pipeline的功能
- 创建ApplicationFilterChain对象,并且缓存到request中
- Context初始化的时候会将所有的过滤器初生成到filterMaps中,这里从Context里面的filterMaps遍历对象,匹配类型、路径名称,放入到ApplicationFilterChain
- 调用过滤器链的doFilter,最终会调用到Servlet的service方法
- 通过pos和n来调用过滤器链里面的每个过滤器。 pos表示当前的过滤器下标,n表示总的过滤器数量
- 最终会调用servlet.service()方法
- 释放掉过滤器链及其相关资源
- 释放掉Servlet及相关资源
- 如果servlet被标记为永远不可达,则需要卸载掉它,并释放这个servlet实例
调优
采用动静分离节约tomcat的性能
静态资源不要通过tomcat处理,可以直接通过nginx等进行转发
调优tomcat的线程池
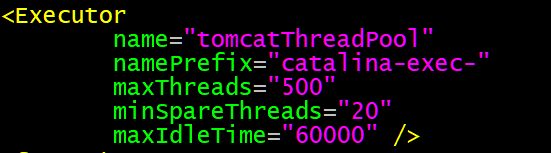
name:给执行器(线程池)起一个名字
namePrefix:指定线程池中的每一个线程的name前缀
maxThreads:线程池中最大的线程数量
minSpareThreads:线程池中允许空闲的线程数量(多余的线程都杀死)
maxIdLeTime:一个线程空闲多久算是一个空闲线程
调优tomcat的连接器Connector

<Connector port="8080"
        protocol="HTTP/1.1"
        connectionTimeout="20000" ##超时时间,毫秒,这里是20秒
        redirectPort="443"
        maxThreads="3000" ##最大线程数
        minSpareThreads="20" ##最小空闲线程数,这里是一直会运行的线程
        acceptCount="1000" ##接收的队列数
        enableLookups="false" ##关闭dns解析,减少性能损耗
        server="None"
        URIEncoding="UTF-8"
      />
executor:指定这个连接器所使用的执行器(线程池)
enableLookups="false":关闭dns解析,减少性能损耗
minProcessors:服务器启动时创建的最少线程数
maxProcessors:最大可以创建的线程数
acceptCount="1000":线程池中的线程都被占用,允许放到队列中的请求数
maxThreads="3000":最大线程数
minSpareThreads="20":最小空闲线程数,这里是一直会运行的线程
运行模式的选择
Tomcat8以下版本,默认使用的就是BIO(阻塞式IO)模式
Tomcat8以上版本,默认使用的就是NIO模式
是Tomcat生产环境运行的首选方式
如果操作系统未安装apr或者apr路径未指到Tomcat默认可识别的路径,
则apr模式无法启动,自动切换启动nio模式。
所以必须要安装apr和native,直接启动就支持apr
apr是从操作系统级别解决异步IO问题,apr的本质就是使用jni(java native interface)
技术调用操作系统底层的IO接口,所以需要提前安装所需要的依赖

 浙公网安备 33010602011771号