
netty之---核心源码剖析
1 NioEventLoopGroup的创建过程,最终调用的是下述构造函数
/**
     * Create a new instance.
     *
     * @param nThreads          使用的线程数,可以指定,默认就是 核数*2
     * @param executor          执行器:如果传入为空,则使用Netty默认的线程工厂以及默认执行器
     * @param chooserFactory    单例 new DefaultEventExecutorChooseFactory(), 可以理解为循环时,返回下一个执行器
     * @param args              穿件的时候的入参
     */
    protected MultithreadEventExecutorGroup(int nThreads, Executor executor,
                                            EventExecutorChooserFactory chooserFactory, Object... args) {
        if (nThreads <= 0) {
            throw new IllegalArgumentException(String.format("nThreads: %d (expected: > 0)", nThreads));
        }

        // 如果传入的为空,则使用默认的线程工厂和默认的执行器
        if (executor == null) {
            executor = new ThreadPerTaskExecutor(newDefaultThreadFactory());
        }

        // 创建指定的线程数的执行器数组
        children = new EventExecutor[nThreads];

        // 出书画线程数组
        for (int i = 0; i < nThreads; i ++) {
            boolean success = false;
            try {
                // 创建新的NioEventLoop
                /*
                protected SingleThreadEventExecutor(EventExecutorGroup parent, Executor executor,
                                        boolean addTaskWakesUp, int maxPendingTasks,
                                        RejectedExecutionHandler rejectedHandler) {
                    super(parent);
                    this.addTaskWakesUp = addTaskWakesUp;
                    this.maxPendingTasks = Math.max(16, maxPendingTasks);
                    this.executor = ThreadExecutorMap.apply(executor, this);
                    taskQueue = newTaskQueue(this.maxPendingTasks);
                    rejectedExecutionHandler = ObjectUtil.checkNotNull(rejectedHandler, "rejectedHandler");
                }
                NioEventLoop(NioEventLoopGroup parent, Executor executor, SelectorProvider selectorProvider,
                 SelectStrategy strategy, RejectedExecutionHandler rejectedExecutionHandler,
                 EventLoopTaskQueueFactory queueFactory) {
                 // 最终调用SingleThreadEventExecutor
                    super(parent, executor, false, newTaskQueue(queueFactory), newTaskQueue(queueFactory),
                            rejectedExecutionHandler);
                    this.provider = ObjectUtil.checkNotNull(selectorProvider, "selectorProvider");
                    this.selectStrategy = ObjectUtil.checkNotNull(strategy, "selectStrategy");
                    final SelectorTuple selectorTuple = openSelector();
                    this.selector = selectorTuple.selector;
                    this.unwrappedSelector = selectorTuple.unwrappedSelector;
                }
                 */
                children[i] = newChild(executor, args);
                success = true;
            } catch (Exception e) {
                // TODO: Think about if this is a good exception type
                throw new IllegalStateException("failed to create a child event loop", e);
            } finally {
                // 如果创建失败,就关闭现在到之前创建的
                if (!success) {
                    for (int j = 0; j < i; j ++) {
                        children[j].shutdownGracefully();
                    }
                    ...
                }
            }
        }

        // 制定选择方式,比如轮询
        chooser = chooserFactory.newChooser(children);

        final FutureListener<Object> terminationListener = ...

        // 为每一个单利线程池添加一个关闭监听器
        for (EventExecutor e: children) {
            e.terminationFuture().addListener(terminationListener);
        }

        Set<EventExecutor> childrenSet = new LinkedHashSet<EventExecutor>(children.length);
        // 将所有的单利线程池加入到HashSet中
        Collections.addAll(childrenSet, children);
        readonlyChildren = Collections.unmodifiableSet(childrenSet);
    }
2 ServerBootstrap启动过程
public B channel(Class<? extends C> channelClass) {
        return channelFactory(new ReflectiveChannelFactory<C>(
                ObjectUtil.checkNotNull(channelClass, "channelClass")
        ));
}
private final Map<ChannelOption<?>, Object> options = new LinkedHashMap<ChannelOption<?>, Object>();
/**
   * the {@link ChannelHandler} to use for serving the requests.
*/
    public B handler(ChannelHandler handler) {
        this.handler = ObjectUtil.checkNotNull(handler, "handler");
        return self();
}
/**
     * Set the {@link ChannelHandler} which is used to serve the request for the {@link Channel}'s.
 */
    public ServerBootstrap childHandler(ChannelHandler childHandler) {
        this.childHandler = ObjectUtil.checkNotNull(childHandler, "childHandler");
        return this;
}
3 bind源码剖析
第一步: AbstractBootstrap
public ChannelFuture bind(int inetPort) {
    return bind(new InetSocketAddress(inetPort));
}
第二步: AbstractBootstrap
/**
 * Create a new {@link io.netty.channel.Channel} and bind it.
 */
public ChannelFuture bind(SocketAddress localAddress) {
    validate();
    return doBind(ObjectUtil.checkNotNull(localAddress, "localAddress"));
}
第三步:AbstractBootstrap
private ChannelFuture doBind(final SocketAddress localAddress) {
    // 调用第四步 initAndRegister 初始化 ChannelFuture
    final ChannelFuture regFuture = initAndRegister();
    // 从第十一部步回
    final Channel channel = regFuture.channel();
    异常
    if (regFuture.cause() != null) {
        return regFuture;
    }
    if (regFuture.isDone()) {
        // At this point we know that the registration was complete and successful.
        ChannelPromise promise = channel.newPromise();
         调用doBind0完成对端口的绑定,最终进入第十三步
        doBind0(regFuture, channel, localAddress, promise);
        return promise;
    } else {
        ...
    });
    return promise;
    }
}

第四步:AbstractBootstrap

final ChannelFuture initAndRegister() {
    Channel channel = null;
    try {
        // 根据之前传递的类 .channel(NioServerSocketChannel.class) 调用构造函数初始化,也就是第五步的初始化方法
        channel = channelFactory.newChannel();
           调用第七步init方法
        init(channel);
    } catch (Throwable t) {
        if (channel != null) {
            // channel can be null if newChannel crashed (eg SocketException("too many open files"))
            channel.unsafe().closeForcibly();
            // as the Channel is not registered yet we need to force the usage of the GlobalEventExecutor
            return new DefaultChannelPromise(channel, GlobalEventExecutor.INSTANCE).setFailure(t);
        }
        // as the Channel is not registered yet we need to force the usage of the GlobalEventExecutor
        return new DefaultChannelPromise(new FailedChannel(), GlobalEventExecutor.INSTANCE).setFailure(t);
    }

    ChannelFuture regFuture = config().group().register(channel);
    if (regFuture.cause() != null) {
        if (channel.isRegistered()) {
            channel.close();
        } else {
            channel.unsafe().closeForcibly();
        }
    }
    // If we are here and the promise is not failed, it's one of the following cases:
    // 1) If we attempted registration from the event loop, the registration has been completed at this point.
    //    i.e. It's safe to attempt bind() or connect() now because the channel has been registered.
    // 2) If we attempted registration from the other thread, the registration request has been successfully
    //    added to the event loop's task queue for later execution.
    //    i.e. It's safe to attempt bind() or connect() now:
    //         because bind() or connect() will be executed *after* the scheduled registration task is executed
    //         because register(), bind(), and connect() are all bound to the same thread.
    return regFuture;
}

第五步:创建Nio实例 AbstractNioChannel
protected AbstractNioChannel(Channel parent, SelectableChannel ch, int readInterestOp) {
    // super实际上调用的就是 AbstractChannel的父类构造方法
    super(parent);
    this.ch = ch;
    this.readInterestOp = readInterestOp;
    ...
    // 设置非阻塞
    ch.configureBlocking(false);
    ...
}

protected AbstractChannel(Channel parent) {
    this.parent = parent;
    id = newId(); // 设置channelId,全局唯一
    // 这个调用第六步
    unsafe = newUnsafe();
    // 下述方法就是最终实例化一个ChannelPipeline
    pipeline = newChannelPipeline();
       返回第四步
}
// AbstractChannel
protected DefaultChannelPipeline newChannelPipeline() {
    // 实例化DefaultChannelPipeline
    return new DefaultChannelPipeline(this);
}

protected DefaultChannelPipeline(Channel channel) {
    this.channel = ObjectUtil.checkNotNull(channel, "channel");
    succeededFuture = new SucceededChannelFuture(channel, null);
    voidPromise =  new VoidChannelPromise(channel, true);
    // 从这里面可以看出在实例化ChannelPipeline时候就初始化了这个首尾的ChannelHandlerContext
    tail = new DefaultChannelPipeline.TailContext(this);
    head = new DefaultChannelPipeline.HeadContext(this);
    // 从这个设置就可以看出就是一个链表
    head.next = tail;
    tail.prev = head;
}

第六步:返回AbstractNioUnsafe,类AbstractNioMessageChannel
@Override
protected AbstractNioUnsafe newUnsafe() {
    return new NioMessageUnsafe();
}
private final class NioMessageUnsafe extends AbstractNioChannel.AbstractNioUnsafe {

    private final List<Object> readBuf = new ArrayList<Object>();

    @Override
    public void read() {
        ...
    }
}

第七步:ServerBootstrap初始化channel
@Override
void init(Channel channel) {
    // 设置channel的option,这个Channel就是NioServerSocketChannel
    setChannelOptions(channel, newOptionsArray(), logger);
    // 设置Channel的option,设置 NioServerSocketChannel 的 TCP 属性
    setAttributes(channel, attrs0().entrySet().toArray(EMPTY_ATTRIBUTE_ARRAY));
    ChannelPipeline p = channel.pipeline();
    // 就是在serverBoot设置的workGroup
    final EventLoopGroup currentChildGroup = childGroup;
    // 在serverBootstrap中设置的childHandler
    final ChannelHandler currentChildHandler = childHandler;
    final Entry<ChannelOption<?>, Object>[] currentChildOptions;
    // 由于 LinkedHashMap 是非线程安全的,使用同步进行处理。
    synchronized (childOptions) {
        currentChildOptions = childOptions.entrySet().toArray(EMPTY_OPTION_ARRAY);
    }
    final Entry<AttributeKey<?>, Object>[] currentChildAttrs = childAttrs.entrySet().toArray(EMPTY_ATTRIBUTE_ARRAY);

        // 对 NioServerSocketChannel 的 ChannelPipeline 添加 ChannelInitializer 处理器
        // 可以看出, init 的方法的核心作用在和 ChannelPipeline 相关
        // 这里调用了他的 addLast 方法,也就是将整个 handler 插入到 tail 的 前面,因为 tail 永远会在后面,需要做一些系统的固定工作。
        /*
                @Override
                public final ChannelPipeline addLast(EventExecutorGroup group, String name, ChannelHandler handler) {
                    final AbstractChannelHandlerContext newCtx;
                    synchronized (this) {
                          checkMultiplicity(handler);

                          newCtx = newContext(group, filterName(name, handler), handler);
                        // 调用 addLast0
                          addLast0(newCtx);
                          // If the registered is false it means that the channel was not registered on an eventLoop yet.
                          // In this case we add the context to the pipeline and add a task that will call
                          // ChannelHandler.handlerAdded(...) once the channel is registered.
                          // 如果没有注册
                          if (!registered) {
                              newCtx.setAddPending();
                              // 将Context加入pipeline的待办任务中,就是DefaultChannelPipeline类中的callHandlerCallbackLater
                              callHandlerCallbackLater(newCtx, true);
                              return this;
                          }

                          EventExecutor executor = newCtx.executor();
                          // 如果不在当前线程
                          if (!executor.inEventLoop()) {
                            // 将Context加入pipeline的待办任务中,就是DefaultChannelPipeline类中的callHandlerAddedInEventLoop
                              callHandlerAddedInEventLoop(newCtx, executor);
                              return this;
                              }
                      }
                    callHandlerAdded0(newCtx);
                    return this;
                }
                    调用addLast就是调用下述方法
                        private void addLast0(AbstractChannelHandlerContext newCtx) {
                            AbstractChannelHandlerContext prev = tail.prev;
                            newCtx.prev = prev;
                            newCtx.next = tail;
                            prev.next = newCtx;
                            tail.prev = newCtx;
                        }
        */
    p.addLast(new ChannelInitializer<Channel>() {
        @Override
        public void initChannel(final Channel ch) {
            final ChannelPipeline pipeline = ch.pipeline();
            ChannelHandler handler = config.handler();
            if (handler != null) {
                pipeline.addLast(handler);
            }
            // 调用SingleThreadEventExecutor的execute方法,第八步,添加任务,相当如注册任务到当前NioEventLoop中
            ch.eventLoop().execute(new Runnable() {
                @Override
                public void run() {
                    pipeline.addLast(new ServerBootstrapAcceptor(
                    ch, currentChildGroup, currentChildHandler, currentChildOptions, currentChildAttrs));
                }
            });
        }
    });
}


第八步:SingleThreadEventExecutor
@Override
public void execute(Runnable task) {
    ObjectUtil.checkNotNull(task, "task");
    execute(task, !(task instanceof LazyRunnable) && wakesUpForTask(task));
}
private void execute(Runnable task, boolean immediate) {
    boolean inEventLoop = inEventLoop();
    // 添加任务
    addTask(task);
    if (!inEventLoop) {
        // 调用第九步(启动过程中或执行这里,因为当前的tread是空的)
        startThread();
    ...
    }
    if (!addTaskWakesUp && immediate) {
        wakeup(inEventLoop);
    }
}

第九步:SingleThreadEventExecutor
private void doStartThread() {
    executor.execute(new Runnable(){
        @Override
        public void run(){
            ...
               这一步就会执行第十步开始进行循环
            SingleThreadEventExecutor.this.run();
            ...
        }
    }
}


第十步:NioEventLoop开始执行,最终会执行完毕
@Override
protected void run() {
    int selectCnt = 0;
    for (;;) {
        ...
        processSelectedKeys();
        // Ensure we always run tasks. 执行所有的task,进入第十一步
        ranTasks = runAllTasks();
    }
  ...
}
第十一步:SingleThreadEventExecutor,之前说过NioEventLoop继承了SingleThreadEventExecutor
protected boolean runAllTasks(long timeoutNanos) {
    ...
    for (;;) {
    // 执行第十二步,真正执行任务
    safeExecute(task);
    runTasks ++;
    // Check timeout every 64 tasks because nanoTime() is relatively expensive.
    // XXX: Hard-coded value - will make it configurable if it is really a problem.
    if ((runTasks & 0x3F) == 0) {
        lastExecutionTime = ScheduledFutureTask.nanoTime();
        if (lastExecutionTime >= deadline) {
            break;
        }
    }
    // 获取下一个任务
    task = pollTask();
    ...
    afterRunningAllTasks();
    this.lastExecutionTime = lastExecutionTime;
       返回第三步
    return true;
}

// 第十二步:AbstractEventExecutor
protected static void safeExecute(Runnable task) {
    try {
        // 这个就是当时注册进来的,开始执行,例如在init方法中我们在eventLoop中execute中添加的任务
        task.run();
    } catch (Throwable t) {
        logger.warn("A task raised an exception. Task: {}", task, t);
    }
}
 第十三步:AbstractChannel的bind
@Override
public final void bind(final SocketAddress localAddress, final ChannelPromise promise) {
    ...
    // 最终调用下面的doBind
    doBind(localAddress);
    ...
    // 通知各个listener,绑定成功
    safeSetSuccess(promise);
}
// NioServerSocketChannel 最终会调用到NioServerSocketChannel的doBind
@Override
protected void doBind(SocketAddress localAddress) throws Exception {
    if (PlatformDependent.javaVersion() >= 7) {
        javaChannel().bind(localAddress, config.getBacklog());
    } else {
        javaChannel().socket().bind(localAddress, config.getBacklog());
    }
}
4 接受请求过程分析
从之前服务器启动源码中,服务器最终注册了一个Accept事件等待客户端链家,而NioServerSocketChannel也将字节注册到了boss单例线程池上。并且在NioEventLoop中的run方法已经启动监听,因此一旦有连接进来,会直接进入processSelectedKeys
//第一步:NioEventLoop 连接进来的地方
private void processSelectedKeys(){
        ...
        processSelectedKeysOptimized();
        }
// 第二步: NioEventLoop 开始循环
private void processSelectedKeysOptimized(){
        // 可以吧selectedKeys当做一个优化的连接
        for(int i=0;i<selectedKeys.size;++i){
        ...
        // 调用执行selectedKey
        processSelectedKey(k,(AbstractNioChannel)a);
        ...
        }
        }
// 第三步: NioEventLoop 处理连接
private void processSelectedKey(SelectionKey k,AbstractNioChannel ch){
        // 判断这个连接属于什么事件
        ...
        if((readyOps&SelectionKey.OP_CONNECT)!=0){
        ...
        }
        // Process OP_WRITE first as we may be able to write some queued buffers and so free memory.
        if((readyOps&SelectionKey.OP_WRITE)!=0){
        ...
        }
        // 如果是连接或者读事件,就进入这个方法,主要看这个
        if((readyOps&(SelectionKey.OP_READ|SelectionKey.OP_ACCEPT))!=0||readyOps==0){
        // 调用NioMessageUnsafe的read方法,我们在源码启动过程中看过这个,当时只是把read方法省略了
        unsafe.read();
        }
        ...
        }

// 第四步:AbstractNioMessageChannel
private final class NioMessageUnsafe extends AbstractNioChannel.AbstractNioUnsafe {

    private final List<Object> readBuf = new ArrayList<Object>();

    @Override
    public void read() {
        // 判断是否在当前线程
        assert eventLoop().inEventLoop();
            ...
        do {
            // 读取信息,调用第五步
            int localRead = doReadMessages(readBuf);
                ...
            // 增加已读消息数量
            allocHandle.incMessagesRead(localRead);
        } while (allocHandle.continueReading());

        int size = readBuf.size();
        for (int i = 0; i < size; i++) {
            readPending = false;
            // 将消息给下一个ChannelHandler,调用第七步,从这个循环,我们就知道之前使用解码器解析List,为什么会逐个元素进行接收
            pipeline.fireChannelRead(readBuf.get(i));
        }
        // 从第九步切入
        // 清空buffer
        readBuf.clear();
        // 通知读取完成
        allocHandle.readComplete();
        // 通知下一个读取完成,执行流程就类似与fireChannelRead,就是不停的调用下一个处理器,并通知完成,最终会调用DefaultChannelPipeline的channelReadComplete,看一下第十步
        pipeline.fireChannelReadComplete();
            ...
    }
}

    // 第五步: NioServerSocketChannel 读取信息
    @Override
    protected int doReadMessages(List<Object> buf) throws Exception {
        // 之前说的这个channel就是NioServerSocketChannel,这个就是获取连接,accept方法,调用的就是第六步
        SocketChannel ch = SocketUtils.accept(javaChannel());
        // 将内容读取到缓冲区
        buf.add(new NioSocketChannel(this, ch));
        // 返回第四步
        return 1;
    }

    // 第六步:SocketUtils,接受一个连接,并返回
    public static SocketChannel accept(final ServerSocketChannel serverSocketChannel) throws IOException {
        return AccessController.doPrivileged(new PrivilegedExceptionAction<SocketChannel>() {
            @Override
            public SocketChannel run() throws IOException {
                return serverSocketChannel.accept();
            }
        }
         ...
    }


    // 第七步:DefaultChannelPipeline,主要作用就是对外接口,并获取下一个处理器
    @Override
    public final ChannelPipeline fireChannelRead(Object msg) {
        // 获取下一个处理器并调用第八步
          /*
          private AbstractChannelHandlerContext findContextInbound(int mask) {
                AbstractChannelHandlerContext ctx = this;
                EventExecutor currentExecutor = executor();
                do {
                    ctx = ctx.next;
                } while (skipContext(ctx, currentExecutor, mask, MASK_ONLY_INBOUND));
                return ctx;
            }
           */
        AbstractChannelHandlerContext.invokeChannelRead(head, msg);
        return this;
    }

    // 第八步:AbstractChannelHandlerContext,从名字就可以看出这里面AbstractChannelHandlerContext就是下一个ChannelHandlerContext
    static void invokeChannelRead(final AbstractChannelHandlerContext next, Object msg) {
        final Object m = next.pipeline.touch(ObjectUtil.checkNotNull(msg, "msg"), next);
        // 从这里可以知道,这个就是获取下一个执行器
        EventExecutor executor = next.executor();
        // 判断是否是当前线程
        if (executor.inEventLoop()) {
            // 这里面会进入下一个处理器,会进入下一个处理器的invokeChannelRead,进入第九步
            next.invokeChannelRead(m);
        } else {
            // 会限制性
            executor.execute(new Runnable() {
                @Override
                public void run() {
                    next.invokeChannelRead(m);
                }
            });
        }
    }

    // 第九步:AbstractChannelHandlerContext,这里面就是再次进行下一个处理器的ChannelRead
    private void invokeChannelRead(Object msg) {
        if (invokeHandler()) {
            try {
                // 下属方法进去处理的消息,等到所有的处理器执行完毕(接下来只看ServerBootstrap的ChannelRead,见第九-2步),就会返回第四步
                ((ChannelInboundHandler) handler()).channelRead(this, msg);
            } catch (Throwable t) {
                invokeExceptionCaught(t);
            }
        } else {
            fireChannelRead(msg);
        }
    }

    // 第九-2步:ServerBootstrap
    @Override
    public void channelRead(ChannelHandlerContext ctx, Object msg) {
        // 将msg强转,实际上这个msg的类型就是NioSocketChannel(因为在接受是传递的就是NioSocketChannel)
        final Channel child = (Channel) msg;
        // 加入在初始化ServerBootstrap的childHandler
        child.pipeline().addLast(childHandler);
        // 设置Option
        setChannelOptions(child, childOptions, logger);
        // 设置属性
        setAttributes(child, childAttrs);
        ...
        //childGroup就是当初设置的workGroup,我们将这个注册到workGroup,其实就是调用下述方法,之后进入第九-3步
        /*
        @Override
            public ChannelFuture register(Channel channel) {
                return next().register(channel);
            }
         */
        childGroup.register(child).addListener(new ChannelFutureListener() {
            @Override
            public void operationComplete(ChannelFuture future) throws Exception {
                if (!future.isSuccess()) {
                    forceClose(child, future.cause());
                }
            }
        });
        ...

    }

    // 第九-3步: SingleThreadEventLoop
    @Override
    public ChannelFuture register(Channel channel) {
        // 进入 第九-4步
        return register(new DefaultChannelPromise(channel, this));
    }

    // 第九-4步:SingleThreadEventLoop
    @Override
    public ChannelFuture register(final ChannelPromise promise) {
        ObjectUtil.checkNotNull(promise, "promise");
        // 进入 第九-5步
        promise.channel().unsafe().register(this, promise);
        return promise;
    }

    // 第九-5步 AbstractChannel
    @Override
    public final void register(EventLoop eventLoop, final ChannelPromise promise) {
        ...
        if (eventLoop.inEventLoop()) {
            register0(promise);
        } else {
            eventLoop.execute(new Runnable() {
                @Override
                public void run() {
                    register0(promise);
                }
            });
            ...
        }
    }

    // 第九-6步: AbstractChannel
    private void register0(ChannelPromise promise) {
        ...
        // 进入第九-6步
        doRegister();
        neverRegistered = false;
        registered = true;

        // Ensure we call handlerAdded(...) before we actually notify the promise. This is needed as the
        // user may already fire events through the pipeline in the ChannelFutureListener.
        pipeline.invokeHandlerAddedIfNeeded();
        // 同志成功
        safeSetSuccess(promise);
        pipeline.fireChannelRegistered();
        // Only fire a channelActive if the channel has never been registered. This prevents firing
        // multiple channel actives if the channel is deregistered and re-registered.
        if (isActive()) {
            // 首次注册们就会触发通道活跃
            if (firstRegistration) {
                // 这个最终也会调用beginRead
                pipeline.fireChannelActive();
            } else if (config().isAutoRead()) {
                // This channel was registered before and autoRead() is set. This means we need to begin read
                // again so that we process inbound data.
                //
                // See https://github.com/netty/netty/issues/4805
                // 进入第十一步
                beginRead();
            }
        }
        ...

    }

    // 第九-7步: AbstractNioChannel
    @Override
    protected void doRegister() throws Exception {
        for (; ; ) {
            // 这个就是注册监听
            selectionKey = javaChannel().register(eventLoop().unwrappedSelector(), 0, this);
        }
    }

    // 第十步:DefaultChannelPipeline 这个就是默认的ChannelPipeline,也就是我们的头部以及尾部处理器就在这个类中
    @Override
    public void channelReadComplete(ChannelHandlerContext ctx) {
        ctx.fireChannelReadComplete();
        readIfIsAutoRead();
    }

    // 第十一步:DefaultChannelPipeline
    private void readIfIsAutoRead() {
        // 这个就是在初始化NioServerChannel的设置是否自动接收,netty建议使用true,自动接收,否则还得手动处罚
        if (channel.config().isAutoRead()) {
            // 进入第十二步
            channel.read();
        }
    }

    // 第十二步: AbstractChannelHandlerContext
    @Override
    public ChannelHandlerContext read() {
        EventExecutor executor = next.executor();
        // 判断是否是当前线程
        if (executor.inEventLoop()) {
            // 进入十三步
            next.invokeRead();
        } else {
            AbstractChannelHandlerContext.Tasks tasks = next.invokeTasks;
            if (tasks == null) {
                next.invokeTasks = tasks = new AbstractChannelHandlerContext.Tasks(next);
            }
            executor.execute(tasks.invokeReadTask);
        }

        return this;
    }

    // 第十三步:AbstractChannelHandlerContext
    private void invokeRead() {
        // 通过下述逐步进行,最终进入第十四步doBeginRead
        ((ChannelOutboundHandler) handler()).read(this);
    }

    // DefaultChannelPipeline
    @Override
    public void read(ChannelHandlerContext ctx) {
        unsafe.beginRead();
    }

    // AbstractChannel
    @Override
    public final void beginRead() {
        doBeginRead();
    }

    // 第十四步: AbstractNioChannel,这里面判断这个selectionKey是否这是合法,自此就执行完毕,可以监听读事件,进入select循环等待,也就是进入第十五步
    @Override
    protected void doBeginRead() throws Exception {
        // Channel.read() or ChannelHandlerContext.read() was called
        final SelectionKey selectionKey = this.selectionKey;
        if (!selectionKey.isValid()) {
            return;
        }

        readPending = true;
        final int interestOps = selectionKey.interestOps();
        if ((interestOps & readInterestOp) == 0) {
            selectionKey.interestOps(interestOps | readInterestOp);
        }
    }

    // 第十五步:NioEventLoop,这个就是在项目启动时看过的NioEventLoop的run方法
    protected void run() {
        int selectCnt = 0;
        for (; ; ) {
            ...
            // 执行select方法进行监听端口
            strategy = select(curDeadlineNanos);
            ...
        }
    }
5 Pipeline Handler HandlerContext源码分析
首先看一下三者的关系,上面bind分期启动时,也有展示部分源码:
每当一个ServerSocket创建一个新的链接的时候,就会创建一个SocketChannel,因此一个客户端就对应一个SocketChannel
每次创建SocketChannel都会分配一个新的ChannelPipeline
每个ChnnelPipeline内部会包含多个ChannelHandlerContext,这些ChannelHandlerContext就组成了一个双向链表

5.1 ChannelPipeline接口设计
从实现的接口可以看出,这个接口继承了ChannelInbound,ChannelOutbound以及Iterable,这个接口可以调用数据入站以及出站的方法吗,因为实现了Iterable,因此可以进行遍历.
- 这个就是在ChannelPipeline源码中的描述,这就是意味着ChannelPipeline是一个handler的list,handler用于拦截以及处理入站以及出站事件
- pipeline是实现了高级的过滤器模式,用户可以控制事件如何处理以及handler在pipeline中交互
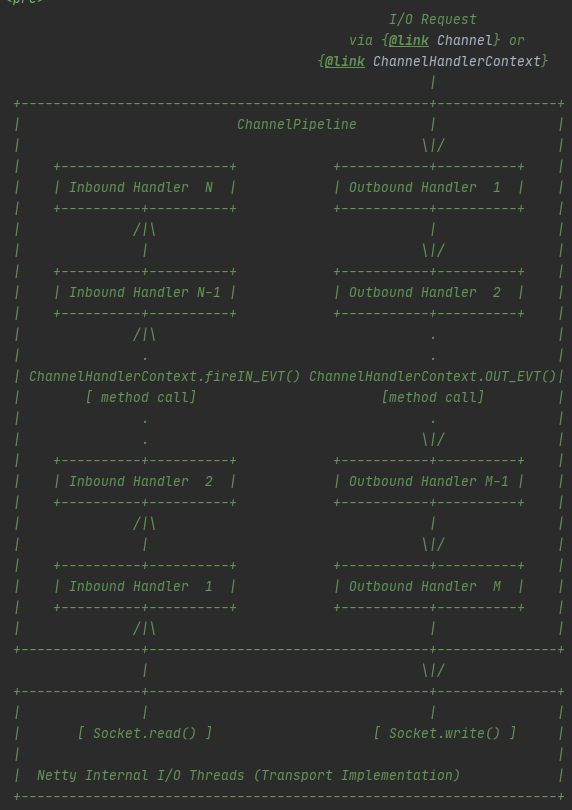
- handler在pipeline中处理I/O事件,如果是入站事件会后inboundHandler捕捉,并调用firChannelRead传递给下一个(入站事件是由入站处理程序以自下而上的方向处理。入站处理程序通常有底部I/O线程生擦好的呢数据。入站的数据一啊不能就是从SocketChannel.read()获取)
5.2 ChannelHandler
首先看一下他的方法
public interface ChannelHandler {
    // 当把ChannelHandler添加到pipeline时被调用
    void handlerAdded(ChannelHandlerContext ctx) throws Exception;
    // 当从pipeline中移除时调用
    void handlerRemoved(ChannelHandlerContext ctx) throws Exception;
    // 处理过程中pipeline发生异常时调用,但是netty生命如果想要使用这个方法,建议继承ChannelInboundHandler来实现他的exceptionCaught
    @Deprecated
    void exceptionCaught(ChannelHandlerContext ctx, Throwable cause) throws Exception;
}
ChannelHandler的作用就是拦截或处理IO,并转发给下一个处理程序。ChannelHandle分为入站以及出站,两个方向的操作都是不同的。
首先看一下入站方法:
public interface ChannelInboundHandler extends ChannelHandler {

    /**
     * 当Channel注册完成调用
     */
    void channelRegistered(ChannelHandlerContext ctx) throws Exception;

    /**
     * 当Channel取消注册时调用
     */
    void channelUnregistered(ChannelHandlerContext ctx) throws Exception;

    /**
     * 当Channel处于活动状态时被调用
     */
    void channelActive(ChannelHandlerContext ctx) throws Exception;

    /**
     * 当Channel处于非活动状态时被调用
     */
    void channelInactive(ChannelHandlerContext ctx) throws Exception;

    /**
     * 当Channel读取数据时被调用
     */
    void channelRead(ChannelHandlerContext ctx, Object msg) throws Exception;

    /**
     * 当Channel读取完毕数据十点用
     */
    void channelReadComplete(ChannelHandlerContext ctx) throws Exception;

    /**
     * 当注册事件被触发十点用
     */
    void userEventTriggered(ChannelHandlerContext ctx, Object evt) throws Exception;

    /**
     * 当这个Channel变为写通道时发生调用
     */
    void channelWritabilityChanged(ChannelHandlerContext ctx) throws Exception;

    /**
     * 当出现异常时调用
     */
    void exceptionCaught(ChannelHandlerContext ctx, Throwable cause) throws Exception;
}
从客户端发送1,2,3的列表,然后服务端使用解码器进行解码,打印所有结果
handlerAdded
channelRegistered
channelActive current thread is: nioEventLoopGroup-3-1
channelRead receive message is: 1
channelRead receive message is: 2
channelRead receive message is: 3
channelReadComplete current thread is: nioEventLoopGroup-3-1  // 从这里可以看出,只有所有的channelRead完成之后在会执行到ChannelReadCompleted
channelReadComplete current thread is: nioEventLoopGroup-3-1
exceptionCaught // 强行关闭客户端连接触发异常
userEventTriggered, evt: io.netty.channel.socket.ChannelInputShutdownReadComplete@6e7d6ecc
channelInactive
channelUnregistered
handlerRemoved
ChannelOutboundHandler
public interface ChannelOutboundHandler extends ChannelHandler {
    /**
     * 监听操作会触发
     */
    void bind(ChannelHandlerContext ctx, SocketAddress localAddress, ChannelPromise promise) throws Exception;

    /**
     * 连接操作之后被触发
     */
    void connect(ChannelHandlerContext ctx, SocketAddress remoteAddress, SocketAddress localAddress, ChannelPromise promise) throws Exception;

    /**
     * 连接一旦取消触发
     */
    void disconnect(ChannelHandlerContext ctx, ChannelPromise promise) throws Exception;

    /**
     * 连接关闭被触发
     */
    void close(ChannelHandlerContext ctx, ChannelPromise promise) throws Exception;

    /**
     * 当前注册中,一旦被取消注册触发
     */
    void deregister(ChannelHandlerContext ctx, ChannelPromise promise) throws Exception;

    /**
     * ChannelHandlerContext开始读取会被拦截
     */
    void read(ChannelHandlerContext ctx) throws Exception;

    /**
     * 写操作执行后会被触发,这个写操作会将消息写入ChannelPipeline。这些结下了会在调用flush之后进入的Channel
     */
    void write(ChannelHandlerContext ctx, Object msg, ChannelPromise promise) throws Exception;

    /**
     * 刷新操作会被触发,刷新操作会厂家讲之前写入的消息进行刷新到待发送
     */
    void flush(ChannelHandlerContext ctx) throws Exception;
}
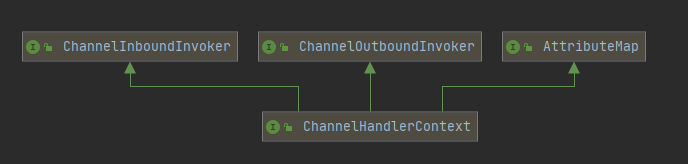
ChannelHandlerContext就是封装了Handler的一切,以方便COntext可以再pipeline中方便操作handler。
其中fire*就是通知下一个handler执行操作,看源码声明,之前在分析元吗请求过程中已经追踪过具体流程:
/**
     * A {@link Channel} received a message.
     *
     * This will result in having the {@link ChannelInboundHandler#channelRead(ChannelHandlerContext, Object)}
     * method  called of the next {@link ChannelInboundHandler} contained in the  {@link ChannelPipeline} of the
     * {@link Channel}.
     */
    ChannelInboundInvoker fireChannelRead(Object msg);
综上所述:
任何一个ChannelSocket创建的同时都会创建一个绑定的pipeline,创建pipeline是会创建tail以及head节点
当系统或内部调用pipeline的addLast方法添加handler是,都会创建包装这个handler的ChannelhandlerContext,这个ChannelContexthandler在pipeline中组成双向链表
6 ChannelPipeline调度Handler分析
根据之前启动过程分析:
pipeline首先会调用ChannelHandlerContext的fire*方法,并传入ChannelHandlerContext
然后会获取下一个ChannelHandlerContext(因为是链表,会一直调用next方法),之后再invoker*方法中会调用这个ChannelHandlerCOntext所包含的Handler的实行方法,调用结束,如果还需要继续传递,则继续调用fire*方法(因为tail以及head里面并没有调用fire,因此在头跟微会结束这个循环)
注意如果自己实现多个handler,一定需要在内部加入fire*方法,否则只会执行最先触发的处理器
private AbstractChannelHandlerContext findContextInbound(int mask) {
        AbstractChannelHandlerContext ctx = this;
        EventExecutor currentExecutor = executor();
        do {
            ctx = ctx.next;
        } while (skipContext(ctx, currentExecutor, mask, MASK_ONLY_INBOUND)); // 跳过不是Inbound的方法
        return ctx;
}

7 EventLoop源码分析
首先看一下NioEventLoop可以做的事情:
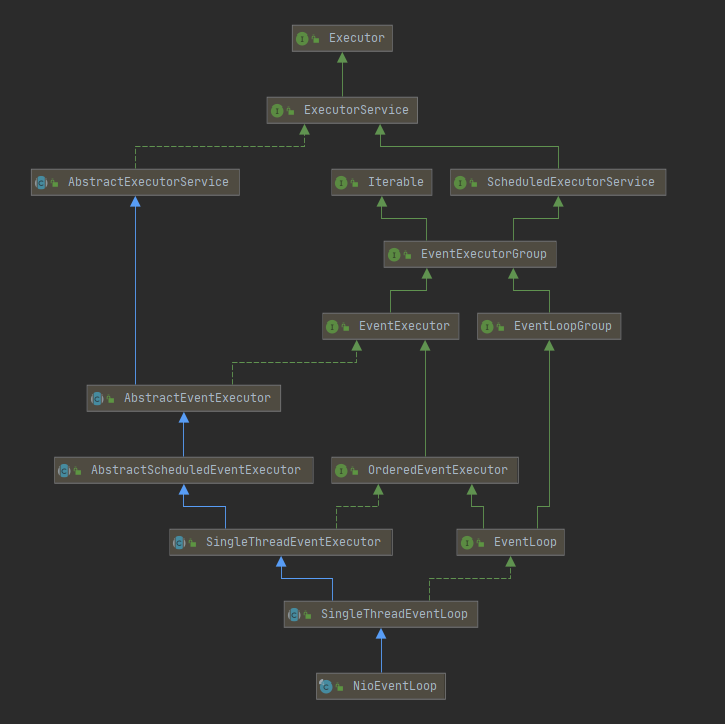
继承了ScheduledExecutorService,这是一个定时器任务接口,表明NioEventLoop可以处理定时任务
继承了SingleThreadEventExecutor这个单线程的线程池,NioEventLoop是一个和单例的显成效hi,里面死循环作者三件事情:监听端口,处理端口时间,处理队列时间。
注意:每个EventLoop可以绑定多个Channel,而每个Channel都只能有一个EventLoop来处理(这个也可以减少多线程直接数据同步问题,主要是有多个线程处理,意义也不大)
之前写过添加任务的方法,都是调用execute添加任务,例如之前第一个demo,向EventLoop中添加任务
...
ctx.channel().eventLoop().execute(() -> lateSend(ctx, "execute"));
...
在比如进行ServerSocketChannel进行绑定端口时:
channel.eventLoop().execute(new Runnable() {
            @Override
            public void run() {
                if (regFuture.isSuccess()) {
                    channel.bind(localAddress, promise).addListener(ChannelFutureListener.CLOSE_ON_FAILURE);
                } else {
                    promise.setFailure(regFuture.cause());
                }
            }
});
过一下NioEventLoop的源码
// 第一步: NioEventLoop
@Override
protected void run() {
    NioEventLoop
    int selectCnt = 0;
    for (;;) {
        try {
            int strategy;
            try {
                // 判断事件类型,其中就是selectNowSupplier下述
                /*
                private final IntSupplier selectNowSupplier = new IntSupplier() {
                    @Override
                    public int get() throws Exception {
                        return selectNow();
                    }
                };
                hasTasks就是 !taskQueue.isEmpty() ||!tailTasks.isEmpty()
                而这个方法就是执行:hasTasks ? selectSupplier.get() : SelectStrategy.SELECT;一般都是-1,也即是select
                初始化执行都是0,因为进行注册事件,也就是doRegister,会直接条古欧select直接运行所有的task
                 */
                strategy = selectStrategy.calculateStrategy(selectNowSupplier, hasTasks());
                switch (strategy) {
                    case SelectStrategy.CONTINUE:
                        continue;

                    case SelectStrategy.BUSY_WAIT:
                        // fall-through to SELECT since the busy-wait is not supported with NIO

                    case SelectStrategy.SELECT:
                        // 获取下一个超时事件
                        long curDeadlineNanos = nextScheduledTaskDeadlineNanos();
                        if (curDeadlineNanos == -1L) {
                            curDeadlineNanos = NONE; // nothing on the calendar
                        }
                        nextWakeupNanos.set(curDeadlineNanos);
                        try {
                            // 如果没有任务就开始select事件,并返回接受数量
                            if (!hasTasks()) {
                                strategy = select(curDeadlineNanos);
                            }
                        } finally {
                            // This update is just to help block unnecessary selector wakeups
                            // so use of lazySet is ok (no race condition)
                            nextWakeupNanos.lazySet(AWAKE);
                        }
                        // fall through
                    default:
                }
            } catch (IOException e) {
                // 异常处理,重新构建
                // If we receive an IOException here its because the Selector is messed up. Let's rebuild
                // the selector and retry. https://github.com/netty/netty/issues/8566
                rebuildSelector0();
                selectCnt = 0;
                handleLoopException(e);
                continue;
            }

            selectCnt++;
            cancelledKeys = 0;
            needsToSelectAgain = false;
            // 这个就是io超时的比例,默认时50,也就是50%,可以设置,需要介于0<ioRatio<=100
            final int ioRatio = this.ioRatio;
            boolean ranTasks;
            // 如果等于100执行这个,与默认的区别就是runAllTasks没有超时时间
            if (ioRatio == 100) {
                try {
                    if (strategy > 0) {
                        // 对selectKey也就是已有连接进行处理(调用过程以及分析过这个源码)
                        processSelectedKeys();
                    }
                } finally {
                    // 没有超时的执行所有任务
                    // Ensure we always run tasks.
                    ranTasks = runAllTasks();
                }
            } else if (strategy > 0) {
                final long ioStartTime = System.nanoTime();
                try {
                    processSelectedKeys();
                } finally {
                    // Ensure we always run tasks.
                    final long ioTime = System.nanoTime() - ioStartTime;
                    // 按照IoRatio的比例执行runAllTasks,默认IO任务的时间与非I/O任务(processSelectedKeys)时间是相同的
                    // 如果非IO任务很多,那么就将ioRatio调小一点,这一样非IO任务就能执行的时间长一点
                    ranTasks = runAllTasks(ioTime * (100 - ioRatio) / ioRatio);
                }
            } else {
                // 最小化的执行任务
                ranTasks = runAllTasks(0); // This will run the minimum number of tasks
            }

            if (ranTasks || strategy > 0) {
                if (selectCnt > MIN_PREMATURE_SELECTOR_RETURNS && logger.isDebugEnabled()) {
                    logger.debug("Selector.select() returned prematurely {} times in a row for Selector {}.",
                            selectCnt - 1, selector);
                }
                selectCnt = 0;
            } else if (unexpectedSelectorWakeup(selectCnt)) { // Unexpected wakeup (unusual case)
                selectCnt = 0;
            }
        } catch (CancelledKeyException e) {
            // Harmless exception - log anyway
            if (logger.isDebugEnabled()) {
                logger.debug(CancelledKeyException.class.getSimpleName() + " raised by a Selector {} - JDK bug?",
                        selector, e);
            }
        } catch (Throwable t) {
            handleLoopException(t);
        }
        // Always handle shutdown even if the loop processing threw an exception.
        try {
            if (isShuttingDown()) {
                closeAll();
                if (confirmShutdown()) {
                    return;
                }
            }
        } catch (Throwable t) {
            handleLoopException(t);
        }
    }
}

// 第二步: NioEventLoop
private int select(long deadlineNanos) throws IOException {
    if (deadlineNanos == NONE) {
        return selector.select();
    }
    // Timeout will only be 0 if deadline is within 5 microsecs
    long timeoutMillis = deadlineToDelayNanos(deadlineNanos + 995000L) / 1000000L;
    return timeoutMillis <= 0 ? selector.selectNow() : selector.select(timeoutMillis);
}

// 第三步:SingleThreadEventExecutor 执行所有任务,设置超时时间
protected boolean runAllTasks(long timeoutNanos) {
    // 进入第四步,获取所有待执行任务
    fetchFromScheduledTaskQueue();
    Runnable task = pollTask();
    // 判断是否优待执行任务
    if (task == null) {
        afterRunningAllTasks();
        return false;
    }
    // 设置超时时间,也就是超过这个时间,就会终止执行任务
    final long deadline = timeoutNanos > 0 ? ScheduledFutureTask.nanoTime() + timeoutNanos : 0;
    long runTasks = 0;
    long lastExecutionTime;
    for (;;) {
        // 执行任务,进入第六步
        safeExecute(task);
        runTasks ++;

        // 如果中兴了64个任务,就查看是否已经超时
        // Check timeout every 64 tasks because nanoTime() is relatively expensive.
        // XXX: Hard-coded value - will make it configurable if it is really a problem.
        if ((runTasks & 0x3F) == 0) {
            lastExecutionTime = ScheduledFutureTask.nanoTime();
            if (lastExecutionTime >= deadline) {
                break;
            }
        }

        task = pollTask();
        // 判断是否还有下一个任务
        if (task == null) {
            lastExecutionTime = ScheduledFutureTask.nanoTime();
            break;
        }
    }

    afterRunningAllTasks();
    // 设置最后执行任务的时间
    this.lastExecutionTime = lastExecutionTime;
    return true;
}

// 第三步:SingleThreadEventExecutor 执行所有任务,无超时时间
protected boolean runAllTasks() {
    assert inEventLoop();
    boolean fetchedAll;
    boolean ranAtLeastOne = false;

    do {
        // 判断是否还继续向taskQueue添加任务,也就是task是否全部添加到taskQueue,第四步
        fetchedAll = fetchFromScheduledTaskQueue();
        // 执行任务,内部时循环执行的。进入第五步
        if (runAllTasksFrom(taskQueue)) {
            ranAtLeastOne = true;
        }
    } while (!fetchedAll); // 获取所有的scheduled的task

    if (ranAtLeastOne) {
        // 设置最后一次执行完任务的时间
        lastExecutionTime = ScheduledFutureTask.nanoTime();
    }
    // 任务执行完毕
    afterRunningAllTasks();
    // 返回第一步
    return ranAtLeastOne;
}

// 第四步: SingleThreadEventExecutor,将scheduledTaskQueue的任务添加到taskQueue
private boolean fetchFromScheduledTaskQueue() {
    if (scheduledTaskQueue == null || scheduledTaskQueue.isEmpty()) {
        return true;
    }
    long nanoTime = AbstractScheduledEventExecutor.nanoTime();
    for (;;) {
        Runnable scheduledTask = pollScheduledTask(nanoTime);
        if (scheduledTask == null) {
            return true;
        }
        if (!taskQueue.offer(scheduledTask)) {
            // 也就是taskQueue没有空间了,先存起来,以后执行
            // No space left in the task queue add it back to the scheduledTaskQueue so we pick it up again.
            scheduledTaskQueue.add((ScheduledFutureTask<?>) scheduledTask);
            return false;
        }
    }
    // 最终返回第三步
}

// 第五步: SingleThreadEventExecutor 执行所有任务,在指定的队列中
protected final boolean runAllTasksFrom(Queue<Runnable> taskQueue) {
    Runnable task = pollTaskFrom(taskQueue);
    if (task == null) {
        return false;
    }
    for (;;) {
        // 执行任务,进入第六步
        safeExecute(task);
        task = pollTaskFrom(taskQueue);
        if (task == null) {
            return true;
        }
    }
    // 任务执行完毕,进入没有超时时间的第三步
}

// 第六步: AbstractEventExecutor 执行任务
protected static void safeExecute(Runnable task) {
    try {
        task.run();
    } catch (Throwable t) {
        logger.warn("A task raised an exception. Task: {}", task, t);
    }
}

 浙公网安备 33010602011771号