FastDFS的安装与配置
1. FastDFS系统
高性能的轻量级分布式文件系统
https://www.cnblogs.com/mafly/p/fastdfs.html
纯C实现,支持Linux,FreeBSD等UNIX系统
只能通过专有API访问,目前提供C,java,PHP API
支持文件大小4K~~~~500MB

2. FastDFS三个角色
Tracker Server: 跟踪服务器,主要做调度工作,起到均衡的作用;负责管理所有的storage server和group,每个storage server在启动后会连接Tracker server,告知自己所属group等信息,并保持周期性心跳。多个Tracker server都是对等关系,也可以做成VIP。
Storage Server: 存储服务器,主要提供容量和备份服务;以group为单位,每个group内可以有多台storage server,数据互为备份。
存储容量以group内容量最小的storage为准;建议group内的storage server配置相同
以group为单位组织存储能够方便的进行应用隔离,负载均衡,副本数定制
缺点:group容量受单机存储容量的限制,同时group内机器坏掉,数据恢复只能依赖group内其他机器重新同步(坏盘替换,重新挂载硬盘重启fdfs_storaged即可)
多个group之间的存储方式有3种策略:round robin(轮询),load balance(选择最大剩余空间的组上传文件),specify group(指定group上传)
Client客户端 上传下载数据的服务器,也就是我们项目所在的服务器。
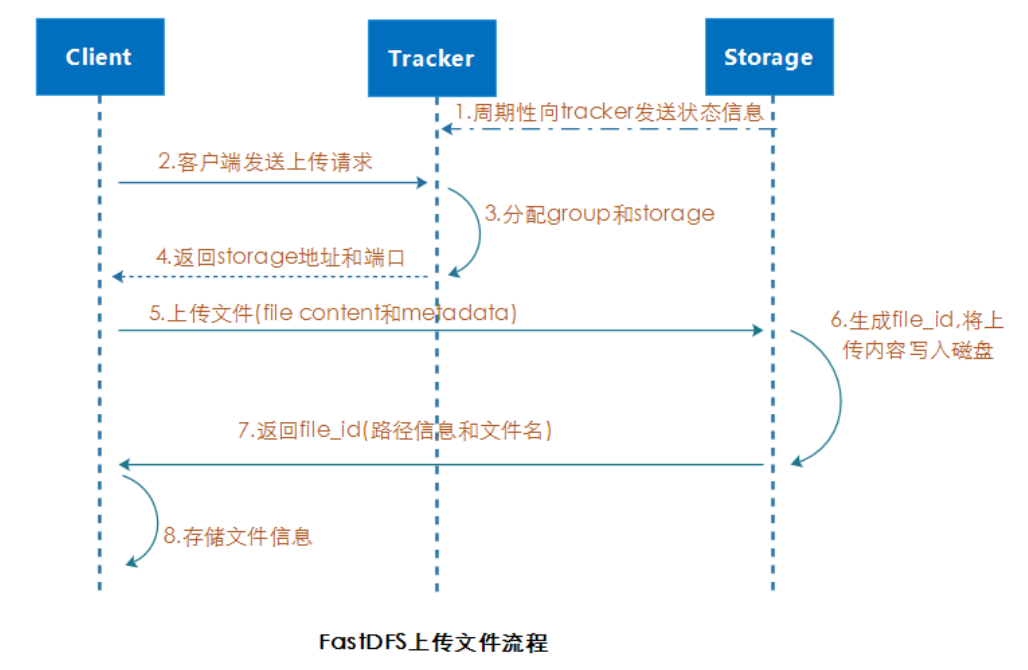
3. Fastdfs上传文件流程
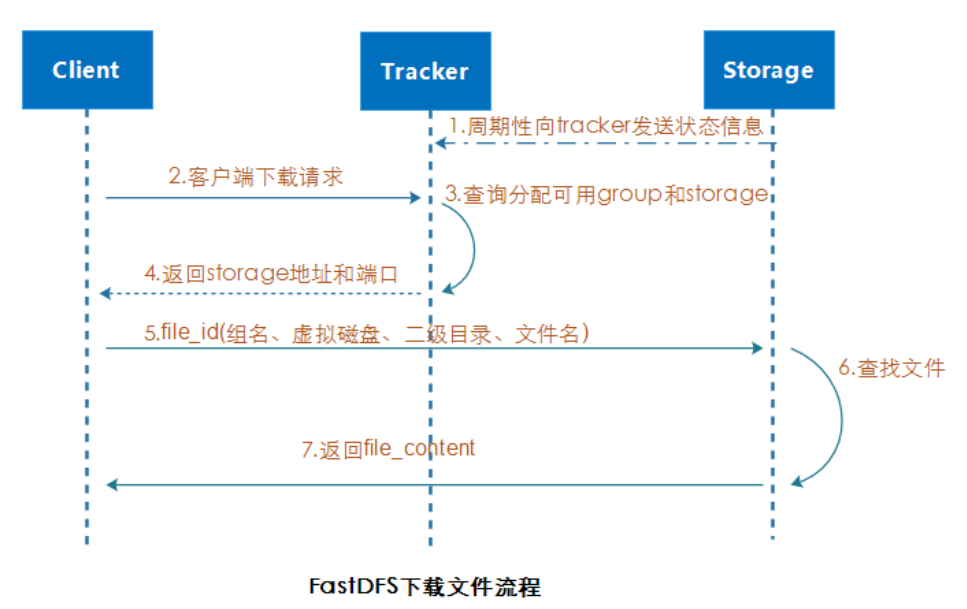
4. Fastdfs下载文件流程
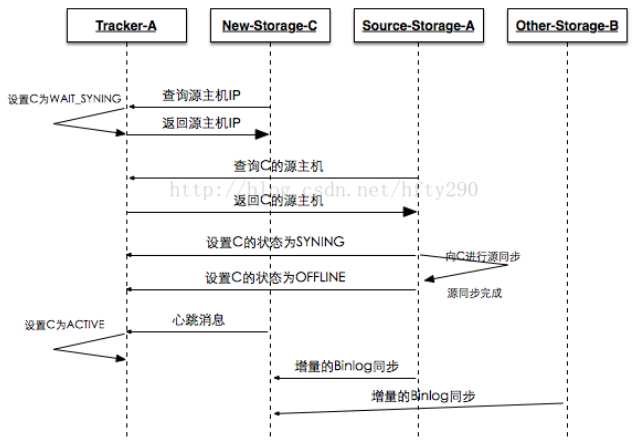
5. FastDFS同步机制
1. 新增tracker服务器数据同步问题
由于storage server上配置了所有的tracker server,storage server和tracker server之间的通信是由storage server主动发起的,storage server为每个tracker server启动一个线程进行通信;在通信过程中,若发现该tracker server返回的本组storage server列表比本机记录少,就会将该tracker server上没有的storage server同步给该tracker,这样的机制使得tracker之间是对等关系,数据保持一致。
2. 新增storage服务器数据同步问题
若新增storage server或者其状态发生变化,tracker server都会将storage server列表同步给该组内所有storage server;以新增 storage server 为例,因为新加入的
storage server 会主动连接 tracker server, tracker server 发现有新的 storage server
加入,就会将该组内所有的 storage server 返回给新加入的 storage server,并重新将
该组的 storage server 列表返回给该组内的其他 storage server;
3. 组内storage数据同步问题
组内 storage server之间是对等的,文件上传、删除等操作可以在组内任意一台 storage
server 上进行。 文件同步只能在同组内的 storage server 之间进行,采用 push 方式,
即源服务器同步到目标服务器
A. 只在同组内的 storage server 之间进行同步
B. 源数据才需要同步,备份数据不再同步
C. 特例:新增 storage server 时, 由其中一台将已有所有数据(包括源数据和备份数
据)同步到新增服务器
4. storage server的7种状态
通过命令fdfs_monitor /etc/fdfs/client.conf可以查看ip_addr选项中的storage server的状态
INIT : 初始化,尚未得到同步已有数据的源服务器
WAIT_SYNC : 等待同步,已得到同步已有数据的源服务器
SYNCING : 同步中
DELETED : 已删除,该服务器从本组中摘除
OFFLINE : 离线
ONLINE : 在线,尚不能提供服务
ACTIVE : 在线,可以提供服务
6. 安装libfastcommon和FastDFS
1. 下载安装libfastcommon.
wget https://github.com/happyfish100/libfastcommon/archive/V1.0.39.tar.gz
2. 解压压缩包
tar -zxvf V1.0.39.tar.gz
cd libfastcommon-1.0.39
./make.sh
yum -y install zlib zlib-devel pcre pcre-devel gcc gcc-c++ openssl openssl-devel libevent libevent-devel perl unzip net-tools wget
./make.sh install
3. 下载FastDFS.
wget https://github.com/happyfish100/fastdfs/archive/V5.11.tar.gz
4. tar -zxvf V5.11.tar.gz
cd fastdfs-5.11
./make.sh
出现错误:
在函数‘main’中:
/home/fastdfs/fastdfs-master/storage/fdfs_storaged.c:130:对‘g_exe_name’未定义的引用
storage_dump.o:在函数‘fdfs_dump_global_vars’中:
/home/fastdfs/fastdfs-master/storage/storage_dump.c:36:对‘g_exe_name’未定义的引用
collect2: 错误:ld 返回 1
解决方法:yum -y install zlib zlib-devel pcre pcre-devel gcc gcc-c++ openssl openssl-devel libevent libevent-devel perl unzip net-tools wget
若未安装以上运行环境,就运行./make.sh。需要清除编译,安装好以上运行环境,重新运行即可。
清楚编译代码: ./make.sh clean
./make.sh install
5. bin文件目录:/usr/bin 执行文件都放在这个目录下
6. 配置文件:/etc/fdfs 配置文件都放在这个目录下
7. 启动文件:/etc/init.d/fdfs_storaged
/etc/init.d/fdfs_trackerd
8. 创建目录/home/yuqing/fastdfs
7. 配置FastDFS文件系统
1. 修改追踪服务器的配置文件。
cp /etc/fdfs/tracker.conf.sample /etc/fdfs/tracker.conf
[root@rsync-server fdfs]# grep -Ev "^#|^$" tracker.conf
disabled=false
bind_addr=  绑定ip地址
port=22122  追踪服务器端口
connect_timeout=30  连接超时,单位秒
network_timeout=60  网络超时,单位秒
base_path=/home/yuqing/fastdfs  存储数据和日志文件
max_connections=256  最大连接数
accept_threads=1
work_threads=4  工作线程
min_buff_size = 8KB
max_buff_size = 128KB
store_lookup=2  0轮询,1指定,2负载均衡
store_group=group2  如果上一个设置为1,就必须指定组名
store_server=0  0轮询,1按照ip地址,2优先级
store_path=0   0轮询,2负载均衡
download_server=0  0轮询,1哪个是源就是哪个
reserved_storage_space = 10%  保留空间百分比
log_level=info  日志级别
run_by_group=
run_by_user=
allow_hosts=*
sync_log_buff_interval = 10  刷新磁盘间隔10秒
check_active_interval = 120  检查存储服务器存活的时间120秒
thread_stack_size = 64KB
storage_ip_changed_auto_adjust = true  如果storage的ip发生变化,会不会自动调整
storage_sync_file_max_delay = 86400
storage_sync_file_max_time = 300
use_trunk_file = false
slot_min_size = 256
slot_max_size = 16MB
trunk_file_size = 64MB
trunk_create_file_advance = false
trunk_create_file_time_base = 02:00
trunk_create_file_interval = 86400
trunk_create_file_space_threshold = 20G
trunk_init_check_occupying = false
trunk_init_reload_from_binlog = false
trunk_compress_binlog_min_interval = 0
use_storage_id = false
storage_ids_filename = storage_ids.conf
id_type_in_filename = ip
store_slave_file_use_link = false
rotate_error_log = false
error_log_rotate_time=00:00
rotate_error_log_size = 0
log_file_keep_days = 0
use_connection_pool = false
connection_pool_max_idle_time = 3600
http.server_port=8080
http.check_alive_interval=30
http.check_alive_type=tcp
http.check_alive_uri=/status.html
启动服务:/etc/init.d/fdfs_trackerd start
chkconfig fdfs_trackerd on
2. 修改存储服务器配置文件。
cp /etc/fdfs/storage.conf.sample /etc/fdfs/storage.conf
[root@rsync-server fdfs]# grep -Ev "^#|^$" storage.conf
disabled=false
group_name=group1  定义组名
bind_addr=
client_bind=true
port=23000  定义端口
connect_timeout=30
network_timeout=60
heart_beat_interval=30  每30秒向追踪服务器发送心跳
stat_report_interval=60
base_path=/home/yuqing/fastdfs
max_connections=256
buff_size = 256KB
accept_threads=1
work_threads=4
disk_rw_separated = true
disk_reader_threads = 1
disk_writer_threads = 1
sync_wait_msec=50
sync_interval=0
sync_start_time=00:00
sync_end_time=23:59
write_mark_file_freq=500
store_path_count=1
store_path0=/home/yuqing/fastdfs  定义数据存储的位置
subdir_count_per_path=256
tracker_server=192.168.1.120:22122  定义tracker
tracker_server=192.168.1.80:22122
log_level=info
run_by_group=
run_by_user=
allow_hosts=*
file_distribute_path_mode=0
file_distribute_rotate_count=100
fsync_after_written_bytes=0
sync_log_buff_interval=10
sync_binlog_buff_interval=10
sync_stat_file_interval=300
thread_stack_size=512KB
upload_priority=10
if_alias_prefix=
check_file_duplicate=0
file_signature_method=hash
key_namespace=FastDFS
keep_alive=0
use_access_log = false
rotate_access_log = false
access_log_rotate_time=00:00
rotate_error_log = false
error_log_rotate_time=00:00
rotate_access_log_size = 0
rotate_error_log_size = 0
log_file_keep_days = 0
file_sync_skip_invalid_record=false
use_connection_pool = false
connection_pool_max_idle_time = 3600
http.domain_name=
http.server_port=8888
存储路径一定要写对,否则会有报错。
启动/etc/init.d/fdfs_storaged start
chkconfig fdfs_storaged on
3. 配置客户端配置文件。
[root@rsync-server fdfs]# grep -Ev "^#|^$" client.conf
connect_timeout=30
network_timeout=60
base_path=/tmp
tracker_server=192.168.0.201:22122
log_level=info
use_connection_pool = false
connection_pool_max_idle_time = 3600
load_fdfs_parameters_from_tracker=false
use_storage_id = false
storage_ids_filename = storage_ids.conf
http.tracker_server_port=80
4. 客户端命令:
fdfs_upload_file /etc/fdfs/client.conf /etc/passwd 上传文件
fdfs_upload_file /etc/fdfs/client.conf /home/zhangshaohua1510/nlogo.jpg 192.168.1.101:23002 指定哪个存储服务器
group1/M00/00/00/wKgAyVuOrqWAMiQ3AAAImOAke3I4305069
fdfs_download_file /etc/fdfs/client.conf group1/M00/00/00/wKgAyVuOrqWAMiQ3AAAImOAke3I4305069 下载文件
fdfs_append_file /etc/fdfs/client.conf 追加文件
fdfs_monitor /etc/fdfs/client.conf 监控整个fastdfs架构
fdfs_monitor /etc/fdfs/client.conf delete group1 ip地址 前提这个服务器要停止,不然会有报错,busy.
fdfs_file_info /etc/fdfs/client.conf G1/M00/00/00/wKgBhVTJ5eOAFjBAAAAfO4TIxXY080.log
fdfs_delete_file /etc/fdfs/client.conf G1/M00/00/00/wKgBhVTJ5eOAFjBAAAAfO4TIxXY080.log
fdfs_monitor /etc/fdfs/client.conf G2 192.168.1.136 剔除组
fdfs_crc32 G1/M00/00/00/wKgBhVTJ8j2EXNDGAAAAAD2A2uQ093.log 查看文件校验码
5. php客户端
6. java客户端
8. Storage server安装nginx
1. 下载fastdfs-nginx-module
git clone https://github.com/happyfish100/fastdfs-nginx-module.git
2. 下载安装nginx
编译安装
--prefix=/usr/local/nginx --user=www --group=www --with-poll_module --with-pcre --with-http_realip_module --with-http_dav_module --with-http_gzip_static_module --with-http_degradation_module --with-http_addition_module=shared --with-http_xslt_module=shared --with-http_image_filter_module=shared --with-http_geoip_module=shared --with-http_sub_module=shared --with-http_flv_module=shared --with-http_slice_module=shared --with-http_mp4_module=shared --with-http_concat_module=shared --with-http_random_index_module=shared --with-http_sysguard_module=shared --with-http_charset_filter_module=shared --with-http_userid_filter_module=shared --with-http_footer_filter_module=shared --with-http_access_module=shared --with-http_autoindex_module=shared --with-http_map_module=shared --with-http_split_clients_module=shared --with-http_referer_module=shared --with-http_rewrite_module=shared --with-http_fastcgi_module=shared --with-http_uwsgi_module=shared --with-http_scgi_module=shared --with-http_memcached_module=shared --with-http_limit_conn_module=shared --with-http_limit_req_module=shared --with-http_empty_gif_module=shared --with-http_browser_module=shared --with-http_user_agent_module=shared --with-http_upstream_ip_hash_module=shared --with-http_upstream_least_conn_module=shared --with-http_lua_module=shared --add-module=../fastdfs-nginx-module/src/
最后一定指定正确fastdfs-nginx-module的目录
make
如果已经安装过nginx,不需要执行make install;否则再执行make install
3. 配置nginx
把之前的可执行文件nginx rm 了
cp /usr/local/src/tengine-2.1.1/objs/nginx /usr/local/nginx/sbin
cp /root/fastdfs-nginx-module/src/mod_fastdfs.conf /etc/fdfs/
cp /root/fastdfs/conf/{anti-steal.jpg,http.conf,mime.types} /etc/fdfs/
4. 配置/etc/fdfs/mod_fastdfs.conf
connect_timeout=2
network_timeout=30
base_path=/tmp
load_fdfs_parameters_from_tracker=true
storage_sync_file_max_delay = 86400
use_storage_id = false
storage_ids_filename = storage_ids.conf
tracker_server=192.168.1.120:22122
tracker_server=192.168.1.80:22122
storage_server_port=23000
group_name=f01/f02/f03/f04
url_have_group_name = true
store_path_count=1
store_path0=/fastdfs_data
log_level=info
log_filename=
response_mode=proxy
if_alias_prefix=
flv_support = true
flv_extension = flv
group_count = 4
[group1]
group_name=f01
storage_server_port=23000
store_path_count=1
store_path0=/fastdfs_data
[group2]
group_name=f02
storage_server_port=23001
store_path_count=1
store_path0=/fastdfs_data/mly
[group3]
group_name=f03
storage_server_port=23002
store_path_count=1
store_path0=/fastdfs_data/zhenpin
[group4]
group_name=f04
storage_server_port=23003
store_path_count=1
store_path0=/fastdfs_data/zhenyiku
5. storage server上的nginx配置
server
{
        listen 8888;  与storage server的配置文件http端口保持一致
        listen 443 ssl;
        ssl_certificate      /usr/local/nginx/ca/server.cer;
        ssl_certificate_key  /usr/local/nginx/ca/server.key;

        ssl_session_cache    shared:SSL:1m;
        ssl_session_timeout  5m;

        ssl_ciphers  HIGH:!aNULL:!MD5;
        ssl_prefer_server_ciphers  on;

        server_name 192.168.1.100;
        access_log /usr/local/nginx/logs/fastsfs_data.log  open1;


        location ~/f01/M00/(.*)/(.*)/(\d+)_(.*)\.(jpg|png|ttf|PNG|JPG|TTF|jpeg|gif) {
                        alias /fastdfs_data/data/;
                        ngx_fastdfs_module;
                        set $w $3;
                        set $h $3;
                  rewrite /f01/M00/(.*)/(.*)/(\d+)_(.*)\.(jpg|png|ttf|JPG|PNG|TTF|jpeg|gif) /f01/M00/$1/$2/$4.$5 break;
                  image_filter resize $w $h;
                  image_filter_buffer 2M;
                }
}
启动nginx。
9. tracker server配置nginx
1. http模块内容ll
http
        {
                limit_conn_zone $binary_remote_addr zone=conn_limit_per_ip:300k;
                limit_req_zone $binary_remote_addr zone=req_limit_per_ip:300k rate=2r/s;
                geo $white_ip {
                default 0;
                61.148.57.198 1;
                61.148.56.158 1;
                }
                limit_req_whitelist geo_var_name=white_ip geo_var_value=1;
                limit_req_zone $binary_remote_addr zone=white_ip:1m rate=2r/s;

                include       mime.types;
                default_type  application/octet-stream;
                server_names_hash_bucket_size 128;
                client_header_buffer_size 32k;
                large_client_header_buffers 4 32k;
                client_max_body_size 50m;
                sendfile on;
                server_tokens off;
                tcp_nopush     on;
                keepalive_timeout 60;
                tcp_nodelay on;
                fastcgi_connect_timeout 300;
                fastcgi_send_timeout 300;
                fastcgi_read_timeout 300;
                fastcgi_buffer_size 256k;
                fastcgi_buffers 4 256k;
                fastcgi_busy_buffers_size 256k;
                fastcgi_temp_file_write_size 256k;
                gzip on;
                gzip_min_length  1k;
                gzip_buffers     4 16k;
                gzip_http_version 1.0;
                gzip_comp_level 3;
                gzip_types       text/plain application/x-javascript text/css application/xml;
                gzip_vary on;
         log_format  access  '$remote_addr - $remote_user [$time_local] "$request" '
             '$status $body_bytes_sent "$http_referer" '
             '"$http_user_agent" $http_x_forwarded_for';
                 lua_need_request_body on;

                lua_package_path "/usr/local/nginx/conf/?.lua";

                lua_shared_dict limit 500m;

                lua_shared_dict blockiplimit 10m;

                init_by_lua_file  /usr/local/nginx/conf/init.lua;
                #设置缓存存储路径、存储方式、分配内存大小、磁盘最大空间、缓存期限
                proxy_cache_path /fastdfs/cache/nginx/proxy_cache levels=1:2
                keys_zone=http-cache:200m max_size=1g inactive=30d;
                proxy_temp_path /fastdfs/cache/nginx/proxy_cache/tmp;


include vhost/*;
}
2. server模块内容
server
{
        listen 80;
        listen 443 ssl;
        ssl_certificate      /usr/local/nginx/ca/server.cer;
        ssl_certificate_key  /usr/local/nginx/ca/server.key;

        ssl_session_cache    shared:SSL:1m;
        ssl_session_timeout  5m;

        ssl_ciphers  HIGH:!aNULL:!MD5;
        ssl_prefer_server_ciphers  on;

        server_name pic.123.com;
        access_log /usr/local/nginx/logs/pic.log  open1;

        #设置清除缓存的访问权限
        location ~/purge(/.*) {
              allow 192.168.1.0;
            deny all;
              proxy_cache_purge http-cache $1$is_args$args;
        }
        large_client_header_buffers 4 64k;
        location /f01 {
                        access_by_lua_file /usr/local/nginx/conf/waf.lua;

                        proxy_cache http-cache;
                        proxy_cache_valid  200 304 12h;
                        proxy_cache_key $uri$is_args$args;
                        proxy_pass http://fdfs_group1;
                        expires 30d;

                       proxy_set_header   Host             $host:$server_port;
                       proxy_set_header   X-Real-IP        $remote_addr;
                       proxy_set_header   X-Forwarded-For  $proxy_add_x_forwarded_for;
                        proxy_set_header REMOTE-HOST $remote_addr;
                        proxy_redirect off;
                        client_max_body_size 50m;
                        client_body_buffer_size 256k;
                        proxy_connect_timeout 120;
                        proxy_send_timeout 120;
                         proxy_read_timeout 60;
                        proxy_buffer_size 256k;
                        proxy_buffers 4 256k;
                        proxy_max_temp_file_size 128m;
                        proxy_next_upstream error timeout invalid_header http_500 http_503 http_404;
                }
        location /f02 {
                        access_by_lua_file /usr/local/nginx/conf/waf.lua;

                        proxy_cache http-cache;
                        proxy_cache_valid  200 304 12h;
                        proxy_cache_key $uri$is_args$args;
                        proxy_pass http://fdfs_group2;
                        expires 30d;

                       proxy_set_header   Host             $host:$server_port;
                       proxy_set_header   X-Real-IP        $remote_addr;
                       proxy_set_header   X-Forwarded-For  $proxy_add_x_forwarded_for;
                        proxy_set_header REMOTE-HOST $remote_addr;
                        proxy_redirect off;
                        client_max_body_size 50m;
                        client_body_buffer_size 256k;
                        proxy_connect_timeout 120;
                        proxy_send_timeout 120;
                         proxy_read_timeout 60;
                        proxy_buffer_size 256k;
                        proxy_buffers 4 256k;
                        proxy_max_temp_file_size 128m;
                        proxy_next_upstream error timeout invalid_header http_500 http_503 http_404;
                }
        location /f03 {
                        access_by_lua_file /usr/local/nginx/conf/waf.lua;

                        proxy_cache http-cache;
                        proxy_cache_valid  200 304 12h;
                        proxy_cache_key $uri$is_args$args;
                        proxy_pass http://fdfs_group3;
                        expires 30d;

                       proxy_set_header   Host             $host:$server_port;
                       proxy_set_header   X-Real-IP        $remote_addr;
                       proxy_set_header   X-Forwarded-For  $proxy_add_x_forwarded_for;
                        proxy_set_header REMOTE-HOST $remote_addr;
                        proxy_redirect off;
                        client_max_body_size 50m;
                        client_body_buffer_size 256k;
                        proxy_connect_timeout 120;
                        proxy_send_timeout 120;
                         proxy_read_timeout 60;
                        proxy_buffer_size 256k;
                        proxy_buffers 4 256k;
                        proxy_max_temp_file_size 128m;
                        proxy_next_upstream error timeout invalid_header http_500 http_503 http_404;
                }
         location /f04 {
                        access_by_lua_file /usr/local/nginx/conf/waf.lua;

                        proxy_cache http-cache;
                        proxy_cache_valid  200 304 12h;
                        proxy_cache_key $uri$is_args$args;
                        proxy_pass http://fdfs_group4;
                        expires 30d;

                        proxy_set_header   Host             $host:$server_port;
                        proxy_set_header   X-Real-IP        $remote_addr;
                        proxy_set_header   X-Forwarded-For  $proxy_add_x_forwarded_for;
                        proxy_set_header REMOTE-HOST $remote_addr;
                        proxy_redirect off;
                        client_max_body_size 50m;
                        client_body_buffer_size 256k;
                        proxy_connect_timeout 120;
                        proxy_send_timeout 120;
                         proxy_read_timeout 60;
                        proxy_buffer_size 256k;
                        proxy_buffers 4 256k;
                        proxy_max_temp_file_size 128m;
                        proxy_next_upstream error timeout invalid_header http_500 http_503 http_404;
                }
         location /marketpic {
                root  /data/ftp/;
                expires 720h;
                }
               error_page   500 502 503 504  /50x.html;
       location = /50x.html {
                root   html;
                }
}
10. FastDFS目录结构
1. tracker server目录及文件结构
${base_path}
|__data
| |__storage_groups.dat:存储分组信息
| |__storage_servers.dat:存储服务器列表
|__logs
|__trackerd.log: tracker server 日志文件
数据文件 storage_groups.dat和 storage_servers.dat 中的记录之间以换行符(\n)
分隔,字段之间以西文逗号(,)分隔。
storage_groups.dat 中的字段依次为:
(1) group_name:组名
(2) storage_port: storage server 端口号
storage_servers.dat 中记录 storage server 相关信息,字段依次为:
(1) group_name:所属组名
(2) ip_addr: ip 地址
(3) status:状态
(4) sync_src_ip_addr:向该 storage server 同步已有数据文件的源服务器
(5) sync_until_timestamp:同步已有数据文件的截至时间(UNIX 时间戳)
(6) stat.total_upload_count:上传文件次数
(7) stat.success_upload_count:成功上传文件次数
(8) stat.total_set_meta_count:更改 meta data 次数
(9) stat.success_set_meta_count:成功更改 meta data 次数
(10) stat.total_delete_count:删除文件次数
(11) stat.success_delete_count:成功删除文件次数
(12) stat.total_download_count:下载文件次数
(13) stat.success_download_count:成功下载文件次数
(14) stat.total_get_meta_count:获取 meta data 次数
(15) stat.success_get_meta_count:成功获取 meta data 次数
(16) stat.last_source_update:最近一次源头更新时间(更新操作来自客户端)
(17) stat.last_sync_update:最近一次同步更新时间(更新操作来自其他 storage
server 的同步)
2. storage server目录及文件结构
${base_path}
|__data
| |__.data_init_flag:当前 storage server 初始化信息
| |__storage_stat.dat:当前 storage server 统计信息
| |__sync:存放数据同步相关文件
| | |__binlog.index:当前的 binlog(更新操作日志)文件索引号
| | |__binlog.###:存放更新操作记录(日志)
| | |__${ip_addr}_${port}.mark:存放向目标服务器同步的完成情况
| |
| |__一级目录: 256 个存放数据文件的目录,目录名为十六进制字符,如: 00,
1F
| |__二级目录: 256 个存放数据文件的目录,目录名为十六进制字符,
如: 0A, CF
|__logs
|__storaged.log: storage server 日志文件
.data_init_flag 文件格式为 ini 配置文件方式,各个参数如下:
(1) storage_join_time:本 storage server 创建时间;
(2) sync_old_done:本 storage server 是否已完成同步的标志(源服务器向本服务
器同步已有数据);
(3) sync_src_server:向本服务器同步已有数据的源服务器 IP 地址,没有则为空;
(4) sync_until_timestamp:同步已有数据文件截至时间(UNIX 时间戳);
storage_stat.dat 文件格式为 ini 配置文件方式,各个参数如下:
(1) total_upload_count:上传文件次数
(2) success_upload_count:成功上传文件次数
(3) total_set_meta_count:更改 meta data 次数
(4) success_set_meta_count:成功更改 meta data 次数
(5) total_delete_count:删除文件次数
(6) success_delete_count:成功删除文件次数
(7) total_download_count:下载文件次数
(8) success_download_count:成功下载文件次数
(9) total_get_meta_count:获取 meta data 次数
(10) success_get_meta_count:成功获取 meta data 次数
(11) last_source_update:最近一次源头更新时间(更新操作来自客户端)
(12) last_sync_update:最近一次同步更新时间(更新操作来自其他 storage server)
binlog.index 中只有一个数据项:当前 binlog 的文件索引号
binlog.###, ###为索引号对应的 3 位十进制字符,不足三位,前面补 0。索引号基
于 0,最大为 999。一个 binlog 文件最大为 1GB。记录之间以换行符(\n)分隔,字段之间
以西文空格分隔。字段依次为:
(1) timestamp:更新发生时间(Unix 时间戳)
(2) op_type:操作类型,一个字符
C 表示源创建、 c 表示副本创建
A 表示源追加、 a 表示副本追加
D 表示源删除、 d 表示副本删除
T 表示源 Truncate、 t 表示副本 Truncate
(3)filename : 操 作 ( 更 新 ) 的 文 件 名 , 包 括 相 对 路 径 , 如 :
5A/3D/FE_93_SJZ7pAAAO_BXYD.S
${ip_addr}_${port}.mark: ip_addr 为同步的目标服务器 IP 地址, port 为本组
storage server 端口。例如: 192.168.1.136_23000.mark。文件格式为 ini 配置文件方式,
各个参数如下:
(1) binlog_index:已处理(同步)到的 binlog 索引号
(2) binlog_offset:已处理(同步)到的 binlog 文件偏移量(字节数)
(3) need_sync_old:同步已有数据文件标记, 0 表示没有数据文件需要同步
(4) sync_old_done:同步已有数据文件是否完成标记, 0 表示未完成, 1 表示已完成
(5) until_timestamp:同步已有数据截至时间点(UNIX 时间戳)
(6) scan_row_count:已扫描的 binlog 记录数
(7) sync_row_count:已同步的 binlog 记录数
11. FastDFS多个group
1. 启动多个组
/usr/bin/fdfs_storaged /etc/fdfs/storage.conf start
/usr/bin/fdfs_storaged /etc/fdfs/storage_f02.conf start
/usr/bin/fdfs_storaged /etc/fdfs/storage_f03.conf start
/usr/bin/fdfs_storaged /etc/fdfs/storage_f04.conf start
2. 关闭多个组
/usr/bin/fdfs_storaged /etc/fdfs/storage.conf stop
/usr/bin/fdfs_storaged /etc/fdfs/storage_f02.conf stop
/usr/bin/fdfs_storaged /etc/fdfs/storage_f03.conf stop
/usr/bin/fdfs_storaged /etc/fdfs/storage_f04.conf stop
12. 记录一次FastDFS故障
1. 业务部分反映访问网站抓取页面的时候,出现很多400报错。
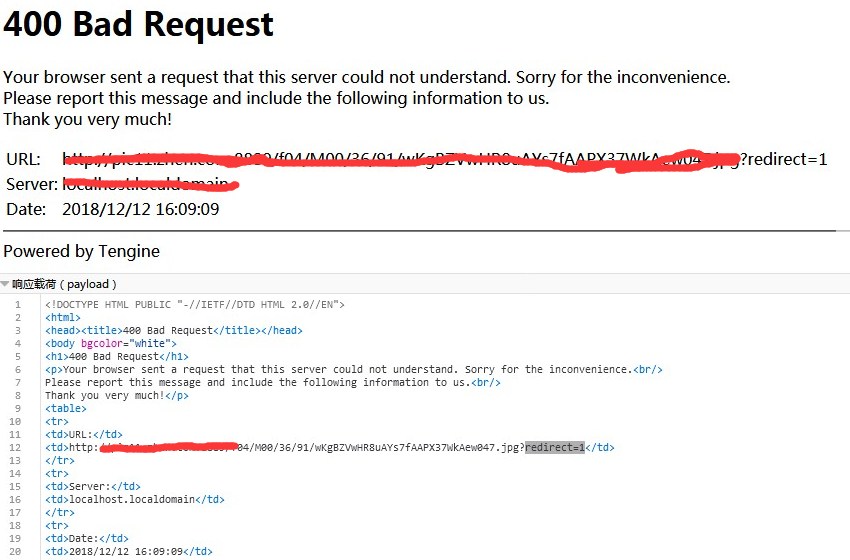
2. 根据报错的URL,找到该URL在fastdfs的一台存储服务器上。分析这个存储服务器的nginx的error.log日志,发现下面的错误:
2018-12-13 10:00:12] WARNING - file: ../fastdfs-nginx-module/src//common.c, line: 1115, redirect again, url: /f04/M00/65/90/wKgBZVwQpFaATkZrAACyAXKhBbw486.jpg?redirect=1
3. 而且所有的400错误,报的URL连接地址都是一台服务器,因为我做的存储服务器有两台,通过前端的一台nginx进行负载均衡。
4. 把经常出问题的服务器从负载均衡中删除,再访问网站,没有400错误,所以断定问题出现在这台服务器上。
5. 根据错误查询百度,说是fastdfs_storage配置文件有问题。后来发现果然如此,group=3,我的group组有4组,而我写的是3组。
13. 调整trackerd最大连接数
fastdfs_trackerd的max_connection连接数,超过1024,导致上传图片到存储出现错误。
调整max_connection并重启fastdfs_trackerd服务。

 浙公网安备 33010602011771号