


Git由浅入深
1. CVS与SVN的痛点
1. 合并困难
2. 几乎无法使用分支
3. 离开服务器就不能提交代码
2. Git特点
1)分布式
2)存储快照而非差异
3)本地有完全的版本库,几乎所有操作都在本地
4)有内在的一致性,SHA1
5)优秀的分支管理
6)支持各种协同模式
7)开源,有一些第三方软件可整合使用,几乎所有操作都是

与CVS/SVN,Git 的优势
1)支持离线开发,离线Repository(仓库)
2)强大的分支功能,适合多个独立开发者协作
3)速度块
3. Git的安装和配置
1. linux
apt-get install git
yum install git
git config --global user.email "you@example.com"
git config --global user.name "Your Name"
useradd git
passwd git
2. mac
xcode自带
3. windows图形工具
4. Git常用命令
add           添加文件内容至索引
bisect       通过二分查找定位引入 bug 的变更
branch     列出、创建或删除分支
checkout  检出一个分支或路径到工作区
clone       克隆一个版本库到一个新目录
commit    记录变更到版本库
diff          显示提交之间、提交和工作区之间等的差异
fetch       从另外一个版本库下载对象和引用
grep        输出和模式匹配的行
init         创建一个空的 Git 版本库或重新初始化一个已存在的版本库
log         显示提交日志
merge    合并两个或更多开发历史
mv        移动或重命名一个文件、目录或符号链接
pull       获取并合并另外的版本库或一个本地分支
push     更新远程引用和相关的对象
rebase  本地提交转移至更新后的上游分支中
reset    重置当前HEAD到指定状态
rm       从工作区和索引中删除文件
show    显示各种类型的对象
status  显示工作区状态
tag      创建、列出、删除或校验一个GPG签名的 tag 对象
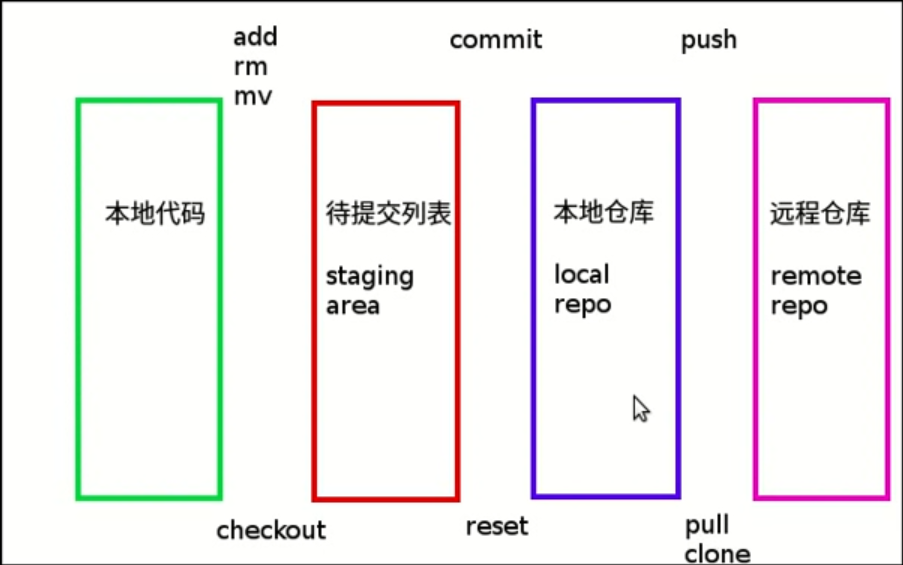
5. git的几个概念
1. 工作区域
2. 待提交列表
3. 本地仓库
4. 远程仓库
6. 创建版本库
mkdir -p /root/d && cd /root/d
git init 初始化仓库
初始化完成后,会在/root/d/目录下,产生一个.git的目录,这个目录是git用来跟踪管理版本库的,不要删除该目录
7. 本地代码进入待提交列表
git add a.txt git add命令不能使用其他目录下,必须得在工作目录下。
使用git status命令可以查看代码的状态
[root@kubernetes-node1 git-ceshi]# git status
# 位于分支 master
#
# 初始提交
#
# 要提交的变更:
#   (使用 "git rm --cached <file>..." 撤出暂存区)
#
#	新文件:    a.txt
#
8. 将待提交列表中的代码提交到本地仓库
[root@kubernetes-node1 git-ceshi]# git commit -m "添加a.txt文件"

*** Please tell me who you are.

Run

  git config --global user.email "you@example.com"
  git config --global user.name "Your Name"

to set your account's default identity.
Omit --global to set the identity only in this repository.

fatal: unable to auto-detect email address (got 'root@kubernetes-node1.(none)')
需要我设置自己的名称和邮箱
[root@kubernetes-node1 git-ceshi]# git config --global user.name "yangjianbo"
[root@kubernetes-node1 git-ceshi]# git config --global user.email "yangjianbo@cmr.net.cn"
然后再提交就没有问题了。
再使用git status查看,就发现待提交列表已经为空。
9. 回滚工作区修改
1.    修改一下版本库的文件,但是不要add到暂存区
2.    使用git status查看一下
        # 位于分支 master
        # 尚未暂存以备提交的变更:
        #   (使用 "git add <file>..." 更新要提交的内容)
        #   (使用 "git checkout -- <file>..." 丢弃工作区的改动)
        #
        #       修改:      yangjianbo.txt
        #
修改尚未加入提交(使用 "git add" 和/或 "git commit -a")
3.    回滚工作区的修改操作
        git checkou yangjianbo.txt
4.    再次查看文件状态
        git status
        # 位于分支 master
        无文件要提交,干净的工作区
10. 回滚暂存区到工作区
1.    修改文件
2.    将工作区内容移动到暂存区
        git add yangjianbo.txt
3.    将暂存区撤回到工作区
        git reset yangjianbo.txt
11. 删除文件
1. 在git中删除文件,然后提交到版本库
git rm a.txt
git commit -m '删除了a.txt文件'
如果文件没有在待提交列表中,那么可以直接使用rm删除。
如果文件已经在待提交列表中,要使用git rm命令删除。
12. 关于用户名和邮箱
1. 查看用户名和邮箱
git config user.name
git config user.email
2. 修改用户名和邮箱
git config --global user.name "username"
git config --global user.email "email"
13. 查看历史的记录
git log
[root@kubernetes-node1 git-ceshi]# git log
commit 1df44571d41fe1d87eb07172a2ada689536976cd  40位随机数
Author: yangjianbo <yangjianbo@cmr.net.cn>  提交人和邮箱
Date:   Fri Jun 15 15:32:26 2018 +0800  提交时间

    添加d.txt文件

commit 4e529c5d8b1d6328830e7ffd8622194e49b88155
Author: yangjianbo <yangjianbo@cmr.net.cn>
Date:   Fri Jun 15 14:55:49 2018 +0800

    添加a.txt文件
可以看到何时提交,谁提交的,提交时间,操作内容的描述。
14. 查看历史记录的详情
git show commit-number
[root@kubernetes-node1 git-ceshi]# git show 1df44571d41fe1d87eb07172a2ada689536976cd
commit 1df44571d41fe1d87eb07172a2ada689536976cd
Author: yangjianbo <yangjianbo@cmr.net.cn>
Date:   Fri Jun 15 15:32:26 2018 +0800

    添加d.txt文件

diff --git a/d.txt b/d.txt
new file mode 100644
index 0000000..4f7b968
--- /dev/null
+++ b/d.txt
@@ -0,0 +1,6 @@
+1
+2
+3
+4
+5
+
-0,0的意思:减少0列0行
+1,6的意思:增加1列6行
15. git忽略一些文件
1. 创建一个文件.gitignore,要与.git同一级目录
2. 添加内容: *.conf
3. 把.gitignore文件,提交一下。
git add .gitignore
git commit -m '忽略了*.conf类型文件'
16. git分支
1. 查看分支
git branch
默认只有* master
git branch -r 查看远程分支
git branch -av 查看分支详情
2. 创建分支
[root@kubernetes-node1 git-ceshi]# git branch 20180615-v1
[root@kubernetes-node1 git-ceshi]# git branch
  20180615-v1
* master
3. 删除分支
[root@kubernetes-node1 git-ceshi]# git branch -d 20160615-v2
4. 切换分支
[root@kubernetes-node1 git-ceshi]# git checkout 20180615-v1
5. 合并分支
git merge
合并之前要先切换到master上,然后再合并指定的分支。
git merge 20180615-v1
6. 创建远程分支
git push -u origin test 以当前分支为模板,创建远程分支test
git push -u origin dev 以当前分支为模板,创建远程分支dev
7. 工作中,实际使用情况
在开发者环境,分别创建master,dev, test三个分支
git branch main
git branch dev
git brach test
本地分支开发完成后,上传到远程服务器的开发分支
git push -u origin dev
本地分支测试完成后,上传到远程服务器测试分支
git push -u origin test
本地测试分支合并到master分支
git checkout master
git merge test
把本地master分支上传到远程服务器master分支
git push -u origin master
17. 在github上创建私库。
1. 在github上申请账号,然后创建私库并初始化。
2. 在本地仓库上,执行
git remote add origin git@github.com:yangjianbo-mm/test_git.git
git push -u origin master
结果报错:
[root@kubernetes-node1 git-ceshi]# git push -u origin master
Permission denied (publickey).
fatal: Could not read from remote repository.

Please make sure you have the correct access rights
and the repository exists.
解决方法:
原因: 可能是没有与github上的账号成功建立密钥对。
解决:
【1】ssh-keygen -t rsa -C "youremail@example.com"
注意,上述youremail@example.com是指github账户的注册邮箱
在用户家目录找到.ssh目录,里面有id_rsa和id_rsa.pub两个文件
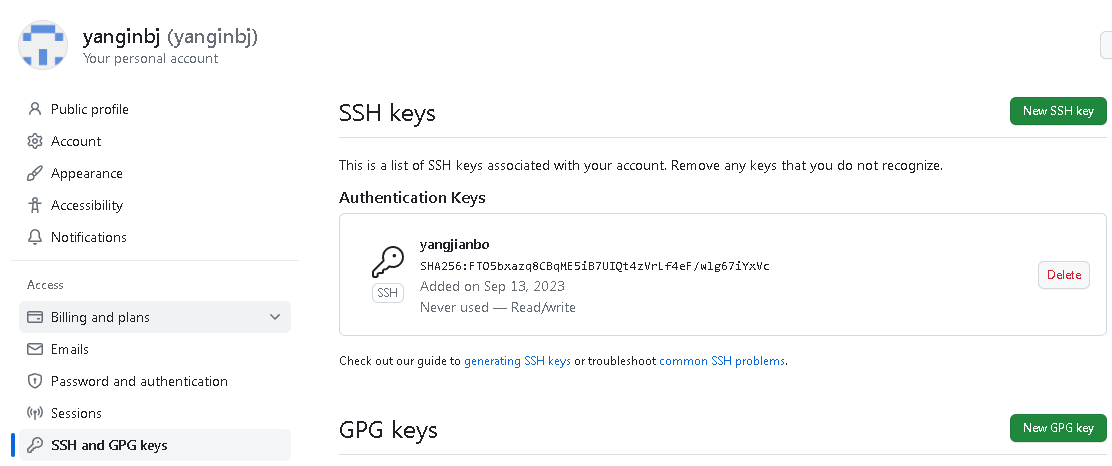
【2】进入github账号,在settings下,选SSH and GPG keys, 点击new SSH key
点击new SSH key后,在title栏里自定义名字,然后将上一步的密钥id_rsa.pub(以ssh-rsa 开头,以github账号的注册邮箱结尾的)粘贴到此处。
然后点击Add SSH Key
3. 创建远程分支
git remote add origin git@github.com:yanginbj/yanginbj.git
4. 将本地主分支main上传到远程分支origin
git push -u origin main
1. origin只是一个别名,可以设置不同的别名,然后上传到不同的远程仓库上。
2. 可以在项目的隐藏目录.git下查看config文件。内容如下:
[root@kubernetes-node1 .git]# cat config
[core]
	repositoryformatversion = 0
	filemode = true
	bare = false
	logallrefupdates = true
[remote "test"]
	url = ssh://admin@172.16.252.101:29418/xtb-ceshi.git
	fetch = +refs/heads/*:refs/remotes/test/*
[branch "master"]
	remote = test
	merge = refs/heads/master
[remote "origin"]
	url = git@github.com:yangjianbo-mm/test_git.git
	fetch = +refs/heads/*:refs/remotes/origin/*
3. 查看当前项目的远程仓库信息。
git remote
5. 第一次获取远程服务器的代码
1. git clone
git clone git@github.com:yanginbj/yanginbj.git
18. git reset --hard 与git reset --soft的区别
1. git reset --hard代码强制回溯到某节点,对于当前节点与回溯节点中间已commit的内容就会全部消失
2. git reset --soft保存当前节点与回溯节点中间已commit的内容
	// 强回最近一次的commit所提交的内容(不保留内容)
	git reset --hard
	// 强回对应commitID的内容(不保留内容)
	git reset --hard commitID

	// 恢复最近一次的commit所提交的内容(保留内容)
	git reset --soft HEAD^
	// 恢复对应commitID的内容(保留内容)
	git reset --hard commitID
3. 例子
1. 分别提交a.txt,b.txt
commit 783979bdb42b1206c3d1071626799fa4ad0a96d4
Author: yangjianbo <yjbkhg@gmail.com>
Date:   Wed Oct 18 15:14:36 2023 +0800

    b.txt

commit cc0acf0ffeeda76478e8c4dedb60b1838393c462
Author: yangjianbo <yjbkhg@gmail.com>
Date:   Wed Oct 18 14:54:24 2023 +0800

    a.txt

commit 5b20825558f440845b0bed996f557dd7f34a7dfd
Author: yangjianbo <yjbkhg@gmail.com>
Date:   Thu Sep 14 14:36:05 2023 +0800

    add houzhen dev

commit d3ea7c1fcd3dfdb1013dcf6f7a658cea10a876e5
Author: yangjianbo <yjbkhg@gmail.com>
Date:   Wed Sep 13 13:23:35 2023 +0800

    add yangjianbo.txt

commit 50ac131ba127dfa45a64e8d1e59cdade0271ae27
Author: yanginbj <144869450+yanginbj@users.noreply.github.com>
Date:   Wed Sep 13 13:19:23 2023 +0800

    Create README.md
2. 使用soft恢复到a.txt的提交点
git reset --soft cc0acf0ffeeda76478e8c4dedb60b1838393c462
3. 会发现b.txt文件存在暂存区
git status
4. 如果使用hard恢复a.txt的提交点,会发现b.txt不会出现在暂存区


 浙公网安备 33010602011771号