


shell编程由浅入深
1. 学好shell编程的知识储备
1. linux系统命令应用
2. vi/vim编辑器的熟练使用。SSH客户端软件的设置。
3. 基础的服务,系统服务ntp crond,网络服务nfs rsync inotify sersync ssh lamp lnmp
2. Shell脚本简介
1. 什么是shell?
Shell是一个命令解释器,是linux/unix操作系统的最外层,负责直接与用户对话,把用户输入的命令解释给操作系统,并处理各种各样的操作系统的输出结果,输出到屏幕给用户。

2. 通过SSH登录到linux系统,就要经过shell解释器,默认是bash.
3. 什么是shell脚本?
当命令或者语句不在命令行执行,而是通过一个程序文件执行时,该程序或文件就被成为shell脚本或者shell程序,shell程序类似DOS系统下的批处理程序。
4. 简单的例子
[root@yangjianboinbeijing day1]# cat del_messages.sh
cd /var/log
cat /dev/null > messages
echo "messages is null!"
这个脚本的缺点:缺乏基本的逻辑判断,会导致前面的命令出错后,后面的命令无法正确执行。
上面脚本的升级版:
#!/bin/bash
#清除messages日志脚本,版本2--yangjianbo
LOG_DIR=/var/log
ROOT_UID=0
if [ "$UID" -ne "$ROOT_UID" ]
then
  echo "You must be root."
  exit 1
fi
cd $LOG_DIR || {
   echo "please change to /var/log/">&2
   exit 1
}
cat /dev/null > messages && echo "messages is cleaned up"
exit 0
3. Shell程序在运维工作中的作用和地位
Shell脚本很擅长处理纯文本类型的数据,而linux中几乎所有的配置文件和日志文件都是纯文本类型的文件。
贴近系统层的操作,shell是最佳的。shell的伙伴(2000个linux命令,awk,sed,grep)

4. Shell脚本语言的种类
1. 主要分为两大类
Bourne shell
C shell
2. 高级运维或者开发型运维常用的脚本语言
php
perl
python
5. 常用操作系统的默认shell
Linux bash
Solaris和FreeBSD sh
AIX ksh
HP-UX sh
如何查看系统的默认shell
echo $SHELL或者cat /etc/passwd查看用户登录的shell
查看系统的shell版本
bash --version
6. 建立一个规范的shell脚本
1. shell脚本组成:Unix/linux命令 bash shell命令 注释 程序结构控制语句
第一行指出是由哪个解释器来执行。
#!/bin/bash或者#!/bin/sh
#!/bin/awk
#!/bin/sed
注释:使用的是#
7. Shell脚本执行的多种方法及重要区别
1. 方法
第一种: 当脚本本身没有执行权限,使用bash 脚本或者sh 脚本。文件权限没有x
/bin/bash 1.sh
bash 1.sh
sh 1.sh
第二种:需要脚本有权限,使用./脚本名执行或者全路径。文件权限必须得有x
./1.sh
第三种:source script-name或者.script-name
第三种与第一种和第二种的区别:
举例来说明:
面试题:
cat test.sh
user=`whoami`
sh test.sh
echo $user
结果是什么?
结果为空,这是为什么呢?
当使用第一种方法和第二种方法执行sh文件,系统会给一个新的bash执行让我们执行sh里面的命令,因此变量都是子进程的bash中执行的。当sh执行完毕后,子进程bash内的所有数据被删除,因此为空。
但是使用第三种方法就不一样了,因为是在自己的进程中执行sh,不会产生子进程,所以不会为空。
8. Shell脚本开发规范和习惯
1. 开头指定脚本解释器
#!/bin/bash或者#!/bin/sh
2. 开头加版本版权功能作者等信息
3. 脚本中不用中文注释
4. 脚本以.sh为扩展名
5. 代码书写的优秀习惯
成对出现的符号一次性写完。
for循环要一次写完。
if语句要一次性写完。
通过手工缩进让代码更容易读。让代码有层次感。
9. Shell变量基础与深入
1. 分类:环境变量和局部变量
环境变量也称为全局变量,可以在创建它们的shell及其派生出来的任意子进程shell中使用。
局部变量只能在它们自己的shell中或脚本中使用。
2. 环境变量
用于定义shell的运行环境,保证shell命令的正确执行,shell通过环境变量来确定登陆用户名,命令路径,终端类型,登录目录等。
环境变量可以在命令行设置,但是注销就消失,所以需要在用户的家目录.bash_profile或者全局配置/etc/profile或者/etc/profile.d/中定义。
环境变量均为大写,必须用export导出。
3. 环境变量读取配置文件,分为两种情况。
1. login shell
1. 直接登录服务器,输入账号和密码
2. 通过ssh登录服务器,输入账号和密码
3. su - username
2. non-login shell
1. su username
2. 图形界面下打开的终端
3. 执行脚本
4. 通过ssh免密钥的方式,直接执行命令。
ssh java@192.168.1.100 'echo $TESTZZ' 注意在命令行使用单引号,脚本使用双引号
3. 配置文件分类
1. 按生效范围划分
1. 全局
/etc/profile
/etc/bashrc
/etc/profile.d/*.sh
2. 个人
~/.bash_profile
~/.bashrc
2. 按功能划分
1. profile类 为交互式登录的shell提供配置
用途:定义环境变量
运行命令或脚本
全局:/etc/profile
个人:~/.bash_profile
2. bashrc类 为非交互式登录的shell提供配置
用途: 定义命令别名
定义本地变量
全局:/etc/bashrc
个人:~/.bashrc
4. 两种登录方式配置文件引用
1. 交互式登录
/etc/profile-->/etc/profile.d/*.sh-->~/.bash_profile-->~/.bashrc-->/etc/bashrc
2. 非交互式登录
~/.bashrc-->/etc/bashrc-->/etc/profile.d/*.sh
4. 查看环境变量
env: 列出所有的环境变量
set: 查看所有变量(含环境变量与自定义变量)
export: 自定义变量转成环境变量
10. 显示与取消环境变量
1. 显示echo $LANG
2. env命令
3. set命令
4. 取消环境变量
unset 变量名
11. 局部变量
1. 本地变量
1. 定义:本地变量在用户当前shell生存期的脚本中使用。退出或者进入另外一个进程,就会失效。
2. 变量定义:
例子1:
[root@yangjianboinbeijing day1]# a=192.168.1.2
[root@yangjianboinbeijing day1]# b='192.168.1.2'
[root@yangjianboinbeijing day1]# c="192.168.1.2"
[root@yangjianboinbeijing day1]# echo "a=$a" "b=$b" "c=${c}"
a=192.168.1.2 b=192.168.1.2 c=192.168.1.2
例子2:
[root@yangjianboinbeijing day1]# a=192.168.1.2-$a
[root@yangjianboinbeijing day1]# echo "a=$a"
a=192.168.1.2-192.168.1.2
[root@yangjianboinbeijing day1]# b='192.168.1.2-$a'
[root@yangjianboinbeijing day1]# echo "b=$b"
b=192.168.1.2-$a
[root@yangjianboinbeijing day1]# c="192.168.1.2-$a"
[root@yangjianboinbeijing day1]# echo "c=${c}"
c=192.168.1.2-192.168.1.2-192.168.1.2
为什么是这样的结果呢?
因为单引号内的特殊字符仅为一般字符(单引号里面是什么就是什么),而双引号内的特殊字符保留原来的特性,例如$符号。
推荐字符串定义使用双引号。
这种方式在awk调用shell变量刚好相反。单引号可以保留原字符的特性,但是双引号里面是什么就是什么。
老男孩运维博客:http://oldboy.blog.51cto.com/2561410/760192
3. 变量的命名规范
1. 都使用大写
2. 不能以数字开头
3. 等号两边不能直接有空格,如果需要使用空格,需要加引号。
4. 把命令作为变量
需要使用反引号。
也可以使用$()
批量创建目录
mkdir `seq 5`
mkdir $(echo {a..e})
mkdir {o..w}
5. 关于awk引用shell变量的使用情况

12. Shell的特殊变量
1. 位置变量
$0 获取当前执行的shell脚本的文件名,包括路径。
[root@yangjianboinbeijing day1]# cat 0.sh
#!/bin/bash
echo $0
[root@yangjianboinbeijing day1]# sh 0.sh     #取文件名
0.sh
[root@yangjianboinbeijing day1]# sh /server/scripts/day1/0.sh    #取完整路径和文件名
/server/scripts/day1/0.sh
[root@yangjianboinbeijing day1]# cat 0.sh
#!/bin/bash
dirname $0 从$0中取路径
basename $0 从$0中取文件名
[root@yangjianboinbeijing day1]# sh /server/scripts/day1/0.sh
/server/scripts/day1
0.sh
想单独获得路径和文件名
dirname /server/scripts/0.sh
basename /server/scripts/0.sh
$n 获取当前执行的shell脚本的第n个参数值,当n大于9,用大括号括起来${10}。
[root@yangjianboinbeijing day1]# cat n.sh
#!/bin/bash
echo $1 $2 $3 ${10}
[root@yangjianboinbeijing day1]# bash n.sh {1..11}
1 2 3 10
[root@yangjianboinbeijing day1]# bash n.sh `seq 11`
1 2 3 10
$# 获取当前执行的shell脚本的传入的参数个数。
[root@yangjianboinbeijing day1]# cat n.sh
#!/bin/bash
echo $1 $2 $3 ${10}
echo $#
[root@yangjianboinbeijing day1]# sh n.sh 1 2 3 4
1 2 3
4
[root@mysql-37 scripts]# /bin/bash canshu.sh {a..z} 传入的参数个数为26,但实际接收的参数个数位为4
a b c d
26
用于判断shell脚本参数个数的时候。

实战例子:
[root@yangjianboinbeijing day1]# cat bijiao.sh
#!/bin/bash
if [ $# -ne 3 ];then
echo "please input 3 args!"
else
echo "input OK"
fi
[root@yangjianboinbeijing day1]# sh bijiao.sh
please input 3 args!
[root@yangjianboinbeijing day1]# sh bijiao.sh 1
please input 3 args!
[root@yangjianboinbeijing day1]# sh bijiao.sh 1 2
please input 3 args!
[root@yangjianboinbeijing day1]# sh bijiao.sh 1 2 3
input OK
[root@yangjianboinbeijing day1]# sh bijiao.sh 1 2 3 4
please input 3 args!
$* 获取当前shell传入的所有的参数
#!/bin/bash
user=`whoami`
echo $*

[zhangshaohua1510@mysql-37 scripts]$ /bin/bash test.sh 1 2 3
1 2 3
$@ 获取当前shell所有传参的参数
#!/bin/bash
user=`whoami`
echo $@

[zhangshaohua1510@mysql-37 scripts]$ /bin/bash test.sh 1 2 3
1 2 3
$*与$@的区别在于,如果不加双引号,那么它们的结果是一样;如果加上双引号,$*输出的结果是"$1 $2 $3",而$@输出的结果是"$1" ,"$2","$3"。
不带引号的结果:
#!/bin/bash
echo $*
for i in $*;
do
  echo $i
done
echo $@
for i in $@;
do
  echo $i
done

sh test.sh "I am"  yang jian bo
不带双引号的时候,两个输出的结果是一样的。
I am yang jian bo   这是$*
I
am
yang
jian
bo
I am yang jian bo   这是$@
I
am
yang
jian
bo
带双引号的结果:
#!/bin/bash
echo $*
for i in "$*";
do
  echo $i
done
echo $@
for i in "$@";
do
  echo $i
done

sh test.sh "I am"  yang jian bo
带双引号的时候,$*与$@的结果完全不一样。
I am yang jian bo 这是$*
I am yang jian bo $*带引号以后,把$1 $2 $3当做一个整体,输出了。
I am yang jian bo 这是$@
I am $@带引号以后,把参数一个一个输出了。
yang
jian
bo
13. Shell脚本的进程状态变量
1. $?:获取上一个指令的返回值(0为成功,非零为失败)
0 成功
2 权限拒绝
1~125 运行失败,脚本命令,系统命令错误或参数传递错误
126 找到该命令了,但是无法执行
127 未找到要运行的命令
>128 命令被系统强制结束
[root@mysql-37 scripts]# cat fanhui.sh
#!/bin/bash
if [ $# -ne 2 ];then
  echo "USAGE: $0 must be two args."
  exit 119
else
  echo yangianbo
fi
[root@mysql-37 scripts]# /bin/bash /server/scripts/fanhui.sh
USAGE: /server/scripts/fanhui.sh must be two args.
[root@mysql-37 scripts]# echo $?
119
[root@mysql-37 scripts]# /bin/bash /server/scripts/fanhui.sh 1 2
yangianbo
$?返回值的用法如下:
1. 判断命令或脚本或函数等程序是否执行成功。
2. 若在脚本中调用执行"exit 数字",则会返回这个数字给"$?"变量。
3. 如果是在函数里,则通过"return 数字" 把这个数字以函数返回值的形式传给"$?"。
2. $$:获取当前执行的shell脚本的进程号
#!/bin/bash
user=`whoami`
echo $$

[zhangshaohua1510@mysql-37 scripts]$ /bin/bash test.sh
11768
3. $_: 获取上一条命令的最后一个参数值
[root@192 tmp]# sh test.sh "I am"  yang jian bo
I am yang jian bo
I am yang jian bo
I am yang jian bo
I am
yang
jian
bo
[root@192 tmp]# echo $_
bo
4. $!: 获取上一次执行脚本的pid
14. bash内部变量与内置命令
1. echo 在屏幕上输出信息
语法: echo args #后面跟字符串或者变量
-n: 不换行输出
-e: 解析转义字符
常用的转义字符:
\n: 换行
\r: 回车
\t: 制表符
\b: 退格
\v: 纵向制表符
[root@mysql-37 scripts]# echo "yangjianbo";echo "liudehua"   默认自动换行
yangjianbo
liudehua
[root@mysql-37 scripts]# echo -n "yangjianbo ";echo "liudehua" -n不换行
yangjianbo liudehua
[root@mysql-37 scripts]# echo -e "yangjianbo\nliudehua"  \n换行
yangjianbo
liudehua
[root@mysql-37 scripts]# echo -e "yangjianbo\tliudehua"   \t 制表符tab
yangjianbo      liudehua
[root@mysql-37 scripts]# echo -e "yangjianbo\bliudehua"    \b 退格,可以看到少了一个o
yangjianbliudehua
[root@mysql-37 scripts]# echo -e "yangjianbo\vliudehua"    \v 纵向制表符
yangjianbo
          liudehua
2. eval 执行到eval语句,shell读取参数,并将他们组成一个新的命令
#!/bin/bash
echo \$$#      输出的结果为$2

[sysadmin@192 tmp]$ sudo /bin/bash test.sh yangjianbo liudehua
$2

#!/bin/bash
eval "echo \$$#"    eval重新组合了echo $2,所以可以输出liudehua

[sysadmin@192 tmp]$ sudo /bin/bash test.sh yangjianbo liudehua
liudehua
3. exec 在不创建新的进程的情况,执行指定的命令,执行完以后,该进程也就结束了。
[sysadmin@192 tmp]$ exec date
2021年 10月 26日 星期二 11:22:10 CST
执行完以后, 直接退出注销了。
4. read 标准输入,传给指定变量
[root@yangjianboinbeijing day2]# cat read.sh
read -p "please input your name:" username
echo $username
[root@yangjianboinbeijing day2]# sh read.sh
please input your name:yangjianbo
yangjianbo
5. history 查看历史记录
6. printf 格式化打印
7. ulimit 文件系统与程序的限制
8. shift 位置参数偏移量,每执行一次,向左移动一个位置
[root@yangjianboinbeijing day2]# set -- "I am" handsome oldboy.
[root@yangjianboinbeijing day2]# echo $#
3
[root@yangjianboinbeijing day2]# echo $1
I am
[root@yangjianboinbeijing day2]# echo $2
handsome
[root@yangjianboinbeijing day2]# echo $3
oldboy.
[root@yangjianboinbeijing day2]# shift
[root@yangjianboinbeijing day2]# echo $1
handsome
[root@yangjianboinbeijing day2]# echo $2
oldboy.
[root@yangjianboinbeijing day2]# echo $3

[root@yangjianboinbeijing day2]# echo $0
-bash
9. exit 退出shell
15. bash变量子串的常用操作
1. 返回变量的内容
[root@yangjianboinbeijing day2]# OLDBOY="I am oldboy"
[root@yangjianboinbeijing day2]# echo $OLDBOY
I am oldboy

[root@mysql-37 scripts]# echo ${OLDBOY}

I am oldboy
2. 返回变量值的长度
[root@yangjianboinbeijing day2]# echo ${#OLDBOY}
11
3. 截取变量值
[root@yangjianboinbeijing day2]# echo ${OLDBOY:2}    从索引为2的开始截取,包含2
am oldboy
[root@yangjianboinbeijing day2]# echo ${OLDBOY:3}    从索引为3的开始截取,包含3
m oldboy
3. 截取其中固定的变量值,第一个参数为索引值,第二个为步长
[root@yangjianboinbeijing day2]# echo ${OLDBOY:5:2}   从索引为5的开始截取,截取2个长度
ol
4. 从开头删除匹配的子字符串 # ##
[root@mysql-37 scripts]# OLDBOY="abcABC123ABCabc"
[root@mysql-37 scripts]# echo $OLDBOY
abcABC123ABCabc
[root@mysql-37 scripts]# echo ${OLDBOY#a*c} 从头开始删除最短匹配a*c的字符串
ABC123ABCabc
[root@mysql-37 scripts]# echo ${OLDBOY##a*c} 从头开始删除最长匹配a*c的字符串,所以整个都删掉了
5. 从字符串的结尾开始删除 % %%
[root@mysql-37 scripts]# echo ${OLDBOY}
abcABC123ABCabc
[root@mysql-37 scripts]# echo ${OLDBOY%a*c}  从尾部开始删除最短匹配的a*c
abcABC123ABC
[root@mysql-37 scripts]# echo ${OLDBOY%%a*c}  从尾部开始删除最长匹配的a*c,所以整个都删掉了
6. 字符串替换
语法:${变量名/子字符串/替换以后的字符串} 从头开始查找子字符串进行替换,替换第一个
[root@yangjianboinbeijing day2]# echo $OLDBOY
I am oldboy am
[root@yangjianboinbeijing day2]# echo ${OLDBOY/I/is}
is am oldboy am
语法:${变量名//子字符串/替换以后的字符串} 替换匹配的所有字符串
[root@yangjianboinbeijing day2]# echo ${OLDBOY//am/is}
is is oldboy is
7. 生产实例
1. 批量删除文件名称中的固定字符串。
[root@yangjianboinbeijing day2]# vi rename.sh
#!/bin/bash
BASEDIR=/server/scripts/day2/testdir
if [ -d $BASEDIR ];then
  cd $BASEDIR
  for file in `ls *.bak`;
    do mv $file ${file//_20190910/}.bak; 替换为空
  done
fi
2. 修改文件的扩展大写变小写,从结尾开始匹配
for file in `ls *.HTML`;do mv $file ${file//HTML/html};done
3. 把文件名修改为大写。
mv $file `echo ${file%.html}|tr "[a-z]" "[A-Z]"`.HTML
批量改名字案例:http://blog.51cto.com/oldboy/711342
ls *_20180405.bak|awk -F "_20180405" '{print "mv " $0,$1$2}'|bash
4. 使用rename命令修改。
rename "_20180405" "" *.bak

rename "HTML" "html" *.HTML
16. bash变量子串的深入介绍与系统案例分析
1. ${value:-word}
当变量未定义或者值为空,返回值为word的内容,否则返回变量的值。 这个功能用来判断变量是否已定义。如果没有定义,就返回word,定义了就返回定义的值。
[root@yangjianboinbeijing testdir]# result=${test:-word}
[root@yangjianboinbeijing testdir]# echo $test

[root@yangjianboinbeijing testdir]# echo $result
word
2. ${value:=word}
当变量未定义或者值为空,返回word的值的同时将word值赋给value.这个变量的功能可以解决变量没有定义的问题,并确保没有定义的变量始终有值。
[root@yangjianboinbeijing testdir]# result=${test:=word}
[root@yangjianboinbeijing testdir]# echo $test   之前test的值是空的,但是现在已经被赋值word了,这就是与-word的区别
word
[root@yangjianboinbeijing testdir]# echo $result
word
3. ${value:?"word"}
当变量未定义或者值为空,返回word,否则返回定义的值。这个功能用来设定由于变量未定义而报错的具体内容。
[root@yangjianboinbeijing testdir]# result=${test:?word}
-bash: test: word
[root@yangjianboinbeijing testdir]# result=${test:?"not defined"}
-bash: test: not defined
4. ${value:+word}
测试变量是不是存在。如果返回了值,那么说明变量被定义了。否则就是变量没有定义。
[zhangshaohua1510@mysql-37 ~]$ oldboy=${oldgirl:+yangjianbo}
[zhangshaohua1510@mysql-37 ~]$ echo $oldboy  olboy值为空

[zhangshaohua1510@mysql-37 ~]$ echo $oldgirl  oldgirl值为空

[zhangshaohua1510@mysql-37 ~]$ oldgirl=20
[zhangshaohua1510@mysql-37 ~]$ oldboy=${oldgirl:+yangjianbo}  定义了oldgirl,则oldboy返回,后面的yangjianbo
[zhangshaohua1510@mysql-37 ~]$ echo $oldboy
yangjianbo
[zhangshaohua1510@mysql-37 ~]$ echo $oldgirl
20
5. 生产实例
1. 查看/etc/init.d/httpd文件的内容。
apachectl=/usr/sbin/apachectl
httpd=${HTTPD-/usr/sbin/httpd}   如果HTTPD变量未定义,就使用/usr/sbin/httpd作为值
prog=httpd
pidfile=${PIDFILE-/var/run/httpd/httpd.pid}
lockfile=${LOCKFILE-/var/lock/subsys/httpd}
2. 生产环境删除文件脚本。
[root@mysql-37 scripts]# cat del20190910.sh
#!/bin/bash
find ${path-/tmp} -name "*.tar.gz" -type f -mtime +7 |xargs rm -rf {}   #没有定义path,那么就使用/tmp作为路径
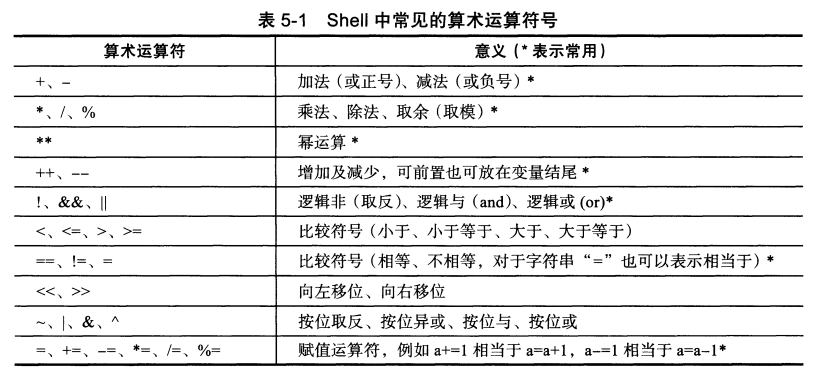
17. 变量的数值计算
常用的算术运算符
常用的算术运算命令
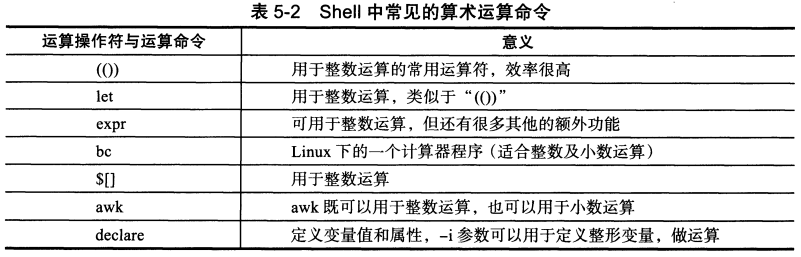
1. (()) 常用,效率最高,只适合整数
1. 简单运算
[root@mysql-37 scripts]# ((a=1+1))
[root@mysql-37 scripts]# echo $a
2
[root@mysql-37 scripts]# echo $((5*9))
45
2. 复杂运算
[root@mysql-37 scripts]# echo $((100*(100+1)/2))
5050
3. 利用双括号进行比较判断
[root@mysql-37 scripts]# echo $((3>8))
0
[root@mysql-37 scripts]# echo $((3<8))
1

[root@mysql-37 scripts]# if ((8<3))
> then
> echo 1
> else
> echo 0
> fi
0
4. 在变量前后使用--和++特殊运算符的表达式
赋值操作
[root@yangjianboinbeijing systemd]# echo $((a+=10))
10
增长减少操作
[root@yangjianboinbeijing systemd]# a=1
[root@yangjianboinbeijing systemd]# echo $((a++))
1
[root@yangjianboinbeijing systemd]# echo $((a++))
2
[root@yangjianboinbeijing systemd]# echo $((a++))
3
[root@yangjianboinbeijing systemd]# echo $((a++))
4
注意:a++与++a的区别,a++先赋值再运算,++a先运算再赋值
从1加到100的和是多少?
[root@yangjianboinbeijing systemd]# echo $((100*(100+1)/2))
5050
使用命令行的方式,实现一个加减乘除的计算器。
[root@yangjianboinbeijing day2]# vi 02.sh
echo $(($1))
[root@yangjianboinbeijing day2]# cat 03.sh
echo $(($1$2$3))
[root@yangjianboinbeijing day2]# sh 03.sh 1 2
12
[root@yangjianboinbeijing day2]# sh 03.sh 1 +2
3
[root@yangjianboinbeijing day2]# sh 03.sh 1 + 3
4
[root@yangjianboinbeijing day2]# sh 03.sh 1 + 2
3
[root@yangjianboinbeijing day2]# sh 03.sh 1 + 2 + 5
3
[root@yangjianboinbeijing day2]# sh 03.sh 1 +2 +8
11
2. let命令 这是shell的内置命令
实际操作:
[root@yangjianboinbeijing day2]# i=2
[root@yangjianboinbeijing day2]# let i=i+8
[root@yangjianboinbeijing day2]# echo $i
10
注意:如果去掉let,相当于给i赋值:i+8
3. expr命令
用于整数计算
[root@yangjianboinbeijing day2]# expr 2+2
2+2
[root@yangjianboinbeijing day2]# expr 2 + 2
4
[root@yangjianboinbeijing day2]# expr 2 * 2
expr: 语法错误
[root@yangjianboinbeijing day2]# expr 2 \* 2
4
注意:运算符左右都需要有空格,乘号要使用\进行转义。
[root@yangjianboinbeijing day2]# expr $i + 5
7
[root@yangjianboinbeijing day2]# expr $[2+8]
10
expr可以统计字符串的长度
[root@yangjianboinbeijing day2]# expr length "zhongguoren"
11
[root@yangjianboinbeijing day2]# expr substr "yangjianbo" 2 2
an
注意:它的截取子串,开始位置为1,而不是变量子串的从0开始。
4. bc命令的用法
bc是unix/linux下的计算器,可以处理小数。
[root@yangjianboinbeijing ~]# seq -s "+" 100
1+2+3+4+5+6+7+8+9+10+11+12+13+14+15+16+17+18+19+20+21+22+23+24+25+26+27+28+29+30+31+32+33+34+35+36+37+38+39+40+41+42+43+44+45+46+47+48+49+50+51+52+53+54+55+56+57+58+59+60+61+62+63+64+65+66+67+68+69+70+71+72+73+74+75+76+77+78+79+80+81+82+83+84+85+86+87+88+89+90+91+92+93+94+95+96+97+98+99+100
[root@yangjianboinbeijing ~]# seq -s "+" 100|bc
5050
5. awk命令的用法
适合计算整数和小数。
[sysadmin@192 ~]$ echo "7 3" | awk '{print ($1-$2)}'
4

[sysadmin@192 ~]$ echo "7.8 3.6" | awk '{print ($1-$2)}'
4.2
6. 使用$[ ]做计算
[root@yangjianboinbeijing ~]# echo $[2*3]
6
[root@yangjianboinbeijing ~]# echo $[2+3]
5
打印杨辉三角:http://blog.51cto.com/oldboy/756234
7. 计算变量值的长度的方法比较
1. echo ${#变量名}
2. echo $(expr length 变量名 )
3. echo ${变量名} |wc -m
结论:使用内部函数耗时小,建议使用第一种方式。
8. read用法
-p: 提示符
-t: 超时
[root@yangjianboinbeijing day3]# cat read.sh
#!/bin/bash
read  -t 5 -p "input your number": var1   输入一个值,给变量var1,注意var1前面有空格
echo $var1
read -p的功能可以用echo -n替换。
18. shell的条件测试与比较
1. 条件测试语法
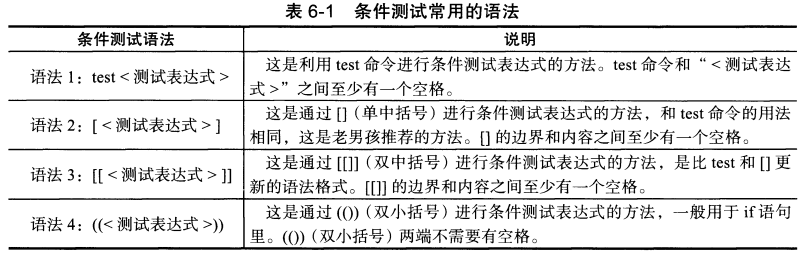
1. test <测试表达式>
[root@yangjianboinbeijing day3]# test -f file && echo true || echo false
false
[root@yangjianboinbeijing day3]# touch file
[root@yangjianboinbeijing day3]# test -f file && echo true || echo false
true
test ! 非的用法
[root@yangjianboinbeijing day3]# test ! -f file && cat file
cat: file: 没有那个文件或目录
[root@yangjianboinbeijing day3]# touch file
[root@yangjianboinbeijing day3]# test ! -f file && cat file
2. [<测试表达式>]
[root@yangjianboinbeijing day3]# [ -f file ] && echo 1 || echo 0
0
[root@yangjianboinbeijing day3]# ll
总用量 4
-rw-r--r-- 1 root root 63 4月   3 20:50 read.sh
[root@yangjianboinbeijing day3]# touch file
[root@yangjianboinbeijing day3]# [ -f file ] && echo 1 || echo 0
1
[root@yangjianboinbeijing day3]# [ ! -f file ] && echo 1 || echo 0
0
[root@yangjianboinbeijing day3]# ll
总用量 4
-rw-r--r-- 1 root root 0 4月 3 21:07 file
-rw-r--r-- 1 root root 63 4月 3 20:50 read.sh
[root@yangjianboinbeijing day3]# rm -r file
rm:是否删除普通空文件 "file"?y
[root@yangjianboinbeijing day3]# [ ! -f file ] && echo 1 || echo 0
1
3. [[<测试表达式>]]
说明:1和2是等价的,3为扩展的test命令。
在3中可以使用通配符进行模式匹配。
&& || > <操作可以应用于[[]]中,但不能应用于[]中。
对整数进行关系运算,也可以使用shell的算术运算符。
2. 文件测试表达式
1. 关于某个文件名的文件类型判断。
-f 该文件名是否存在且为文件
-d 该文件名是否存在且为目录
-e 该文件名是否存在
-s 该文件名是否存在且为“非空”文件
2. 关于某个文件名的权限检测。
-r 该文件名是否存在且有可读的权限
-w 该文件名是否存在且有可写的权限
-x 该文件名是否存在且有可执行的权限
3. 关于两个文件的之间的比较
-nt newer than 判断file1是否比file2新
-ot older than 判断file1是否比file2旧
-ef 判断两个文件是不是指向同一个inode
4. 例子
1. 如果测试的是变量,那么变量需要添加引号,否则会有误判。
[root@192 ~]# echo $oldboy

[root@192 ~]# [ -f $oldboy ] && echo 1 || echo 0
1
[root@192 ~]# [ -f "$oldboy" ] && echo 1 || echo 0
0
2. 如果测试的是实体路径,那么有没有双引号,结果都是一样的。
[root@192 ~]# [ -f /root/vhost.sh ] && echo 1 || echo 0
1
[root@192 ~]# [ -f "/root/vhost.sh" ] && echo 1 || echo 0
1
3. 字符串测试表达式
1. 字符串测试操作符 
注意:字符串测试一定要加双引号,如果不加,会带来逻辑错误。
=和!= 两边一定要有空格,如果没有空格,会带来逻辑错误
=和!=可以判断两个字符串是否相同
4. 整数二元比较

1. 建议最好都是用-eq,-ne这些比较符号,因为<>在[ ] 中会出现逻辑错误,如下面的例子
[root@yangjianboinbeijing day2]# [ 2 > 1 ] && echo 1 || echo 0
1
[root@yangjianboinbeijing day2]# [ 2 < 1 ] && echo 1 || echo 0
1
[root@yangjianboinbeijing day2]# [[ 2 < 1 ]] && echo 1 || echo 0
0
如果是单中括号,不要使用符号,使用-eq,-ne,-gt,-lt等;或者使用双中括号。
双中括号也可以使用-eq -ne -gt
2. 整数变量的比较
[root@192 ~]# a=55
[root@192 ~]# b=66
[root@192 ~]# [ $a -gt $b ] && echo 1 || echo 0
0
[root@192 ~]# [ $a -lt $b ] && echo 1 || echo 0
1
5. 逻辑操作符

1. 例子
[root@192 ~]# [ -f /etc/hosts -a -f /etc/resolv.conf ] && echo 1 || echo 0
1
如果在[ ]中使用&&  ||会有报错。
-bash: [: missing `]'
-bash: -f: command not found
[root@192 ~]# [[ -f /etc/hosts && -f /etc/resolv.conf ]] && echo 1 || echo 0
1
如果在[[ ]]中使用-a -o也会有报错
-bash: syntax error in conditional expression
-bash: syntax error near `-a'
6. 测试表达式的区别

19. if条件语句
1. 单分支结构
1. 语法:
if [条件]
then
指令
fi
或者
if [条件]; then
指令
fi
2. 单分支结构举例
1. 比较两个数字的大小
[root@yangjianboinbeijing day4]# vi if1.sh
#!/bin/bash
if [ 3 -gt 2 ];then
    echo 1
fi
read读入参数
[root@yangjianboinbeijing day4]# cat if2.sh
#!/bin/bash
read -p "input num1": num1
read -p "input num2": num2
if [ $num1 -gt $num2 ];then
   echo 1
fi
以位置参数的形式输入值。
[root@yangjianboinbeijing day4]# cat if3.sh
#!/bin/bash
if [ $1 -gt $2 ];then
    echo 1
fi
/bin/bash if3.sh  3 1
2. 开发脚本实现如果/server/scripts/下面存在if4.sh就输出到屏幕。
注意:如果执行脚本后发现该if4.sh不存在,就自动创建这个if4.sh脚本。
#!/bin/bash
scriptname=/server/scripts/day4/if4.sh
if [ -e $scriptname ];then
   echo "exist if4.sh"
else
   `touch $scriptname`
fi
变量名称最好用大写,当然小写也没有问题。
3. 判断系统内存大小,小于100M,就邮件报警。
[root@yangjianboinbeijing day4]# cat if-free.sh
#!/bin/bash
MEMORY=`free -m | awk 'NR==3{print $4}'`
if [ $MEMORY -lt 2000 ];then
   echo "memory is $MEMORY" |mail -s "memory" 329624434@qq.com
fi
4. 判断系统的根目录剩余空间大小,小于50G,就邮件报警
#!/bin/bash
FREE_DISK=`df -h | awk 'NR==2{print $4}'`
JIELUN=`echo "${FREE_DISK//G/} < 50" | bc`
if [ ${JIELUN} -eq 1 ];then
   echo "free_disk is ${FREE_DISK}" |mail -s "free_disk" 329624434@qq.com
fi
3. if双分支结构讲解和实例
1. 双分支结构
1. 语法:
if [条件一];then
执行语句
else
执行语句
fi
2. 实例
1. 比较两个整数的大小。
[root@yangjianboinbeijing day4]# cat if-double.sh
#!/bin/bash
a=10
b=11
if [ $a -gt $b ];then
   echo $a
else
   echo $b
fi
2. 使用传参的方式。
[root@yangjianboinbeijing day4]# cat if-double2.sh
#!/bin/bash
if [ $1 -gt $2 ];then
   echo $1
else
   echo $2
fi
3. 脚本判断需要添加几个参数,如果参数不正确就退出,并报错
[root@yangjianboinbeijing day4]# cat if-double3.sh
#!/bin/bash
if [ $# -ne 2 ];then
   echo "ERROR: $0 num1 num2"
   exit 1
fi
if [ $1 -gt $2 ];then
   echo $1
else
   echo $2
fi
4. 判断输入的参数是不是数字,使用sed命令。
[root@yangjianboinbeijing day4]# cat if-double5.sh
#!/bin/bash
if [ $# -ne 2 ];then
   echo "ERROR: $0 num1 num2"
   exit 1
fi
[ -z "`echo $1|sed 's/[a-z]//g'`" ] && {
   echo "num1 must be int."
   exit 1
}
[ -z "`echo $2|sed 's/[a-z]//g'`" ] && {
   echo "num2 must be int."
   exit 1
}
if [ $1 -gt $2 ];then
   echo $1
else
   echo $2
fi
5. 使用read读入变量参数,判断为数字,不能为字符串,比较两个数字的大小。
#!/bin/bash
read -p "please input your number: " num1 num2
if [ -z $num1 ];then
   echo "$0 need two args!"
   exit 1
elif [ -z $num2 ];then
   echo "$0 need two args!"
   exit 1
else
   [ -z `echo $num1 | sed 's/[a-z]//g'` ] && {
     echo "num1  must be int"
     exit 1
   }
   [ -z `echo $num2 | sed 's/[a-z]//g'` ] && {
     echo "num2  must be int"
     exit 1
   }
   if [ $num1 -gt $num2 ];then
     echo "$num1 > $num2"
   elif [ $num1 -lt $num2 ];then
     echo "$num1 < $num2"
   else
     echo "$num1=$num2"
   fi
fi
4. if条件语句企业实例
1. 生产监控mysql服务
1. 监控mysql服务是否正常启动,如果未正常启动,就启动mysql服务。
通过端口来判断,mysql服务是不是在运行中。
[root@yangjianboinbeijing day4]# cat monitor_mysql.sh
#!/bin/bash
#monitor mysql server
lsof -i:3306 >/dev/null  &&  echo $? >/dev/null
if [ $? -eq 0 ];then
   echo "mysql server is starting!"
else
   echo `systemctl start mysqld.service` >/dev/null
   echo "mysqld.service start successful!"
fi

或者使用netstat -lnt | grep 3306 | wc -l
ps -ef | grep mysqld
注意:如果过滤进程数,不要让脚本带有mysql字样。涉及到数据库,脚本使用db字样。
如果没有启动,就启动,再对启动的结果进行判断,如果发现没有成功,就彻底杀死,再启动mysql。
2. 监控mysql服务,通过连接mysql监控。
[root@yangjianboinbeijing day4]# cat monitor_mysql_pid_port.sh
#!/bin/bash
#monitor mysql server
mysql -uroot -p123456 -e "select version();" > /dev/null && echo $? >/dev/null
if [ $? -eq 0 ];then
   echo "mysql server is starting!"
else
   echo `systemctl start mysqld.service` >/dev/null
   echo "mysqld.service start successful!"
fi
3. 监控mysql服务,通过PHP/JAVA程序监控mysql。
2. 监控apache和nginx服务
1. 通过本地端口或进程监控。
#!/bin/bash
NGX_NUM=`netstat -lntp | grep nginx| wc -l`
if [ $NGX_NUM -gt 0 ];then
  echo "nginx is starting"
else
  /etc/init.d/nginx start
  echo "nginx is start sucessful"
fi
2. 通过远程URL监控。wget或者curl。
#!/bin/bash
if [ `curl -I -s  https://www.baidu.com | awk 'NR==1{print $2 }'` -eq 200 ];then
  echo "nginx is starting"
else
  echo "nginx is stop"
  /etc/init.d/nginx start
fi
3. 使用if语句比较两个整数的大小
1. 使用传参的方式(要判断传入的参数的个数和传入的是否是整数)
#!/bin/bash
a=$1
b=$2
if [ $# -ne 2 ];then
     echo "USAGE: $0 number is two"
     exit 200
fi

expr $a + 1 > /dev/null
RET_a=$?

expr $b + 1 > /dev/null
RET_b=$?

if [ $RET_a -ne 0 -o $RET_b -ne 0  ];then
      echo "the number must be int"
      exit 100
fi

if [ $a -gt $b ];then
   echo "$a>$b"
elif [ $a -lt $b ];then
   echo "$a<$b"
else
   echo "$a=$b"
fi
2. 使用read读取的方式
#!/bin/bash
read -p "insert to two number: " a b

expr $a + 0 > /dev/null
RET_a=$?

expr $b + 0 > /dev/null
RET_b=$?
if [ -z "$a" ] || [ -z "$b" ];then
      echo "the number is two"
      exit 200
fi
if [ $RET_a -ne 0 -o $RET_b -ne 0  ];then
      echo "the number must be int"
      exit 100
fi

if [ $a -gt $b ];then
   echo "$a>$b"
elif [ $a -lt $b ];then
   echo "$a<$b"
else
   echo "$a=$b"
fi
20. shell函数
1. 函数的定义
function 函数名 () {
  指令
  return n
}
2. 函数的调用
1. 不带参数
函数名
2. 带参数
函数名 参数1 参数2
3. 函数的使用说明
1. 执行函数时,不需要function和函数后的小括号
2. 函数的定义必须在执行的程序前面定义或加载
3. shell执行系统中各种程序的执行顺序为:系统别名-函数-系统命令-可执行文件
4. 函数执行时,会调用环境变量,还有自己定义的局部变量以及特殊位置参数
5. 在shell函数,return的功能与exit类似,return的作用是退出函数,而exit是退出脚本文件
6. 如果函数在一个单独的文件中,被脚本加载时,需要使用source或者.来加载(一个点)
4. 范例
1. 基本
[root@mysql-37 scripts]# cat hanshu.sh
#!/bin/bash
oldboy
oldboy ()
{
    echo "I am yangjianbo!"
}
function oldgirl ()
{
    echo "I am qiwei!"
}
oldboy
oldgirl
2. 分离函数体和执行函数
1. 函数体
[root@mysql-37 scripts]# cat hanshu_fenli.sh
#!/bin/bash
#created by yangjianbo at 2019-09-17
function yangjianbo (){
    echo "I am liudehua!"
}
只是定义了函数,但是没有执行函数
2. 执行函数的脚本
[root@mysql-37 scripts]# cat hanshu_diaoyong.sh
#!/bin/bash
[ -f /server/scripts/hanshu_fenli.sh ] && source /server/scripts/hanshu_fenli.sh || exit 1
yangjianbo
注意函数体的脚本,要使用source或者.执行,否则提示找不到函数yangjianbo.
3. 带参数[root@mysql-37 scripts]# cat hanshu_fenli.sh
#!/bin/bash
#created by yangjianbo at 2019-09-17
function yangjianbo (){
    echo "I am liudehua! $1"
}
[root@mysql-37 scripts]# cat hanshu_diaoyong.sh
#!/bin/bash
[ -f /server/scripts/hanshu_fenli.sh ] && source /server/scripts/hanshu_fenli.sh || exit 23
yangjianbo $1
4. 检查网站url
采用传入参数的方式
#!/bin/bash
. /etc/init.d/functions
function usage () {
   echo "USAGE $0: only one"
   exit 1
}

function check_url () {
  wget --spider -q -o /dev/null --tries=1 -T 5 $1
  if [ $? -eq 0 ];then
    action "the web server is OK" /bin/true
  else
    action "the web server is not OK" /bin/false
  fi
}

function main () {
  if [ $# -ne 1 ];then
    usage
  fi
  check_url $1
}
main $*

执行脚本:/bin/bash test.sh www.baidu.com
5. 简单例子:
[root@yangjianboinbeijing day5]# cat script1.sh
#!/bin/bash
#Sourse function library.
. /etc/init.d/functions
if [ "$1" == "start" ]
   then
     action "nginx starting." /bin/true
elif [ "$1" == "stop" ]
   then
     action "nginx is stopped." /bin/true
else
     action "nginx is start"  /bin/false
fi

[root@yangjianboinbeijing day5]# sh script1.sh
nginx is start                                             [失败]
[root@yangjianboinbeijing day5]# sh script1.sh start
nginx starting.                                            [  确定  ]
[root@yangjianboinbeijing day5]# sh script1.sh stop
nginx is stopped.                                          [  确定  ]
6. 利用shell函数开发一键优化系统脚本
1. 针对centos6的一键优化
#1.    更改yum源
#2.    关闭selinux
#3.    关闭iptables
#4.    精简开机自启服务
#5.    提权用户为sudo
#6.    中文字符集
#7.    时间同步
#8.    加大文件描述
#9.    内核优化
根据以上内容,将每个优化模块写成函数,如下:
#!/bin/bash
if [ $UID -ne 0 ];then
  echo "You must use thr root user!"
fi

function mod_yum(){
  if [ -e /etc/yum.repos.d/CentOS-Base.repo ];then
    mv /etc/yum.repos.d/CentOS-Base.repo /etc/yum.repos.d/CentOS-Base.repo.backup
    wget -O /etc/yum.repos.d/CentOS-Base.repo http://pub.mirrors.aliyun.com/repo/Centos-7.repo
  fi
}

function close_selinux(){
  sed -i "s#SELINUX=enforcing#SELINUX=disabled#g" /etc/sysconfig/selinux
  setenforce 0 > /dev/null 2>&1
}

function close_iptables(){
  /etc/init.d/iptables stop
  chkconfig iptables off
}

function add_user(){
  if [ `grep 'zhangshaohua1510' /etc/passwd | wc -l` -lt 1 ];then
    useradd zhangshaohua1510
    echo huazai007@zhenpin.com | passwd --stdin zhangshaohua1510
    \cp /etc/sudoers /etc/sudoers.bak
    echo "zhangshaohua1510 ALL=(ALL) NOPASSWD: ALL" >> /etc/sudoers
  fi
}

function time_sync(){
  if [ `rpm -qa | grep ntpdate | wc -l` -lt 1 ];then
     yum install ntpdate -y
  fi
  echo "* 4 * * * /usr/sbin/ntpdate us.pool.ntp.org > /dev/null 2>&1" >> /var/spool/cron/root
}

function openfile(){
  echo -e "* - nproc 65535 \n* - nofile 65535" >> /etc/security/limits.conf
}

main (){
  mod_yum
  close_selinux
  close_iptables
  add_user
  time_sync
  openfile
}
main
2. 针对centos7的一键优化
#!/bin/bash
if [ $UID -ne 0 ];then
  echo "You must use thr root user!"
fi

function mod_yum(){
  if [ -e /etc/yum.repos.d/CentOS-Base.repo ];then
    mv /etc/yum.repos.d/CentOS-Base.repo /etc/yum.repos.d/CentOS-Base.repo.backup
    wget -O /etc/yum.repos.d/CentOS-Base.repo http://pub.mirrors.aliyun.com/repo/Centos-7.repo
  fi
}

function close_selinux(){
  sed -i "s#SELINUX=enforcing#SELINUX=disabled#g" /etc/sysconfig/selinux
  setenforce 0 > /dev/null 2>&1
}

function close_iptables(){
  systemctl stop firewalld
  systemctl disable firewalld
}

function add_user(){
  if [ `grep 'zhangshaohua1510' /etc/passwd | wc -l` -lt 1 ];then
    useradd zhangshaohua1510
    echo huazai007@zhenpin.com | passwd --stdin zhangshaohua1510
    \cp /etc/sudoers /etc/sudoers.bak
    echo "zhangshaohua1510 ALL=(ALL) NOPASSWD: ALL" >> /etc/sudoers
  fi
}

function time_sync(){
  if [ `rpm -qa | grep ntpdate | wc -l` -lt 1 ];then
     yum install ntpdate -y
  fi
  echo "* 4 * * * /usr/sbin/ntpdate us.pool.ntp.org > /dev/null 2>&1" >> /var/spool/cron/root
}

function openfile(){
  echo -e "* - nproc 65535 \n* - nofile 65535" >> /etc/security/limits.conf
}

main (){
  mod_yum
  close_selinux
  close_iptables
  add_user
  time_sync
  openfile
}
main
7. 利用shell函数开发rsync服务启动脚本
1. 服务启动脚本
#!/bin/bash
if [ $# -ne 1 ];then
    echo $"usage:$0 {start|stop|restart}"
    exit 1
fi

if [ "$1" == "start" ];then
   rsync --daemon
   sleep 2
   if [ `netstat -lntp | grep rsync | wc -l` -ge 1 ];then
      echo "rsyncd is started."
      exit 0
   fi
elif [ "$1" == "stop" ];then
   killall rsync &>/dev/null
   sleep 2
   if [ `netstat -lntp | grep rsync |wc -l` -eq 0 ];then
      echo "rsyncd is stopped."
      exit 0
   fi
elif [ "$1" == "restart" ];then
   killall rsync
   sleep 1
   killpro=`netstat -lntp | grep rsync | wc -l`
   rsync --daemon
   sleep 1
   startpro=`netstat -lntp | grep rsync |wc -l`
   if [ $killpro -eq 0 -a $startpro -ge 1 ];then
      echo "rsyncd is restarted."
      exit 0
   fi
else
      echo $"usage:$0 {start|stop|restart}"
      exit 1
fi
2. 改造为函数
#!/bin/bash
function check_canshu(){
    echo $"usage:$0 {start|stop|restart}"
    exit 1
}

function start(){
   rsync --daemon
   sleep 2
   if [ `netstat -lntp | grep rsync | wc -l` -ge 1 ];then
      echo "rsyncd is started."
      exit 0
   fi
}

function stop(){
   killall rsync &>/dev/null
   sleep 2
   if [ `netstat -lntp | grep rsync |wc -l` -eq 0 ];then
      echo "rsyncd is stopped."
      exit 0
   fi
}

function restart(){
   killall rsync
   sleep 1
   killpro=`netstat -lntp | grep rsync | wc -l`
   rsync --daemon
   sleep 1
   startpro=`netstat -lntp | grep rsync |wc -l`
   if [ $killpro -eq 0 -a $startpro -ge 1 ];then
      echo "rsyncd is restarted."
      exit 0
   fi
}
function main(){
   if [ $# -ne 1 ];then
      check_canshu
   fi

   if [ "$1" == "start" ];then
      start
   elif [ "$1" == "stop" ];then
      stop
   elif [ "$1" == "restart" ];then
      restart
   else
      check_canshu
   fi
}
main
21. case条件语句的应用实践
1. 语法
case "条件" in
值1) 执行1
;;
值2) 执行2
;;
*) 执行3
esac
2. 实例
1. 根据用户的输入判断用户输入的是哪个数字
#!/bin/bash
read -p "input your number:" number
case "$number" in
  1)
     echo "you input the number is 1"
  ;;
  2)
     echo "you input the number is 2"
  ;;
  [3-9])
     echo "you input the number is $number"
  ;;
  *)
     echo $"usage:$0 you input 1-9 number"
esac
2. 往某个文件添加用户
#!/bin/bash
. /etc/init.d/functions
FILE_PATH=/etc/openvpn_authfile.conf
[ ! -f $FILE_PATH ] && touch $FILE_PATH
usage () {
  cat << EOF
    USAGE: `basename $0` {-add|-del|-search} username
EOF
}

if [ $UID -ne 0 ];then
   echo "You are not supper user,please call root!"
   exit 1;
fi

if [ $# -ne 2 ];then
   usage
   exit 2
fi

case "$1" in
    -a|-add)
        shift
        if grep "^$1$" ${FILE_PATH} >/dev/null 2>&1;then
           action $"vpnuser,$1 is exist" /bin/false
           exit
        else
           chattr -i ${FILE_PATH}
           /bin/cp ${FILE_PATH} ${FILE_PATH}.$(date +%F%T)
           echo "$1" >> ${FILE_PATH}
           [ $? -eq 0 ] && action $"Add $1" /bin/true
           chattr +i ${FILE_PATH}
        fi
        ;;

    -d|-del)
        shift
        if [ `grep "\b$1\b" ${FILE_PATH}|wc -l` -lt 1 ];then
           action $"vpnuser,$1 is not exist." /bin/false
           exit
        else
           chattr -i ${FILE_PATH}
           /bin/cp ${FILE_PATH} ${FILE_PATH}.$(date +%F%T)
           sed -i "/^${1}$/d" ${FILE_PATH}
           [ $? -eq 0 ] && action $"Del $1" /bin/true
           chattr +i ${FILE_PATH}
        fi
        ;;

     -s|-search)
        shift
        if [ `grep -w "$1" ${FILE_PATH}|wc -l` -lt 1 ];then
           echo $"vpnuser,$1 is not exist.";exit
        else
           echo $"vpnuser,$1 is exist.";exit
        fi
        ;;

      *)
        usage
        exit

esac
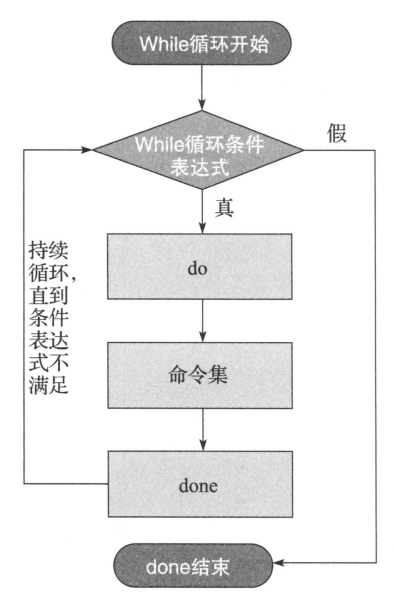
22. while循环和until循环的应用实践
1. while循环的语法
while <条件表达式>
do
    指令
done
2. while循环执行流程的逻辑图
3. until循环的语法
until <条件表达式>
do
        指令
done
4. 当型和直到型循环的基本范例
1. 持续查看uptime
#!/bin/bash
while true
do
   uptime
   sleep 2
done
5. shell脚本后台运行
1. 相关用法和说明
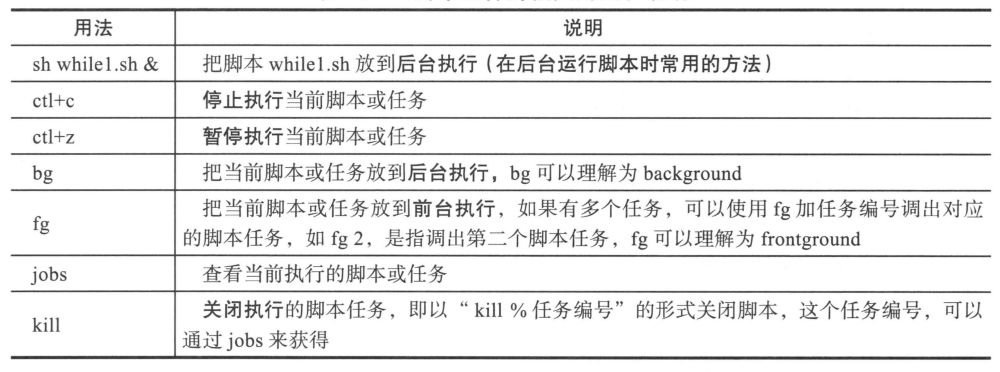
2. 例子
开启两个脚本,都放到后台执行
/bin/bash while.sh &
/bin/bash while2.sh &
通过jobs命令,查看当前任务的编号

想把其中一个放到前台执行,fg 1
如果想把1又放到后台执行,先ctrl+z暂停,然后执行bg 1,就放到后台执行了。
想杀掉一个任务,kill %1
6. while和until的例子
1. 打印出54321
#!/bin/bash
i=5
while [ $i -gt 0 ]
do
    echo $i >> /tmp/1.txt
    ((i--))
done

#!/bin/bash
i=5
until [ $i -lt 1 ]
do
    echo $i >> /tmp/2.txt
    ((i--))
done
2. 计算从1加到100之和
#!/bin/bash
i=1
sum=0
while [ $i -le 100 ]
do
   ((sum=$sum+$i))
   ((i++))
done
echo $sum
7. 企业实战
1. 使用while守护进程的方式监控网站,每隔10秒确定一次网站是否正常
#!/bin/bash
. /etc/init.d/functions
if [ $# -ne 1 ];then
    echo $"usage: $0 url"
    exit 1
fi

while true
do
  if [ `curl -o /dev/null -s -w %{http_code} $1 | grep -E "200|301|302" | wc -l` -ne 1 ];then
      action "$1 is error" /bin/false
    else
      action "$1 is OK" /bin/true
  fi
  sleep 10
done
2. 使用shell数组的方式,同时检测多个网站
#!/bin/bash
. /etc/init.d/functions
check_count=0
url_list=(
https://www.baidu.com
https://www.google.com.cn
https://www.zhen.com
)

function wait(){
  echo -n '3秒后,执行检查url操作.';
  for ((i=0;i<3;i++))
  do
    echo -n ".";sleep 1
  done
  echo
}

function check_url(){
  wait
  for ((i=0;i<`echo ${#url_list[*]}`; i++))
  do
    wget -o /dev/null -T 3 --tries=1 --spider --no-check-certificate ${url_list[$i]} >/dev/null 2>&1
    if [ $? -eq 0 ];then
       action "${url_list[$i]}" /bin/true
    else
       action "${url_list[$i]}" /bin/false
    fi
  done
  ((check_count++))
}

main(){
  while true
  do
    check_url
    echo "--------check count:${check_count}"
    sleep 10
  done
}
main
3. 分析apache或者nginx访问日志的字节总数
#!/bin/bash
sum=0
exec <$1
while read line
do
  size=`echo $line | awk '{print $10}'`
  expr $size + 1 &> /dev/null
  if [ $? -ne 0 ];then
     continue
  fi
  ((sum=sum+$size))
done
echo "$1:total:${sum}bytes=`echo $((${sum}/1024))`KB"
其它方法
awk '{print $10}' /usr/local/nginx/logs/test.zhenpin.com.log |awk '{sum+=$1}END{print sum}'
4. 分析nginx的访问日志,每一个小时一次,并且把访问的web的ip的PV次数超过500的,通过iptables禁止掉。
#!/bin/bash
file=$1

while true
do
  awk '{print $1}' access.log | sort | uniq -c > /tmp/ip.txt
  exec < /tmp/ip.txt
  while read line
  do
    ip=`echo $line | awk '{print $2}'`
    count=`echo $line |awk '{print $1}'`
    if [ $count -gt 500 ]  && [ `iptables -L -n | grep "$ip" | wc -l` -lt 1 ];then
       iptables -I INPUT -s $ip -j DROP
       echo "$line is dropped" >> /tmp/iptables_drop.txt
    fi
  done
  sleep 3600
done
5. 分析系统的网络连接数
#!/bin/bash
while true
do
  netstat -ntp | awk -F '[ :]+' '{print $(NF-4)}' | sort | uniq -c > /tmp/ip.txt
  while read line
  do
    ip=`echo $line | awk '{print $2}'`
    count=`echo $line |awk '{print $1}'`
    if [ $count -gt 500 ]  && [ `iptables -L -n | grep "$ip" | wc -l` -lt 1 ];then
       iptables -I INPUT -s $ip -j DROP
       echo "$line is dropped" >> /tmp/iptables_drop.txt
    fi
  done
  sleep 3600
done
8. while循环按行读文件的方式
1. 使用exec方式
exec < a.txt
while read line
do
   cmd
done
2. cat方式
cat a.txt | while read line
do
    cmd
done
3. 结尾使用<输入重定向
while read line
do
   cmd
done <a.txt
23. for和select循环的应用实践
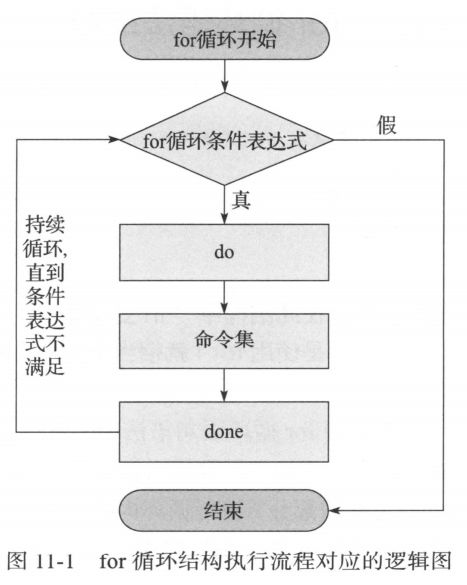
1. for循环
1. 语法: for 变量 in <变量取值列表>
do
循环体
done
第二种语法:
for ((exp1;exp2;exp3))
do
指令
done
例子:
for ((i=1;i<=3;i++))
do
echo $i
done
2. for循环执行过程
2. for循环语句的基础实践
1. 取值列表为普通数字或字符串
#!/bin/bash
for i in 1 2 3 4 5
do
  echo $i
done
2. 取值列表为{}大括号的数字序列
#!/bin/bash
for i in {5..10}
do
  echo $i
done
3. 取值列表为某个命令的输出结果
#!/bin/bash
for i in `seq 10 100`
do
  echo $i
done
#!/bin/bash
for i in $(seq 5 10)
do
  echo $i
done
4. 列出某个目录下的所有文件和目录
#!/bin/bash
for i in `ls`
do
    echo $i
done
5. 批量修改文件名称
#!/bin/bash
for file in `find /data/vendor/653/ -type f`
do
 newfile=`echo $file | sed 's/%//g'`
 mv $file $newfile
done
#!/bin/bash
for i in `ls`
do
    rename ".txt" ".gif" $i
done
6. 九九乘法表
#!/bin/bash
COLOR='\E[47;30m'
RES='\E[0m'
for num1 in `seq 9`
do
  for num2 in `seq 9`
  do
    if [ $num1 -ge $num2 ];then
       if (((num1*num2)>9));
       then
         echo -ne "${COLOR}$num1*$num2=$((num1*num2))$RES " 后面跟了一个空格
       else
         echo -ne "${COLOR}$num1*$num2=$((num1*num2))$RES  " 后面跟了两个空格
       fi
    fi
  done
echo ""    使用echo是为了换行
done
7. 计算从1加到100的和
#!/bin/bash
for ((i=1;i<=100;i++))
do
  ((sum=sum+i))
done
echo $sum
8. 每5秒访问一次百度
#!/bin/bash
for ((i=0;i<5;i++))
do
   curl http://www.baidu.com
   sleep 5
done
3. for循环语句的企业高级实战实例
1. mysql分库备份脚本
#!/bin/bash
USER=root
PASSWD="123.com"
BACK_PATH=/server/backup
MYSQL_CMD="mysql -u$USER -p$PASSWD"
MYSQL_DUMP="mysqldump -u$USER -p$PASSWD -B"
[ ! -d $BACK_PATH ] && mkdir -p $BACK_PATH
for dbname in `$MYSQL_CMD -e "show databases" |grep -Ev "mysql|performance_schema|information_schema|password|Database|sys"`
do
   `$MYSQL_DUMP ${dbname} | gzip > $BACK_PATH/${dbname}_$(date +%F).sql.gz`
done
2. mysql分库分表备份脚本
#!/bin/bash
USER=root
PASSWD="123.com"
BACK_PATH=/server/backup
MYSQL_CMD="mysql -u$USER -p$PASSWD"
MYSQL_DUMP="mysqldump -u$USER -p$PASSWD -B"
[ ! -d $BACK_PATH ] && mkdir -p $BACK_PATH
for dbname in `$MYSQL_CMD -e "show databases" |grep -Ev "mysql|performance_schema|information_schema|password|Database|sys"`
do
    [ ! -d $BACK_PATH/${dbname} ] && mkdir -p $BACK_PATH/${dbname}
    for tbname in `$MYSQL_CMD -e "show tables from ${dbname}" | sed "1d"`
    do
      `$MYSQL_DUMP ${dbname} ${tbname} | gzip > $BACK_PATH/${dbname}/${tbname}_$(date +%F).sql.gz`
    done
done
3. 检查web服务是否正常,并且发送相关邮件或手机报警信息
4. 批量创建10个账号,密码随机
#!/bin/bash
#created by yangjianbo
rm -rf /tmp/password.log
for num in `seq -w 10`
do
    useradd oldboy_user${num}
    password=`echo $RANDOM | md5sum | cut -c 1-8`
    echo ${password} | passwd --stdin oldboy_user${num}
    echo -e "username:oldboy_user${num}\tpassword:${password}" >> /tmp/password.log
done
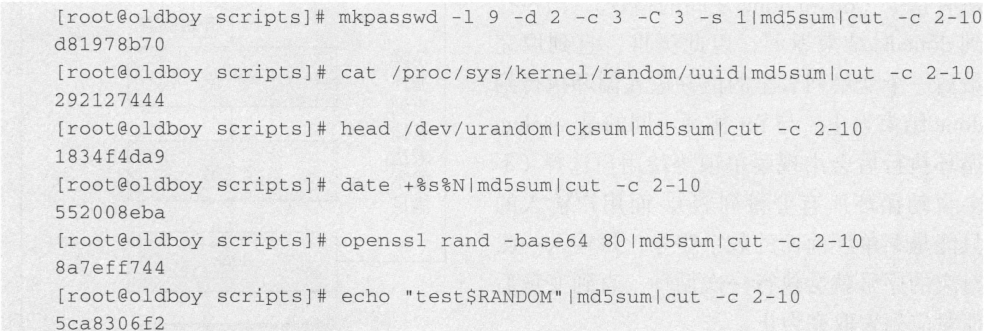
4. linux系统产生随机数的6种方法
1. 通过系统环境变量($RANDOM)
RANDOM的随机数范围为0~32767,加密性不是很好,可以使用md5sum并截取结果的后n位
[root@192 scripts]# echo $RANDOM | md5sum | cut -c 1-8
af861e2e
2. 通过openssl产生随机数
[root@192 scripts]# openssl rand -base64 60 | md5sum | cut -c 2-9
72d02d47
3. 通过date获得随机数
[root@192 scripts]# date +%s$N
1637826212
4. 通过/dev/urandom配合chksum生成随机数
[root@192 ~]# head /dev/urandom |cksum
3483541954 2747
5. 通过UUID生成随机数
[root@192 ~]# cat /proc/sys/kernel/random/uuid
cfd1f306-4a1e-4770-9383-963e18851062
6. 通过expect附带的mkpasswd生成随机数
yum install expect -y
mkpasswd相关参数

7. 以上所有命令需要结合md5sum使用
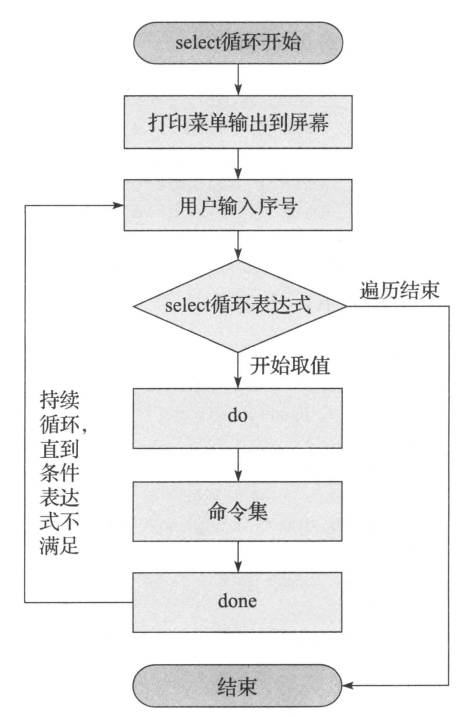
5. select循环语句
1. 语法
select 变量名 in [菜单取值列表]
do
指令
done
2. 案例
1. 打印菜单
#!/bin/bash
select name in yangjianbo luoyin yichangkun
do
  echo $name
done
2. 使用数组做变量列表
#!/bin/bash
array=(liudehua zhangxueyou liming guofucheng)
select name in "${array[@]}"
do
  echo $name
done
3. 调整select的默认提示符
#!/bin/bash
array=(liudehua zhangxueyou liming guofucheng)
PS3="please select a num from menu:"
select name in "${array[@]}"
do
  echo $name
done
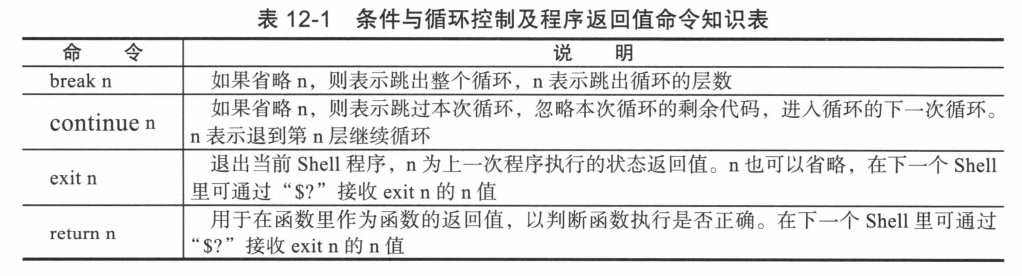
24. 循环控制及状态返回值的应用实践
1. break,continue,exit,return的区别和对比
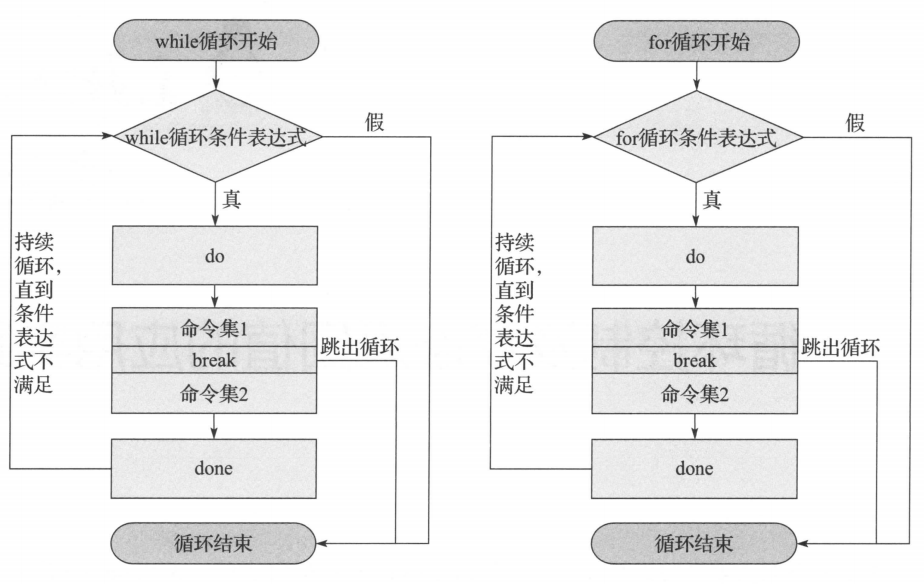
2. break,continue,exit功能执行流程图
1. break执行流程图
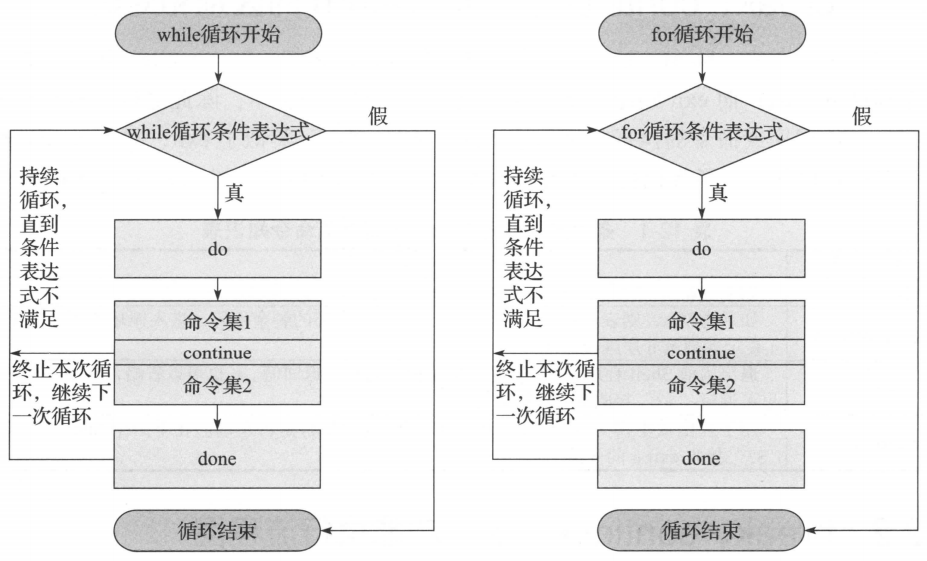
2. continue执行流程图
3. exit的执行流程图

3. break,continue,exit,return的基础案例
#!/bin/bash
if [ $# -ne 1 ];then
    echo "usage: break|continue|exit|return"
fi

function test (){
  for ((i=0;i<5;i++))
  do
    if [ $i -eq 3 ];then
       $*;
    fi
    echo $i
  done
  echo "I am in func"
}
test $*
func_test=$?
if [ `echo $* | grep return | wc -l` -eq 1 ];then
    echo "function is exit status: $func_test"
fi
echo "ok"
1. 传入的参数为break,当for循环条件成立,那么直接跳出了for循环
[root@192 scripts]# /bin/bash test_break.sh break
0
1
2
I am in func
ok
2. 传入的参数为continue,当for循环成立,跳出了本次循环,进入了下一次循环
[root@192 scripts]# /bin/bash test_break.sh continue
0
1
2
4
I am in func
ok
3. 传入的参数为exit,当for循环成立,直接退出了脚本,后面的代码就没有执行
[root@192 scripts]# /bin/bash test_break.sh exit
0
1
2
4. 传入的参数为return,当for循环成立,退出了函数,后面的代码仍然执行了。
[root@192 scripts]# /bin/bash test_break.sh return
0
1
2
function is exit status: 0
ok
4. 企业案例
1. 服务器上添加或删除网卡的ip地址
2. 把日志中每行的访问字节数所对应的字段数字相加,计算出总的访问量。
#!/bin/bash
sum=0
exec <$1
while read line
do
  size=`echo $line | awk '{print $10}'`
  expr $size + 1 &> /dev/null
  if [ $? -ne 0 ];then
     continue
  fi
  ((sum=sum+$size))
done
echo "$1:total:${sum}bytes=`echo $((${sum}/1024))`KB"
3. 提供了一个字符串(RANDOM随机数采用md5sum加密后取出连续10位的结果),请破解字符串对应的md5sum前的数字。
for i in {0..32767};do echo `echo $i |md5sum`,$i >> /tmp/1.txt;done

#!/bin/bash
md5char="4fe8bf20ed"
while read line
do
   if [ `echo $line|grep "$md5char"| wc -l` -eq 1 ];then
      echo $line
      break
   fi
done < /tmp/1.txt
25. shell数组的应用实践
1. 什么是数组
shell数组就是一个元素集合
2. 数组的定义与增删改查
1. 定义
语法:array=(value1 value2 value3 ...)
2. 定义变量的方式
1. 小括号直接赋值
[root@192 scripts]# a=(1 2 3)
[root@192 scripts]# echo ${a[*]}
1 2 3
2. 小括号内采用键值对
[root@192 scripts]# a=([15]=1 [13]=2 [14]=3)
[root@192 scripts]# echo ${a[*]}
2 3 1
3. 分别定义数组变量
[root@192 scripts]# a[0]=yangjianbo;a[1]=luoying;a[2]=yichangkun
[root@192 scripts]# echo ${a[*]}
yangjianbo luoying yichangkun
4. 动态定义数组变量
[root@192 scripts]# echo ${a[*]}
1.gif 2.gif 3.gif case.sh check_ip.sh check_netstat.sh check_url.sh index.html ls_test.sh memeory_free.sh openvpn_user.sh rsynd rsynd-funcation solrslow.sh test_break.sh test_centos7.sh test_random.sh test_select.sh test.sh test_url.sh until.sh while2.sh while.sh
3. 打印数组元素
echo ${a[0]} 默认下标从0开始的
echo ${a[*]} 打印出所有的元素
4. 打印数组元素的个数
echo ${#a[*]}
echo ${#a[@]}
5. 数组赋值
[root@192 scripts]# a[0]=liudehua
[root@192 scripts]# echo ${a[0]}
liudehua
6. 数组删除
[root@192 scripts]# unset a[0]     删除某个元素
[root@192 scripts]# unset a    删除整个变量
7. 数组内容的截取和替换
1. 内容截取
[root@192 ~]# echo ${a[*]}
a b c d e f g h i j k l m n o p q r s t u v w x y z

[root@192 ~]# echo ${a[*]:1:4}    第一个冒号后面的数字表示从下标为1开始,第二个冒号后面的数字表示截取的长度
b c d e
2. 内容替换
[root@192 ~]# echo ${a[*]/one/1}
1 two three four five six seven eight nine ten
3. shell数组开发实践
1. 通过C语言型的for循环语句打印数组元素
#!/bin/bash
a=(one two three four five)
for ((i=0;i<${#a[*]};i++))
do
  echo ${a[i]}
done
使用普通的for循环
#!/bin/bash
a=(one two three four five)
for i in ${a[*]}
do
   echo $i
done
2. 通过while循环语句打印数组元素
#!/bin/bash
a=(one two three four five)
i=0
while ((i<${#a[*]}));
do
  echo ${a[i]}
  ((i++))
done
3. 将命令结果作为数组元素定义并打印
#!/bin/bash
a=($(ls /root))
for i in ${a[*]};
do
  echo $i
done
4. 高级实战案例
1. 利用bash for循环打印下面这句话中字母数不大于6的单词
I am oldboy teacher welcome to oldboy training class
1. 通过数组实现
#!/bin/bash
a=(I am oldboy teacher welcome to oldboy training class)
for ((i=0;i<${#a[*]};i++))
do
   if [ ${#a[i]} -le 6 ];then
      echo ${a[i]}
   fi
done
2. 通过for循环实现
#!/bin/bash
a="I am oldboy teacher welcome to oldboy training class"
for i in $a;
do
  if [ ${#i} -le 6 ];then
     echo $i
  fi
done
3. 通过awk实现
[root@192 scripts]# a="I am oldboy teacher welcome to oldboy training class"
[root@192 scripts]# echo $a | awk '{for (i=1;i<=NF;i++) if (length($i)<=6) print $i}'
2. 批量检查多个网站地址是否正常
#!/bin/bash
. /etc/init.d/functions
check_count=0
url_list=(
https://www.baidu.com
https://www.google.com.cn
https://www.zhen.com
)

function wait(){
  echo -n '3秒后,执行检查url操作.';
  for ((i=0;i<3;i++))
  do
    echo -n ".";sleep 1
  done
  echo
}

function check_url(){
  wait
  for ((i=0;i<`echo ${#url_list[*]}`; i++))
  do
    wget -o /dev/null -T 3 --tries=1 --spider --no-check-certificate ${url_list[$i]} >/dev/null 2>&1
    if [ $? -eq 0 ];then
       action "${url_list[$i]}" /bin/true
    else
       action "${url_list[$i]}" /bin/false
    fi
  done
  ((check_count++))
}

main(){
  while true
  do
    check_url
    echo "--------check count:${check_count}"
    sleep 10
  done
}
main
3. 开一个守护进程脚本,每30秒监控一次mysql主从复制是否正常,如果有异常,就发出邮件报警
#!/bin/sh
USER=root
PASSWORD=123456
PORT=3307
error=(1158 1159 1008 1007 1062)
MYSQLCMD="mysql -u$USER -p$PASSWORD -S /data/$PORT/mysql.sock"

is_run(){
  [ `lsof -i:$PORT|wc -l` -lt 2 ]&&{
    echo "mysql server is stopped"
    exit 1
  }
}

status_array(){
 status=($($MYSQLCMD -e "show slave status\G"|egrep "_Running|Last_Errno|Behind_Master"|awk '{print $NF}'))
}

status_error(){
for((i=0;i<${#error[*]};i++))
do
  if [ "$1" == "${error[$i]}" ]
    then
      $MYSQLCMD -e "stop slave;set global sql_slave_skip_counter=1;start slave;"
  else
      echo "MySQL slave is failed, errorno is $1"
  fi
done
}

judge_slave(){
  status_array
  if [ "${status[0]}" == "Yes" -a "${status[1]}" == "Yes" -a "${status[3]}" = "0" ]
  then
    echo "MySQL slave is ok"
  else
    status_error ${status[2]}
  fi
}

main(){
while true
do
  is_run
  judge_slave
  sleep 60
done
}
main
26. shell脚本开发规范
1. 脚本基本规范
1. 第一行指定脚本解释器。/bin/bash
2. 从第二行开始添加日期,作者,功能介绍,版本号
3. 脚本命名以sh结尾
4. 成对出现的符号,一次性写完
5. 流程控制语句一次性写完
6. 代码缩进让代码易读
7. 字符串赋值给变量要加双引号
2. shell变量命名及引用变量规范
1. 全局变量
必须大写
2. 局部变量
驼峰语法
首字母大写
3. 变量的引用规范
使用大括号引用变量 ${变量名}
变量内容为字符串时,加双引号 "${变量名}"
变量内容为整数时,直接使用 $变量名 来引用
3. shell函数的命名及函数定义规范
1. 函数名首字母大写
4. shell脚本高级命名规范
1. 常规shell使用.sh后缀
2. 模块的启动或停止 start_模块名.sh stop_模块名.sh
3. 监控脚本*_mon.sh
4. 控制脚本*_ctl.sh
27. shell脚本的调试
1. 常见脚本错误范例
1. if条件语句缺少结尾关键字
2. 循环语句缺少关键字
3. 成对符号落了单
4. 中括号两端没空格
2. shell脚本调试技巧
1. 使用dos2unix命令处理在windows下开发的脚本
dos2unix while.sh
yum install dos2unix -y
2. 使用echo命令调试
3. 使用bash命令参数调试
-n 不会执行脚本,只会检查语法
-v 先将脚本的内容输出到屏幕上,然后执行脚本,如果有错误,也会给出错误提示
-x 将执行的脚本内容及输出显示到屏幕上,常用的参数
28. shell脚本开发环境的配置和优化
1. 配置文件.vimrc的重要参数
set nocompatible
set history=100
filetype on
filetype plugin on
filetype indent on
set autoread
set mouse=a
syntax enable
set cursorline
hi cursorline guibg=#00ff00
hi CursorColumn guibg=#00ff00
set nofen
set fdl=0
set expandtab
set tabstop=4
set shiftwidth=4
set softtabstop=4
set smarttab
set ai
set si
set wrap
set sw=4
set wildmenu
set ruler
set cmdheight=1
set lz
set backspace=eol,start,indent
set whichwrap+=<,>,h,l
set magic
set noerrorbells
set novisualbell
set showmatch
set mat=2
set hlsearch
set ignorecase
set encoding=utf-8
set fileencodings=utf-8
set termencoding=utf-8
set smartindent
set cin
set showmatch
set guioptions-=T
set guioptions-=m
set vb t_vb=
set laststatus=2
set pastetoggle=<F9>
set background=dark
highlight Search ctermbg=black  ctermfg=white guifg=white guibg=black
autocmd BufNewFile *.py,*.cc,*.sh,*.java exec ":call SetTitle()"
func SetTitle()
    if expand("%:e") == 'sh'
        call setline(1, "#!/bin/bash")
        call setline(2, "#Author:Ray")
        call setline(3, "#Blog:https://blog.51cto.com/14154700")
        call setline(4, "#Time:".strftime("%F %T"))
        call setline(5, "#Name:".expand("%"))
        call setline(6, "#Version:V1.0")
        call setline(7, "#Description:This is a test script.")
    endif
endfunc
对于上面参数的解释
"关闭兼容模式
set nocompatible
"设置历史记录步数
set history=100
"开启相关插件
filetype on
filetype plugin on
filetype indent on
"当文件在外部被修改时,自动更新该文件
set autoread
"激活鼠标的使用
set mouse=a
"""""""""""""""""""""
" => 字体和颜色
"""""""""""""""""""""
"开启语法
syntax enable
"设置字体
"set guifont=dejaVu\ Sans\ MONO\ 10
"
""设置配色
"colorscheme desert
"高亮显示当前行
set cursorline
hi cursorline guibg=#00ff00
hi CursorColumn guibg=#00ff00
"""""""""""""""""""""
" => 代码折叠功能 by oldboy
"""""""""""""""""""""
"激活折叠功能
set foldenable
"设置按照语法方式折叠(可简写set fdm=XX)
"有6种折叠方法:
"manual 手工定义折叠
"indent 更多的缩进表示更高级别的折叠
"expr   用表达式来定义折叠
"syntax 用语法高亮来定义折叠
"diff   对没有更改的文本进行折叠
"marker 对文中的标志进行折叠
set foldmethod=manual
"设置折叠区域的宽度
"如果不为0,则在屏幕左侧显示一个折叠标识列
"分别用“-”和“+”来表示打开和关闭的折叠。
set foldcolumn=0
"设置折叠层数为3
setlocal foldlevel=3
"设置为自动关闭折叠
set foldclose=all
"用空格键来代替zo和zc快捷键实现开关折叠
"zo  O-pen a fold   (打开折叠)
"zc  C-lose a fold  (关闭折叠)
"zf  F-old creation (创建折叠)
nnoremap <space> @=((foldclosed(line('.')) < 0)  'zc' : 'zo')<CR>
"""""""""""""""""""""
" => 文字处理 by oldboy
"""""""""""""""""""""
"使用空格来替换Tab
set expandtab
"设置所有的Tab和缩进为4个空格
set tabstop=4
"设定 << 和 >> 命令移动时的宽度为4
set shiftwidth=4
"使得按退格键时可以一次删掉4个空格
set softtabstop=4
set smarttab
"缩进,自动缩进(继承前一行的缩进)
"set autoindent命令关闭自动缩进,是下面配置的缩写。
"可使用autoindent命令的简写,即 “:set ai” 和 “:set noai”。
"还可以使用“ :set ai sw=4”在一个命令中打开缩进并设置缩进级别。
set ai
"智能缩进
set si
"自动换行
set wrap
"设置软宽度
set sw=4
"""""""""""""""""""""
" => Vim 界面 by oldboy
"""""""""""""""""""""
"Turn on WiLd menu
set wildmenu
"显示标尺
set ruler
"设置命令行的高度
set cmdheight=1
"显示行数
"set nu
"Do not redraw, when running macros.. lazyredraw
set lz
"设置退格
set backspace=eol,start,indent
"Bbackspace and cursor keys wrap to
set whichwrap+=<,>,h,l
"Set magic on(设置魔术)
set magic
"关闭遇到错误时的声音提示
"关闭错误信息响铃
set noerrorbells
"关闭使用可视响铃代替呼叫
set novisualbell
"显示匹配的括号([{和}])
set showmatch
"How many tenths of a second to blink
set mat=2
"搜索时高亮显示搜索到的内容
set hlsearch
"搜索时不区分大小写
"还可以使用简写(“:set ic” 和 “:set noic”)
set ignorecase
"""""""""""""""""""""
" => 编码设置
"""""""""""""""""""""
"设置编码
set encoding=utf-8
"设置文件编码
set fileencodings=utf-8
"设置终端编码
set termencoding=utf-8
"""""""""""""""""""""
" => 其他设置 by oldboy 2010
"""""""""""""""""""""
"开启新行时使用智能自动缩进
set smartindent
set cin
set showmatch
"隐藏工具栏
set guioptions-=T
"隐藏菜单栏
set guioptions-=m
"置空错误铃声的终端代码
set vb t_vb=
"显示状态栏 (默认值为 1, 表示无法显示状态栏)
set laststatus=2
"粘贴不换行问题的解决方法
set pastetoggle=<F9>
"设置背景色
set background=dark
"设置高亮相关
highlight Search ctermbg=black  ctermfg=white guifg=white guibg=black
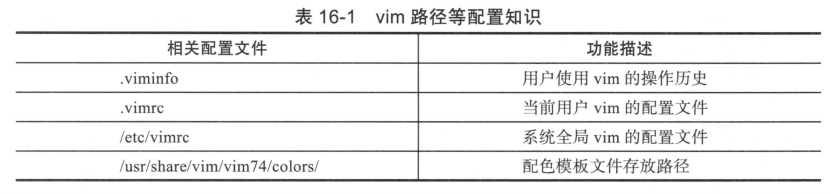
vim路径等配置
29. Expect自动化交互式程序应用实践
1. 安装Expect软件
yum install expect -y
2. Expect程序自动交互的重要命令及实践
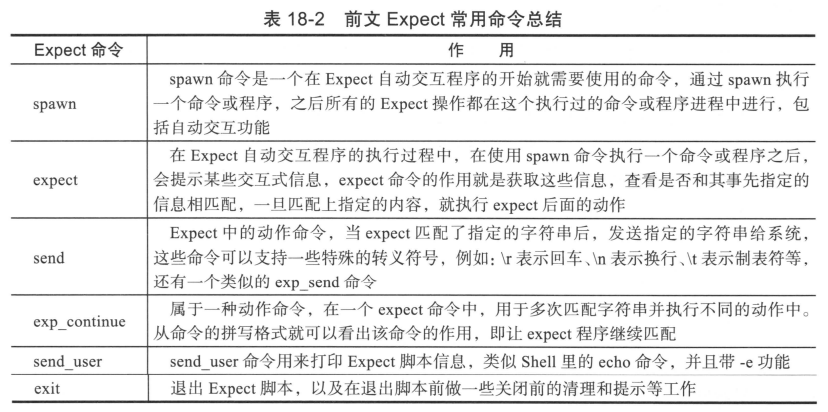
1. spawn命令
语法: spawn [选项] [需要自动交互的命令或程序]
spawn ssh root@192.168.10.200 uptime
2. expect命令
获取spawn命令执行后的信息,看是否匹配,匹配就执行expect后面的动作
语法: expect 表达式 [动作]
expect "*password" {send "123456\r"}
expect eof
或者expect与send放在不同行
expect "*password"
send "123456\r"
expect eof
多次匹配不同的字符串
expect {
"yes/no" {exp_send "yes\r";exp_continue}
"*password" {exp_send "123456\r"}
}
expect eof
3. send命令
\r表示回车
\n表示换行
\t表示制表符
4. exp_continue命令
表示继续匹配
5. 常用命令总结
3. expect程序变量
1. 普通变量
语法: set 变量名 变量值
set password "123456"
打印变量
puts $变量名
2. 特殊参数变量
1. 位置参数
语法:[lindex $argv n]
例子:
#!/usr/bin/expect
#define var
set file [lindex $argv 0]
set host [lindex $argv 1]
set dir  [lindex $argv 2]
send_user "$file\t$host\t$dir\n"
puts "$file\t$host\t$dir\n"
结果:
[root@192 scripts]# expect teshu.exp yangjianbo.log 192.168.1.130 /tmp
yangjianbo.log  192.168.1.130   /tmp
yangjianbo.log  192.168.1.130   /tmp
2. 传参的个数和脚本名参数
#!/usr/bin/expect
#define var
set file [lindex $argv 0]
set host [lindex $argv 1]
set dir  [lindex $argv 2]
send_user "$file\t$host\t$dir\n"
puts "$file\t$host\t$dir\n"
puts "$argc\n"     传参个数$argc
puts "$argv0\n"     传参脚本名 $argv0,没有空格的
4. expect的if条件语句
1. 语法
if   {条件表达式}   {
   指令
}

if    {条件表达式}   {
   指令
}  else  {       #固定格式,不能修改
   指令
}
2. 例子
1. 判断传参个数
#!/usr/bin/expect
if { $argc !=3 } {
    send_user  "usage: expect $argv0 file host dir\n"
    exit
}

#define var
set file [lindex $argv 0]
set host [lindex $argv 1]
set dir  [lindex $argv 2]
send_user "$file\t$host\t$dir\n"
puts "$file\t$host\t$dir\n"
puts "$argc\n"
puts "$argv0\n"
2. 判断传参个数,不管是否符合都给予提示
#!/usr/bin/expect
if { $argc !=3 } {
    send_user  "usage: expect $argv0 file host dir\n"
    exit
} else {
  puts "good."
}

#define var
set file [lindex $argv 0]
set host [lindex $argv 1]
set dir  [lindex $argv 2]
send_user "$file\t$host\t$dir\n"
puts "$file\t$host\t$dir\n"
puts "$argc\n"
puts "$argv0\n"
5. expect中的关键字
1. eof
用于匹配结束符
2. timeout
控制时间的关键字变量
6. 生产场景下的实例
1. 批量执行命令
#!/usr/bin/expect
if { $argc !=2 }  {
    send_user "usage:expect $argv0 ip cmd \n"
    exit
}

#define var
set ip [lindex $argv 0]
set cmd [lindex $argv 1]
set password "**********"

spawn ssh -p11984 zhangshaohua1510@$ip $cmd
expect {
    "yes/no"    {send "yes\r";exp_continue}
    "*password" {send "$password\r"}

}
expect eof
再加一个shell脚本,for循环,用来遍历多个机器ip
[root@node1 scripts]# cat for.sh
#!/bin/bash
#Author:yangjianbo
#Blog:https://www.cnblogs.com/yangjianbo
#Time:2021-12-08 09:36:39
#Name:for.sh
#Version:V1.0
#Description:This is a test script.
if [ $# -ne 1 ];then
    echo $"USAGE: $0 cmd"
    exit 1
fi
cmd=$1
for i in 192 193 194
do
    expect /server/scripts/ceshi.exp 192.168.2.$i "$cmd"
done
2. 批量复制文件
#!/usr/bin/expect
if { $argc != 3 } {
    puts "usage: expect $argv0 file host dir"
    exit
}

#define var
set file [lindex $argv 0]
set host [lindex $argv 1]
set dir  [lindex $argv 2]
set password "***************"
spawn scp -P11984 -rp $file zhangshaohua1510@$host:$dir
expect {
    "yes/no"    {send "yes\r";exp_continue}
    "*password" {send "$password\r"}
}
expect eof
再加一个脚本,执行for循环,遍历多台机器
#!/bin/bash
#Author:yangjianbo
#Blog:https://www.cnblogs.com/yangjianbo
#Time:2021-12-08 09:36:39
#Name:for.sh
#Version:V1.0
#Description:This is a test script.
if [ $# -ne 2 ];then
    echo $"USAGE: $0 file dir"
    exit 1
fi
file=$1
dir=$2
for i in 192 193 194
do
    expect /server/scripts/copy.exp $file 192.168.2.$i $dir
done
3. 自动化部署ssh密钥认证+ansible的项目实战
#!/usr/bin/expect
if { $argc != 2 } {
        send_user "usage: expect $argv0 file host\n"
                exit
}

#define var
set file [lindex $argv 0]
set host [lindex $argv 1]
set password "huazai007@zhenpin.com"
spawn ssh-copy-id -i $file "-p 11984 zhangshaohua1510@$host"
expect {
        "yes/no"    {send "yes\r";exp_continue}
        "*password" {send "$password\r"}
}
expect eof
加一个for循环脚本,遍历多个机器
#!/bin/bash
for i in 191 192 193 194
do
    expect /server/scripts/ssh-copy.exp ~/.ssh/id_rsa.pub 192.168.2.$i
done


 浙公网安备 33010602011771号