
Nginx之lua实现机制
1. nginx_lua原理
ngx_lua将lua集成进Nginx
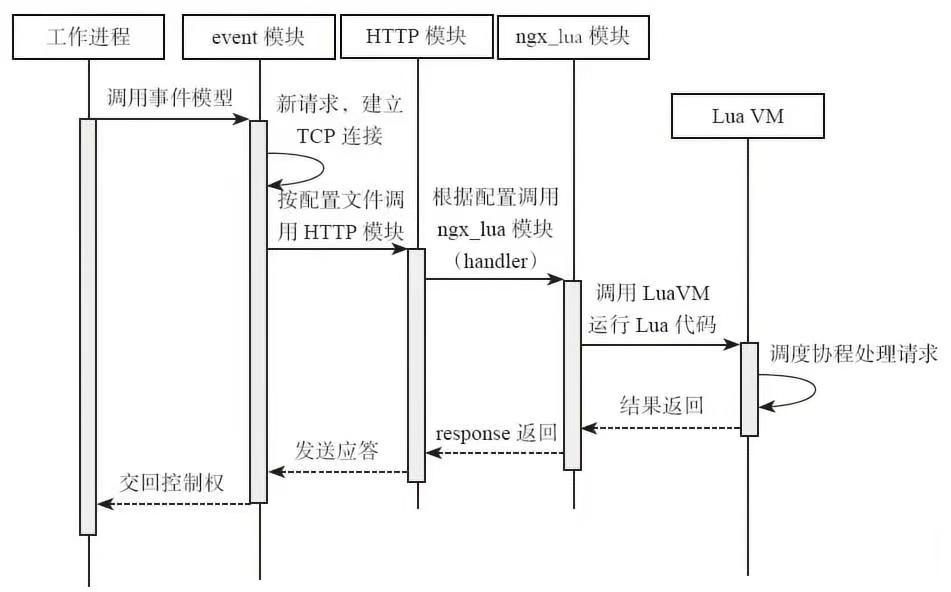
Lua内建协程,协程调用异步API,然后协程挂起,在异步回调事件到来时,再将协程唤醒,继续执行。
这样既可以实现全异步的Nginx机制,不会影响nginx的高并发处理性能,又使开发者以同步的方式编写异步程序,使代码复杂性大为降低。
ngx_lua中Lua的I/O操作都委托给Nginx事件模型,从而实现完全的非阻塞调用。
ngx_lua在Nginx的管理/工作进程机制基础上加入了Lua解释器或虚拟机。
ngx_lua在每一个Nginx工作进程上执行一个Lua解释器或LuaJIT实例,这个工作进程上处理的所有请求共享这个实例。
每个请求的上下文都被Lua的协程分割,保证每个请求都是独立的。
ngx_lua采用 “一个请求一个协程”的处理模型,对于每个用户请求,ngx_lua都会创建一个协程用于执行用户代码以处理请求,请求处理完毕,协程会被销毁。
协程是轻量级线程,所以占用极少内存,通常每个请求ngx_lua只会占用2KB左右内存。协程不能同时运行。
下面是一个简单的ngx_lua请求处理流程
2. HTTP请求的处理阶段
参考另外一篇文章https://www.cnblogs.com/yangjianbo/articles/19113524
3. ngx_lua的处理阶段
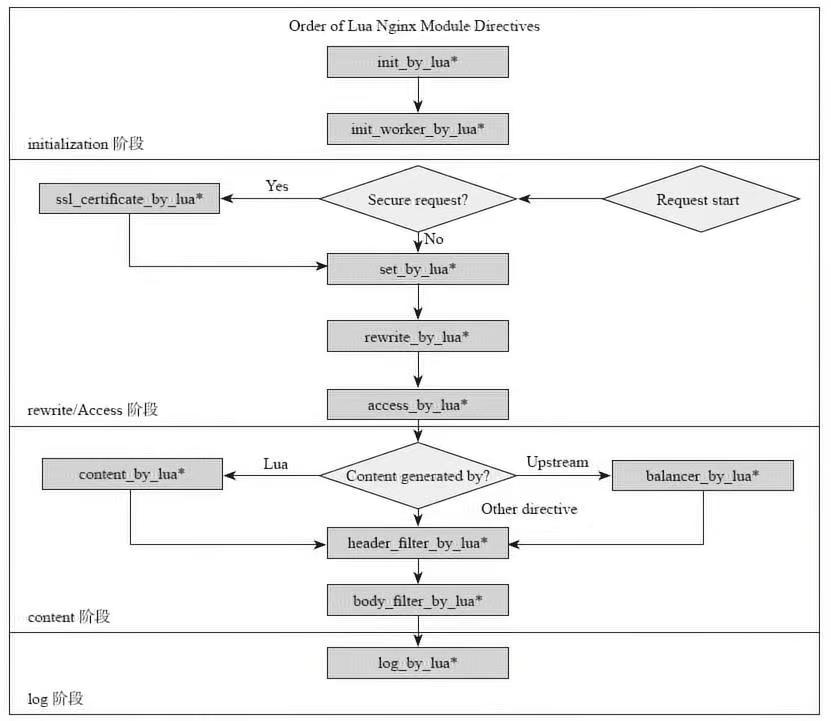
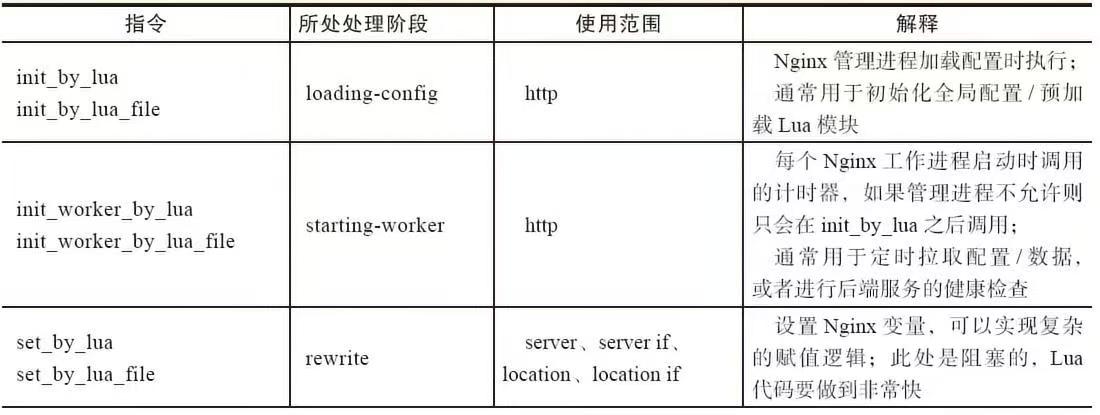
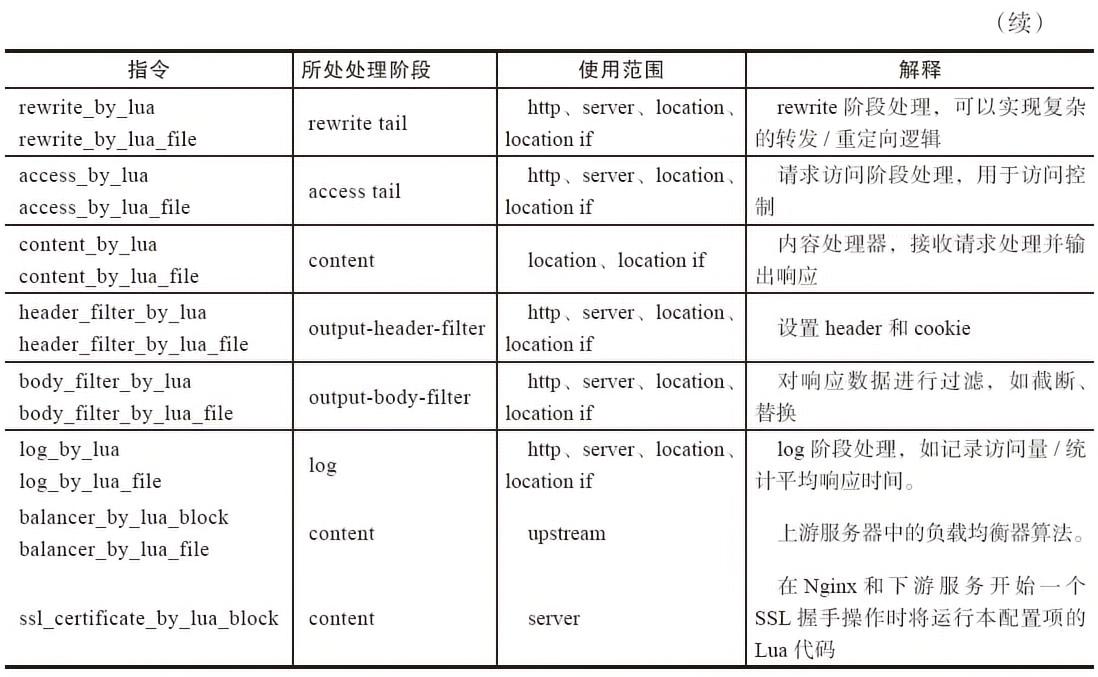
ngx_lua在HTTP处理阶段基础上,分别在Rewrite/Access阶段,content阶段,log阶段注册了自己的handler,加上系统初始阶段master的两个阶段,共11个阶段为Lua脚本提供处理介入的能力
指令可以在http,server ,server if ,location,location if几个范围进行配置
1. Lua可以使用的主要阶段流程
2. Lua指令使用
4. Lua阶段详细解析
1. init_by_lua
init_by_lua 在每次 Nginx 重新加载配置时执行,可用来完成一些耗时模块的加载,或者初始化一些全局配置。在管理进程创建工作进程时,指令中的全局变量会复制到工作进程中。
1. 在nginx.conf的http模块中写入
# 设置全局共享变量(字典),名字为 shared_data 共享内存的大小是1M

lua_shared_dict shared_data 1m;

init_by_lua_file /tmp/init.lua;                     # 初始化的lua代码位置
2. 编写init.lua
-- init_by_lua_file 在 Nginx 启动时执行一次(所有 worker 共享)
local shared_data = ngx.shared.shared_data
shared_data:set("count", 1)
ngx.log(ngx.INFO, "init.lua 初始化完成,count=1")
3. 编写test.lua
-- 获取共享内存对象
local shared_data = ngx.shared.shared_data

-- 获取当前 count 值,没有则设为 0
local count = shared_data:get("count") or 0

-- 增加计数(incr 如果 key 不存在,会返回 nil)
local new_count, err = shared_data:incr("count", 1)
if not new_count then
    shared_data:set("count", count + 1)
    new_count = count + 1
end

ngx.say("共享计数:", new_count)
4. 增加location测试
location /lua {
default_type "text/plain; charset=utf-8";

content_by_lua_file /tmp/test.lua;
}


// 启动 Nginx ,访问 /lua 可见全局变量一直保持不变,共享内存中的变量每次访问依次 + 1,因为共享内存的变量只在 Nginx 退出后才被收回,而每个 worker 接受 /lua 请求后都能获取共享变量并执行 test.lua 文件
2. init_worker_by_lua
在每个worker启动时执行一次,用于启动一些定时任务,比如心跳检查,定时拉取服务器配置等。有多少个工作进程,该定时任务就会启动多少个,一个工作进程拥有一个定时器。
3. set_by_lua
用于设置Nginx变量
1. 例子:参数相加
1. 在nginx.conf的server模块中添加
location /lua {
    default_type "text/html";
    set_by_lua_file $num /tmp/test_set.lua ;
    echo $num;
}
2. 编辑test_set.lua文件
#!/usr/local/bin/lua
local uri_args = ngx.req.get_uri_args()            -- 获取 http request 的参数
local i = uri_args["i"] or 0
local j = uri_args["j"] or 0
return i + j
3. 访问接口
http://ad.zhen.com:8888/lua?i=20&j=30
2. 例子:不同域名响应不同的内容
1. 在nginx的conf文件中添加
#map主机
map $host $host_var {
    default 0;
    2.test.com 1;
}
2. 修改/etc/hosts
119.254.109.194 adtest.zhen.com adtest2.zhen.com
3. 在nginx的server模块中添加
set_by_lua $host_jump '
    local var = ngx.var.host_var
    if var == "1" then
        return 1
    else
        return 0
    end
';

location /test {
    echo $host_jump;

    if ($host_jump = 1) {
        proxy_pass http://192.168.1.194:8888/$host_jump.html;
        break;
    }

    if ($host_jump = 0) {
        proxy_pass http://192.168.1.194:8888/$host_jump.html;
        break;
    }
}
4. 请求adtest.zhen.com:8888/test,响应http://192.168.1.194:8888/0.html
5. 请求adtest2.zhen.com:8888/test,响应http://192.168.1.194:8888/1.html
4. rewrite_by_lua
用于执行内部 URL 重写或外部重定向,典型的如伪静态化 url 重写,本阶段在 rewrite 处理阶段的最后默认执行。
1. 例子:实现新老页面跳转
1. 修改nginx.conf
location /lua_rewrite_1 {
    default_type "text/html";
    rewrite_by_lua_file /usr/example/lua/test.lua;
    echo "no rewrite";
}
2. 编写test.lua
if ngx.req.get_uri_args()["jump"] == "1" then
    return ngx.redirect("http://jd.com", 302)
end

-- 301 或者 302 可根据自己需求
3. 请求地址
https://adtest.zhen.com:8888/lua_rewrite_1?jump=1
2. 例子:设置内部重定向
1. 修改nginx.conf
location /lua_rewrite_2 {
    default_type "text/html";
    rewrite_by_lua_file /tmp/test_rewrite2.lua;
    echo "rewrite2 uri : $uri, a : $arg_a";

    # $uri 获取当前请求的uri地址 $arg_a 能直接获取GET参数的a的值
}
2. 编写test_rewrte2.lua文件
if ngx.req.get_uri_args()["jump"] == "1" then
    ngx.req.set_uri("/lua_rewrite_3", false)         -- 设置uri不发生重定向,当第二个参数为true时,会发生重定向,而不会执行后面的代码
    ngx.req.set_uri("/lua_rewrite_4", false)
    ngx.req.set_uri_args({a = 1, b = 2})             -- 设置uri参数
end
3. 请求地址
https://adtest.zhen.com:8888/lua_rewrite_2?jump=1
5. access_by_lua
用于访问控制,如限定某个指定token的用户才能访问页面
1. 修改nginx.conf
location /lua_access {
    default_type "text/html";
    access_by_lua_file /root/access.lua;
    echo "access";
}
2. 修改access.lua
if ngx.req.get_uri_args()["token"] ~= "123" then
    ngx.exit(403)
end
3. 请求地址
https://adtest.zhen.com:8888/lua_access?token=123
6. content_by_lua
正式处理内容
1. 修改nginx.conf
location /lua_content_testapi {
    default_type "text/html";
    echo $args;
}


# 使用 content_by_lua

location /lua_content_test {
    default_type "application/json";
    # lua_need_request_body on;
    # client_max_body_size 50k;
    # client_body_buffer_size 50k;


    content_by_lua '
        local vdata = {}
        local cjson = require "cjson"
        vdata["name"] = "pan"
        vdata["age"] = 12
        local jsonRequest = cjson.encode(vdata)
        local resp = ngx.location.capture("/lua_content_testapi", {method = ngx.HTTP_GET, args = jsonRequest})

        if resp.status == ngx.HTTP_OK and resp.body then
            ngx.print(resp.body)
        end
    ';
}
2. 请求地址
http://adtest.zhen.com:8888/lua_content_test
7. header_filter_by_lua
设置响应的头部信息
1. 修改nginx.conf
location /lua_header_test {
    default_type "text/html";
    header_filter_by_lua 'ngx.header.Foo = "panguangyu"';
    echo $uri;
}
2. 请求地址
http://adtest.zhen.com:8888/lua_header_test
8. body_filter_by_lua
设置响应body的内容
1. 修改nginx.conf
location /lua_body {
    default_type "text/html";
    echo a;
    echo b;
    echo c;
    echo d;

    body_filter_by_lua '
        local chunk = ngx.arg[1];
        if (string.match(chunk, "c")) then
            ngx.arg[1] = "f"
        end
    ';
}
2. 请求地址
http://adtest.zhen.com:8888/lua_body
9. log_by_lua
用于log请求处理阶段,用lua处理日志,但并不替换原有log处理。
1. 在server模块外层添加
# 在 server 外层定义
lua_shared_dict log_dict 5M;
2. 在server内添加
# log_by_lua 测试
location /lua_log_count {
    default_type "text/html";
    log_by_lua '
        local log_dict = ngx.shared.log_dict
        local newvalue, err = log_dict:incr("pv", 1)
        if not newvalue and err == "not found" then
            log_dict:add("pv", 0)
            log_dict:incr("pv", 1)
        end
    ';

    content_by_lua '
        ngx.say("success")
    ';
}

location /lua_log_see {
    default_type "text/html";
    content_by_lua '
        local log_dict = ngx.shared.log_dict
        local pv = log_dict:get("pv")
        if pv then
            ngx.say("total pv : ", pv)
        end
    ';
}
3. 请求地址
访问网站 http://adtest.zhen.com:8888/lua_log_count
查看pv地址 http://adtest.zhen.com:8888/lua_log_see

 浙公网安备 33010602011771号