MongoDB之分片
1. Sharding分片概念
分片 (sharding)是指将数据库拆分,将其分散在不同的机器上的过程。将数据分散到不同的机器上,不需要功能强大的服务器就可以存储更多的数据和处理更大的负载。
2. 应用场景
1. 机器的磁盘不够用
2. 单个mongod已经不能满足写数据的性能要求
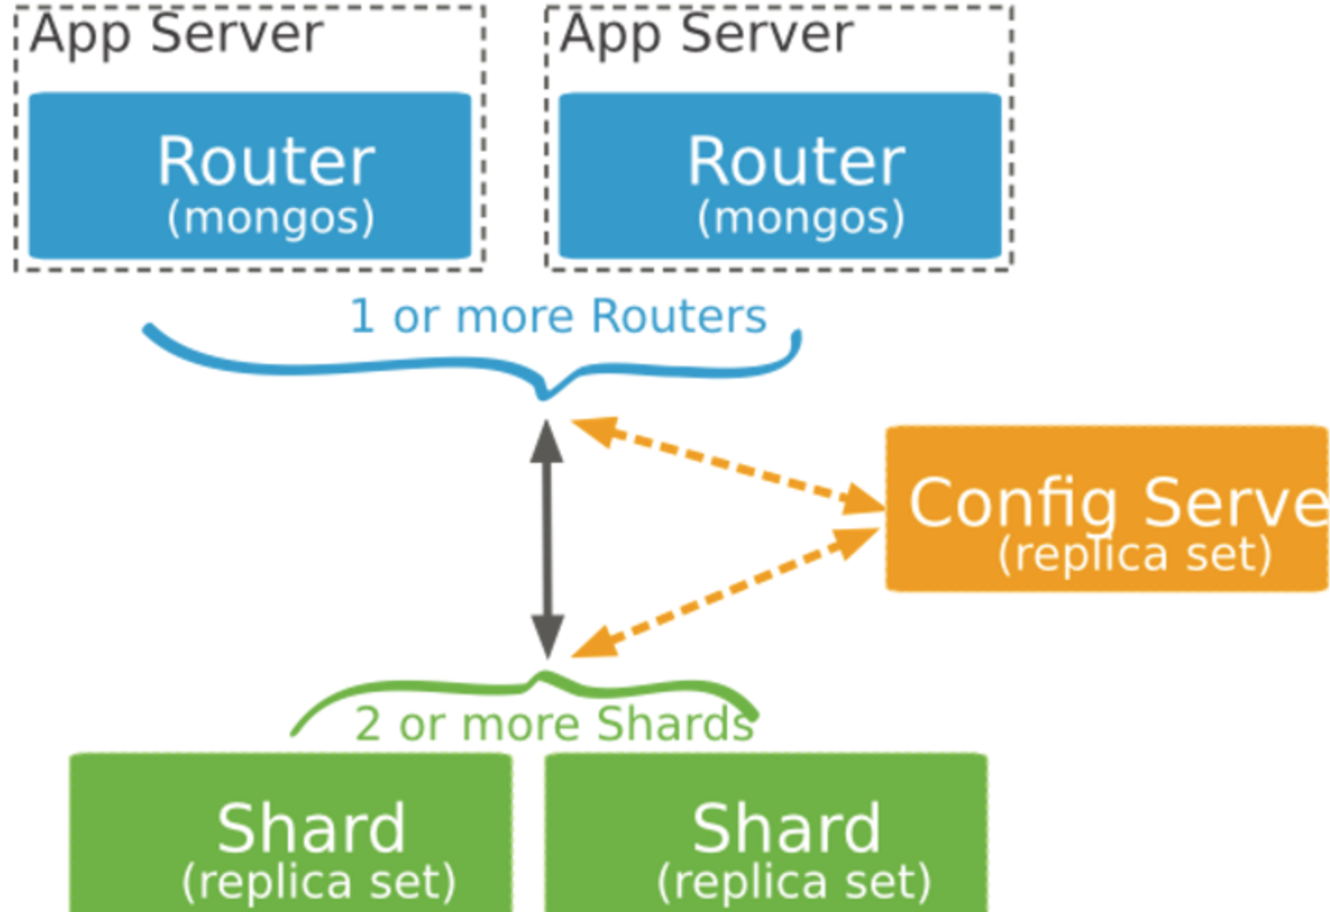
3. 分片集群的构成
1. 分片服务器
一个mongod实例或者一个副本集组成
2. 配置服务器
存储了整个cluster metadata,其中包括chunk信息
一个mongod实例或者一个副本集组成
3. 路由服务器
客户端由此接入
本身不保存数据,在启动时从配置服务器加载集群信息,开启mongos进程需要知道配置服务器的地址,指定configdb选项
4. 片键
必须是一个索引
自增的片键对写入和数据均匀分布不好,但是按照片键查询会非常高效
随机片键对数据的均匀分布效果很好,尽量避免在多个分片上进行查询
4. Mongodb副本集+分片集群部署
1. 集群结构图

2. 机器信息
| 主机 | ip | 功能 |
| server1 | 172.16.1.228 |
172.16.1.228:27017(shard11) 172.16.1.228:27018(shard21) 172.16.1.228:20000(config1) 172.16.1.228:27019(mongos1) |
| server2 | 172.16.1.229 |
172.16.1.229:27017(shard12) 172.16.1.229:27018(shard22) 172.16.1.229:20000(config2) 172.16.1.229:27019(mongos2) |
| server3 | 172.16.1.230 |
172.16.1.230:27017(shard13) 172.16.1.230:27018(shard23) 172.16.1.230:20000(config3) 172.16.1.230:27019(mongos3) |
3. 准备工作
1. 在三台服务器上,安装mongodb
tar -zxvf mongodb-linux-x86_64-4.0.10.tgz
mv mongodb-linux-x86_64-4.0.10 /usr/local/mongodb
cd /usr/local/mongodb
mkdir conf mongos config shard1 shard2
2. 环境变量
vim /etc/profile
export MONGODB_HOME=/usr/local/mongodb
export PATH=$MONGODB_HOME/bin:$PATH
# 使立即生效
source /etc/profile
3. 部署过程
1. 配置shard1的副本集
172.16.1.228的shard1分片的配置
[root@datanode2 conf]# cat shard11.conf
systemLog:
  destination: file    #指定了日志存储的形式,通常设置为file
  logAppend: true    #指定以追加模式记录日志
  path: /usr/local/mongodb/shard1/log/shard1.log   #指定日志文件的路径
storage:
  dbPath: /usr/local/mongodb/shard1/data   #指定数据库存储文件的路径
  journal:
    enabled: true
  wiredTiger:
    engineConfig:
      cacheSizeGB: 8   #指定mongodb存储引擎wiredTiger所能使用的缓存大小。此值默认为1和物理内存 * 50%中的较大值
processManagement:
  fork: true    #指定进程以fork模式运行
net:
  port: 27017   #指定进程所开放的端口
  bindIp: 172.16.1.228   #指定进程绑定的ip
sharding:
  clusterRole: shardsvr    #指定进程在分片集群中的角色,shard server应配置为shardsvr,config server应配置为configsvr
  archiveMovedChunks: true    #指定据群在执行moveChunk操作时,将相关文档保存在moveChunk文件夹
replication:
  oplogSizeMB: 10240   #指定oplog的大小,若此值设置过小,可能会导致副本集中的Secondary不能正常复制Primary的数据
  replSetName: shard1    #指定启动的mongod分片节点进程的副本集名称
  secondaryIndexPrefetch: all    #指定副本集成员在接受oplog之前是否加载索引到内存,none不加载; all加载所有; _id_only仅加载_id。
172.16.1.229的shard1分片的配置
#配置文件内容
pidfilepath = /usr/local/mongodb/shard1/log/shard1.pid
dbpath = /usr/local/mongodb/shard1/data
logpath = /usr/local/mongodb/shard1/log/shard1.log
logappend = true

bind_ip = 172.16.1.229
port = 27017
fork = true

#副本集名称
replSet=shard1

#declare this is a shard db of a cluster;
shardsvr = true

#设置最大连接数
maxConns=20000
172.16.1.230的shard1分片的配置
#配置文件内容
pidfilepath = /usr/local/mongodb/shard1/log/shard1.pid
dbpath = /usr/local/mongodb/shard1/data
logpath = /usr/local/mongodb/shard1/log/shard1.log
logappend = true

bind_ip = 172.16.1.230
port = 27017
fork = true

#副本集名称
replSet=shard1

#declare this is a shard db of a cluster;
shardsvr = true

#设置最大连接数
maxConns=20000
启动三个mongod服务 mongod -f /usr/local/mongodb/conf/shard11.conf
初始化shard1副本集
config={_id: "shard1", members:[{_id:0,host:"172.16.1.228:27017"},{_id:1,host:"172.16.1.229:27017"},{_id:2,host:"172.16.1.230:27017"}]}
rs.initiate(config)
2. 配置shard2的副本集
172.16.1.228的shard2的分片的配置
#配置文件内容
pidfilepath = /usr/local/mongodb/shard2/log/shard2.pid
dbpath = /usr/local/mongodb/shard2/data
logpath = /usr/local/mongodb/shard2/log/shard2.log
logappend = true

bind_ip = 172.16.1.228
port = 27018
fork = true

#副本集名称
replSet=shard2

#declare this is a shard db of a cluster;
shardsvr = true

#设置最大连接数
maxConns=20000
172.16.1.229的shard2的分片的配置
#配置文件内容
pidfilepath = /usr/local/mongodb/shard2/log/shard2.pid
dbpath = /usr/local/mongodb/shard2/data
logpath = /usr/local/mongodb/shard2/log/shard2.log
logappend = true

bind_ip = 172.16.1.229
port = 27018
fork = true

#副本集名称
replSet=shard2

#declare this is a shard db of a cluster;
shardsvr = true

#设置最大连接数
maxConns=20000
172.16.1.230的shard2的分片的配置
#配置文件内容
pidfilepath = /usr/local/mongodb/shard2/log/shard2.pid
dbpath = /usr/local/mongodb/shard2/data
logpath = /usr/local/mongodb/shard2/log/shard2.log
logappend = true

bind_ip = 172.16.1.230
port = 27018
fork = true

#副本集名称
replSet=shard2

#declare this is a shard db of a cluster;
shardsvr = true

#设置最大连接数
maxConns=20000
启动三个mongod服务 mongod -f /usr/local/mongodb/conf/shard23.conf
初始化shard2副本集
config={_id: "shard2", members:[{_id:0,host:"172.16.1.228:27018"},{_id:1,host:"172.16.1.229:27018"},{_id:2,host:"172.16.1.230:27018"}]}
rs.initiate(config)
3. 配置config的副本集
## 配置文件内容
pidfilepath = /usr/local/mongodb/config/log/configsrv.pid
dbpath = /usr/local/mongodb/config/data
logpath = /usr/local/mongodb/config/log/configsrv.log
logappend = true

bind_ip = 172.16.1.228
port = 20000
fork = true

#declare this is a config db of a cluster;
configsvr = true

#副本集名称
replSet=configs

#设置最大连接数
maxConns=20000
三台机器都要生成配置文件,并启动mongod服务(注意:对应的目录要创建好,否则会有报错)
mongod -f /usr/local/mongodb/conf/config.conf
初始化副本集
config={_id: "configs", members:[{_id:0,host:"172.16.1.228:20000"},{_id:1,host:"172.16.1.229:20000"},{_id:2,host:"172.16.1.230:20000"}]}
rs.initiate(config)
4. 配置mongos的三台机器
172.16.1.228的配置
#内容
pidfilepath = /usr/local/mongodb/mongos/log/mongos.pid
logpath = /usr/local/mongodb/mongos/log/mongos.log
logappend = true

bind_ip = 172.16.1.228
port = 27019
fork = true

#监听的配置服务器,只能有1个或者3个 configs为配置服务器的副本集名字
configdb = configs/172.16.1.228:20000,172.16.1.229:20000,172.16.1.230:20000

#设置最大连接数
maxConns=20000
172.16.1.229的配置
#内容
pidfilepath = /usr/local/mongodb/mongos/log/mongos.pid
logpath = /usr/local/mongodb/mongos/log/mongos.log
logappend = true

bind_ip = 172.16.1.229
port = 27019
fork = true

#监听的配置服务器,只能有1个或者3个 configs为配置服务器的副本集名字
configdb = configs/172.16.1.228:20000,172.16.1.229:20000,172.16.1.230:20000

#设置最大连接数
maxConns=20000
172.16.1.230的配置
#内容
pidfilepath = /usr/local/mongodb/mongos/log/mongos.pid
logpath = /usr/local/mongodb/mongos/log/mongos.log
logappend = true

bind_ip = 172.16.1.230
port = 27019
fork = true

#监听的配置服务器,只能有1个或者3个 configs为配置服务器的副本集名字
configdb = configs/172.16.1.228:20000,172.16.1.229:20000,172.16.1.230:20000

#设置最大连接数
maxConns=20000
启动三台服务器的mongos
mongos -f /usr/local/mongodb/conf/mongos.conf
5. 连接到任意一台mongos,切换到admin库
mongo 172.16.1.228:27019
use admin
6. 加入shards
1. 如果shard是单台服务器,使用命令: db.runCommand({addshard: "服务器名: port"})
2. 如果shard是副本集,使用命令:
db.runCommand( { addshard:"shard1/172.16.1.228:27017,172.16.1.229:27017,172.16.1.230:27017",name:"s1",maxsize:20480});
db.runCommand( { addshard:"shard2/172.16.1.228:27018,172.16.1.229:27018,172.16.1.230:27018",name:"s2",maxsize:20480});
注意:
可选参数 Name:用于指定每个shard的名字,不指定的话系统将自动分配 maxSize:指定各个shard可使用的最大磁盘空间,单位megabytes{
"shards" : [
{
"_id" : "s1",
"host" : "shard1/172.16.1.228:27017,172.16.1.229:27017,172.16.1.230:27017",
"state" : 1
},
{
"_id" : "s2",
"host" : "shard2/172.16.1.228:27018,172.16.1.229:27018,172.16.1.230:27018",
"state" : 1
}
],
"ok" : 1,
"operationTime" : Timestamp(1667531517, 1),
"$clusterTime" : {
"clusterTime" : Timestamp(1667531517, 1),
"signature" : {
"hash" : BinData(0,"AAAAAAAAAAAAAAAAAAAAAAAAAAA="),
"keyId" : NumberLong(0)
}
}
}
8. 启用分片
1. 激活数据库分片
db.runCommand({enablesharding:”yangjianbo”})
通过执行以上命令,可以让数据库跨shard,如果不执行这步,数据库只会存放在一个shard,一旦激活数据库分片,数据库中不同的collection将被存放在不同的shard上,
但一个collection仍旧存放在同一个shard上,要使单个collection也分片,还需单独对collection作些操作 2. 对collection分片
db.runCommand( { shardcollection : "yangjianbo.student", key : { id : 1 } } );
注意:
a)分片的collection系统会自动创建一个索引(也可用户提前创建好) b)分片的collection只能有一个在分片key上的唯一索引,其它唯一索引不被允许 1. 查看数据库的分片状态


 浙公网安备 33010602011771号