


第一个驱动之字符设备驱动(二)mdev
mdev是busybox提供的一个工具,用在嵌入式系统中,相当于简化版的udev,作用是在系统启动和热插拔或动态加载驱动程序时, 自动创建设备节点。文件系统中的/dev目录下的设备节点都是由mdev创建的。在加载驱动过程中,根据驱动程序,在/dev下自动创建设备节点。
前面的博客实现了第一个版本,但是需要手工创建字符设备节点,这里使用mdev自动创建。
源代码如下:
#include <linux/module.h>
#include <linux/kernel.h>
#include <linux/fs.h>
#include <linux/init.h>
#include <linux/delay.h>
#include <asm/uaccess.h>
#include <asm/irq.h>
#include <asm/io.h>
#include <asm/arch/regs-gpio.h>
#include <asm/hardware.h>

static struct class *first_drv_class;
static struct class_device    *first_drv_class_devs;
int auto_major;
static int first_drv_open(struct inode *inode, struct file *file)
{
    printk("first_drv_open...\r\n");
    return 0;
}

static ssize_t first_drv_write(struct file *file, const char __user *buf, size_t count, loff_t * ppos)
{
    printk("first_drv_write...\r\n");
    return 0;
}

/* 这个结构是字符设备驱动程序的核心
 * 当应用程序操作设备文件时所调用的open、read、write等函数,
 * 最终会调用这个结构中指定的对应函数
 */
static struct file_operations first_drv_fops = {
    .owner  =   THIS_MODULE,    /* 这是一个宏,推向编译模块时自动创建的__this_module变量 */
    .open   =   first_drv_open,
    .write    =    first_drv_write,
};
int fisrt_drv_init(void)
{
    auto_major=register_chrdev(0, "first_drv", &first_drv_fops);

    first_drv_class = class_create(THIS_MODULE, "firstdrv");
    first_drv_class_devs = class_device_create(first_drv_class, NULL, MKDEV(auto_major, 0), NULL, "xyz"); /* /dev/xyz */

    return 0;
}

void fisrt_drv_exit(void)
{
    unregister_chrdev(auto_major, "first_drv");

    class_device_unregister(first_drv_class_devs);
    class_destroy(first_drv_class);
}

module_init(fisrt_drv_init);
module_exit(fisrt_drv_exit);

MODULE_AUTHOR("http://www.100ask.net");
MODULE_VERSION("0.1.0");
MODULE_DESCRIPTION("S3C2410/S3C2440 LED Driver");
MODULE_LICENSE("GPL");
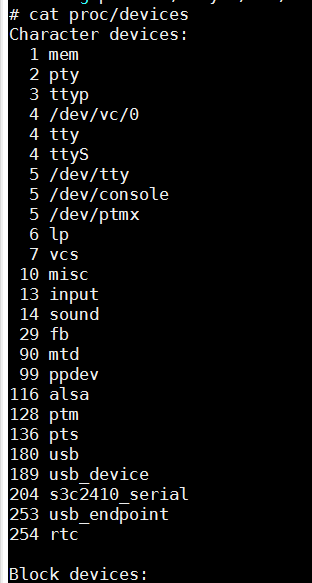
查看现在的字符设备,没有发现有first_drv节点:
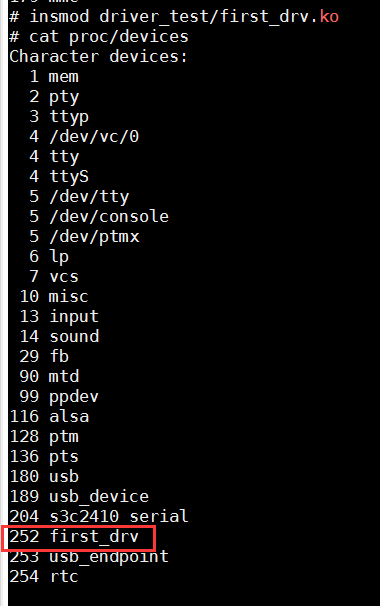
加载.ko文件之后出现first_drv设备:
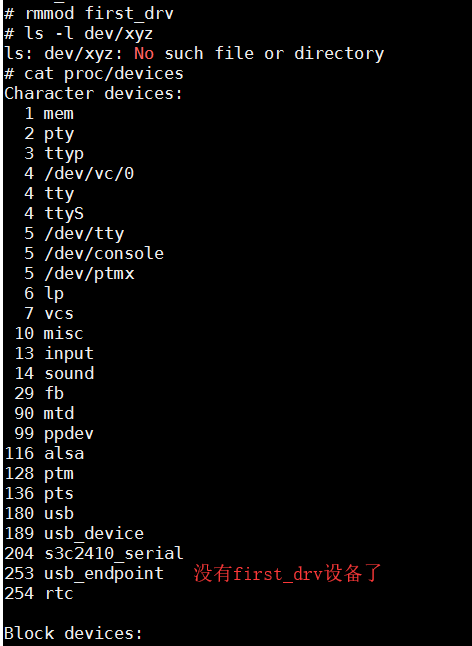
此时查看自动创建的/dev/xyz文件:

然后卸载挂载的驱动first_drv之后,发现/dev/xyz文件自动消失,而且first_drv设备也自动消失了:
这样,就避免了每次都手动创建设备节点了。
Summary:
现在关于内核驱动的函数,我们先学会怎么去使用,跟着韦老师的步伐,之后会有专门的内核源码和驱动的分析,那是入门之后的事情,现在先知道怎么调用API,后面进阶的时候需要阅读源码。毕竟先学会使用,第一可以让自己兴趣更大,一来就阅读源码会很吃力,第二可以快速先入门,第三,可以自己做点小东西。学习是循序渐进的一个过程。
一个字符设备或块设备都有一个主设备号和一个次设备号。主设备号用来标识与设备文件相连的驱动程序,用来反映设备类型。次设备号被驱动程序用来辨别操作的是哪个设备,用来区分同类型的设备。
字符驱动中提及到了次设备号,它可以被用来区分不同的操作:
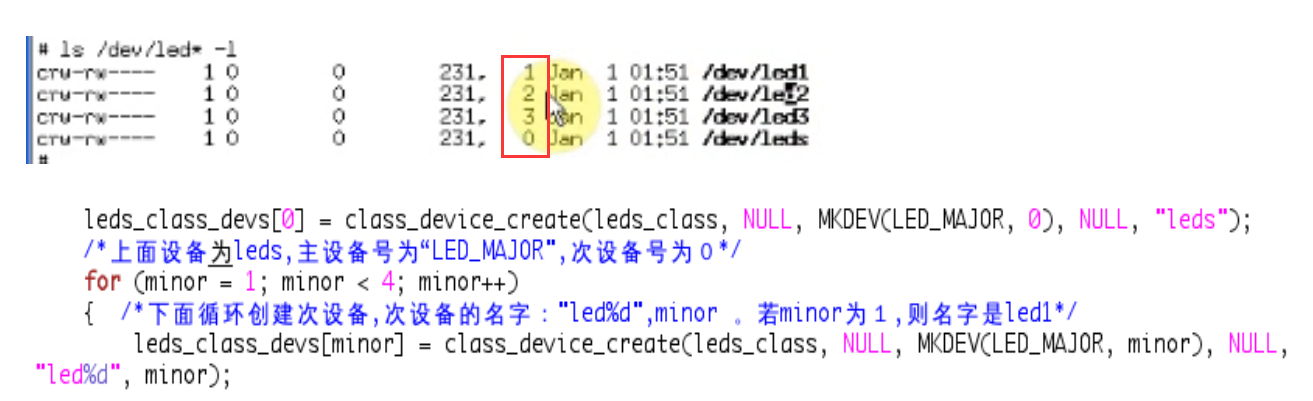
创建不同的次设备号,我们可以根据次设备号执行不同的操作,比如:
    printf("Usage:\n");
    printf("%s <dev> <on|off>\n",file);
    printf("eg. \n");
    printf("%s /dev/leds on\n", file);
    printf("%s /dev/leds off\n", file);
    printf("%s /dev/led1 on\n", file);
    printf("%s /dev/led1 off\n", file);
./ledtest /dev/leds on:表示全部led亮
./ledtest /dev/led1 on:表示第一个led亮
这样的效果可以通过次设备不同来实现。内核中有获取次设备号的函数,在open和write时有不同的操作,还是那句话,具体的内核函数实现,我们之后再说,先在先会使用API就行。
欢迎加入作者的小圈子
扫描下方左边二维码加入QQ交流群,扫描下方右边二维码关注个人微信公众号并获取更多隐藏干货,QQ交流群:816747642 微信公众号:Crystal软件学堂


|
作者:Crystal软件学堂 bilibili视频教程地址:https://space.bilibili.com/5782182 本文版权归作者和博客园共有,欢迎转载,但未经作者同意必须保留此段声明,且在转载文章页面给出原文连接。 如果你觉得文章对你有所帮助,烦请点个推荐,你的支持是我更文的动力。 文中若有错误,请您务必指出,感谢给予我建议并让我提高的你。 |

 浙公网安备 33010602011771号