

Java3D提供的API中,生成了2中Point的对象:PointArray 和 IndexedPointArray
在介绍以上2个Point对象之前,先介绍一下PointAttributes对象,从该对象名就可以看出该对象是用来Point对象设置属性,如大小,显示形状(即显示效果)等。
PointAttributes设置点的大小及显示效果的主要方法:
SetPointSize(float pointSize);
SetPointAntialiasingEnable(boolean state) //当state=true时,point为圆形,当state=false时,point的形状为方形,默认情况下state=false.
PointAttributes有4个flags:
ALLOW_SIZE_READ ALLOW_SIZE_WRITE ALLOW_ANTIALISING_READ ALLOW_ANTIALISING_WRITE
这些flags可用于交互式编程中,使点的大小及形状在程序运行时改变,产生点的动态变化效果
PointArray对象
PointArray对象的构造方法: PointArray(int vertexCount, int vertexFormat)
vertexFormat的使用可参照点、线、面的生成(一)
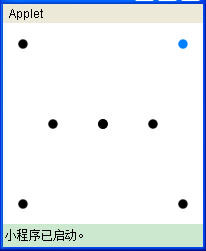
vertexCount表示数组里顶点的个数,当其个数大于实际提供的顶点个数时,多余的点数将被默认为是位置:(0.0f,0.0f,0.0f),即显示在原点,即使有多个多余的点,都将累计显示在原点,我们看到的就将会是一个点。若vertexCount少于实际提供的点数时,程序将出现错误。但是当vertexCount的数目小于给定的颜色数组个数时,将正常显示。
举例如下:
例1:
import java.applet.Applet;
import java.awt.BorderLayout;
import javax.media.j3d.*;
import javax.vecmath.Color3f;
import javax.vecmath.Point3d;
import com.sun.j3d.utils.applet.MainFrame;
import com.sun.j3d.utils.universe.SimpleUniverse;
public class Point1 extends Applet{
public BranchGroup createSceneGraph()
{
BranchGroup objRoot=new BranchGroup();
BoundingSphere bounds=new BoundingSphere(new Point3d(0.0,0.0,0.0),100); //定义背景的有效范围
Color3f bgcolor=new Color3f(1.0f,1.0f,1.0f);
Background bg=new Background(bgcolor); //设定背景颜色
bg.setApplicationBounds(bounds);
objRoot.addChild(bg);
float vert[]=
{
0.8f,0.8f,0.0f, -0.8f,0.8f,0.0f,
0.5f,0.0f,0.0f, -0.5f,0.0f,0.0f,
-0.8f,-0.8f,0.0f, 0.8f,-0.8f,0.0f,
};
float color[]=
{
0.0f,0.5f,1.0f, 0.5f,0.0f,1.0f,
0.0f,0.8f,0.2f, 1.0f,0.0f,0.3f,
0.0f,1.0f,0.3f, 0.3f,0.8f,0.0f,
0.0f,1.0f,0.5f,
};
int vCount=6;
Shape3D shape=new Shape3D(); //定义形体
PointArray point=new PointArray(vCount,PointArray.COORDINATES|PointArray.COLOR_3); //定义形体的几何参数
point.setCoordinates(0, vert);
point.setColor(0, color);
PointAttributes pa=new PointAttributes(); //定义点的特征
pa.setPointSize(10.0f);
pa.setPointAntialiasingEnable(true);
Appearance ap=new Appearance(); //定义形体材质
ap.setPointAttributes(pa);
shape.setGeometry(point);
shape.setAppearance(ap);
objRoot.addChild(shape);
objRoot.compile();
return objRoot;
}
public Point1()
{
setLayout(new BorderLayout());
Canvas3D c=new Canvas3D(null);
add("Center",c);
BranchGroup scene=createSceneGraph();
SimpleUniverse u=new SimpleUniverse(c);
u.getViewingPlatform().setNominalViewingTransform();
u.addBranchGraph(scene);
}
public static void main(String[] args)
{
new MainFrame(new Rotate(),400,300);
}
}
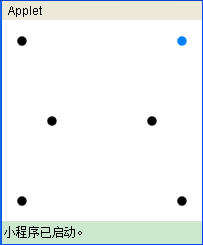
该程序的显示结果为: 当vCount>=7时,图形的显示效果如下:
IndexedPointArray对象
IndexedPointArray对象的构造函数为:PointArray(int vertexCount, int vertexFormat, int indexCount)
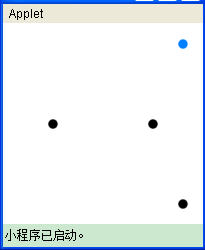
该对象可以在多个顶点中选择部分或全部顶点,并将其以指定的颜色显示
indexCount:用于表示从顶点坐标数组中选取需要显示的点的个数。因此,程序中还需要定义一个数组,存放所挑选的顶点的下标值。
正因为有indexCount,IndexedPointArray对象相对于PointArray对象就多了两个方法:
setCoordinateIndices(int index, int indexCount), setColorIndices(int index, int indexCount) //indexCount是选取的要显示的点的个数
将上述代码的蓝色部分修改为一下代码即可达到效果:
int[] index={0,2,5,3};
int indexCount=4;
IndexedPointArray point=new IndexedPointArray(vCount,IndexedPointArray.COORDINATES|IndexedPointArray.COLOR_3,indexCount);
point.setCoordinates(0, vert);
point.setColor(0, color);
point.setCoordinateIndices(0, index);
point.setColorIndices(0, index);
PointAttributes pa=new PointAttributes();
pa.setPointSize(10.0f);
pa.setPointAntialiasingEnable(true);
显示的效果如下:

 浙公网安备 33010602011771号