Docker从入门到精通<9> harbor高可用实践
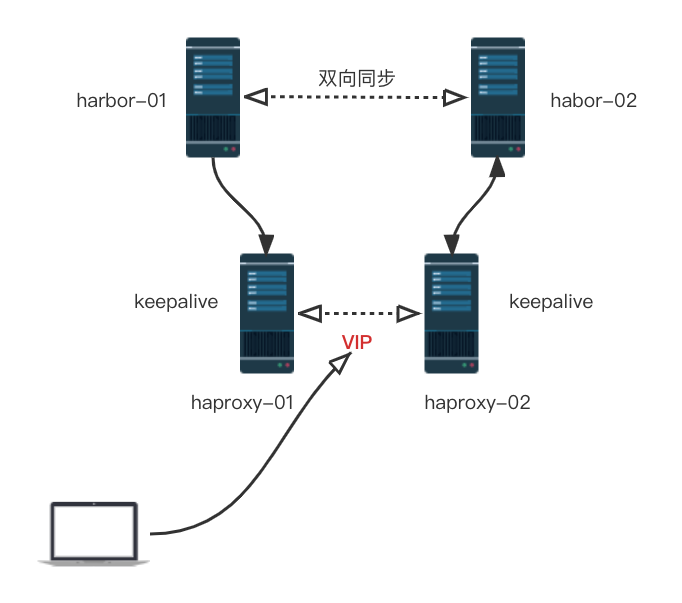
上面是一个完成的harbor高可用架构,这里为了我们简化一下,使用一个haproxy
环境介绍
| 主机名 | ip | 角色 |
|---|---|---|
| ubuntu-server1 | 192.168.22.8 | harbor-01 |
| ubuntu-server2 | 192.168.22.4 | harbor-02 |
| ubuntu-server3 | 192.168.22.7 | haproxy |
- 在ubuntu-server1和ubuntu-server2上安装docker和docker-compose
- 在ubuntu-server1和ubuntu-server2上安装habor,分别在两台机器上下载好harbor的安装包,这里我们使用的版本为v2.3.0, 这里我们仅把在harbor-01上安装过程贴出来
root@ubuntu-server1:/home/liulv# ls
docker-19.03.15-binary-install.tar.gz  harbor-offline-installer-v2.3.0.tgz
root@ubuntu-server1:/home/liulv# tar -zxf harbor-offline-installer-v2.3.0.tgz
root@ubuntu-server1:/home/liulv# cd harbor/
root@ubuntu-server1:/home/liulv/harbor# ls
LICENSE  common.sh  harbor.v2.3.0.tar.gz  harbor.yml.tmpl  install.sh  prepare
root@ubuntu-server1:/home/liulv/harbor# cp harbor.yml.tmpl harbor.yml
root@ubuntu-server1:/home/liulv/harbor# vim harbor.yml
root@ubuntu-server1:/home/liulv/harbor#
root@ubuntu-server1:/home/liulv/harbor# diff harbor.yml harbor.yml.tmpl
5c5
< hostname: 192.168.22.8
---
> hostname: reg.mydomain.com
13c13
< #https:
---
> https:
15c15
<   #  port: 443
---
>   port: 443
17,18c17,18
<   #certificate: /your/certificate/path
<   #private_key: /your/private/key/path
---
>   certificate: /your/certificate/path
>   private_key: /your/private/key/path
34c34
< harbor_admin_password: 123456
---
> harbor_admin_password: Harbor12345
47,48c47
< data_volume: /data/harbor
< # 注意如果在生产环境中需要把该目录单独挂载到一块磁盘空间上面,从而避免数据丢失
---
> data_volume: /data
这里由于我们需要修改的地方:
hostname:设置为ubuntu-server1的自己的ip地址
由于我们没有申请证书,这里我们注销https
harbor_admin_password: 这里我们配置成一个简单点的密码
path:harbor中存储数据的地方,生产环境中一定要把该目录挂载到单独的一块磁盘上面,防止数据丢失。
这里我们把/data目录挂载到了一块单独的磁盘上面/dev/sdb
root@ubuntu-server1:/data/docker# df -hT
Filesystem     Type      Size  Used Avail Use% Mounted on
udev           devtmpfs  447M     0  447M   0% /dev
tmpfs          tmpfs      99M  804K   98M   1% /run
/dev/sda2      xfs        40G  6.5G   34G  17% /
tmpfs          tmpfs     491M     0  491M   0% /dev/shm
tmpfs          tmpfs     5.0M     0  5.0M   0% /run/lock
tmpfs          tmpfs     491M     0  491M   0% /sys/fs/cgroup
/dev/sdb       xfs        10G  104M  9.9G   2% /data
tmpfs          tmpfs      99M     0   99M   0% /run/user/1000
- 使用自带的安装脚本安装
root@ubuntu-server1:/home/liulv/harbor# ./install.sh --with-trivy --with-chartmuseum

[Step 0]: checking if docker is installed ...

Note: docker version: 19.03.15

[Step 1]: checking docker-compose is installed ...

Note: docker-compose version: 1.24.1

[Step 2]: loading Harbor images ...
Loaded image: goharbor/nginx-photon:v2.3.0
Loaded image: goharbor/registry-photon:v2.3.0
Loaded image: goharbor/harbor-core:v2.3.0
Loaded image: goharbor/harbor-registryctl:v2.3.0
Loaded image: goharbor/harbor-db:v2.3.0
Loaded image: goharbor/harbor-exporter:v2.3.0
Loaded image: goharbor/redis-photon:v2.3.0
Loaded image: goharbor/notary-server-photon:v2.3.0
Loaded image: goharbor/harbor-portal:v2.3.0
Loaded image: goharbor/harbor-log:v2.3.0
Loaded image: goharbor/harbor-jobservice:v2.3.0
Loaded image: goharbor/chartmuseum-photon:v2.3.0
Loaded image: goharbor/trivy-adapter-photon:v2.3.0
Loaded image: goharbor/prepare:v2.3.0
Loaded image: goharbor/notary-signer-photon:v2.3.0


[Step 3]: preparing environment ...

[Step 4]: preparing harbor configs ...
prepare base dir is set to /home/liulv/harbor
WARNING:root:WARNING: HTTP protocol is insecure. Harbor will deprecate http protocol in the future. Please make sure to upgrade to https
Generated configuration file: /config/portal/nginx.conf
Generated configuration file: /config/log/logrotate.conf
Generated configuration file: /config/log/rsyslog_docker.conf
Generated configuration file: /config/nginx/nginx.conf
Generated configuration file: /config/core/env
Generated configuration file: /config/core/app.conf
Generated configuration file: /config/registry/config.yml
Generated configuration file: /config/registryctl/env
Generated configuration file: /config/registryctl/config.yml
Generated configuration file: /config/db/env
Generated configuration file: /config/jobservice/env
Generated configuration file: /config/jobservice/config.yml
loaded secret from file: /data/secret/keys/secretkey
Generated configuration file: /config/trivy-adapter/env
Generated configuration file: /config/chartserver/env
Generated configuration file: /compose_location/docker-compose.yml
Clean up the input dir


[Step 5]: starting Harbor ...
Creating network "harbor_harbor" with the default driver
Creating network "harbor_harbor-chartmuseum" with the default driver
Creating harbor-log ... done
Creating harbor-db     ... done
Creating redis         ... done
Creating harbor-portal ... done
Creating chartmuseum   ... done
Creating registry      ... done
Creating registryctl   ... done
Creating trivy-adapter ... done
Creating harbor-core   ... done
Creating harbor-jobservice ... done
Creating nginx             ... done
✔ ----Harbor has been installed and started successfully.----
--with-trivy 表示开启harbor扫描镜像功能
--with-chartmuseum 表示开启harbor可以存储Helm Charts
- 使用docker-compose查看开启的容器
root@ubuntu-server1:/home/liulv/harbor# docker-compose ps
      Name                     Command                  State                 Ports
---------------------------------------------------------------------------------------------
chartmuseum         ./docker-entrypoint.sh           Up (healthy)
harbor-core         /harbor/entrypoint.sh            Up (healthy)
harbor-db           /docker-entrypoint.sh 96 13      Up (healthy)
harbor-jobservice   /harbor/entrypoint.sh            Up (healthy)
harbor-log          /bin/sh -c /usr/local/bin/ ...   Up (healthy)   127.0.0.1:1514->10514/tcp
harbor-portal       nginx -g daemon off;             Up (healthy)
nginx               nginx -g daemon off;             Up (healthy)   0.0.0.0:80->8080/tcp
redis               redis-server /etc/redis.conf     Up (healthy)
registry            /home/harbor/entrypoint.sh       Up (healthy)
registryctl         /home/harbor/start.sh            Up (healthy)
trivy-adapter       /home/scanner/entrypoint.sh      Up (healthy)
- 此时我们在浏览器打开试试: http://192.168.22.8/
同理安装好另外一个habor实例
- 开始在两台机器上进行同步配置
-
"仓库管理",然后点击“新加目标”,然后把对端的填上,访问IP和访问密码,分别对应harbor的用户名和密码,最后测试连接看是否能通。
对端也需要相同的配置 -
分别登录到两个harbor实例,点击“复制管理”,然后“新建规则”
根据自己的情况填写,目标仓库选择对端,触发模式,这里我们选择“事件驱动”
对端也需要类似配置
- 测试仓库是否可以正常同步
- 我们首先要修改docker的配置,并重启docker
ubuntu-server1上面的docker配置
liulv@ubuntu-server1:~/harbor$ cat /etc/docker/daemon.json
{
  "registry-mirrors": ["https://22tqp4v4.mirror.aliyuncs.com"],
  "data-root": "/data/docker/",
  "insecure-registries": ["192.168.22.8"]
}
ubuntu-server2上面的docker配置
root@ubuntu-server2:~# cat /etc/docker/daemon.json
{
  "registry-mirrors": ["https://22tqp4v4.mirror.aliyuncs.com"],
  "data-root": "/data/",
  "insecure-registries": ["192.168.22.4"]
}
因为这里我们的harbor没有配置https的模式,默认docker是不信任这个源的所以我们要修改下docker配置
- 在ubuntu-server1上的harbor新建一个项目web,然后我们ubuntu-server1拉取一个镜像,然后tag改名,推动到ubuntu-server1上的harbor上面,看能否推送到ubuntu-server2上的harbor上面
  no_proxy:
  components:
    - core
    - jobservice
    - trivy

# metric:
#   enabled: false
#   port: 9090
#   path: /metrics
liulv@ubuntu-server1:~/harbor$ cat /etc/docker/
daemon.json  key.json
liulv@ubuntu-server1:~/harbor$ cat /etc/docker/daemon.json
{
  "registry-mirrors": ["https://22tqp4v4.mirror.aliyuncs.com"],
  "data-root": "/data/docker/",
  "insecure-registries": ["192.168.22.27"]
}
liulv@ubuntu-server1:~/harbor$
liulv@ubuntu-server1:~/harbor$
liulv@ubuntu-server1:~/harbor$
liulv@ubuntu-server1:~/harbor$ ip ro sh
default via 192.168.22.254 dev enp0s3 proto dhcp src 192.168.22.8 metric 100
172.17.0.0/16 dev docker0 proto kernel scope link src 172.17.0.1 linkdown
172.18.0.0/16 dev br-0cb484852e9d proto kernel scope link src 172.18.0.1
172.19.0.0/16 dev br-1807a7339380 proto kernel scope link src 172.19.0.1
192.168.22.0/24 dev enp0s3 proto kernel scope link src 192.168.22.8
192.168.22.254 dev enp0s3 proto dhcp scope link src 192.168.22.8 metric 100
liulv@ubuntu-server1:~/harbor$ vim /etc/docker/daemon.json
liulv@ubuntu-server1:~/harbor$ sudo -i
[sudo] password for liulv:
root@ubuntu-server1:~# ls
iptable.save  nginx-1.21.5.tar.gz
root@ubuntu-server1:~# vim /etc/docker/daemon.json
root@ubuntu-server1:~#
root@ubuntu-server1:~#
root@ubuntu-server1:~# systemctl restart docker
root@ubuntu-server1:~#
root@ubuntu-server1:~#
root@ubuntu-server1:~# ls
iptable.save  nginx-1.21.5.tar.gz
root@ubuntu-server1:~#
root@ubuntu-server1:~#
root@ubuntu-server1:~# docker pull nginx:1.21.5
1.21.5: Pulling from library/nginx
a2abf6c4d29d: Pull complete
a9edb18cadd1: Pull complete
589b7251471a: Pull complete
186b1aaa4aa6: Pull complete
b4df32aa5a72: Pull complete
a0bcbecc962e: Pull complete
Digest: sha256:0d17b565c37bcbd895e9d92315a05c1c3c9a29f762b011a10c54a66cd53c9b31
Status: Downloaded newer image for nginx:1.21.5
docker.io/library/nginx:1.21.5
root@ubuntu-server1:~#
root@ubuntu-server1:~#
root@ubuntu-server1:~# docker tag nginx:1.21.5 192.168.22.8/web/nginx:1.21.5
root@ubuntu-server1:~#
root@ubuntu-server1:~# docker push 192.168.22.8/web/nginx:1.21.5
The push refers to repository [192.168.22.8/web/nginx]
d874fd2bc83b: Preparing
32ce5f6a5106: Preparing
f1db227348d0: Preparing
b8d6e692a25e: Preparing
e379e8aedd4d: Preparing
2edcec3590a4: Waiting
unauthorized: unauthorized to access repository: web/nginx, action: push: unauthorized to access repository: web/nginx, action: push
root@ubuntu-server1:~#
root@ubuntu-server1:~#
root@ubuntu-server1:~# docker login 192.168.22.8
Username: admin
Password:
WARNING! Your password will be stored unencrypted in /root/.docker/config.json.
Configure a credential helper to remove this warning. See
https://docs.docker.com/engine/reference/commandline/login/#credentials-store

Login Succeeded
root@ubuntu-server1:~# docker push 192.168.22.8/web/nginx:1.21.5
The push refers to repository [192.168.22.8/web/nginx]
d874fd2bc83b: Pushed
32ce5f6a5106: Pushed
f1db227348d0: Pushed
b8d6e692a25e: Pushed
e379e8aedd4d: Pushed
2edcec3590a4: Pushed
1.21.5: digest: sha256:ee89b00528ff4f02f2405e4ee221743ebc3f8e8dd0bfd5c4c20a2fa2aaa7ede3 size: 1570
此时ubuntu-server2上面已经有了我们刚才上传的ubuntu-server1上面的镜像了
同步我们往ubuntu-server2上面harbor,创建一个os的项目,然后上传一个centos的镜像的,看是否能同步到ubuntu-server1上面
root@ubuntu-server2:/home/liulv/harbor# docker pull centos:8.4.2105
8.4.2105: Pulling from library/centos
a1d0c7532777: Pull complete
Digest: sha256:a27fd8080b517143cbbbab9dfb7c8571c40d67d534bbdee55bd6c473f432b177
Status: Downloaded newer image for centos:8.4.2105
docker.io/library/centos:8.4.2105
root@ubuntu-server2:/home/liulv/harbor#
root@ubuntu-server2:/home/liulv/harbor# docker tag centos:8.4.2105 192.168.22.4/os/centos:8.4.2105
root@ubuntu-server2:/home/liulv/harbor# docker push 192.168.22.4/os/centos:8.4.2105
The push refers to repository [192.168.22.4/os/centos]
74ddd0ec08fa: Preparing
unauthorized: unauthorized to access repository: os/centos, action: push: unauthorized to access repository: os/centos, action: push
root@ubuntu-server2:/home/liulv/harbor#
root@ubuntu-server2:/home/liulv/harbor# docker login 192.168.22.4
Username: admin
Password:
WARNING! Your password will be stored unencrypted in /root/.docker/config.json.
Configure a credential helper to remove this warning. See
https://docs.docker.com/engine/reference/commandline/login/#credentials-store

Login Succeeded
root@ubuntu-server2:/home/liulv/harbor# docker push 192.168.22.4/os/centos:8.4.2105
The push refers to repository [192.168.22.4/os/centos]
74ddd0ec08fa: Pushed
8.4.2105: digest: sha256:a1801b843b1bfaf77c501e7a6d3f709401a1e0c83863037fa3aab063a7fdb9dc size: 529
我们可以看到ubuntu-server1上面已经有centos的镜像了
- 另外由于我们我们还可以对镜像进行扫描以及垃圾清理工作
- 在ubuntu-server3上面搭建haproxy,修改配置并启动
root@ubuntu-server3:~# cat /etc/haproxy/haproxy.cfg
listen 192.168.22.27
 bind 192.168.22.27:80
 mode tcp
 balance source
 server 192.168.22.4 192.168.22.4:80 weight 10 check inter 3s fall 3 rise 5
 server 192.168.22.8 192.168.22.8:80 weight 10 check inter 3s fall 3 rise 5
重启
systemctl restart haproxy.service
此时我们通过haproxy所在机器(192.168.22.27)即可登录harbor服务,我们可以模拟harbor故障,看故障切换大概需要的时间(3*5=15s)
补充,我们可以把harbor加入开机自启动
[Unit]
Description=Harbor
After=docker.service systemd-networkd.service systemd-resolved.service
Requires=docker.service
Documentation=http://github.com/vmware/harbor

[Service]
Type=simple
Restart=on-failure
RestartSec=5
ExecStart=/usr/bin/docker-compose -f  /home/liulv/harbor/docker-compose.yml up
ExecStop=/usr/bin/docker-compose -f /home/liulv/harbor/docker-compose.yml down

[Install]
WantedBy=multi-user.target

 浙公网安备 33010602011771号