

Mybatis(上)
Mybatis
一、MyBatis 简介
1. MyBatis作用
MyBatis 是支持定制化 SQL、存储过程以及高级映射的优秀的持久层框架。
MyBatis 避免了几乎所有的 JDBC 代码和手动设置参数以及获取结果集。
MyBatis可以使用简单的XML用于配置和原始映射,将接口和Java的POJO类映射成数据库中的记录,使开发者只需要关注 SQL 本身,而不需要花费精力去处理例如注册驱动、创建connection、创建statement、手动设置参数、结果集检索等jdbc繁杂的过程代码。
2. 历史
原是apache的一个开源项目iBatis,2010年6月这个项目由apache software foundation 迁移到了google code,并且改名为MyBatis 。
iBATIS一词来源于“internet”和“abatis”的组合,是一个基于Java的持久层框架。
3. 为什么要使用MyBatis?
JDBC
SQL夹在Java代码块里,耦合度高导致硬编码内伤,维护不易且实际开发需求中sql是有变化,频繁修改的情况多见。
要自已创建connection、创建statement、手动设置参数、结果集检索等
Hibernate
长难复杂SQL,对于Hibernate而言处理也不容易,内部自动生产的SQL,不容易做特殊优化。
基于全映射的全自动框架,javaBean存在大量字段时无法只映射部分字段。导致数据库性能下降。
Mybatis
对开发人员而言,核心sql还是需要自己优化。MyBatis是一个半自动化的持久化层框架。
MyBatis 是支持定制化 SQL、存储过程以及高级映射的优秀的持久层框架。
二、 MyBatis 入门程序
1. 下载Mybatis核心包
2. 创建工程,引入MyBatis核心包及依赖包
学习 MyBatis 先用简单的 java 项目
导入包
+ lib
  - ant-1.10.3.jar
  - ant-launcher-1.10.3.jar
  - asm-7.0.jar
  - cglib-3.2.10.jar
  - commons-logging-1.2.jar
  - javassist-3.24.1-GA.jar
  - junit-4.10.jar
  - log4j-1.2.17.jar
  - log4j-api-2.11.2.jar
  - log4j-core-2.11.2.jar
  - lombok-1.18.8.jar
  - mybatis-3.5.3.jar
  - mysql-connector-java-8.0.15.jar
  - ognl-3.2.10.jar
  - slf4j-api-1.7.26.jar
  - slf4j-log4j12-1.7.26.jar
3. 创建customer表,建立与表对象的domain
customer.sql
SET FOREIGN_KEY_CHECKS=0;

-- ----------------------------
-- Table structure for customer
-- ----------------------------
DROP TABLE IF EXISTS `customer`;
CREATE TABLE `customer` (
  `cust_id` int(11) NOT NULL AUTO_INCREMENT,
  `cust_name` varchar(255) DEFAULT NULL,
  `cust_profession` varchar(255) DEFAULT NULL,
  `cust_phone` varchar(255) DEFAULT NULL,
  `email` varchar(255) DEFAULT NULL,
  PRIMARY KEY (`cust_id`)
) ENGINE=InnoDB AUTO_INCREMENT=11 DEFAULT CHARSET=utf8;

-- ----------------------------
-- Records of customer
-- ----------------------------
INSERT INTO `customer` VALUES ('1', '鲁班', '射手', '13499887733', '12341241@qq.com');
INSERT INTO `customer` VALUES ('2', '李白', '刺客', '18977665521', 'libai@163.com');
INSERT INTO `customer` VALUES ('3', '阿轲', '刺客', '18977665997', 'aike@qq.com');
INSERT INTO `customer` VALUES ('4', '德玛西亚', '肉盾', '13700997665', 'demaxiya.126.com6');
INSERT INTO `customer` VALUES ('5', '亚索', '战士', '13586878987', 'yasuo@qq.com');
INSERT INTO `customer` VALUES ('6', '奶妈', '辅助', '13398909089', 'nama@qq.com');
INSERT INTO `customer` VALUES ('7', '剑圣', '刺客', '13398909088', 'jiansheng@163.com');
INSERT INTO `customer` VALUES ('8', '盖伦', '肉盾', '15923242231', 'gailun@126.com');
INSERT INTO `customer` VALUES ('9', '锤石', '辅助', '13398908900', '8888@163.com');
INSERT INTO `customer` VALUES ('10', '阿木木', '辅助', '13398908928', '13398908928@qq.com');
Customer
package com.mybatis.domain;

import lombok.Getter;
import lombok.Setter;

@Setter@Getter
public class Customer {
    private Integer cust_id;
    private String cust_name;
    private String cust_profession;
    private String cust_phone;
    private String email;

    @Override
    public String toString() {
        return "Customer{" +
                "cust_id=" + cust_id +
                ", cust_name='" + cust_name + '\'' +
                ", cust_profession='" + cust_profession + '\'' +
                ", cust_phone='" + cust_phone + '\'' +
                ", email='" + email + '\'' +
                '}';
    }
}
4. 创建MyBatis核心配置文件SqlMappingConfig.xml
SqlMappingConfig.xml
<?xml version="1.0" encoding="UTF-8" ?>
<!DOCTYPE configuration
        PUBLIC "-//mybatis.org//DTD Config 3.0//EN"
        "http://mybatis.org/dtd/mybatis-3-config.dtd">
<configuration>

    <!--配置sql打印-->
    <settings>
        <setting name="logImpl" value="STDOUT_LOGGING"/>
    </settings>
    <!-- spring整合后 environments配置将废除 使用spring中的连接池 -->
    <environments default="development">
        <environment id="development">
            <!-- 使用jdbc事务管理 -->
            <transactionManager type="JDBC" />
            <!-- 数据库连接池 -->
            <dataSource type="POOLED">
                <property name="driver" value="com.mysql.jdbc.Driver" />
                <property name="url"
                          value="jdbc:mysql://localhost:3307/mybatis?characterEncoding=utf-8" />
                <property name="username" value="root" />
                <property name="password" value="123456" />
            </dataSource>
        </environment>
    </environments>
</configuration>
5. 创建与表对象的关系映射Mapping文件编写sql语句
Customer.xml
<?xml version="1.0" encoding="UTF-8" ?>
<!DOCTYPE mapper
        PUBLIC "-//mybatis.org//DTD Mapper 3.0//EN"
        "http://mybatis.org/dtd/mybatis-3-mapper.dtd">

<mapper namespace="myTest">
    <!--根据cust_id查询客户-->
    <select id="queryCustomerById" parameterType="Int" resultType="com.mybatis.domain.Customer">
		SELECT * FROM `customer` WHERE cust_id  = #{cust_id}
	</select>
</mapper>
6. 在核心配置文件当中引入Mapping
SqlMappingConfig.xml
<?xml version="1.0" encoding="UTF-8" ?>
<!DOCTYPE configuration
        PUBLIC "-//mybatis.org//DTD Config 3.0//EN"
        "http://mybatis.org/dtd/mybatis-3-config.dtd">
<configuration>

    <!--配置sql打印-->
    <settings>
        <setting name="logImpl" value="STDOUT_LOGGING"/>
    </settings>
    <!-- spring整合后 environments配置将废除 使用spring中的连接池 -->
    <environments default="development">
        <environment id="development">
            <!-- 使用jdbc事务管理 -->
            <transactionManager type="JDBC"/>
            <!-- 数据库连接池 -->
            <dataSource type="POOLED">
                <property name="driver" value="com.mysql.jdbc.Driver"/>
                <property name="url"
                          value="jdbc:mysql://localhost:3307/mybatis?characterEncoding=utf-8"/>
                <property name="username" value="root"/>
                <property name="password" value="123456"/>
            </dataSource>
        </environment>
    </environments>
    <!--加载映射文件-->
    <mappers>
        <mapper resource="com/mybatis/domain/Customer.xml"></mapper>
    </mappers>
</configuration>
7. 创建工厂,执行sql语句
@Test
public void test() throws IOException {
    // 1.sqlSessionFactoryBuilder 加载配置文件
    SqlSessionFactoryBuilder sqlSessionFactoryBuilder = new SqlSessionFactoryBuilder();
    // 2.读取配置文件
    InputStream resourceAsStream = Resources.getResourceAsStream("SqlMappingConfig.xml");
    // 3.获取session工厂
    SqlSessionFactory sessionFactory = sqlSessionFactoryBuilder.build(resourceAsStream);
    // 4.获取会话   ---JDBC 连接
    SqlSession sqlSession = sessionFactory.openSession();
    // 5.执行sql
    // 第一个参数是 Customer.xml 中的 statement 的 id
    // 第二个参数是执行sql需要的参数
    Customer customer = sqlSession.selectOne("queryCustomerById", 2);
    System.out.println(customer);
    // 6.关闭session
    sqlSession.close();
}
三、MyBatis核心API
1. SqlSessionFactoryBuilder
SqlSessionFactoryBuilder用于创建SqlSessionFacoty
SqlSessionFacoty一旦创建完成就不需要SqlSessionFactoryBuilder了
因为SqlSession是通过SqlSessionFactory创建的,所以可以将SqlSessionFactoryBuilder当成一个工具类使用,最佳使用范围是方法范围即方法体内局部变量。
2. SqlSessionFactory
SqlSessionFactory是创建sqlSession的工厂,是一个接口,接口中定义了openSession的不同重载方法。
SqlSessionFactory的最佳使用范围是整个应用运行期间,一旦创建后可以重复使用,通常以单例模式管理SqlSessionFactory。
3. SqlSession
连接到数据库的一个会话,sqlSession中定义了数据库操作方法。
每个线程都应该有它自己的SqlSession实例,SqlSession的实例不能共享使用,它也是线程不安全的。因此最佳的范围是请求或方法范围,绝对不能将SqlSession实例的引用放在一个类的静态字段或实例字段中。
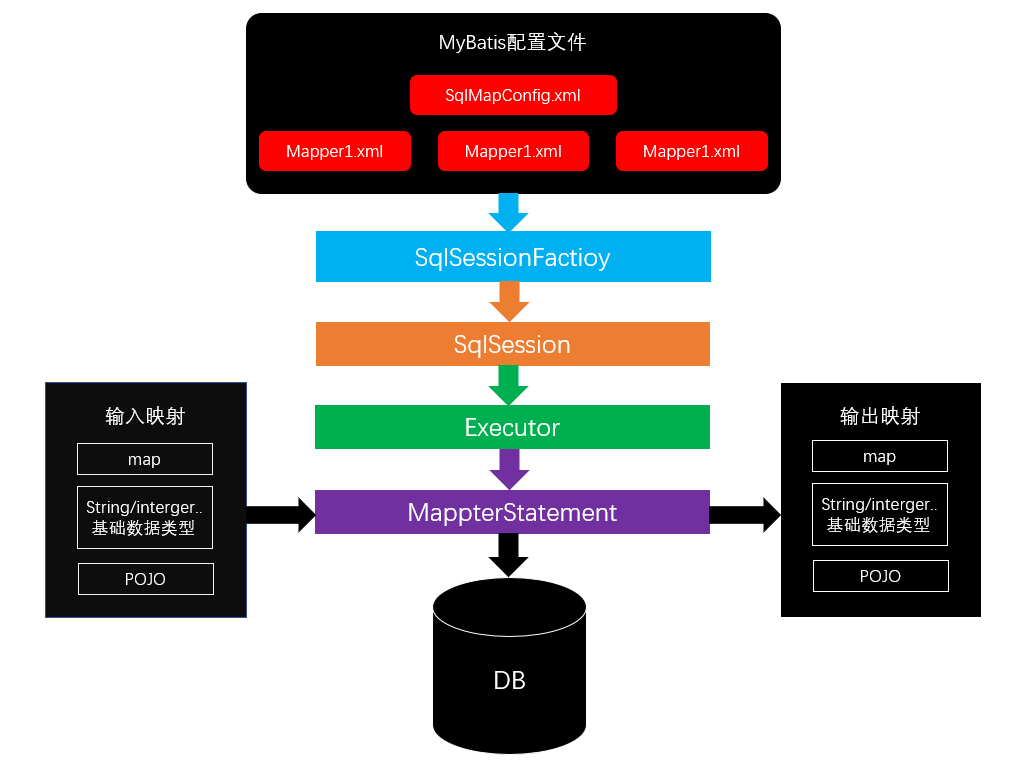
MyBatis架构
MyBatis抽取工具类
MybatisUtils
package com.mybatis.utils;

import org.apache.ibatis.io.Resources;
import org.apache.ibatis.session.SqlSession;
import org.apache.ibatis.session.SqlSessionFactory;
import org.apache.ibatis.session.SqlSessionFactoryBuilder;

import java.io.IOException;
import java.io.InputStream;

public class MybatisUtils {
    public static final SqlSessionFactory sessionFactory;
    static {
        // 1.sqlSessionFactoryBuilder 加载配置文件
        SqlSessionFactoryBuilder sqlSessionFactoryBuilder = new SqlSessionFactoryBuilder();
        // 2.读取配置文件
        InputStream resourceAsStream = null;
        try {
            resourceAsStream = Resources.getResourceAsStream("SqlMappingConfig.xml");
        } catch (IOException e) {
            e.printStackTrace();
        }
        // 3.获取session工厂
        sessionFactory = sqlSessionFactoryBuilder.build(resourceAsStream);
    }

    public static SqlSession openSession(){
        return sessionFactory.openSession();
    }
}
执行sql
@Test
public void test() {
    // 4.获取会话   ---JDBC 连接
    SqlSession sqlSession = MybatisUtils.openSession();
    // 5.执行sql
    // 第一个参数是 Customer.xml 中的 statement 的 id
    // 第二个参数是执行sql需要的参数
    Customer customer = sqlSession.selectOne("queryCustomerById", 2);
    System.out.println(customer);
    // 6.关闭session
    sqlSession.close();
}
控制台打印sql语句
<!--配置sql打印-->
<settings>
    <setting name="logImpl" value="STDOUT_LOGGING"/>
</settings>
SqlMappingConfig.xml
<?xml version="1.0" encoding="UTF-8" ?>
<!DOCTYPE configuration
        PUBLIC "-//mybatis.org//DTD Config 3.0//EN"
        "http://mybatis.org/dtd/mybatis-3-config.dtd">
<configuration>

    <!--配置sql打印-->
    <settings>
        <setting name="logImpl" value="STDOUT_LOGGING"/>
    </settings>
    <!-- spring整合后 environments配置将废除 使用spring中的连接池 -->
    <environments default="development">
        <environment id="development">
            <!-- 使用jdbc事务管理 -->
            <transactionManager type="JDBC"/>
            <!-- 数据库连接池 -->
            <dataSource type="POOLED">
                <property name="driver" value="com.mysql.jdbc.Driver"/>
                <property name="url"
                          value="jdbc:mysql://localhost:3307/mybatis?characterEncoding=utf-8"/>
                <property name="username" value="root"/>
                <property name="password" value="123456"/>
            </dataSource>
        </environment>
    </environments>
    <!--加载映射文件-->
    <mappers>
        <mapper resource="com/mybatis/domain/Customer.xml"></mapper>
    </mappers>
</configuration>
四、MyBatis-查询
1. 查询所有客户
Customer.xml
<?xml version="1.0" encoding="UTF-8" ?>
<!DOCTYPE mapper
        PUBLIC "-//mybatis.org//DTD Mapper 3.0//EN"
        "http://mybatis.org/dtd/mybatis-3-mapper.dtd">

<mapper namespace="myTest">
    <!--根据cust_id查询客户-->
    <select id="queryCustomerById" parameterType="Int" resultType="com.mybatis.domain.Customer">
		SELECT * FROM `customer` WHERE cust_id  = #{cust_id}
	</select>

    <!--查询所有-->
    <select id="queryAllCustomer" resultType="com.mybatis.domain.Customer">
	    SELECT * FROM `customer`
	</select>
</mapper>
MyTest
/* 查询所有的用户 */
@Test
public void test2() {
    SqlSession sqlSession = MybatisUtils.openSession();
    List<Customer> queryAllCustomer = sqlSession.selectList("queryAllCustomer");
    for (Customer customer : queryAllCustomer) {
        System.out.println(customer);
    }
    sqlSession.close();
}
2. 根据用户名模糊查询客户
方式一:#
Customer.xml
<!--根据用户名模糊查询客户-->
<select id="querytCustomerByName" parameterType="String" resultType="com.mybatis.domain.Customer">
    select * from customer where cust_name like #{name};
</select>
MyTest
@Test
public void test3(){
    SqlSession sqlSession = MybatisUtils.openSession();
    List<Customer> customers = sqlSession.selectList("querytCustomerByName", "%李%");
    for (Customer customer : customers) {
        System.out.println(customer);
    }
    sqlSession.close();
}
方式二:$
Customer.xml
<!--根据用户名模糊查询客户-->
<select id="querytCustomerByName" parameterType="String" resultType="com.mybatis.domain.Customer">
    select * from customer where cust_name like '%${value}%';
</select>
MyTest
@Test
public void test3(){
    SqlSession sqlSession = MybatisUtils.openSession();
    List<Customer> customers = sqlSession.selectList("querytCustomerByName", "李");
    for (Customer customer : customers) {
        System.out.println(customer);
    }
    sqlSession.close();
}
#{} 和 ${}
#{}
表示一个占位符号,通过#{}可以实现preparedStatement向占位符中设置值,自动进行java类型和jdbc类型转换。
#{}可以有效防止sql注入,#{}可以接收简单类型值或pojo属性值。
如果parameterType传输单个简单类型值,#{}括号中可以是value或其它名称
${}
表示拼接sql串,通过${}可以将parameterType 传入的内容拼接在sql中且不进行jdbc类型转换。
${}可以接收简单类型值或pojo属性值。
如果parameterType传输单个简单类型值,${}括号中只能是value
3. 总结
(1)parameterType
指定输入参数类型,mybatis通过ognl从输入对象中获取参数值拼接在sql中。
(2)resultType
指定输出结果类型,mybatis将sql查询结果的一行记录数据映射为resultType指定类型的对象。如果有多条数据,则分别进行映射,并把对象放到容器List中。
(3)selectOne
查询一条记录,如果使用selectOne查询多条记录则抛出异常。
(4)selectList
可以查询一条或多条记录。
五、保存更新删除
1. 添加客户
Customer.xml
<!--添加-->
<insert id="insertCustom" parameterType="com.mybatis.domain.Customer">
    insert into `customer`(cust_name,cust_profession,cust_phone,email)
    values (#{cust_name},#{cust_profession},#{cust_phone},#{email})
</insert>
MyTest
/*添加客户*/
@Test
public void insert(){
    SqlSession sqlSession = MybatisUtils.openSession();
    Customer customer = new Customer();
    customer.setCust_name("后裔");
    customer.setCust_profession("射手");
    customer.setCust_phone("18907897879");
    sqlSession.insert("insertCustom", customer);
    // 当要改动数据库当中的记录时,执行sql时要自己手动提交事务
    sqlSession.commit();
    System.out.println(customer);
    sqlSession.close();
}
上面代码输出为:
Customer{cust_id=null, cust_name='后裔', cust_profession='射手', cust_phone='18907897879', email='null'}
id为空,假设我们需要插入的时候就获取到自增的id。
2. 返回自增的主键
Customer.xml
<!--添加-->
<insert id="insertCustom" parameterType="com.mybatis.domain.Customer">
    /*获取插入的最后一个id*/
    <selectKey keyColumn="cust_id" keyProperty="cust_id" resultType="Integer" order="AFTER">
        select last_insert_id()
    </selectKey>

    insert into `customer`(cust_name,cust_profession,cust_phone,email)
    values (#{cust_name},#{cust_profession},#{cust_phone},#{email})
</insert>
MyTest 不变,再次执行 MyTest ,输出如下,就会获取到插入的最后一个id
Customer{cust_id=13, cust_name='后裔', cust_profession='射手', cust_phone='18907897879', email='null'}
3. 更新客户
Customer.xml
<!--更新-->
<update id="updateCustomer" parameterType="com.mybatis.domain.Customer">
    update `customer` set cust_name=#{cust_name} where cust_id=#{cust_id}
</update>
MyTest
/*更新操作*/
@Test
public void update(){
    SqlSession sqlSession = MybatisUtils.openSession();
    Customer customer = sqlSession.selectOne("queryCustomerById", 12);
    customer.setCust_name("孙悟空");
    sqlSession.update("updateCustomer",customer);
    sqlSession.commit();
    sqlSession.close();
}
4. 删除客户
Customer.xml
<!--删除操作-->
<delete id="deleteCustomer" parameterType="com.mybatis.domain.Customer">
    delete from `customer` where cust_id=#{cust_id}
</delete>
MyTest
/*删除*/
@Test
public void delete(){
    SqlSession sqlSession = MybatisUtils.openSession();
    Customer customer = sqlSession.selectOne("queryCustomerById", 12);
    sqlSession.delete("deleteCustomer",customer);
    sqlSession.commit();
    sqlSession.close();
}
六、MyBatis开发DAO
1. 原始Dao开发方法
定义Dao 接口,定义Dao实现类
import com.mybatis.domain.Customer;
import java.util.List;

public interface CustomerDao {
    public Customer getCustomerbyId(Integer id);
    public List<Customer> getAllCustomer();
    public void addCustomer(Customer customer);
    public void  updateCustomer(Customer customer);
}
import com.mybatis.domain.Customer;
import com.mybatis.utils.MybatisUtils;
import org.apache.ibatis.session.SqlSession;

import java.util.List;

public class CustomerDaoImpl implements CustomerDao {
    @Override
    public Customer getCustomerbyId(Integer id) {
        SqlSession sqlSession = MybatisUtils.openSession();
        Customer customer = sqlSession.selectOne("queryCustomerById", id);
        sqlSession.close();
        return customer;
    }

    @Override
    public List<Customer> getAllCustomer() {
        SqlSession sqlSession = MybatisUtils.openSession();
        List<Customer> customers = sqlSession.selectList("queryAllCustomer");
        sqlSession.close();
        return customers;
    }

    @Override
    public void addCustomer(Customer customer) {
        SqlSession sqlSession = MybatisUtils.openSession();
        sqlSession.insert("insertCustom",customer);
        sqlSession.commit();
        sqlSession.close();
    }

    @Override
    public void updateCustomer(Customer customer) {
        SqlSession sqlSession = MybatisUtils.openSession();
        sqlSession.update("insertCustom",customer);
        sqlSession.commit();
        sqlSession.close();
    }
}
@Test
public void test(){
    CustomerDao customerDao = new CustomerDaoImpl();
    Customer customerbyId = customerDao.getCustomerbyId(1);
    System.out.println(customerbyId);

    List<Customer> allCustomer = customerDao.getAllCustomer();
    for (Customer customer : allCustomer) {
        System.out.println(customer);
    }
}

@Test
public void test2(){
    CustomerDao customerDao = new CustomerDaoImpl();
    Customer customerbyId = customerDao.getCustomerbyId(13);
    customerbyId.setCust_name("孙悟空");
    customerDao.updateCustomer(customerbyId);
}
2. Mapper动态代理
(1)要求
在 domain.xml 中
① namespace 必须和Mapper接口类路径一致
② id 必须和Mapper接口方法名一致
③ parameterType必须和接口方法参数类型一致
④ resultType必须和接口方法返回值类型一致
动态代理对象调用sqlSession.selectOne()和sqlSession.selectList()是根据mapper接口方法的返回值决定
如果返回List则调用selectList方法,如果返回单个对象则调用selectOne方法。
(2)过程
① domain.xml
<?xml version="1.0" encoding="UTF-8" ?>
<!DOCTYPE mapper
        PUBLIC "-//mybatis.org//DTD Mapper 3.0//EN"
        "http://mybatis.org/dtd/mybatis-3-mapper.dtd">

<mapper namespace="com.mybatis.mapper.CustomerMapper">
    <!--根据cust_id查询客户-->
    <select id="getCustomerById" parameterType="Integer" resultType="com.mybatis.domain.Customer">
		SELECT * FROM `customer` WHERE cust_id  = #{cust_id}
	</select>

    <!--查询所有-->
    <select id="getAllCustomer" resultType="com.mybatis.domain.Customer">
	    SELECT * FROM `customer`
	</select>

    <!--根据用户名模糊查询客户-->
    <select id="getCustomerByName" parameterType="String" resultType="com.mybatis.domain.Customer">
		select * from `customer` where cust_name like '%${value}%';
	</select>

    <!--添加-->
    <insert id="insertCustom" parameterType="com.mybatis.domain.Customer">
        /*获取插入的最后一个id*/
        <selectKey keyColumn="cust_id" keyProperty="cust_id" resultType="Integer" order="AFTER">
            select last_insert_id()
        </selectKey>

        insert into `customer`(cust_name,cust_profession,cust_phone,email)
        values (#{cust_name},#{cust_profession},#{cust_phone},#{email})
    </insert>

    <!--更新-->
    <update id="updateCustomer" parameterType="com.mybatis.domain.Customer">
        update `customer` set cust_name=#{cust_name} where cust_id=#{cust_id}
    </update>

    <!--删除操作-->
    <delete id="deleteCustomer" parameterType="com.mybatis.domain.Customer">
        delete from `customer` where cust_id=#{cust_id}
    </delete>

</mapper>
② 定义接口
import com.mybatis.domain.Customer;

import java.util.List;

public interface CustomerMapper {
    Customer getCustomerById(Integer id);
    List<Customer> getAllCustomer();
    List<Customer> getCustomerByName(String name);
    void insertCustom(Customer customer);
    void updateCustomer(Customer customer);
    void deleteCustomer(Customer customer);
}
③ 调用
@Test
public void test3(){
    SqlSession sqlSession = MybatisUtils.openSession();
    CustomerMapper mapper = sqlSession.getMapper(CustomerMapper.class);
    Customer customer = mapper.getCustomerById(15);
    System.out.println(customer);

    List<Customer> customers = mapper.getAllCustomer();
    for (Customer customer1 : customers) {
        System.out.println(customer1);
    }

    List<Customer> customerList = mapper.getCustomerByName("%李%");
    for (Customer customer1 : customerList) {
        System.out.println(customer1);
    }

    customer.setCust_name("虞姬");
    mapper.updateCustomer(customer);
    sqlSession.commit();
    sqlSession.close();
}
七、参数传递
1. 单个参数
可以接受基本类型,对象类型,集合类型的值。MyBatis可直接使用这个参数,不需要经过任何处理。
单个参数时, #{ } 里边的参数名称可以任意取。
2. 多个参数
任意多个参数,都会被MyBatis重新包装成一个Map传入。Map的key是param1,param2…,值就是参数的值。
多个参数时,parameterType 可以不用写了。
#{ } 里边的参数名称要使用 arg0,arg1…… 或者 param1,param2……
注意:arg是从0开始,param是从1开始。
<!--根据id和name查询客户-->
<select id="getCustomerByIdName" resultType="com.mybatis.domain.Customer">
    SELECT * FROM `customer` WHERE cust_id  = #{arg0} and cust_name = #{arg1}
</select>
<!--  或者   -->
<!--根据id和name查询客户-->
<select id="getCustomerByIdName" resultType="com.mybatis.domain.Customer">
    SELECT * FROM `customer` WHERE cust_id  = #{param1} and cust_name = #{param2}
</select>
3. @param命名参数
如果不想使用 arg 和 param,想自己起一个名字。
可以使用@Param为参数起一个名字,MyBatis就会将这些参数封装进map中,key就是我们自己指定的名字。
CustomerMapper
public interface CustomerMapper {
    Customer getCustomerById(Integer id);
    List<Customer> getAllCustomer();
    List<Customer> getCustomerByName(String name);
    void insertCustom(Customer customer);
    void updateCustomer(Customer customer);
    void deleteCustomer(Customer customer);
    Customer getCustomerByIdName(@Param("id") Integer id, @Param("name") String name);
}
Customer.xml
<!--根据id和name查询客户-->
<select id="getCustomerByIdName" resultType="com.mybatis.domain.Customer">
    SELECT * FROM `customer` WHERE cust_id  = #{id} and cust_name = #{name}
</select>
@param 起了名之后 arg 就失效了,但是 param 还能使用。
<!--根据id和name查询客户-->
<select id="getCustomerByIdName" resultType="com.mybatis.domain.Customer">
    SELECT * FROM `customer` WHERE cust_id  = #{param1} and cust_name = #{param2}
</select>
4. Map
我们也可以封装多个参数为map,直接传递
CustomerMapper
public interface CustomerMapper {
    Customer getCustomerById(Integer id);
    List<Customer> getAllCustomer();
    List<Customer> getCustomerByName(String name);
    void insertCustom(Customer customer);
    void updateCustomer(Customer customer);
    void deleteCustomer(Customer customer);
    Customer getCustomerByIdName(@Param("id") Integer id, @Param("name") String name);
    Customer getCustomerByIdName(Map<String, Object> map);
}
Customer.xml
<!--根据id和name查询客户-->
<select id="getCustomerByIdName" resultType="com.mybatis.domain.Customer">
    SELECT * FROM `customer` WHERE cust_id  = #{id} and cust_name = #{name}
</select>
@Test
public void test4(){
    SqlSession sqlSession = MybatisUtils.openSession();
    CustomerMapper mapper = sqlSession.getMapper(CustomerMapper.class);
    HashMap<String, Object> map = new HashMap<>();
    map.put("id",1);
    map.put("name","鲁班");
    Customer customer = mapper.getCustomerByIdName(map);
    System.out.println(customer);
    sqlSession.close();
}
使用 map,#{ } 里边的参数名称必须和map的key名相一致。
5. POJO
当这些参数属于我们业务POJO时,我们直接传递POJO
CustomerMapper
public interface CustomerMapper {
    Customer getCustomerById(Integer id);
    List<Customer> getAllCustomer();
    List<Customer> getCustomerByName(String name);
    void insertCustom(Customer customer);
    void updateCustomer(Customer customer);
    void deleteCustomer(Customer customer);
    Customer getCustomerByIdName(@Param("id") Integer id, @Param("name") String name);
    Customer getCustomerByIdName(Map<String, Object> map);
    Customer getCustomerByIdName(Customer customer);
}
Customer.xml
<!--根据id和name查询客户-->
<select id="getCustomerByIdName" resultType="com.mybatis.domain.Customer">
    SELECT * FROM `customer` WHERE cust_id  = #{cust_id} and cust_name = #{cust_name}
</select>
@Test
public void test4(){
    SqlSession sqlSession = MybatisUtils.openSession();
    CustomerMapper mapper = sqlSession.getMapper(CustomerMapper.class);
    Customer cust = new Customer();
    cust.setCust_id(1);
    cust.setCust_name("鲁班");
    Customer customer = mapper.getCustomerByIdName(cust);
    System.out.println(customer);
    sqlSession.close();
}
使用 POJO,#{ } 里边的参数名称必须和POJO的字段名相一致。
6. 参数传递分析
会把参数给放到一个数组当中,
如果一个参数, 内部处理时,会自动把该参数返回。
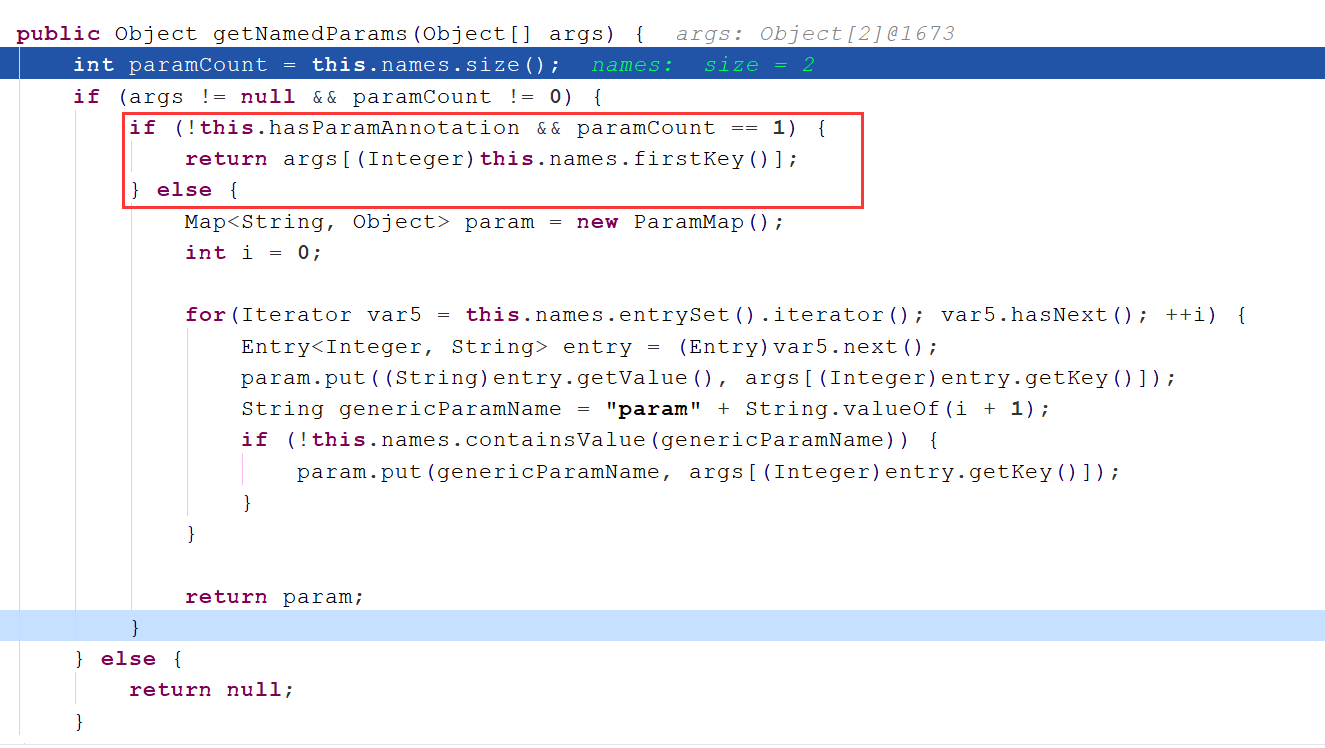
如果是多个参数,内部会做判断,判断是否有@param注解。
① 如果没有,没有注解的话,就直接使用arg0 arg1...为key, 放到map中。并且还会以param1和param2...为key放一份到map中。
② 如果有,如果有注解的话,会使用注解当中的值,替换掉默认的arg0和arg1,使用@param中的值,做为key 放到一个map当中。并且还会以param1和param2...为key放一份到map中。
public Object getNamedParams(Object[] args) {
    int paramCount = this.names.size();
    if (args != null && paramCount != 0) {
        if (!this.hasParamAnnotation && paramCount == 1) {
            return args[(Integer)this.names.firstKey()];
        } else {
            Map<String, Object> param = new ParamMap();
            int i = 0;

            for(Iterator var5 = this.names.entrySet().iterator(); var5.hasNext(); ++i) {
                Entry<Integer, String> entry = (Entry)var5.next();
                param.put((String)entry.getValue(), args[(Integer)entry.getKey()]);
                String genericParamName = "param" + String.valueOf(i + 1);
                if (!this.names.containsValue(genericParamName)) {
                    param.put(genericParamName, args[(Integer)entry.getKey()]);
                }
            }

            return param;
        }
    } else {
        return null;
    }
}

 浙公网安备 33010602011771号