
SpringMVC(下)
一、访问静态资源
在进行Spring MVC的配置时,通常我们会配置一个dispatcher servlet用于处理对应的URL
在设置url-pattern时可以设置三种形式
(1)/* :拦截所有 jsp js png .css 真的全拦截。不建议使用。
(2)/ :拦截所有,不包括jsp,包含.js .png.css 建议使用。
(3)**.action .do :拦截以do action 结尾的请求。
<!-- 配置SpringMVC前端控制器 -->
<servlet>
    <servlet-name>mySpringMVC</servlet-name>
    <servlet-class>org.springframework.web.servlet.DispatcherServlet</servlet-class>
    <!-- 指定SpringMVC配置文件 -->
    <!-- SpringMVC的配置文件的默认路径是/WEB-INF/${servlet-name}-servlet.xml -->
    <init-param>
        <!-- DispatcherServlet类的初始化参数 -->
        <param-name>contextConfigLocation</param-name>
        <!-- 初始化参数的值,即springmvc配置文件的路径 -->
        <param-value>classpath:springmvc.xml</param-value>
    </init-param>
    <!-- 表示web应用启动即加载该servlet -->
    <load-on-startup>1</load-on-startup>
</servlet>
<servlet-mapping>
    <servlet-name>mySpringMVC</servlet-name>
    <url-pattern>/</url-pattern>
</servlet-mapping>
url-pattern为 / 时,访问静态资源,会被拦截,找不到静态资源
解决方法:
(1)在springmvc.xml中配置
<mvc:default-servlet-handler/>
自动的根据访问地址看下是不是静态资源,如果是直接放行,如果不是就去找 @RequestMapping
(2)在springmvc.xml中配置 mvc:resources (推荐使用)
<mvc:resources location="/img/" mapping="/img/**"/>
<mvc:resources location="/js/" mapping="/js/**"/>
<mvc:resources location="/css/" mapping="/css/**"/>
描述:
- location元素表示webapp目录下的static包下的所有文件;
- mapping元素表示以/static开头的所有请求路径,如/static/a 或者/static/a/b;
- 该配置的作用是:DispatcherServlet不会拦截以/static开头的所有请求路径,并当作静态资源交由Servlet处理。
二、Json处理
概述
当前端使用Ajax发送请求时,服务器要以JSON的数据格式响应给浏览器。
使用方式
@ResponseBody来实现;注解方式
@ResponseBody
(1)添加 json处理 相关jar包
+ jackson 2.9.9
    - jackson-annotations-2.9.9.jar
    - jackson-core-2.9.9.jar
    - jackson-databind-2.9.9.jar
(2)在springmvc.xml配置文件当中写上
<mvc:annotation-driven/>
(3)设置映射方法的返回值为@ResponseBody
请求发送页
<%@ page contentType="text/html;charset=UTF-8" language="java" %>
<html>
  <head>
    <title>Title</title>
    <script src="${pageContext.request.contextPath}/js/jquery-3.3.1.min.js"></script>
  </head>
  <body>

  <input type="button" value="请求JSON" id="btn">

  <script>
    $(function () {
        $('#btn').click(function () {
            // 发送Ajax 请求
            $.post("${pageContext.request.contextPath}/getJson",function (data) {
                console.log(data);
            })
        });
    });
  </script>
  </body>
</html>
方式1-直接返回一个对象
@Controller
public class MyController {
    @RequestMapping("getJson")
    @ResponseBody
    public User show(){
        User user = new User();
        user.setUsername("user2");
        user.setPassword("159357");
        user.setAge(20);
        user.setHobby(new String[]{"篮球","足球"});
        return user;
    }
}
方式2-返回一个List集合
@Controller
public class MyController {
    @RequestMapping("getJson")
    @ResponseBody
    public ArrayList<User> show(){
        User user1 = new User();
        user1.setUsername("user2");
        user1.setPassword("159357");
        user1.setAge(20);
        user1.setHobby(new String[]{"篮球","足球"});

        User user2 = new User();
        user2.setUsername("user1");
        user2.setPassword("123456");
        user2.setAge(18);
        user2.setHobby(new String[]{"篮球","足球"});

        ArrayList<User> users = new ArrayList<>();
        users.add(user1);
        users.add(user2);

        return users;
    }
}
方式3-返回一个Map集合
@Controller
public class MyController {
    @RequestMapping("getJson")
    @ResponseBody
    public HashMap<String, Object> show(){
        User user1 = new User();
        user1.setUsername("user2");
        user1.setPassword("159357");
        user1.setAge(20);
        user1.setHobby(new String[]{"篮球","足球"});

        User user2 = new User();
        user2.setUsername("user1");
        user2.setPassword("123456");
        user2.setAge(18);
        user2.setHobby(new String[]{"篮球","足球"});

        ArrayList<User> users = new ArrayList<>();
        users.add(user1);
        users.add(user2);

        HashMap<String, Object> map = new HashMap<>();
        map.put("name", "hashmap");
        map.put("list", users);
        return map;
    }
}
表单序列化
serialize()
请求发送页
<%@ page contentType="text/html;charset=UTF-8" language="java" %>
<html>
  <head>
    <title>Title</title>
    <script src="${pageContext.request.contextPath}/js/jquery-3.3.1.min.js"></script>
  </head>
  <body>

  <form id="myform">
    <p>用户Id :<input type="text" name="id"></p>
    <p>用户名 :<input type="text" name="username"></p>
    <p>密码 :<input type="text" name="password"></p>
    <p>性别 :
      <input type="radio" name="sex" value="男">男
      <input type="radio" name="sex" value="女">女
    </p>
    <p>年龄 :<input type="text" name="age"></p>
    <p>爱好 :
      <input type="checkbox" name="like" value="篮球">篮球
      <input type="checkbox" name="like" value="足球">足球
      <input type="checkbox" name="like" value="排球">排球
      <input type="checkbox" name="like" value="乒乓球">乒乓球
    </p>
  </form>

  <input type="button" value="发送form" id="btn">

  <script>
    $(function () {
        $('#btn').click(function () {
            // 获取表单所有参数,发送给服务器
            var serialize = $('#myform').serialize();
            console.log(serialize);
            // output: 参数=值&参数=值&参数=值
        });
    });
  </script>
  </body>
</html>
我们希望获取的是json格式的数据:
序列化转Json
(function($){
    $.fn.serializeJson=function(){
        var serializeObj={};
        var array=this.serializeArray();
        var str=this.serialize();
        $(array).each(function(){
            if(serializeObj[this.name]){
                if($.isArray(serializeObj[this.name])){
                    serializeObj[this.name].push(this.value);
                }else{
                    serializeObj[this.name]=[serializeObj[this.name],this.value];
                }
            }else{
                serializeObj[this.name]=this.value;
            }
        });
        return serializeObj;
    };
})(jQuery);
请求发送页
<%@ page contentType="text/html;charset=UTF-8" language="java" %>
<html>
  <head>
    <title>Title</title>
    <script src="${pageContext.request.contextPath}/js/jquery-3.3.1.min.js"></script>
  </head>
  <body>

  <form id="myform">
    <p>用户Id :<input type="text" name="id"></p>
    <p>用户名 :<input type="text" name="username"></p>
    <p>密码 :<input type="text" name="password"></p>
    <p>性别 :
      <input type="radio" name="gender" value="男">男
      <input type="radio" name="gender" value="女">女
    </p>
    <p>年龄 :<input type="text" name="age"></p>
    <p>爱好 :
      <input type="checkbox" name="hobby" value="篮球">篮球
      <input type="checkbox" name="hobby" value="足球">足球
      <input type="checkbox" name="hobby" value="排球">排球
      <input type="checkbox" name="hobby" value="乒乓球">乒乓球
    </p>
  </form>

  <input type="button" value="发送form" id="btn">

  <script>
    (function($){
        $.fn.serializeJson=function(){
            var serializeObj={};
            var array=this.serializeArray();
            var str=this.serialize();
            $(array).each(function(){
                if(serializeObj[this.name]){
                    if($.isArray(serializeObj[this.name])){
                        serializeObj[this.name].push(this.value);
                    }else{
                        serializeObj[this.name]=[serializeObj[this.name],this.value];
                    }
                }else{
                    serializeObj[this.name]=this.value;
                }
            });
            return serializeObj;
        };
    })(jQuery);

    $(function () {
        $('#btn').click(function () {
            // 获取表单所有参数,发送给服务器
            var serialize = $('#myform').serializeJson();
            console.log(serialize);
        });
    });
  </script>
  </body>
</html>
这时候的 serialize 就是以json格式的数据,我们再把数据发送给服务器
<%@ page contentType="text/html;charset=UTF-8" language="java" %>
<html>
  <head>
    <title>Title</title>
    <script src="${pageContext.request.contextPath}/js/jquery-3.3.1.min.js"></script>
  </head>
  <body>

  <form id="myform">
    <p>用户Id :<input type="text" name="id"></p>
    <p>用户名 :<input type="text" name="username"></p>
    <p>密码 :<input type="text" name="password"></p>
    <p>性别 :
      <input type="radio" name="gender" value="男">男
      <input type="radio" name="gender" value="女">女
    </p>
    <p>年龄 :<input type="text" name="age"></p>
    <p>爱好 :
      <input type="checkbox" name="hobby" value="篮球">篮球
      <input type="checkbox" name="hobby" value="足球">足球
      <input type="checkbox" name="hobby" value="排球">排球
      <input type="checkbox" name="hobby" value="乒乓球">乒乓球
    </p>
  </form>

  <input type="button" value="发送form" id="btn">

  <script>
    (function($){
        $.fn.serializeJson=function(){
            var serializeObj={};
            var array=this.serializeArray();
            var str=this.serialize();
            $(array).each(function(){
                if(serializeObj[this.name]){
                    if($.isArray(serializeObj[this.name])){
                        serializeObj[this.name].push(this.value);
                    }else{
                        serializeObj[this.name]=[serializeObj[this.name],this.value];
                    }
                }else{
                    serializeObj[this.name]=this.value;
                }
            });
            return serializeObj;
        };
    })(jQuery);

    $(function () {
        $('#btn').click(function () {
            // 获取表单所有参数,发送给服务器
            var serialize = $('#myform').serializeJson();
            console.log(serialize);

            $.post("${pageContext.request.contextPath}/formJson",serialize,function (data) {
                console.log(data);
            })
        });
    });
  </script>
  </body>
</html>
Controller
@Controller
public class MyController {
    @RequestMapping("formJson")
    @ResponseBody
    public String show(User user){
        System.out.println(user);
        return "success";
    }
}
发现问题
运行后会发现,当爱好选一个的时候可以正常运行,当选择大等于两个的时候,会报错。
当传递复杂类型的时候,服务器不能接收。
这是因为,默认情况下,在发送请求的时候 Content-Type 都是 application/x-www-form-urlencoded; 直接使用@RequestParam接收参数。 urlencoded 只能发送简单的 key-value 字符串类型。
@RequestBody
默认情况下我们发送的都是 Content-Type: application/x-www-form-urlencoded,直接使用@RequestParam接收参数。
如果不是Content-Type: application/x-www-form-urlencoded 编码的内容,例如application/json, application/xml等;使用@RequestBody接收。
解决方法
在发送的时候以 json 的形式发送,接受的时候以 json 的形式接收。
<%@ page contentType="text/html;charset=UTF-8" language="java" %>
<html>
  <head>
    <title>Title</title>
    <script src="${pageContext.request.contextPath}/js/jquery-3.3.1.min.js"></script>
  </head>
  <body>

  <form id="myform">
    <p>用户Id :<input type="text" name="id"></p>
    <p>用户名 :<input type="text" name="username"></p>
    <p>密码 :<input type="text" name="password"></p>
    <p>性别 :
      <input type="radio" name="gender" value="男">男
      <input type="radio" name="gender" value="女">女
    </p>
    <p>年龄 :<input type="text" name="age"></p>
    <p>爱好 :
      <input type="checkbox" name="hobby" value="篮球">篮球
      <input type="checkbox" name="hobby" value="足球">足球
      <input type="checkbox" name="hobby" value="排球">排球
      <input type="checkbox" name="hobby" value="乒乓球">乒乓球
    </p>
  </form>

  <input type="button" value="发送form" id="btn">

  <script>
    (function($){
        $.fn.serializeJson=function(){
            var serializeObj={};
            var array=this.serializeArray();
            var str=this.serialize();
            $(array).each(function(){
                if(serializeObj[this.name]){
                    if($.isArray(serializeObj[this.name])){
                        serializeObj[this.name].push(this.value);
                    }else{
                        serializeObj[this.name]=[serializeObj[this.name],this.value];
                    }
                }else{
                    serializeObj[this.name]=this.value;
                }
            });
            return serializeObj;
        };
    })(jQuery);

    $(function () {
        $('#btn').click(function () {
            // 获取表单所有参数,发送给服务器
            var serialize = $('#myform').serializeJson();
            console.log(serialize);

            $.ajax({
                type:"post",
                url:"${pageContext.request.contextPath}/formJson",
                data:JSON.stringify(serialize),
                dataType:'json',
                contentType:'application/json',
                success:function (data) {
                    console.log(data);
                }
            });
        });
    });
  </script>
  </body>
</html>
Controller
@Controller
public class MyController {
    @RequestMapping("formJson")
    @ResponseBody
    public String show(@RequestBody User user){
        System.out.println(user);
        return "success";
    }
}
这样当爱好选择两个以上的时候就可以接收复杂类型的数据。
现在还有一个小问题:当爱好选择一个时,服务器接收不了。
原因是 当选择一个时,json串中hobby的数据为String类型,而hobby需要数组类型,Content-Type:application/x-www-form-urlencoded; 会自动帮我们解析,而 application/json 不会。所以我们要自己解析。
解决方法:
<%@ page contentType="text/html;charset=UTF-8" language="java" %>
<html>
  <head>
    <title>Title</title>
    <script src="${pageContext.request.contextPath}/js/jquery-3.3.1.min.js"></script>
  </head>
  <body>

  <form id="myform">
    <p>用户Id :<input type="text" name="id"></p>
    <p>用户名 :<input type="text" name="username"></p>
    <p>密码 :<input type="text" name="password"></p>
    <p>性别 :
      <input type="radio" name="gender" value="男">男
      <input type="radio" name="gender" value="女">女
    </p>
    <p>年龄 :<input type="text" name="age"></p>
    <p>爱好 :
      <input type="checkbox" name="hobby" value="篮球">篮球
      <input type="checkbox" name="hobby" value="足球">足球
      <input type="checkbox" name="hobby" value="排球">排球
      <input type="checkbox" name="hobby" value="乒乓球">乒乓球
    </p>
  </form>

  <input type="button" value="发送form" id="btn">

  <script>
    (function($){
        $.fn.serializeJson=function(){
            var serializeObj={};
            var array=this.serializeArray();
            var str=this.serialize();
            $(array).each(function(){
                if(serializeObj[this.name]){
                    if($.isArray(serializeObj[this.name])){
                        serializeObj[this.name].push(this.value);
                    }else{
                        serializeObj[this.name]=[serializeObj[this.name],this.value];
                    }
                }else{
                    serializeObj[this.name]=this.value;
                }
            });
            return serializeObj;
        };
    })(jQuery);

    $(function () {
        $('#btn').click(function () {
            // 获取表单所有参数,发送给服务器
            var serialize = $('#myform').serializeJson();
            console.log(serialize);
            // 解析
            if (typeof serialize.hobby == "string") {
                serialize.hobby = new Array(serialize.hobby);
            }

            $.ajax({
                type:"post",
                url:"${pageContext.request.contextPath}/formJson",
                data:JSON.stringify(serialize),
                dataType:'json',
                contentType:'application/json',
                success:function (data) {
                    // alert(data.responseText)
                    console.log(data);
                }
            });
        });
    });
  </script>
  </body>
</html>
@RequestBody 获取文件信息
<%@ page contentType="text/html;charset=UTF-8" language="java" %>
<html>
  <head>
    <title>Title</title>
    <script src="${pageContext.request.contextPath}/js/jquery-3.3.1.min.js"></script>
  </head>
  <body>
  <form action="${pageContext.request.contextPath}/myfile" method="post" enctype="multipart/form-data">
    <input type="file" name="myfile">
    <input type="submit" value="提交">
  </form>
  </body>
</html>
Controller
@RequestMapping("myfile")
@ResponseBody
public String file(@RequestBody String file){
    System.out.println(file);
    return "success";
}
三、视图解析器
视图解析器
请求处理方法执行完成后,最终返回一个 ModelAndView 对象
对于那些返回 String,View 或 ModeMap 等类型的处理方法,Spring MVC 也会在内部将它们装配成一个 ModelAndView 对象。
它包含了逻辑名和模型对象的视图,Spring MVC 借助视图解析器(ViewResolver)得到最终的视图对象(View),最终的视图可以是 JSP 。
视图
视图的作用是渲染模型数据,将模型里的数据以某种形式呈现给客户,视图对象由视图解析器负责实例化
在org.springframework.web.servlet 包中定义了一个高度抽象的 View 接口
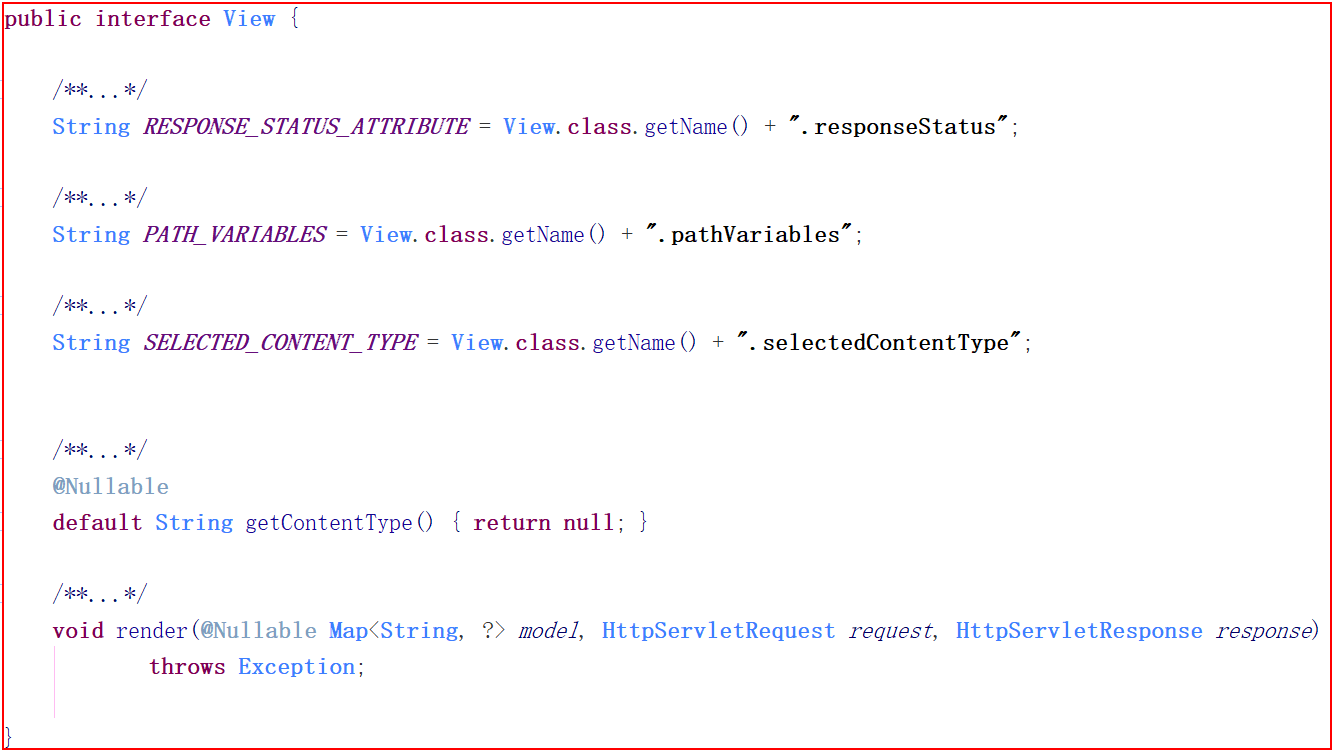
常见实现类:InternalResourceView,将JSP或其它资源封装成一个视图,是InternalResourceViewResoler默认使用的实现类。
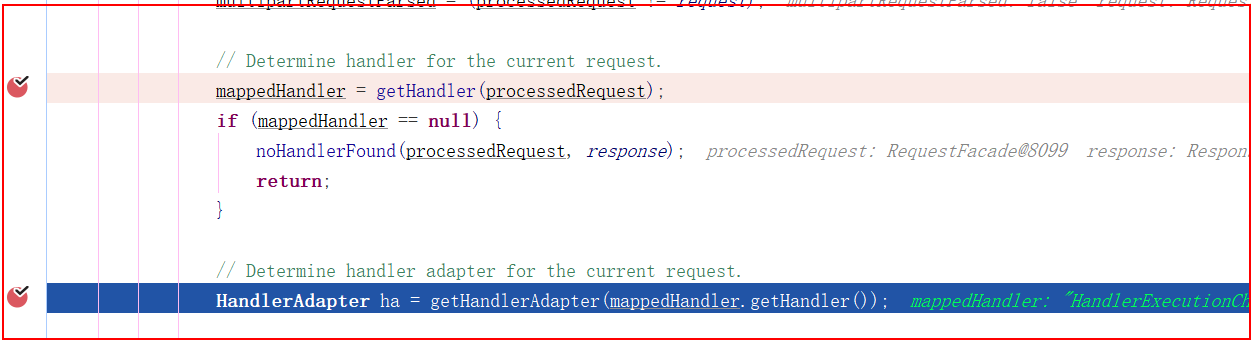
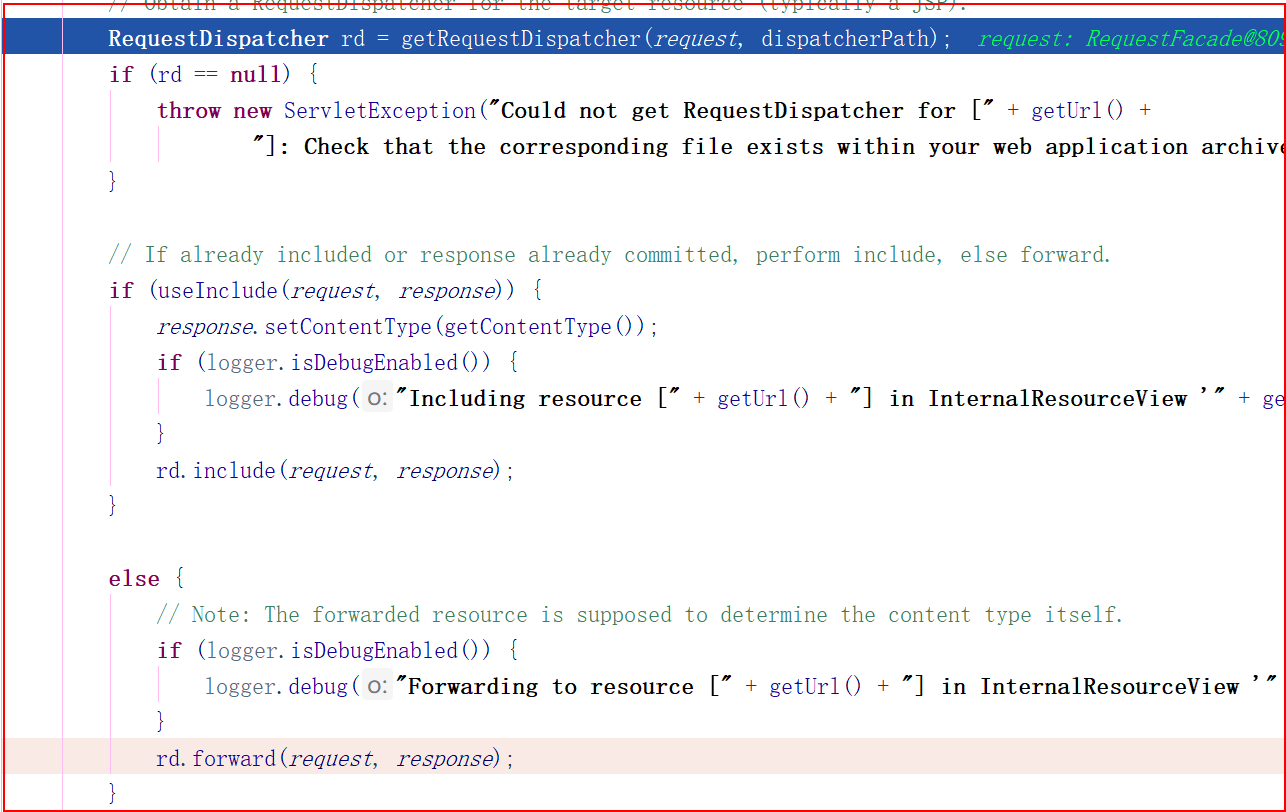
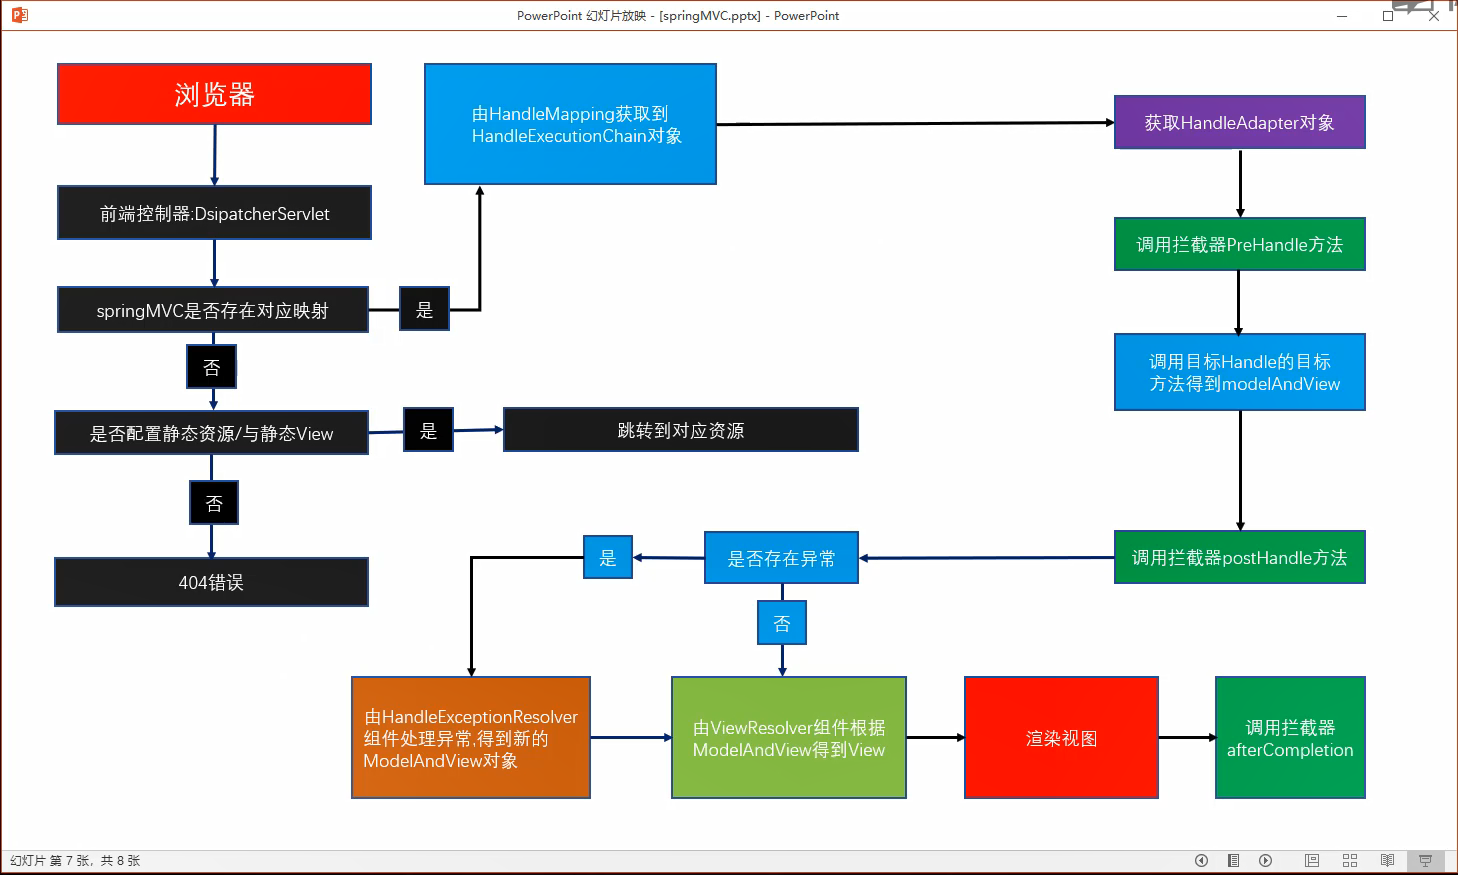
源码分析
执行DispatcherServlet
(1)获取mapping映射

(2)获取适配器
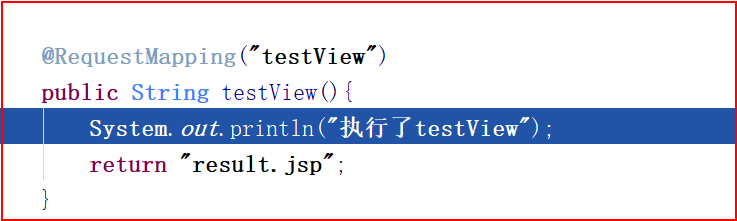
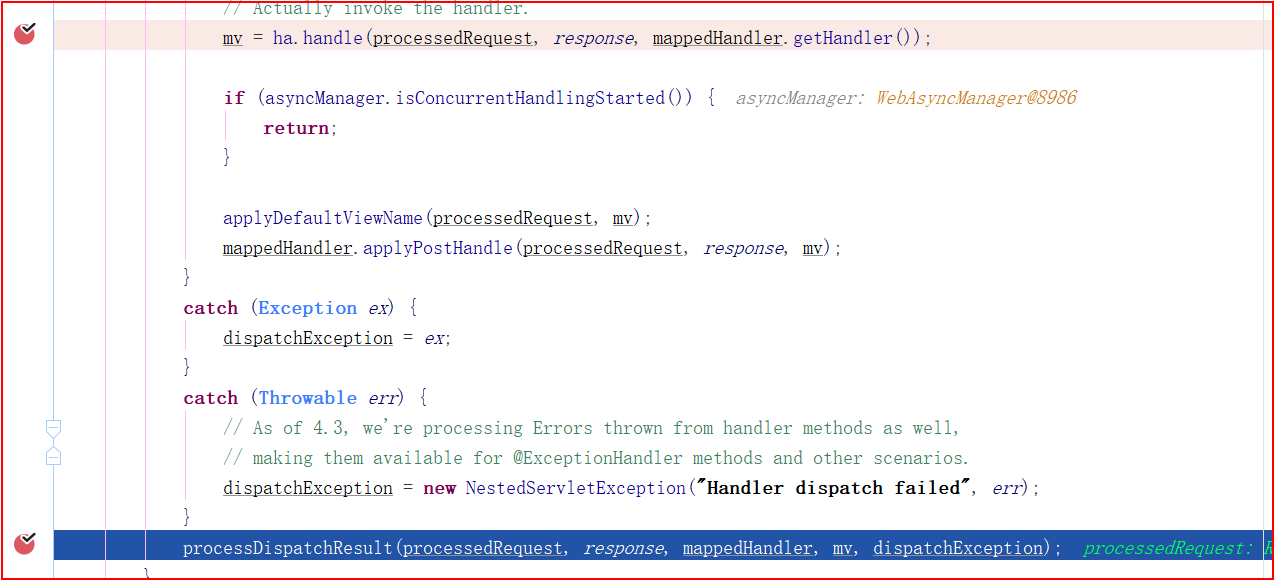
(3)调用处理器,执行映射方法,返回MV

(4)处理转发页面
(5)在方法内部渲染页面
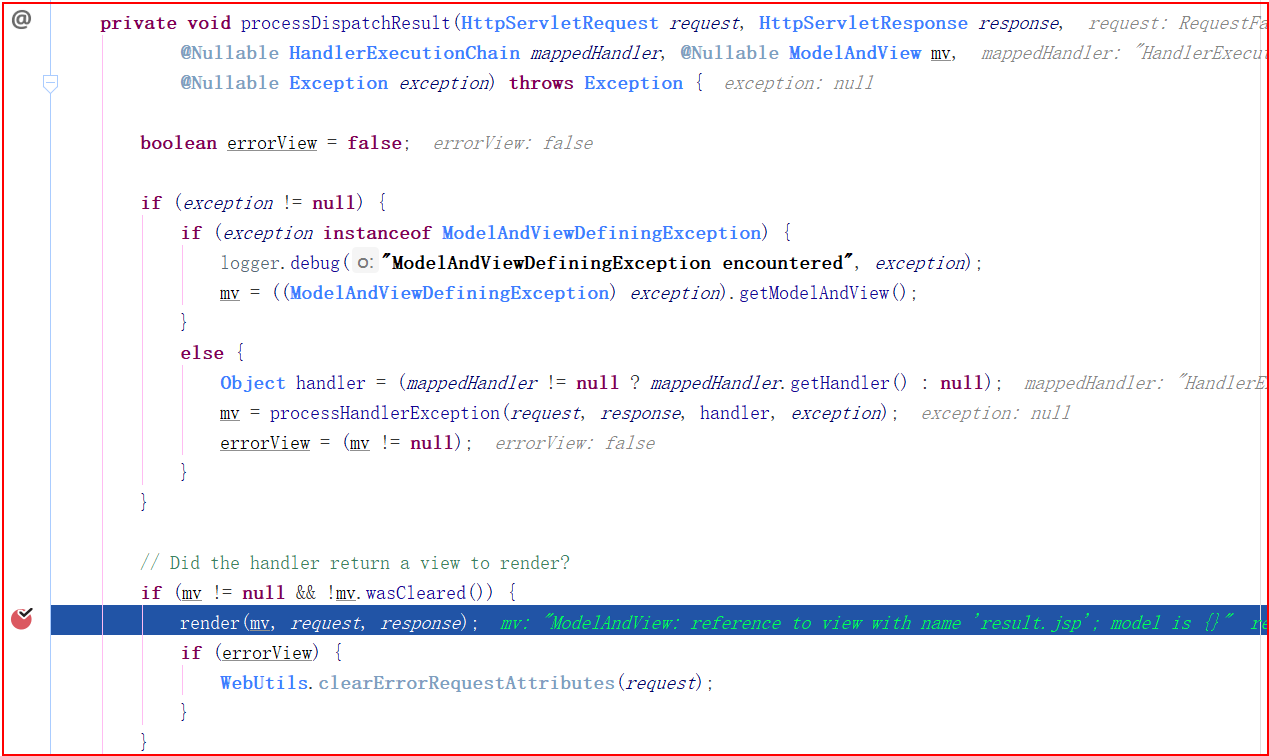
(6)创建视图对象
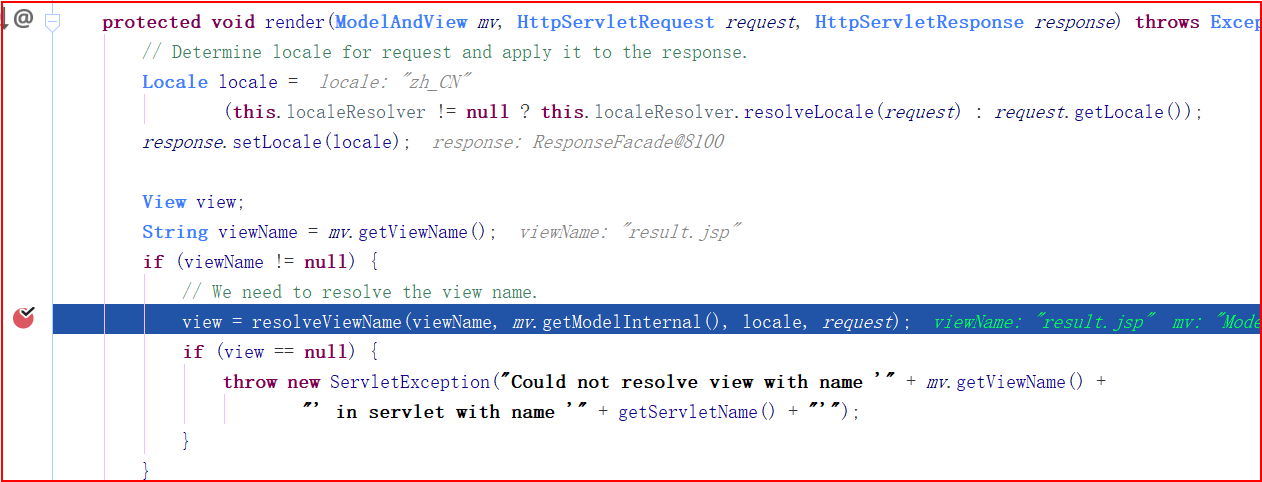
(7)调用View对象渲染页面
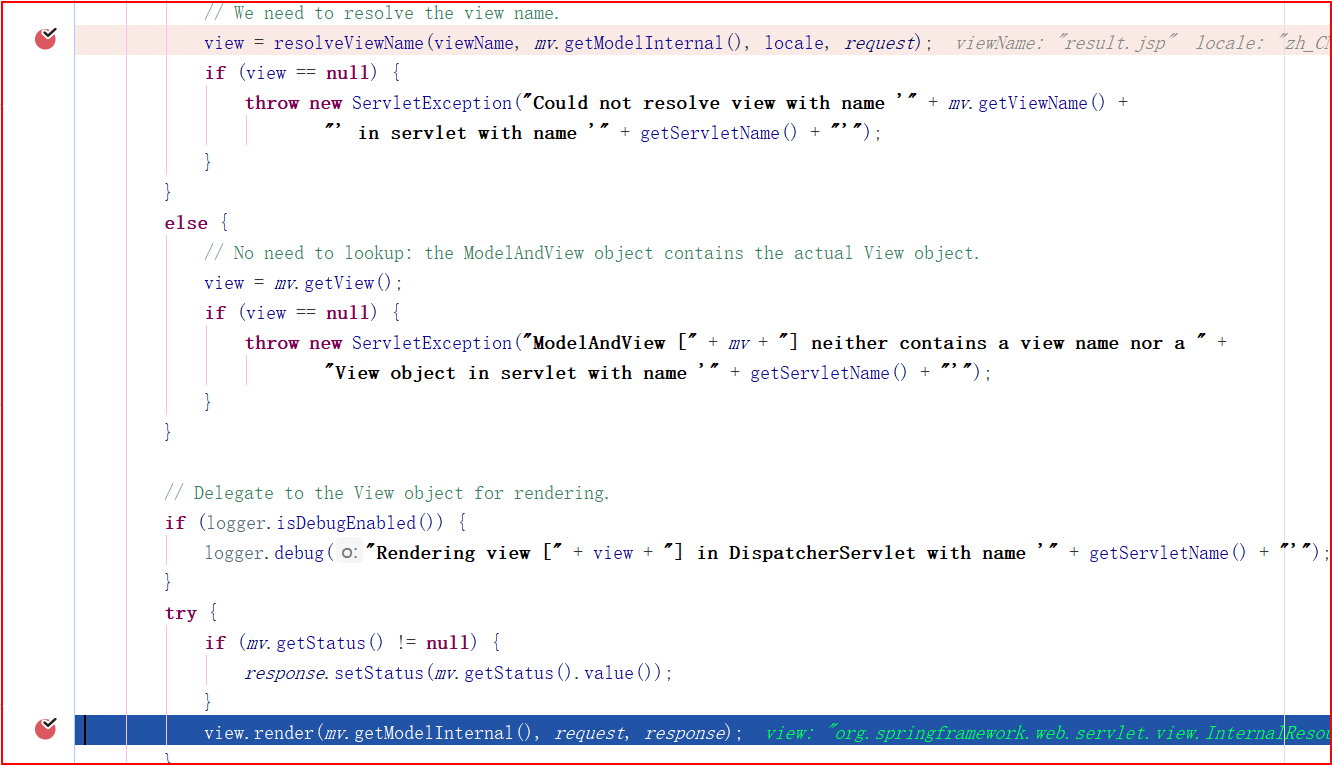
(8)在render内部解析数据
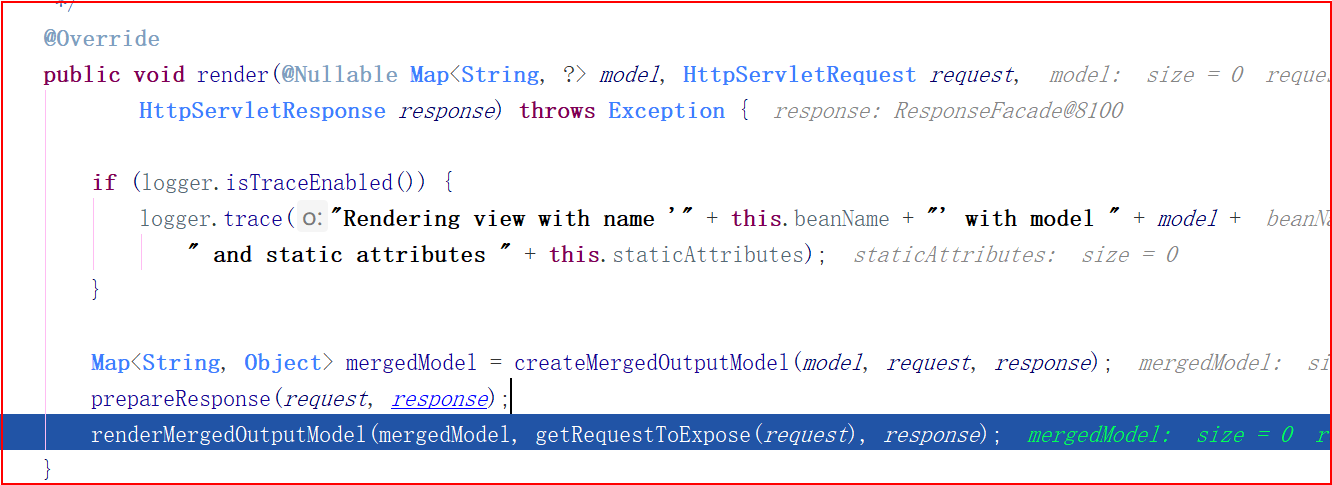


(9)转发到jsp页面
四、文件下载
请求页
<%@ page contentType="text/html;charset=UTF-8" language="java" %>
<html>
  <head>
    <title>Title</title>
    <script src="${pageContext.request.contextPath}/js/jquery-3.3.1.min.js"></script>
  </head>
  <body>
  <a href="${pageContext.request.contextPath}/download/背景.jpg">下载背景.jpg</a>
  </body>
</html>
Controller
package com.ssm.web.controller;

import org.springframework.http.HttpHeaders;
import org.springframework.http.HttpStatus;
import org.springframework.http.ResponseEntity;
import org.springframework.stereotype.Controller;
import org.springframework.web.bind.annotation.PathVariable;
import org.springframework.web.bind.annotation.RequestMapping;

import javax.servlet.ServletContext;
import javax.servlet.http.HttpSession;
import java.io.FileInputStream;
import java.io.InputStream;
import java.net.URLEncoder;

@Controller
public class MyController {
    @RequestMapping("/download/{filename:.+}")
    public ResponseEntity download(@PathVariable String filename, HttpSession session) throws Exception {
        System.out.println(filename);
        /* 1.获取文件路径 */
        // 获取 servletContext
        ServletContext servletContext = session.getServletContext();
        // 获取文件路径
        String realPath = servletContext.getRealPath("/download/" + filename);

        /* 2.把文件读取程序当中 */
        // 创建一个输入流
        InputStream io = new FileInputStream(realPath);
        byte[] body = new byte[io.available()];
        // 将文件流读到数组当中
        io.read(body);

        /* 3.创建响应头 */
        // 创建请求头
        HttpHeaders httpHeaders = new HttpHeaders();
        // 对文件名进行中文编码
        filename = URLEncoder.encode(filename,"UTF-8");
        // 告诉浏览器以附件形式下载文件
        httpHeaders.add("Content-Disposition","attachment;filename="+filename);
        // 设置响应码
        HttpStatus statusCode = HttpStatus.OK;
        ResponseEntity<byte[]> responseEntity = new ResponseEntity<>(body, httpHeaders, statusCode);
        // 关闭流
        io.close();

        return responseEntity;
    }
}
注意
@RequestMapping("/download/{filename}") :只会传文件名,不会带后缀
@RequestMapping("/download/{filename:.+}") :会传文件名带后缀
五、文件上传
概述
Spring MVC 为文件上传提供了直接的支持,是通过即插即用的 MultipartResolver 实现的。
MultipartResolver是一个接口,Spring MVC 上下文中默认没有装配 MultipartResovler,如果想使用 Spring 的文件上传功能,就必须得要自己下载相关jar包,自己到配置文件当中装配到springMVC当中。
上传步骤
(1)导入相关jar包
- com.springsource.org.apache.commons.fileupload-1.2.0.jar
- com.springsource.org.apache.commons.io-1.4.0.jar
- com.springsource.org.apache.commons.logging-1.1.1.jar
(2)在springmvc配置文件当中装配MultipartResovler
<!--上传文件配置-->
<bean id="multipartResolver" class="org.springframework.web.multipart.commons.CommonsMultipartResolver">
    <property name="defaultEncoding" value="UTF-8"/>
    <property name="maxUploadSize" value="102400"/>
</bean>
(3)实现上传代码
@RequestMapping("/download/{filename:.+}")
public ResponseEntity download(@PathVariable String filename, HttpSession session) throws Exception {
    System.out.println(filename);
    /* 1.获取文件路径 */
    // 获取 servletContext
    ServletContext servletContext = session.getServletContext();
    // 获取文件路径
    String realPath = servletContext.getRealPath("/download/" + filename);

    /* 2.把文件读取程序当中 */
    // 创建一个输入流
    InputStream io = new FileInputStream(realPath);
    byte[] body = new byte[io.available()];
    // 将文件流读到数组当中
    io.read(body);

    /* 3.创建响应头 */
    // 创建请求头
    HttpHeaders httpHeaders = new HttpHeaders();
    // 对文件名进行中文编码
    filename = URLEncoder.encode(filename, "UTF-8");
    // 告诉浏览器以附件形式下载文件
    httpHeaders.add("Content-Disposition", "attachment;filename=" + filename);
    // 设置响应码
    HttpStatus statusCode = HttpStatus.OK;
    ResponseEntity<byte[]> responseEntity = new ResponseEntity<>(body, httpHeaders, statusCode);
    // 关闭流
    io.close();

    return responseEntity;
}

@RequestMapping("/upload")
public String upload(@RequestParam("file") CommonsMultipartFile file, HttpSession session) throws IOException {
    System.out.println("文件类型:" + file.getContentType());
    System.out.println("文件名:" + file.getOriginalFilename());
    System.out.println("文件大小:" + file.getSize());
    System.out.println("表单name属性:" + file.getName());

    // 确定上传的路径
    ServletContext servletContext = session.getServletContext();
    String realPath = servletContext.getRealPath("/upload");
    // 变成程序当中的路径
    File uploadPath = new File(realPath);
    if (!uploadPath.exists()) {
        // 如果路径不存在 ,创建一个新的
        uploadPath.mkdirs();
    }
    // 确认最终的路径  /文件夹/文件名    工程的名称/upload/java.png
    String fileName = file.getOriginalFilename();
    uploadPath = new File(uploadPath + "/" + fileName);

    // 开始上传
    file.transferTo(uploadPath);

    return "result.jsp";
}
多文件上传
WebUploader是由Baidu WebFE(FEX)团队开发的一个简单的以HTML5为主,FLASH为辅的现代文件上传组件。
文件上传的代码不动,只要前端页面加入WebUploader插件即可。
引入插件
- webuploader.css
- Uploader.swf
- webuploader.js
<%@ page contentType="text/html;charset=UTF-8" language="java" %>
<html>
<head>
    <title>Title</title>
    <%--引入css样式--%>
    <link href="${pageContext.request.contextPath}/css/webuploader.css" rel="stylesheet" type="text/css"/>
    <script src="${pageContext.request.contextPath}/js/jquery-3.3.1.min.js" type="text/javascript"></script>
    <%--引入文件上传插件--%>
    <script type="text/javascript" src="${pageContext.request.contextPath}/js/webuploader.js"></script>
    <script type="text/javascript">
        $(function () {
            var $ = jQuery,
                $list = $('#fileList'),
                //优化retina, 在retina下这个值是2
                ratio = window.devicePixelRatio || 1,
                // 缩略图大小
                thumbnailWidth = 100 * ratio,
                thumbnailHeight = 100 * ratio,
                // Web Uploader实例uploader;
                // 初始化Web Uploader
                uploader = WebUploader.create({
                    // 自动上传。
                    auto: false,
                    // swf文件路径
                    swf: '${pageContext.request.contextPath}/js/Uploader.swf',
                    // 文件接收服务端。
                    server: '${pageContext.request.contextPath}/upload',
                    fileVal: 'file',
                    threads: '30',      //同时运行30个线程传输
                    fileNumLimit: '10',   //文件总数量只能选择10个
                    // 选择文件的按钮。可选。
                    pick: {
                        id: '#filePicker',  //选择文件的按钮
                        multiple: true        //允许可以同时选择多个图片
                    },
                    //图片质量,只有type为`image/jpeg`的时候才有效。
                    quality: 100,
                    //限制传输文件类型,accept可以不写 (用于显示文件类型筛选)
                    /* accept: {
                    title: 'Images',//描述
                    extensions: 'gif,jpg,jpeg,bmp,png,zip',//类型
                    mimeTypes: 'image/*'//mime类型
                   } */
                });

            // 当有文件添加进来的时候,创建img显示缩略图使用
            uploader.on('fileQueued', function (file) {
                var $li = $(
                    '<div id="' + file.id + '" class="file-item thumbnail">' +
                    '<img>' +
                    '<div class="info">' + file.name + '</div>' +
                    '</div>'
                    ),
                    $img = $li.find('img');
                // $list为容器jQuery实例
                $list.append($li);
                // 创建缩略图
                // 如果为非图片文件,可以不用调用此方法。
                // thumbnailWidth x thumbnailHeight 为 100 x 100
                uploader.makeThumb(file, function (error, src) {
                    if (error) {
                        $img.replaceWith('<span>不能预览</span>');
                        return;
                    }
                    $img.attr('src', src);
                }, thumbnailWidth, thumbnailHeight);
            });
            // 文件上传过程中创建进度条实时显示。
            // uploadProgress事件:上传过程中触发,携带上传进度。
            // file文件对象 percentage传输进度 Number类型
            uploader.on('uploadProgress', function (file, percentage) {
                console.log(percentage);
            });
            // 文件上传成功时候触发,给item添加成功class,
            // 用样式标记上传成功。
            // file:文件对象,
            // response:服务器返回数据
            uploader.on('uploadSuccess', function (file, response) {
                $('#' + file.id).addClass('upload-state-done');
                //console.info(response);
                $("#upInfo").html("<font color='red'>" + response._raw + "</font>");
            });
            // 文件上传失败
            // file:文件对象 ,
            // code:出错代码
            uploader.on('uploadError', function (file, code) {
                var $li = $('#' + file.id),
                    $error = $li.find('div.error');

                // 避免重复创建
                if (!$error.length) {
                    $error = $('<div class="error"></div>').appendTo($li);
                }
                $error.text('上传失败!');
            });

            // 不管成功或者失败,
            // 文件上传完成时触发。
            // file: 文件对象
            uploader.on('uploadComplete', function (file) {
                $('#' + file.id).find('.progress').remove();
            });
            //绑定提交事件
            $("#btn").click(function () {
                console.log("上传...");
                uploader.upload();   //执行手动提交
                console.log("上传成功");
            });
        });
    </script>
    <script>
        var contextpath = ${pageContext.request.contextPath};
    </script>
</head>
<body>
<h3>多文件上传</h3>
<!--dom结构部分-->
<div id="uploader-demo">
     <!--用来存放item-->
    <div id="fileList" class="uploader-list"></div>
    <div id="upInfo"></div>
    <div id="filePicker">选择文件</div>
</div>
<br>
<input type="button" id="btn" value="开始上传">
</body>
</html>
六、异常
概述
Spring MVC 通过 HandlerExceptionResolver 处理程序的异常,包括 Handler 映射、数据绑定以及目标方法执行时发生的异常。
SpringMVC 提供的 HandlerExceptionResolver 的实现类。
异常处理
处理 Handler 中用 @ExceptionHandler 注解定义的方法。
@RequestMapping("testException")
public String testException() {
    int i = 1 / 0;
    return "/result.jsp";
}

@ExceptionHandler(value = ArithmeticException.class)
public String handleException(Exception e) {
    System.out.println("出现异常" + e.getMessage());
    return "/error.jsp";
}
@ExceptionHandler优先级
根据继承关系,找继承关系比较近的那一个。
@ExceptionHandler(value = ArithmeticException.class)
public String handleException(Exception e) {
    System.out.println("出现异常1" + e.getMessage());
    return "/error.jsp";
}


@ExceptionHandler(value = RuntimeException.class)
public String handleException2(Exception e) {
    System.out.println("出现异常2" + e.getMessage());
    return "/error.jsp";
}

@ExceptionHandler(value = Exception.class)
public String handleException3(Exception e) {
    System.out.println("出现异常3" + e.getMessage());
    return "/error.jsp";

}
@ControllerAdvice
如果在当前类中没有找到 @ExceptionHanler ,则会到 @ControllerAdvice 中的 @ExceptionHandler 注解方法
@ControllerAdvice
public class ExceptionController {
    @ExceptionHandler(value = Exception.class)
    public String handleException(Exception e) {
        System.out.println("出现异常" + e.getMessage());
        return "/error.jsp";
    }
}
七、国际化
概述
SpringMVC 根据 Accept-Language 参数判断客户端的本地化类型,当接受到请求时,SpringMVC 会在上下文中查找一个本地化解析器(LocalResolver),找到后使用它获取请求所对应的本地化类型信息。
默认实现过程
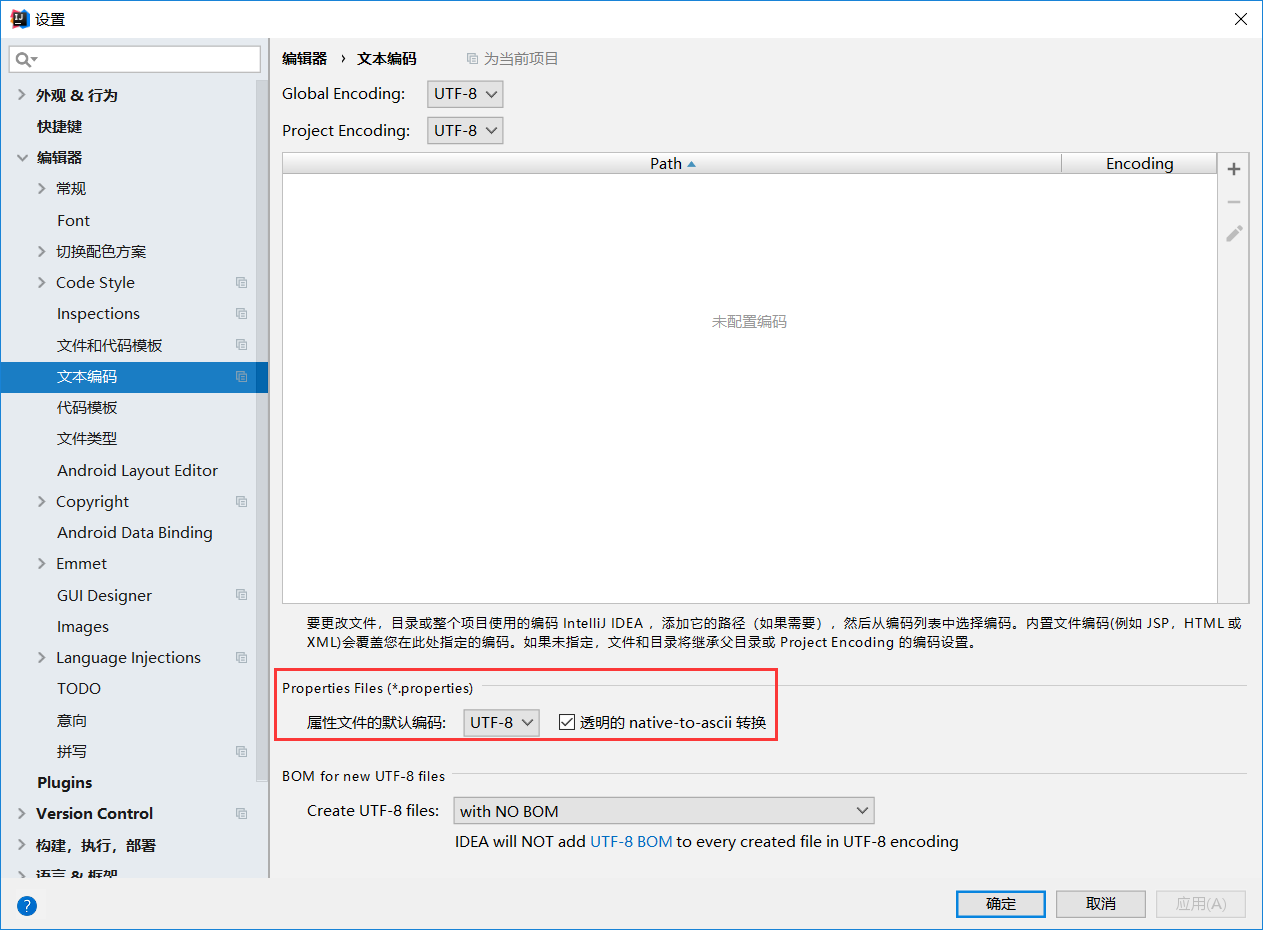
(1)要先创建国际化的资源文件
+ resource
    - language_en_US.properties
    - language_zh_CN.properties
新建配置文件时确保编码正确。在IDEA中
language_en_US.properties
welcome = welcome
introduce = This is Demo
name = ZhangSan
language_zh_CN.properties
welcome = 欢迎光临
introduce = 这是一个国际化示例
name = 张三
(2)添加配置文件 springmvc.xml
<?xml version="1.0" encoding="UTF-8"?>
<beans xmlns="http://www.springframework.org/schema/beans"
       xmlns:xsi="http://www.w3.org/2001/XMLSchema-instance"
       xmlns:context="http://www.springframework.org/schema/context"
       xmlns:mvc="http://www.springframework.org/schema/mvc"
       xmlns:aop="http://www.springframework.org/schema/aop"
       xmlns:tx="http://www.springframework.org/schema/tx"
       xsi:schemaLocation="http://www.springframework.org/schema/beans
    http://www.springframework.org/schema/beans/spring-beans.xsd
    http://www.springframework.org/schema/context
    http://www.springframework.org/schema/context/spring-context.xsd
    http://www.springframework.org/schema/aop
    http://www.springframework.org/schema/aop/spring-aop.xsd
    http://www.springframework.org/schema/mvc
    http://www.springframework.org/schema/mvc/spring-mvc-4.0.xsd
    http://www.springframework.org/schema/tx
    http://www.springframework.org/schema/tx/spring-tx.xsd">

    <!--注解扫描-->
    <context:component-scan base-package="com.ssm"/>

    <mvc:view-controller path="success" view-name="/result.jsp"/>
    <mvc:resources location="/imgs/" mapping="/imgs/**"/>
    <mvc:resources location="/js/" mapping="/js/**"/>
    <mvc:resources location="/css/" mapping="/css/**"/>
    <mvc:annotation-driven />

    <!--国际化-->
    <bean id="messageSource" class="org.springframework.context.support.ResourceBundleMessageSource">
        <property name="basename" value="language"/>
    </bean>
</beans>
(3)添加JSTL jar包
    - jstl-1.2.jar
    - standard-1.1.2.jar
(4)在页面当中编写标签
<%@ page contentType="text/html;charset=UTF-8" language="java" %>
<%@ taglib uri="http://java.sun.com/jsp/jstl/fmt" prefix="fmt"%>
<%@ taglib uri="http://www.springframework.org/tags" prefix="spring"%>
<html>
<head>
    <title>Title</title>
</head>
<body>
<h1>local</h1>
    <fmt:message key="welcome"/> <br>
    <fmt:message key="introduce"/> <br>
    <fmt:message key="name"/> <br>
<hr>
    <spring:message code="welcome"/> <br>
    <spring:message code="introduce"/> <br>
    <spring:message code="name"/> <br>
</body>
</html>
谷歌浏览器中可以设置不同语言来查看
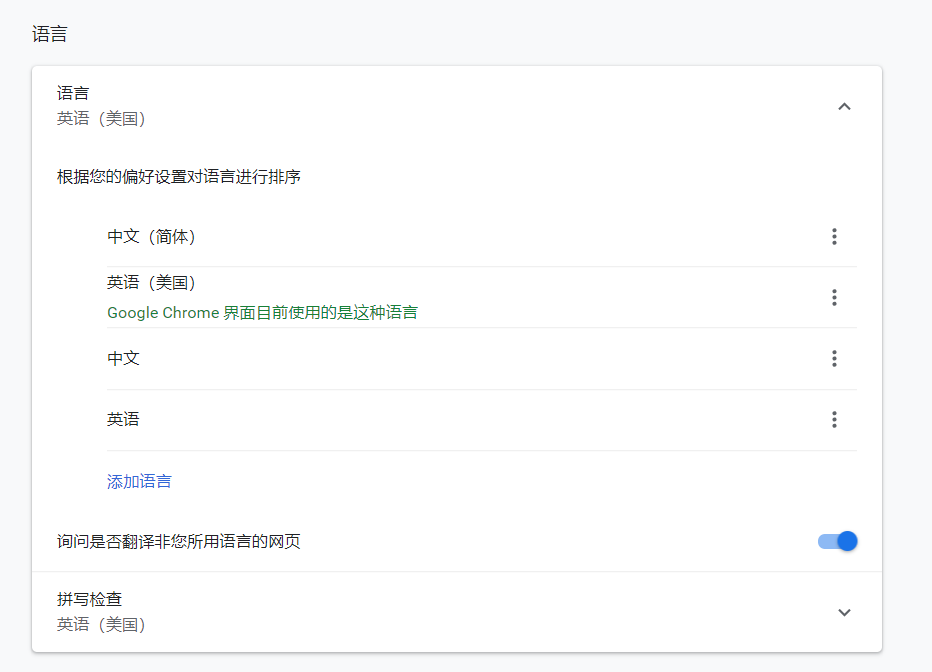
原理
如果没有显式定义本地化解析器, SpringMVC 会使用 AcceptHeaderLocaleResolver:根据 HTTP 请求头的 Accept-Language 参数确定本地化类型。

中英文切换
概述
默认情况是通过AccepHeaderLocaleResolver来从浏览器当中获取语言信息。
可以从请求参数中获取本次请求对应的本地化类型。获取到本地类型后, 给写入到session当中。
实现
配置文件
<?xml version="1.0" encoding="UTF-8"?>
<beans xmlns="http://www.springframework.org/schema/beans"
       xmlns:xsi="http://www.w3.org/2001/XMLSchema-instance"
       xmlns:context="http://www.springframework.org/schema/context"
       xmlns:mvc="http://www.springframework.org/schema/mvc"
       xmlns:aop="http://www.springframework.org/schema/aop"
       xmlns:tx="http://www.springframework.org/schema/tx"
       xsi:schemaLocation="http://www.springframework.org/schema/beans
    http://www.springframework.org/schema/beans/spring-beans.xsd
    http://www.springframework.org/schema/context
    http://www.springframework.org/schema/context/spring-context.xsd
    http://www.springframework.org/schema/aop
    http://www.springframework.org/schema/aop/spring-aop.xsd
    http://www.springframework.org/schema/mvc
    http://www.springframework.org/schema/mvc/spring-mvc-4.0.xsd
    http://www.springframework.org/schema/tx
    http://www.springframework.org/schema/tx/spring-tx.xsd">

    <!--注解扫描-->
    <context:component-scan base-package="com.ssm"/>

    <mvc:view-controller path="success" view-name="/result.jsp"/>
    <mvc:resources location="/imgs/" mapping="/imgs/**"/>
    <mvc:resources location="/js/" mapping="/js/**"/>
    <mvc:resources location="/css/" mapping="/css/**"/>
    <mvc:annotation-driven />

    <!--国际化-->
    <bean id="messageSource" class="org.springframework.context.support.ResourceBundleMessageSource">
        <property name="basename" value="language"/>
    </bean>

    <!--配置session本地解析器-->
    <bean id="localeResolver" class="org.springframework.web.servlet.i18n.SessionLocaleResolver"></bean>
    <mvc:interceptors>
        <bean class="org.springframework.web.servlet.i18n.LocaleChangeInterceptor">
            <property name="paramName" value="language"/>
        </bean>
    </mvc:interceptors>
</beans>
属性文件
language_en_US.properties
language.cn=Chinese
language.en=English
welcome=welcome
introduce=This is Demo
name=ZhangSan
language_zh_CN.properties
language.cn=中文
language.en=英文
welcome=欢迎光临
introduce=这是一个国际化示例
name=张三
页面信息
<%@ page contentType="text/html;charset=UTF-8" language="java" %>
<%@ taglib uri="http://java.sun.com/jsp/jstl/fmt" prefix="fmt"%>
<%@ taglib uri="http://www.springframework.org/tags" prefix="spring"%>
<html>
<head>
    <title>Title</title>
</head>
<body>
<h1>local</h1>
<a href="?language=zh_CN"><fmt:message key="language.cn" /></a>
<a href="?language=en_US"><fmt:message key="language.en" /></a>
<hr>
    <fmt:message key="welcome"/> <br>
    <fmt:message key="introduce"/> <br>
    <fmt:message key="name"/> <br>
<hr>
    <spring:message code="welcome"/> <br>
    <spring:message code="introduce"/> <br>
    <spring:message code="name"/> <br>
</body>
</html>
八、拦截器
概述
Java 里的拦截器是动态拦截 action 调用的对象。可以在Controller中的方法执行之前与执行之后, 及页面显示完毕后,执行指定的方法。
自定义的拦截器必须实现HandlerInterceptor接口
方法介绍
preHandle()	 		// 在业务处理器处理请求之前被调用
postHandle   		// 在业务处理器处理完请求后
afterCompletion		// 在 DispatcherServlet 完全处理完请求后被调用
SpringMVC拦截器使用
(1)拦截所有请求
① 创建一个类实现HandlerInterceptor接口
package com.ssm.web.interceptor;

import org.springframework.web.servlet.HandlerInterceptor;
import org.springframework.web.servlet.ModelAndView;

import javax.servlet.http.HttpServletRequest;
import javax.servlet.http.HttpServletResponse;

public class MyFirstInterceptor implements HandlerInterceptor {

    @Override
    // 在处理器方法执行之前调用
    // 返回值: true-放行; false-不放行-执行不了处理器方法
    public boolean preHandle(HttpServletRequest request, HttpServletResponse response, Object handler) throws Exception {
        System.out.println("在处理器方法执行之前调用");
        return true;
    }

    @Override
    // 在处理器方法执行之后自动调用
    public void postHandle(HttpServletRequest request, HttpServletResponse response, Object handler, ModelAndView modelAndView) throws Exception {
        System.out.println("在处理器方法执行之后自动调用");
    }

    @Override
    // 请求处理完毕之后会调用
    public void afterCompletion(HttpServletRequest request, HttpServletResponse response, Object handler, Exception ex) throws Exception {
        System.out.println("请求处理完毕之后会调用");
    }
}
② 配置文件当中添加拦截器
<?xml version="1.0" encoding="UTF-8"?>
<beans xmlns="http://www.springframework.org/schema/beans"
       xmlns:xsi="http://www.w3.org/2001/XMLSchema-instance"
       xmlns:context="http://www.springframework.org/schema/context"
       xmlns:mvc="http://www.springframework.org/schema/mvc"
       xmlns:aop="http://www.springframework.org/schema/aop"
       xmlns:tx="http://www.springframework.org/schema/tx"
       xsi:schemaLocation="http://www.springframework.org/schema/beans
    http://www.springframework.org/schema/beans/spring-beans.xsd
    http://www.springframework.org/schema/context
    http://www.springframework.org/schema/context/spring-context.xsd
    http://www.springframework.org/schema/aop
    http://www.springframework.org/schema/aop/spring-aop.xsd
    http://www.springframework.org/schema/mvc
    http://www.springframework.org/schema/mvc/spring-mvc-4.0.xsd
    http://www.springframework.org/schema/tx
    http://www.springframework.org/schema/tx/spring-tx.xsd">

    <!--注解扫描-->
    <context:component-scan base-package="com.ssm"/>

    <mvc:resources location="/imgs/" mapping="/imgs/**"/>
    <mvc:resources location="/js/" mapping="/js/**"/>
    <mvc:resources location="/css/" mapping="/css/**"/>
    <mvc:annotation-driven />


    <!--配置session本地解析器-->
    <bean id="localeResolver" class="org.springframework.web.servlet.i18n.SessionLocaleResolver"></bean>
    <mvc:interceptors>
        <bean class="com.ssm.web.interceptor.MyFirstInterceptor"></bean>
    </mvc:interceptors>
</beans>
(2)拦截指定请求
<?xml version="1.0" encoding="UTF-8"?>
<beans xmlns="http://www.springframework.org/schema/beans"
       xmlns:xsi="http://www.w3.org/2001/XMLSchema-instance"
       xmlns:context="http://www.springframework.org/schema/context"
       xmlns:mvc="http://www.springframework.org/schema/mvc"
       xmlns:aop="http://www.springframework.org/schema/aop"
       xmlns:tx="http://www.springframework.org/schema/tx"
       xsi:schemaLocation="http://www.springframework.org/schema/beans
    http://www.springframework.org/schema/beans/spring-beans.xsd
    http://www.springframework.org/schema/context
    http://www.springframework.org/schema/context/spring-context.xsd
    http://www.springframework.org/schema/aop
    http://www.springframework.org/schema/aop/spring-aop.xsd
    http://www.springframework.org/schema/mvc
    http://www.springframework.org/schema/mvc/spring-mvc-4.0.xsd
    http://www.springframework.org/schema/tx
    http://www.springframework.org/schema/tx/spring-tx.xsd">

    <!--注解扫描-->
    <context:component-scan base-package="com.ssm"/>

    <mvc:resources location="/imgs/" mapping="/imgs/**"/>
    <mvc:resources location="/js/" mapping="/js/**"/>
    <mvc:resources location="/css/" mapping="/css/**"/>
    <mvc:annotation-driven />


    <!--配置session本地解析器-->
    <bean id="localeResolver" class="org.springframework.web.servlet.i18n.SessionLocaleResolver"></bean>
    <mvc:interceptors>
        <!--自定义 拦截器  拦截所有请求-->
        <!--<bean class="com.ssm.web.interceptor.MyFirstInterceptor"></bean>-->

        <mvc:interceptor>
            <!--设置拦截哪些请求-->
            <mvc:mapping path="/local"/>
            <!--设置哪些请求不拦截-->
            <mvc:exclude-mapping path="/hello"/>
            <bean class="com.ssm.web.interceptor.MyFirstInterceptor"></bean>
        </mvc:interceptor>
    </mvc:interceptors>
</beans>
(3)配置多个拦截器执行顺序
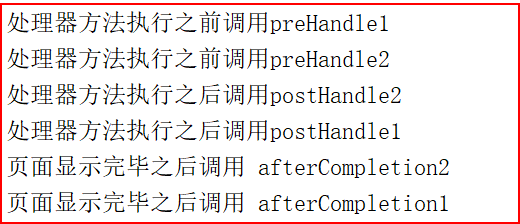
从上面结果可以看出,preHandle 是按正序调用,postHandle 和 afterCompletion是倒序调用
源码分析
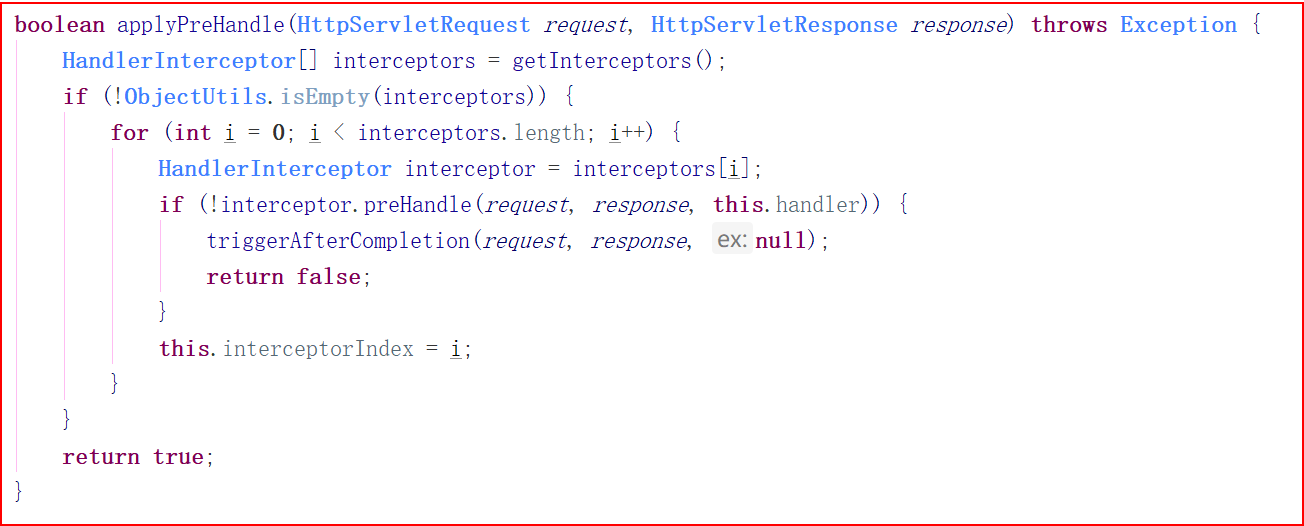
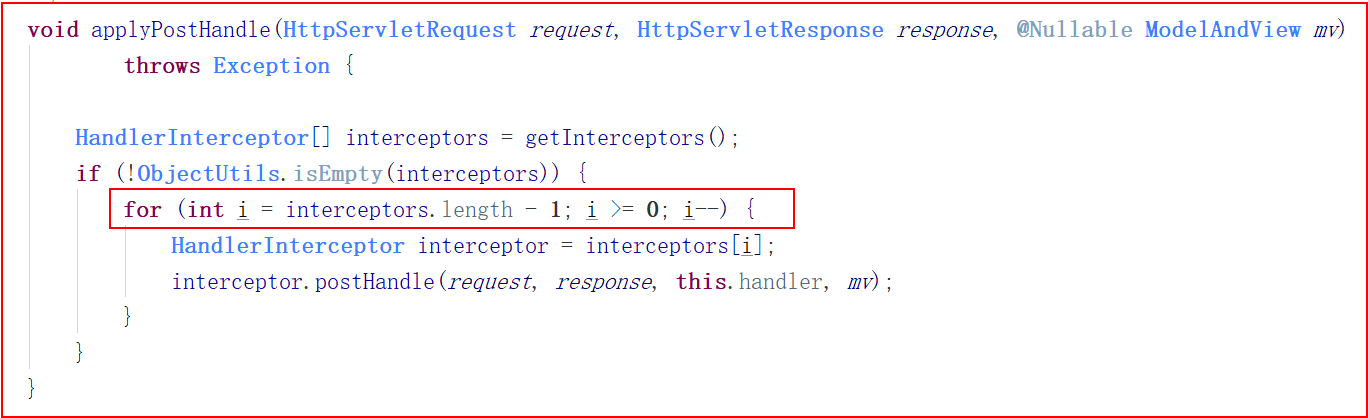
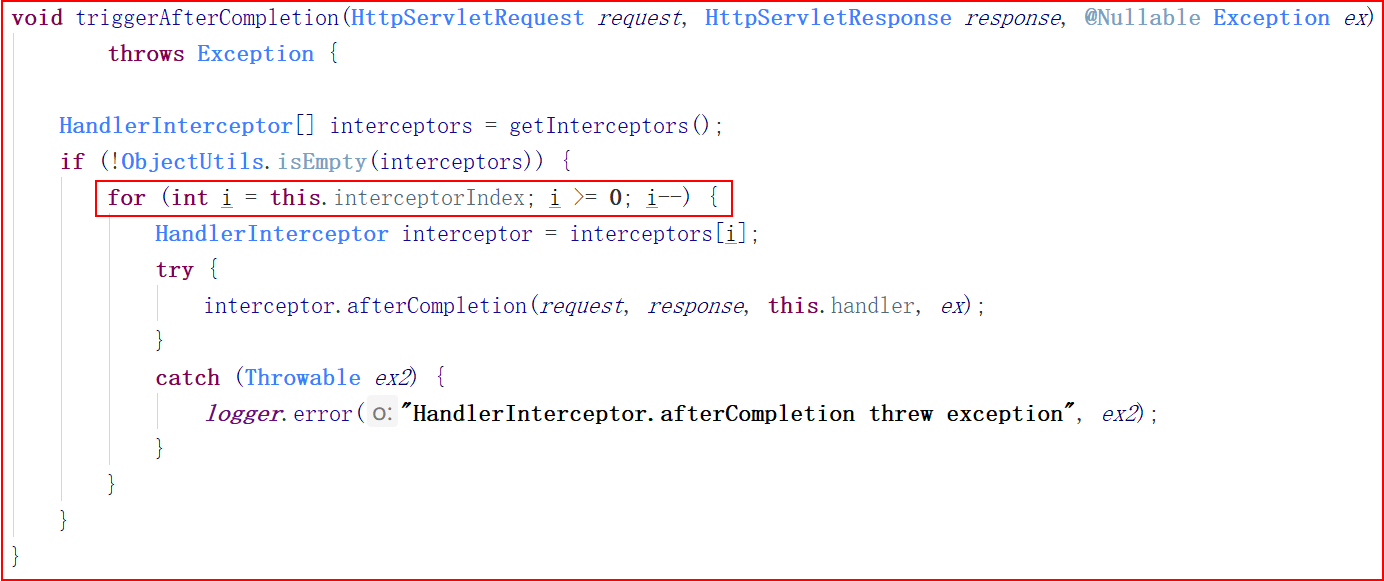
preHandle 是正序遍历,postHandle 和 afterCompletion是倒序遍历
九、总结

 浙公网安备 33010602011771号